nio
1基本介绍
Java NIO(New IO)也有人称之为java non-blocking IO,可以替代标准的 Java IO API
NIO 与原来的 IO 有同样的作用和目的,但是使用的方式完全不同,NIO支持面向缓冲区的、基于通道的IO操作。
NIO 是非阻塞 IO,传统的 IO 的 read 和 write 只能阻塞执行,线程在读写期间不能干其他事情,比如调用 socket.read()方法时,如果服务器一直没有数据传输过来,线程就一直阻塞,而 NIO 中可以配置 socket 为非阻塞模式。
NIO 相关类都放在 java.nio包及子包下,并且对 Java.io包中很多类进行改写。
NIO有三大核心部分:Channel(通道),Buffer(缓冲区),Selector(选择器)
Java NIO 的非阻塞模式
-
使一个线程从某通道发送请求或者读取数据,但是它仅能得到目前可用的数据;
-
如果目前没有数据可用时,就什么都不会获取,而不是保持线程阻塞,所以直至数据变得可以读取之前,该线程可以继续做其他的事情。
-
非阻塞写也是如此,一个线程请求写入一些数据到某通道,但不需要等待它完全写入,这个线程同事可以去做别的事情。
-
NIO 是可以做到用一个线程来处理多个操作的。
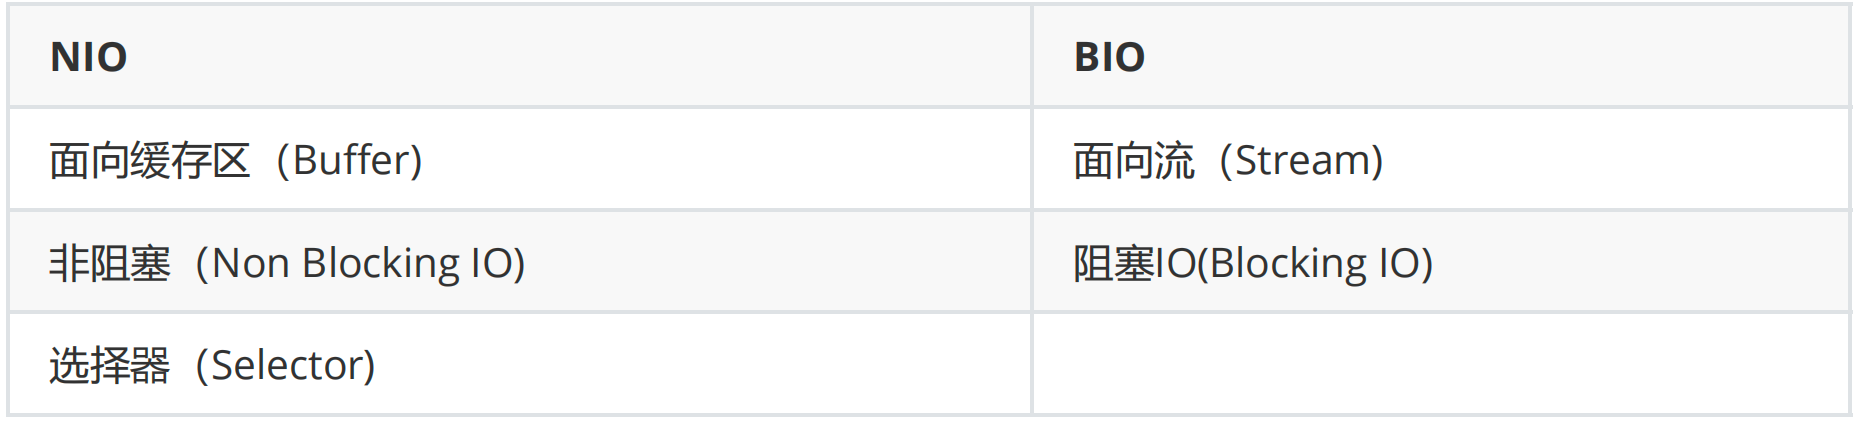
2NIO 和 BIO 比较
-
BIO 以 3 流的方式处理数据,而 NIO 以块的方式处理数据,块 I/O 的效率比流 I/O 高很多
-
BIO 是阻塞的,NIO 是非阻塞的
-
BIO 基于字节流和字符流进行操作,而 NIO 基于 Channel(通道)和 Buffer(缓冲区)进行操作,数据总是从通道读取到缓冲区中,或者从缓冲区写入到通道中
-
Selector(选择器)用于监听多个通道的事件(比如:连接请求,数据到达等),因此使用单个线程就可以监听多个客户端通道
3NIO 三大核心
NIO 有三大核心部分:Channel(通道)、Buffer(缓存区)、Selector(选择器)
3.1、Buffer缓存区
缓冲区本质上是一块可以写入数据,然后可以从中读取数据的内存
这块内存被包装成 NIO Buffer 对象,并提供了一组方法,用来方便的访问该块内存
相比较直接对数组的操作,Buffer API 更加容易操作和管理
3.2、Channel 通道
Java NIO 的通道类似流,但又有些不同
既可以从通道中读取数据,又可以写数据到通道。
但是流的(input 或 output)读写通常是单向的
通道可以非阻塞读取和写入通道,通道可以支持读取或写入缓冲区,也支持异步地读写
3.3、Selector 选择器
Selector 是一个 Java NIO 组件,可以能够检查一个或多个 NIO 通道,并确定哪些通道已经准备好进行读取或写入
这样,一个单独的线程可以管理多个 channel,从而管理多个网络连接,提高效率
-
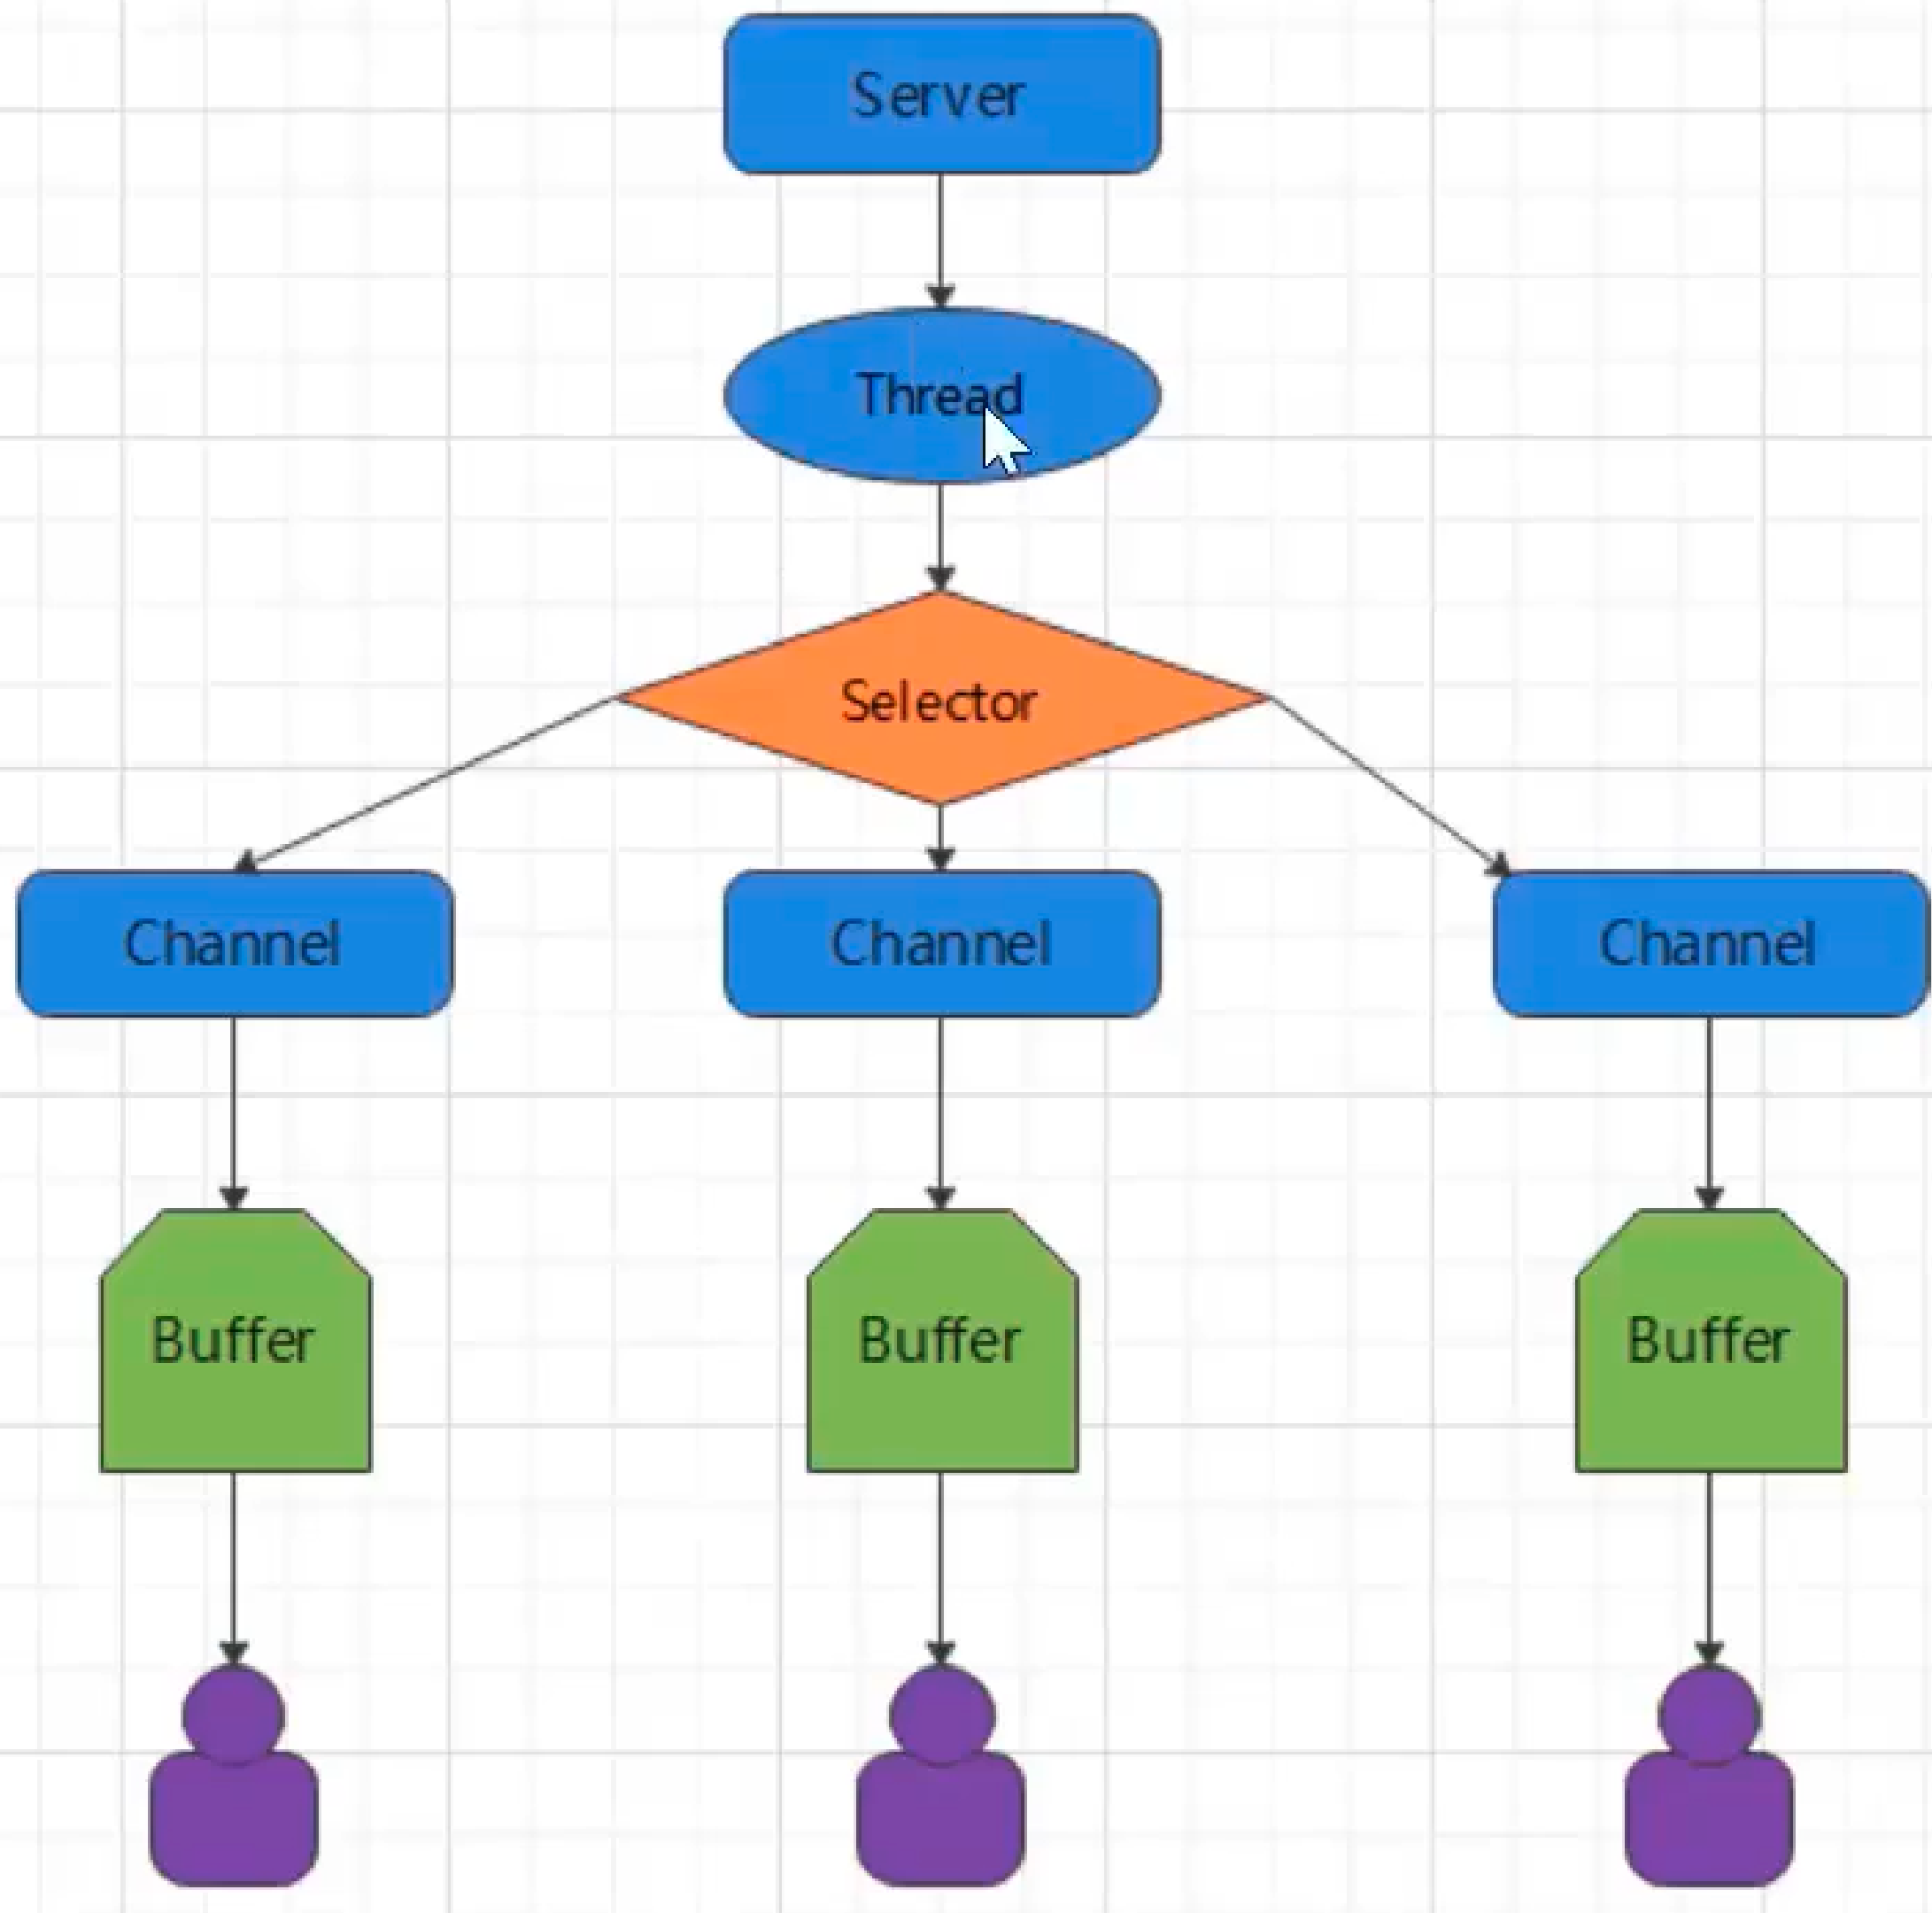
每个 Channel 都会对应一个 Buffer
-
一个线程对应 Selector,一个 Selector 对应多个 Channel(连接)
-
程序切换到哪个channel是由事件决定的
-
Selector会根据不同的事件,在各个通道上切换
-
Buffer就是一个内存块,底层是一个数组
-
数据的读取写入是通过Buffer完成的,BIO中要么是输入流,或者是输出流,不能双向,但是NIO的Buffer是可以读也可以写。
-
Java NIO系统的核心在于:通道(Channel)和缓存区(Buffer)。通道表示打开到IO设备(例如:文件、套接字) 的连接。若需要使用NlO系统,需要获取用于连接IO设备的通道以及用于容纳数据的缓冲区。然后操作缓 冲区,对数据进行处理。简而言之,Channel负责传输,Buffer负责存取数据
4缓存区(Buffer)
Buffer
一个用于特定基本数据类型的容器。
由 Java.nio包定义,所有缓冲区都是 Buffer 抽象类的子类
Java NIO 的 Buffer 主要用于与 NIO 通道进行交互,数据是从通道读入缓冲区,从缓冲区写入通道中的。
Buffer类及其子类
Buffer就像一个数组,可以保存多个相同类型的数据。根据数据类型不同,有以下Buffer常用子类:
-
ByteBuffer
-
CharBuffer
-
ShortBuffer
-
IntBuffer
-
LongBuffer
-
FloatBuffer
-
DoubleBuffer
上述Buffer类 他们都采用相似的方法进行管理数据,只是各自管理的数据类型不同而已。都是通过如下方法获取一个Buffer对象:
static XxxBuffer allocate(int capacity):创建一个容量为capacity的XxxBuffer对象
缓存区的基本属性:
-
容量(capacity):作为一个内存块,Buffer 具有一定的固定大小,也称为“容量”,缓冲区容量也不能为负,并且创建后不能更改
-
限制(limit):表示缓冲区中可以操作数据的大小(limit 之后数据不能进行读写)。缓冲区的限制不能为负,并且不能大于其容量。
-
写入模式,限制等于 buffer 的容量
-
读取模式下,limit 等于写入的数据量
-
-
位置(position):下一个要读取或写入的数据的索引。缓冲区的位置不能为负,并且不能大于其限制
-
标记(mark)与重置(reset):标记是一个索引,通过 Buffer 中的 mark()方法指定 Buffer 中一个特定的 position,之后可以通过调用 reset()方法恢复到这个 position。
-
标记、位置、限制、容量遵守以 T 不变式:
- 0 <= mark <= position <= limit <= capacity
-
Buffer常见方法
-
Buffer clear()
- 清空缓冲区并返回对缓冲区的引用
-
Buffer flip()
- 为将缓冲区的界限设置为当前位置,并将当前位置重置为 0
-
int capacity()
- 返回 Buffer 的 capacity 大小
-
boolean hasRemaining()
- 判断缓冲区中是否还有元素
-
int limit()
- 返回 Buffer 的界限(limit)的位置
-
Buffer limit(int n)
- 设置缓冲区界限为 n,并返回一个具有新 limit 的缓冲区对象
-
Buffer mark()
-
对缓冲区设置标记
-
mark = position
-
-
int position()
-
返回缓冲区的当前位置 position
-
return position
-
-
Buffer position(int n)
- 将缓冲区的当前位置设置为 n,并返回修改后的 Buffer 对象
-
int remaining()
- 返回 position 和 limit 之间的元素个数
-
Buffer reset()
- 将位置 position 转到以前设置的 mark(标记)所在的位置
-
Buffer rewind()
-
将位置设置为 0
-
取消设置的 mark
-
缓存区的数据操作
Buffer 所有子类提供了两个用于数据操作的方法:get() put()方法

----获取Buffer中的数据----
get():读取单个字节
get (byte[〕dst):批量读取多个字节到dst中
get(int index):读取指定索引位置的字节(不会移动position)

----放入数据到Buffer中----
put(byte b):将给定单个字节写入缓冲区的当前位置
put (byte[] src):将src中的字节写入缓存区的当前位置
put(int index,byte b)L将指定字节写入缓存区的索引位置(不会移动position)
使用 Buffer 读写数据步骤
-
写入数据到 Buffer
-
调用 flip()方法,转换为读取模式
-
从 Buffer 中读取数据
-
调用 buffer.clear()方法或者 buffer.compact()方法清除缓存区
案例:
@Test
    public void test1(){
        // 1、分配一个缓存区,容量设置为10
        ByteBuffer buffer = ByteBuffer.allocate(20);
        System.out.println("buffer.position() = "+buffer.position());
        System.out.println("buffer.limit() = " + buffer.limit());
        System.out.println("buffer.capacity() = " + buffer.capacity());
        System.out.println("================================================================");

        // 2、put 往缓冲区中添加数据
        String name = "P_P_P_P_P_P";
        System.out.println("name.getBytes().length = " + name.getBytes().length);
        buffer.put(name.getBytes());
        System.out.println("buffer.position() = "+buffer.position());
        System.out.println("buffer.limit() = " + buffer.limit());
        System.out.println("buffer.capacity() = " + buffer.capacity());
        System.out.println("================================================================");

        // 3、flip() 将缓存区的界限设置为当前位置,并将当前位置设置为0  ==> 可读模式
        buffer.flip();
        System.out.println("buffer.position() = "+buffer.position());
        System.out.println("buffer.limit() = " + buffer.limit());
        System.out.println("buffer.capacity() = " + buffer.capacity());
        System.out.println("================================================================");

        // 4、get() 对数据进行读取
//        char ch = (char) buffer.get();
//        System.out.println(ch);
//        System.out.println("buffer.position() = "+buffer.position());
//        System.out.println("buffer.limit() = " + buffer.limit());
//        System.out.println("buffer.capacity() = " + buffer.capacity());
//        System.out.println("================================================================");
//        buffer.flip();
        // 5、读取缓存区中所有数据
        char ch;
        for (int i = 0; i < buffer.limit(); i++) {
            ch = (char) buffer.get();
            System.out.println(ch);
            System.out.println("buffer.position() = "+buffer.position());
            System.out.println("buffer.limit() = " + buffer.limit());
            System.out.println("buffer.capacity() = " + buffer.capacity());
            System.out.println("================================================================");
        }
    }

    @Test
    public void test2(){
        // 1、分配一个缓存区,容量设置为10
        ByteBuffer buffer = ByteBuffer.allocate(10);
        System.out.println("buffer.position() = "+buffer.position());
        System.out.println("buffer.limit() = " + buffer.limit());
        System.out.println("buffer.capacity() = " + buffer.capacity());
        System.out.println("buffer.remaining() = " + buffer.remaining());
        System.out.println("================================================================");

        String name = "pp419";
        buffer.put(name.getBytes());
        System.out.println("buffer.position() = "+buffer.position());
        System.out.println("buffer.limit() = " + buffer.limit());
        System.out.println("buffer.capacity() = " + buffer.capacity());
        System.out.println("buffer.remaining() = " + buffer.remaining());
        System.out.println("================================================================");
        // 2、clear 清除缓存区中的数据
        buffer.clear();
        System.out.println("buffer.position() = "+buffer.position());
        System.out.println("buffer.limit() = " + buffer.limit());
        System.out.println("buffer.capacity() = " + buffer.capacity());
        System.out.println("buffer.remaining() = " + buffer.remaining());
        System.out.println("(char) buffer.get() = " + (char) buffer.get());// 还是可以获取数据,表示数据没有清除,只是恢复了position的位置
        System.out.println("================================================================");
        // 3、定义一个缓存区
        ByteBuffer buf = ByteBuffer.allocate(10);
        String x = "ppxx123";
        buf.put(x.getBytes());
        buf.flip();

        // 读取数据
        byte[] b = new byte[2];
        buf.get(b);// 读取两个字符
        String rs = new String(b);
        // pos=2 lim=4 cap=10
        System.out.println("buf = " + buf);
        System.out.println("rs = " + rs);

        System.out.println("buffer.position() = "+buf.position());
        System.out.println("buffer.limit() = " + buf.limit());
        System.out.println("buffer.capacity() = " + buf.capacity());
        System.out.println("buffer.remaining() = " + buf.remaining());
        System.out.println("================================================================");

        buf.mark();// 标记区域当前的limit位置: 2
        System.out.println("buffer.position() = "+buf.position());

        System.out.println("buffer.limit() = " + buf.limit());

        byte[] b2 = new byte[3];
        buf.get(b2);// 读取两个字符
        System.out.println(new String(b2));
        System.out.println("buffer.position() = "+buf.position());
        System.out.println("buffer.limit() = " + buf.limit());
        System.out.println("buffer.capacity() = " + buf.capacity());
        System.out.println("buffer.remaining() = " + buf.remaining());
        System.out.println("================================================================");
        buf.reset();// 回到标记位置
        System.out.println("回到标记位置 = "+buf.position());
        System.out.println("buffer.limit() = " + buf.limit());
        if (buf.hasRemaining()){
            System.out.println("剩余空间 => "+buf.remaining());
        }
    }
直接与非直接缓存区
什么是直接内存与非直接内存?
byte buffer,有两种类型
-
直接内存(也就是非堆内存)
-
对于直接内存来说,JVM 将会在 IO 操作上具有跟高的性能,因为它直接作用于本地系统的 IO 操作
-
本地 IO ===> 直接内存 ===> 本地 IO
-
-
非直接内存(也就是堆内存)
-
非直接内存,也就是堆内存中的数据,如果要进行 IO 操作,会先从本进程内存赋值到直接内存,再利用本地 IO 处理
-
本地 IO ===> 直接内存 ===> 非直接内存 ===> 直接内存 ===> 本地 IO
-
在做 IO 处理时,比如网络发送大量数据时,直接内存会具有更高的效率
直接内存使用 allocateDirect 创建,但是它比申请普通的堆内存需要耗费更高的性能
不过,这部分的数据是在JVM之外的,因此它不会占用应用 的内存。所以呢,当你有很大的数据要缓存,并且它的生命周期又很长,那么就比较适合使用直接内存。
使用 isDirect()
@Test
    public void test3(){
        // 创建一个非直接内存的缓存区
        ByteBuffer buffer = ByteBuffer.allocate(1024);
        System.out.println(buffer.isDirect());
        System.out.println("==========================");
        // 创建一个直接内存的缓存区
        ByteBuffer bufferDirect = ByteBuffer.allocateDirect(1024);
        System.out.println(bufferDirect.isDirect());
    }
-
有很大的数据需要存储,生命周期又很长
-
适合频繁的 IO 操作,比如网络并发场景
5通道(Channel)
通道Channel概述
-
通道(Channel),由java.nio.channels包定义的。
-
Channel表示 IO 源与目标打开的连接
-
Channel 类似于传统的“流”
-
不过 Channel 本身不能直接访问数据,Channel 只能与 Buffer 进行交互
NIO 的通道类似于流,但有些区别
-
通道可以同时进行读写,而流只能读或者只能写
-
通道可以实现异步读写数据
-
通道可以从缓冲读数据,也可以写数据到缓冲
BIO 中的 stream 是单向的,例如 FileInputStream 对象只能进行读取数据的操作,而NIO中的通道(Channel)是双向的,可以读操作,也可以写操作。
Channel在NIO中是一个接口
public interface Channel extends Closeable()
常用的 Channel实现类
-
FileChannel:用于读取、写入、映射和操作文件的通道
-
DatagramChannel:通过 UDP 读写网络中的数据通道
-
SocketChannel:通过 TCP 读写网络中的数据【SocketChannel 类似于 Socket】
-
ServerSocketChannel:可以监听新进来的 TCP 连接,对每一个新进来的连接都会创建一个 SocketChannel【ServerSocketChannel类似于ServerSocket】
FileChannel 类
获取通道的一种方式是对支持通道的对象调用 getChannel()方法,支持通道的类如下:
-
FileInputStream
-
FileOutputStream
-
RandomAccessFile
-
DatagramSocket
-
Socket
-
ServerSocket
获取通道的其他方式是使用 Files 类的静态方法 newByteChannel()获取字节通道,或通过通道的静态方法 open()打开并返回指定通道
public class ByteChannelExample {

    public static void main(String[] args) throws IOException {
        Path path = Paths.get("data.txt");
        String data = "Hello World";
        byte[] bytes = data.getBytes();

        // 打开文件通道
        FileChannel channel = (FileChannel) Files.newByteChannel(path, StandardOpenOption.CREATE, StandardOpenOption.WRITE);

        // 写入数据到通道
        ByteBuffer buffer = ByteBuffer.wrap(bytes);
        channel.write(buffer);

        // 关闭通道
        channel.close();

        // 读取数据
        channel = (FileChannel) Files.newByteChannel(path, StandardOpenOption.READ);
        buffer = ByteBuffer.allocate(1024);
        channel.read(buffer);
        buffer.flip();
        byte[] readBytes = new byte[buffer.limit()];
        buffer.get(readBytes);
        System.out.println(new String(readBytes));

        // 关闭通道
        channel.close();
    }
}
FileChannel的常用方法
-
int read(ByteBuffer dst) 从 channel 当做读取数据至 ByteBuffer
-
long read(ByteBuffer[] dsts)将channel当中的数据“分散”至ByteBuffer[]
-
int write(Bytesuffer src)将ByteBuffer当中的数据写入到Channel
-
long write(ByteBuffer[] srcs)将Bytesuffer[]当中的数据“聚集”到Channel
-
long position()返回此通道的文件位置
-
FileChannel position(long p)设置此通道的文件位置
-
long size()返回此通道的文件的当前大小
-
FileChannel truncate(long s)将此通道的文件截取为给定大小
-
void force(boolean metaData)强制将所有对此通道的文件更新写入到存储设备中
案例 1-本地文件写数据
流程如下:
-
创建一个字节输出流,用于连接到文件
-
通过流获取通道(channel)
-
分配缓存区,并向缓存区内写入数据,切换缓存区模式(flip)
-
利用通道将缓存区内数据写入流
-
释放缓存区、关闭通道、关闭流
代码:
public void write() throws IOException{
    try{
        // 1、创建一个字节输出流,连接文件
        FileOutputStream fos = new FileOutputStream("data.txt");
        // 2、得到输出流的通道
        FileChannel channel = fos.getChannel();
        // 3、分配一个缓存区,用于存放数据
        ByteBuffer buffer = ByteBuffer.allocate(1024);
        buffer.put("Hello World~ (: ".getBytes());
        // 4、把缓存区切换为写模式
        buffer.flip();
        // 5、把缓存中的数据写入通道
        channel.write(buffer);
        // 6、释放缓存区
        buffer.clear();
        channel.close();
        fos.close();
        System.out.println("数据写入成功");
    }catch (Exception e){
      e.printStackTrace();
    }
}
案例 2-本地文件读数据
流程如下:
-
创建一个字节输入流,连接目标文件
-
得到字节输入流对应的通道 Channel
-
分配缓存区,将文件中的数据读取到缓存区,切换缓存区模式(flip)
-
读取数据
-
释放缓存区、关闭通道、关闭流
 @Test
    public void read()throws IOException {
        // 1、创建一个字节输入流,连接目标文件
        FileInputStream fis = new FileInputStream("data01.txt");
        // 2、得到字节输入流对应的通道Channel
        FileChannel channel = fis.getChannel();
        // 3、分配缓存区
        ByteBuffer buffer = ByteBuffer.allocate(1024);
        // 4、利用通道将数据读取到缓存区内
        channel.read(buffer);
        // 5、翻转缓存区
        buffer.flip();
        // 6、读取出缓存区中的数据并输出即可
        System.out.println(new String(buffer.array(),0,buffer.remaining()));
        buffer.clear();
        channel.close();
        fis.close();
    }
案例 3-使用 Buffer 完成文件复制
@Test
    public void copy()throws IOException{
        // 源文件地址
        File srcFile = new File("/Library/Soft/data/io/1.jpg");
        File destFile = new File("1_copy.jpg");// 目标文件
        // 创建一个字节输出流、一个字节输入流
        FileInputStream fis = new FileInputStream(srcFile);
        FileOutputStream fos = new FileOutputStream(destFile);
        // 获取对应的通道
        FileChannel fisChannel = fis.getChannel();
        FileChannel fosChannel = fos.getChannel();
        // 分配一个缓存区
        ByteBuffer buffer = ByteBuffer.allocate(1024);
        while (true){
            // 必须先清空缓存区然后在写入数据到缓存区
            buffer.clear();
            // 开始读取一次数据
            int flag = fisChannel.read(buffer);
            System.out.println("flag = " + flag);
            if (flag == -1){
                //
                break;
            }
            // 已经读取了数据,把缓存区的 模式切换为可读模式
            buffer.flip();
            // 把数据写出到
            fosChannel.write(buffer);
        }
        // 释放通道、关闭流
        fisChannel.close();
        fosChannel.close();
        fis.close();
        fos.close();

    }
案例 4-分散(Scatter)和聚集(Gatter)
分散读取(Scatter):是指把 Channel 通道的数据读取到多个缓存区中
聚集写入(Gathering):是指将多个 Buffer 中的数据聚集到 Channel
@Test
    public void testScatterAndGather() throws IOException{
        // 1、字节输入管道
        FileInputStream is = new FileInputStream("data01.txt");
        FileChannel isChannel = is.getChannel();
        // 2、字节输出管道
        FileOutputStream os = new FileOutputStream("data02.txt");
        FileChannel osChannel = os.getChannel();
        // 3、定义多个缓存区做数据分散
        ByteBuffer buffer1 = ByteBuffer.allocate(4);
        ByteBuffer buffer2 = ByteBuffer.allocate(1024);
        ByteBuffer[] buffers = {buffer1, buffer2};
        // 4、从通道中读取数据分散到各个缓存区
        isChannel.read(buffers);
        // 5、从每个缓存区中查询是否有数据读取到了
        for (ByteBuffer buffer: buffers){
            buffer.flip();
            System.out.println(new String(buffer.array(),0,buffer.remaining()));
        }
        // 6、聚集写入到通道
        osChannel.write(buffers);
        isChannel.close();
        osChannel.close();
        System.out.println("文件复制~");
    }
案例 5-transferForm
从目标通道中去复制原通道数据
/**
     * 从目标通道中复制数据到原通道
     * @throws Exception
     */
    @Test
    public void testTransferForm() throws Exception {
        // 1、字节输入管道
        FileInputStream is = new FileInputStream("data01.txt");
        FileChannel isChannel = is.getChannel();// 源通道
        // 2、字节输出管道
        FileOutputStream os = new FileOutputStream("data03.txt");
        FileChannel osChannel = os.getChannel();// 目标通道
        // 3、复制数据
        osChannel.transferFrom(isChannel,isChannel.position(),isChannel.size());
        isChannel.close();
        osChannel.close();
        System.out.println("复制完成!");

    }
案例 6-transferTo
把原通道数据复制到目标通道
/**
     * 从 源通道中复制数据到目标通道
     * @throws Exception
     */
    @Test
    public void testTransferTo() throws Exception {
        // 1、字节输入管道
        FileInputStream is = new FileInputStream("data01.txt");
        FileChannel isChannel = is.getChannel();// 源通道
        // 2、字节输出管道
        FileOutputStream os = new FileOutputStream("data04.txt");
        FileChannel osChannel = os.getChannel();// 目标通道
        // 3、复制数据
        isChannel.transferTo(isChannel.position(),isChannel.size(),osChannel);
        isChannel.close();
        osChannel.close();
        System.out.println("复制完成!");
    }
6选择器(Selector)
选择器(Selector)
选择器是 SelectableChannel 对象的多路复用器
Selector 可以同时监控多个 SelectableChannel 的 IO 状况
利用 Selector 可使一个单独的线程管理多个 Channel
Selector 是非阻塞IO 的核心
java的NIO,用非阻塞的IO方式。可以用一个线程,处理多个的客户端连接,就会使用到Selector(选择器)
Selector能够检测多个注册的通道上篡若有事件发生(注意:多个Channel以事件的方式可以注册到同一个 Selector),如果有事件发生,便获取事件然后针对每个事件进行相应的处理。这样就可以只用一个单线程去管理多个通道,也就是管理多个连接和请求。
只有在连接/通道真正有读写事件发生时,才会进行读写,就大大地减少了系统开销,并且不必为每个连接都 创建一个线程,不用去维护多个线程 避免了多线程之间的上下文切换导致的开销
Selector 的应用
创建 Selector:通过 Selector.open()方法创建一个 Selector
Selector selector = Selector.open();
向选择器注册通道:SelectableChannel.register(Selector sel, int ops);
//1.获取通道
ServerSocketChannel ssChannel = ServerSocketChannel.open();
//2.切换非阻塞模式
ssChannel.configureBlocking(false);
//3.绑定连接
ssChannel.bind(new InetSocketAddress(9898));
//4.获取选择器
Selector selector = Selector.open();
//5.将通道注册到选择器上,并且指定“监听接收事件”
ssChannel.register(select,SelectionKey.OP_ACCEPT);
当调用register(Selector sel, mt ops)将通道注册选择器时,选择器对通道的监听事件,需要通过第二个参数。ops指定。
可以监听的事件类型(用可使用Selection Key的四个常量表示):
-
读:SelectionKey.OP_READ (1)
-
写:SelectionKey.OP_WRITE (4)
-
连接:SelectionKey.OP_CONNECT (8)
-
接收:SelectionKey.OP_ACCEPT (16)
若注册时不止监听一个事件,则可以使用‘位或”操作符连接。
int interestSet = selectionKey.OP_READ | SelectionKey.OP_WERITE
Selector 实现一个 I/O线程可以并发处理 N 个客户端连接的读写操作,这从根本上解决了传统同步阻塞 I/O(1 连接、1 线程模型),架构的性能、弹性伸缩功能和可靠性都得到了极大的提升。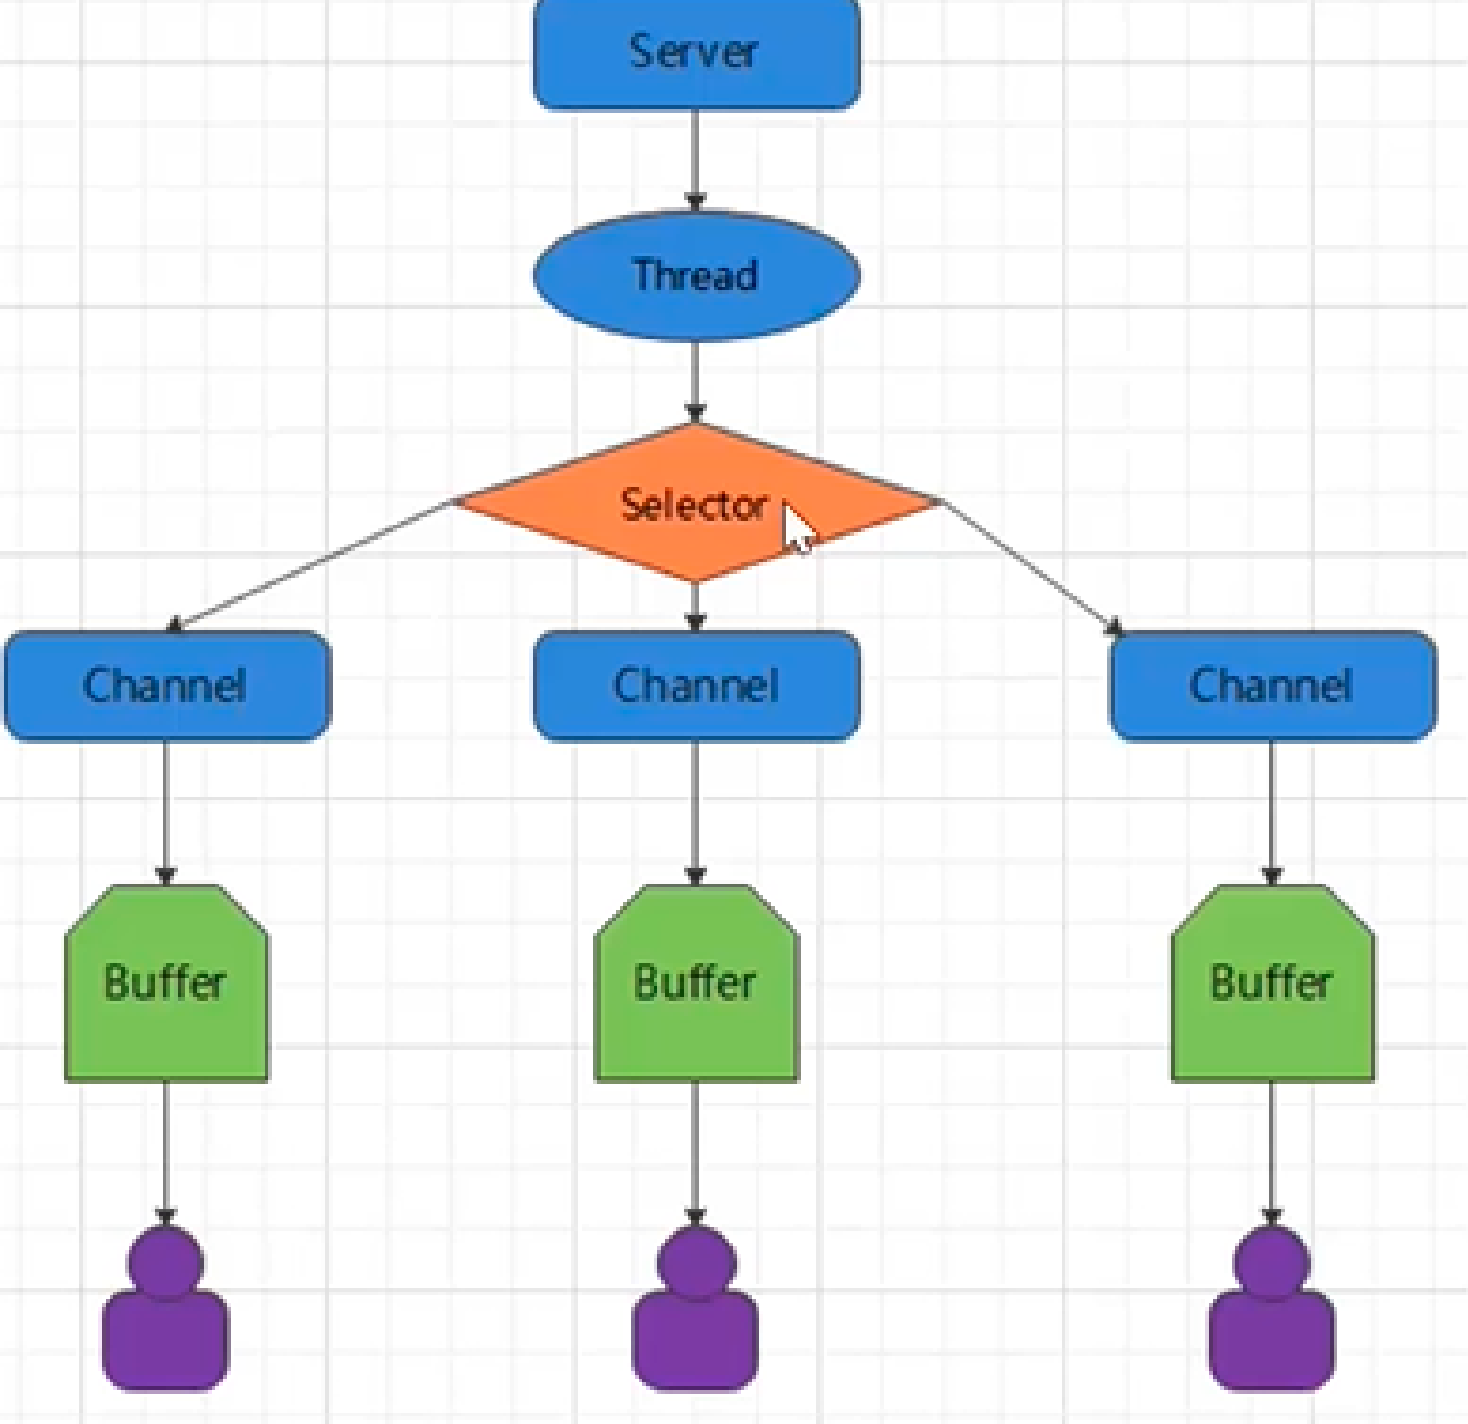
服务端流程
1、当客户端连接服务端时,服务端会通过 ServerSocketChannel 得到 SocketChannel,获取通道
ServerSocketChannel ssChannel = ServerSocketChannel.open();
2、切换非阻塞模式
ssChannel.configureBlocking(false);
3、绑定连接
ssChannel.bind(new InetSocketAddress(9999));
4、获取选择器
Selector selector = Selector.open();
5、将通道注册到选择器上,并且指定“监听接收事件”
ssChannel.register(selector,Selectionkey.OP_ACCEPT);
6、轮询式的获取选择器上已经“准备就绪”的事件
//轮询式的获取选择器上已经“准备就绪”的事件
while(selector.select() > 0){
    System.out.println("轮一轮");
    //7. 获取当前选择器中所有注册的“选择键(已就绪的监听事件)“
    Iterator<SelectionKey> it = selector.selector.selectedKeys().iterator();
    while(it.hasNext()){
        //8.获取准备”就绪“的事件
        SelectionKey sk = it.next();
        //9.判断具体是什么事件准备就绪
        if(sk.isAcceptable()){
        //10.若”接收就绪“,获取客户端连接
        SocletChannel sChannel = ssChannel.accept();
        //11.切换非阻塞模式
        sChannel.configureBlocking(fales);
        //12.将该通道注册到选择器上
        sChannel.register(selector,SelectionKey.OP_READ);
        }else if(sk.isReadable()){
        //13.获取当前选择器上”读就绪“状态的通道
        SocketChannle sChannel = (SocketChannel)sk.channel();
        //14.读取数据
        ByteBuffer buf = ByteBuffer.allocate(1024);
        int len = 0;
        while((len = sChannel.read(buf)) > 0){
        buf.flip();
        System.out.println()new String(buf.array(),0,len); buf.clear();
         }
     }
    //15.取消选择键SelectionKey
     it.remove();
    } }
客户端流程
1、获取通道
SocketChannel sChannel = SocketChannel.open(new InetSocketAddress("127.0.0.1",9999);
2、切换非阻塞模式
sChannel.configureBlocking(false);
3、分配指定大小的缓存区
ByteBuffer buf = ByteBuffer.allocate(1024);
4、发送数据给服务端
Scanner scan = new Scanner(System.in);
while(scan.hasNext()){
    String str = scan.nextLine();
    buf.put((new SimpleDateFormat("yyyy/MM/dd HH:mm:ss").format(System.currentTimeMillis()) + "\n" + str).getByte());
    buf.flip();
    sChannel.write(buf);
    buf.clear();
}
// 关闭通道
sChannel.close();
NIO 非阻塞式网络通信
需求:服务端接受客户端的连接请求,并接收多个客户端发送过来的事件
/**
 * TODO 客户端案例实现-基于NIO非阻塞通信
 *
 * @author ss_419
 * @version 1.0
 * @date 2023/8/24 16:57
 */
public class NIOClient {
    public static void main(String[] args) throws IOException {
        // 1、获取通道
        SocketChannel sChannel = SocketChannel.open(new InetSocketAddress("localhost", 9999));
        // 2、切换为非阻塞模式
        sChannel.configureBlocking(false);
        // 3、分配指定缓存区大小
        ByteBuffer buf = ByteBuffer.allocate(1024);
        // 4、发送数据给服务端
        Scanner sc = new Scanner(System.in);
        while (true){
            System.out.println("请输入:");
            String msg = sc.nextLine();
            buf.put(("波仔:"+msg).getBytes());
            buf.flip();
            sChannel.write(buf);
            buf.clear();
        }
    }
}
/**
 * TODO 目标:NIO非阻塞通信下的入门案例:服务端开发
 *
 * @author ss_419
 * @version 1.0
 * @date 2023/8/24 17:10
 */
public class NIOServer {
    public static void main(String[] args) throws IOException {
        System.out.println("----服务端启动----");
        // 1、获取通道
        ServerSocketChannel ssChannel = ServerSocketChannel.open();
        // 2、切换为非阻塞模式
        ssChannel.configureBlocking(false);
        // 3、绑定连接的端口
        ssChannel.bind(new InetSocketAddress(9999));
        // 4、获取选择器
        Selector selector = Selector.open();
        // 5、将通道都注册到选择器上,并且开始指定监听接收事件
        ssChannel.register(selector, SelectionKey.OP_ACCEPT);
        // 6、使用选择器轮训已经就绪的事件
        while (selector.select() > 0){
            // 7、获取选择器中所有注册的选择键,获取选择器中的所有注册的通道中已经就绪的事件
            Iterator<SelectionKey> it = selector.selectedKeys().iterator();
            // 8、开始便利这些准备好的事件
            while (it.hasNext()) {
                // 提取当前这个事件
                SelectionKey sk = it.next();
                // 9、判断这个事件具体是什么事件
                if (sk.isAcceptable()){
                    // 10、直接获取当前接入的客户端通道
                    SocketChannel schannel = ssChannel.accept();
                    // 11、将服务端通道也设置为非阻塞模式
                    schannel.configureBlocking(false);
                    // 12、将服务端通道也注册到选择器Selector上
                    schannel.register(selector,SelectionKey.OP_READ);
                }else if (sk.isReadable()){
                    // 13、获取当前选择器上的“读就绪事件”
                    SocketChannel schannel = (SocketChannel) sk.channel();
                    // 14、开始读取数据
                    ByteBuffer buffer = ByteBuffer.allocate(1024);
                    int read = 0;
                    while ((read = schannel.read(buffer)) > 0){
                        buffer.flip();
                        System.out.println(new String(buffer.array(),0,read));
                        buffer.clear();// 清除之前的数据
                    }
                }
                // 处理完毕当前事件后,需要移除掉当前事件,否则会重复处理
                it.remove();
            }
        }
    }
}
NIO-群聊系统
需求:使用 NIO 非阻塞网络编程,实现多人群聊
-
编写一个 NIO 群聊系统,实现客户端与客户端的通信需求(非阻塞)
-
服务端:可以监测用户上线,离线,并实现消息转发功能
-
客户端:通过 channel 可以无阻塞发送消息给其他所有客户端用户,同时可以接受其他客户端用户通过服务端转发来的消息
服务端实现:
import java.io.IOException;
import java.net.InetSocketAddress;
import java.nio.ByteBuffer;
import java.nio.channels.*;
import java.util.Iterator;

/**
 * TODO 群聊系统-服务端
 *
 * @author ss_419
 * @version 1.0
 * @date 2023/8/24 17:28
 */
public class NioChatServer {
    // 定义属性
    private Selector selector;
    private ServerSocketChannel ssChannel;
    private static final int PORT = 9999;

    /**
     * 构造器
     * 初始化工作
     */
    public NioChatServer() {
        try{
            // 1、创建选择器
            selector = Selector.open();
            // 2、获取通道
            ssChannel = ServerSocketChannel.open();
            // 3、切换为非阻塞模式
            ssChannel.configureBlocking(false);
            // 4、绑定连接的端口
            ssChannel.bind(new InetSocketAddress(PORT));
            // 5、将通道都注册到选择器上,并且开始指定监听接收事件
            ssChannel.register(selector, SelectionKey.OP_ACCEPT);
        }catch (Exception e){
            e.printStackTrace();
        }
    }

    public static void main(String[] args) {
        // 创建服务端对象
        NioChatServer server = new NioChatServer();
        // 调用监听事件,持续监听客户端
        server.listen();
    }
    // 监听
    public void listen(){
        System.out.println("监听线程 => " + Thread.currentThread().getName());
        try{
            while (selector.select() > 0){
                // 1、获取选择器中所有注册通道的就绪事件
                Iterator<SelectionKey> it = selector.selectedKeys().iterator();
                // 2、开始遍历这个事件
                while (it.hasNext()){
                    // 3、提取这个事件
                    SelectionKey sk = it.next();
                    // 4、判断这个事件
                    if (sk.isAcceptable()){
                        // 连接事件
                        // 客户端接入请求
                        // 获取当前客户端通道
                        SocketChannel schannel = ssChannel.accept();
                        // 注册成非阻塞模式
                        schannel.configureBlocking(false);
                        // 注册给选择器,监听读数据的事件
                        schannel.register(selector,SelectionKey.OP_READ);
                    }else if (sk.isReadable()){
                        // 处理这个客户端的消息,接收它,然后实现转发逻辑
                        readClientData(sk);
                    }
                    // 处理完毕之后,需要移除当前事件
                    it.remove();
                }
            }
        }catch (Exception e){
            e.printStackTrace();
        }
    }

    // 接收当前客户端的信息,转发给其他全部客户端通道
    private void readClientData(SelectionKey sk) {
        SocketChannel sChannel = null;
        try{
            // 直接得到当前客户端通道
            sChannel = (SocketChannel) sk.channel();
            // 创建缓存区对象,开始接收客户端通道的数据
            ByteBuffer buffer = ByteBuffer.allocate(1024);
            int count = sChannel.read(buffer);
            if (count > 0){
                buffer.flip();
                // 提取读取到的信息
                String msg = new String(buffer.array(),0,buffer.remaining());
                System.out.println("接收到了客户端的信息:" + msg);
                // 把这个消息推送给全部客户读啊接收
                sendMsgToAllClient(msg,sChannel);
            }
        }catch (Exception e){
            try{
                System.out.println("有人离线了:" + sChannel.getRemoteAddress());
                // 当前客户端离线
                sk.cancel();// 取消注册
                sChannel.close();
            }catch (IOException e1){
                e1.printStackTrace();
            }
        }
    }

    // 把当前客户端的消息推送给当前全部在线注册的Channel
    private void sendMsgToAllClient(String msg, SocketChannel sChannel) throws IOException{
        System.out.println("服务端开始转发这个消息,当前处理的线程 => " + Thread.currentThread().getName());
        for (SelectionKey key : selector.keys()){
            Channel channel = key.channel();
            // 不要把消息发给自己
            if (channel instanceof SocketChannel && channel != sChannel){
                ByteBuffer buffer = ByteBuffer.wrap(msg.getBytes());
                ((SocketChannel)channel).write(buffer);
            }
        }
    }
}
客户端实现:
import java.io.IOException;
import java.net.InetSocketAddress;
import java.nio.ByteBuffer;
import java.nio.channels.SelectionKey;
import java.nio.channels.Selector;
import java.nio.channels.SocketChannel;
import java.util.Iterator;
import java.util.Scanner;

/**
 * TODO 群聊系统-客户端
 *
 * @author ss_419
 * @version 1.0
 * @date 2023/8/24 17:28
 */
public class NioChatClient {
    // 1、定义客户端相关属性
    private Selector selector;
    private static int PORT = 9999;
    private SocketChannel socketChannel;

    // 2、初始化客户端信息
    public NioChatClient() {
        try{
            // 1、创建选择器
            selector = Selector.open();
            // 2、连接服务器
            socketChannel = SocketChannel.open(new InetSocketAddress("localhost",PORT));
            // 3、设置非阻塞模式
            socketChannel.configureBlocking(false);
            // 4、注册
            socketChannel.register(selector, SelectionKey.OP_READ);
            System.out.println("当前客户端准备完成");
        }catch (Exception e){
            e.printStackTrace();
        }
    }

    public static void main(String[] args) {
        NioChatClient client = new NioChatClient();
        // 读消息
        // 定义一个线程,专门负责监听服务端发送过来的读消息事件
        new Thread(new Runnable() {
            @Override
            public void run() {
                try{
                    client.readInfo();
                }catch (Exception e){
                    e.printStackTrace();
                }
            }
        }).start();
        // 发消息
        Scanner sc = new Scanner(System.in);
        while (sc.hasNextLine()){
            System.out.println("--------------------------------");
            String s = sc.nextLine();
            client.sendToServer(s);
        }

    }

    private void sendToServer(String s) {
        try{
            socketChannel.write(ByteBuffer.wrap(("PP : "+ s).getBytes()));
        }catch (IOException e){
            e.printStackTrace();
        }
    }

    private void readInfo() throws IOException{
        // 遍历获取消息
        while (selector.select() > 0){
            Iterator<SelectionKey> it = selector.selectedKeys().iterator();
            while (it.hasNext()){
                SelectionKey key = it.next();
                if (key.isReadable()){
                    // 转换为SocketChannel
                    SocketChannel sc = (SocketChannel) key.channel();
                    // 创建一个缓存区
                    ByteBuffer buffer = ByteBuffer.allocate(1024);
                    sc.read(buffer);
                    System.out.println(new String(buffer.array()).trim());
                    System.out.println("--------------------------------");
                }
                it.remove();
            }
        }
    }
}