python代码如下:
import cv2
import numpy as np
import open3d as o3d
import matplotlib.pyplot as plt
if __name__ == "__main__":
fx_d = 377.5033
fy_d = 379.9958
cx_d = 253.8629
cy_d = 214.0377
k1_d = 0.1457
k2_d = -0.2000
p1_d = 0.0164
p2_d = -0.0031
# 深度相机内参矩阵
K_d = np.array([[fx_d, 0, cx_d],
[0, fy_d, cy_d],
[0, 0, 1]])
# 深度相机畸变参数 [k1, k2, p1, p2, k3=None, k4=None, k5=None, k6=None]
P_d = np.array([k1_d, k2_d, p1_d, p2_d])
fx_rgb = 1.0888e+03
fy_rgb = 1.0998e+03
cx_rgb = 984.8159
cy_rgb = 570.7545
k1_rgb = 0.1332
k2_rgb = -0.0906
p1_rgb = 0.0233
p2_rgb = 0.0015
# 彩色相机内参矩阵
K_rgb = np.array([[fx_rgb, 0, cx_rgb],
[0, fy_rgb, cy_rgb],
[0, 0, 1]])
# 彩色相机畸变参数 [k1, k2, p1, p2, k3=None, k4=None, k5=None, k6=None]
P_rgb = np.array([k1_rgb, k2_rgb, p1_rgb, p2_rgb])
# 相机外参(旋转矩阵和平移向量)
rotation_rgb = np.array([[0.9956, -0.0331, 0.0876],
[-0.0030, 0.9234, 0.3838],
[-0.0936, -0.3824, 0.9192]])
vector_rgb = np.array([-44.3683289763779, -152.716998210367, 547.186338939539])
rotation_d = np.array([[0.9962, -0.0420, 0.0762],
[0.0111, 0.9296, 0.3684],
[-0.0863, -0.3661, 0.9266]])
vector_d = np.array([-95.6925127546288, -143.920721920010, 549.547667621852])
depth_scale = 0.001
# 加载深度图和彩色图
depth_image = cv2.imread('D:/biaoding/lion/depth_1.png', cv2.IMREAD_UNCHANGED)
rgb_image = cv2.imread('D:/biaoding/lion/color_1.png')
# 去畸变
img_d_distort = cv2.undistort(depth_image, K_d, P_d)
img_rgb_distort = cv2.undistort(rgb_image, K_rgb, P_rgb)
"""""""""
# 显示去畸变前后深度图
# 将深度值映射为颜色
# 这里使用了简单的线性映射,可以根据需要自定义映射方式
min_depth = min(np.min(depth_image), np.min(img_d_distort))
max_depth = max(np.max(depth_image), np.max(img_d_distort))
depth_normalized1 = (depth_image - min_depth) / (max_depth - min_depth) # 将深度值归一化到 [0, 1] 范围
depth_normalized2 = (img_d_distort - min_depth) / (max_depth - min_depth)
创建子图(1行2列)
fig, axes = plt.subplots(1, 2)
# 在第一个子图中绘制深度图1
axes[0].imshow(depth_normalized1, cmap='jet')
# axes[0].imshow(rgb_image)
axes[0].set_title('Depth 1')
# 在第二个子图中绘制深度图2
axes[1].imshow(depth_normalized2, cmap='jet')
# axes[1].imshow(img_rgb_distort)
axes[1].set_title('Depth 2')
# 调整子图的布局
plt.tight_layout()
# 显示图像
plt.show()
"""
# 使用cv2.rgbd.depthTo3d()函数将深度图像转换为深度相机坐标系下的点云
img_d_distort = img_d_distort*depth_scale
point_d_camera = cv2.rgbd.depthTo3d(img_d_distort, K_d)
# 调整为n*3形状的数组
point_d_camera = point_d_camera.reshape(-1, 3)
# 去除其中0向量
# 计算数组中每行的向量范数
norms = np.linalg.norm(point_d_camera, axis=1)
# 找到非零向量的索引
nonzero_indices = np.where(norms != 0)
# 提取非零向量
point_d_camera = point_d_camera[nonzero_indices]
"""""""""
# 打印转换后的数组和形状
print(point_d_camera)
print(point_d_camera.shape)
point_cloud = o3d.geometry.PointCloud()
point_cloud.points = o3d.utility.Vector3dVector(point_d_camera)
# 可视化点云对象
o3d.visualization.draw([point_cloud])
"""
# 将点云转换到彩色相机坐标系下
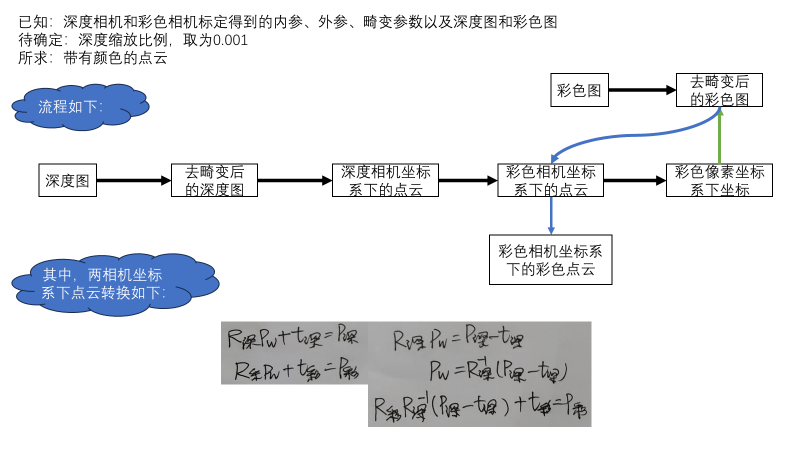
point_rgb_camera = (np.dot(rotation_rgb, np.dot(np.linalg.inv(rotation_d), (point_d_camera - vector_d*depth_scale).T)).T
+ vector_rgb*depth_scale)
"""""""""
# 可视化点云对象
point_cloud = o3d.geometry.PointCloud()
point_cloud.points = o3d.utility.Vector3dVector(point_rgb_camera)
o3d.visualization.draw([point_cloud])
"""
# 从彩色相机坐标系投影到彩色图像坐标系,加入点云颜色
height = rgb_image.shape[0]
width = rgb_image.shape[1]
aligned = np.zeros((len(point_rgb_camera), 6))
# print(point_rgb_camera)
print(point_rgb_camera.shape)
# 遍历所有点云
for i in range(len(point_rgb_camera)):
# 从彩色相机坐标系转换到彩色图像坐标系
depth_to_rgb, _ = cv2.projectPoints(point_rgb_camera[i], np.eye(3), np.array([[0.], [0.], [0.]]), K_rgb, P_rgb)
depth_to_rgb = np.reshape(depth_to_rgb, (2, 1))
# print(depth_to_rgb)
if depth_to_rgb[0] > width - 1 or depth_to_rgb[1] > height - 1 or depth_to_rgb[1] < 0 or depth_to_rgb[1] < 0:
pass
else:
x = np.round(depth_to_rgb[0]).astype(int)
y = np.round(depth_to_rgb[1]).astype(int)
aligned[i, 0] = point_rgb_camera[i, 0]
aligned[i, 1] = point_rgb_camera[i, 1]
aligned[i, 2] = point_rgb_camera[i, 2]
aligned[i, 3] = img_rgb_distort[y, x, 0].item()
aligned[i, 4] = img_rgb_distort[y, x, 1].item()
aligned[i, 5] = img_rgb_distort[y, x, 2].item()
# print(aligned)
# 去除其中0向量
# 计算数组中每行的向量范数
norms = np.linalg.norm(aligned, axis=1)
# 找到非零向量的索引
nonzero_indices = np.where(norms != 0)
# 提取非零向量
aligned = aligned[nonzero_indices]
print(aligned.shape)
# 将点云数据转换为open3d格式
xyz = aligned[:, :3] # 提取x, y, z坐标
rgb = aligned[:, 3:] # 提取颜色信息
pcd = o3d.geometry.PointCloud()
pcd.points = o3d.utility.Vector3dVector(xyz)
pcd.colors = o3d.utility.Vector3dVector(rgb / 255.0) # 颜色范围通常是[0, 255],将其归一化到[0, 1]
# 可视化点云
o3d.visualization.draw_geometries([pcd])
# 保存点云为.ply文件
# 以ASCII格式保存点云数据到文件
np.savetxt('point and color_rgb_camera.txt', aligned, delimiter=' ', fmt='%.6f')
# 打开文件并逐行写入PLY文件
with open('point and color_rgb_camera.txt', 'r', encoding='ascii') as file:
lines = file.readlines()
num_points = len(lines)
# 创建PLY文件并写入头信息
with open('point and color_rgb_camera.ply', 'w', encoding='ascii') as ply_file:
ply_file.write('ply\n')
ply_file.write('format ascii 1.0\n')
ply_file.write('element vertex {}\n'.format(num_points))
ply_file.write('property float x\n')
ply_file.write('property float y\n')
ply_file.write('property float z\n')
ply_file.write('end_header\n')
# 逐行写入点云数据
for line in lines:
ply_file.write(line)