1.学习目标

2.Spring框架发展史
2.1. Spring1.x 时代
的配置文件中,需要频繁的在 java 类和 xml 配置文件中切换。
2.2. Spring2.x 时代
随着 JDK 1.5 带来的注解支持,Spring2.x 可以使用注解对Bean进行声明和注入,大大的减少了 xml 配
置文件,同时也大大简化了项目的开发。
那么,问题来了,究竟是应该使用 xml 还是注解呢?
最佳实践:
1.应用的基本配置用 xml,比如:数据源、资源文件等;
2.业务开发用注解,比如:Service 中注入 bean 等;
2.3. Spring3.x 到 Spring4.x 再到 Spring5.x
从 Spring3.x 开始提供了 Java 配置方式,使用 Java 配置方式可以更好的理解你配置的 Bean,现在我
们就处于这个时代,并且 Spring4.x、Spring5.x 和 Spring Boot 都推荐使用 java 配置的方式。
3.Spring 5.X 应用零配置开发
Spring 框架从 5.x 版本推荐使用注解形式来对 java 应用程序进行开发与配置,并且可以完全替代原始的 XML + 注解形式的开发,在使用注解形式进行项目开发与环境配置时,Spring 框架提供了针对环境配
置与业务 bean 开发相关注解。
3.1. 注解
3.1.1. 声明Bean 注解
 @Component: 组件 没有明确规定其⻆⾊,作⽤在类级别上声明当前类为⼀个业务组件,被Spring Ioc 容器维护

 @Service: 在业务逻辑层(Service 层)类级别进⾏声明

 @Repository: 在数据访问层(dao 层) 类级别声明

 @Controller: 在展现层(MVC) 使⽤ 标注当前类为⼀个控制器
3.1.2. 注入Bean 注解
 @AutoWired: Spring 官⽅提供注解

 @Inject: JSR-330 提供注解(标准制定⽅)

 @Resource: JSR-250 提供注解
以上三种注解在 Set 方法或属性上声明,⼀般情况下通用⼀般开发中更习惯声明在属性上,代码简洁
清晰。基于5.x 注解配置方式简化了xml 配置,应用程序开发与xml 环境配置均通过相应注解来实现。
3.1.3. Spring5.x 中配置与获取Bean注解
  @Configuration: 作⽤与类上,将当前类声明为⼀个配置类,相当于⼀个xml 配置⽂件


  @ComponentScan: ⾃动扫描指定包下标注有@Repository,@Service,@Controller
  @Component: 注解的类并由Ioc 容器进⾏实例化和维护

  @Bean: 作⽤于⽅法上,相当于xml ⽂件中<bean> 声明当前⽅法返回值为⼀个bean

  @Value: 获取properties ⽂件指定key value值
3.2. 实例1 - IOC 中 Bean 的实例化与获取
3.2.1. 创建 Spring 普通工程
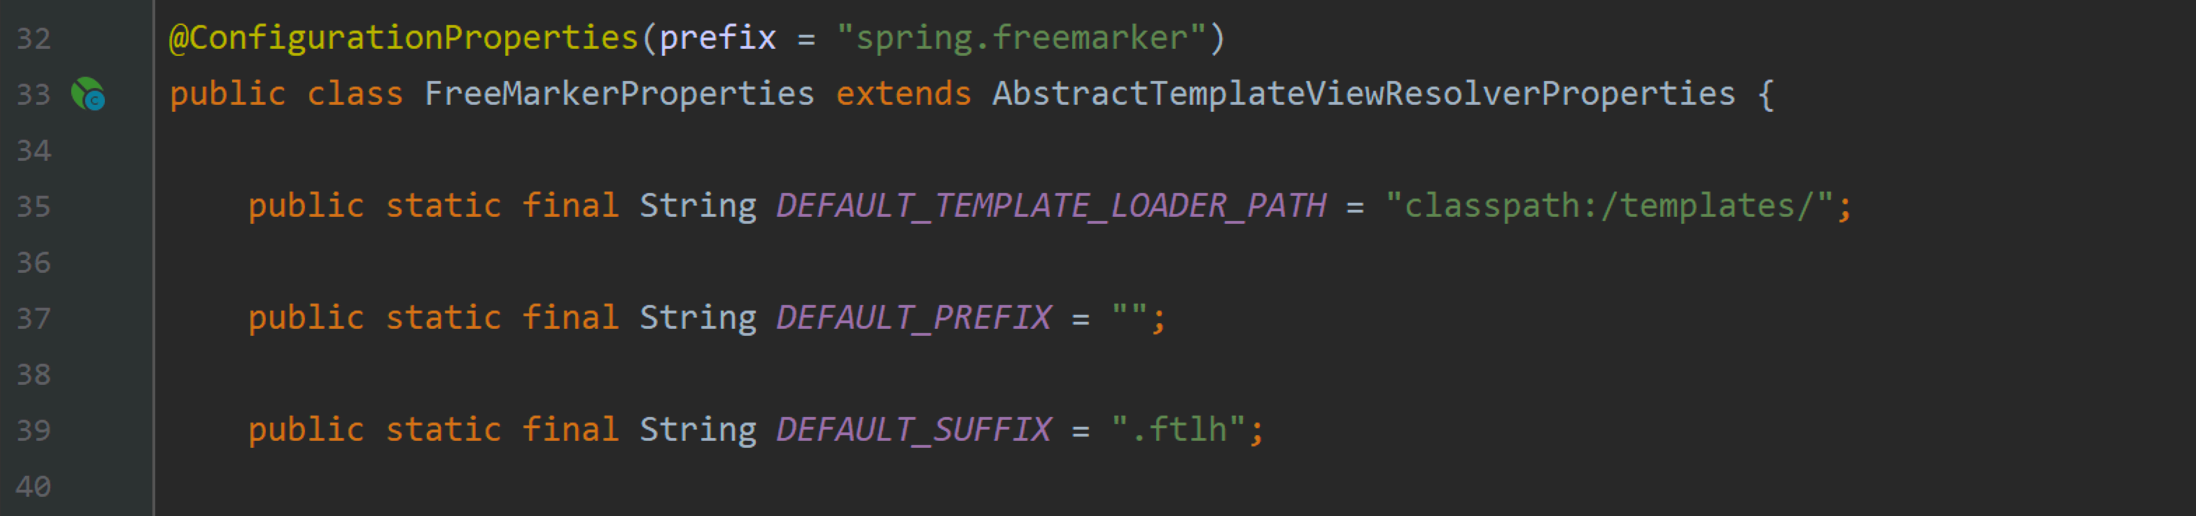
在 pom.xml 中添加坐标相关配置
 <!-- spring的依赖坐标 -->
     <dependency>
       <groupId>org.springframework</groupId>
       <artifactId>spring-context</artifactId>
       <version>5.2.4.RELEASE</version>
     </dependency>


     <plugins>
       <!-- 指定Maven编译的JDK版本和编码 -->
       <plugin>
         <groupId>org.apache.maven.plugins</groupId>
         <artifactId>maven-compiler-plugin</artifactId>
         <version>3.8.1</version>
         <configuration>
           <!-- 源代码使⽤的JDK版本 -->
           <source>1.8</source>
           <!-- 需要⽣成的⽬标class⽂件的编译版本 -->
           <target>1.8</target>
           <!-- 字符集编码 -->
           <encoding>utf-8</encoding>
         </configuration>
       </plugin>
     </plugins>
3.2.2. 创建 Bean 对象
UserDao.java
package com.xxx.springboot.dao;
import org.springframework.stereotype.Repository;
@Repository
public class UserDao {
public void test(){
System.out.println("UserDao test..");
}
}
3.2.3. 创建 IocConfig 配置类
package com.xxx.springboot.config;
import org.springframework.context.annotation.ComponentScan;
import org.springframework.context.annotation.Configuration;
// 将当前类声明为⼀个配置类
@Configuration
// 设置扫描包范围
@ComponentScan("com.xxx.springboot")
public class IocConfig {
}3.2.4. 创建启动类执行测试
package com.xxx.springboot;
import com.xxx.springboot.config.IocConfig;
import com.xxx.springboot.service.UserService;
import org.springframework.context.annotation.AnnotationConfigApplicationContext;
public class Starter {
public static void main(String[] args) {
// 基于Java的配置类加载Spring的应⽤上下⽂
AnnotationConfigApplicationContext ac = new AnnotationConfigApplicationContext(IocConfig.class);
// 获取指定的Bean对象
UserService userService = ac.getBean(UserService.class);
// 调⽤Bean对象的⽅法
userService.test();
}
}此时启动 Spring IOC 容器,通过实例化 AnnotationConfigApplicationContext 类,接收配置参数类
IocConfig,并获取 UserService Bean 实现方法调用,此时应用环境不存在 xml 配置文件,简化了应用的
xml 配置。
3.3. 实例2 - @Bean注解使用
使用@Bean 注解声明在方法(注意:方法名⼀般为bean对象名称)级别用于返回实例化的Bean对象。
3.3.1. 创建 Bean 对象
AccountDao.java
// 注意:此时类级别并未添加 @Repository 注解
public class AccountDao {
     public void test(){
     	System.out.println("AccountDao.test...");
     }
}
3.3.2. 修改 IocConfig 配置类
添加返回AccountDao Bean对象方法
package com.xxx.springboot.config;

import com.xxx.springboot.dao.AccountDao;
import org.springframework.context.annotation.Bean;
import org.springframework.context.annotation.ComponentScan;
import org.springframework.context.annotation.Configuration;

@Configuration
@ComponentScan("com.xxx.springboot")
public class IocConfig02 {
    // 返回实例化的单例Bean对象
    @Bean//通常用于整合第三方的Bean对象,比如:数据源,第三方组件等(只需要实例化一次Bean对象)
    public AccountDao accountDao(){
        return new AccountDao();
    }
}
3.3.3. 创建启动类并执行测试
package com.xxx.springboot;

import com.xxx.springboot.config.IocConfig;
import com.xxx.springboot.config.IocConfig02;
import com.xxx.springboot.dao.AccountDao;
import com.xxx.springboot.service.UserService;
import org.springframework.context.annotation.AnnotationConfigApplicationContext;

public class Starter02 {
    public static void main(String[] args) {
        // 基于Java的配置类加载Spring的应⽤上下⽂
        AnnotationConfigApplicationContext ac = new AnnotationConfigApplicationContext(IocConfig02.class);

        // 获取配置类IocConfig对象
        IocConfig02 iocConfig02 = ac.getBean(IocConfig02.class);

        //返回布尔类型,true表示是单例,false表示不是单例
        System.out.println(ac.isSingleton("iocConfig02"));

        // 获取配置类定义的方法(通过@Bean注解标识方法,方法返回值会交给IOC维护)
        AccountDao accountDao01 = iocConfig02.accountDao();
        AccountDao accountDao02 = iocConfig02.accountDao();

        System.out.println(accountDao01 + "," + accountDao02);

        accountDao01.test();
    }
}
3.4. 实例3 - 读取外部配置文件
在开发 Java web 应用时,配置文件是比较常见的,比如 xml,properties,yml 等文件,在 Spring 应
用中对于配置文件的读取同样提供支持。对于配置文件读取,我们可以通过 @PropertySource 注解声明
到类级别来指定读取相关配置。
Spring El 表达式语言,支持在 Xml 和注解中使用表达式,类似于 JSP 中 EL 表达式,Spring 框架借助该表达式实现资源注⼊,主要通过 @Value 注解来使用表达式,通过 @Value 注解,可以实现普通字符
串,表达式运算结果,Bean 属性文件内容,属性文件等参数注入。具体使用如下:
3.4.1. 准备配置文件
src/main/resources 目录下添加 user.properties、jdbc.properties 文件
# user.properties
    user.userName=admin
    user.password=admin

# jdbc.properties
    jdbc.driver=com.mysql.jdbc.Driver
    jdbc.url=jdbc:mysql://127.0.0.1:3306/hr?useUnicode=true&characterEncoding=utf8
    jdbc.username=root
    jdbc.password=root
3.4.2. @PropertySource 加载配置文件
通过 @PropertySource 加载 properties 配置文件
package com.xxx.springboot.config;

import com.xxx.springboot.dao.AccountDao;
import org.springframework.beans.factory.annotation.Value;
import org.springframework.context.annotation.Bean;
import org.springframework.context.annotation.ComponentScan;
import org.springframework.context.annotation.Configuration;
import org.springframework.context.annotation.PropertySource;

@Configuration
@ComponentScan("com.xxx.springboot")
@PropertySource(value = {"classpath:jdbc.properties","classpath:user.properties"})
public class IocConfig03 {
    @Value("${jdbc.driver}")
    private String driver;
    @Value("${jdbc.url}")
    private String url;
    @Value("${jdbc.username}")
    private String userName;
    @Value("${jdbc.password}")
    private String password;


    // 控制台打印属性值信息
    public void showConfigInfo(){
        System.out.println("driver:" + driver + ",url:" + url);
        System.out.println("userName:" + userName + ",password:" + password);
    }
}
3.4.3. 其他Bean对象获取properties文件内容
package com.xxx.springboot.service;

import com.xxx.springboot.dao.UserDao;
import org.springframework.beans.factory.annotation.Value;
import org.springframework.stereotype.Service;

import javax.annotation.Resource;

@Service
public class UserService {
    @Resource
    private UserDao userDao;


    @Value("${user.userName}")
    private String uname;
    @Value("${user.passWord}")
    private String upwd;

    public void test(){
        System.out.println("UserService test...");
        userDao.test();

        //获取配置文件属性
        System.out.println("姓名:"+uname + "密码:" + upwd);
    }
}
启动,查看控制台输出内容效果
3.5. 组合注解与元注解
Spring 从2.x版本开始引入注解支持(目的是jdk1.5中推出注解功能),通过引⼊注解来消除大量xml 配置,Spring 引入注解主要用来注⼊ bean 以及 aop 切面相关配置,但由于注解大量使用,就会造成大量
重复注解代码出现,代码出现了重复,Spring 为了消除重复注解,在元注解上引入了组合注解,其实可
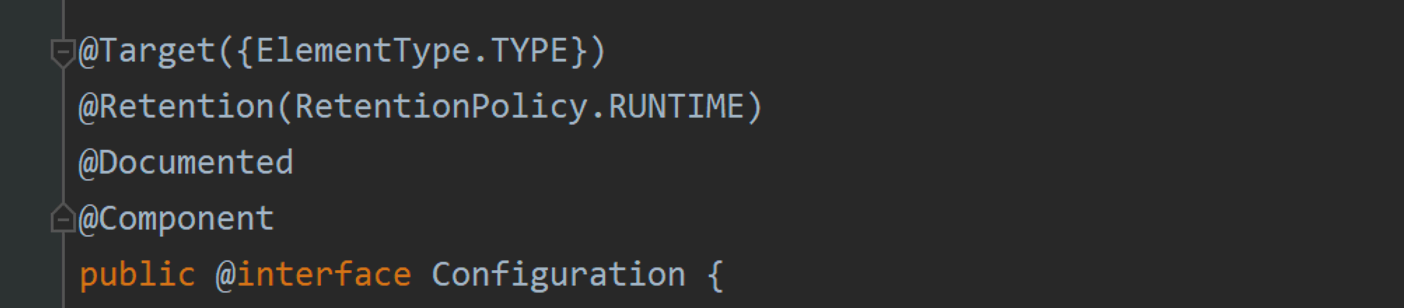
以理解为对代码的重构,相当于注解的注解,拥有元注解的原始功能,比如在定义配置类时用到的
@Configuration 注解就是组合注解,拥有 @Component 注解功能,即配置类本身也是⼀个被 IOC 维护的
单例 Bean。
3.5.1. 自定义组合注解
定义 MyCompScan 注解,拥有 @ComponentScan 扫描器注解功能
package com.xxx.springboot.annoation;


import org.springframework.context.annotation.ComponentScan;
import org.springframework.context.annotation.Configuration;

import java.lang.annotation.*;

/**
 * 组合注解MyCompScan 定义
 * 拥有元注解@Configuration + @ComponentScan 两者功能
 * 覆盖 value 属性
 */
@Target(ElementType.TYPE)
@Retention(RetentionPolicy.RUNTIME)
@Documented
@ComponentScan
public @interface MyCompScan {

    String[] value() default {};
}
3.5.2. 应用组合注解
package com.xxx.springboot.config;

import com.xxx.springboot.annoation.MyCompScan;
import org.springframework.beans.factory.annotation.Value;
import org.springframework.context.annotation.ComponentScan;
import org.springframework.context.annotation.Configuration;
import org.springframework.context.annotation.PropertySource;

@Configuration
@MyCompScan("com.xxx.springboot")
@PropertySource(value = {"classpath:jdbc.properties","classpath:user.properties"})
public class IocConfig04 {
    @Value("${jdbc.driver}")
    private String driver;
    @Value("${jdbc.url}")
    private String url;
    @Value("${jdbc.username}")
    private String userName;
    @Value("${jdbc.password}")
    private String password;


    // 控制台打印属性值信息
    public void showConfigInfo(){
        System.out.println("driver:" + driver + ",url:" + url);
        System.out.println("userName:" + userName + ",password:" + password);
    }
}
测试组合注解
package com.xxx.springboot;

import com.xxx.springboot.config.IocConfig03;
import com.xxx.springboot.config.IocConfig04;
import com.xxx.springboot.service.UserService;
import org.springframework.context.annotation.AnnotationConfigApplicationContext;

public class Starter04 {
    public static void main(String[] args) {
        // 基于Java的配置类加载Spring的应⽤上下⽂
        AnnotationConfigApplicationContext ac = new AnnotationConfigApplicationContext(IocConfig04.class);

        // 获取配置类IocConfig对象
        IocConfig04 iocConfig004 = ac.getBean(IocConfig04.class);

        //获取userService对象
        UserService userService =ac.getBean(UserService.class);
        userService.test();
    }
}
4.Spring MVC 零配置创建与部署
基于 Spring Mvc 5.X 使用 Maven 搭建 SpringMvc Web项目,通过 Spring 提供的注解与相关配置来对项
目进行创建与部署。
4.1. 创建Spring MVC Web工程
创建 Maven 的 web 项目
4.2. pom.xml 添加坐标相关配置
<!-- spring web -->
    <dependency>
      <groupId>org.springframework</groupId>
      <artifactId>spring-web</artifactId>
      <version>5.2.4.RELEASE</version>
    </dependency>
    <!-- spring mvc -->
    <dependency>
      <groupId>org.springframework</groupId>
      <artifactId>spring-webmvc</artifactId>
      <version>5.2.4.RELEASE</version>
    </dependency>
    <!-- web servlet -->
    <dependency>
      <groupId>javax.servlet</groupId>
      <artifactId>javax.servlet-api</artifactId>
      <version>3.0.1</version>
    </dependency>


    <build>
    <finalName>springboot02</finalName>
    <plugins>
      <!-- 指定Maven编译的JDK版本和编码 -->
      <plugin>
        <groupId>org.apache.maven.plugins</groupId>
        <artifactId>maven-compiler-plugin</artifactId>
        <version>3.6.2</version>
        <configuration>
          <source>1.8</source>
          <target>1.8</target>
          <encoding>utf-8</encoding>
        </configuration>
      </plugin>
    </plugins>
  </build>
4.3. 添加源代码
package com.xxx.springboot.controller;

import org.springframework.stereotype.Controller;
import org.springframework.web.bind.annotation.RequestMapping;

@Controller
public class HelloController {
    @RequestMapping("/index")
    public String index(){
        return "index";
    }
}
4.4. 添加视图
在 WEB-INF/views 目录下创建 index.jsp(这里以jsp为模板)
<%--
  Created by IntelliJ IDEA.
  User: ZhangXiaolong
  Date: 2023/3/19
--%>
<%@ page contentType="text/html;charset=UTF-8" language="java" %>
<html>
<head>
    <title>Title</title>
</head>
<body>
    <h2>Hello mvc!</h2>
</body>
</html>
4.5. SpringMVC 配置类添加
Spring Mvc 配置信息 MvcConfig 文件添加,作为 Mvc 框架环境,原来是通过 xml 来进行配置 (视图解析器、Json转换器、文件上传解析器等),这里基于注解通过继承 WebMvcConfigurerAdapter 类并重写相关
方法来进行配置 (注意通过 @EnableWebMvc 注解来启动 MVC 环境)。
package com.xxx.springboot.config;

import org.springframework.context.annotation.Bean;
import org.springframework.context.annotation.ComponentScan;
import org.springframework.context.annotation.Configuration;
import org.springframework.web.servlet.config.annotation.EnableWebMvc;
import org.springframework.web.servlet.view.InternalResourceViewResolver;

/**
 * MVC基本配置
 */
// 配置类
@Configuration
// 在@Configuration注解的配置类中添加,⽤于为该应⽤添加SpringMVC的功能
@EnableWebMvc
// 扫描包范围
@ComponentScan("com.xxx.springboot")
public class MvcConfig {
    /**
     * 配置 JSP视图解析器
     * @return
     */
    @Bean // 将⽅法返回的结果交给IOC容器维护
    public InternalResourceViewResolver viewResolver(){
        // 获取视图解析器
        InternalResourceViewResolver viewResolver = new InternalResourceViewResolver();
        // 设置前缀
        viewResolver.setPrefix("/WEB-INF/views/");
        // 设置后缀
        viewResolver.setSuffix(".jsp");
        // 返回解析器对象 (交给IOC容器进⾏维护)
        return viewResolver;
    }
}
MvcConfig 类定义好了,那么问题来了,怎么加载 MvcConfig 类呢,原来在构建 Mvc 应用时是通过容
器启动应⽤时加载 web.xml 文件实现配置文件加载,现在的环境 web.xml 文件不存在,此时基于注解方
式构建的 Mvc 应用,定义 WebInitializer 实现 WebApplicationInitializer 接口 (该接口用来配置 Servlet3.0+
配置的接口,用于替代 web.xml 配置),当 servlet 容器启动Mvc应用时会通过SpringServletContainerInitializer 接口
进行加载,从而加载 Mvc 应用信息配置。实现该接口 onStartup 方法 ,加载应用信息配置。
4.6. 入口文件代码添加
package com.xxx.springboot;

import com.xxx.springboot.config.MvcConfig;
import org.springframework.web.WebApplicationInitializer;
import org.springframework.web.context.support.AnnotationConfigWebApplicationContext;
import org.springframework.web.servlet.DispatcherServlet;

import javax.servlet.ServletContext;
import javax.servlet.ServletException;
import javax.servlet.ServletRegistration;

/**
 * 实现 WebApplicationinitializer 接⼝的类都可以在web应⽤程序启动时被加载
 */
public class WebInitializer implements WebApplicationInitializer {
    @Override
    public void onStartup(ServletContext servletContext) throws ServletException {
        // 基于Java的配置类加载Spring的应⽤上下⽂
        AnnotationConfigWebApplicationContext ctx = new AnnotationConfigWebApplicationContext();
        // 注册 Mvc 配置信息
        ctx.register(MvcConfig.class);
        // 设置 ServletContext 上下⽂信息
        ctx.setServletContext(servletContext);
        // 配置转发器 Dispatcher
        ServletRegistration.Dynamic servlet = servletContext.addServlet("dispatcher",new DispatcherServlet(ctx));
        // 设置映射路径
        servlet.addMapping("/");
        // 启动时即实例化 Bean
        servlet.setLoadOnStartup(1);
    }
}
4.7. 部署与测试
通过 Tomcat 启动项目并访问

此时地址访问成功。
当项目访问成功后,那么问题来了,如果项目中存在静态资源文件,Handler 放行处理该如何配置,
定义的拦截器怎么应用,此时关注 WebMvcConfigurationSupport 父类方法,重写相关方法即可。
5.Spring Boot 概念与特点
5.1. 框架概念
随着动态语言流行(Ruby、Scala、NodeJs等),Java 开发变得相对笨重,配置繁琐,开发效率低下,部
署流程复杂,以及第三方集成难度也相对较⼤,针对该环境,Spring Boot 被开发出来,其使用“习惯大
于配置目标”,借助Spring Boot 能够让项目快速运行起来,同时借助 Spring Boot 可以快速创建 web 应用
并独立进行部署(jar包 war 包方式,内嵌 servlet 容器),同时借助 Spring Boot 在开发应用时可以不用或
很少去进行相关 xml 环境配置,简化了开发,大大提高项目开发效率。
Spring Boot 是由 Pivotal 团队提供的全新框架,其设计目的是用来简化 Spring 应用的初始搭建以及开
发过程。该框架使用了特定的方式来进行配置,从而使开发⼈员不再需要定义样板化的配置。通过这种
方式,让 Spring Boot在蓬勃发展的快速应用开发领域 (rapid application development) 成为领导者。
5.2. 框架特点
创建独立 Spring 应用程序、嵌入式 Tomcat、Jetty 容器、无需部署 WAR 包、简化 Maven 及 Gradle 配
置、尽可能⾃动化配置 Spring、直接植⼊产品环境下的实⽤功能,比如度量指标、健康检查及扩展配
置、无需代码生成及 XML 配置等,同时 Spring Boot 不仅对 web 应用程序做了简化,还提供⼀系列的依
赖包来把其它⼀些工作做成开箱即用。
5.3. Spring Boot 快速入门
5.3.1. 环境准备:Idea、Maven、Jdk 1.8+ 、Spring Boot 2.x
5.3.2. 创建项目
通过 Maven 创建⼀个普通的 java 项目
5.3.3. 添加依赖坐标
<parent>
    <groupId>org.springframework.boot</groupId>
    <artifactId>spring-boot-starter-parent</artifactId>
    <version>2.2.2.RELEASE</version>
  </parent>
  <dependencies>
    <dependency>
      <groupId>org.springframework.boot</groupId>
      <artifactId>spring-boot-starter-web</artifactId>
    </dependency>
  </dependencies>
Spring Boot 的项目必须要将 parent 设置为 Spring Boot 的 parent,该 parent 包含了⼤量默认的配置,
简化程序的开发。
5.3.4. 导入Spring Boot的web坐标与相关插件
<plugins>
      <plugin>
        <groupId>org.springframework.boot</groupId>
        <artifactId>spring-boot-maven-plugin</artifactId>
      </plugin>
</plugins>
5.3.5. 添加源代码
package com.xxx.springboot.controller;

import org.springframework.stereotype.Controller;
import org.springframework.web.bind.annotation.RequestMapping;
import org.springframework.web.bind.annotation.ResponseBody;

@Controller
public class HelloController {
    @RequestMapping("hello")
    @ResponseBody
    public String hello(){
        return "Hello SpringBoot";
    }
}
5.3.6. 创建启动程序
在 HelloController.java 所在包下,创建 StarterApplication.java
package com.xxx.springboot.controller;

import org.springframework.boot.SpringApplication;
import org.springframework.boot.autoconfigure.SpringBootApplication;

@SpringBootApplication
public class Starter{
    public static void main(String[] args) {
        SpringApplication.run(Starter.class);
    }
}
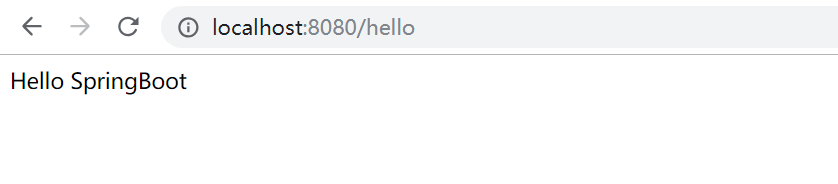
5.3.7. 启动Spring Boot用并测试
这⾥运行main 方法即可,通过浏览器访问 http://localhost:8080/hello 效果如下:
6.Spring Boot 核心配置
6.1. 设置 Banner 图标
在搭建 Spring Boot 项目环境时,程序启动后会在控制台打印醒目的 SpringBoot 图标,图标描述了
Spring Boot 版本信息,这是 Spring Boot 项目与 Spring 项目启动区别较大的地方,Spring Boot 通过默认
Banner 在程序启动时显示应用启动图标,当然图标我们也可以进行自定义。
6.1.1. Banner 图标自定义
Spring Boot 项目启动时默认加载 src/main/resources 目录下的 banner.txt 图标文件,如果该目录文件未提供,则使用 Spring Boot 默认。在 main 目录下新建 resources 资源目录,并在该目录下新建banner.txt
文本文件,可以设置自定义图标。
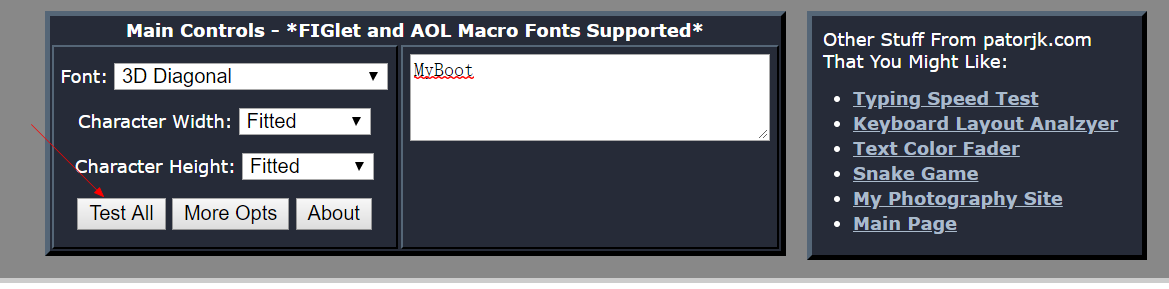
打开网址:
标对应文本并将文本内容copy 到 banner.txt 中
启动Spring Boot 应⽤打印如下:

6.1.2. Banner 图标关闭
如果启动时不想要看到启动图标 ,这里也可以通过代码进行关闭操作,修改 StarterApplication 设置
BannerMode 值为 Banner.Mode.OFF,启动 Spring Boot 应用关闭图标输出功能即可
package com.xxx.springboot.controller;

import org.springframework.boot.Banner;
import org.springframework.boot.SpringApplication;
import org.springframework.boot.autoconfigure.SpringBootApplication;

@SpringBootApplication
public class Starter{
    public static void main(String[] args) {
        //SpringApplication.run(Starter.class);

        SpringApplication application = new SpringApplication(Starter.class);
        //设置Banner  图标关闭
        application.setBannerMode(Banner.Mode.OFF);
        application.run();
    }
}
6.2. Spring Boot 配置文件
Spring Boot 默认会读取全局配置文件,配置文件名固定为:application.properties 或 application.yml,
放置在 src/main/resources 资源目录下,使用配置文件来修改 SpringBoot 自动配置的默认值。
在 resources 资源目录下添加 application.properties 文件,配置信息如下:
## 项⽬启动端⼝号配置
server.port=8989
## 项⽬访问上下⽂路径
server.servlet.context-path=/mvc
## 数据源配置
spring.datasource.driver-class-name=com.mysql.cj.jdbc.Driver
spring.datasource.url=jdbc:mysql://127.0.0.1:3306/hr?
useUnicode=true&characterEncoding=utf8
spring.datasource.username=root
spring.datasource.password=root
或者 application.yml 文件
## 端⼝号 上下⽂路径
server:
 port: 8989
 servlet:
 	context-path: /mvc

## 数据源配置
spring:
 datasource:
 type: com.mchange.v2.c3p0.ComboPooledDataSource
 driver-class-name: com.mysql.cj.jdbc.Driver
 url: jdbc:mysql://127.0.0.1:3306/hr
 username: root
 password: root
6.3. Starter 坐标 & 自动化配置
6.3.1. Starter坐标配置
Spring Boot 引入了全新的Starter坐标体系,简化企业项目开发大部分场景的 Starter pom,应用程序引
入指定场景的 Start pom 相关配置就可以消除 ,通过 Spring Boot 就可以得到⾃动配置的 Bean。
6.3.1.1. Web starter
使用 Spring MVC 来构建 RESTful Web 应用,并使用 Tomcat 作为默认内嵌容器
<dependency>
      <groupId>org.springframework.boot</groupId>
      <artifactId>spring-boot-starter-web</artifactId>
</dependency>
6.3.1.2. Freemarker Starter & Thymeleaf starter
集成视图技术,引入 Freemarker Starter , Thymeleaf Starter
<dependency>
      <groupId>org.springframework.boot</groupId>
      <artifactId>spring-boot-starter-freemarker</artifactId>
</dependency>


<dependency>
 	<groupId>org.springframework.boot</groupId>
 	<artifactId>spring-boot-starter-thymeleaf</artifactId>
</dependency>
6.3.1.3. JavaMail邮件发送 Starter
<dependency>
 	<groupId>org.springframework.boot</groupId>
 	<artifactId>spring-boot-starter-mail</artifactId>
</dependency>
6.3.1.4. 引入AOP环境
<dependency>
 	<groupId>org.springframework.boot</groupId>
 	<artifactId>spring-boot-starter-aop</artifactId>
</dependency>
相关starter系列坐标参考
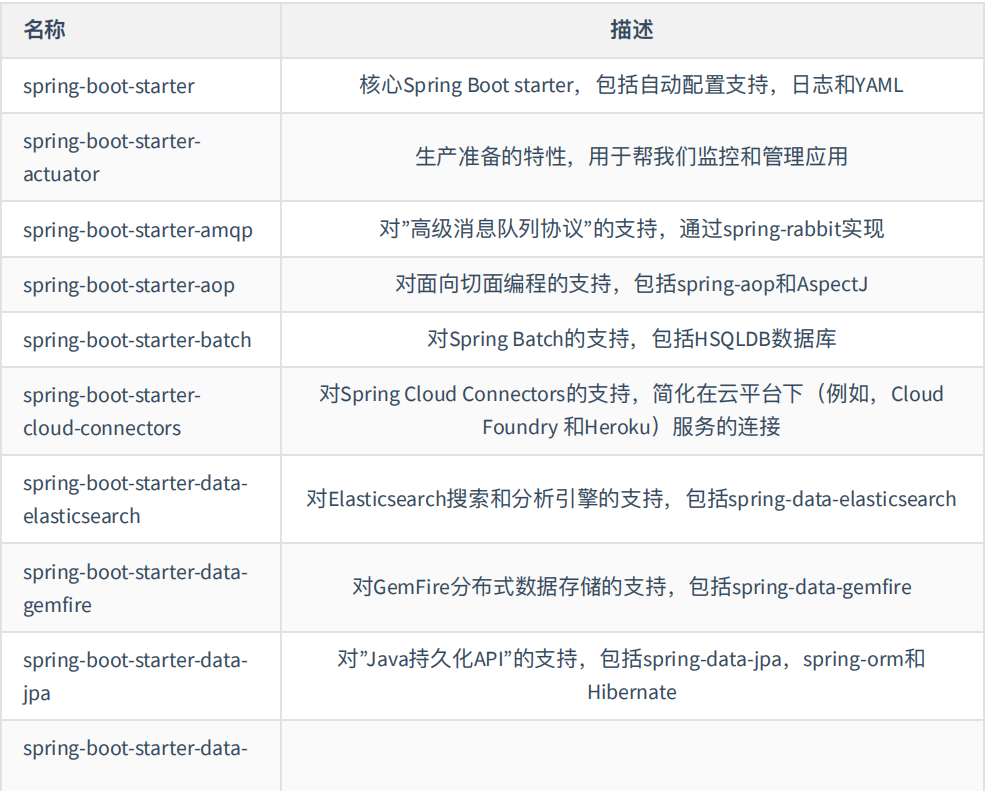
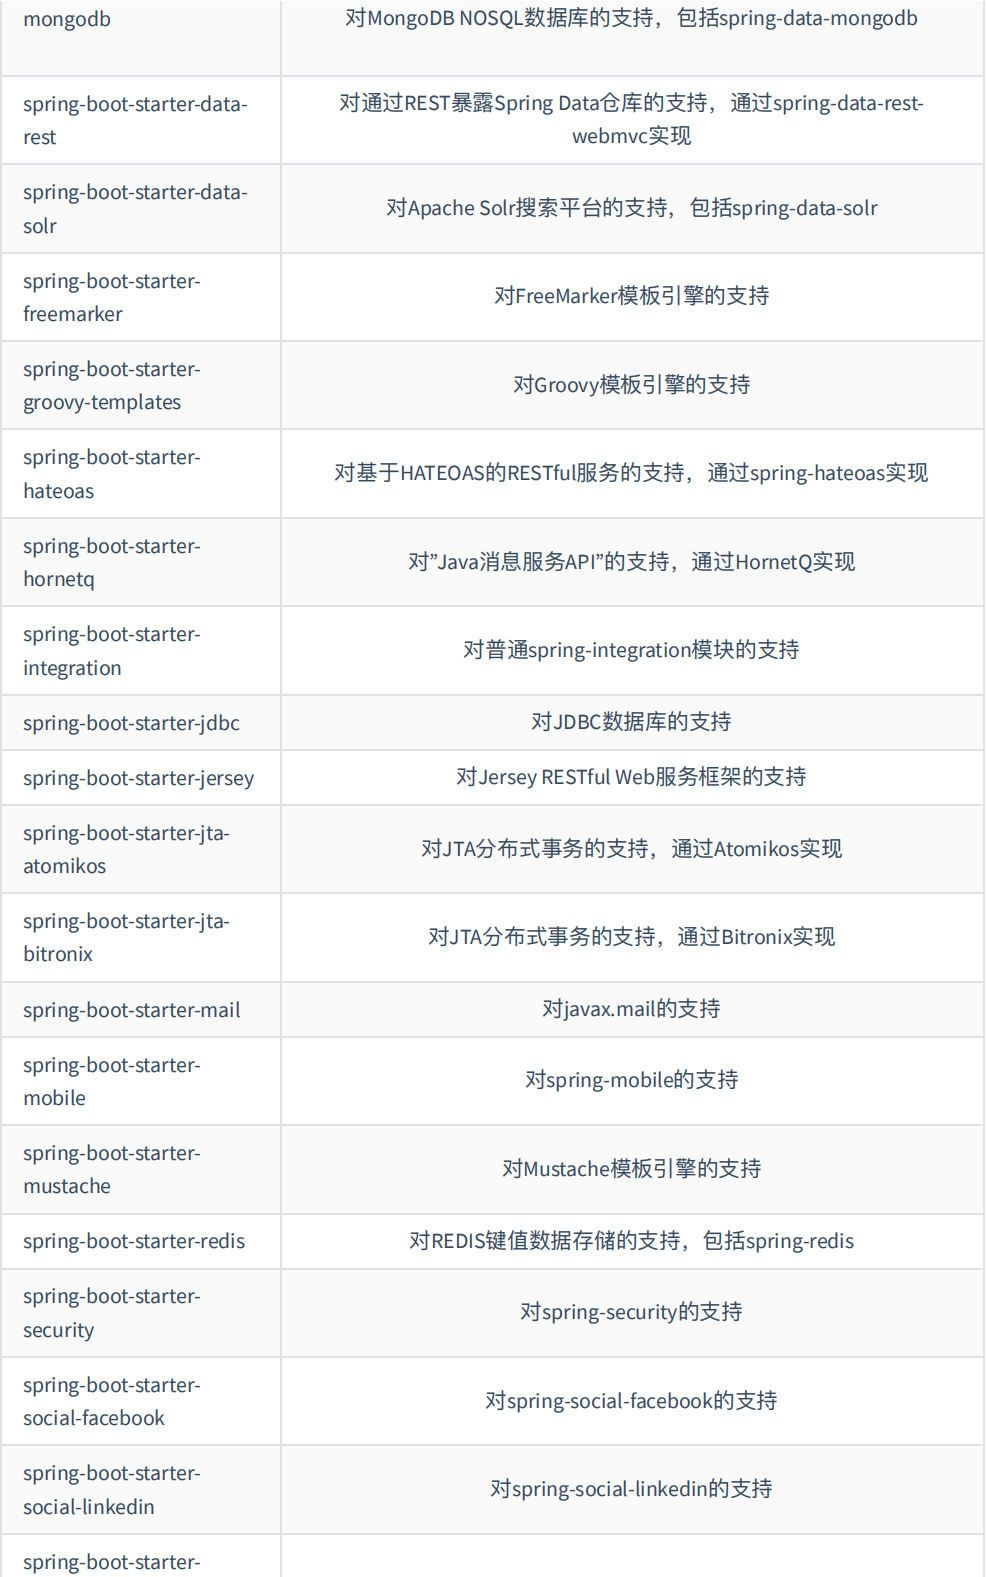
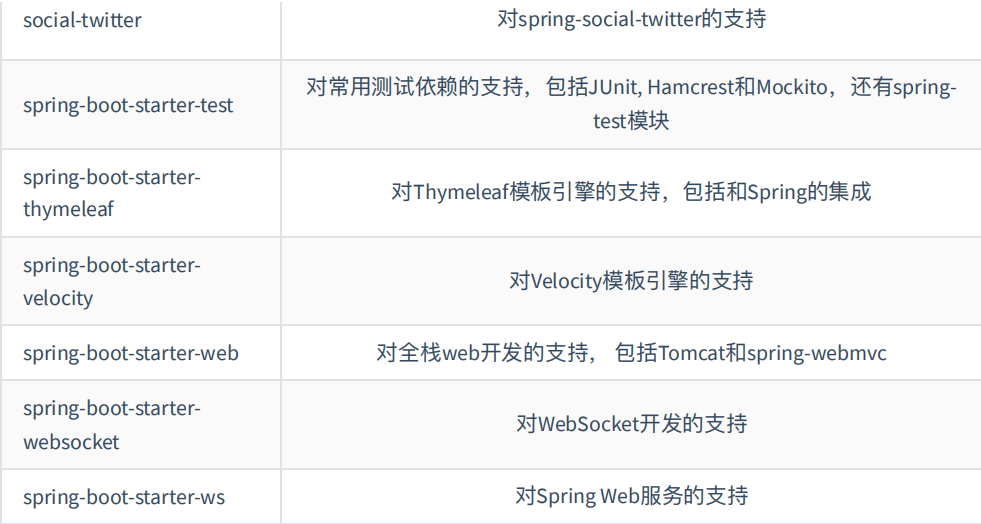
传统的 maven 坐标这⾥同样适⽤,如果引入传统 maven 坐标需要考虑相关配置类的编写。
如果引入相关starter坐标这里不存在,可以到这⾥搜索。
6.3.2. 自动化配置
6.3.2.1. SpringBoot Starter坐标版本查看
前面介绍了 SpringBoot Starter 相关坐标,引⼊ Starter 坐标来简化应用环境的配置。这里以环境搭建
spring-boot-starter-web 坐标来简单分析 SpringBoot 自动化配置过程。
<dependency>
 	<groupId>org.springframework.boot</groupId>
 	<artifactId>spring-boot-starter-web</artifactId>
</dependency>
这里引入的 web 环境坐标不像传统的maven坐标那样包含坐标的版本号,项⽬中引⼊的 starter 系列坐
标对应的版本库统⼀由父工程坐标统⼀控制即项目中引入的 parent 标签。
<parent>
     <groupId>org.springframework.boot</groupId>
     <artifactId>spring-boot-starter-parent</artifactId>
     <!--
     ⽗类项⽬统⼀对项⽬依赖版本统⼀控制!
     -->
     <version>2.2.2.RELEASE</version>
</parent>
这里 spring-boot-starter-parent 继承 spring-boot-dependencies 项目,在 spring-boot-dependencies 项⽬
中定义了 spring-boot-starter-web 坐标的版本!(spring-boot-dependencies 项目中定义了当前
SpringBoot版本下各个 starter 坐标版本以及依赖的其他坐标版本)
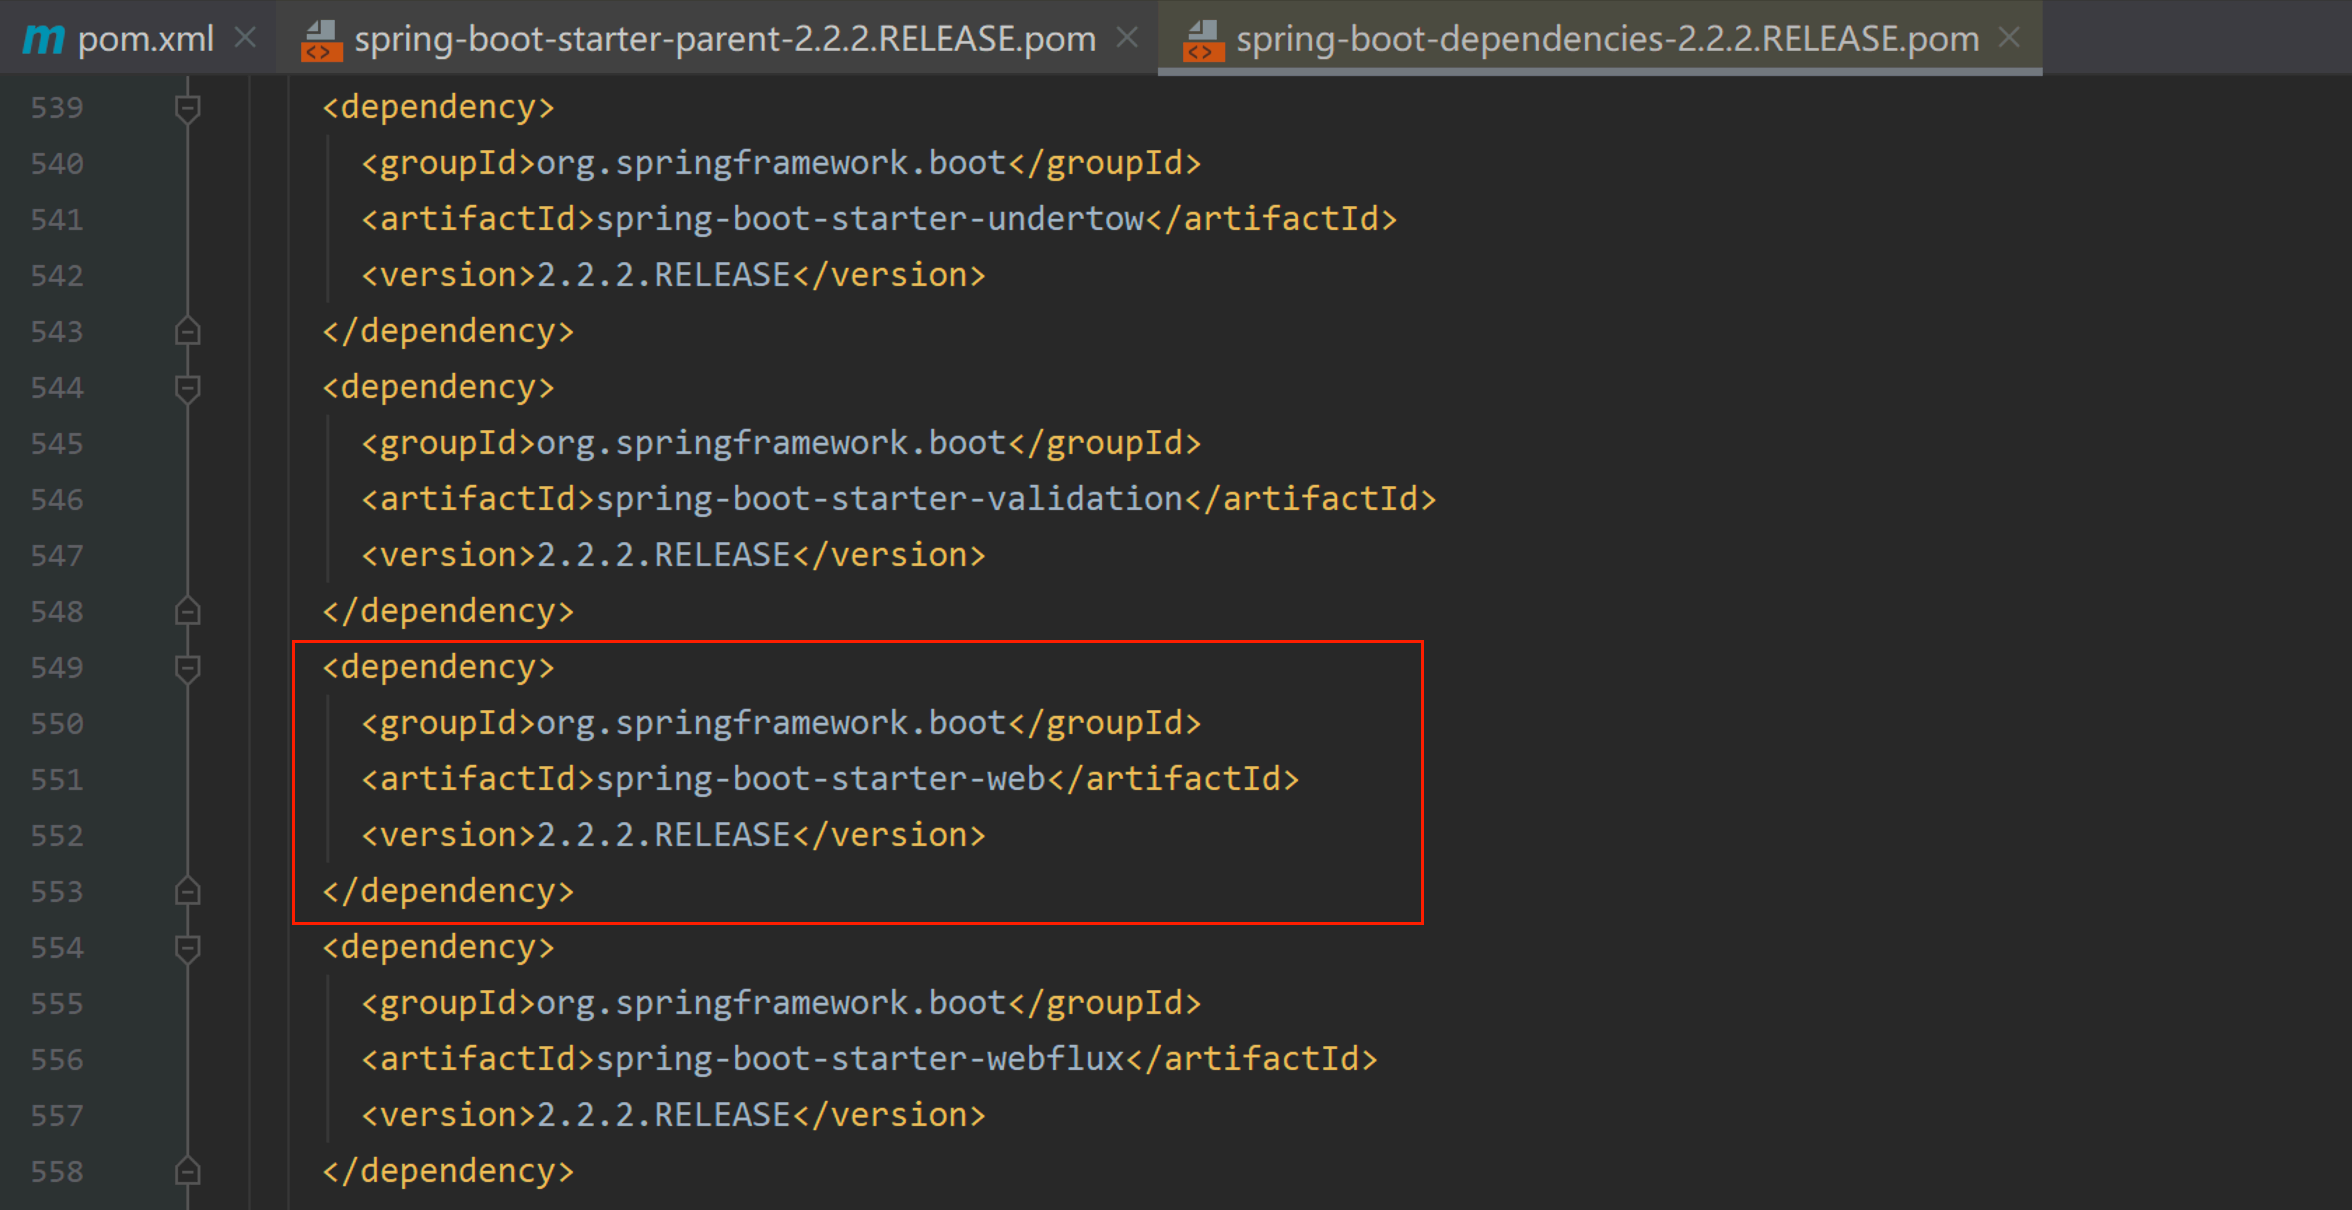
这里依赖的坐标较多,不在截图展示,可关注 spring-boot-dependencies-2.2.2.RELEASE.pom ⽂件。
6.3.2.2. Spring Boot自动化配置
Spring Boot的项目⼀般都会有 Application 的入口类,入口类中提供 main 方法,这是⼀个标准的 Java
应⽤程序的入口方法。@SpringBootApplication 注解是 Spring Boot 的核心注解,它其实是⼀个组合注解:
@SpringBootApplication
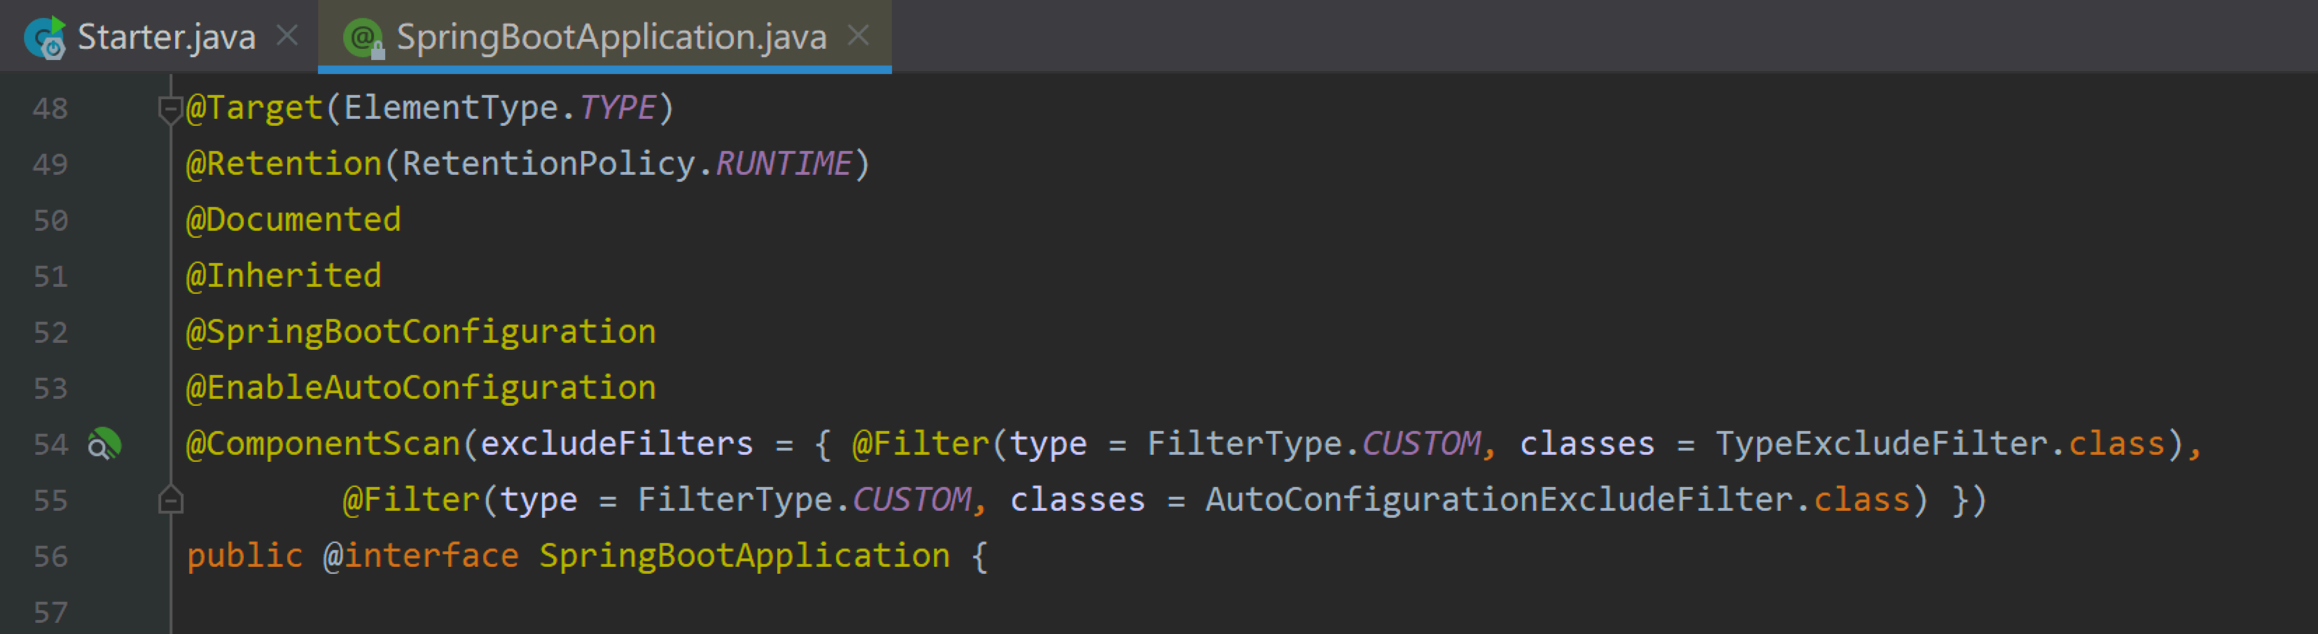
可以看出该注解也是⼀个组合注解,组合了 @Configuration 注解,对于Spring Boot应用,@SpringBootConfiguration
注解属于Boot 项⽬的配置注解也是属于⼀个组合注解,Spring Boot 项目中推荐使用@SpringBootConfiguration 注解,
因为其组合了 @Configuration 注解。
@EnableAutoConfiguration

@EnableAutoConfiguration 注解组合了 @AutoConfigurationPackage、
@Import(AutoConfigurationImportSelector.class) 注解。
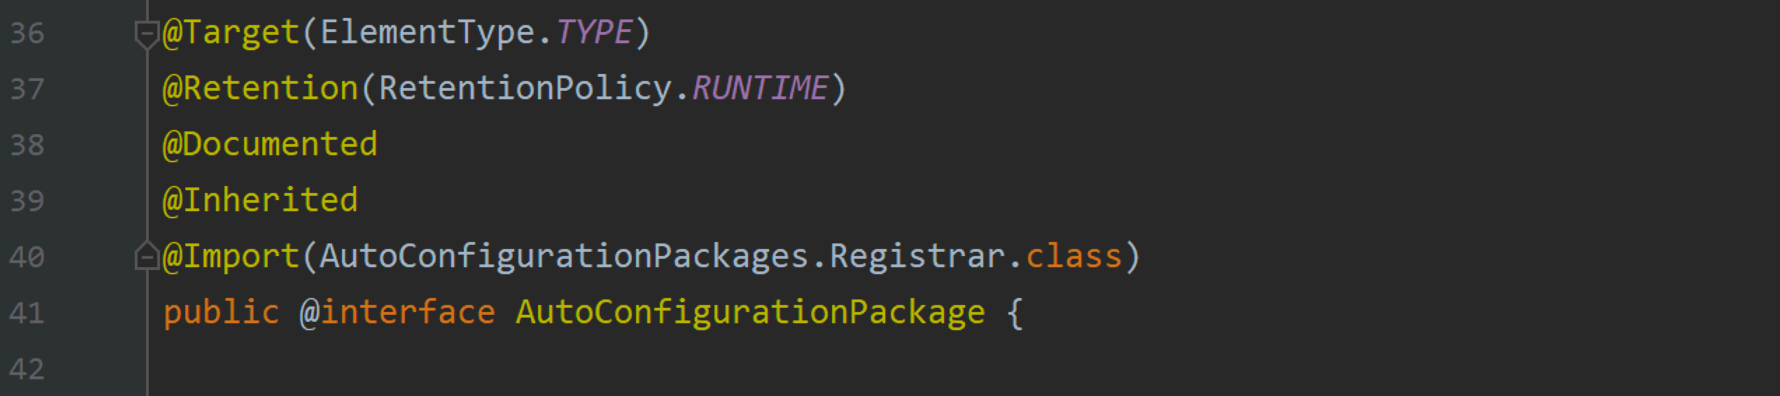
@AutoConfigurationPackage 底层也是⼀个 @Import(AutoConfigurationPackages.Registrar.class),其会把
启动类的包下组件都扫描到Spring容器中。
@Import(AutoConfigurationImportSelector.class) ⾃动配置的核⼼类
AutoConfigurationImportSelector.class,该类导⼊⼤量的⾃动配置类,debug可以发现,其读取的是
classpath下的 META-INF/spring.factories 下配置⽂件。
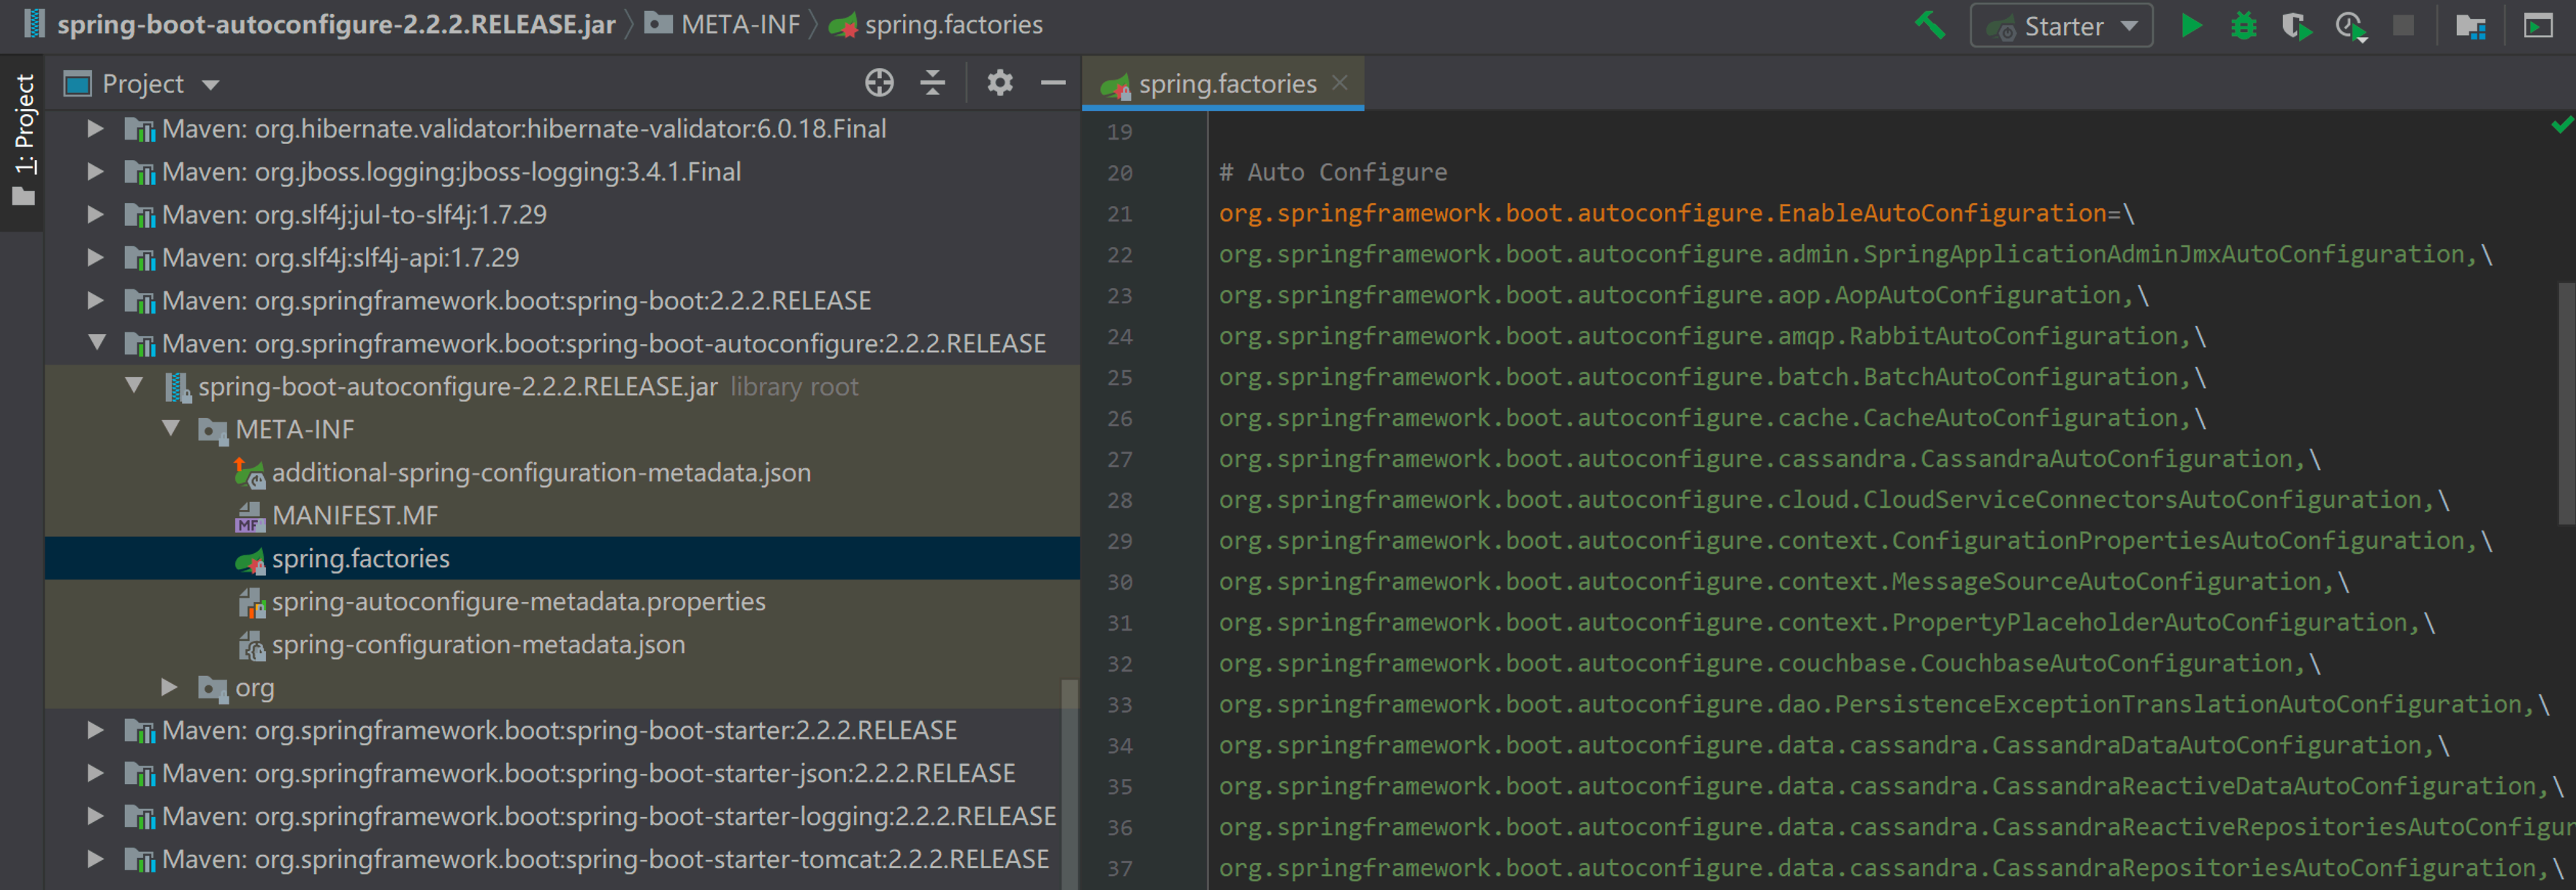
以 WebMvcAutoConfiguration 为例,可以看出该类使⽤ @Configuration 注解进⾏标注其为⼀个配置类。
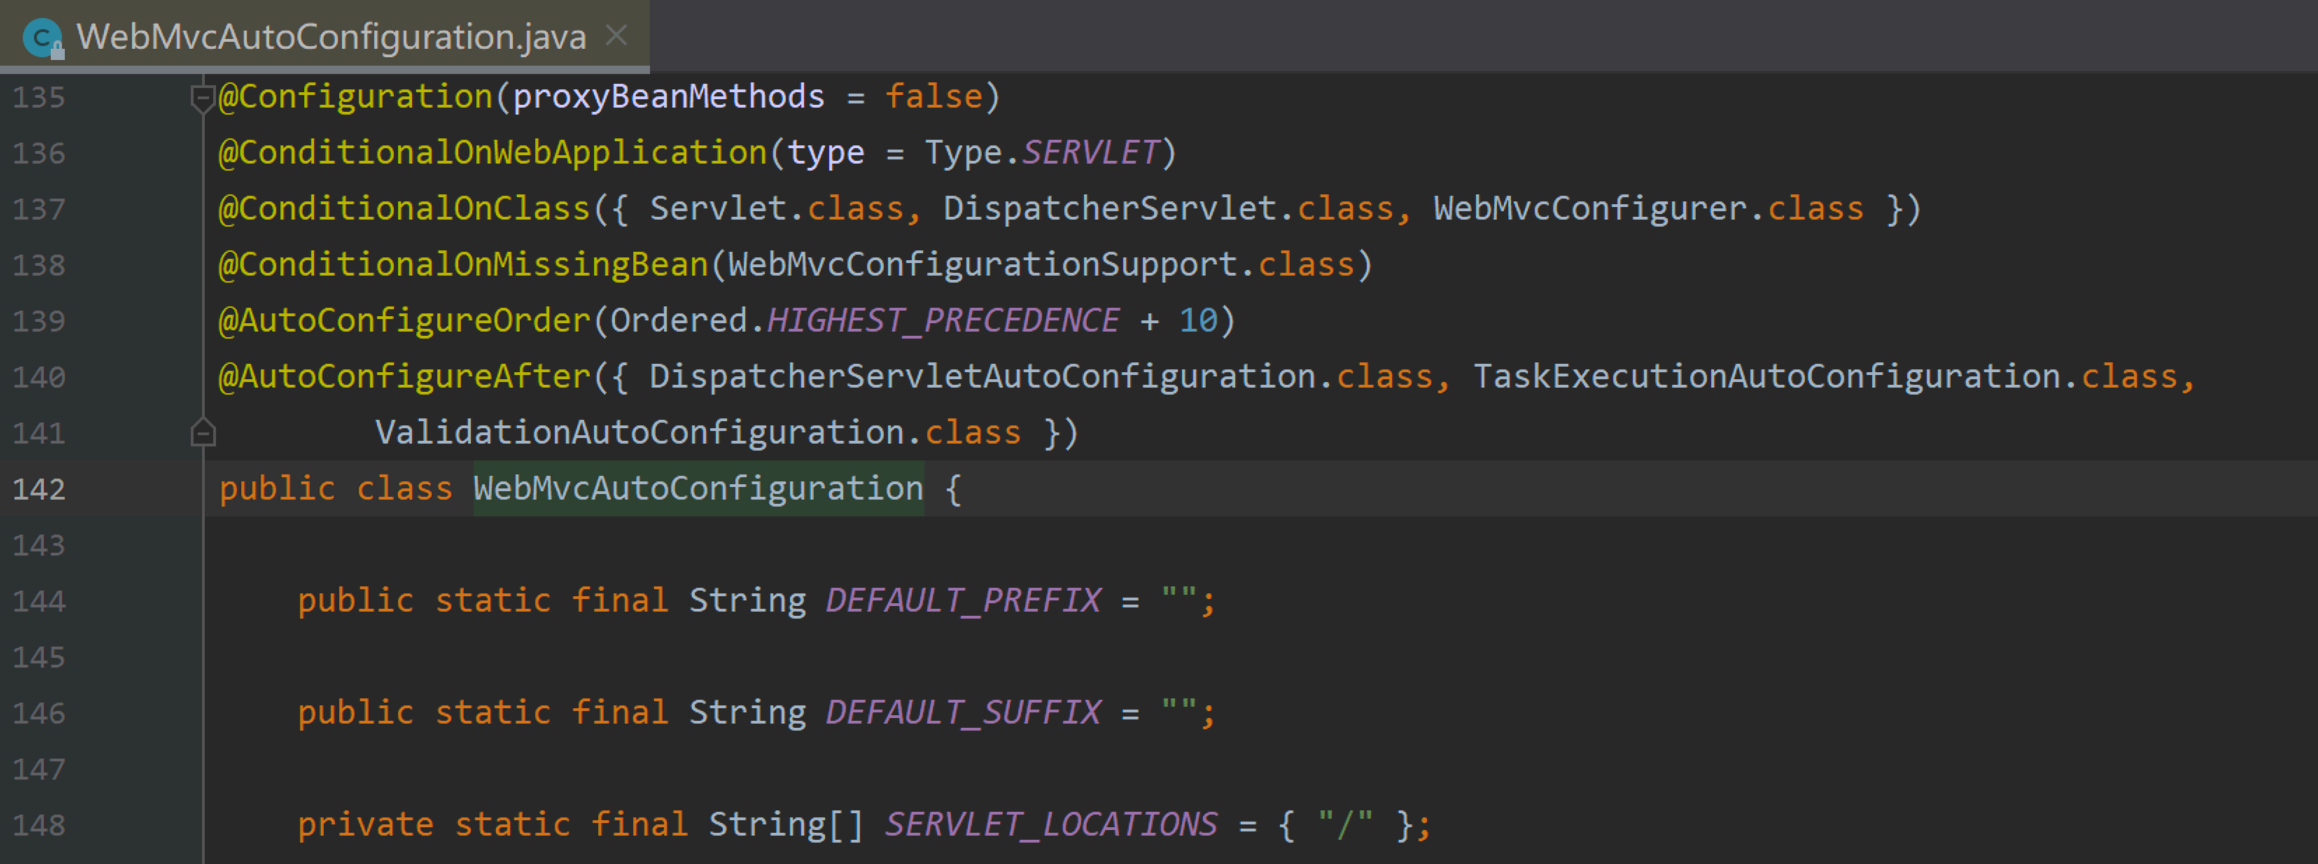
当然 spring.factories 文件中配置类默认不会都生效,具体哪些配置类生效由配置类上标注的
@ConditionalOnClass 注解来决定,这里了解下 @ConditionalOnClass 注解含义。
@ConditionalOnBean // 当给定的在bean存在时,则实例化当前Bean

@ConditionalOnMissingBean // 当给定的在bean不存在时,则实例化当前Bean

@ConditionalOnClass // 当给定的类名在类路径上存在,则实例化当前Bean

@ConditionalOnMissingClass // 当给定的类名在类路径上不存在,则实例化当前Bean
意味着 WebMvcAutoConfiguration 配置类生效需要环境中存在 Servlet.class,DispatcherServlet.class,
WebMvcConfigurer.class 实例,配置类才会生效。
从以上分析可以得出如下结论:
Spring Boot 通过 maven 中的 starter 导入了所需场景下的 jar 包,并通过主启动类上的
@SpringBootApplication 中的 @EnableAutoConfiguration 读取了类路径下的 META INF/
spring.factories下 EnableAutoConfiguration 的配置类,这些配置类使用@ConditionalOnClass 来标注,
根据@ConditionalOnClass 标注的约束条件来引入自动化的环境配置
6.4. Profile 配置
Profile 是 Spring ⽤来针对不同环境对不同配置提供支持的全局 Profile 配置使用 application-
{profile}.yml,比如 application-dev.yml ,application-test.yml。
通过在 application.yml 中设置 spring.profiles.active=test|dev|prod 来动态切换不同环境,具体配置如下:
application-dev.yml 开发环境配置文件
#本地环境
## 端⼝号 上下⽂路径
server:
  port: 8181
  servlet:
    context-path: /mvc
application-test.yml 测试环境配置文件
#测试环境
## 端⼝号 上下⽂路径
server:
  port: 8989
  servlet:
    context-path: /mvc
application-prod.yml 生产环境配置文件
#本地环境
## 端⼝号 上下⽂路径
server:
  port: 9999
  servlet:
    context-path: /mvc
application.yml 主配置文件
spring:
 profiles:
  active: prod
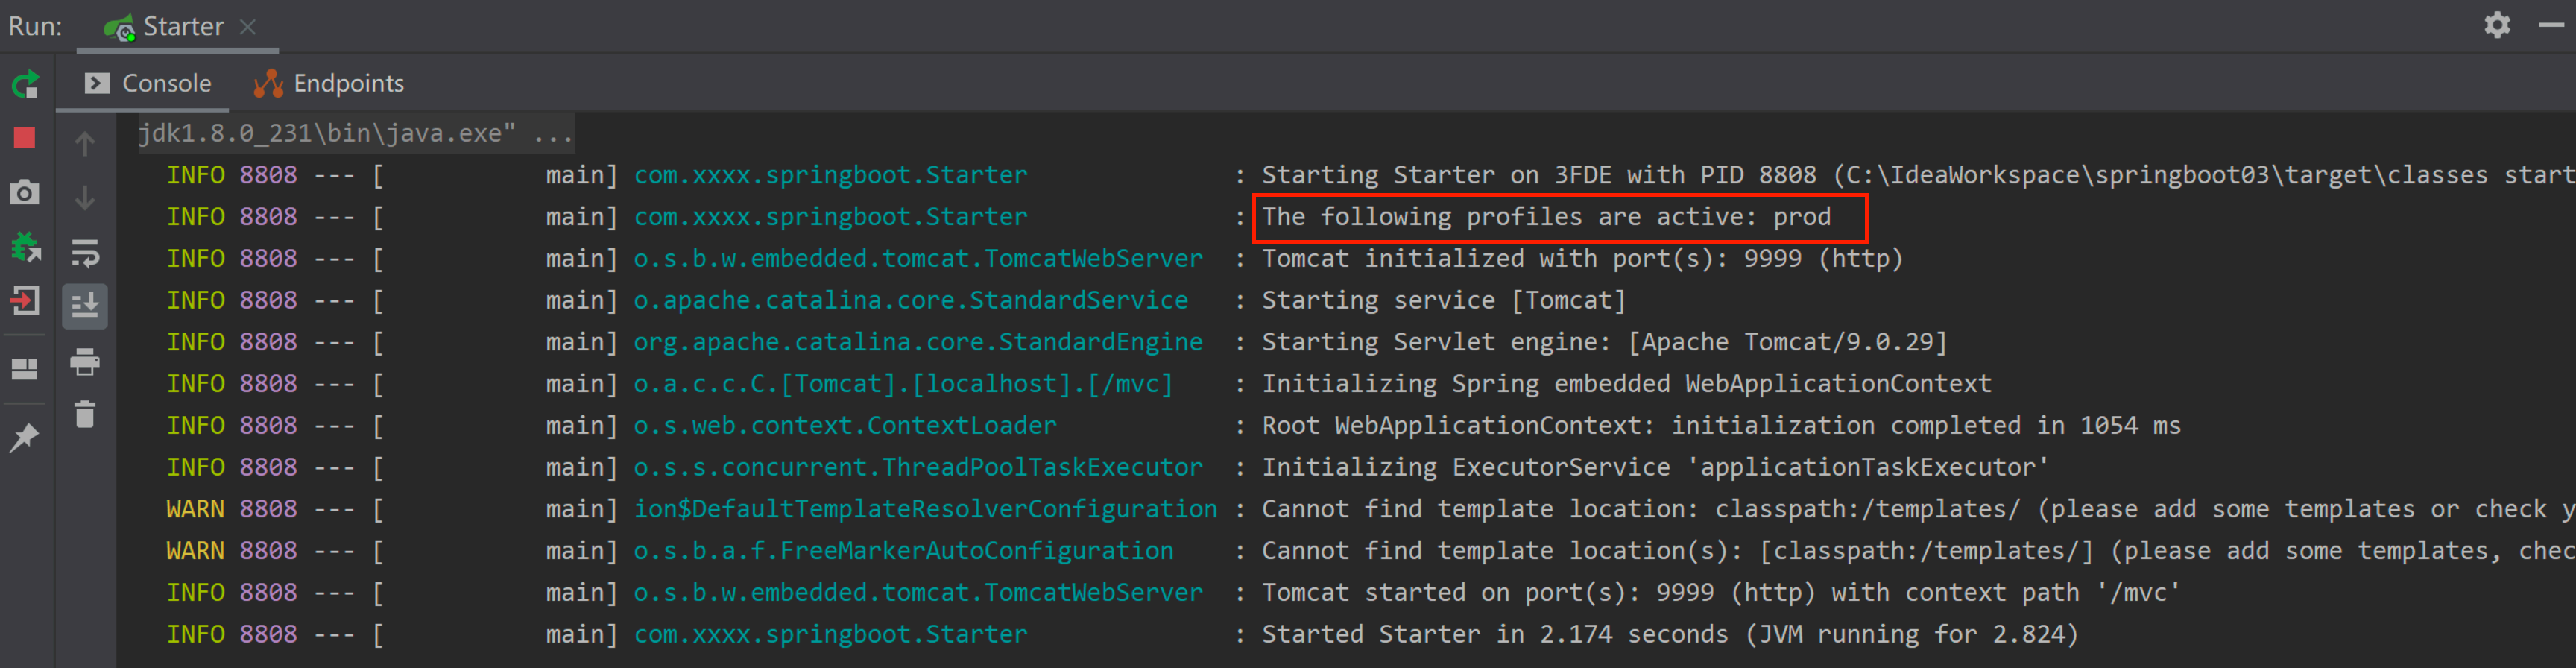
启动Starter 查看控制台输⼊效果
修改 application.yml 设置 active 值为 prod
## 环境选择配置
spring:
 profiles:
 active: prod
启动Starter 再次查看控制台输⼊效果
6.5. 日志配置
在开发企业项目时,日志的输出对于系统 bug 定位无疑是⼀种比较有效的方式,也是项目后续进⼊生
产环境后快速发现错误解决错误的⼀种有效⼿段,所以⽇志的使⽤对于项⽬也是⽐较重要的⼀块功能。
Spring Boot 默认使用 LogBack 日志系统,如果不需要更改为其他日志系统如 Log4j2 等,则无需多余的
配置,LogBack 默认将日志打印到控制台上。如果要使⽤ LogBack,原则上是需要添加 dependency 依赖的。
<dependency>
 	<groupId>org.springframework.boot</groupId>
 	<artifactId>spring-boot-starter-logging</artifactId>
</dependency>
因为新建的 Spring Boot 项⽬⼀般都会引用 spring-boot-starter 或者 spring-boot-starter web ,而这两个起步依赖中都已经包含了对于 spring-boot-starter-logging 的依赖,所以,无需额外添加依赖。
6.5.1. 项目中日志信息输出
Starter 启动类中添加 Log ⽇志类,控制台打印⽇志信息。
package com.xxx.springboot;
import org.slf4j.Logger;
import org.slf4j.LoggerFactory;
import org.springframework.boot.Banner;
import org.springframework.boot.SpringApplication;
import org.springframework.boot.autoconfigure.SpringBootApplication;
@SpringBootApplication
public class Starter{
private static Logger logger = LoggerFactory.getLogger(Starter.class);
public static void main(String[] args) {
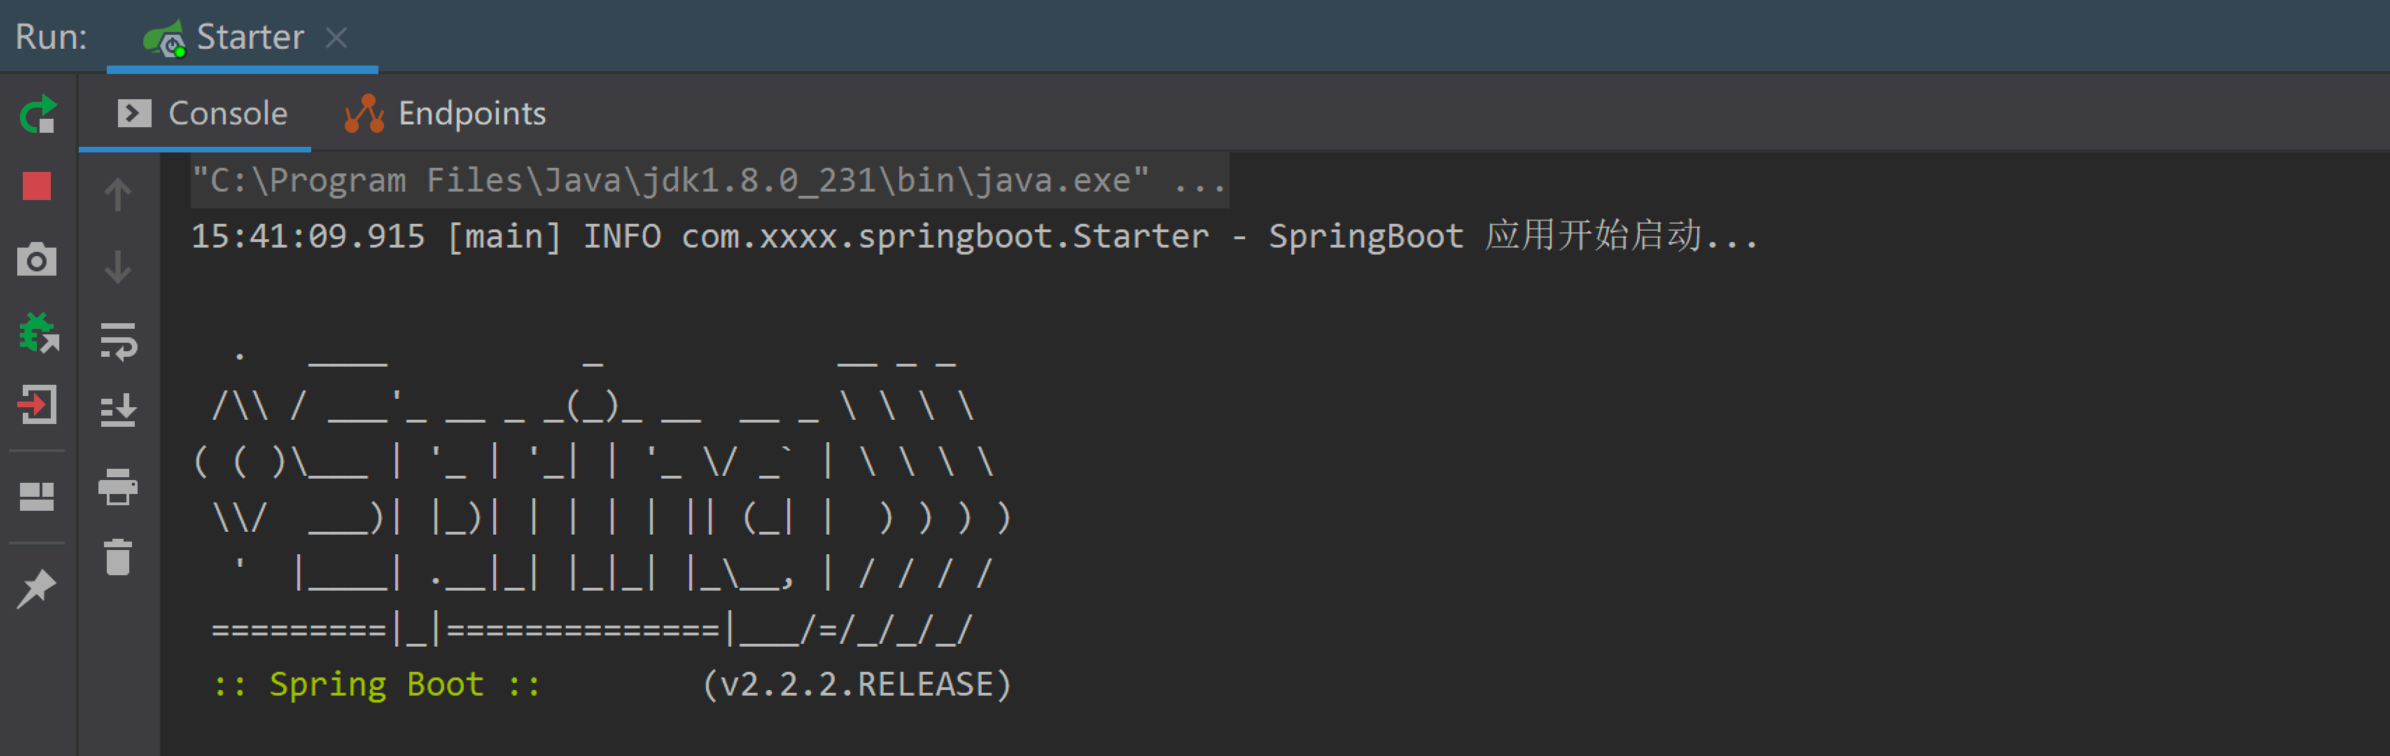
//使用日志
logger.info("SpringBoot 应用正在启动。。。");
//SpringApplication.run(Starter.class);
SpringApplication application = new SpringApplication(Starter.class);
//设置Banner 图标关闭
application.setBannerMode(Banner.Mode.OFF);
application.run();
}
}
6.5.2. 日志输出格式配置
修改 application.yml 文件添加日志输出格式信息配置,可以修改 application.yml ⽂件来控制控制台日
志输出格式,同时可以设置日志信息输出到外部文件。
logging:
     pattern:
     console: "%d{yyyy-MM-dd HH:mm:ss} [%thread] %-5level %logger- %msg%n"
     level: debug
     file:
     path: "."
     name: "springboot.log"
更多日志输出,参考官网
7.Freemarker & Thymeleaf 视图集成
7.1. Freemarker 视图集成
SpringBoot 内部支持 Freemarker 视图技术的集成,并提供了自动化配置类FreeMarkerAutoConfiguration,借助自动化配置可以很方便的集成 Freemarker基础到 SpringBoot 环境
中。这里借助入门项目引⼊ Freemarker 环境配置。
Starter 坐标引入
<dependency>
 <groupId>org.springframework.boot</groupId>
 <artifactId>spring-boot-starter-freemarker</artifactId>
</dependency>
添加 Freemarker 配置信息
Freemarker 默认默认视图路径文 resources/templates 目录(由自动化配置类 FreemarkerProperties
决定),该目录可以进行在 application.yml 中进行修改。
spring:
     freemarker:
         suffix: .ftl
         content-type: text/html
         charset: UTF-8
         template-loader-path: classpath:/views/
编写IndexController 控制器转发视图
package com.xxx.springboot.controller;
import org.springframework.stereotype.Controller;
import org.springframework.web.bind.annotation.RequestMapping;

@Controller
public class IndexController {
    @RequestMapping("/index")
    public String index(){
        return "index";
    }
}
views 目录下添加 index.ftl 视图

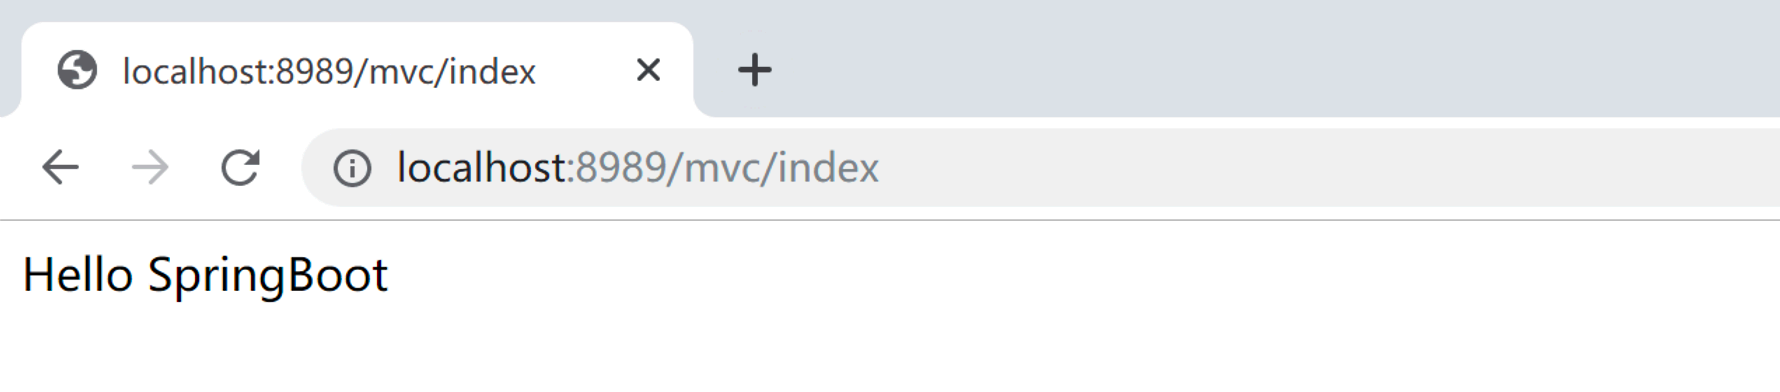
启动Starter访问
7.2. Thymeleaf 视图集成
SpringBoot 支持多种视图技术集成,并且 SpringBoot 官网推荐使用 Thymeleaf 作为前端视图页面,这
里实现Thymeleaf 视图集成,借助入门项目引入 Thymeleaf 环境配置。
-
starter坐标引入
<dependency>
 	<groupId>org.springframework.boot</groupId>
 	<artifactId>spring-boot-starter-thymeleaf</artifactId>
</dependency>-
添加 Thymeleaf 配置信息
Thymeleaf 默认默认视图路径 resources/templates 目录(由⾃动化配置类 ThymeleafProperties 类
决定),该目录可以进行在 application.yml 中进行修改。

## 环境选择配置
spring:
     thymeleaf:
     	prefix: classpath:/html/
     	## 关闭 thymeleaf ⻚⾯缓存
     	cache: false
-
编写 IndexController 控制器转发视图
package com.xxx.springboot.controller;
import org.springframework.stereotype.Controller;
import org.springframework.ui.Model;
import org.springframework.web.bind.annotation.RequestMapping;

@Controller
public class IndexController {
    /**
     * FreeMarker视图
     * @return
     */
    /*@RequestMapping("/index")
    public String index(){
        return "index";
    }*/

    @RequestMapping("/index")
    public String index(Model model){
        // 设置请求域的值
        model.addAttribute("msg","Hello SpringBoot");
        return "index";
    }
}
-
html 目录下添加 index.html 视图
修改 Thymeleaf 模板默认存放路径 (在 resources 目录下创建 html ⽂件夹)
<!DOCTYPE html>
<html lang="en" xmlns:th="http://www.thymeleaf.org">
<head>
    <meta charset="UTF-8">
    <title>Thymeleaf视图</title>
</head>
<body>
<!-- 获取请求域的值 -->
<h2 th:text="${msg}"></h2>
</body>
</html>
启动Starter访问
8.SpringBoot 静态资源访问
从入门项目中可以看到:对于 Spring Mvc 请求拦截规则为 '/' ,Spring Boot 默认静态资源路径如下:

即:我们可以在 resources 资源目录下存放 web 应用静态资源文件。
8.1. 默认静态资源路径
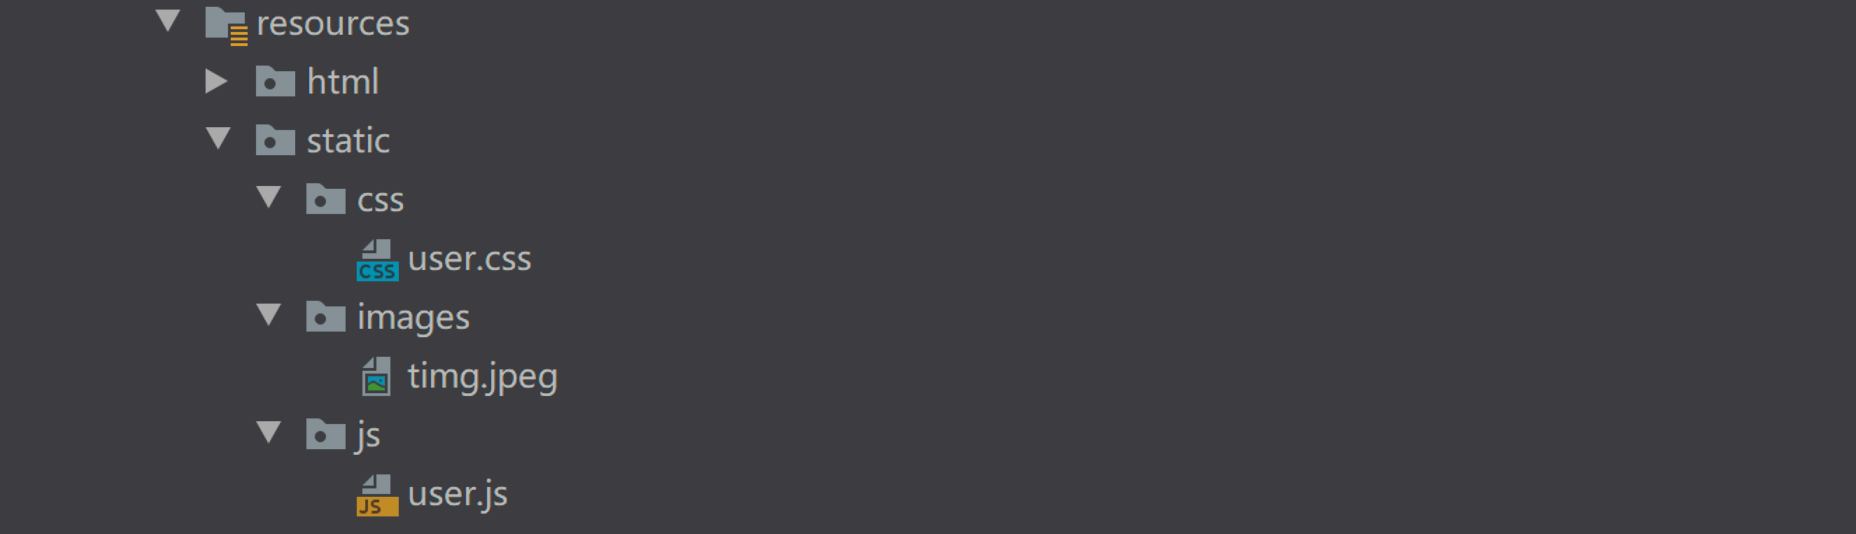
在 resources 目录下创建 static 或者 public 目录,存放 images、js、css 等静态资源文件
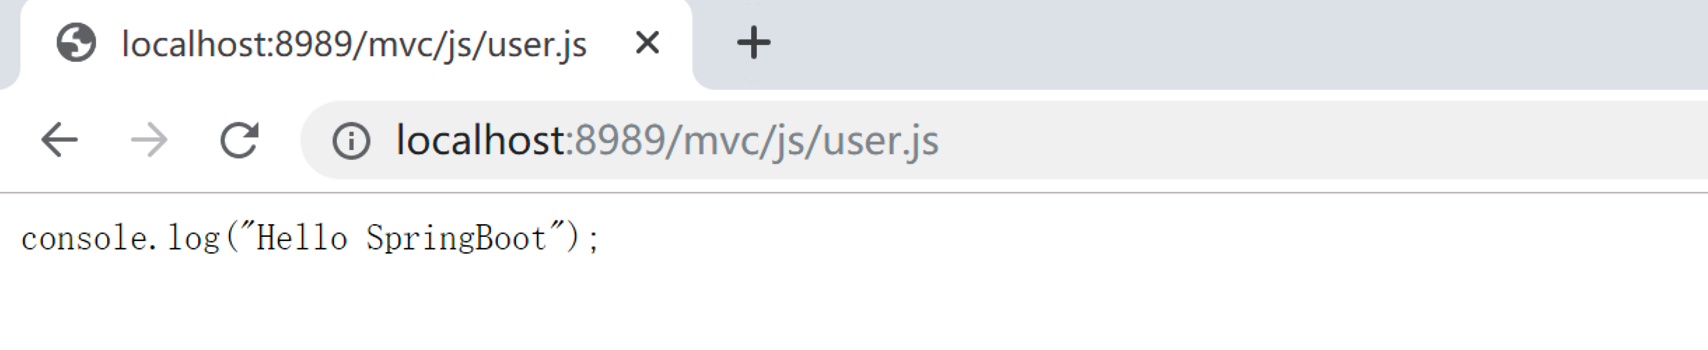


在视图中使用静态资源
8.2. 自定义静态资源路径
在 spring.resources.static-locations 后⾯追加⼀个配置 classpath:/os/
spring:
   # 修改默认的静态寻址资源⽬录 多个路径之间⽤逗号隔开
   resources:
      static-locations: classpath:/public/,classpath:/static/,classpath:/os/
9.SpringBoot 应用打包与部署
当项目开发完毕进行部署上线时,需要对目进行打包操作,入门中构建的项目属于普通应用,由于
SpringBoot 内嵌 Tomcat 容器,所有打包后的 jar 包默认可以自行运行。
9.1. Jar 包部署
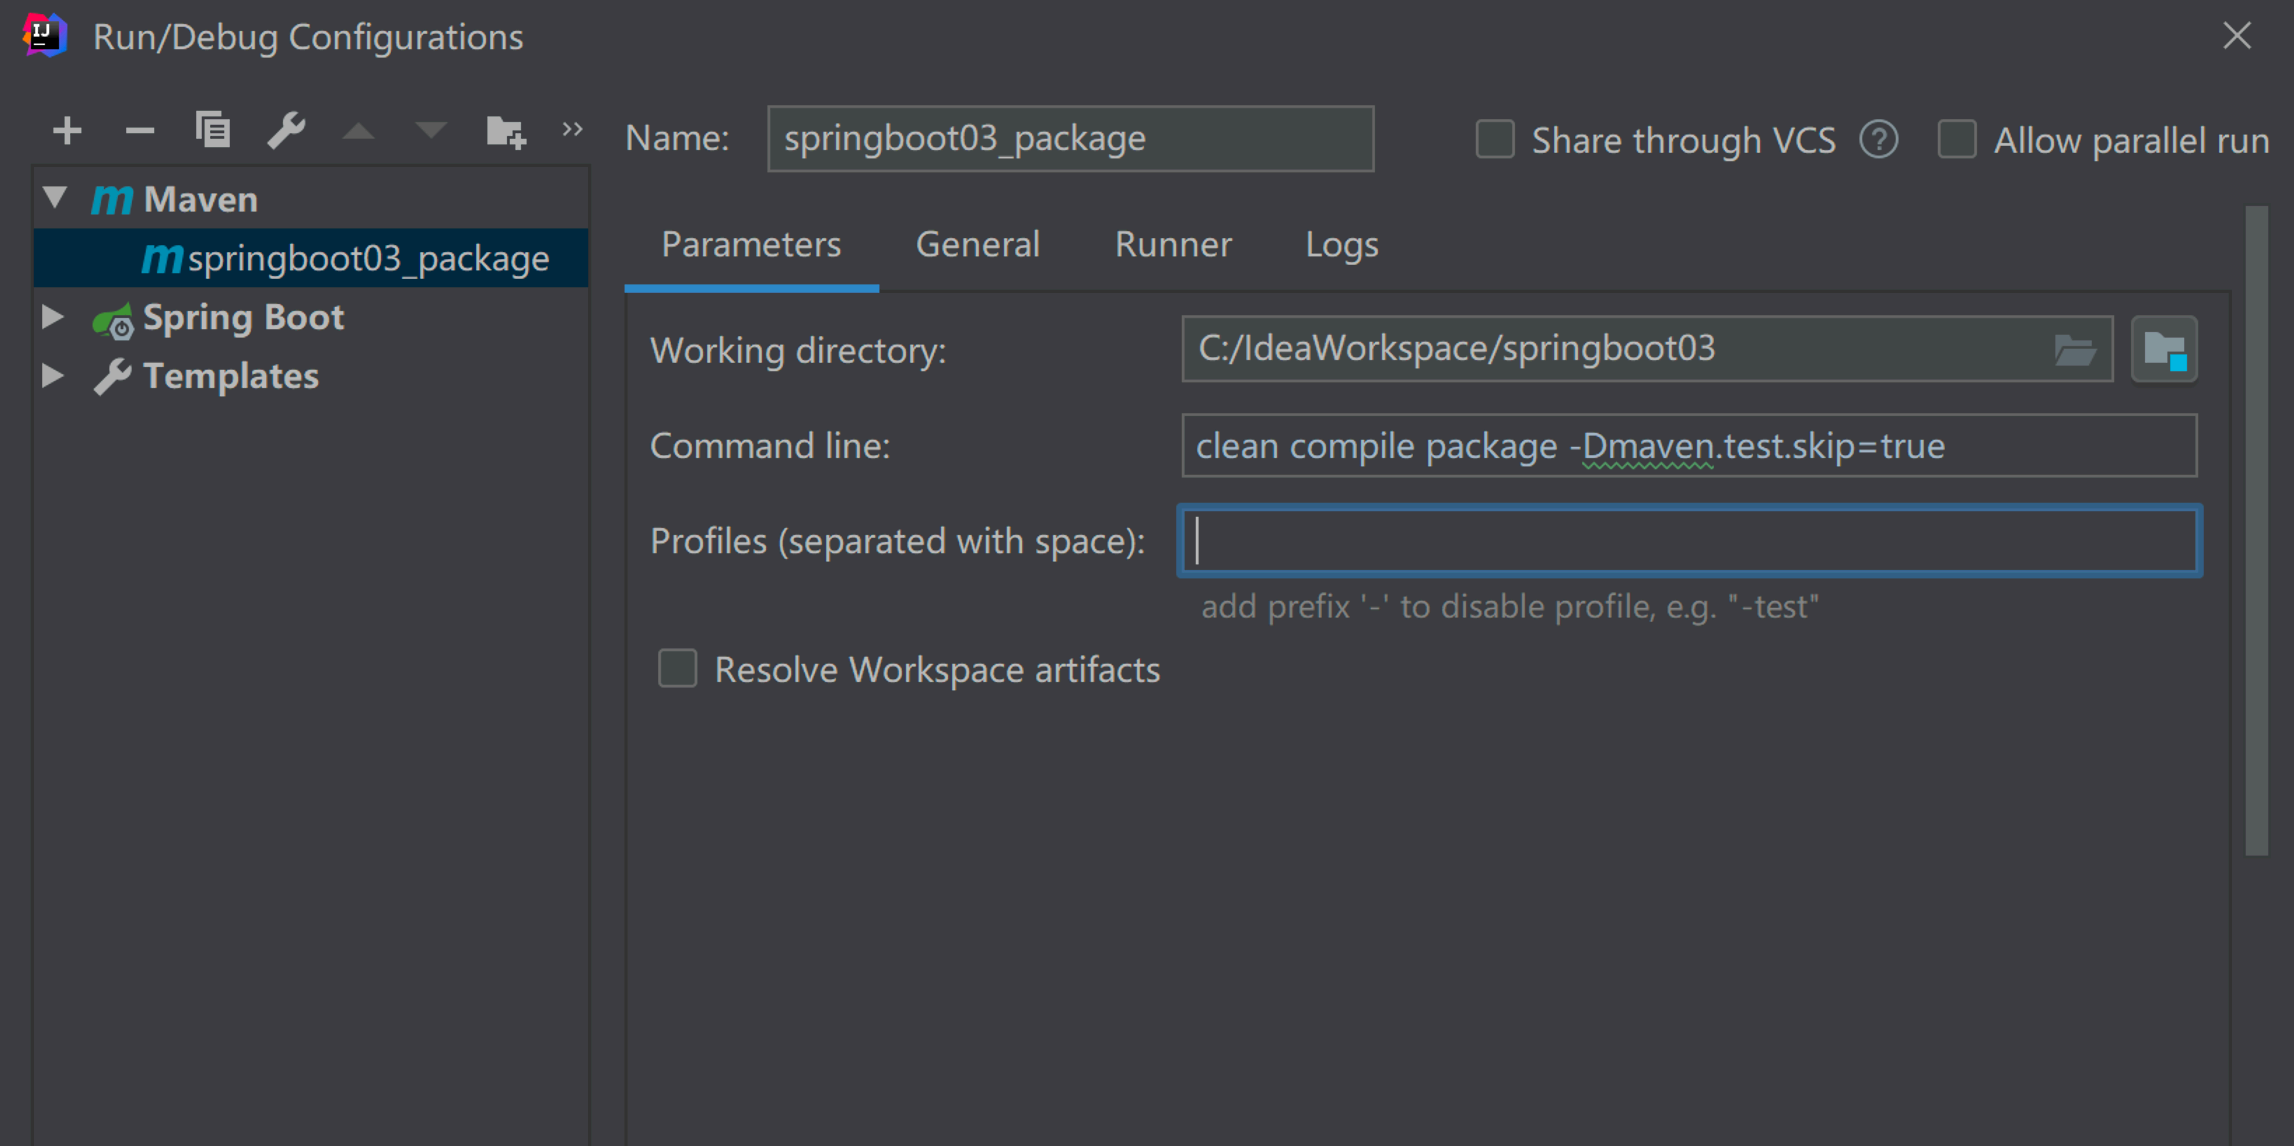
9.1.1. 配置打包命令
idea 下配置 clean compile package -Dmaven.test.skip=true 执⾏打包命令,target 目录得到待部署的项目文件

9.1.2. 部署并访问
打开本地 dos 窗口,执行 java -jar 命令 部署已打好的 jar 包文件。
命令如下: java -jar jar包所在目录
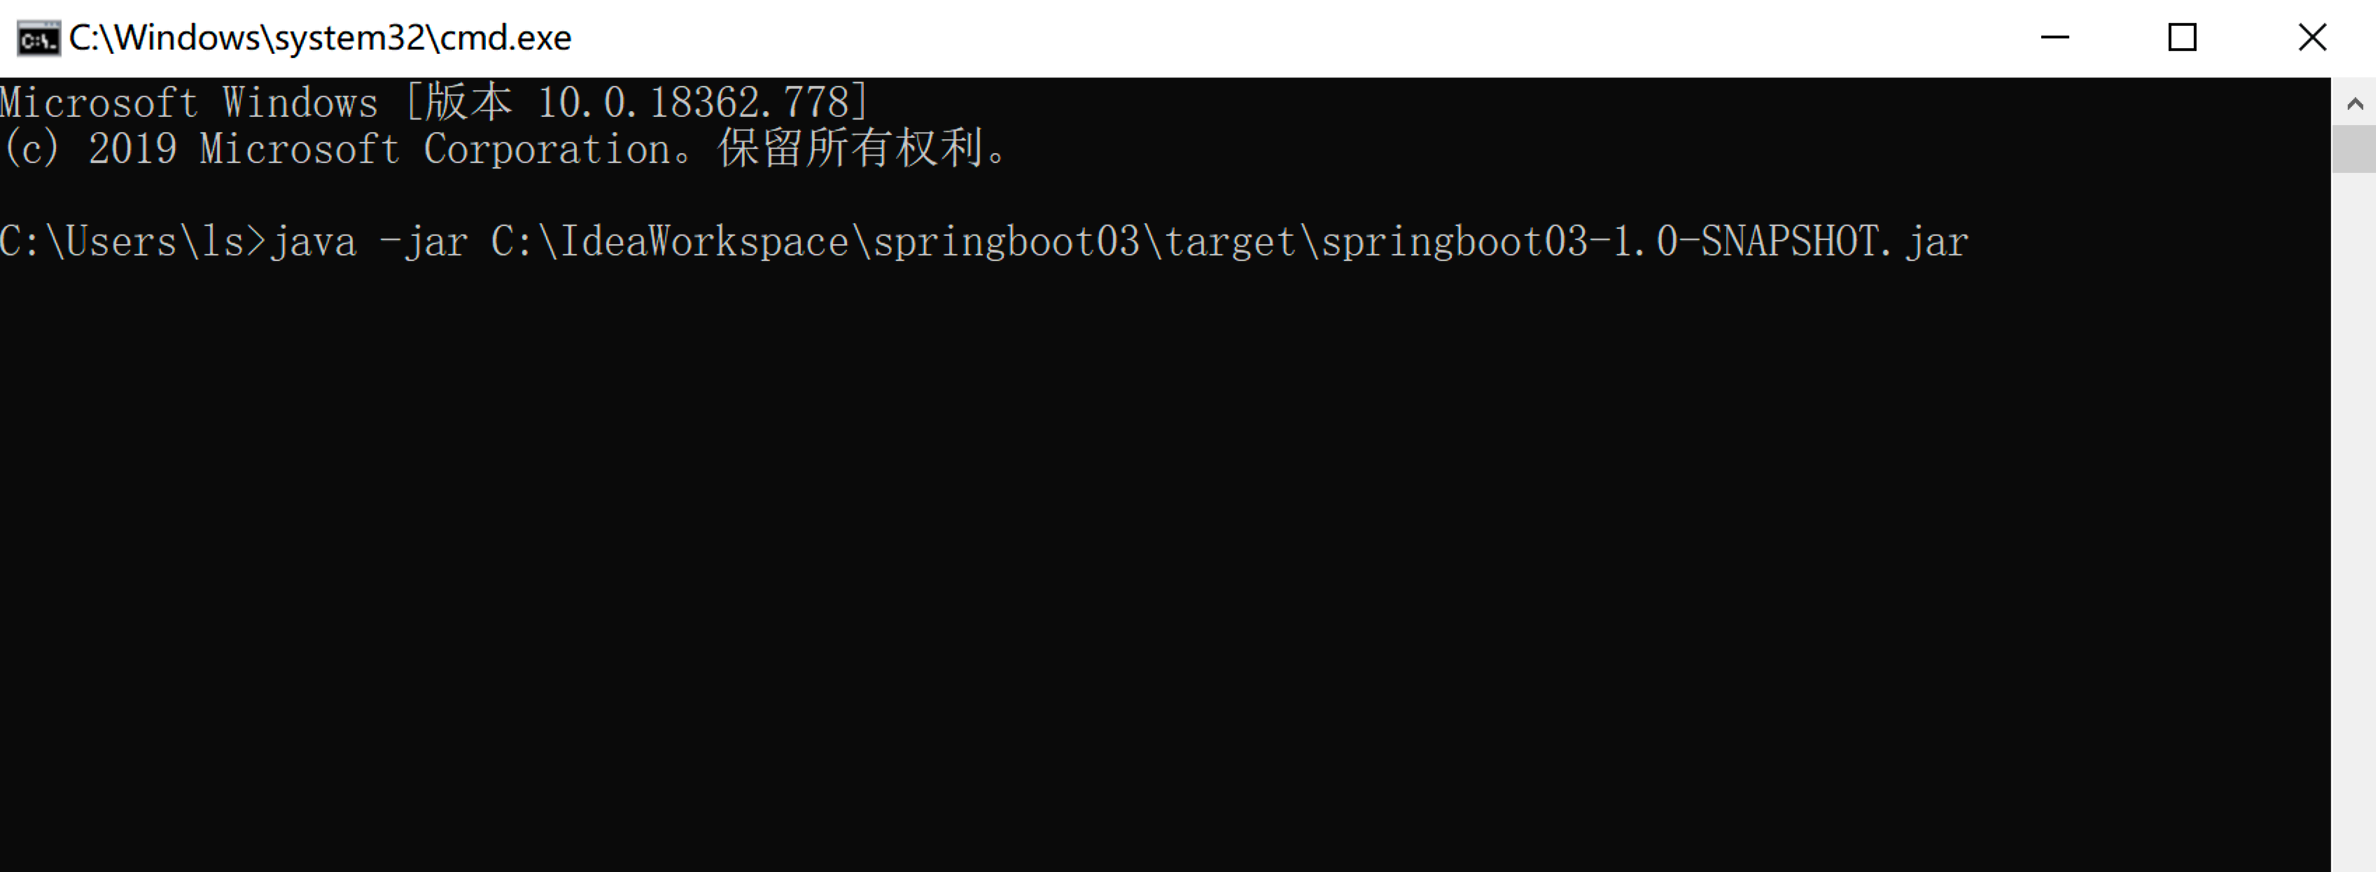
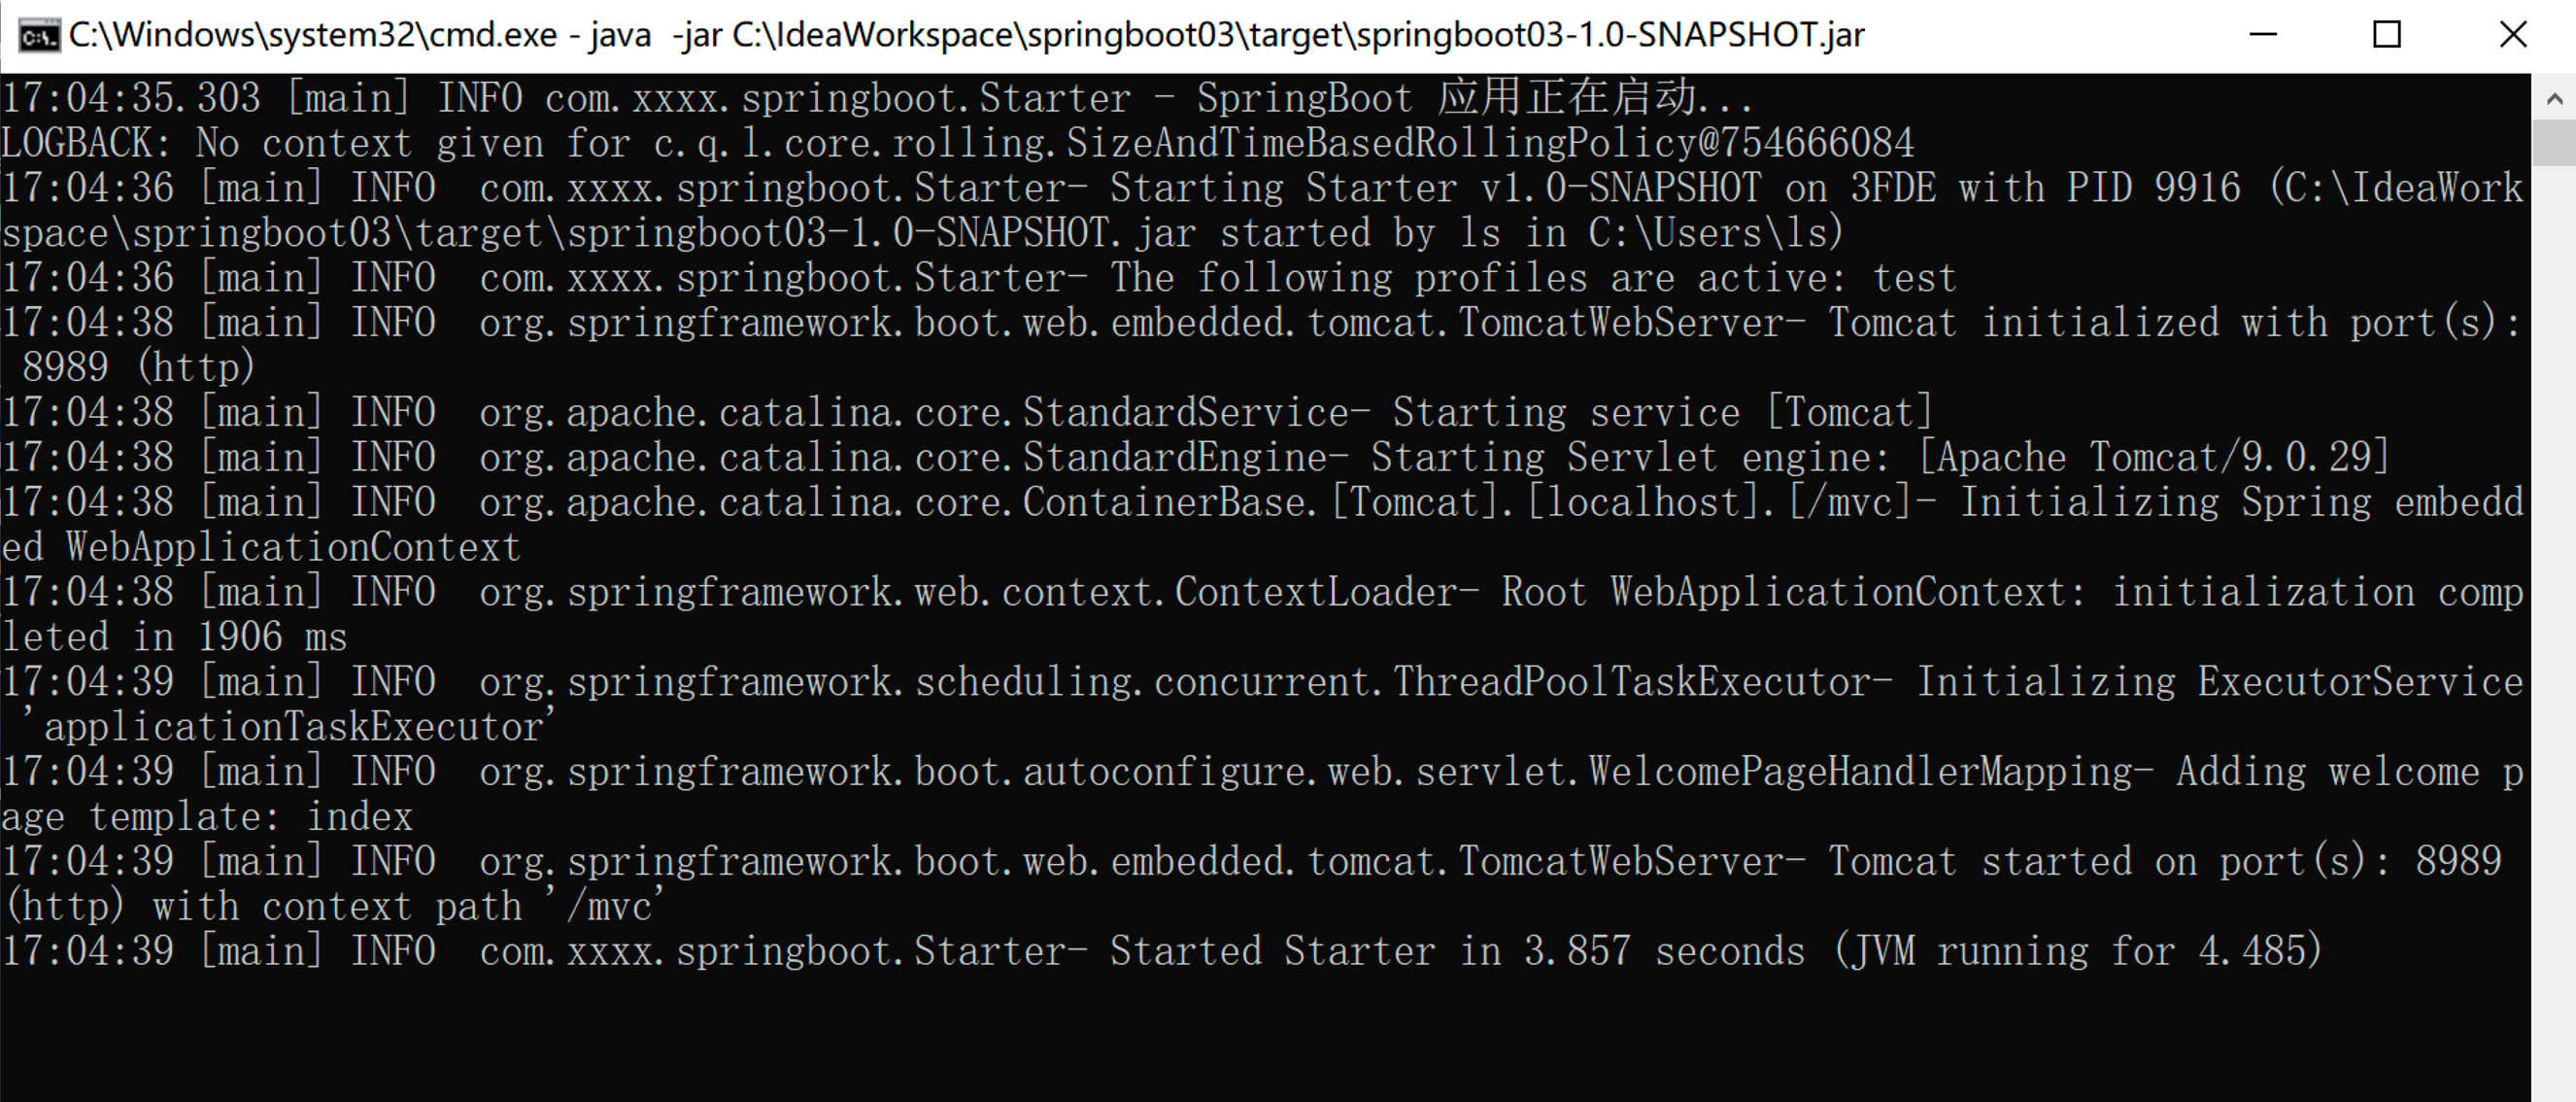
浏览器访问

9.2. war 包部署
War 包形式部署 Web 项目在生产环境中是比较常见的部署方式,也是目前⼤多数 web 应用部署的方案,这里对于 Spring Boot Web 项目进行打包部署步骤如下9.2.1. pom.xml修改
-
应用类型修改
由于入门项目构建的项目默认为 jar 应用,所以这⾥打 war 需要作如下修改

-
内嵌tomcat忽略
构建 SpringBoot 应⽤时,引入的 spring-boot-starter-web 默认引入Tomcat 容器,这里忽略掉内容Tomcat
<dependency>
     <groupId>org.springframework.boot</groupId>
     <artifactId>spring-boot-starter-tomcat</artifactId>
     <scope>provided</scope>
</dependency>
9.2.2. Starter 修改
添加容器启动加载文件 (类似于读取 web.xml),这里通过继承 SpringBootServletInitializer 类并重写
configure 方法来实现,在部署项目时指定外部 Tomcat 读取项目入口方法。
package com.xxx.springboot;
import org.slf4j.Logger;
import org.slf4j.LoggerFactory;
import org.springframework.boot.Banner;
import org.springframework.boot.SpringApplication;
import org.springframework.boot.autoconfigure.SpringBootApplication;
import org.springframework.boot.builder.SpringApplicationBuilder;
import org.springframework.boot.web.servlet.support.SpringBootServletInitializer;
@SpringBootApplication
public class Starter extends SpringBootServletInitializer {
private static Logger logger = LoggerFactory.getLogger(Starter.class);
@Override
protected SpringApplicationBuilder configure(SpringApplicationBuilder builder) {
return builder.sources(Starter.class);
}
public static void main(String[] args) {
//使用日志
logger.info("SpringBoot 应用正在启动。。。");
//SpringApplication.run(Starter.class);
SpringApplication application = new SpringApplication(Starter.class);
//设置Banner 图标关闭
application.setBannerMode(Banner.Mode.OFF);
application.run();
}
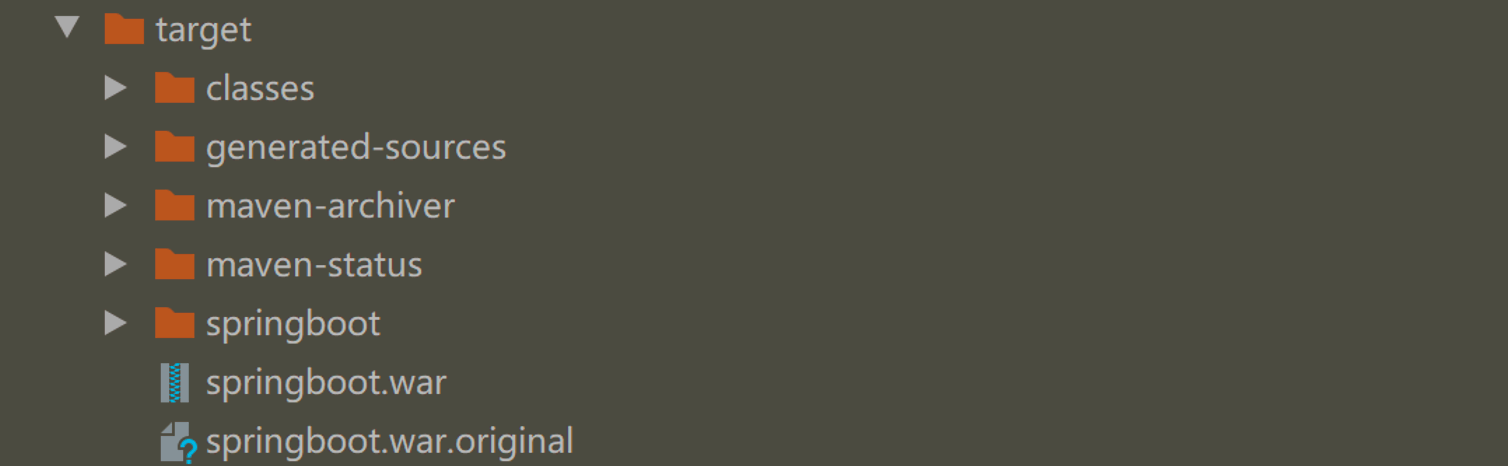
}9.2.3. 打包操作
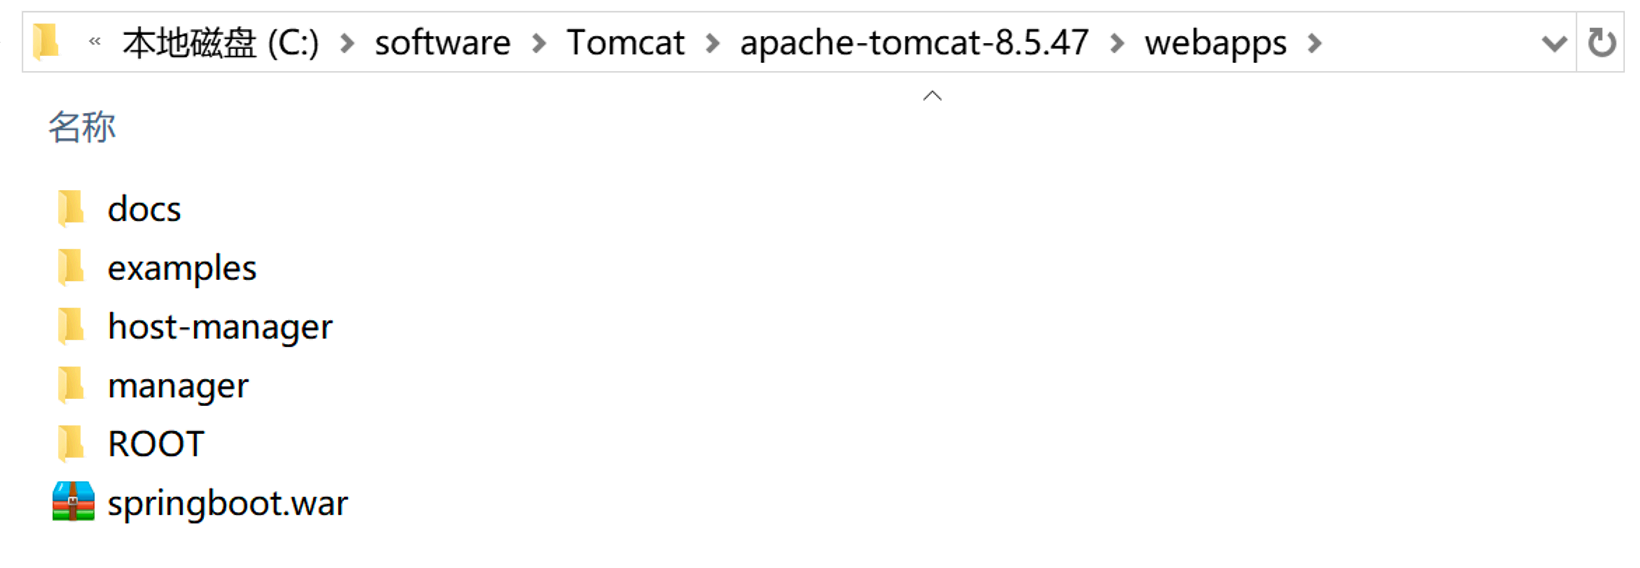
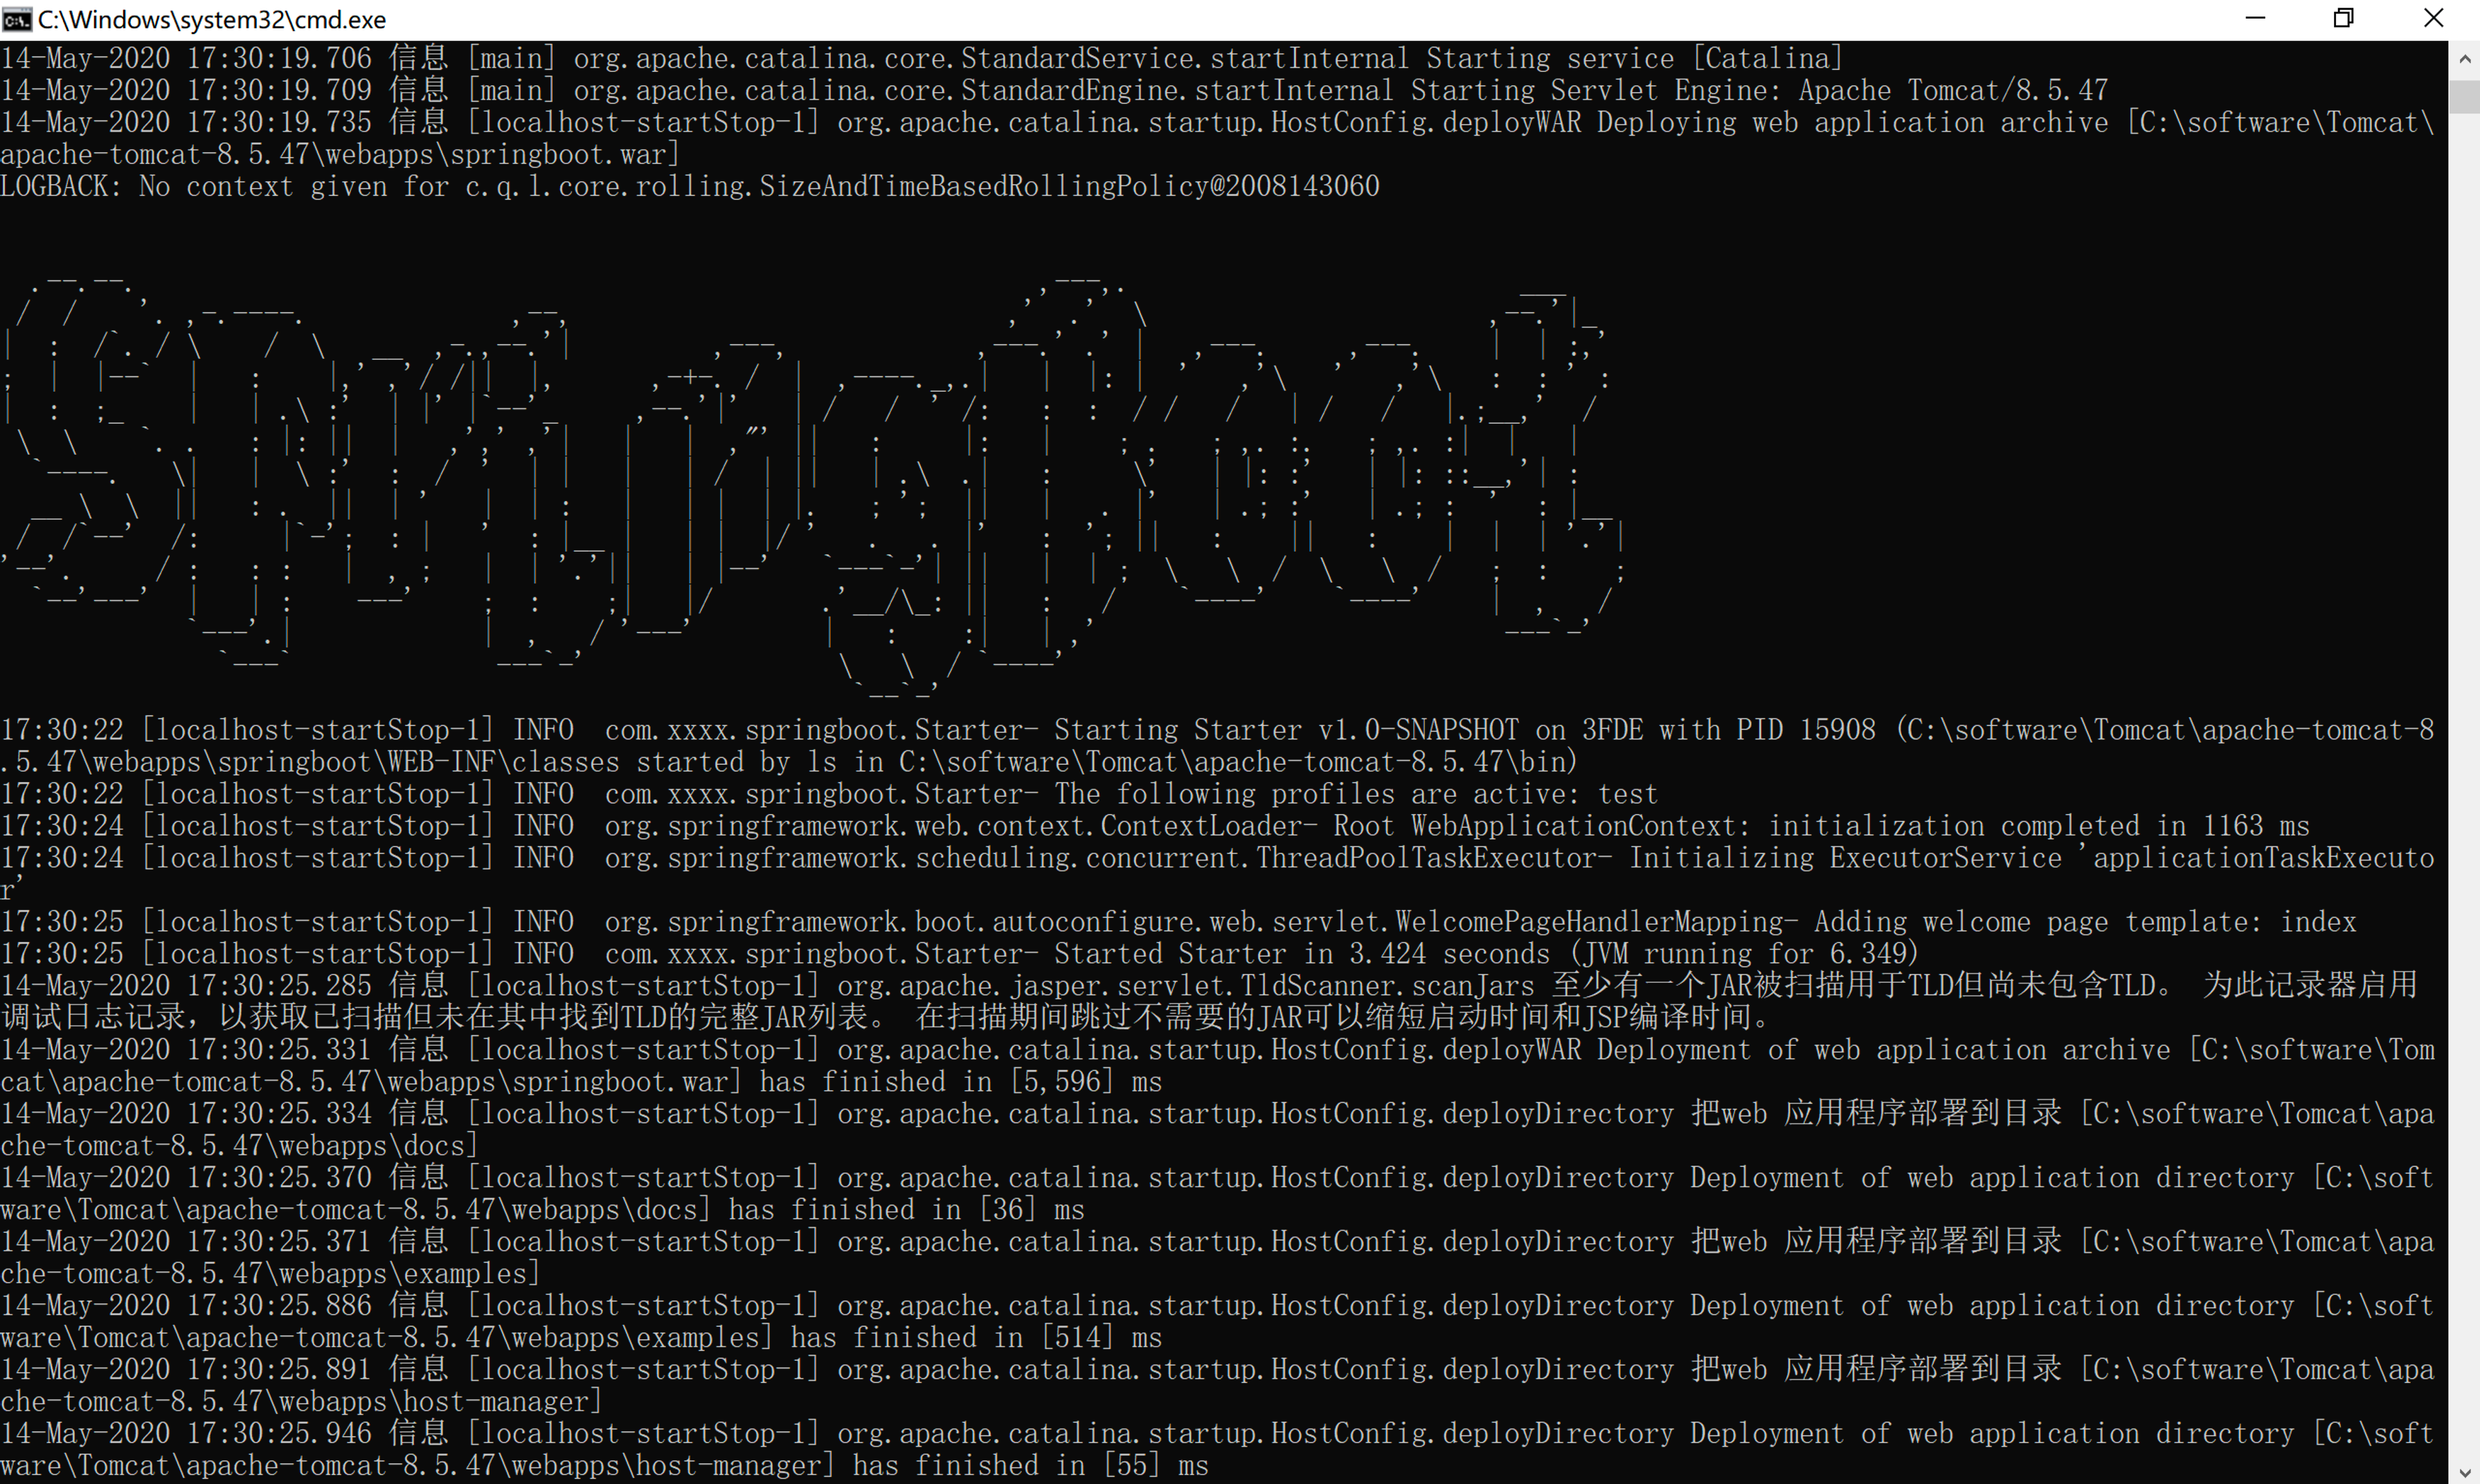
执行命令,生成对应的 war 包
9.2.4. 部署并访问
-
外部tomcat部署并访问