本实验基于MRS环境,Kafka部分主要介绍kafka命令行脚本的基本使用规范,以及通过介绍一个电商数据实时分析的场景将Kafka和Spark Streaming进行组合,帮助大家更好地掌握实际项目的开发流程。ClickHouse部分主要介绍常见的业务操作,代码样例中所涉及的SQL操作主要包括创建数据库、创建表、插入表数据、查询表数据以及删除表操作。
购买MRS集群
点击“购买集群”:
选择“自定义购买”
区域:华北—北京四
计费模式:按需计费
版本类型:普通版
集群名称:mrs-bigdata
集群版本:MRS 3.1.0 WXL
集群类型:自定义
勾选组件:Hadoop/Spark2x/Hive/Kafka/Zookeeper/Ranger/ClickHouse
可用区:任意均可
虚拟私有云:vpc-bigdata
子网:subnet-bigdata
安全组:sg-bigdata
弹性公网IP:下拉选择已有的IP地址
拓扑调整:开启“拓扑调整”,勾选如下图位置所示的“DN, NM, B”。
Kafka Shell实验
Kafka 是一个高吞吐、分布式、基于发布订阅的消息系统,利用Kafka技术可在廉价PC Server上搭建起大规模消息系统。本任务主要介绍如何利用Kafka的命令行脚本文件,进行Topic的创建、查看,Consumer的创建,Producer的创建,以及其他相关的Topic操作,帮助大家熟悉Kafka的基本使用。
查看集群信息
先查看本集群所有组件服务器配置信息,本次主要查看Zookeeper、Kafka服务器信息。
点击manager查看组件信息,选择EIP访问'
将Zookeeper三个quorumpeer实例的“管理IP”地址记录下来
将Kafka三个Broker实例的“管理IP”地址记录下来
创建topic
打开xfce ssh命令远程登录到MRS集群中。
使用如下命令进入Kafka脚本文件的安装路径。注意Kafka的两级目录,上一级为大写K,下一级为小写k
cd /opt/Bigdata/components/FusionInsight_HD_8.1.0.1/Kafka/client/install_files/kafka/bin
为脚本添加可执行权限:
chmod 777 kafka-topics.sh
chmod 777 kafka-run-class.sh

接下来利用kafka-topics.sh创建Topic。
./kafka-topics.sh --create --zookeeper xxx.xxx.xxx.xxx:2181,xxx.xxx.xxx.xxx:2181,xxx.xxx.xxx.xxx:2181/kafka --topic mytopic --replication-factor 2 --partitions 2./kafka-topics.sh --list --zookeeper xxx.xxx.xxx.xxx:2181,xxx.xxx.xxx.xxx:2181,xxx.xxx.xxx.xxx:2181/kafka运行生产者Producer
chmod 777 kafka-console-producer.sh
在当前界面,调用kafka-console-producer.sh脚本文件来创建生产者。
./kafka-console-producer.sh --broker-list xxx.xxx.xxx.xxx:9092,xxx.xxx.xxx.xxx:9092,xxx.xxx.xxx.xxx:9092 --topic mytopic运行消费者consumer
此用xfce新开一个窗口,使用同样的方法登录集群。
再次切换到Kafka脚本文件的安装路径
cd /opt/Bigdata/components/FusionInsight_HD_8.1.0.1/Kafka/client/install_files/kafka/binchmod 777 kafka-console-consumer.sh./kafka-console-consumer.sh --bootstrap-server xxx.xxx.xxx.xxx:9092,xxx.xxx.xxx.xxx:9092,xxx.xxx.xxx.xxx:9092 --topic mytopic --from-beginning测试Kafka
将生产者和消费者的窗口界面同时打开,左右对照。在生产者界面输入以下信息
success!
其他Topic操作
再次新开一个xfce窗口,使用同样的方法登录集群,并切换到Kafka脚本文件的安装路径
cd /opt/Bigdata/components/FusionInsight_HD_8.1.0.1/Kafka/client/install_files/kafka/bin./kafka-topics.sh --zookeeper xxx.xxx.xxx.xxx:2181,xxx.xxx.xxx.xxx:2181,xxx.xxx.xxx.xxx:2181/kafka --describe --topic mytopic

第一个行显示所有partitions的一个总结,以下每一行给出一个partition中的信息。
leader 是在给出的所有partitons中负责读写的节点,每个节点都有可能成为leader。
replicas 显示给定partiton所有副本所存储节点的节点列表,不管该节点是否是leader或者是否存活。
ISR 副本都已同步的的节点集合,这个集合中的所有节点都是存活状态,并且跟leader同步。
(2)修改topic分区数
./kafka-topics.sh --zookeeper xxx.xxx.xxx.xxx:2181,xxx.xxx.xxx.xxx:2181,xxx.xxx.xxx.xxx:2181/kafka --alter --topic mytopic --partitions 3./kafka-topics.sh --zookeeper xxx.xxx.xxx.xxx:2181,xxx.xxx.xxx.xxx:2181,xxx.xxx.xxx.xxx:2181/kafka --describe --topic mytopic./kafka-run-class.sh kafka.tools.GetOffsetShell --topic mytopic --time -1 --broker-list xxx.xxx.xxx.xxx:9092,xxx.xxx.xxx.xxx:9092,xxx.xxx.xxx.xxx:9092 --partitions 0
./kafka-run-class.sh kafka.tools.GetOffsetShell --topic mytopic --time -1 --broker-list xxx.xxx.xxx.xxx:9092,xxx.xxx.xxx.xxx:9092,xxx.xxx.xxx.xxx:9092 --partitions 1
./kafka-run-class.sh kafka.tools.GetOffsetShell --topic mytopic --time -1 --broker-list xxx.xxx.xxx.xxx:9092,xxx.xxx.xxx.xxx:9092,xxx.xxx.xxx.xxx:9092 --partitions 2
partition 0 中的偏移量为1是刚才已被消费的数据“success!”.
回到生产者producer,多生产几条数据:
.............
这些数据在Consumer处应该都能消费到。
重新查看分区偏移量
./kafka-run-class.sh kafka.tools.GetOffsetShell --topic mytopic --time -1 --broker-list xxx.xxx.xxx.xxx:9092,xxx.xxx.xxx.xxx:9092,xxx.xxx.xxx.xxx:9092 --partitions 0
./kafka-run-class.sh kafka.tools.GetOffsetShell --topic mytopic --time -1 --broker-list xxx.xxx.xxx.xxx:9092,xxx.xxx.xxx.xxx:9092,xxx.xxx.xxx.xxx:9092 --partitions 1
./kafka-run-class.sh kafka.tools.GetOffsetShell --topic mytopic --time -1 --broker-list xxx.xxx.xxx.xxx:9092,xxx.xxx.xxx.xxx:9092,xxx.xxx.xxx.xxx:9092 --partitions 2
Spark Streaming订单实时统计分析
本案例主要采用Kafka+SparkStreaming进行订单实时统计分析,采用Kafka模拟订单生成,SparkStreaming对订单进行实时统计分析。希望通过本案例分析,加深对SparkStreaming实时数据处理分析的理解
安装jdk环境
wget https://sandbox-expriment-files.obs.cn-north-1.myhuaweicloud.com/hccdp/HCCDP/jdk-8u341-linux-x64.tar.gz下载解压Maven环境
wget https://sandbox-expriment-files.obs.cn-north-1.myhuaweicloud.com/hccdp/HCCDP/apache-maven-3.6.0.tar.gz安装Scala环境
wget https://sandbox-expriment-files.obs.cn-north-1.myhuaweicloud.com/hccdp/HCCDP/scala-2.11.8.tgz下载完成后,运行下列命令进行解压:
tar -zxf scala-2.11.8.tgz
解压成功后,修改配置文件。使用如下命令进入配置文件编辑界面
vim ~/.bashrc
export JAVA_HOME=/home/user/jdk1.8.0_341
export JRE_HOME=${JAVA_HOME}/jre
export CLASSPATH=.:${JAVA_HOME}/lib:${JRE_HOME}/lib
export SCALA_HOME=/home/user/scala-2.11.8
export PATH=${JAVA_HOME}/bin:${SCALA_HOME}/bin:$PATH
source ~/.bashrc
安装IDEA
打开xfce命令行,利用下列命令下载IDEA:
wget https://sandbox-expriment-files.obs.cn-north-1.myhuaweicloud.com/hccdp/ideaIC.tar.gz解压完成后,利用下列命令安装idea:
/home/user/idea-IC/bin/idea.sh
修改Maven配置
等待安装完毕,出现IDEA界面,在界面左侧找到Customize标签,点击该标签。
在Customize窗口下找到All settings,点击弹出配置窗口。
在新窗口左侧找到“Build, Execution, Deployment”,展开该标签,选择“Build Tools”-“Maven”标签进入如下界面。
直接编辑“Maven home path”,修改为如下路径:
修改“User settings file”为相关配置路径(记得点选右侧的Override):
安装Scala插件
在IDEA初始界面找到Plugins标签,单击打开
安装scala插件后,点击绿色的Restart IDE重启IntelliJ IDEA。
点击New Project,如果在Language标签下显示Scala,表示已成功安装。
查看集群信息
先查看本集群所有组件服务器配置信息,本次主要查看Zookeeper、Kafka服务器信息。
记录相关IP
新建Scala Maven工程
点击”New Project” 按钮,新建一个项目。记得勾选Maven Archetype。
按如下配置项目信息:
① Name:SparkStreaming
② Location:~/IdeaProjects
③ JDK:1.8
④ Catalog:Internal
⑤ Archetype:org.scala-tools.archetypes:scala-archetype-simple
⑥ Version:1.2
⑦ Advanced Settings:
⑧ GroupId:com.huawei
⑨ ArtifactId:SparkStreaming
⑩ Version:1.0-SNAPSHOT
确认无误后点击Create。
此时系统会自动从华为云中央仓库拉取所需的依赖。此步骤所耗时间较长,预计需耐心等待约5分钟。
项目架构安装完毕后,会看到下方出现以下信息。此时可以进行下一步操作。
配置POM文件
<project xmlns="http://maven.apache.org/POM/4.0.0" xmlns:xsi="http://www.w3.org/2001/XMLSchema-instance" xsi:schemaLocation="http://maven.apache.org/POM/4.0.0 http://maven.apache.org/maven-v4_0_0.xsd">
<modelVersion>4.0.0</modelVersion>
<groupId>cn.com.hw</groupId>
<artifactId>SparkStreaming</artifactId>
<version>1.0-SNAPSHOT</version>
<inceptionYear>2008</inceptionYear>
<properties>
<scala.version>2.11.8</scala.version>
</properties>
<dependencies>
<dependency>
<groupId>org.scala-lang</groupId>
<artifactId>scala-library</artifactId>
<version>${scala.version}</version>
</dependency>
<dependency>
<groupId>org.apache.spark</groupId>
<artifactId>spark-core_2.11</artifactId>
<version>2.3.1</version>
</dependency>
<dependency>
<groupId>org.apache.spark</groupId>
<artifactId>spark-streaming_2.11</artifactId>
<version>2.3.1</version>
</dependency>
<dependency>
<groupId>org.apache.spark</groupId>
<artifactId>spark-streaming-kafka-0-10_2.11</artifactId>
<version>2.3.1</version>
</dependency>
</dependencies>
<build>
<sourceDirectory>src/main/scala</sourceDirectory>
<plugins>
<plugin>
<groupId>org.scala-tools</groupId>
<artifactId>maven-scala-plugin</artifactId>
<executions>
<execution>
<goals>
<goal>compile</goal>
<goal>testCompile</goal>
</goals>
</execution>
</executions>
<configuration>
<scalaVersion>${scala.version}</scalaVersion>
<args>
<arg>-target:jvm-1.5</arg>
</args>
</configuration>
</plugin>
<plugin>
<artifactId>maven-assembly-plugin</artifactId>
<configuration>
<appendAssemblyId>false</appendAssemblyId>
<descriptorRefs>
<descriptorRef>jar-with-dependencies</descriptorRef>
</descriptorRefs>
<archive>
<manifest>
<!-- 此处指定main方法入口的class -->
<mainClass></mainClass>
</manifest>
</archive>
</configuration>
<executions>
<execution>
<id>make-assembly</id>
<phase>package</phase>
<goals>
<goal>assembly</goal>
</goals>
</execution>
</executions>
</plugin>
<plugin>
<groupId>org.apache.maven.plugins</groupId>
<artifactId>maven-compiler-plugin</artifactId>
<configuration>
<source>6</source>
<target>6</target>
</configuration>
</plugin>
</plugins>
</build>
<reporting>
<plugins>
<plugin>
<groupId>org.scala-tools</groupId>
<artifactId>maven-scala-plugin</artifactId>
<configuration>
<scalaVersion>${scala.version}</scalaVersion>
</configuration>
</plugin>
</plugins>
</reporting>
</project>
定义订单类型
删除原工程中的App文件及test文件夹。
在com.huawei文件夹中新建order包
在com.huawei.order包下新建一个名为Order的Java类,定义订单类型。
package com.huawei.order;
import scala.Serializable;
public class Order implements Serializable{
private static final long serialVersionUID = 1L;
//订单商品名称
private String name;
//订单价格
private int price;
public Order() {
super();
}
public Order(String name, int price) {
super();
this.name = name;
this.price = price;
}
public String getName() {
return name;
}
public void setName(String name) {
this.name = name;
}
public int getPrice() {
return price;
}
public void setPrice(int price) {
this.price = price;
}
@Override
public String toString() {
return "Order [name=" + name + ", price=" + price + "]";
}
}
定义常量工具类
在com.huawei.order文件夹下新建一个名为ConstantUtils的Java类,统一管理本工程的配置信息。
package com.huawei.order;
public class ConstantUtils {
//项目配置信息,注意此处“xxx.xxx.xxx.xxx”应改为步骤1所查询到的Kafka Broker的IP
public final static String METADATA_BROKER_LIST_VALUE = "xxx.xxx.xxx.xxx:9092";
public final static String CHECKPOINT_PATH = "~/checkpoint";
public final static String MAX_POLL = "500";
public final static String SERIALIZER_CLASS_VALUE = "kafka.serializer.StringEncoder";
public final static String ORDER_TOPIC = "OrderTopic";
public final static String GROUP_ID = "SparkStreaming";
public final static String KEY_DESERIALIZER = "org.apache.kafka.common.serialization.StringDeserializer";
public final static String VALUE_DESERIALIZER = "org.apache.kafka.common.serialization.StringDeserializer";
public final static String KEY_SERIALIZER = "org.apache.kafka.common.serialization.StringSerializer";
public final static String VALUE_SERIALIZER = "org.apache.kafka.common.serialization.StringSerializer";
}
注意:代码里的public final static String METADATA_BROKER_LIST_VALUE = "xxx.xxx.xxx.xxx:9092"; 此处的xxx.xxx.xxx.xxx需改为之前所查询到的Kafka Broker的IP (任选三个中的一个即可),否则后续步骤都没有办法正常执行。
定义随机数生成类
在com.huawei.order文件夹下新建一个名为RandomUtils的Java类,用于生成随机数据,模拟订单的情况。
package com.huawei.order;
import java.util.Random;
public class RandomUtils {
public static int getRandomNum(int bound){
//随机数生成
Random random = new Random();
return random.nextInt(bound);
}
}
定义订单生产者
在com.huawei.order包下新建一个名为OrderProducer的Java类,用于生成订单数据。本实验随机生成"bread", "milk", "fruit", "clothes", "hat", "shoes",总计6类商品销售订单。
package com.huawei.order;
import org.apache.kafka.clients.producer.KafkaProducer;
import org.apache.kafka.clients.producer.ProducerRecord;
import java.util.Properties;
public class OrderProducer {
public static void main(String[] args) throws InterruptedException {
//定义商品类型
String[] item = new String[]{"bread", "milk", "fruit", "clothes", "hat", "shoes"};
//配置Kafka信息
Properties props = new Properties();
props.put("serializer.class", ConstantUtils.SERIALIZER_CLASS_VALUE);
props.put("bootstrap.servers", ConstantUtils.METADATA_BROKER_LIST_VALUE);
props.put("key.serializer", ConstantUtils.KEY_SERIALIZER);
props.put("value.serializer", ConstantUtils.VALUE_SERIALIZER);
KafkaProducer<String, String> kafkaProducer = new KafkaProducer(props);
Order order = new Order();
// 每隔1秒生产随机个订单消息
while (true) {
int random = RandomUtils.getRandomNum(10);
if (random == 0) {
continue;
}
for (int i = 0; i < random; i++) {
//随机生成订单类型和价格
int orderRandom = RandomUtils.getRandomNum(random * 10);
order.setName(item[RandomUtils.getRandomNum(6)]);
order.setPrice(orderRandom);
}
//向Kafka发送订单数据
kafkaProducer.send(new ProducerRecord(ConstantUtils.ORDER_TOPIC, order.getName() + " " + order.getPrice()));
kafkaProducer.flush();
//在控制台输出订单内容
System.out.println(order.toString());
Thread.sleep(1000);
}
}
}
定义订单消费者
在com.huawei.order文件夹下新建一个名为OrderConsumer的Scala的Object,用于统计分析订单数据。
package com.huawei.order
import org.apache.kafka.clients.consumer.ConsumerConfig
import org.apache.kafka.common.serialization.StringDeserializer
import org.apache.spark.SparkConf
import org.apache.spark.streaming.{Seconds, StreamingContext}
import org.apache.spark.streaming.kafka010.{ConsumerStrategies, KafkaUtils, LocationStrategies}
object OrderConsumer {
def updateFunction(newValues: Seq[Int], runningCount: Option[Int]): Option[Int] = {
val newCount = runningCount.getOrElse(0) + newValues.sum
Some(newCount)
}
def main(args: Array[String]): Unit = {
//配置spark应用名,启动线程数为2,1个线程接收数据,另1个线程处理数据
val conf = new SparkConf().setAppName("OrderConsumer").setMaster("local[2]")
//每2秒运行一次计算
val sc = new StreamingContext(conf, Seconds(2))
//屏蔽警告以下日志信息
sc.sparkContext.setLogLevel("WARN")
//设置检查点保存路径
sc.checkpoint(ConstantUtils.CHECKPOINT_PATH)
//设置Kafka参数信息
val kafkaParams = Map(
ConsumerConfig.BOOTSTRAP_SERVERS_CONFIG -> ConstantUtils.METADATA_BROKER_LIST_VALUE,
ConsumerConfig.GROUP_ID_CONFIG -> ConstantUtils.GROUP_ID,
ConsumerConfig.MAX_POLL_RECORDS_CONFIG -> ConstantUtils.MAX_POLL,
ConsumerConfig.KEY_DESERIALIZER_CLASS_CONFIG -> classOf[StringDeserializer],
ConsumerConfig.VALUE_DESERIALIZER_CLASS_CONFIG -> classOf[StringDeserializer]
)
//读取Kafka数据
val kafkaTopicDS = KafkaUtils.createDirectStream(sc, LocationStrategies.PreferConsistent,
ConsumerStrategies.Subscribe[String, String](Set(ConstantUtils.ORDER_TOPIC), kafkaParams))
//将读入数据切分为(商品,价格)形式进行统计
val pair = kafkaTopicDS.map(_.value).map(_.split(" ")).map(x => (x(0), x(1).toInt))
//统计程序启动以来商品总销售量,updateStateByKey将按商品名统计总销售信息
pair.updateStateByKey(updateFunction).print()
//每隔2秒统计近4秒钟各类商品销售情况
pair.reduceByKey(_ + _).window(Seconds(4), Seconds(2)).print()
//启动应用
sc.start()
sc.awaitTermination()
}
}
此时项目结构如下:

Maven打包并上传
打开编译器右上角的maven project,在Lifecycle下面找到package,点击package,此时编译器下面会开始进行build。
打包时同样会下载补充依赖文件,预计需等待约2分钟。
package结束后会出现BUILD SUCCESS,此时我们就可以在相应的目录下查看jar包。
利用scp命令将SparkStreaming-1.0-SNAPSHOT.jar上传到MRS集群中:
scp ~/IdeaProjects/SparkStreaming/target/SparkStreaming-1.0-SNAPSHOT.jar root@xxx.xxx.xxx.xxx:/root
运行并验证
打开xfce ssh命令远程登录到MRS集群中。
(1)创建topic
切换到Kafka脚本文件的安装路径
cd /opt/Bigdata/components/FusionInsight_HD_8.1.0.1/Kafka/client/install_files/kafka/bin./kafka-topics.sh --create --zookeeper xxx.xxx.xxx.xxx:2181, xxx.xxx.xxx.xxx:2181, xxx.xxx.xxx.xxx:2181/kafka --topic OrderTopic --replication-factor 2 --partitions 2回到/root目录下spark-submit --class com.huawei.order.OrderConsumer --master yarn-client SparkStreaming-1.0-SNAPSHOT.jar(3)启动订单生产者
新建一个xfce窗口,以同样的方式登录集群。
spark-submit --class com.huawei.order.OrderProducer --master yarn-client SparkStreaming-1.0-SNAPSHOT.jar新建ClickHouse Maven工程
安装jdk环境,如果已安装则无需再操作此步骤
集群目前只有jre环境,无法进行打包操作,仍需安装jdk环境才行。运行下列代码下载jdk1.8压缩文件,直接下载到/home/user目录下即可,方便查找。
wget https://sandbox-expriment-files.obs.cn-north-1.myhuaweicloud.com/hccdp/HCCDP/jdk-8u341-linux-x64.tar.gz
下载完成后,运行下列命令进行解压:
                                tar -zxvf jdk-8u341-linux-x64.tar.gz

打开实验桌面的eclipse,点击“File->New->Project”
选择“Maven Project”,点击“Next”
勾选“Create a simple project…”,点击“Next”
Group Id: com.huawei
Artifact Id: ClickHouseExample
修改JDK路径
右上角选择Window标签,在下拉菜单最后一栏中找到Preferences
回到初始界面,看到项目名称下有一个类似JRE System Library的标签。右键点击该标签,选择Build Path->Configure Build Path:

在新窗口点击Add Library
选择JRE System Library,点击Next。
配置POM文件
打开“ClickHouseExample->pom.xml”文件,编辑pom.xml如下:
<project xmlns="http://maven.apache.org/POM/4.0.0" xmlns:xsi="http://www.w3.org/2001/XMLSchema-instance" xsi:schemaLocation="http://maven.apache.org/POM/4.0.0 https://maven.apache.org/xsd/maven-4.0.0.xsd">
<modelVersion>4.0.0</modelVersion>
<groupId>com.huawei</groupId>
<artifactId>ClickHouseExample</artifactId>
<version>0.0.1-SNAPSHOT</version>
<properties>
<project.build.sourceEncoding>UTF-8</project.build.sourceEncoding>
<log4j2.version>2.11.2</log4j2.version>
</properties>
<dependencies>
<dependency>
<groupId>ru.yandex.clickhouse</groupId>
<artifactId>clickhouse-jdbc</artifactId>
<version>0.3.0</version>
</dependency>
<dependency>
<groupId>commons-io</groupId>
<artifactId>commons-io</artifactId>
<version>2.7</version>
<scope>compile</scope>
</dependency>
<dependency>
<groupId>org.apache.logging.log4j</groupId>
<artifactId>log4j-core</artifactId>
<version>${log4j2.version}</version>
</dependency>
<dependency>
<groupId>org.apache.logging.log4j</groupId>
<artifactId>log4j-api</artifactId>
<version>${log4j2.version}</version>
</dependency>
<dependency>
<groupId>org.apache.logging.log4j</groupId>
<artifactId>log4j-slf4j-impl</artifactId>
<version>${log4j2.version}</version>
</dependency>
</dependencies>
<repositories>
<repository>
<id>huaweicloud2</id>
<name>huaweicloud2</name>
<url>https://mirrors.huaweicloud.com/repository/maven/</url>
</repository>
<repository>
<id>huaweicloud1</id>
<name>huaweicloud1</name>
<url>https://repo.huaweicloud.com/repository/maven/huaweicloudsdk/</url>
</repository>
</repositories>
<build>
<plugins>
<plugin>
<artifactId>maven-assembly-plugin</artifactId>
<configuration>
<descriptorRefs>
<descriptorRef>jar-with-dependencies</descriptorRef>
</descriptorRefs>
</configuration>
<executions>
<execution>
<id>make-assembly</id>
<phase>package</phase>
<goals>
<goal>assembly</goal>
</goals>
</execution>
</executions>
</plugin>
</plugins>
</build>
</project>
查询集群ClickHouse信息
在MRS集群详情页面,点击“前往Manager”
点击“实例”即可看到ClickHouseBalancer所对应的业务IP信息。
添加配置文件
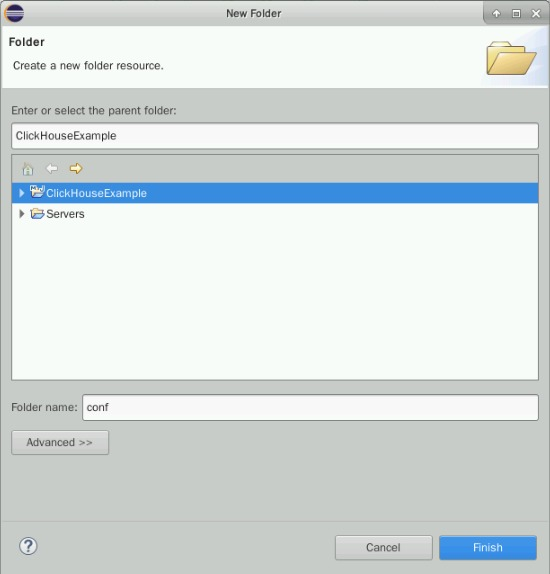
在Eclipse项目名处右键点击,选择“New -> Folder”创建文件夹conf。
在conf文件夹处右键点击,选择“New -> File”创建配置文件clickhouse-example.properties。
在配置文件中输入以下信息
loadBalancerIPList=192.168.xxx.xxx,192.168.xxx.xxx,
sslUsed=false
loadBalancerHttpPort=21425
loadBalancerHttpsPort=21426
CLICKHOUSE_SECURITY_ENABLED=false
user=default
password=
clusterName=default_cluster
databaseName=testdb
tableName=testtb
batchRows=10000
batchNum=10
注意:loadBalancerIPList所对应的IP信息即为上一步实验在MRS Manager中所查询到的ClickHouseBalancer IP信息。
开发程序
通过典型场景,我们可以快速学习和掌握ClickHouse的开发过程,并且对关键的接口函数有所了解。
ClickHouse可以使用SQL进行常见的业务操作,代码样例中所涉及的SQL操作主要包括创建数据库、创建表、插入表数据、查询表数据以及删除表操作。
本代码样例讲解顺序为:
1. 设置属性
2. 建立连接
3. 创建库
4. 创建表
5. 插入数据
6. 查询数据
7. 删除表
创建程序包
在“src/main/java”处右键“new->package”
创建包ClickHouseDemo,点击“Finish”
创建类Demo
在上步ClickHouseDemo处右键点击,选择“New->Class”创建Java类Demo,并输入信息如下:
package ClickHouseDemo;
import java.io.File;
import java.io.FileInputStream;
import java.io.IOException;
import java.util.ArrayList;
import java.util.Arrays;
import java.util.List;
import java.util.Properties;
public class Demo {
private String loadBalancerIPList;
private String loadBalancerHttpPort;
static String user;
private static String clusterName;
private Boolean isSec;
static String password;
static List<String> ckLbServerList;
private static String tableName;
private static String databaseName;
private Util util = new Util();
private static int batchRows;
private static int batchNum;
static Boolean sslUsed;
//主函数
public static void main(String[] args) {
Demo demo = new Demo();
try {
demo.getProperties();
demo.getCkLbServerList();
demo.dropTable(databaseName, tableName, clusterName);
demo.createDatabase(databaseName, clusterName);
demo.createTable(databaseName, tableName, clusterName);
demo.insertData(databaseName, tableName, batchNum, batchRows);
demo.queryData(databaseName, tableName);
} catch (Exception e) {
System.out.println(e.toString());
}
}
//获取配置文件信息
private void getProperties() throws Exception {
Properties properties = new Properties();
String proPath = System.getProperty("user.dir") + File.separator + "conf"
+ File.separator + "clickhouse-example.properties";
try {
properties.load(new FileInputStream(new File(proPath)));
} catch (IOException e) {
System.out.println("Failed to load properties file.");
throw e;
}
loadBalancerIPList = properties.getProperty("loadBalancerIPList");
sslUsed = Boolean.parseBoolean(properties.getProperty("sslUsed"));
if (sslUsed) {
loadBalancerHttpPort = properties.getProperty("loadBalancerHttpsPort");
} else {
loadBalancerHttpPort = properties.getProperty("loadBalancerHttpPort");
}
isSec = Boolean.parseBoolean(properties.getProperty("CLICKHOUSE_SECURITY_ENABLED"));
if (isSec) {
password = properties.getProperty("password");
}
user = properties.getProperty("user");
clusterName = properties.getProperty("clusterName");
databaseName = properties.getProperty("databaseName");
tableName = properties.getProperty("tableName");
batchRows = Integer.parseInt(properties.getProperty("batchRows"));
batchNum = Integer.parseInt(properties.getProperty("batchNum"));
}
//拼接ClickHouse Balancer信息
private void getCkLbServerList() {
if (null == loadBalancerIPList || loadBalancerIPList.length() == 0) {
System.out.println("clickhouseBalancer ip list is empty.");
return;
}
ckLbServerList = Arrays.asList(loadBalancerIPList.split(","));
for (int i = 0; i < ckLbServerList.size(); i++) {
String tmpIp = ckLbServerList.get(i);
if (tmpIp.contains(":")) {
tmpIp = "[" + tmpIp + "]";
ckLbServerList.set(i, tmpIp);
}
String tmpServer = ckLbServerList.get(i) + ":" + loadBalancerHttpPort;
ckLbServerList.set(i, tmpServer);
}
}
//删除表
private void dropTable(String databaseName, String tableName, String clusterName) throws Exception {
String dropLocalTableSql = "drop table if exists " + databaseName + "." + tableName + " on cluster " + clusterName;
String dropDisTableSql = "drop table if exists " + databaseName + "." + tableName + "_all" + " on cluster " + clusterName;
ArrayList<String> sqlList = new ArrayList<String>();
sqlList.add(dropLocalTableSql);
sqlList.add(dropDisTableSql);
util.exeSql(sqlList);
}
//创建数据库
private void createDatabase(String databaseName, String clusterName) throws Exception {
String createDbSql = "create database if not exists " + databaseName + " on cluster " + clusterName;
util.exeSql(createDbSql);
}
//创建表
private void createTable(String databaseName, String tableName, String clusterName) throws Exception {
String createSql = "create table " + databaseName + "." + tableName + " on cluster " + clusterName
+ " (name String, age UInt8, date Date)engine=ReplicatedMergeTree('/clickhouse/tables/{shard}/" + databaseName
+ "." + tableName + "'," + "'{replica}') partition by toYYYYMM(date) order by age";
String createDisSql = "create table " + databaseName + "." + tableName + "_all" + " on cluster " + clusterName + " as "
+ databaseName + "." + tableName + " ENGINE = Distributed(default_cluster," + databaseName + "," + tableName + ", rand());";
ArrayList<String> sqlList = new ArrayList<String>();
sqlList.add(createSql);
sqlList.add(createDisSql);
util.exeSql(sqlList);
}
//插入数据
private void insertData(String databaseName, String tableName, int batchNum, int batchRows) throws Exception {
util.insertData(databaseName, tableName, batchNum, batchRows);
}
//查询数据
private void queryData(String databaseName, String tableName) throws Exception {
String querySql1 = "select * from " + databaseName + "." + tableName + "_all" + " order by age limit 10";
String querySql2 = "select toYYYYMM(date),count(1) from " + databaseName + "." + tableName + "_all"
+ " group by toYYYYMM(date) order by count(1) DESC limit 10";
ArrayList<String> sqlList = new ArrayList<String>();
sqlList.add(querySql1);
sqlList.add(querySql2);
ArrayList<ArrayList<ArrayList<String>>> result = util.exeSql(sqlList);
for (ArrayList<ArrayList<String>> singleResult : result) {
for (ArrayList<String> strings : singleResult) {
StringBuilder stringBuilder = new StringBuilder();
for (String string : strings) {
stringBuilder.append(string).append("\t");
}
System.out.println(stringBuilder.toString());
}
}
}
}
创建类Util
在上步ClickHouseDemo处右键点击,选择“New->Class”创建Java类Util并输入信息如下:
package ClickHouseDemo;
import java.sql.Connection;
import java.sql.PreparedStatement;
import java.sql.ResultSet;
import java.sql.SQLException;
import java.sql.Statement;
import java.sql.Date;
import java.text.SimpleDateFormat;
import java.util.ArrayList;
import java.util.List;
import ru.yandex.clickhouse.ClickHouseDataSource;
import ru.yandex.clickhouse.settings.ClickHouseProperties;
public class Util {
private static final String JDBC_PREFIX = "jdbc:clickhouse://";
ArrayList<ArrayList<ArrayList<String>>> exeSql(ArrayList<String> sqlList) throws Exception {
ArrayList<ArrayList<ArrayList<String>>> multiSqlResults = new ArrayList<ArrayList<ArrayList<String>>>();
for (String sql : sqlList) {
ArrayList<ArrayList<String>> singleSqlResult = exeSql(sql);
multiSqlResults.add(singleSqlResult);
}
return multiSqlResults;
}
//数据查询工具函数
ArrayList<ArrayList<String>> exeSql(String sql) throws Exception {
ArrayList<ArrayList<String>> resultArrayList = new ArrayList<ArrayList<String>>();
List<String> serverList = Demo.ckLbServerList;
Connection connection = null;
Statement statement = null;
ResultSet resultSet;
String user = Demo.user;
String password = Demo.password;
try {
Class.forName("ru.yandex.clickhouse.ClickHouseDriver");
ClickHouseProperties clickHouseProperties = new ClickHouseProperties();
clickHouseProperties.setSocketTimeout(60000);
if (Demo.sslUsed) {
clickHouseProperties.setSsl(true);
clickHouseProperties.setSslMode("none");
}
for (int tries = 1; tries <= serverList.size(); tries++) {
try {
System.out.println("Current load balancer is " + serverList.get(tries - 1));
ClickHouseDataSource clickHouseDataSource =
new ClickHouseDataSource(JDBC_PREFIX + serverList.get(tries - 1), clickHouseProperties);
connection = clickHouseDataSource.getConnection(user, password);
statement = connection.createStatement();
System.out.println("Execute query: " + sql);
long begin = System.currentTimeMillis();
resultSet = statement.executeQuery(sql);
long end = System.currentTimeMillis();
if (null != resultSet && null != resultSet.getMetaData()) {
int columnCount = resultSet.getMetaData().getColumnCount();
ArrayList<String> rowResultArray = new ArrayList<String>();
for (int j = 1; j <= columnCount; j++) {
rowResultArray.add(resultSet.getMetaData().getColumnName(j));
}
resultArrayList.add(rowResultArray);
while (resultSet.next()) {
rowResultArray = new ArrayList<String>();
for (int j = 1; j <= columnCount; j++) {
rowResultArray.add(resultSet.getString(j));
}
if (rowResultArray.size() != 0) {
resultArrayList.add(rowResultArray);
}
}
}
} catch (Exception e) {
System.out.println(e.toString());
System.out.println("this is the " + tries);
if (tries == serverList.size()) {
throw e;
}
continue;
}
break;
}
} catch (Exception e) {
System.out.println(e.toString());
throw e;
} finally {
try {
if (statement != null) {
statement.close();
}
if (connection != null) {
connection.close();
}
} catch (SQLException e) {
System.out.println(e.getMessage());
}
}
return resultArrayList;
}
//数据插入工具函数
void insertData(String databaseName, String tableName, int batchNum, int batchRows) throws Exception {
List<String> serverList = Demo.ckLbServerList;
Connection connection = null;
String user = Demo.user;
String password = Demo.password;
try {
Class.forName("ru.yandex.clickhouse.ClickHouseDriver");
ClickHouseProperties clickHouseProperties = new ClickHouseProperties();
clickHouseProperties.setSocketTimeout(60000);
if (Demo.sslUsed) {
clickHouseProperties.setSsl(true);
clickHouseProperties.setSslMode("none");
}
for (int tries = 1; tries <= serverList.size(); tries++) {
try {
System.out.println("Current load balancer is " + serverList.get(tries - 1));
ClickHouseDataSource clickHouseDataSource =
new ClickHouseDataSource(JDBC_PREFIX + serverList.get(tries - 1), clickHouseProperties);
connection = clickHouseDataSource.getConnection(user, password);
String insertSql = "insert into " + databaseName + "." + tableName + " values (?,?,?)";
PreparedStatement preparedStatement = connection.prepareStatement(insertSql);
long allBatchBegin = System.currentTimeMillis();
for (int j = 0; j < batchNum; j++) {
for (int i = 0; i < batchRows; i++) {
preparedStatement.setString(1, "huawei_" + (i + j * 10));
preparedStatement.setInt(2, ((int) (Math.random() * 100)));
preparedStatement.setDate(3, generateRandomDate("2018-01-01", "2021-12-31"));
preparedStatement.addBatch();
}
long begin = System.currentTimeMillis();
preparedStatement.executeBatch();
long end = System.currentTimeMillis();
}
long allBatchEnd = System.currentTimeMillis();
} catch (Exception e) {
System.out.println(e.toString());
System.out.println("this is the " + tries);
if (tries == serverList.size()) {
throw e;
}
continue;
}
break;
}
} catch (Exception e) {
System.out.println(e.getMessage());
throw e;
} finally {
try {
if (connection != null) {
connection.close();
}
} catch (SQLException e) {
System.out.println(e.getMessage());
}
}
}
//测试数据生成工具函数
private Date generateRandomDate(String beginDate, String endDate) {
try {
SimpleDateFormat format = new SimpleDateFormat("yyyy-MM-dd");
java.util.Date start = format.parse(beginDate);// \u6784\u9020\u5f00\u59cb\u65e5\u671f
java.util.Date end = format.parse(endDate);// \u6784\u9020\u7ed3\u675f\u65e5\u671f
// getTime()\u8868\u793a\u8fd4\u56de\u81ea 1970 \u5e74 1 \u6708 1 \u65e5 00:00:00 GMT \u4ee5\u6765\u6b64 Date \u5bf9\u8c61\u8868\u793a\u7684\u6beb\u79d2\u6570\u3002
if (start.getTime() >= end.getTime()) {
return null;
}
long date = random(start.getTime(), end.getTime());
return new Date(date);
} catch (Exception e) {
e.printStackTrace();
}
return null;
}
//测试数据生成工具函数
private static long random(long begin, long end) {
long rtn = begin + (long) (Math.random() * (end - begin));
// \u5982\u679c\u8fd4\u56de\u7684\u662f\u5f00\u59cb\u65f6\u95f4\u548c\u7ed3\u675f\u65f6\u95f4\uff0c\u5219\u9012\u5f52\u8c03\u7528\u672c\u51fd\u6570\u67e5\u627e\u968f\u673a\u503c
if (rtn == begin || rtn == end) {
return random(begin, end);
}
return rtn;
}
}
程序打包
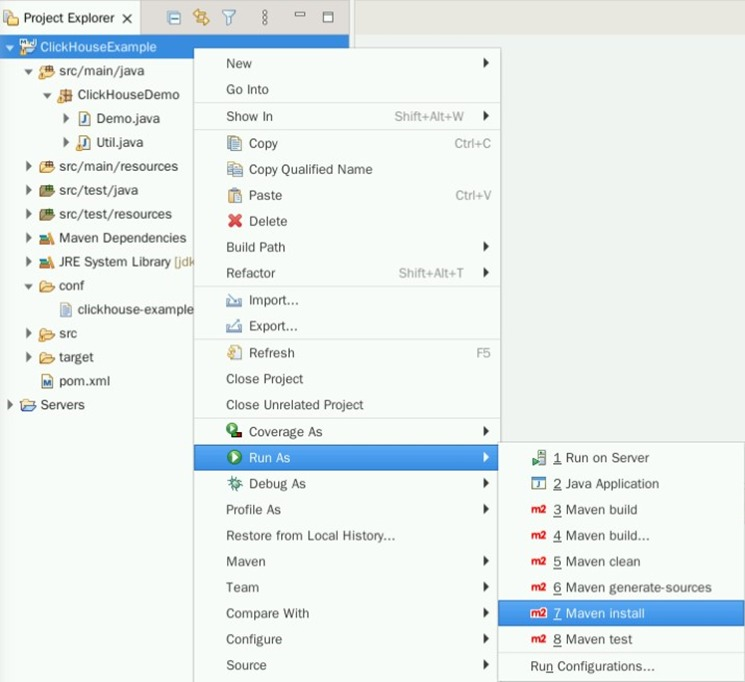
在ClickHouseExample右键,选择“Run As->Maven install”导出Jar包。
成功导出Jar包后,可以在target文件夹下找到ClickHouseExample-0.0.1-SNAPSHOT-jar-with-dependencies.jar
创建一个新的Xfce终端。将Eclipse工程中的ClickHouseExample-0.0.1-SNAPSHOT-jar-with-dependencies.jar及conf文件夹上传至大数据集群/home/omm目录下。
scp /home/user/eclipse-workspace/ClickHouseExample/target/ClickHouseExample-0.0.1-SNAPSHOT-jar-with-dependencies.jar root@xxx.xxx.xxx.xxx:/home/ommscp -r /home/user/eclipse-workspace/ClickHouseExample/conf root@xxx.xxx.xxx.xxx:/home/omm安装ClickHouse客户端

、打开实验桌面的“Xfce终端”,使用ssh命令连接集群。
解压客户端
cd /home/omm
tar -vxf FusionInsight_Cluster_1_ClickHouse_Client.tar
tar -vxf FusionInsight_Cluster_1_ClickHouse_ClientConfig.tar
安装ClickHouse客户端至/home/omm目录
cd FusionInsight_Cluster_1_ClickHouse_ClientConfig ./install.sh /home/omm/ClickHouseClient
程序运行
进入/home/omm目录,修改文件权限为777。
cd /home/omm
chmod 777 ClickHouseExample-0.0.1-SNAPSHOT-jar-with-dependencies.jar
切换到ClickHouse安装目录
cd /home/omm/ClickHouseClientsource bigdata_env