上一章讲解了SpringBoot中的 AutoConfiguration自动装配,而这一章就来讲讲自动装配时会用到的Spring三大特性之一的IOC控制反转。
使用过Spring的人都熟知,SpringIOC容器可以在对象生成或初始化时就直接将数据注入到对象中,如果对象A的属性是另一个对象B,还可以将这个对象B的引用注入到注入到A的数据域中.
如果在初始化对象A的时候,对象B还没有进行初始化,而A又需要对象B作为自己的属性,那么就会用一种递归的方式进行注入,这样就可以把对象的依赖关系清晰有序的建立起来.
IOC容器解决问题的核心就是把创建和管理对象的控制权从具体的业务对象手中抢过来.由IOC容器来管理对象之间的依赖关系,并由IOC容器完成对象的注入.这样就把应用从复杂的对象依赖关系的管理中解放出来,简化了程序的开发过程.
springboot项目从一个main方法开始,main方法将会调用SpringApplication的run方法开始springboot的启动流程。所以,本文即从构造SpringApplication对象开始。
@SpringBootApplication
public class SpringBootLearnApplication {

    public static void main(String[] args) {
        SpringApplication.run(SpringBootLearnApplication.class, args);
    }

}
我们跟进SpringApplication的run方法
    public static ConfigurableApplicationContext run(Class<?> primarySource, String... args) {
        return run(new Class[]{primarySource}, args);
    }
这是一个静态方法,入参有两个:
1)main方法所在的类,该类后续将被作为主要的资源来使用,比如通过该类获取到basePackage;
2)main方法的命令行参数,命令行参数可以通过main传入,也就意味着可以在springboot启动的时候设置对应的参数,比如当前是dev环境、还是production环境等。
第2行代码,run方法将调用另外一个内部run方法,并返回一个ConfigurableApplicationContext,预示着spring容器将在后续过程中创建。
跟进另一个run方法
    public static ConfigurableApplicationContext run(Class<?>[] primarySources, String[] args) {
        return (new SpringApplication(primarySources)).run(args);
    }
run方法中先是构造了一个SpringApplication实例对象,而后调用了SpringApplication的成员方法run,这个run方法将包含springboot启动流程的核心逻辑。
让我们继续跟进另一个run方法
public ConfigurableApplicationContext run(String... args) {
    // 声明一个Context容器
    ConfigurableApplicationContext context = null;
    // 获取监听器
    SpringApplicationRunListeners listeners = getRunListeners(args);
    // 调用监听器的启动
    listeners.starting();

    try {
        // 创建并配置Environment(这个过程会加载application配置文件)
        ConfigurableEnvironment environment = prepareEnvironment(listeners, applicationArguments);
        // 根据应用类型创建对应的Context容器
        context = createApplicationContext();

        // 刷新Context容器之前的准备
        prepareContext(context, environment, listeners, applicationArguments, printedBanner);
        // 刷新Context容器
        refreshContext(context);
        // 刷新Context容器之后处理
        afterRefresh(context, applicationArguments);

        // Context容器refresh完毕发布
        listeners.started(context);

        // 触发Context容器refresh完以后的执行
        callRunners(context, applicationArguments);
    } catch (Throwable ex) {}

    try {
        // Context启动完毕,Runner运行完毕发布
        listeners.running(context);
    } catch (Throwable ex) {}

    return context;
}
run方法中,prepareContext和afterRefresh之间的refreshContext方法正是ioc容器刷新的入口方法。
打开refreshContext方法
    private void refreshContext(ConfigurableApplicationContext context) {
        if (this.registerShutdownHook) {
            try {
                context.registerShutdownHook();
            } catch (AccessControlException var3) {
            }
        }

        this.refresh((ApplicationContext)context);
    }
跟进this.refresh((ApplicationContext)context);
    @Deprecated
    protected void refresh(ApplicationContext applicationContext) {
        Assert.isInstanceOf(ConfigurableApplicationContext.class, applicationContext);
        this.refresh((ConfigurableApplicationContext)applicationContext);
    }

    protected void refresh(ConfigurableApplicationContext applicationContext) {
        applicationContext.refresh();
    }
我们可以看到最终调用的是参数未ConfigurableApplicationContext的refresh方法。而ConfigurableApplicationContext是一个接口
我们可以看看他的继承关系。
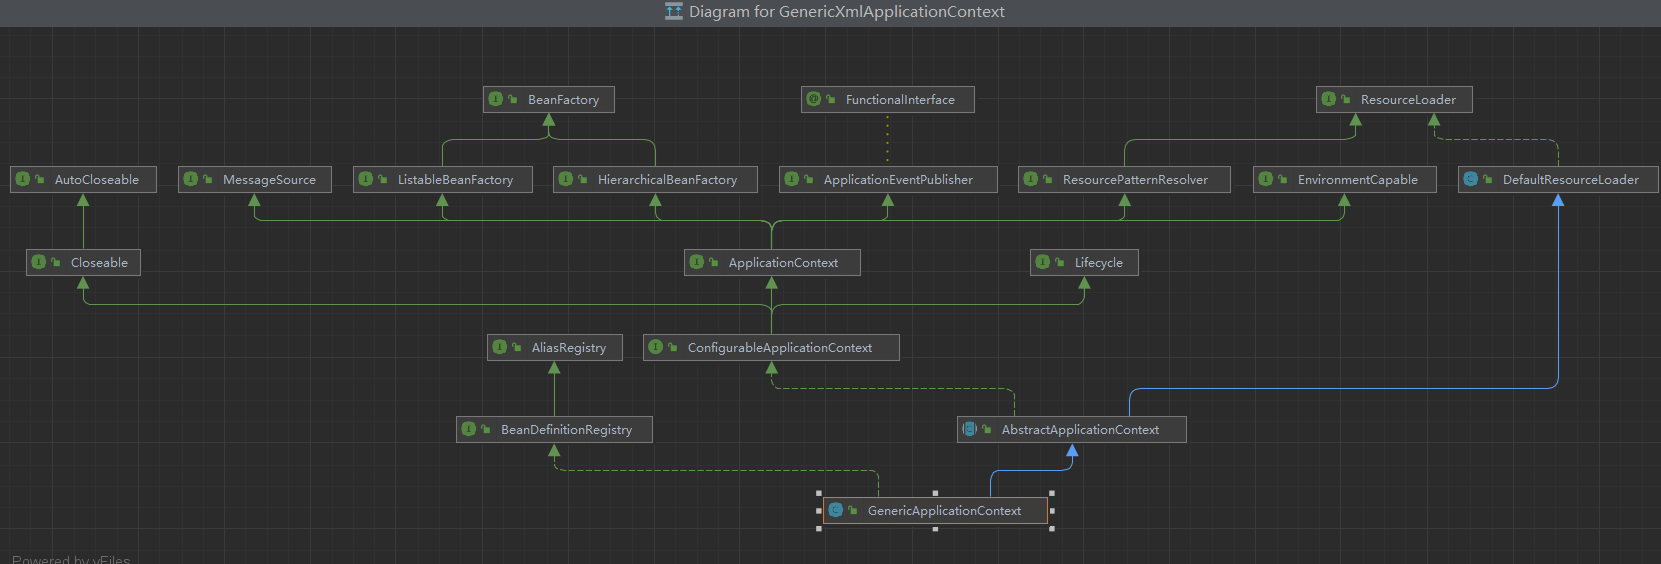
可以看到最终最终由AbstractApplicationContext进行实现refresh方法。
继续跟进AbstractApplicationContext的refresh方法。
 public void refresh() throws BeansException, IllegalStateException {
        synchronized(this.startupShutdownMonitor) {
             // 刷新前准备,设置flag、时间,初始化properties等
            this.prepareRefresh();
            // 获取ApplicationContext中组合的BeanFactory
            ConfigurableListableBeanFactory beanFactory = this.obtainFreshBeanFactory();
            // 设置类加载器,添加后置处理器等准备
            this.prepareBeanFactory(beanFactory);

            try {
                // 供子类实现的后置处理
                this.postProcessBeanFactory(beanFactory);
                 // 调用Bean工厂的后置处理器
                this.invokeBeanFactoryPostProcessors(beanFactory);
                // 注册Bean的后置处理器
                this.registerBeanPostProcessors(beanFactory);
                 // 初始化消息源
                this.initMessageSource();
                 // 初始化事件广播
                this.initApplicationEventMulticaster();
                // 供之类实现的,初始化特殊的Bean
                this.onRefresh();
                // 注册监听器
                this.registerListeners();
                // 实例化所有的(non-lazy-init)单例Bean
                this.finishBeanFactoryInitialization(beanFactory);
                // 发布刷新完毕事件
                this.finishRefresh();
            } catch (BeansException var9) {
                if (this.logger.isWarnEnabled()) {
                    this.logger.warn("Exception encountered during context initialization - cancelling refresh attempt: " + var9);
                }

                this.destroyBeans();
                this.cancelRefresh(var9);
                throw var9;
            } finally {
                this.resetCommonCaches();
            }

        }
    }
首先我们得知道初始化过程,annotation或者xml中Bean的配置 --> 内存中的BeanDefinition --> Bean的过程。也就是实际的配置,转化成内存中的配置对象,再根据配置对象转化成具体的实例对象。
而从annotation或者xml的Bean配置 --> 内存中的BeanDefinition的过程。这个过程的实现在调用Bean工厂的后置处理器的时候完成,也就是invokeBeanFactoryPostProcessors方法。
让我们跟进invokeBeanFactoryPostProcessors方法
protected void invokeBeanFactoryPostProcessors(ConfigurableListableBeanFactory beanFactory) {
 PostProcessorRegistrationDelegate.invokeBeanFactoryPostProcessors(beanFactory,this.getBeanFactoryPostProcessors();
//......
    }
这里先获取了所有后置处理器,然后调用处理。再跟进PostProcessorRegistrationDelegate的invokeBeanFactoryFactoryPostProcessors方法
该方法很长,我们删减掉大部分内容
public static void invokeBeanFactoryPostProcessors(
        ConfigurableListableBeanFactory beanFactory,
        List<BeanFactoryPostProcessor> beanFactoryPostProcessors
        ) {
    //
    if (beanFactory instanceof BeanDefinitionRegistry) {
        //
        while (reiterate) {
            // 调用BeanDefinition注册的后置处理器
            invokeBeanDefinitionRegistryPostProcessors(currentRegistryProcessors, registry);
            //
        }
        //
    } else {
        //
    }
    //
}
可以看到,调用后置处理器的时候会调用到注册BeanDefinition的后置处理器。也就是从这里开始作为BeanDefinition的注册入口
跟进invokeBeanDefinitionRegistryPostProcessors
private static void invokeBeanDefinitionRegistryPostProcessors(
            Collection<? extends BeanDefinitionRegistryPostProcessor> postProcessors,
            BeanDefinitionRegistry registry
            ) {
    for (BeanDefinitionRegistryPostProcessor postProcessor : postProcessors) {
        postProcessor.postProcessBeanDefinitionRegistry(registry);
    }
}
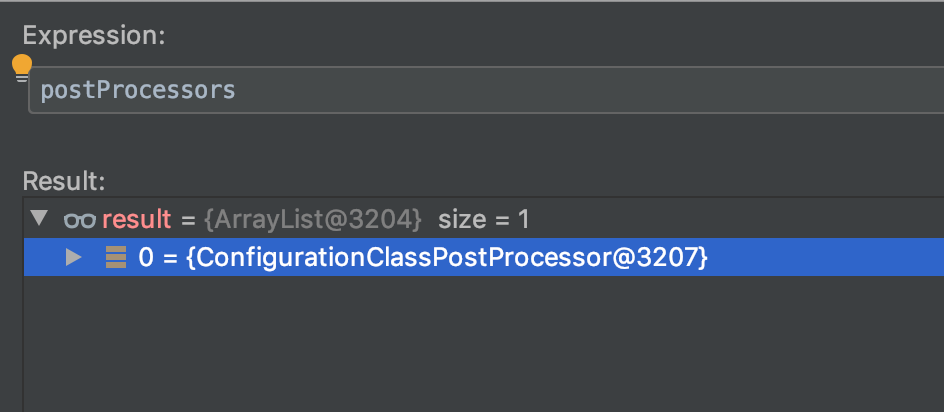
通过debug 我们看到了ConfigurationClassPostProcessor也就是它完成BeanDefinition注册这项工作的
我们跟进ConfigurationClassPostProcessor的postProcessBeanDefinitionRegistry方法
public void processConfigBeanDefinitions(BeanDefinitionRegistry registry) {
    List<BeanDefinitionHolder> configCandidates = new ArrayList<>();
    String[] candidateNames = registry.getBeanDefinitionNames();

    for (String beanName : candidateNames) {
        BeanDefinition beanDef = registry.getBeanDefinition(beanName);
        if (ConfigurationClassUtils.isFullConfigurationClass(beanDef) ||
                ConfigurationClassUtils.isLiteConfigurationClass(beanDef)) {
            //
        } else if (ConfigurationClassUtils.checkConfigurationClassCandidate(beanDef, this.metadataReaderFactory)) {
            // 默认仅有主类被添加
            configCandidates.add(new BeanDefinitionHolder(beanDef, beanName));
        }
    }

    //

    // 解析被 @Configuration 注解的类
    ConfigurationClassParser parser = new ConfigurationClassParser(
            this.metadataReaderFactory,
            this.problemReporter,
            this.environment,
            this.resourceLoader,
            this.componentScanBeanNameGenerator,
            registry);

    Set<BeanDefinitionHolder> candidates = new LinkedHashSet<>(configCandidates);
    //
    do {
        // 解析的核心方法
        parser.parse(candidates);
        parser.validate();

        //

        candidates.clear();
        //
    } while (!candidates.isEmpty());
    //
}
该主类将被作为一个配置类被解析,解析器即ConfigurationClassParser。
我们跟进parse方法看看
public void parse(Set<BeanDefinitionHolder> configCandidates) {
    for (BeanDefinitionHolder holder : configCandidates) {
        BeanDefinition bd = holder.getBeanDefinition();
        try {
            if (bd instanceof AnnotatedBeanDefinition) {
                // 主类的解析将从这里进入
                parse(((AnnotatedBeanDefinition) bd).getMetadata(), holder.getBeanName());
            } else if (bd instanceof AbstractBeanDefinition && ((AbstractBeanDefinition) bd).hasBeanClass()) {
                parse(((AbstractBeanDefinition) bd).getBeanClass(), holder.getBeanName());
            } else {
                parse(bd.getBeanClassName(), holder.getBeanName());
            }
        } catch (BeanDefinitionStoreException ex) {}
          catch (Throwable ex) {}
    }

    this.deferredImportSelectorHandler.process();
}
继续跟进parse方法
protected final void parse(AnnotationMetadata metadata, String beanName) throws IOException {
    processConfigurationClass(new ConfigurationClass(metadata, beanName));
}
可以看到主类作为配置类的解析过程将从processConfigurationClass这里开始
跟进processConfigurationClass方法
protected void processConfigurationClass(ConfigurationClass configClass) throws IOException {
    //

    // 由main方法所在的主类开始,向超类逐层向上递归解析
    SourceClass sourceClass = asSourceClass(configClass);
    do {
        // 这里包含了解析单个配置类的核心逻辑
        sourceClass = doProcessConfigurationClass(configClass, sourceClass);
    } while (sourceClass != null);

    //
}
我们注意到,doProcessConfigurationClass方法将会完成解析的主要工作,但是又会返回一个新的sourceClass用于解析。而这个新的sourceClass会是当前上一个sourceClass的父类。所在解析过程是一个递归过程,由主类开始,向超类逐层向上递归解析处理。
继续跟进doProcessConfigurationClass方法,我们看看这个核心的解析逻辑。代码量对较多,我们只关注两个点
1)@ComponentScan注解解析,扫描并注册BeanDefinition
2)获取超类向上递归
protected final SourceClass doProcessConfigurationClass(ConfigurationClass configClass, SourceClass sourceClass)
        throws IOException {
    //

    // 处理@ComponentScan注解
    Set<AnnotationAttributes> componentScans = AnnotationConfigUtils.attributesForRepeatable(sourceClass.getMetadata(), ComponentScans.class, ComponentScan.class);
    if (!componentScans.isEmpty() &&
            !this.conditionEvaluator.shouldSkip(sourceClass.getMetadata(), ConfigurationPhase.REGISTER_BEAN)) {
        // 遍历@ComponentScan的属性值
        for (AnnotationAttributes componentScan : componentScans) {
            // 解析扫描
            Set<BeanDefinitionHolder> scannedBeanDefinitions = this.componentScanParser.parse(componentScan, sourceClass.getMetadata().getClassName());
            //
        }
    }

    //

    // 判断是否有超类
    if (sourceClass.getMetadata().hasSuperClass()) {
        String superclass = sourceClass.getMetadata().getSuperClassName();
        if (superclass != null && !superclass.startsWith("java") &&
                !this.knownSuperclasses.containsKey(superclass)) {
            this.knownSuperclasses.put(superclass, configClass);
            // 返回待解析的超类
            return sourceClass.getSuperClass();
        }
    }

    // 没有超类,则解析完毕
    return null;
}
首先我们main方法所在的主类是被@SpringbootApplication注解所标注的,而@SpringbootApplication组合了@ComponentScan。所谓解析主类的时候将会处理@ComponentScan注解。解析@ComponentScan的主要工作的实现由ComponentScanAnnotationParser这个解析器来完成。通常这个解析器完成之后,被扫描到的BeanDefinition将会被注册到BeanFactory当中。
doProcessConfigurationClass方法的最后一部分是从当前被解析的类元数据中获取超类,如果超类存在且需要被解析那么就当做返回值返回回去,从而被外层的方法给递归处理。
总结
到这里,ioc容器refresh过程部分就结束了。我们略过不少东西,将解析主类、解析@ComponentScan扫描Bean定义、注册到BeanFactory这个主要的流程过了一遍。当然,在这里可能还存在一个比较困惑的点。前面的文章中,我们提过几次:配置 -> BeanDefinition -> Bean这样一个过程。ioc的refresh过程却只有从配置 -> BeanDefinition这样一个过程,那么BeanDefinition -> Bean这个过程又在哪里呢?
上文讲到refresh只是把BeanDefinition注册到BeanFactory中,而不是把Bean注册到BeanFactory中。
而是在我们调用上下文的getBean的时候才会去根据BeanDefinition生成
@Override
public Object getBean(String name) throws BeansException {
    //
    return getBeanFactory().getBean(name);
}
上下文的getBean方法把功能实现委托给了BeanFactory,跟进AbstractBeanFactory的getBean方法
@Override
public Object getBean(String name) throws BeansException {
    return doGetBean(name, null, null, false);
}
跟进doGetBean方法
protected <T> T doGetBean(
        final String name,
        @Nullable final Class<T> requiredType,
        @Nullable final Object[] args,
        boolean typeCheckOnly) throws BeansException {

    final String beanName = transformedBeanName(name);
    Object bean;

    // 如果拿到已经注册的单例Bean,直接返回结果
    Object sharedInstance = getSingleton(beanName);
    if (sharedInstance != null && args == null) {
        //
        bean = getObjectForBeanInstance(sharedInstance, name, beanName, null);
    } else {

        //

        try {
            final RootBeanDefinition mbd = getMergedLocalBeanDefinition(beanName);

            //

            // 创建单例
            if (mbd.isSingleton()) {
                // 回调创建
                sharedInstance = getSingleton(beanName, () -> {
                    try {
                        return createBean(beanName, mbd, args);
                    } catch (BeansException ex) {
                        //
                    }
                });
                bean = getObjectForBeanInstance(sharedInstance, name, beanName, mbd);
            } else if (mbd.isPrototype()) {
                Object prototypeInstance = null;
                try {
                    beforePrototypeCreation(beanName);
                    // 每次创建
                    prototypeInstance = createBean(beanName, mbd, args);
                } finally {
                    //
                }
                bean = getObjectForBeanInstance(prototypeInstance, name, beanName, mbd);
            } else {
                //
            }
        } catch (BeansException ex) {
            //
        }
    }
    //

    return (T) bean;
}
该方法的逻辑是先去单例的缓存中找,如果找得到直接返回。如果找不到,那么判断是单例还是原型,如果是单例创建并缓存,如果是原型那么每次都创建新的。
跟进创建单例的时候的getSingleton方法
private final Map<String, Object> singletonObjects = new ConcurrentHashMap<>(256);

public Object getSingleton(String beanName, ObjectFactory<?> singletonFactory) {
    // 内置锁控制
    synchronized (this.singletonObjects) {
        // 双重校验
        Object singletonObject = this.singletonObjects.get(beanName);
        if (singletonObject == null) {
            //

            boolean newSingleton = false;
            //
            try {
                // 回调创建Bean
                singletonObject = singletonFactory.getObject();
                newSingleton = true;
            }
            catch (IllegalStateException ex) {
                //
            }
            catch (BeanCreationException ex) {
                //
            } finally {
                //
            }
            if (newSingleton) {
                // 添加单例到缓存中
                addSingleton(beanName, singletonObject);
            }
        }
        return singletonObject;
    }
}
这里采用双重校验机制控制了单例,如果二次校验的时候发现缓存中没有Bean,那么就会回调创建的方法去创建一个Bean,然后再注册到本地堆缓存当中。
createBean创建Bean
创建实现委托给了createBean方法,该方法的实现属于AbstractAutowireCapableBeanFactory,跟进该类的CreateBean方法
@Override
protected Object createBean(
        String beanName,
        RootBeanDefinition mbd,
        @Nullable Object[] args) throws BeanCreationException {
    //
    RootBeanDefinition mbdToUse = mbd;

    //

    try {
        // 创建Bean实例
        Object beanInstance = doCreateBean(beanName, mbdToUse, args);
        //
        return beanInstance;
    } catch (BeanCreationException | ImplicitlyAppearedSingletonException ex) {
        //
    } catch (Throwable ex) {
        //
    }
}
继续跟进doCreateBean
protected Object doCreateBean(
        final String beanName,
        final RootBeanDefinition mbd,
        final @Nullable Object[] args) throws BeanCreationException {

    // 创建Bean实例对象
    BeanWrapper instanceWrapper = null;
    //
    if (instanceWrapper == null) {
        instanceWrapper = createBeanInstance(beanName, mbd, args);
    }
    //
    try {
        // 自动注入
        populateBean(beanName, mbd, instanceWrapper);
        //
    } catch (Throwable ex) {
        //
    }
    //

    return exposedObject;
}
createBeanInstance创建实例,到这里,BeanDefinition就被初步创建成为了一个Bean实例对象。
populateBean自动注入
前面我们说到,doCreateBean有两个步骤
1)创建Bean实例对象
2)自动注入
接下来,我们跟进populateBean方法看看当前这个创建好的Bean实例实怎么注入其它Bean的
protected void populateBean(String beanName, RootBeanDefinition mbd, @Nullable BeanWrapper bw) {
    //

    // 获取待注入的property,配置文件中配置的<property>将在这里被处理
    PropertyValues pvs = (mbd.hasPropertyValues() ? mbd.getPropertyValues() : null);

    // 按照名字或者类型获取属性,这里会进行递归
    if (mbd.getResolvedAutowireMode() == AUTOWIRE_BY_NAME || mbd.getResolvedAutowireMode() == AUTOWIRE_BY_TYPE) {
        MutablePropertyValues newPvs = new MutablePropertyValues(pvs);
        // 按照名字获取属性
        if (mbd.getResolvedAutowireMode() == AUTOWIRE_BY_NAME) {
            autowireByName(beanName, mbd, bw, newPvs);
        }
        // 按照类型获取属性
        if (mbd.getResolvedAutowireMode() == AUTOWIRE_BY_TYPE) {
            autowireByType(beanName, mbd, bw, newPvs);
        }
        pvs = newPvs;
    }

    boolean hasInstAwareBpps = hasInstantiationAwareBeanPostProcessors();
    boolean needsDepCheck = (mbd.getDependencyCheck() != AbstractBeanDefinition.DEPENDENCY_CHECK_NONE);

    PropertyDescriptor[] filteredPds = null;
    if (hasInstAwareBpps) {
        if (pvs == null) {
            pvs = mbd.getPropertyValues();
        }
        for (BeanPostProcessor bp : getBeanPostProcessors()) {
            if (bp instanceof InstantiationAwareBeanPostProcessor) {
                InstantiationAwareBeanPostProcessor ibp = (InstantiationAwareBeanPostProcessor) bp;
                PropertyValues pvsToUse = ibp.postProcessProperties(pvs, bw.getWrappedInstance(), beanName);
                if (pvsToUse == null) {
                    if (filteredPds == null) {
                        filteredPds = filterPropertyDescriptorsForDependencyCheck(bw, mbd.allowCaching);
                    }
                    // 后置处理器处理@Autowired @Resource等注解
                    pvsToUse = ibp.postProcessPropertyValues(pvs, filteredPds, bw.getWrappedInstance(), beanName);
                    if (pvsToUse == null) {
                        return;
                    }
                }
                pvs = pvsToUse;
            }
        }
    }
    // 注入<property>属性
    if (pvs != null) {
        applyPropertyValues(beanName, mbd, bw, pvs);
    }
}
我们看到populateBean主要做两件事,获取属性值,然后把属性值给注入到Bean里面去。
我们重点关注后置处理器处理@Autowired @Resource注解的逻辑。
跟进AutowiredAnnotationBeanPostProcessor类的postProcessPropertyValues方法
public PropertyValues postProcessPropertyValues(
        PropertyValues pvs, PropertyDescriptor[] pds, Object bean, String beanName) {

    return postProcessProperties(pvs, bean, beanName);
}
跟进postProcessProperties方法
public PropertyValues postProcessProperties(PropertyValues pvs, Object bean, String beanName) {
    // 获取当前Bean的元数据,将包含@Autowired等注解的标注的待注入元素
    InjectionMetadata metadata = findAutowiringMetadata(beanName, bean.getClass(), pvs);
    try {
        // 注入元素
        metadata.inject(bean, beanName, pvs);
    }
    catch (BeanCreationException ex) {
        throw ex;
    }
    catch (Throwable ex) {
        throw new BeanCreationException(beanName, "Injection of autowired dependencies failed", ex);
    }
    return pvs;
}
后置处理属性值包含两件事,找到当前Bean被@Autowired等注解标注的待注入的元素,然后注入相应的到元素。
跟进findAutowiringMetadata方法
private InjectionMetadata findAutowiringMetadata(String beanName, Class<?> clazz, @Nullable PropertyValues pvs) {
.
    String cacheKey = (StringUtils.hasLength(beanName) ? beanName : clazz.getName());

    InjectionMetadata metadata = this.injectionMetadataCache.get(cacheKey);
    if (InjectionMetadata.needsRefresh(metadata, clazz)) {
        synchronized (this.injectionMetadataCache) {
            metadata = this.injectionMetadataCache.get(cacheKey);
            if (InjectionMetadata.needsRefresh(metadata, clazz)) {
                if (metadata != null) {
                    metadata.clear(pvs);
                }
                // 构造元数据
                metadata = buildAutowiringMetadata(clazz);
                this.injectionMetadataCache.put(cacheKey, metadata);
            }
        }
    }
    return metadata;
}
这里找到注解@Autowired的Field以后包装成Element,然后向父类递归,最后包装成元数据
我们回到postProcessProperties方法以后,再跟进inject注入方法看看
protected void inject(Object target, @Nullable String requestingBeanName, @Nullable PropertyValues pvs)
        throws Throwable {

    if (this.isField) {
        Field field = (Field) this.member;
        ReflectionUtils.makeAccessible(field);
        // 反射设置值,这里的取值会对依赖进行递归处理
        field.set(target, getResourceToInject(target, requestingBeanName));
    } else {
        // 省略
    }
}
这里主要是对Bean的Field的一个反射来设置值,值的获取将会进行递归处理
CommonAnnotationBeanPostProcessor处理@Resource注入注解
private InjectionMetadata buildResourceMetadata(final Class<?> clazz) {
    List<InjectionMetadata.InjectedElement> elements = new ArrayList<>();
    Class<?> targetClass = clazz;

    do {
        final List<InjectionMetadata.InjectedElement> currElements = new ArrayList<>();

        ReflectionUtils.doWithLocalFields(targetClass, field -> {
            if (webServiceRefClass != null && field.isAnnotationPresent(webServiceRefClass)) {
                //
            }
            else if (ejbRefClass != null && field.isAnnotationPresent(ejbRefClass)) {
                //
            }
            // 如果注解了@Resource
            else if (field.isAnnotationPresent(Resource.class)) {
                //
                if (!this.ignoredResourceTypes.contains(field.getType().getName())) {
                    // 添加element
                    currElements.add(new ResourceElement(field, field, null));
                }
            }
        });

        //

        elements.addAll(0, currElements);
        // 向父类递归
        targetClass = targetClass.getSuperclass();
    }
    while (targetClass != null && targetClass != Object.class);

    return new InjectionMetadata(clazz, elements);
}
元数据返回以后的流程和@Autowired也是一样的。
总结
本文粗略地过了一下ioc依赖注入的过程,从BeanDefinition --> Bean的过程。我们一开始创建了Bean的实例,然后再通过递归解析依赖注入处理把Bean之间的关系结合处理。在最后还提了一下@Autowired和@Resource的后置处理器。
依赖注入的过程相对来说还是很复杂的,包含了非常多的细节处理。但是我们可以简单地去概括一下它,整个依赖注入的过程就是创建Bean,并建立Bean之间的关系。
以上内容均来自下面文章,本人只是自己做了个总结,方便以后学习,如有侵权,请告知我,马上删除!