防火墙相关概念
防火墙定义
防火墙技术是通过有机结合各类用于安全管理与筛选的软件和硬件设备,帮助计算机网络于其内、外网之间构建一道相对隔绝的保护屏障,以保护用户资料与信息安全性的一种技术。
用途
防火墙技术的功能主要在于及时发现并处理计算机网络运行时可能存在的安全风险、数据传输等问题,其中处理措施包括隔离与保护,同时可对计算机网络安全当中的各项操作实施记录与检测,以确保计算机网络运行的安全性,保障用户资料与信息的完整性,为用户提供更好、更安全的计算机网络使用体验。
著名厂商
国内:天融信TOPSEC、华为HUAWEI、新华三H3C、Hillstone、深信服SANGFOR、Fortinet防特网、迪普科技DPtech、启明星辰、绿盟科技、奇安信等
国外:Cisco、卡巴斯基等
Linux中的防火墙
Linux中,真正的防火墙是netfilter,使用Iptables和firewalld进行防火墙管理
其实Iptables和firewalld服务不是真正的防火墙,只是用来定义防火墙规则功能的"防火墙管理工具",将定义好的规则交由内核中的netfilter即网络过滤器来读取,从而真正实现防火墙功能。
netfilter无记忆功能,断电即丢失,需要iptables服务开机载入配置,关机导出来。
名词解释
表(table):存放链的容器,防护墙的最大概念
链(chain):存放规则的容器
规则(policy):准许或者拒绝规则
| netfilter | 表 | 链 | 规则 |
|---|---|---|---|
| 一栋楼 | 楼里面的房子 | 房子里的柜子 | 柜子里的衣服(规则) |
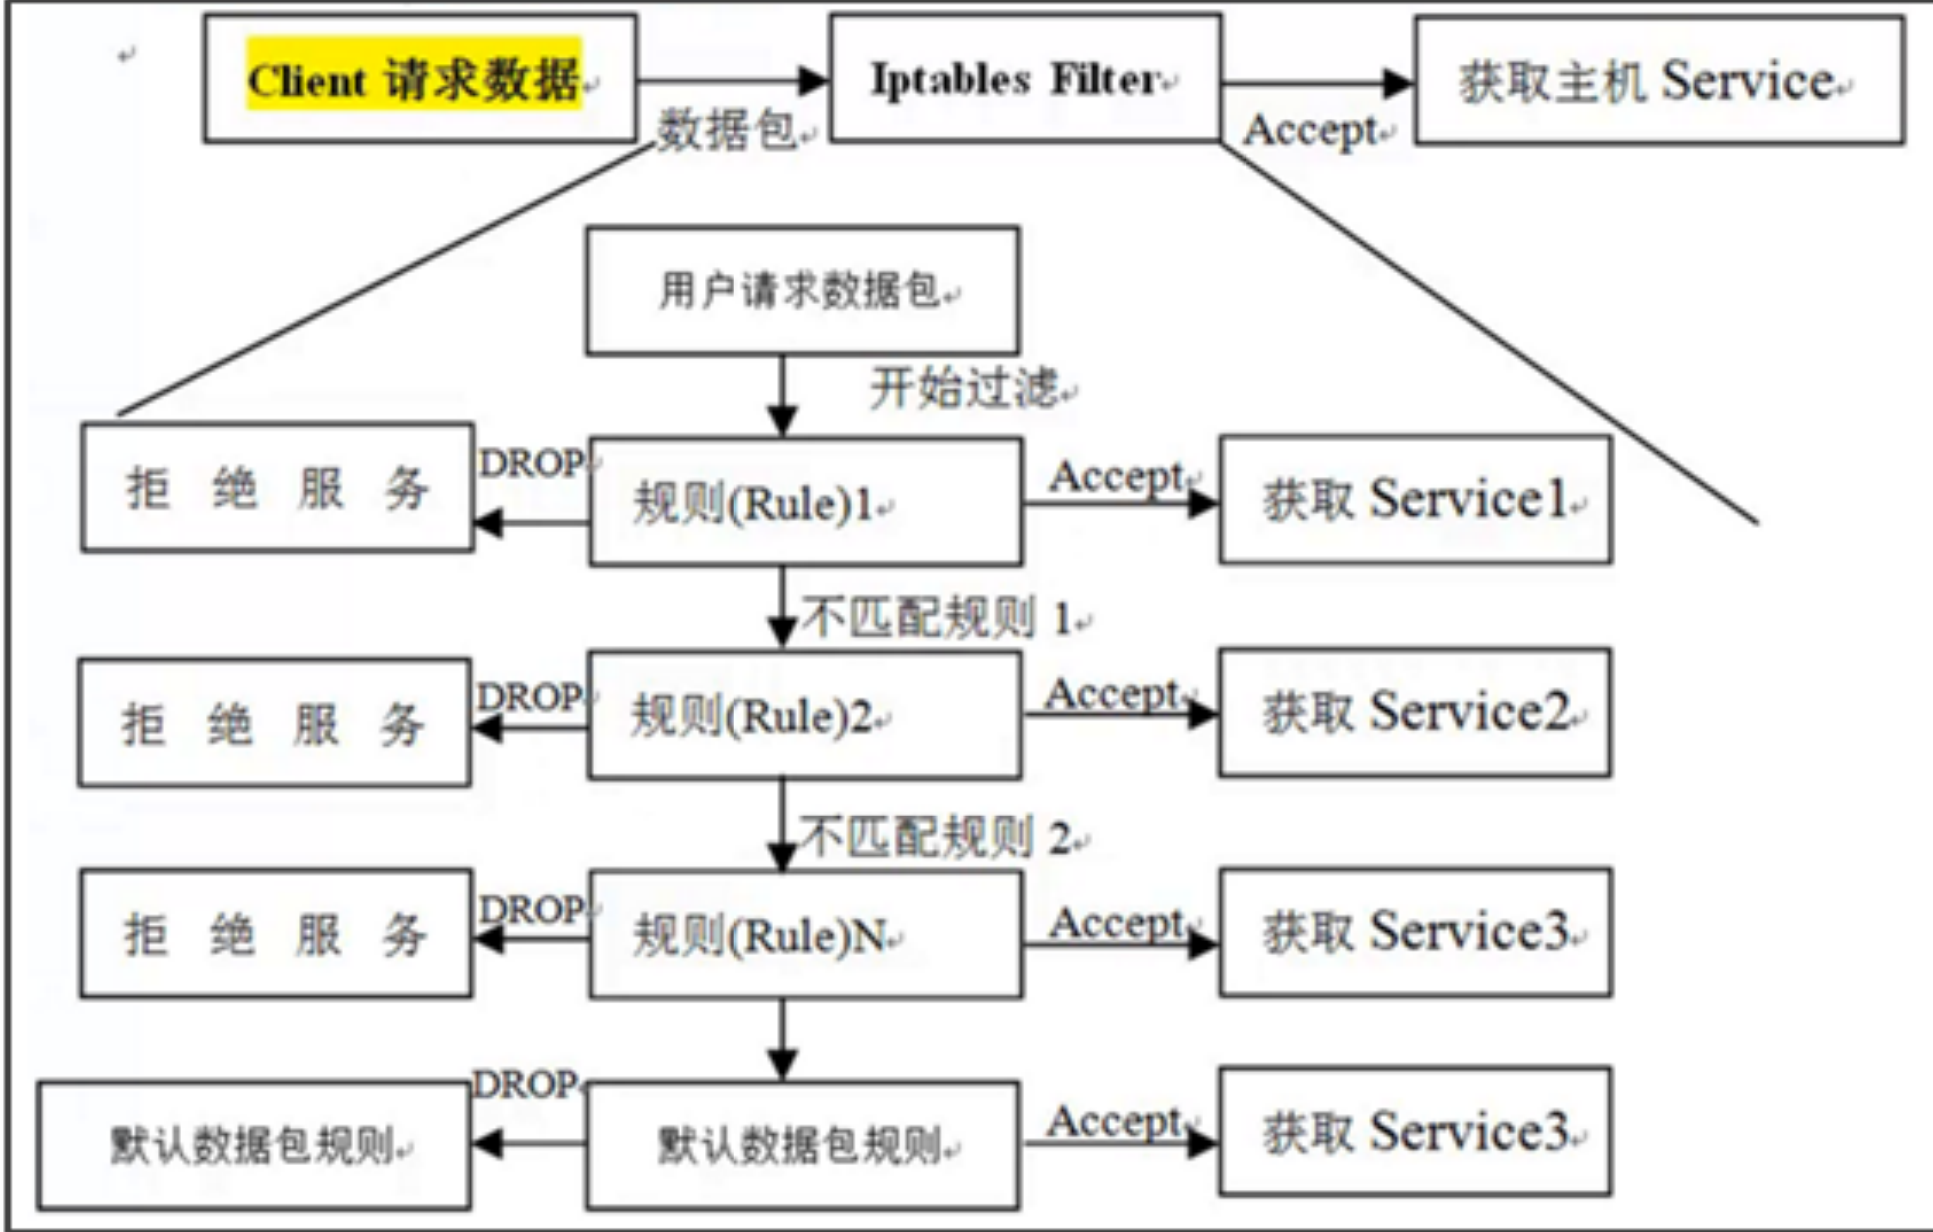
基本执行流程
-
防⽕墙是层层过滤的,实际是按照配置规则的顺序从上到下,从前到后进⾏过滤的。
-
如果匹配成功规则,即明确表示是拒绝(DROP)还是接收(ACCEPT),数据包就不再向下匹配新的规则。
-
如果规则中没有明确表明是阻⽌还是通过的,也就是没有匹配规则,向下进⾏匹配,直到匹配默认规则得到明
确的阻⽌还是通过。
- 防⽕墙的默认规则是所有规则都匹配完才会匹配的。
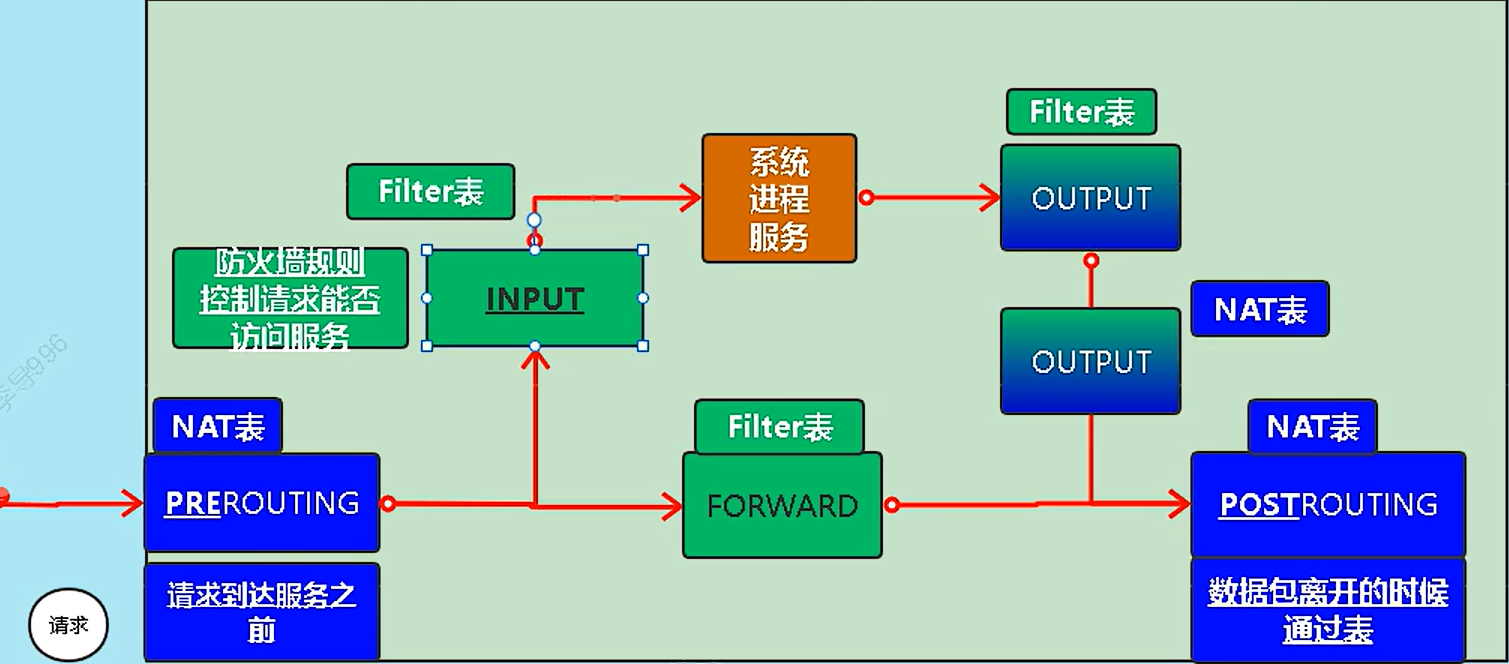
五链
iptables命令中设置数据过滤或处理数据包的策略叫做规则,将多个规则合成一个链,叫规则链。 规则链则依据处理数据包的位置不同分类:
- PREROUTING
- 在进行路由判断之前所要进行的规则(DNAT/REDIRECT)
- INPUT
- 处理入站的数据包
- OUTPUT
- 处理出站的数据包
- FORWARD
- 处理转发的数据包
- POSTROUTING
- 在进行路由判断之后所要进行的规则(SNAT/MASQUERADE)
四表
iptables中的规则表是用于容纳规则链,规则表默认是允许状态的,那么规则链就是设置被禁止的规则,而反之如果规则表是禁止状态的,那么规则链就是设置被允许的规则。
- raw表
- 确定是否对该数据包进行状态跟踪(较少使用)
- mangle表
- 为数据包设置标记(较少使用)
- nat表
- 修改数据包中的源、目标IP地址或端口
- filter表
- 确定是否放行该数据包(过滤)
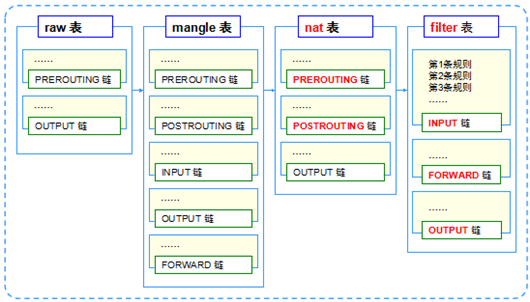
规则表的先后顺序:raw→mangle→nat→filter
规则链的先后顺序:
- 入站顺序
- PREROUTING→INPUT
- 出站顺序
- OUTPUT→POSTROUTING
- 转发顺序
- PREROUTING→FORWARD→POSTROUTING
基本选项和用法
[root@laohu ~]# yum install -y iptables-services #安装/更新最新防火墙服务
[root@laohu ~]# systemctl stop firewalld #关闭防火墙
[root@laohu ~]# systemctl disable firewalld #永久关闭防火墙
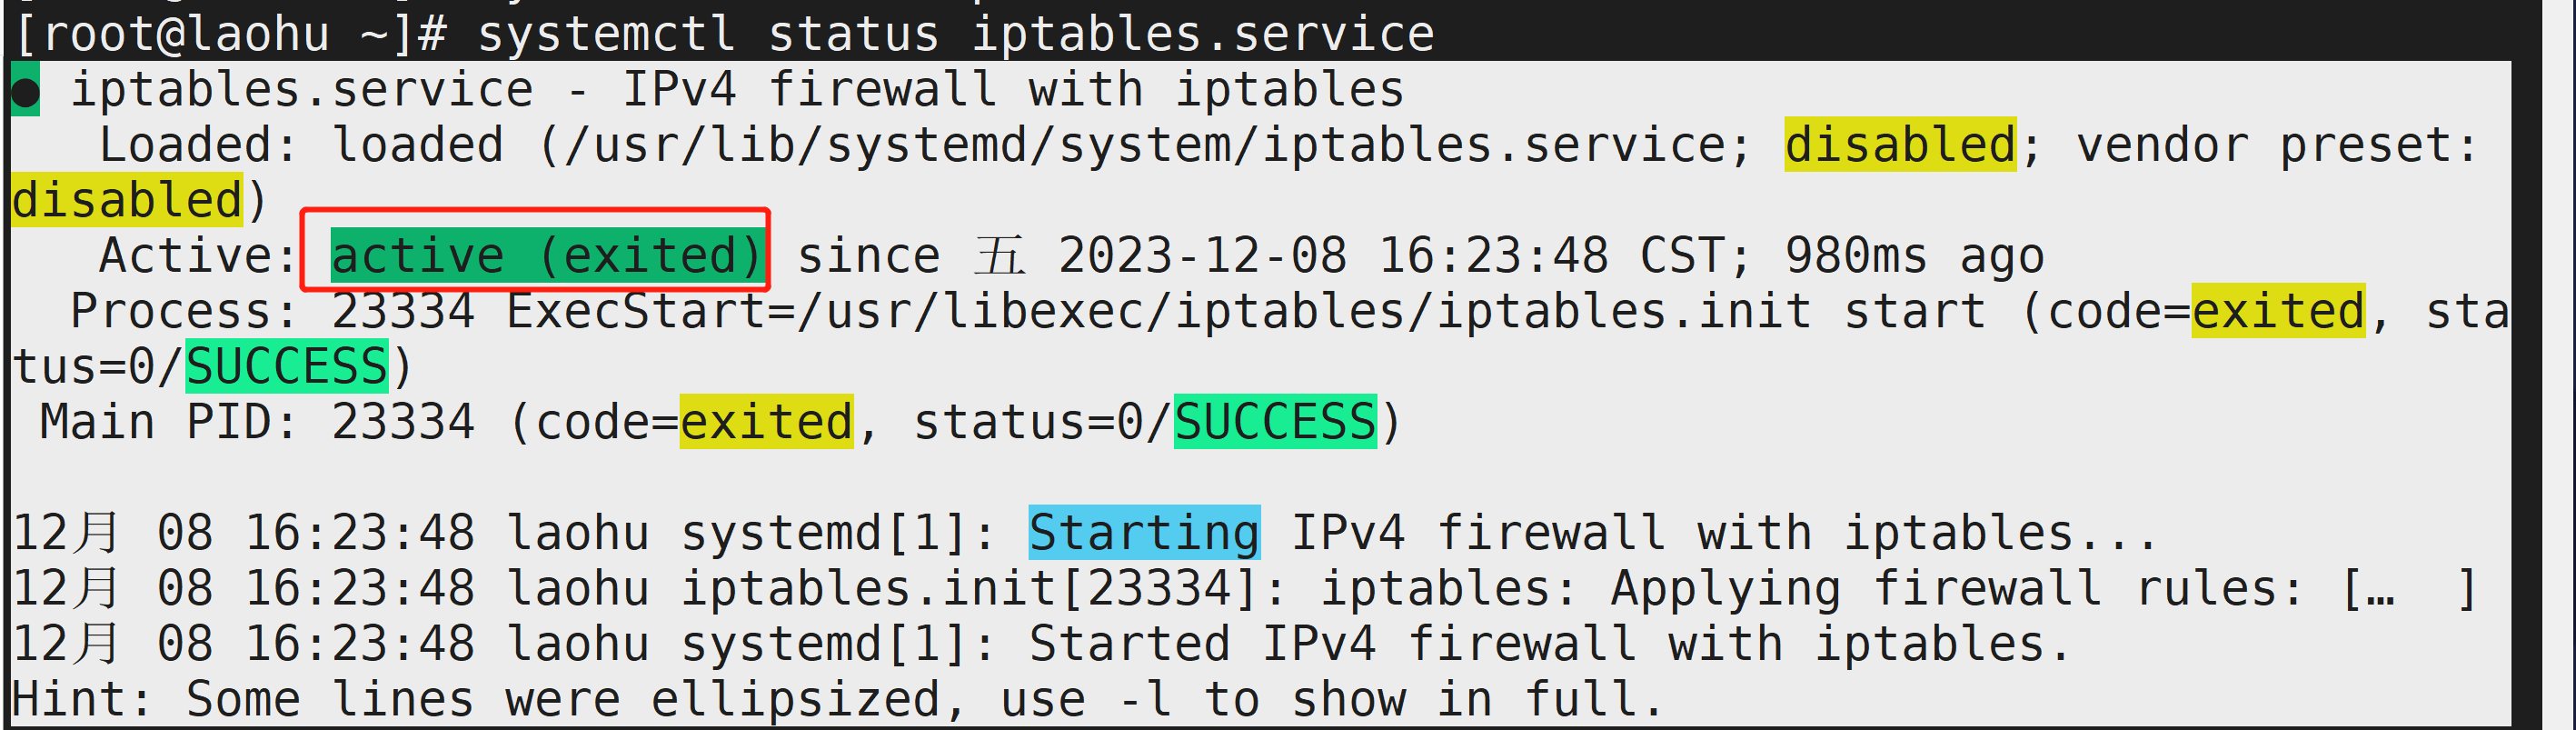
[root@laohu ~]# systemctl start iptables.service #启动防火墙
[root@laohu ~]# systemctl enable iptables.service #开机启动防火墙
[root@laohu ~]# systemctl status iptables.service #查看防护墙状态
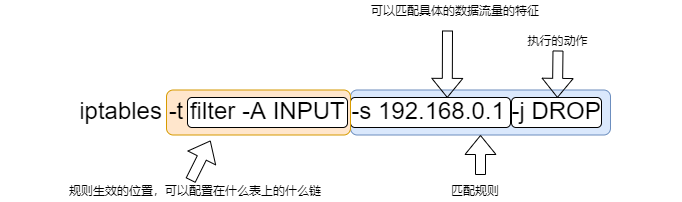
常用格式:
iptables [-t 表名] 选项 [链名] [条件] [-j 控制类型]
iptables –[A|I 链] [-i|o 网络接口] [-p 协议] [-s 来源ip/网域] [-d 目标ip/网域] –j[ACCEPT|DROP]
| 参数 | 作用 |
|---|---|
| -P | 设置默认策略:iptables -P INPUT (DROP|ACCEPT)类似于黑白名单 |
| -F | 清空规则链 |
| -n | 不要把端口或ip反向解析为名字 |
| -L | 查看规则链 |
| -A | 在规则链的末尾加入新规则 |
| -I num | 在规则链的头部加入新规则 |
| -D num | 删除某一条规则 |
| -s | 匹配来源地址IP/MASK,加叹号"!"表示除这个IP外。 |
| -d | 匹配目标地址 |
| -i 网卡名称 | 匹配从这块网卡流入的数据 |
| -o 网卡名称 | 匹配从这块网卡流出的数据 |
| -p | 匹配协议,如tcp,udp,icmp |
| --dports num | 匹配目标端口号 |
| --sports num | 匹配来源端口号 |
iptables规则说明
- 规则:根据指定的匹配条件来尝试匹配每个经流“关卡”的报文,一旦匹配成功,则由规则后面指定的处理动作进行处理
- 匹配条件
- 基本匹配条件:sip、dip
- 扩展匹配条件:sport、dport
- 扩展条件也是条件的一部分,只不过使用的时候需要用
-m参数声明对应的模块 - 处理动作
- accept:接受
- drop:丢弃
- reject:拒绝
- snat:源地址转换,解决内网用户同一个公网地址上上网的问题
- masquerade:是snat的一种特殊形式,使用动态的、临时会变的ip上
- dnat:目标地址转换
- redirect:在本机作端口映射
- log:记录日志,/var/log/messages文件记录日志信息,然后将数据包传递给下一条规则
查看规则
[root@localhost ~]# iptables [-t tables] [-L] [-nv]
参数:
-t  后面接table,例如nat或filter,如果省略,默认显示filter
-L  列出目前的table的规则
-n  不进行IP与主机名的反查,显示信息的速度会快很多
-v  列出更多的信息,包括封包数,相关网络接口等
--line-numbers 显示规则的序号
-S  selected,以iptables-save 命令格式显示链上规则
[root@localhost ~]# iptables -nL --line-numbers
[root@localhost ~]# iptables -vnL INPUT -t filter --line-numbers
[root@localhost ~]# iptables -nL -t nat
[root@localhost ~]# iptables -nL -t mangle
[root@localhost ~]# iptables -nL -t raw
iptables策略配置用法
-t table指定表- raw
- mangle
- nat
-
filter 默认
-
subcommand子命令
-
-N:new, 自定义一条新的规则链
-
-E:重命名自定义链;引用计数不为0的自定义链不能够被重命名,也不能被删除
-
-X:delete,删除自定义的空的规则链
-
-P:Policy,设置默认策略;对filter表中的链而言,其默认策略有:ACCEPT:接受, DROP:丢弃
filter表案例
[root@localhost ~]# iptables -A INPUT -i lo -j ACCEPT
# 所有的来自 lo 这个网口的封包,都予以接受
[root@localhost ~]# iptables -A INPUT -s 192.168.1.200 -j ACCEPT
# 目标来自 192.168.1.200 这个 IP 的封包都予以接受
[root@localhost ~]# iptables -A INPUT -s 192.168.1.0/24 -j ACCEPT
[root@localhost ~]# iptables -A INPUT -s 192.168.1.10 -j DROP
# 192.168.1.0/24 可接受,但 192.168.1.10 丢弃
[root@localhost ~]# iptables -L -n --line-numbers
Chain INPUT (policy ACCEPT)
num  target     prot opt source               destination
1    ACCEPT     tcp  --  0.0.0.0/0            0.0.0.0/0            tcp dpt:80
2    ACCEPT     all  --  0.0.0.0/0            0.0.0.0/0            state RELATED,ESTABLISHED
3    ACCEPT     icmp --  0.0.0.0/0            0.0.0.0/0
4    ACCEPT     all  --  0.0.0.0/0            0.0.0.0/0
5    ACCEPT     tcp  --  0.0.0.0/0            0.0.0.0/0            state NEW tcp dpt:22
6    REJECT     all  --  0.0.0.0/0            0.0.0.0/0            reject-with icmp-host-prohibited
7    ACCEPT     all  --  0.0.0.0/0            0.0.0.0/0
8    ACCEPT     all  --  192.168.1.200        0.0.0.0/0
9    ACCEPT     all  --  192.168.1.0/24       0.0.0.0/0
10   DROP       all  --  192.168.1.10         0.0.0.0/0

Chain FORWARD (policy ACCEPT)
num  target     prot opt source               destination
1    REJECT     all  --  0.0.0.0/0            0.0.0.0/0            reject-with icmp-host-prohibited

Chain OUTPUT (policy ACCEPT)
num  target     prot opt source               destination
[root@localhost ~]# iptables -D INPUT 10
# 删掉INPUT中第10条规则
[root@localhost ~]# iptables -F
# 清空所有规则
本地测试:
[root@Centos7-VM-1 ~]# iptables -A INPUT -s 192.168.128.105 -p icmp -j DROP
[root@Centos7-VM-1 ~]# iptables -A INPUT -p tcp -s 192.168.128.105 --dport 22  -j DROP
[root@Centos7-VM-1 ~]# iptables -vnL -t filter --line-numbers
Chain INPUT (policy ACCEPT 1214 packets, 88194 bytes)
num   pkts bytes target     prot opt in     out     source               destination
1        5   420 DROP       icmp --  *      *       192.168.128.105      0.0.0.0/0
2       10   600 DROP       tcp  --  *      *       192.168.128.105      0.0.0.0/0            tcp dpt:22

Chain FORWARD (policy ACCEPT 0 packets, 0 bytes)
num   pkts bytes target     prot opt in     out     source               destination

Chain OUTPUT (policy ACCEPT 230 packets, 23950 bytes)
num   pkts bytes target     prot opt in     out     source               destination

[root@Centos7-VM-1 ~]# iptables -D INPUT 1
[root@Centos7-VM-1 ~]# iptables -D INPUT 2
#105设备上
[root@localhost ~]# ping 192.168.128.109
PING 192.168.128.109 (192.168.128.109) 56(84) bytes of data.
^C
--- 192.168.128.109 ping statistics ---
5 packets transmitted, 0 received, 100% packet loss, time 106ms
[root@localhost ~]# ssh -p22 root@192.168.128.109
ssh: connect to host 192.168.128.109 port 22: Connection timed out
自定义链
- 可以将同一种作用的规则整合到同一个链中进行管理
- 比如与网页有关的,可以自定义一个web_chain
[root@localhost ~]# iptables -N web_chain
# web_chain用在filter表内,此时还不生效,需要在INPUT里面引用
[root@localhost ~]# iptables -N web_chain -t filter
[root@localhost ~]# iptables -A web_chain -s 192.168.175.1 -p tcp -m multiport --dports 80,443 -j ACCEPT
[root@localhost ~]# iptables -A web_chain -s 192.168.175.0/24 -p tcp --dport 80 -j ACCEPT
#允许本地SSH链接
[root@localhost ~]# iptables -A web_chain -s 192.168.128.103/32 -p tcp -m tcp --dport 22 -j ACCEPT
[root@localhost ~]# iptables -vnL web_chain -t filter --line-numbers
Chain web_chain (0 references)
num   pkts bytes target     prot opt in     out     source               destination
1        0     0 ACCEPT     tcp  --  *      *       192.168.128.105      0.0.0.0/0            multiport dports 80,443
2        0     0 ACCEPT     tcp  --  *      *       192.168.128.0/24     0.0.0.0/0            tcp dpt:80
3        0     0 ACCEPT     tcp  --  *      *       192.168.128.103      0.0.0.0/0            tcp dpt:22
# webchain用在INPUT里,像一个目录包含规则的集合
[root@localhost ~]# iptables -A INPUT -j web_chain
# 开启INPUT白名单模式,测试效果
[root@localhost ~]# iptables -P INPUT DROP
[root@localhost ~]# iptables -vnL -t filter --line-numbers
# INPUT链包含web_chain
Chain INPUT (policy DROP 15 packets, 932 bytes)
num   pkts bytes target     prot opt in     out     source               destination
1       62  5372 web_chain  all  --  *      *       0.0.0.0/0            0.0.0.0/0

Chain FORWARD (policy ACCEPT 0 packets, 0 bytes)
num   pkts bytes target     prot opt in     out     source               destination

Chain OUTPUT (policy ACCEPT 43 packets, 4364 bytes)
num   pkts bytes target     prot opt in     out     source               destination

# web_chain被INPUT链引用
Chain web_chain (1 references)
num   pkts bytes target     prot opt in     out     source               destination
1        0     0 ACCEPT     tcp  --  *      *       192.168.128.105      0.0.0.0/0            multiport dports 80,443
2        0     0 ACCEPT     tcp  --  *      *       192.168.128.0/24     0.0.0.0/0            tcp dpt:80
3       47  4440 ACCEPT     tcp  --  *      *       192.168.128.103      0.0.0.0/0            tcp dpt:22

# 此时删除失效
[root@localhost ~]# iptables -X web_chain
iptables: Too many links.
[root@localhost ~]# iptables -vnL --line-numbers
# 开启INPUT黑名单模式,否则会断网只能去console操作
[root@localhost ~]# iptables -P INPUT ACCEPT
# 在INPUT链里干掉引用的web_chain
[root@localhost ~]# iptables -D INPUT 1
# 依旧删除失效,因为web_chain里面有规则
[root@localhost ~]# iptables -X web_chain
iptables: Directory not empty.
# 删除所有规则
[root@localhost ~]# iptables -F web_chain
# 删除成功
[root@localhost ~]# iptables -X web_chain
保存与恢复
- 用脚本保存各iptables命令;让此脚本开机后自动运行
/etc/rc.d/rc.local文件中添加脚本路径/PATH/TO/SOME_SCRIPT_FILE- 用规则文件保存各规则,开机时自动载入此规则文件中的规则
- 定义Unit File, CentOS 7,8 可以安装 iptables-services 实现iptables.service
yum install iptables-services
iptables-save > /etc/sysconfig/iptables
iptables-restore < /etc/sysconfig/iptables
systemctl enable iptables.service
转发本地端口
[root@localhost ~]# iptables -t nat -A PREROUTING -p tcp --dport 6666 -j REDIRECT --to-port 22
# 此时连6666端口,直接跳转到22端口
[root@localhost ~]# iptables -t nat -vnL --line-numbers
Chain PREROUTING (policy ACCEPT 1 packets, 78 bytes)
num   pkts bytes target     prot opt in     out     source               destination
1        4    128 REDIRECT   tcp  --  *      *       0.0.0.0/0            0.0.0.0/0            tcp dpt:6666 redir ports 22

Chain INPUT (policy ACCEPT 1 packets, 78 bytes)
num   pkts bytes target     prot opt in     out     source               destination

Chain OUTPUT (policy ACCEPT 6 packets, 348 bytes)
num   pkts bytes target     prot opt in     out     source               destination

Chain POSTROUTING (policy ACCEPT 6 packets, 348 bytes)
num   pkts bytes target     prot opt in     out     source               destination
# 删除掉该条目
[root@localhost ~]# iptables -t nat -D PREROUTING 1
[root@localhost ~]# iptables -t nat -vnL --line-numbers
Chain PREROUTING (policy ACCEPT 1 packets, 78 bytes)
num   pkts bytes target     prot opt in     out     source               destination

Chain INPUT (policy ACCEPT 1 packets, 78 bytes)
num   pkts bytes target     prot opt in     out     source               destination

Chain OUTPUT (policy ACCEPT 4 packets, 232 bytes)
num   pkts bytes target     prot opt in     out     source               destination

Chain POSTROUTING (policy ACCEPT 4 packets, 232 bytes)
num   pkts bytes target     prot opt in     out     source               destination
NAT表案例
- 先经过 NAT table 的 PREROUTING 链;
- 经由路由判断确定这个封包是要进入本机与否,若不进入本机,则下一步;
- 再经过 Filter table 的 FORWARD 链;
- 通过 NAT table 的 POSTROUTING 链,最后传送出去。
NAT 主机的重点就在于上面流程的第 1,4 步骤,也就是 NAT table 的两条重要的链:PREROUTING 与POSTROUTING。 那这两条链重要功能在于修改IP,而这两条链修改的IP又是不一样的,POSTROUTING在修改来源IP,PREROUTING则在修改目标IP 。由于修改的 IP 不一样,所以就称为来源NAT (Source NAT, SNAT) 及目标 NAT (Destination NAT, DNAT)。
Linux2不通外网

# 一定要开启转发
[root@localhost ~]# echo "net.ipv4.ip_forward=1" >> /usr/lib/sysctl.d/50-default.conf
[root@localhost ~]# sysctl -w net.ipv4.ip_forward=1
[root@localhost ~]# sysctl -p
# 将匹配192.168.12.0/24的源IP转换成10.1.0.59(用作新的IP)
[root@localhost ~]# iptables -t nat -A PREROUTING -d 10.1.0.59 -p tcp --dport 22 -j DNAT --to-destination 192.168.204.147

[root@laohu ~]# iptables -nL -t nat --line-numbers                       Chain PREROUTING (policy ACCEPT)
num  target     prot opt source               destination
1    DNAT       tcp  --  0.0.0.0/0            10.1.0.59            tcp dpt:22 to:192.168.204.147

Chain INPUT (policy ACCEPT)
num  target     prot opt source               destination

Chain OUTPUT (policy ACCEPT)
num  target     prot opt source               destination

Chain POSTROUTING (policy ACCEPT)
num  target     prot opt source               destination
测试
在另一台机器上,能够成功登录
[root@laohu ~]# ssh root@10.1.0.59
The authenticity of host '10.1.0.59 (10.1.0.59)' can't be established.
ECDSA key fingerprint is SHA256:xQbfSegY1wa8l9tJ+J97Fy5dOHe6eIvQ6kwk3HSj7fk.
ECDSA key fingerprint is MD5:ac:2e:f6:f6:58:c7:7b:b4:e4:ef:ac:43:4d:47:06:d6.
Are you sure you want to continue connecting (yes/no)? ys
Please type 'yes' or 'no': yes
Warning: Permanently added '10.1.0.59' (ECDSA) to the list of known hosts.
root@10.1.0.59's password:

Last login: Fri Dec  8 17:17:03 2023 from 192.168.204.151
firewalld
firewalld是CentOS 7.0新推出的管理netfilter的用户空间软件工具 firewalld是配置和监控防火墙规则的系统守护进程。可以实现iptables,ip6tables,ebtables的功能 firewalld服务由firewalld包提供 firewalld支持划分区域zone,每个zone可以设置独立的防火墙规则
- 流量的规则匹配顺序
- 先根据数据包中源地址,将其纳为某个zone(区域)
- 纳为网络接口所属zone
-
纳入默认zone,默认为public zone,管理员可以改为其它zone
-
firewalld中常用的区域名称及策略规则
| 区域 | 默认策略规则 |
|---|---|
| trusted | 允许所有的数据包 |
| home | 拒绝流入的流量,除非与流出的流量相关;而如果流量与ssh、mdns、ipp-client、amba-client与dhcpv6-client服务相关,则允许流量 |
| internal | 等同于home区域 |
| work | 拒绝流入的流量,除非与流出的流量数相关;而如果流量与ssh、ipp-client与dhcpv6-client服务相关,则允许流量 |
| public | 拒绝流入的流量,除非与流出的流量相关;而如果流量与ssh、dhcpv6-client服务相关,则允许流量 |
| external | 拒绝流入的流量,除非与流出的流量相关;而如果流量与ssh服务相关,则允许流量 |
| dmz | 拒绝流入的流量,除非与流出的流量相关;而如果流量与ssh服务相关,则允许流量 |
| block | 拒绝流入的流量,除非与流出的流量相关 |
| drop | 拒绝流入的流量,除非与流出的流量相关 |
终端管理工具
- firewall-cmd命令中使用的参数以及作用
| 参数 | 作用 |
|---|---|
| --get-default-zone | 查询默认的区域名称 |
| --set-default-zone=<区域名称> | 设置默认的区域,使其永久生效 |
| --get-zones | 显示可用的区域 |
| --get-services | 显示预先定义的服务 |
| --get-active-zones | 显示当前正在使用的区域与网卡名称 |
| --add-source= | 将源自此IP或子网的流量导向指定的区域 |
| --remove-source= | 不再将源自此IP或子网的流量导向某个指定区域 |
| --add-interface=<网卡名称> | 将源自该网卡的所有流量都导向某个指定区域 |
| --change-interface=<网卡名称> | 将某个网卡与区域进行关联 |
| --list-all | 显示当前区域的网卡配置参数、资源、端口以及服务等信息 |
| --list-all-zones | 显示所有区域的网卡配置参数、资源、端口以及服务等信息 |
| --add-service=<服务名> | 设置默认区域允许该服务的流量 |
| --add-port=<端口号/协议> | 设置默认区域允许该端口的流量 |
| --remove-service=<服务名> | 设置默认区域不再允许该服务的流量 |
| --remove-port=<端口号/协议> | 设置默认区域不再允许该端口的流量 |
| --reload | 让“永久生效”的配置规则立即生效,并覆盖当前的配置规则 |
| --panic-on | 开启应急状况模式 |
| --panic-off | 关闭应急状况模式 |
| --permanent | 设定的当前规则保存到本地,下次重启生效 |
#开启防火墙
[root@localhost ~]# systemctl start firewalld
[root@localhost ~]# systemctl enable firewalld
# 此时网页打不开,通过更换默认zone或者关闭firewalld可以打开
[root@localhost ~]# yum -y install httpd
[root@localhost ~]# echo "<h1>Test1</h1>" > /var/www/html/index.html
[root@localhost ~]# systemctl start httpd
[root@localhost ~]# systemctl enable httpd
# 切换后可以打开网页
[root@localhost ~]# firewall-cmd --set-default-zone=trusted
- 查看firewalld服务当前所使用的区域
[root@localhost ~]# firewall-cmd --get-default-zone
public
- 查询ens33网卡在firewalld服务中的区域
[root@localhost ~]# firewall-cmd --get-zone-of-interface=ens33
public
- 把firewalld服务中ens33网卡的默认区域修改为external,并在系统重启后生效。分别查看当前与永久模式下的区域名称
[root@localhost ~]# firewall-cmd --permanent --zone=external --change-interface=ens33
The interface is under control of NetworkManager, setting zone to 'external'.
success
[root@localhost ~]# firewall-cmd --permanent --get-zone-of-interface=ens33
no zone
[root@localhost ~]# firewall-cmd --get-zone-of-interface=ens33
external
- 把firewalld服务的当前默认区域设置为public
[root@localhost ~]# firewall-cmd --set-default-zone=public
Warning: ZONE_ALREADY_SET: public
success
[root@localhost ~]# firewall-cmd --get-default-zone
public
- 启动/关闭firewalld防火墙服务的应急状况模式,阻断一切网络连接(当远程控制服务器时请慎用)
[root@localhost ~]# firewall-cmd --panic-on
[root@localhost ~]# firewall-cmd --panic-off
- 查询public区域是否允许请求SSH和HTTPS协议的流量
[root@localhost ~]# firewall-cmd --zone=public --query-service=ssh
yes
[root@localhost ~]# firewall-cmd --zone=public --query-service=https
no
- 把firewalld服务中请求HTTPS协议的流量设置为永久允许,并立即生效
[root@localhost ~]# firewall-cmd --zone=public --add-service=https
success
[root@localhost ~]# firewall-cmd --permanent --zone=public --add-service=https
success
[root@localhost ~]# firewall-cmd --reload
success
[root@localhost ~]# firewall-cmd --zone=public --query-service=https
yes
- 把firewalld服务中请求HTTP协议的流量设置为永久拒绝,并立即生效
[root@localhost ~]# firewall-cmd --zone=public --remove-service=https --permanent
success
[root@localhost ~]# firewall-cmd --reload
success
- 把在firewalld服务中访问8080和8081端口的流量策略设置为允许,但仅限当前生效
[root@localhost ~]# firewall-cmd --zone=public --add-port=8080-8081/tcp
success
[root@localhost ~]# firewall-cmd --zone=public --list-ports
8080-8081/tcp
- 把原本访问本机888端口的流量转发到22端口,要且求当前和长期均有效
firewall-cmd --permanent --zone=<区域> --add-forward-port=port= <源端口号>:proto=<协议>:toport=<目标端口号>:toaddr=<目标IP地址>
[root@localhost ~]# firewall-cmd --permanent --zone=public --add-forward-port=port=888:proto=tcp:toport=22:toaddr=192.168.91.128
success
[c:\~]$ ssh root@192.168.91.128 888


Connecting to 192.168.91.128:888...
Connection established.
To escape to local shell, press 'Ctrl+Alt+]'.

Last login: Thu Apr 18 16:20:23 2019 from 192.168.91.1
# 可以看到firewall其实调用了iptables的功能

[root@localhost ~]# iptables -vnL --line-numbers -t nat
Chain PREROUTING (policy ACCEPT 2 packets, 465 bytes)
 pkts bytes target     prot opt in     out     source               destination
   36  3694 PREROUTING_direct  all  --  *      *       0.0.0.0/0            0.0.0.0/0
   36  3694 PREROUTING_ZONES_SOURCE  all  --  *      *       0.0.0.0/0            0.0.0.0/0
   36  3694 PREROUTING_ZONES  all  --  *      *       0.0.0.0/0            0.0.0.0/0

Chain INPUT (policy ACCEPT 2 packets, 104 bytes)
 pkts bytes target     prot opt in     out     source               destination

Chain OUTPUT (policy ACCEPT 224 packets, 13563 bytes)
 pkts bytes target     prot opt in     out     source               destination
 1252 76406 OUTPUT_direct  all  --  *      *       0.0.0.0/0            0.0.0.0/0

Chain POSTROUTING (policy ACCEPT 224 packets, 13563 bytes)
 pkts bytes target     prot opt in     out     source               destination
 1252 76406 POSTROUTING_direct  all  --  *      *       0.0.0.0/0            0.0.0.0/0
 1252 76406 POSTROUTING_ZONES_SOURCE  all  --  *      *       0.0.0.0/0            0.0.0.0/0
 1252 76406 POSTROUTING_ZONES  all  --  *      *       0.0.0.0/0            0.0.0.0/0

Chain OUTPUT_direct (1 references)
 pkts bytes target     prot opt in     out     source               destination

Chain POSTROUTING_ZONES (1 references)
 pkts bytes target     prot opt in     out     source               destination
  114  8055 POST_public  all  --  *      ens33   0.0.0.0/0            0.0.0.0/0           [goto]
 1129 67740 POST_public  all  --  *      +       0.0.0.0/0            0.0.0.0/0           [goto]

Chain POSTROUTING_ZONES_SOURCE (1 references)
 pkts bytes target     prot opt in     out     source               destination

Chain POSTROUTING_direct (1 references)
 pkts bytes target     prot opt in     out     source               destination

Chain POST_public (2 references)
 pkts bytes target     prot opt in     out     source               destination
 1243 75795 POST_public_log  all  --  *      *       0.0.0.0/0            0.0.0.0/0
 1243 75795 POST_public_deny  all  --  *      *       0.0.0.0/0            0.0.0.0/0
 1243 75795 POST_public_allow  all  --  *      *       0.0.0.0/0            0.0.0.0/0

Chain POST_public_allow (1 references)
 pkts bytes target     prot opt in     out     source               destination

Chain POST_public_deny (1 references)
 pkts bytes target     prot opt in     out     source               destination

Chain POST_public_log (1 references)
 pkts bytes target     prot opt in     out     source               destination

Chain POST_trusted (0 references)
 pkts bytes target     prot opt in     out     source               destination
    9   611 POST_trusted_log  all  --  *      *       0.0.0.0/0            0.0.0.0/0
    9   611 POST_trusted_deny  all  --  *      *       0.0.0.0/0            0.0.0.0/0
    9   611 POST_trusted_allow  all  --  *      *       0.0.0.0/0            0.0.0.0/0

Chain POST_trusted_allow (1 references)
 pkts bytes target     prot opt in     out     source               destination

Chain POST_trusted_deny (1 references)
 pkts bytes target     prot opt in     out     source               destination

Chain POST_trusted_log (1 references)
 pkts bytes target     prot opt in     out     source               destination

Chain PREROUTING_ZONES (1 references)
 pkts bytes target     prot opt in     out     source               destination
   35  3590 PRE_public  all  --  ens33  *       0.0.0.0/0            0.0.0.0/0           [goto]
    0     0 PRE_public  all  --  +      *       0.0.0.0/0            0.0.0.0/0           [goto]

Chain PREROUTING_ZONES_SOURCE (1 references)
 pkts bytes target     prot opt in     out     source               destination

Chain PREROUTING_direct (1 references)
 pkts bytes target     prot opt in     out     source               destination

Chain PRE_public (2 references)
 pkts bytes target     prot opt in     out     source               destination
   35  3590 PRE_public_log  all  --  *      *       0.0.0.0/0            0.0.0.0/0
   35  3590 PRE_public_deny  all  --  *      *       0.0.0.0/0            0.0.0.0/0
   35  3590 PRE_public_allow  all  --  *      *       0.0.0.0/0            0.0.0.0/0

Chain PRE_public_allow (1 references)
 pkts bytes target     prot opt in     out     source               destination
    2   104 DNAT       tcp  --  *      *       0.0.0.0/0            0.0.0.0/0            mark match 0x64 to:192.168.1.13:22

Chain PRE_public_deny (1 references)
 pkts bytes target     prot opt in     out     source               destination

Chain PRE_public_log (1 references)
 pkts bytes target     prot opt in     out     source               destination

Chain PRE_trusted (0 references)
 pkts bytes target     prot opt in     out     source               destination
    1   104 PRE_trusted_log  all  --  *      *       0.0.0.0/0            0.0.0.0/0
    1   104 PRE_trusted_deny  all  --  *      *       0.0.0.0/0            0.0.0.0/0
    1   104 PRE_trusted_allow  all  --  *      *       0.0.0.0/0            0.0.0.0/0

Chain PRE_trusted_allow (1 references)
 pkts bytes target     prot opt in     out     source               destination

Chain PRE_trusted_deny (1 references)
 pkts bytes target     prot opt in     out     source               destination

Chain PRE_trusted_log (1 references)
 pkts bytes target     prot opt in     out     source               destination
firewalld中的富规则表示更细致、更详细的防火墙策略配置,它可以针对系统服务、端口号、源地址和目标地址等诸多信息进行更有针对性的策略配置。它的优先级在所有的防火墙策略中也是最高的。比如,我们可以在firewalld服务中配置一条富规则,使其拒绝192.168.91.0/24网段的所有用户访问本机的ssh服务(22端口)
[root@localhost ~]# firewall-cmd --permanent --zone=public --add-rich-rule="rule \
family="ipv4" \
source address="192.168.91.0/24" \
service name="ssh" \
reject"
success
[root@localhost ~]# firewall-cmd --reload
success
[c:\~]$ ssh root@192.168.91.128


Connecting to 192.168.91.128:22...
Could not connect to '192.168.91.128' (port 22): Connection failed.
服务的访问控制列表
TCP Wrappers服务的控制列表文件中常用的参数
| 客户端类型 | 示例 | 满足示例的客户端列表 |
|---|---|---|
| 单一主机 | 192.168.10.10 | IP地址为192.168.10.10的主机 |
| 指定网段 | 192.168.10. | IP段为192.168.10.0/24的主机 |
| 指定网段 | 192.168.10.0/255.255.255.0 | IP段为192.168.10.0/24的主机 |
| 指定DNS后缀 | .eagleslab.com | 所有DNS后缀为.eagleslab.com的主机 |
| 指定主机名称 | www.eagleslab.com | 主机名称为www.eagleslab.com的主机 |
| 指定所有客户端 | ALL | 所有主机全部包括在内 |
在配置TCP Wrappers服务时需要遵循两个原则:
- 编写拒绝策略规则时,填写的是服务名称,而非协议名称;
- 建议先编写拒绝策略规则,再编写允许策略规则,以便直观地看到相应的效果。
下面编写拒绝策略规则文件,禁止访问本机sshd服务的所有流量
[root@localhost ~]# vim /etc/hosts.deny
#
# hosts.deny    This file contains access rules which are used to
#       deny connections to network services that either use
#       the tcp_wrappers library or that have been
#       started through a tcp_wrappers-enabled xinetd.
#
#       The rules in this file can also be set up in
#       /etc/hosts.allow with a 'deny' option instead.
#
#       See 'man 5 hosts_options' and 'man 5 hosts_access'
#       for information on rule syntax.
#       See 'man tcpd' for information on tcp_wrappers
#
#
sshd:*
[c:\~]$ ssh root@192.168.91.128


Connecting to 192.168.91.128:22...
Connection established.
To escape to local shell, press 'Ctrl+Alt+]'.
Connection closing...Socket close.

Connection closed by foreign host.

Disconnected from remote host(192.168.91.128:22) at 16:35:31.
在允许策略规则文件中添加一条规则,使其放行源自192.168.10.0/24网段,访问本机sshd服务的所有流量
[root@localhost ~]# vim /etc/hosts.allow
#
# hosts.allow   This file contains access rules which are used to
#       allow or deny connections to network services that
#       either use the tcp_wrappers library or that have been
#       started through a tcp_wrappers-enabled xinetd.
#
#       See 'man 5 hosts_options' and 'man 5 hosts_access'
#       for information on rule syntax.
#       See 'man tcpd' for information on tcp_wrappers
#
sshd:192.168.91.
SELinux安全子系统
SELinux(Security-Enhanced Linux)是美国国家安全局在Linux开源社区的帮助下开发的一个强制访问控制(MAC,Mandatory Access Control)的安全子系统。RHEL 7系统使用SELinux技术的目的是为了让各个服务进程都受到约束,使其仅获取到本应获取的资源。
SELinux服务有三种配置模式,具体如下。
- enforcing:强制启用安全策略模式,将拦截服务的不合法请求。
- permissive:遇到服务越权访问时,只发出警告而不强制拦截。
- disabled:对于越权的行为不警告也不拦截。
然在禁用SELinux服务后确实能够减少报错几率,但这在生产环境中相当不推荐。
[root@localhost ~]# vim /etc/selinux/config
# This file controls the state of SELinux on the system.
# SELINUX= can take one of these three values:
#     enforcing - SELinux security policy is enforced.
#     permissive - SELinux prints warnings instead of enforcing.
#     disabled - No SELinux policy is loaded.
SELINUX=enforcing
# SELINUXTYPE= can take one of three values:
#     targeted - Targeted processes are protected,
#     minimum - Modification of targeted policy. Only selected processes are protected.
#     mls - Multi Level Security protection.
SELINUXTYPE=targeted
SELinux服务的主配置文件中,定义的是SELinux的默认运行状态,可以将其理解为系统重启后的状态,因此它不会在更改后立即生效。可以使用getenforce命令获得当前SELinux服务的运行模式
[root@localhost ~]# getenforce
Enforcing
可以用setenforce [0|1]命令修改SELinux当前的运行模式(0为禁用,1为启用)。注意,这种修改只是临时的,在系统重启后就会失效
我们比较一下自己创建的acpache目录和原本的目录的安全上下文
[root@localhost ~]# ls -Zd /var/www/html
drwxr-xr-x. root root system_u:object_r:httpd_sys_content_t:s0 /var/www/html
[root@localhost ~]# ls -Zd /home/wwwroot/
drwxr-xr-x. root root unconfined_u:object_r:home_root_t:s0 /home/wwwroot/
在文件上设置的SELinux安全上下文是由用户段、角色段以及类型段等多个信息项共同组成的。其中,
- 用户段system_u代表系统进程的身份,
- 角色段object_r代表文件目录的角色,
- 类型段httpd_sys_content_t代表网站服务的系统文件
semanage
用于管理SELinux的策略
semanage [选项] [文件]
使用semanage命令时,经常用到的几个参数及其功能如下所示:
- -l参数用于查询;
- -a参数用于添加;
- -m参数用于修改;
- -d参数用于删除。
可以向新的网站数据目录中新添加一条SELinux安全上下文,让这个目录以及里面的所有文件能够被httpd服务程序所访问到
[root@localhost ~]# semanage fcontext -a -t httpd_sys_content_t /home/wwwroot/
[root@localhost ~]# semanage fcontext -a -t httpd_sys_content_t /home/wwwroot/*
[root@localhost ~]# restorecon -Rv /home/wwwroot/
restorecon reset /home/wwwroot context unconfined_u:object_r:home_root_t:s0->unconfined_u:object_r:user_home_dir_t:s0
restorecon reset /home/wwwroot/index.html context unconfined_u:object_r:home_root_t:s0->unconfined_u:object_r:httpd_sys_content_t:s0
注意,执行上述设置之后,还无法立即访问网站,还需要使用restorecon命令将设置好的SELinux安全上下文立即生效。在使用restorecon命令时,可以加上-Rv参数对指定的目录进行递归操作,以及显示SELinux安全上下文的修改过程。最后,再次刷新页面,就可以正常看到网页内容了
[root@localhost wwwroot]# chcon -t httpd_sys_content_t index.html
# 修改index文件selinux标签
[root@localhost wwwroot]# systemctl restart httpd
# 重启httpd服务,使用网页访问
[root@localhost wwwroot]# semanage port -l | grep http_port_t
# 查看selinux端口标签
[root@localhost wwwroot]# semanage port -a -t http_port_t -p tcp 10086
# 添加端口标签
使用getsebool命令查询并过滤出所有与HTTP协议相关的安全策略。其中,off为禁止状态,on为允许状态。
[root@localhost ~]# getsebool -a | grep http
httpd_anon_write --> off
httpd_builtin_scripting --> on
httpd_can_check_spam --> off
httpd_can_connect_ftp --> off
httpd_can_connect_ldap --> off
httpd_can_connect_mythtv --> off
httpd_can_connect_zabbix --> off
httpd_can_network_connect --> off
httpd_can_network_connect_cobbler --> off
httpd_can_network_connect_db --> off
httpd_can_network_memcache --> off
httpd_can_network_relay --> off
httpd_can_sendmail --> off
httpd_dbus_avahi --> off
httpd_dbus_sssd --> off
httpd_dontaudit_search_dirs --> off
httpd_enable_cgi --> on
httpd_enable_ftp_server --> off
httpd_enable_homedirs --> off
httpd_execmem --> off
httpd_graceful_shutdown --> on
httpd_manage_ipa --> off
httpd_mod_auth_ntlm_winbind --> off
httpd_mod_auth_pam --> off
httpd_read_user_content --> off
httpd_run_ipa --> off
httpd_run_preupgrade --> off
httpd_run_stickshift --> off
httpd_serve_cobbler_files --> off
httpd_setrlimit --> off
httpd_ssi_exec --> off
httpd_sys_script_anon_write --> off
httpd_tmp_exec --> off
httpd_tty_comm --> off
httpd_unified --> off
httpd_use_cifs --> off
httpd_use_fusefs --> off
httpd_use_gpg --> off
httpd_use_nfs --> off
httpd_use_openstack --> off
httpd_use_sasl --> off
httpd_verify_dns --> off
named_tcp_bind_http_port --> off
prosody_bind_http_port --> off
[root@localhost ~]# setsebool -P httpd_enable_homedirs=on
面对如此多的SELinux域安全策略规则,实在没有必要逐个理解它们,我们只要能通过名字大致猜测出相关的策略用途就足够了。比如,想要开启httpd服务的个人用户主页功能,那么用到的SELinux域安全策略应该是httpd_enable_homedir