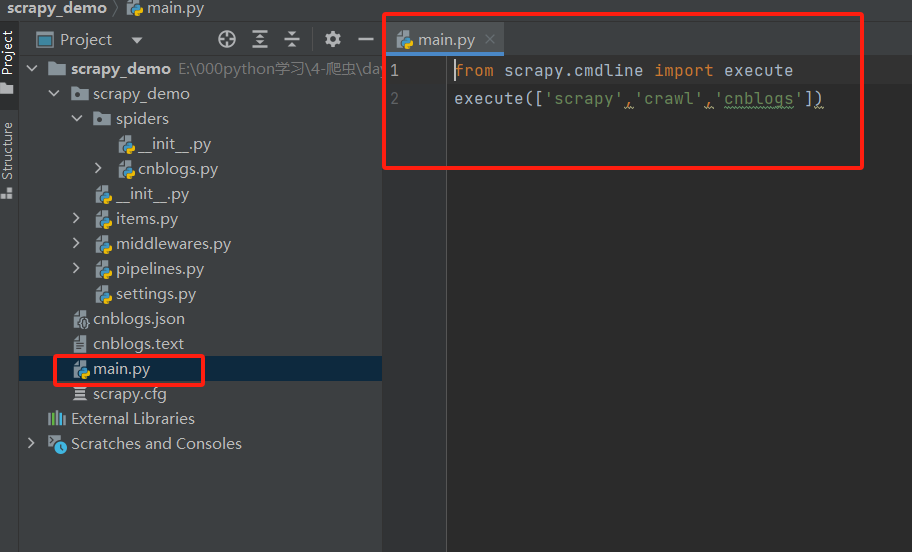
from scrapy.cmdline import execute
execute(['scrapy','crawl','cnblogs','--nolog'])

重点
1、response对象有css方法和xpath方法
-css中写css选择器 response.css('')
-xpath中写xpath选择 response.xpath('')
2、重点1
xpath取文本内容
'.//a[contains(@class,"link-title")]/text()'
xpath取属性
'.//a[contains(@class,"link-title")]/@href'
css取文本
'a.link-title::text'
css取属性
'img.image-scale::attr(src)'
3、重点2
.extract_first() 取一个
. extract() 取所有
使用css选择器解析数据
 def parse(self, response):
        article_list = response.css('article.post-item')
        for article in article_list:
            name = article.css('a.post-item-title::text').extract_first()    #属性是post-item-title的a标签
            author = article.css('a.post-item-author>span::text').extract_first()
            url = article.css('a.post-item-title::attr(href)').extract_first()
            img = article.css('img.avatar::attr(src)').extract_first()
            desc = article.css('p.post-item-summary::text').extract()  # 文本内容可能放在第二个位置
            desc_content=desc[0].replace('\n', '').replace(' ', '')
            if not desc_content:
                desc_content = desc[1].replace('\n', '').replace(' ', '')

            print('''
            文章标题:%s
            文章作者:%s
            文章地址:%s
            头像:%s
            摘要:%s
            ''' % (name, author, url, img, desc_content))

    #### xpath 解析数据
    def parse(self, response):
        article_list = response.xpath('//article[@class="post-item"]')
        for article in article_list:
            name = article.xpath('.//a[@class="post-item-title"]/text()').extract_first()
            # name = article.xpath('./section/div/a/text()').extract_first()
            author = article.xpath('.//a[@class="post-item-author"]/span/text()').extract_first()
            url = article.xpath('.//a[@class="post-item-title"]/@href').extract_first()
            img = article.xpath('./section/div/p/a/img/@src').extract_first()
            desc = article.xpath('./section/div/p/text()').extract()  # 文本内容可能放在第二个位置
            desc_content = desc[0].replace('\n', '').replace(' ', '')
            if not desc_content:
                desc_content = desc[1].replace('\n', '').replace(' ', '')

            print('''
            文章标题:%s
            文章作者:%s
            文章地址:%s
            头像:%s
            摘要:%s
            ''' % (name, author, url, img, desc_content))
配置文件
基础配置
项目名
BOT_NAME = "scrapy_demo"
爬虫所在路径
SPIDER_MODULES = ["scrapy_demo.spiders"]
NEWSPIDER_MODULE = "scrapy_demo.spiders"
记住 日志级别
LOG_LEVEL='ERROR'
请求头中的 USER_AGENT(找浏览器中的USER_AGENT)
USER_AGENT = "Mozilla/5.0 (Windows NT 10.0; Win64; x64) AppleWebKit/537.36 (KHTML, like Gecko) Chrome/119.0.0.0 Safari/537.36"
是否遵循爬虫协议(一般不遵循,否则很多无法实现)
ROBOTSTXT_OBEY = False
默认请求头
#DEFAULT_REQUEST_HEADERS = {
# "Accept": "text/html,application/xhtml+xml,application/xml;q=0.9,*/*;q=0.8",
# "Accept-Language": "en",
#}
#爬虫中间件
#SPIDER_MIDDLEWARES = {
# "scrapy_demo.middlewares.ScrapyDemoSpiderMiddleware": 543,
#}
# 下载中间件
#DOWNLOADER_MIDDLEWARES = {
# "scrapy_demo.middlewares.ScrapyDemoDownloaderMiddleware": 543,
#}
# 持久化相关
#ITEM_PIPELINES = {
# "scrapy_demo.pipelines.ScrapyDemoPipeline": 300,
#}
高级配置(提高爬取效率)
1 、增加并发:默认16
默认scrapy开启的并发线程为32个,可以适当进行增加。在settings配置文件中修改
CONCURRENT_REQUESTS = 100
值为100,并发设置成了为100
2 、提高日志级别:
在运行scrapy时,会有大量日志信息的输出,为了减少CPU的使用率。可以设置log输出信息为INFO或者ERROR即可。在配置文件中编写:
LOG_LEVEL = 'INFO'
3 、禁止cookie:
如果不是真的需要cookie,则在scrapy爬取数据时可以禁止cookie从而减少CPU的使用率,提升爬取效率。在配置文件中编写:
COOKIES_ENABLED = False
4 、禁止重试:
对失败的HTTP进行重新请求(重试)会减慢爬取速度,因此可以禁止重试。在配置文件中编写:
RETRY_ENABLED = False
5 、减少下载超时:
如果对一个非常慢的链接进行爬取,减少下载超时可以能让卡住的链接快速被放弃,从而提升效率。在配置文件中进行编写:
DOWNLOAD_TIMEOUT = 10 超时时间为10s
爬取所有页
-解析出下一页 yield Request(url=next, callback=self.parse)
爬取文章详情
-解析出详情地址:yield Request(url=url, callback=self.detail_parser)
多个Request之间数据传递
yield Request(url=url,meta={'item':item})
在解析的 response中 response.meta.get('item')
 def parse(self, response):
        article_list = response.xpath('//article[@class="post-item"]')
        for article in article_list:
            name = article.xpath('.//a[@class="post-item-title"]/text()').extract_first()
            # name = article.xpath('./section/div/a/text()').extract_first()
            author = article.xpath('.//a[@class="post-item-author"]/span/text()').extract_first()
            url = article.xpath('.//a[@class="post-item-title"]/@href').extract_first()
            img = article.xpath('./section/div/p/a/img/@src').extract_first()
            desc = article.xpath('./section/div/p/text()').extract()  # 文本内容可能放在第二个位置
            desc_content = desc[0].replace('\n', '').replace(' ', '')
            if not desc_content:
                desc_content = desc[1].replace('\n', '').replace(' ', '')

            # print('''
            # 文章标题:%s
            # 文章作者:%s
            # 文章地址:%s
            # 头像:%s
            # 摘要:%s
            # ''' % (name, author, url, img, desc_content))
            # 详情地址:url ----》想继续爬取详情
            item={'name':name,'url':url,'img':img,'text':None}
            yield Request(url=url, callback=self.detail_parser,meta={'item':item})

        #### 继续爬取下一页
        # next='https://www.cnblogs.com'+response.css('div.pager>a:last-child::attr(href)').extract_first()
        next = 'https://www.cnblogs.com' + response.xpath('//div[@class="pager"]/a[last()]/@href').extract_first()
        print(next)
        yield Request(url=next, callback=self.parse)

        # 逻辑---》起始地址:https://www.cnblogs.com---》回到了parse---》自己解析了(打印数据,继续爬取的地址)---》yield Request对象---》第二页---》爬完后又回到parser解析

    def detail_parser(self, response):
        print(len(response.text))
        item=response.meta.get('item')
        text=response.css('#cnblogs_post_body').extract_first()
        item['text']=text
        # 我们想把:上一个请求解析出来的  标题,摘要,图片 和这个请求解析出来的 文本合并到一起
        # 这个text 无法和 上面 parse解析出的文章标题对应上
        print(item)