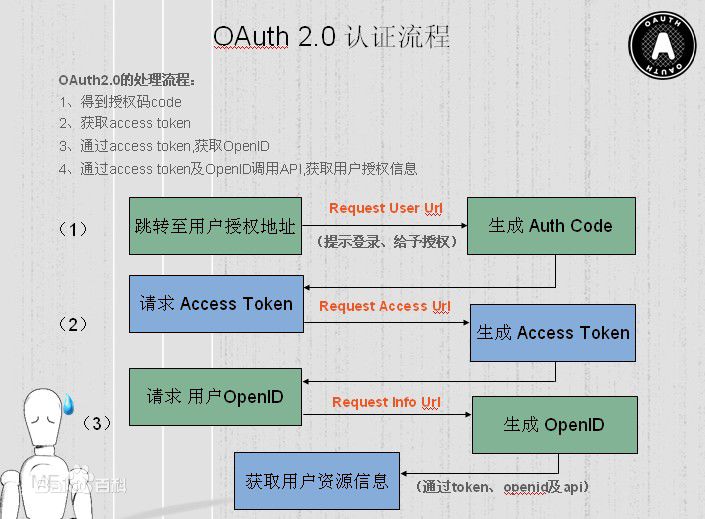
1、Oauth2简介
OAuth(开放授权)是一个开放标准,允许用户授权第三方移动应用访问他们存储在另外的服务提供者上的信息,而不需要将用户名和密码提供给第三方移动应用或分享他们数据的所有内容,OAuth2.0是OAuth协议的延续版本,但不向后兼容OAuth 1.0即完全废止了OAuth1.0。
2、Oauth2服务器
- 授权服务器 Authorization Service.
- 资源服务器 Resource Service.
授权服务器
授权服务器,即服务提供商专门用来处理认证的服务器。在这里简单说一下,主要的功能;
1、通过请求获得令牌(Token),默认的URL是/oauth/token.
2、根据令牌(Token)获取相应的权限.
资源服务器
资源服务器托管了受保护的用户账号信息,并且对接口资源进行用户权限分配及管理,简单的说,就是某个接口(/user/add),我限制只能持有管理员权限的用户才能访问,那么普通用户就没有访问的权限。
以下摘自百度百科图:
3、Demo实战加代码详解
前面我是简单地介绍了一下oauth2的一些基本概念,关于oauth2的深入介绍,可以去搜索更多其它相关oauth2的博文,在这里推荐一篇前辈的博文https://www.cnblogs.com/Wddpct/p/8976480.html,里面有详细的oauth2介绍,包括原理、实现流程等都讲得比较详细。我的课题,是主要是以实战为主,理论的东西我不想介绍太多, 这里是我个人去根据自己的业务需求去改造的,存在很多可优化的点,希望大家可以指出和给予我一些宝贵意见。
接下来开始介绍我的代码流程吧!
准备
新建一个springboot项目,引入以下依赖。

 1 <dependencies>
 2         <dependency>
 3             <groupId>org.springframework.boot</groupId>
 4             <artifactId>spring-boot-starter</artifactId>
 5         </dependency>
 6         <dependency>
 7             <groupId>org.springframework.boot</groupId>
 8             <artifactId>spring-boot-starter-test</artifactId>
 9             <scope>test</scope>
10         </dependency>
11
12         <!--web依赖-->
13         <dependency>
14             <groupId>org.springframework.boot</groupId>
15             <artifactId>spring-boot-starter-web</artifactId>
16         </dependency>
17
18         <!--redis依赖-->
19        <dependency>
20             <groupId>org.springframework.boot</groupId>
21             <artifactId>spring-boot-starter-data-redis</artifactId>
22         </dependency>
23
24         <!--sl4f日志框架-->
25         <dependency>
26             <groupId>org.projectlombok</groupId>
27             <artifactId>lombok</artifactId>
28         </dependency>
29
30         <!--security依赖-->
31         <dependency>
32             <groupId>org.springframework.boot</groupId>
33             <artifactId>spring-boot-starter-security</artifactId>
34         </dependency>
35         <!--oauth2依赖-->
36         <dependency>
37             <groupId>org.springframework.security.oauth</groupId>
38             <artifactId>spring-security-oauth2</artifactId>
39             <version>2.3.3.RELEASE</version>
40         </dependency>
41
42         <!--JPA数据库持久化-->
43         <dependency>
44             <groupId>mysql</groupId>
45             <artifactId>mysql-connector-java</artifactId>
46             <version>5.1.47</version>
47             <scope>runtime</scope>
48         </dependency>
49         <dependency>
50             <groupId>org.springframework.boot</groupId>
51             <artifactId>spring-boot-starter-data-jpa</artifactId>
52         </dependency>
53
54         <!--json工具-->
55         <dependency>
56             <groupId>com.alibaba</groupId>
57             <artifactId>fastjson</artifactId>
58             <version>1.2.47</version>
59         </dependency>
60     </dependencies>
项目目录结构

接口
这里我只编写了一个AuthController,里面基本所有关于用户管理及登录、注销的接口我都定义出来了。
AuthController代码如下:
  1 package com.unionman.springbootsecurityauth2.controller;
  2
  3 import com.unionman.springbootsecurityauth2.dto.LoginUserDTO;
  4 import com.unionman.springbootsecurityauth2.dto.UserDTO;
  5 import com.unionman.springbootsecurityauth2.service.RoleService;
  6 import com.unionman.springbootsecurityauth2.service.UserService;
  7 import com.unionman.springbootsecurityauth2.utils.AssertUtils;
  8 import com.unionman.springbootsecurityauth2.vo.ResponseVO;
  9 import lombok.extern.slf4j.Slf4j;
 10 import org.springframework.beans.factory.annotation.Autowired;
 11 import org.springframework.security.oauth2.provider.token.store.redis.RedisTokenStore;
 12 import org.springframework.validation.annotation.Validated;
 13 import org.springframework.web.bind.annotation.*;
 14
 15 import javax.validation.Valid;
 16
 17 /**
 18  * @description 用户权限管理
 19  * @author Zhifeng.Zeng
 20  * @date 2019/4/19 13:58
 21  */
 22 @Slf4j
 23 @Validated
 24 @RestController
 25 @RequestMapping("/auth/")
 26 public class AuthController {
 27
 28     @Autowired
 29     private UserService userService;
 30
 31     @Autowired
 32     private RoleService roleService;
 33
 34     @Autowired
 35     private RedisTokenStore redisTokenStore;
 36
 37     /**
 38      * @description 添加用户
 39      * @param userDTO
 40      * @return
 41      */
 42     @PostMapping("user")
 43     public ResponseVO add(@Valid @RequestBody UserDTO userDTO){
 44         userService.addUser(userDTO);
 45         return ResponseVO.success();
 46     }
 47
 48     /**
 49      * @description 删除用户
 50      * @param id
 51      * @return
 52      */
 53     @DeleteMapping("user/{id}")
 54     public ResponseVO deleteUser(@PathVariable("id")Integer id){
 55         userService.deleteUser(id);
 56         return ResponseVO.success();
 57     }
 58
 59     /**
 60      * @descripiton 修改用户
 61      * @param userDTO
 62      * @return
 63      */
 64     @PutMapping("user")
 65     public ResponseVO updateUser(@Valid @RequestBody UserDTO userDTO){
 66         userService.updateUser(userDTO);
 67         return ResponseVO.success();
 68     }
 69
 70     /**
 71      * @description 获取用户列表
 72      * @return
 73      */
 74     @GetMapping("user")
 75     public ResponseVO findAllUser(){
 76         return userService.findAllUserVO();
 77     }
 78
 79     /**
 80      * @description 用户登录
 81      * @param loginUserDTO
 82      * @return
 83      */
 84     @PostMapping("user/login")
 85     public ResponseVO login(LoginUserDTO loginUserDTO){
 86         return userService.login(loginUserDTO);
 87     }
 88
 89
 90     /**
 91      * @description 用户注销
 92      * @param authorization
 93      * @return
 94      */
 95     @GetMapping("user/logout")
 96     public ResponseVO logout(@RequestHeader("Authorization") String authorization){
 97         redisTokenStore.removeAccessToken(AssertUtils.extracteToken(authorization));
 98         return ResponseVO.success();
 99     }
100
101     /**
102      * @description 用户刷新Token
103      * @param refreshToken
104      * @return
105      */
106     @GetMapping("user/refresh/{refreshToken}")
107     public ResponseVO refresh(@PathVariable(value = "refreshToken") String refreshToken){
108         return userService.refreshToken(refreshToken);
109     }
110
111
112     /**
113      * @description 获取所有角色列表
114      * @return
115      */
116     @GetMapping("role")
117     public ResponseVO findAllRole(){
118         return roleService.findAllRoleVO();
119     }
120
121
122 }
这里所有的接口功能,我都已经在业务代码里实现了,后面相关登录、注销、及刷新token的等接口的业务实现的内容我会贴出来。接下来我需要讲解的是关于oath2及security的详细配置。
注意一点:这里没有角色的增删改功能,只有获取角色列表功能,为了节省时间,我这里的角色列表是项目初始化阶段,直接生成的固定的两个角色,分别是ROLE_USER(普通用户)、ROLE_ADMIN(管理员);同时初始化一个默认的管理员。
springbootsecurityauth.sql脚本如下:
 1 SET NAMES utf8;
 2 SET FOREIGN_KEY_CHECKS = 0;
 3 /**
 4 初始化角色信息
 5  */
 6  CREATE TABLE IF NOT EXISTS `um_t_role`(
 7 `id` INT(11) PRIMARY KEY AUTO_INCREMENT ,
 8  `description` VARCHAR(255) CHARACTER SET utf8 COLLATE utf8_general_ci NULL DEFAULT NULL,
 9  `created_time` BIGINT(20) NOT NULL,
10  `name` VARCHAR(255) CHARACTER SET utf8 COLLATE utf8_general_ci NOT NULL,
11  `role` VARCHAR(255) CHARACTER SET utf8 COLLATE utf8_general_ci NOT NULL
12 );
13 INSERT IGNORE INTO `um_t_role`(id,`name`,description,created_time,role) VALUES(1,'管理员','管理员拥有所有接口操作权限',UNIX_TIMESTAMP(NOW()),'ADMIN'),(2,'普通用户','普通拥有查看用户列表与修改密码权限,不具备对用户增删改权限',UNIX_TIMESTAMP(NOW()),'USER');
14
15 /**
16 初始化一个默认管理员
17  */
18  CREATE TABLE IF NOT EXISTS `um_t_user`(
19 `id` INT(11) PRIMARY KEY AUTO_INCREMENT ,
20  `account` VARCHAR(255) CHARACTER SET utf8 COLLATE utf8_general_ci NULL DEFAULT NULL,
21  `description` VARCHAR(255) CHARACTER SET utf8 COLLATE utf8_general_ci NULL DEFAULT NULL,
22  `password` VARCHAR(255) CHARACTER SET utf8 COLLATE utf8_general_ci NULL DEFAULT NULL,
23  `name` VARCHAR(255) CHARACTER SET utf8 COLLATE utf8_general_ci NOT NULL
24 );
25 INSERT IGNORE INTO `um_t_user`(id,account,`password`,`name`,description) VALUES(1,'admin','123456','小小丰','系统默认管理员');
26
27 /**
28 关联表赋值
29  */
30 CREATE TABLE IF NOT EXISTS `um_t_role_user`(
31 `role_id` INT(11),
32  `user_id` INT(11)
33 );
34 INSERT IGNORE INTO `um_t_role_user`(role_id,user_id)VALUES(1,1);
配置
application.yml文件:
 1 server:
 2   port: 8080
 3 spring:
 4   # mysql 配置
 5   datasource:
 6       url: jdbc:mysql://localhost:3306/auth_test?useUnicode=true&characterEncoding=UTF-8&useSSL=false
 7       username: root
 8       password: 123456
 9       schema: classpath:springbootsecurityauth.sql
10       sql-script-encoding: utf-8
11       initialization-mode: always
12       driver-class-name: com.mysql.jdbc.Driver
13       # 初始化大小,最小,最大
14       initialSize: 1
15       minIdle: 3
16       maxActive: 20
17      # 配置获取连接等待超时的时间
18       maxWait: 60000
19       # 配置间隔多久才进行一次检测,检测需要关闭的空闲连接,单位是毫秒
20       timeBetweenEvictionRunsMillis: 60000
21       # 配置一个连接在池中最小生存的时间,单位是毫秒
22       minEvictableIdleTimeMillis: 30000
23       validationQuery: select 'x'
24       testWhileIdle: true
25       testOnBorrow: false
26       testOnReturn: false
27       # 打开PSCache,并且指定每个连接上PSCache的大小
28       poolPreparedStatements: true
29       maxPoolPreparedStatementPerConnectionSize: 20
30       # 配置监控统计拦截的filters,去掉后监控界面sql无法统计,'wall'用于防火墙
31       filters: stat,wall,slf4j
32       # 通过connectProperties属性来打开mergeSql功能;慢SQL记录
33       connectionProperties: druid.stat.mergeSql=true;druid.stat.slowSqlMillis=5000
34 #redis 配置
35   redis:
36     open: true # 是否开启redis缓存  true开启   false关闭
37     database: 1
38     host: localhost
39     port: 6379
40     timeout: 5000s  # 连接超时时长(毫秒)
41     jedis:
42       pool:
43         max-active: 8 #连接池最大连接数(使用负值表示没有限制)
44         max-idle: 8  #连接池中的最大空闲连接
45         max-wait: -1s #连接池最大阻塞等待时间(使用负值表示没有限制)
46         min-idle: 0  #连接池中的最小空闲连接
47
48 # jpa 配置
49   jpa:
50     database: mysql
51     show-sql: false
52     hibernate:
53       ddl-auto: update
54     properties:
55       hibernate:
56         dialect: org.hibernate.dialect.MySQL5Dialect
资源服务器与授权服务器
编写类Oauth2Config,实现资源服务器与授权服务器,这里的资源服务器与授权服务器以内部类的形式实现。
Oauth2Config代码如下:
  1 package com.unionman.springbootsecurityauth2.config;
  2
  3 import com.unionman.springbootsecurityauth2.handler.CustomAuthExceptionHandler;
  4 import org.springframework.beans.factory.annotation.Autowired;
  5 import org.springframework.context.annotation.Bean;
  6 import org.springframework.context.annotation.Configuration;
  7 import org.springframework.data.redis.connection.RedisConnectionFactory;
  8 import org.springframework.http.HttpMethod;
  9 import org.springframework.security.authentication.AuthenticationManager;
 10 import org.springframework.security.config.annotation.web.builders.HttpSecurity;
 11 import org.springframework.security.config.http.SessionCreationPolicy;
 12 import org.springframework.security.crypto.bcrypt.BCryptPasswordEncoder;
 13 import org.springframework.security.oauth2.config.annotation.configurers.ClientDetailsServiceConfigurer;
 14 import org.springframework.security.oauth2.config.annotation.web.configuration.AuthorizationServerConfigurerAdapter;
 15 import org.springframework.security.oauth2.config.annotation.web.configuration.EnableAuthorizationServer;
 16 import org.springframework.security.oauth2.config.annotation.web.configuration.EnableResourceServer;
 17 import org.springframework.security.oauth2.config.annotation.web.configuration.ResourceServerConfigurerAdapter;
 18 import org.springframework.security.oauth2.config.annotation.web.configurers.AuthorizationServerEndpointsConfigurer;
 19 import org.springframework.security.oauth2.config.annotation.web.configurers.AuthorizationServerSecurityConfigurer;
 20 import org.springframework.security.oauth2.config.annotation.web.configurers.ResourceServerSecurityConfigurer;
 21 import org.springframework.security.oauth2.provider.token.DefaultTokenServices;
 22 import org.springframework.security.oauth2.provider.token.store.redis.RedisTokenStore;
 23
 24 import java.util.concurrent.TimeUnit;
 25
 26
 27
 28 /**
 29  * @author Zhifeng.Zeng
 30  * @description OAuth2服务器配置
 31  */
 32 @Configuration
 33 public class OAuth2Config {
 34
 35     public static final String ROLE_ADMIN = "ADMIN";
 36     //访问客户端密钥
 37     public static final String CLIENT_SECRET = "123456";
 38     //访问客户端ID
 39     public static final String CLIENT_ID ="client_1";
 40     //鉴权模式
 41     public static final String GRANT_TYPE[] = {"password","refresh_token"};
 42
 43     /**
 44      * @description 资源服务器
 45      */
 46     @Configuration
 47     @EnableResourceServer
 48     protected static class ResourceServerConfiguration extends ResourceServerConfigurerAdapter {
 49
 50         @Autowired
 51         private CustomAuthExceptionHandler customAuthExceptionHandler;
 52
 53         @Override
 54         public void configure(ResourceServerSecurityConfigurer resources) {
 55             resources.stateless(false)
 56                     .accessDeniedHandler(customAuthExceptionHandler)
 57                     .authenticationEntryPoint(customAuthExceptionHandler);
 58         }
 59
 60         @Override
 61         public void configure(HttpSecurity http) throws Exception {
 62             http.sessionManagement().sessionCreationPolicy(SessionCreationPolicy.IF_REQUIRED)
 63                     .and()
 64                     //请求权限配置
 65                     .authorizeRequests()
 66                     //下边的路径放行,不需要经过认证
 67                     .antMatchers("/oauth/*", "/auth/user/login").permitAll()
 68                     //OPTIONS请求不需要鉴权
 69                     .antMatchers(HttpMethod.OPTIONS, "/**").permitAll()
 70                     //用户的增删改接口只允许管理员访问
 71                     .antMatchers(HttpMethod.POST, "/auth/user").hasAnyAuthority(ROLE_ADMIN)
 72                     .antMatchers(HttpMethod.PUT, "/auth/user").hasAnyAuthority(ROLE_ADMIN)
 73                     .antMatchers(HttpMethod.DELETE, "/auth/user").hasAnyAuthority(ROLE_ADMIN)
 74                     //获取角色 权限列表接口只允许系统管理员及高级用户访问
 75                     .antMatchers(HttpMethod.GET, "/auth/role").hasAnyAuthority(ROLE_ADMIN)
 76                     //其余接口没有角色限制,但需要经过认证,只要携带token就可以放行
 77                     .anyRequest()
 78                     .authenticated();
 79
 80         }
 81     }
 82
 83     /**
 84      * @description 认证授权服务器
 85      */
 86     @Configuration
 87     @EnableAuthorizationServer
 88     protected static class AuthorizationServerConfiguration extends AuthorizationServerConfigurerAdapter {
 89
 90         @Autowired
 91         private AuthenticationManager authenticationManager;
 92
 93         @Autowired
 94         private RedisConnectionFactory connectionFactory;
 95
 96         @Override
 97         public void configure(ClientDetailsServiceConfigurer clients) throws Exception {
 98             String finalSecret = "{bcrypt}" + new BCryptPasswordEncoder().encode(CLIENT_SECRET);
 99             //配置客户端,使用密码模式验证鉴权
100             clients.inMemory()
101                     .withClient(CLIENT_ID)
102                     //密码模式及refresh_token模式
103                     .authorizedGrantTypes(GRANT_TYPE[0], GRANT_TYPE[1])
104                     .scopes("all")
105                     .secret(finalSecret);
106         }
107
108         @Bean
109         public RedisTokenStore redisTokenStore() {
110             return new RedisTokenStore(connectionFactory);
111         }
112
113         /**
114          * @description token及用户信息存储到redis,当然你也可以存储在当前的服务内存,不推荐
115          * @param endpoints
116          */
117         @Override
118         public void configure(AuthorizationServerEndpointsConfigurer endpoints) {
119             //token信息存到服务内存
120             /*endpoints.tokenStore(new InMemoryTokenStore())
121                     .authenticationManager(authenticationManager);*/
122
123             //token信息存到redis
124             endpoints.tokenStore(redisTokenStore()).authenticationManager(authenticationManager);
125             //配置TokenService参数
126             DefaultTokenServices tokenService = new DefaultTokenServices();
127             tokenService.setTokenStore(endpoints.getTokenStore());
128             tokenService.setSupportRefreshToken(true);
129             tokenService.setClientDetailsService(endpoints.getClientDetailsService());
130             tokenService.setTokenEnhancer(endpoints.getTokenEnhancer());
131             //1小时
132             tokenService.setAccessTokenValiditySeconds((int) TimeUnit.HOURS.toSeconds(1));
133             //1小时
134             tokenService.setRefreshTokenValiditySeconds((int) TimeUnit.HOURS.toSeconds(1));
135             tokenService.setReuseRefreshToken(false);
136             endpoints.tokenServices(tokenService);
137         }
138
139         @Override
140         public void configure(AuthorizationServerSecurityConfigurer oauthServer) {
141             //允许表单认证
142             oauthServer.allowFormAuthenticationForClients().tokenKeyAccess("isAuthenticated()")
143                     .checkTokenAccess("permitAll()");
144         }
145     }
146 }
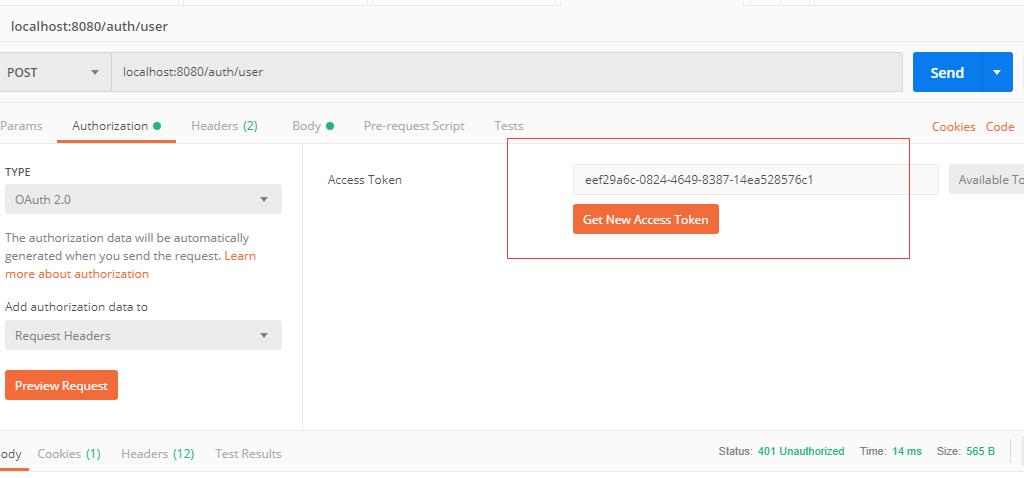
这里有个点要强调一下,就是上面的CustomAuthExceptionHandler ,这是一个自定义返回异常处理。要知道oauth2在登录时用户密码不正确或者权限不足时,oauth2内部携带的Endpoint处理,会默认返回401并且携带的message是它内部默认的英文,例如像这种:

感觉就很不友好,所以我这里自己去处理AuthException并返回自己想要的数据及数据格式给客户端。
CustomAuthExceptionHandler代码如下:
 1 package com.unionman.humancar.handler;
 2
 3 import com.alibaba.fastjson.JSON;
 4 import com.unionman.humancar.enums.ResponseEnum;
 5 import com.unionman.humancar.vo.ResponseVO;
 6 import lombok.extern.slf4j.Slf4j;
 7 import org.springframework.security.access.AccessDeniedException;
 8 import org.springframework.security.core.AuthenticationException;
 9 import org.springframework.security.oauth2.common.exceptions.InvalidTokenException;
10 import org.springframework.security.web.AuthenticationEntryPoint;
11 import org.springframework.security.web.access.AccessDeniedHandler;
12 import org.springframework.stereotype.Component;
13
14 import javax.servlet.ServletException;
15 import javax.servlet.http.HttpServletRequest;
16 import javax.servlet.http.HttpServletResponse;
17 import java.io.IOException;
18
19 /**
20  * @author Zhifeng.Zeng
21  * @description 自定义未授权 token无效 权限不足返回信息处理类
22  * @date 2019/3/4 15:49
23  */
24 @Component
25 @Slf4j
26 public class CustomAuthExceptionHandler implements AuthenticationEntryPoint, AccessDeniedHandler {
27     @Override
28     public void commence(HttpServletRequest request, HttpServletResponse response, AuthenticationException authException) throws IOException, ServletException {
29
30         Throwable cause = authException.getCause();
31         response.setContentType("application/json;charset=UTF-8");
32         response.setStatus(HttpServletResponse.SC_UNAUTHORIZED);
33         // CORS "pre-flight" request
34         response.addHeader("Access-Control-Allow-Origin", "*");
35         response.addHeader("Cache-Control","no-cache");
36         response.addHeader("Access-Control-Allow-Methods", "GET, POST, PUT, DELETE, OPTIONS");
37         response.setHeader("Access-Control-Allow-Headers", "x-requested-with");
38         response.addHeader("Access-Control-Max-Age", "1800");
39         if (cause instanceof InvalidTokenException) {
40             log.error("InvalidTokenException : {}",cause.getMessage());
41             //Token无效
42             response.getWriter().write(JSON.toJSONString(ResponseVO.error(ResponseEnum.ACCESS_TOKEN_INVALID)));
43         } else {
44             log.error("AuthenticationException : NoAuthentication");
45             //资源未授权
46             response.getWriter().write(JSON.toJSONString(ResponseVO.error(ResponseEnum.UNAUTHORIZED)));
47         }
48
49     }
50
51     @Override
52     public void handle(HttpServletRequest request, HttpServletResponse response, AccessDeniedException accessDeniedException) throws IOException, ServletException {
53         response.setContentType("application/json;charset=UTF-8");
54         response.setStatus(HttpServletResponse.SC_UNAUTHORIZED);
55         response.addHeader("Access-Control-Allow-Origin", "*");
56         response.addHeader("Cache-Control","no-cache");
57         response.addHeader("Access-Control-Allow-Methods", "GET, POST, PUT, DELETE, OPTIONS");
58         response.setHeader("Access-Control-Allow-Headers", "x-requested-with");
59         response.addHeader("Access-Control-Max-Age", "1800");
60         //访问资源的用户权限不足
61         log.error("AccessDeniedException : {}",accessDeniedException.getMessage());
62         response.getWriter().write(JSON.toJSONString(ResponseVO.error(ResponseEnum.INSUFFICIENT_PERMISSIONS)));
63     }
64 }
Spring Security
这里security主要承担的角色是,用户资源管理,简单地说就是,在客户端发送登录请求的时候,security会将先去根据用户输入的用户名和密码,去查数据库,如果匹配,那么就把相应的用户信息进行一层转换,然后交给认证授权管理器,然后认证授权管理器会根据相应的用户,给他分发一个token(令牌),然后下次进行请求的时候,携带着该token(令牌),认证授权管理器就能根据该token(令牌)去找到相应的用户了。
SecurityConfig代码如下:
 1 package com.unionman.springbootsecurityauth2.config;
 2
 3 import com.unionman.springbootsecurityauth2.domain.CustomUserDetail;
 4 import com.unionman.springbootsecurityauth2.entity.User;
 5 import com.unionman.springbootsecurityauth2.repository.UserRepository;
 6 import lombok.extern.slf4j.Slf4j;
 7 import org.springframework.beans.factory.annotation.Autowired;
 8 import org.springframework.context.annotation.Bean;
 9 import org.springframework.context.annotation.Configuration;
10 import org.springframework.security.authentication.AuthenticationManager;
11 import org.springframework.security.config.annotation.web.configuration.EnableWebSecurity;
12 import org.springframework.security.config.annotation.web.configuration.WebSecurityConfigurerAdapter;
13 import org.springframework.security.core.GrantedAuthority;
14 import org.springframework.security.core.authority.AuthorityUtils;
15 import org.springframework.security.core.userdetails.UserDetails;
16 import org.springframework.security.core.userdetails.UserDetailsService;
17 import org.springframework.security.core.userdetails.UsernameNotFoundException;
18 import org.springframework.security.crypto.bcrypt.BCryptPasswordEncoder;
19 import org.springframework.security.crypto.factory.PasswordEncoderFactories;
20 import org.springframework.security.crypto.password.PasswordEncoder;
21 import org.springframework.web.client.RestTemplate;
22
23 import java.util.List;
24
25 /**
26  * @description Security核心配置
27  * @author Zhifeng.Zeng
28  */
29 @Configuration
30 @EnableWebSecurity
31 @Slf4j
32 public class SecurityConfig extends WebSecurityConfigurerAdapter {
33
34
35     @Autowired
36     private UserRepository userRepository;
37
38     @Bean
39     @Override
40     public AuthenticationManager authenticationManagerBean() throws Exception {
41         return super.authenticationManagerBean();
42     }
43
44     @Bean
45     public RestTemplate restTemplate(){
46         return new RestTemplate();
47     }
48
49     @Bean
50     @Override
51     protected UserDetailsService userDetailsService() {
52         BCryptPasswordEncoder bCryptPasswordEncoder = new BCryptPasswordEncoder();
53        return new UserDetailsService(){
54            @Override
55            public UserDetails loadUserByUsername(String username) throws UsernameNotFoundException {
56                log.info("username:{}",username);
57                User user = userRepository.findUserByAccount(username);
58                if(user != null){
59                    CustomUserDetail customUserDetail = new CustomUserDetail();
60                    customUserDetail.setUsername(user.getAccount());
61                    customUserDetail.setPassword("{bcrypt}"+bCryptPasswordEncoder.encode(user.getPassword()));
62                    List<GrantedAuthority> list = AuthorityUtils.createAuthorityList(user.getRole().getRole());
63                    customUserDetail.setAuthorities(list);
64                    return customUserDetail;
65                }else {//返回空
66                    return null;
67                }
68
69            }
70        };
71     }
72
73     @Bean
74     PasswordEncoder passwordEncoder() {
75         return PasswordEncoderFactories.createDelegatingPasswordEncoder();
76     }
77 }
业务逻辑
这里我只简单地实现了用户的增删改查以及用户登录的业务逻辑。并没有做太深的业务处理,主要是重点看一下登录的业务逻辑。里面引了几个组件,简单说一下,RestTemplate(http客户端)用于发送http请求,ServerConfig(服务配置)用于获取本服务的ip和端口,RedisUtil(redis工具类) 用户对redis进行缓存的增删改查操作。
UserServiceImpl代码如下:
|
1
2
3
4
5
6
7
8
9
10
11
12
13
14
15
16
17
18
19
20
21
22
23
24
25
26
27
28
29
30
31
32
33
34
35
36
37
38
39
40
41
42
43
44
45
46
47
48
49
50
51
52
53
54
55
56
57
58
59
60
61
62
63
64
65
66
67
68
69
70
71
72
73
74
75
76
77
78
79
80
81
82
83
84
85
86
87
88
89
90
91
92
93
94
95
96
97
98
99
100
101
102
103
104
105
106
107
108
109
110
111
112
113
114
115
116
117
118
119
120
121
122
123
124
125
126
127
128
129
130
131
132
133
134
135
136
137
138
139
140
141
142
143
144
145
146
147
148
149
150
151
152
153
154
155
156
157
158
159
160
161
162
163
164
165
166
167
168
169
170
171
172
173
174
175
176
177
178
179
180
181
182
183
184
185
186
187
188
189
190
191
192
193
194
195
196
197
198
199
200
201
202
|
package com.unionman.springbootsecurityauth2.service.impl;import com.unionman.springbootsecurityauth2.config.ServerConfig;import com.unionman.springbootsecurityauth2.domain.Token;import com.unionman.springbootsecurityauth2.dto.LoginUserDTO;import com.unionman.springbootsecurityauth2.dto.UserDTO;import com.unionman.springbootsecurityauth2.entity.Role;import com.unionman.springbootsecurityauth2.entity.User;import com.unionman.springbootsecurityauth2.enums.ResponseEnum;import com.unionman.springbootsecurityauth2.enums.UrlEnum;import com.unionman.springbootsecurityauth2.repository.UserRepository;import com.unionman.springbootsecurityauth2.service.RoleService;import com.unionman.springbootsecurityauth2.service.UserService;import com.unionman.springbootsecurityauth2.utils.BeanUtils;import com.unionman.springbootsecurityauth2.utils.RedisUtil;import com.unionman.springbootsecurityauth2.vo.LoginUserVO;import com.unionman.springbootsecurityauth2.vo.ResponseVO;import com.unionman.springbootsecurityauth2.vo.RoleVO;import com.unionman.springbootsecurityauth2.vo.UserVO;import org.springframework.beans.factory.annotation.Autowired;import org.springframework.stereotype.Service;import org.springframework.transaction.annotation.Transactional;import org.springframework.util.LinkedMultiValueMap;import org.springframework.util.MultiValueMap;import org.springframework.web.client.RestClientException;import org.springframework.web.client.RestTemplate;import java.util.ArrayList;import java.util.List;import java.util.concurrent.TimeUnit;import static com.unionman.springbootsecurityauth2.config.OAuth2Config.CLIENT_ID;import static com.unionman.springbootsecurityauth2.config.OAuth2Config.CLIENT_SECRET;import static com.unionman.springbootsecurityauth2.config.OAuth2Config.GRANT_TYPE;@Servicepublic class UserServiceImpl implements UserService { @Autowired private UserRepository userRepository; @Autowired private RoleService roleService; @Autowired private RestTemplate restTemplate; @Autowired private ServerConfig serverConfig; @Autowired private RedisUtil redisUtil; @Override @Transactional(rollbackFor = Exception.class) public void addUser(UserDTO userDTO) { User userPO = new User(); User userByAccount = userRepository.findUserByAccount(userDTO.getAccount()); if(userByAccount != null){ //此处应该用自定义异常去返回,在这里我就不去具体实现了 try { throw new Exception("This user already exists!"); } catch (Exception e) { e.printStackTrace(); } } userPO.setCreatedTime(System.currentTimeMillis()); //添加用户角色信息 Role rolePO = roleService.findById(userDTO.getRoleId()); userPO.setRole(rolePO); BeanUtils.copyPropertiesIgnoreNull(userDTO,userPO); userRepository.save(userPO); } @Override @Transactional(rollbackFor = Exception.class) public void deleteUser(Integer id) { User userPO = userRepository.findById(id).get(); if(userPO == null){ //此处应该用自定义异常去返回,在这里我就不去具体实现了 try { throw new Exception("This user not exists!"); } catch (Exception e) { e.printStackTrace(); } } userRepository.delete(userPO); } @Override @Transactional(rollbackFor = Exception.class) public void updateUser(UserDTO userDTO) { User userPO = userRepository.findById(userDTO.getId()).get(); if(userPO == null){ //此处应该用自定义异常去返回,在这里我就不去具体实现了 try { throw new Exception("This user not exists!"); } catch (Exception e) { e.printStackTrace(); } } BeanUtils.copyPropertiesIgnoreNull(userDTO, userPO); //修改用户角色信息 Role rolePO = roleService.findById(userDTO.getRoleId()); userPO.setRole(rolePO); userRepository.saveAndFlush(userPO); } @Override public ResponseVO<List<UserVO>> findAllUserVO() { List<User> userPOList = userRepository.findAll(); List<UserVO> userVOList = new ArrayList<>(); userPOList.forEach(userPO->{ UserVO userVO = new UserVO(); BeanUtils.copyPropertiesIgnoreNull(userPO,userVO); RoleVO roleVO = new RoleVO(); BeanUtils.copyPropertiesIgnoreNull(userPO.getRole(),roleVO); userVO.setRole(roleVO); userVOList.add(userVO); }); return ResponseVO.success(userVOList); } @Override public ResponseVO login(LoginUserDTO loginUserDTO) { MultiValueMap<String, Object> paramMap = new LinkedMultiValueMap<>(); paramMap.add("client_id", CLIENT_ID); paramMap.add("client_secret", CLIENT_SECRET); paramMap.add("username", loginUserDTO.getAccount()); paramMap.add("password", loginUserDTO.getPassword()); paramMap.add("grant_type", GRANT_TYPE[0]); Token token = null; try { //因为oauth2本身自带的登录接口是"/oauth/token",并且返回的数据类型不能按我们想要的去返回 //但是我的业务需求是,登录接口是"user/login",由于我没研究过要怎么去修改oauth2内部的endpoint配置 //所以这里我用restTemplate(HTTP客户端)进行一次转发到oauth2内部的登录接口,比较简单粗暴 token = restTemplate.postForObject(serverConfig.getUrl() + UrlEnum.LOGIN_URL.getUrl(), paramMap, Token.class); LoginUserVO loginUserVO = redisUtil.get(token.getValue(), LoginUserVO.class); if(loginUserVO != null){ //登录的时候,判断该用户是否已经登录过了 //如果redis里面已经存在该用户已经登录过了的信息 //我这边要刷新一遍token信息,不然,它会返回上一次还未过时的token信息给你 //不便于做单点维护 token = oauthRefreshToken(loginUserVO.getRefreshToken()); redisUtil.deleteCache(loginUserVO.getAccessToken()); } } catch (RestClientException e) { try { e.printStackTrace(); //此处应该用自定义异常去返回,在这里我就不去具体实现了 //throw new Exception("username or password error"); } catch (Exception e1) { e1.printStackTrace(); } } //这里我拿到了登录成功后返回的token信息之后,我再进行一层封装,最后返回给前端的其实是LoginUserVO LoginUserVO loginUserVO = new LoginUserVO(); User userPO = userRepository.findUserByAccount(loginUserDTO.getAccount()); BeanUtils.copyPropertiesIgnoreNull(userPO, loginUserVO); loginUserVO.setPassword(userPO.getPassword()); loginUserVO.setAccessToken(token.getValue()); loginUserVO.setAccessTokenExpiresIn(token.getExpiresIn()); loginUserVO.setAccessTokenExpiration(token.getExpiration()); loginUserVO.setExpired(token.isExpired()); loginUserVO.setScope(token.getScope()); loginUserVO.setTokenType(token.getTokenType()); loginUserVO.setRefreshToken(token.getRefreshToken().getValue()); loginUserVO.setRefreshTokenExpiration(token.getRefreshToken().getExpiration()); //存储登录的用户 redisUtil.set(loginUserVO.getAccessToken(),loginUserVO,TimeUnit.HOURS.toSeconds(1)); return ResponseVO.success(loginUserVO); } /** * @description oauth2客户端刷新token * @param refreshToken * @date 2019/03/05 14:27:22 * @author Zhifeng.Zeng * @return */ private Token oauthRefreshToken(String refreshToken) { MultiValueMap<String, Object> paramMap = new LinkedMultiValueMap<>(); paramMap.add("client_id", CLIENT_ID); paramMap.add("client_secret", CLIENT_SECRET); paramMap.add("refresh_token", refreshToken); paramMap.add("grant_type", GRANT_TYPE[1]); Token token = null; try { token = restTemplate.postForObject(serverConfig.getUrl() + UrlEnum.LOGIN_URL.getUrl(), paramMap, Token.class); } catch (RestClientException e) { try { //此处应该用自定义异常去返回,在这里我就不去具体实现了 throw new Exception(ResponseEnum.REFRESH_TOKEN_INVALID.getMessage()); } catch (Exception e1) { e1.printStackTrace(); } } return token; }} |
示例
这里我使用postman(接口测试工具)去对接口做一些简单的测试。
(1)这里我去发送一个获取用户列表的请求:
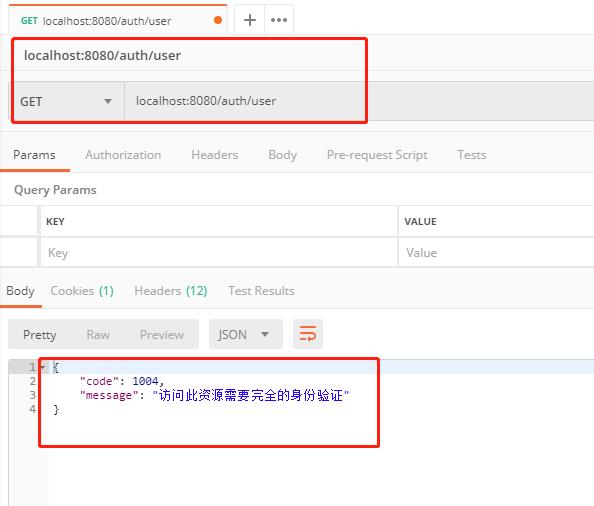
结果可以看到,由于没有携带token信息,所以返回了如下信息。
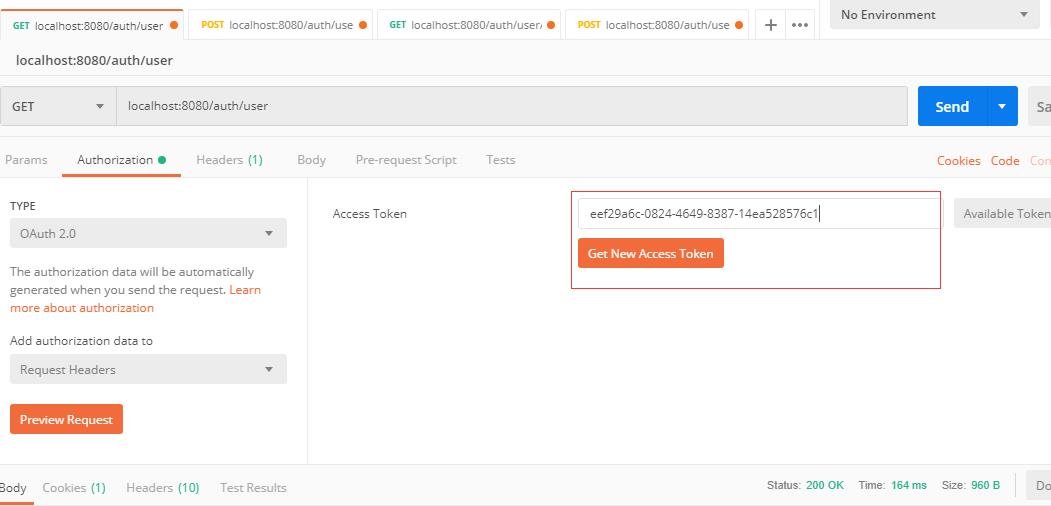
(2)接下来,我们先去登录。
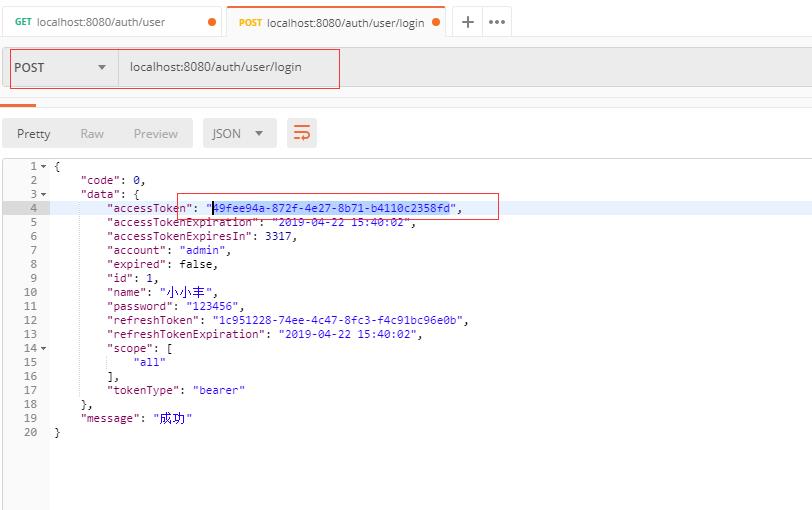
登录成功后,这里会返回一系列信息,记住这个token信息,待会我们尝试使用这个token信息再次请求上面那个获取用户列表接口。
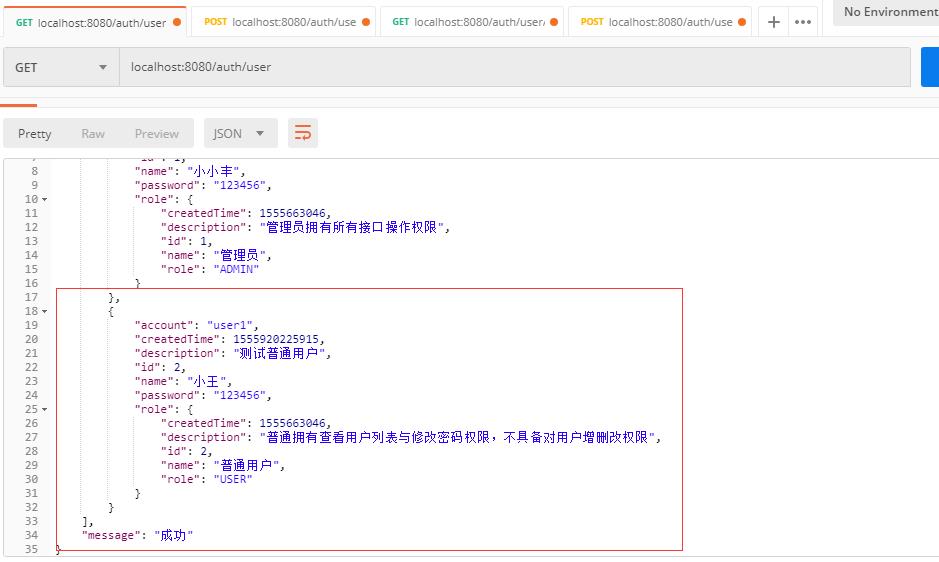
(3)携带token去获取用户列表
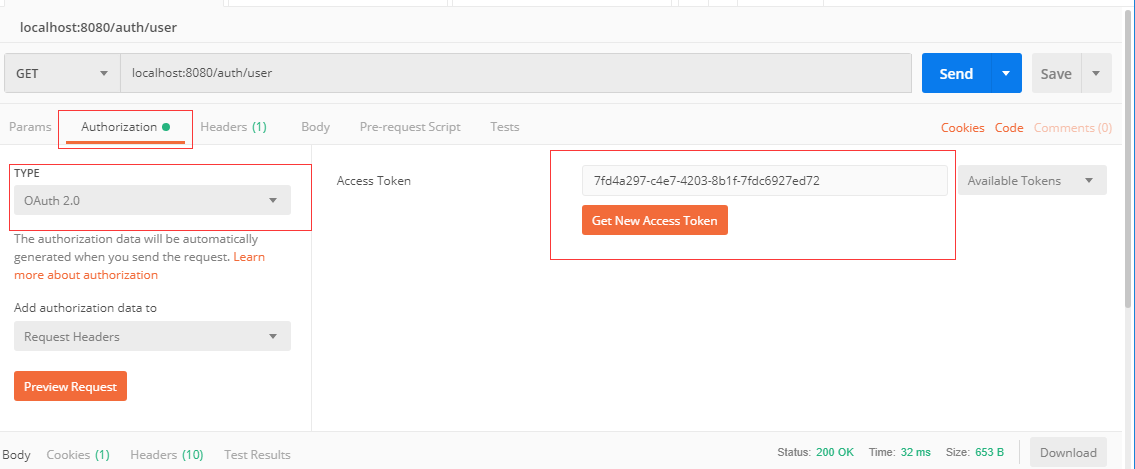
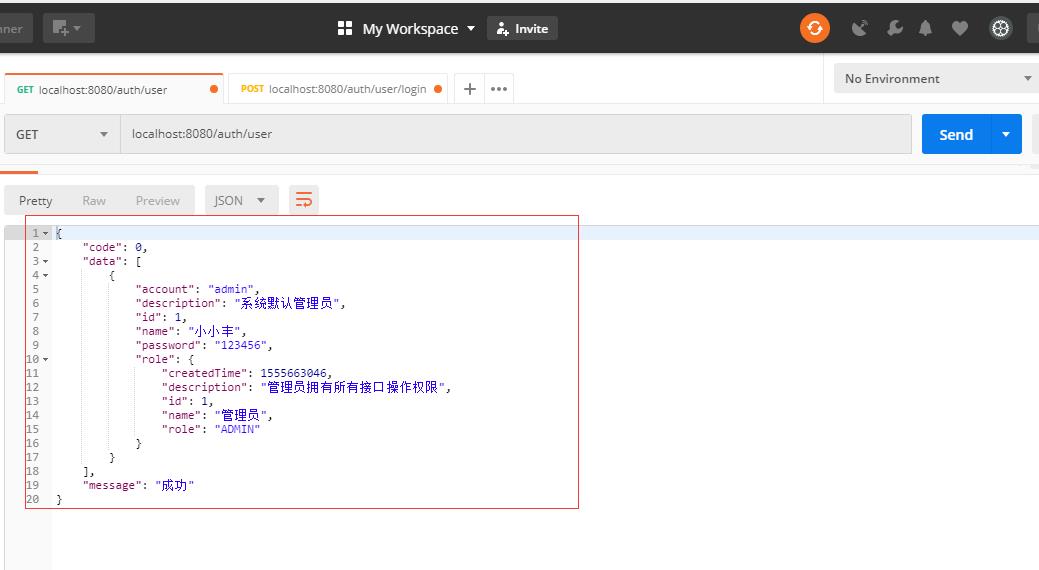
可以看到,可以成功拿到接口返回的资源(用户的列表信息)啦。
(4)这里测试一下,用户注销的接口。用户注销,会把redis里的token信息全部清除。
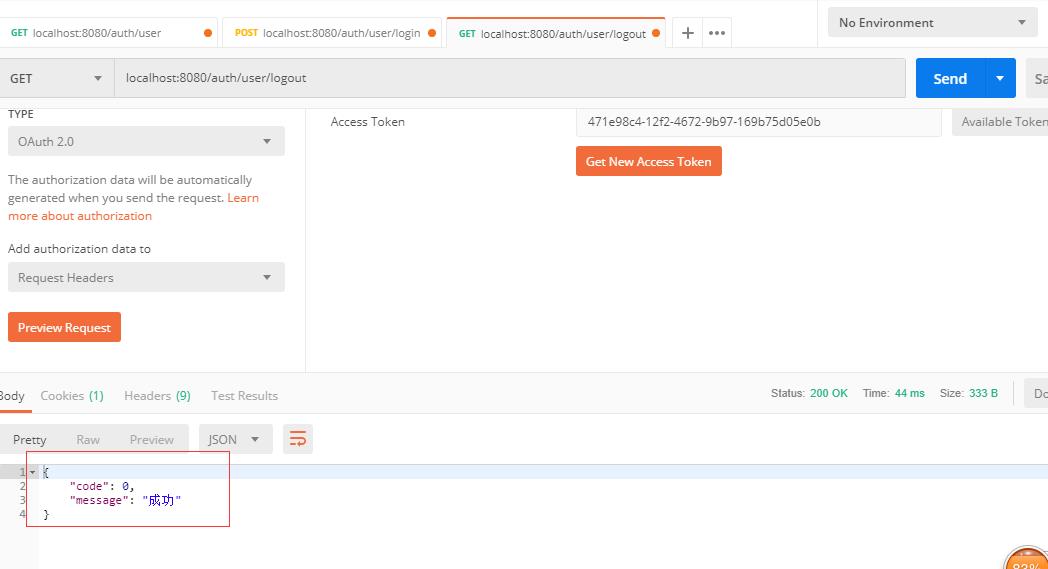
可以看到,注销成功了。那么我们再用这个已经被注销的token再去请求一遍那个获取用户列表接口。
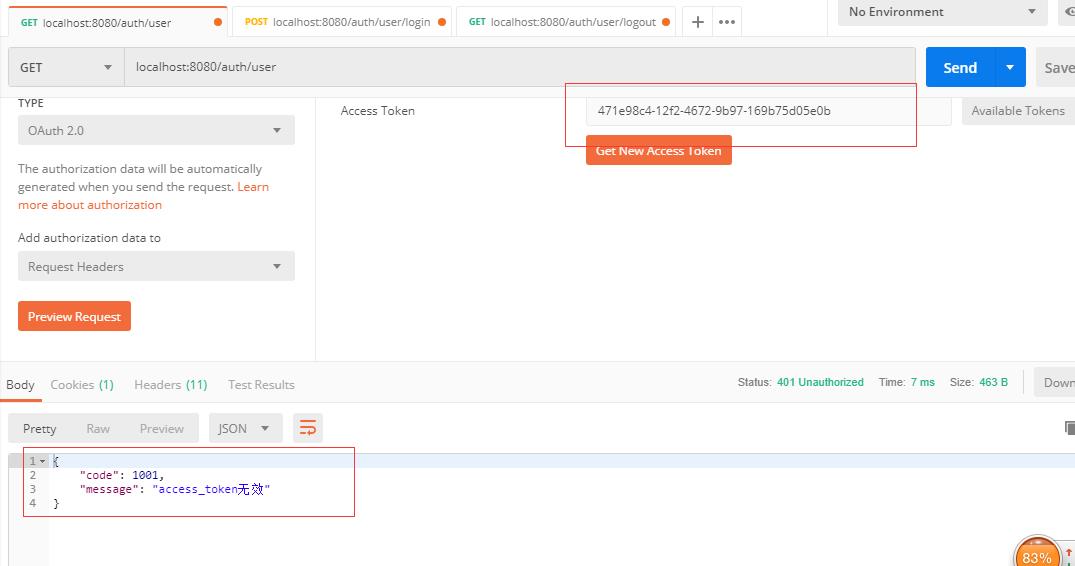
很显然,此时已经报token无效了。
接下来,我们对角色的资源分配管理进行一个测试。可以看到我们库里面,项目初始化的时候,就已经创建了一个管理员,我们上面配置已经规定,管理员是拥有所有接口的访问权限的,而普通用户却只有查询权限。我们现在就来测试一下这个效果。
(1)首先我使用该管理员去添加一个普通用户。
可以看到,我们返回了添加成功信息了,那么我去查看一下用户列表。
很显然,现在这个用户已经成功添加进去了。
(2)接下来,我们用新添加的用户去登录一下该系统。
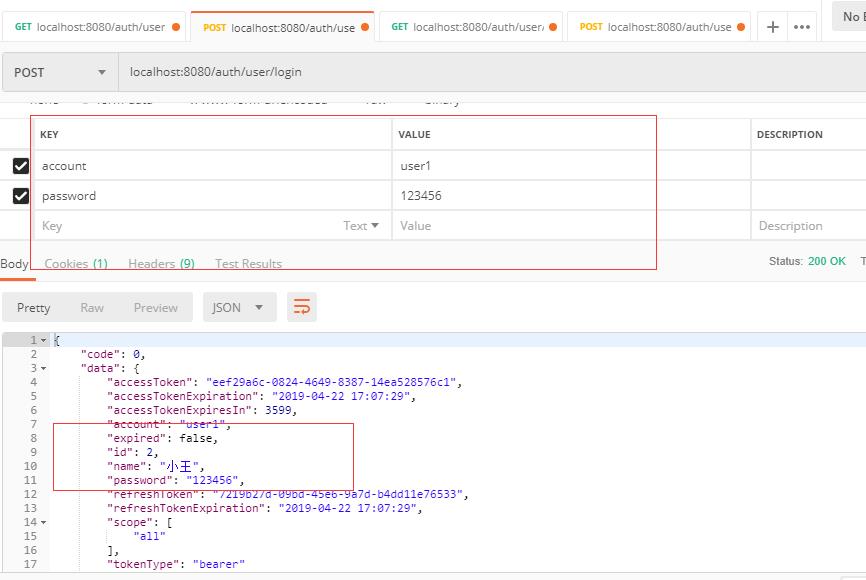
该用户也登录成功了,我们先保存这个token。
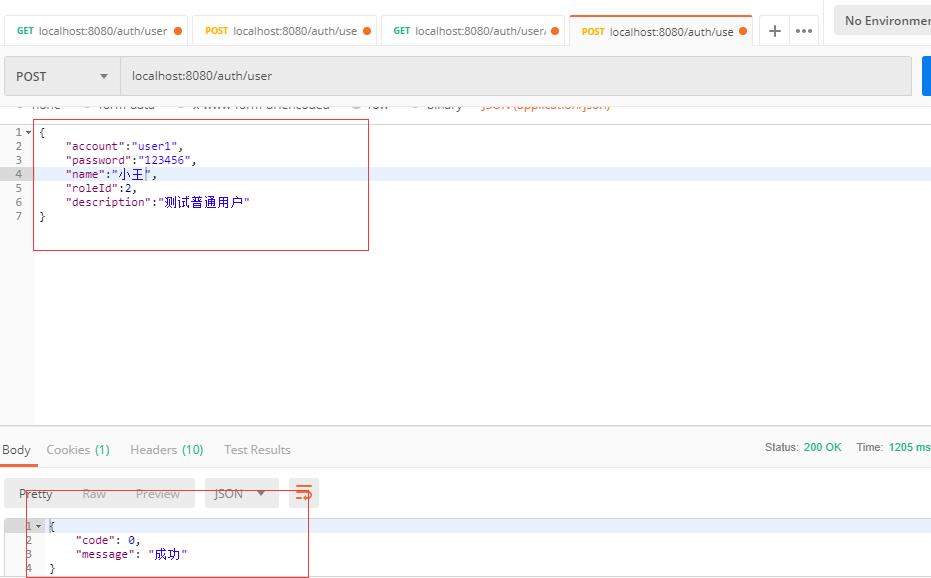
(3)我们现在携带着刚才登录的普通用户"小王"的token去添加一个普通用户。
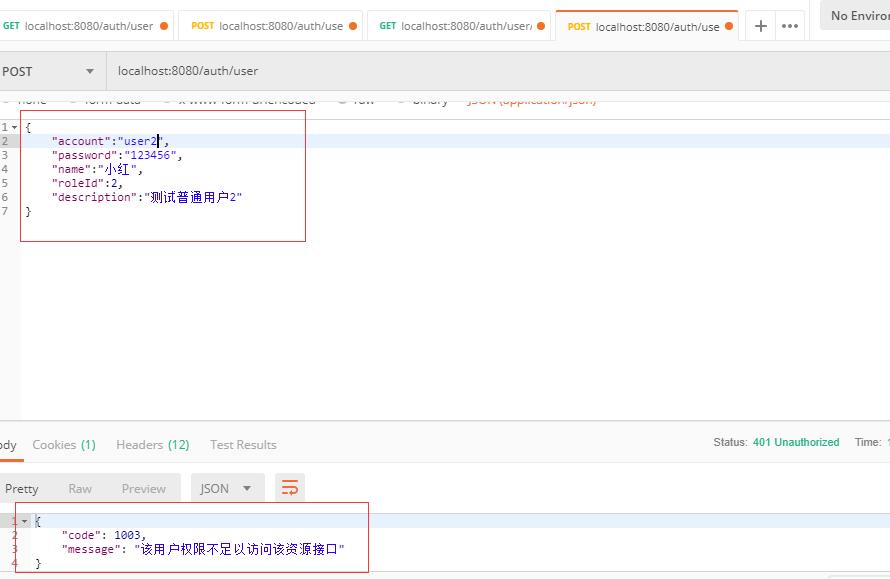
可以看到,由于"小王"是普通用户,所以是不具备添加用户的权限的。
(4)那么我们现在用"小王"这个用户去查询一下用户列表。
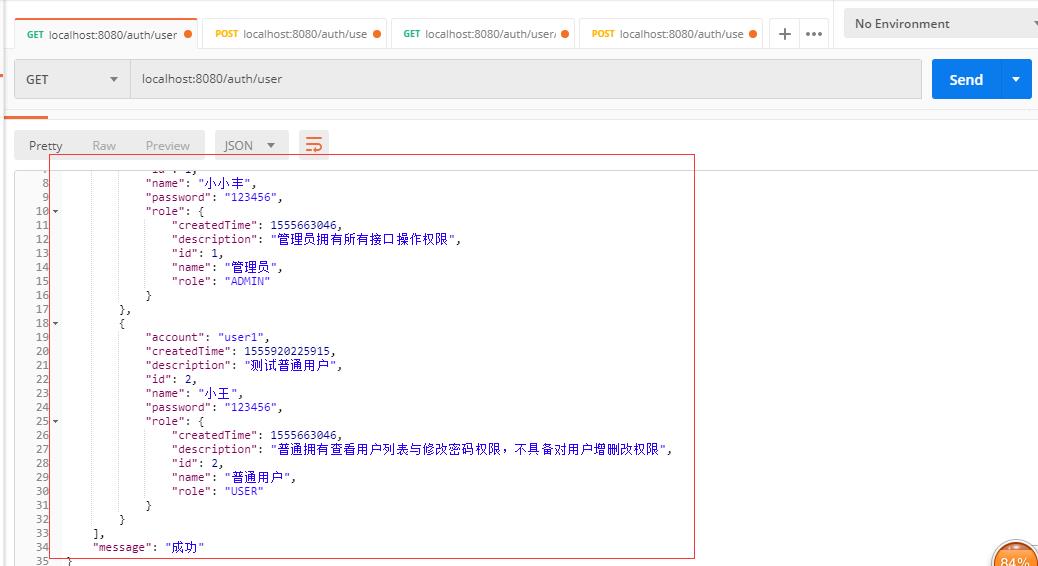
可以看到,"小王"这个普通用户是拥有查询用户列表接口的权限的。
总结
基于Springboot集成security、oauth2实现认证鉴权、资源管理的博文就到这了。描述得其实已经较为详细了,具体代码的示例也给了相关的注释。基本上都是以最简单最基本的方式去做的一个整合Demo。一般实际应用场景里,业务会比较复杂,其中还会有,修改密码,重置密码,主动延时token时长,加密解密等等。这些就根据自己的业务需求去做相应的处理了,基本上的操作都是针对redis去做,因为token相关信息都是存储在redis的。
具体源码我已经上传到github:https://github.com/githubzengzhifeng/springboot-security-oauth2
转https://www.cnblogs.com/xiaofengxzzf/p/10733955.html