今天是《Net 高级调试》的第三篇文章,压力还是不小的。上一篇文章,我们浅浅的谈了谈 CLR 和 Windows 加载器是如何加载 Net 程序集的,如何找到程序的入口点的,有了前面的基础,我们今天看一点更详细的东西。既然 Windows 操作系统已经加载了 CLR,初始化了应用程序域,加载了我们的 Net 程序,那我们就看看Net 类型在内存中的具体样子。这一篇文章还是有一点难度的,我看第一遍视频的时候,也不知道说了个啥,后来又看了《Net 高级调试》,似懂非懂。一遍不行,那就再来一遍,还不行,那就再来一遍,俗话说的好,书读千遍,其意自现。
如果在没有说明的情况下,所有代码的测试环境都是 Net Framewok 4.8,但是,有时候为了查看源码,可能需要使用 Net Core 的项目,我会在项目章节里进行说明。好了,废话不多说,开始我们今天的调试工作。
调试环境我需要进行说明,以防大家不清楚,具体情况我已经罗列出来。
操作系统:Windows Professional 10
调试工具:Windbg Preview(可以去Microsoft Store 去下载)
开发工具:Visual Studio 2022
Net 版本:Net Framework 4.8
CoreCLR源码:源码下载
二、相关知识
我们知道了 CLR,了解了 JIT,晓得了 Net 的编译过程,也真正做到了眼见为实,所有的知识点都有根了,这次好好的研究一下类型的东西,当然,这写东西平时时很难遇到的,就是不懂,也可以写出东西。但是,如果要想做到,知其一也要知其二的话,这些只是还是有必要了解的,对我们写出高效的代码还是很有帮助的,一以下就是相关的知识点,我一一罗列出来。
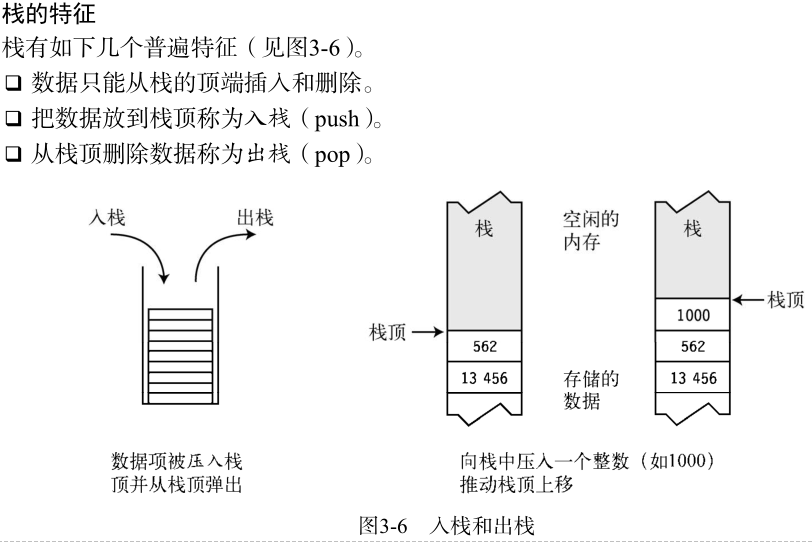
栈stack(先进后出)是编译期间就分配好的内存空间,因此你的代码中必须就栈的大小有明确的定义;
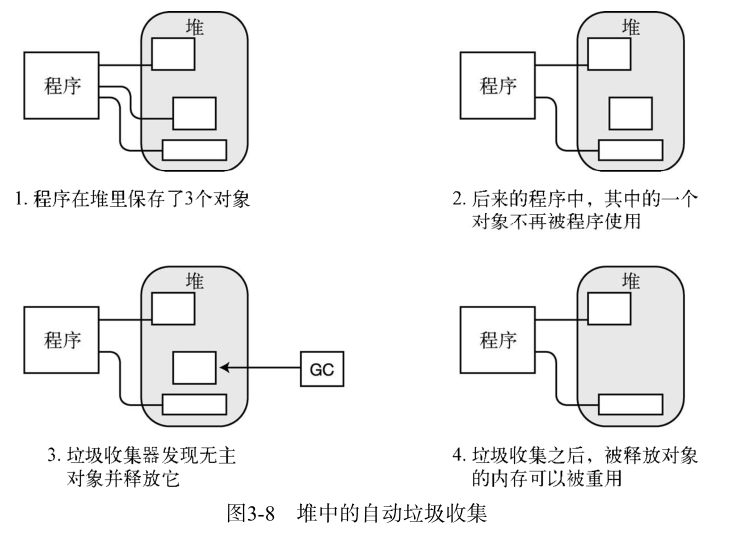
堆heap(队列优先,先进先出)是程序运行期间动态分配的内存空间,你可以根据程序的运行情况确定要分配的堆内存的大小。
1、简介
类型是 Net 程序中基本编程单元,类型又可以细分为:值类型,引用类型。
a)、值类型
枚举【enum】,结构【Struct】和其他简单类型,比如:int,float,double,char,bool等。这些类型占据的空间小,一般存放在线程栈上,当然也可以保存在寄存器中、托管堆中或者是私有堆中。
b)、引用类型
接口、数组、类和我们自定义的 Class,都是引用类型,这样的类型,一般占据的空间比较大,它们存在托管堆中,由 GC 负责分配内存和回收内存来管理这些引用类型的实例。
2、值类型布局
一般而言,方法的参数、在方法内部声明的局部变量都是存放在当前的线程栈上,也就是说在线程栈上直接存储值类型的值。
3、引用类型布局
class 类型是一种引用类型,实例对象在托管堆中分配空间,并将对象的首地址存在栈地址上。
4、同步块表
这个名称叫的不太准确,叫 ObjectHeader 更好点,因为源码中就是叫这个名称。托管堆上的每个对象的前面都有一个同步块索引,它指向 CLR 中私有堆上的同步块表,同步块表中可以包含很多信息,比如:对象散列码、锁信息、应用程序域索引。

5、类型句柄(方法表)
类型句柄是针对类型的描述信息,比如:这个类中有多少个方法,方法的结构,方法的字段信息等。
6、方法描述符
用来描述C# 方法在 CLR 层面的特征,使用 MethodDesc 类结构来承载,记录了方法的字节码,所属类,Token 等信息。
7、模块
模块是包含在程序集中,程序集是一个 Net 程序的部署单元,可以用 !dumpAssembly 和 !dumpmodule 显示各自的信息。
8、元数据标记
因为程序集是自描述的,类型信息都有响应的 Metadata 来表示,可以使用 ILSpy 来查看。可以使用 !token2ee 来检索对应的方法。
9、EEClass
EEClass 和 MethodTable 是同级别的,用来描述 C# 的一个类,可以使用 !dumpclass 来显示类型的 EECLass 信息。
三、调试过程
废话不多说,这一节是具体的调试操作的过程,有可以说是眼见为实的过程,在开始之前,我还是要啰嗦两句,这一节分为两个部分,第一部分是测试的源码部分,没有代码,当然就谈不上测试了,调试必须有载体。第二部分就是根据具体的代码来证实我们学到的知识,是具体的眼见为实。
1、测试源码
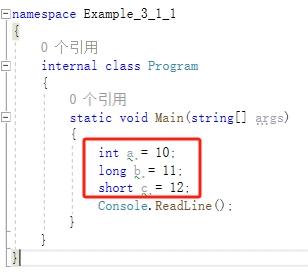
1.1、Example_3_1_1


 1 namespace Example_3_1_1
 2 {
 3     internal class Program
 4     {
 5         static void Main(string[] args)
 6         {
 7             int a = 10;
 8             long b = 11;
 9             short c = 12;
10             Console.ReadLine();
11         }
12     }
13 }
1.2、Example_3_1_2
 1 namespace Example_3_1_2
 2 {
 3     internal class Program
 4     {
 5         static void Main(string[] args)
 6         {
 7             var person = new Person()
 8             {
 9                 Name = "jack",
10                 Age = 20
11             };
12             Console.ReadLine();
13         }
14     }
15
16     public class Person
17     {
18         public string Name { get; set; }
19
20         public int Age { get; set; }
21     }
22 }
1.3、Example_3_1_3
 1 namespace Example_3_1_3
 2 {
 3     internal class Program
 4     {
 5         static void Main(string[] args)
 6         {
 7             var person = new Person() { Name = "jack", Age = 20 };
 8             var hashcode = person.GetHashCode().ToString("x");
 9             Console.WriteLine($"hashcode={hashcode}");
10             Debugger.Break();
11             Console.ReadLine();
12         }
13     }
14
15     public class Person
16     {
17         public string Name { get; set; }
18
19         public int Age { get; set; }
20     }
21 }
1.4、Example_3_1_4
 1 namespace Example_3_1_4
 2 {
 3     internal class Program
 4     {
 5         public static Person person=new Person();
 6
 7         static void Main(string[] args)
 8         {
 9             Task.Run(() =>
10             {
11                 lock (person)
12                 {
13                     Console.WriteLine($"tid={Environment.CurrentManagedThreadId}进入锁了");
14                     Console.ReadLine();
15                 }
16             });
17             Task.Run(() => {
18                 lock (person)
19                 {
20                     Console.WriteLine($"tid={Environment.CurrentManagedThreadId}进入锁了");
21                     Console.ReadLine();
22                 }
23             });
24
25             Console.ReadLine();
26         }
27     }
28
29     public class Person
30     {
31         public string Name { get; set; }
32
33         public int Age { get; set; }
34     }
35 }
1.5、Example_3_1_5
 1 namespace Example_3_1_5
 2 {
 3     internal class Program
 4     {
 5         static void Main(string[] args)
 6         {
 7             var person = new Person()
 8             {
 9                 Name = "jack",
10                 Age = 20
11             };
12             Console.WriteLine("Hello World!");
13             Console.ReadLine();
14         }
15     }
16     public class Person
17     {
18         public string Name { get; set; }
19
20         public int Age { get; set; }
21     }
22 }
1.6、Example_3_1_5_1(这个项目是 Net 7.0版本的)
 1 namespace Example_3_1_5_1
 2 {
 3     internal class Program
 4     {
 5         static void Main(string[] args)
 6         {
 7             var person = new Person()
 8             {
 9                 Name = "jack",
10                 Age = 20
11             };
12             Console.WriteLine("Hello World!");
13             Console.ReadLine();
14         }
15     }
16     public class Person
17     {
18         public string Name { get; set; }
19
20         public int Age { get; set; }
21     }
22 }
2、眼见为实
2.1、值类型的布局
代码样例:Example_3_1_1
我们使用 Windbg Preview 调试器,通过【launch executable】菜单加载【Example_3_1_1.exe】项目,通过【g】命令,运行程序,调试器运行代【Console.ReadLine()】次会暂停执行,然后我们点击【break】按钮,进入调试状态。我们还需要通过【~0s】命令,切换到主线程,当然,我们可以使用【cls】命令清理一下调试器显示的过多信息,自己来决定,我是会清理的。
!clrstack -l 这个命令是显示当前的线程调用栈局部变量,l 表示 local,局部变量,代码关键部分
 1 0:000> !clrstack -l
 2 OS Thread Id: 0x317c (0)
 3 Child SP       IP Call Site
 4 00aff1c4 778e10fc [InlinedCallFrame: 00aff1c4]
 5 00aff1c0 6fee9b71 ...(Microsoft.Win32.SafeHandles.SafeFileHandle, Byte*, Int32, Int32 ByRef, IntPtr)
 6
 7 ......
 8
 9 00aff2c0 00d3089e Example_3_1_1.Program.Main(System.String[]) [E:\...\Example_3_1_1\Program.cs @ 12]
10     LOCALS:【表示局部变量】
11         0x00aff2d0 = 0x0000000a【0x00aff2d0是栈地址,0x0000000a 是栈上的值,这是十六进制的】
12         0x00aff2c8 = 0x0000000b【0x00aff2c8是栈地址,0x0000000b 是栈上的值,这是十六进制的】
13         0x00aff2c4 = 0x0000000c【0x00aff2d0是栈地址,0x0000000c 是栈上的值,这是十六进制的】
14
15 00aff448 70f1f036 [GCFrame: 00aff448]
以上显示的红色部分是最重要的,LOCALS 表示局部变量,11,12,13 三行是具体的局部变量,等号前面是 线程栈上的变量地址,后面是具体的值,我们可以使用【?】命令查看具体的值。
1 0:000> ? 0x0000000a
2 Evaluate expression: 10 = 0000000a
3 0:000> ? 0x0000000b
4 Evaluate expression: 11 = 0000000b
5 0:000> ? 0x0000000c
6 Evaluate expression: 12 = 0000000c
由于栈的特点,先进后出,后进先出,所以说【a】是最先入栈的,在栈底,依次是【b】,最上面的是【c】,所以我们从【c】的地址打印,可以显示【c、b、a】的值。由此,我们执行【dp】命令,效果如下。
1 0:000> dp 0x00aff2c4 l4
2 00aff2c4  0000000c 0000000b 00000000 0000000a
1 0:000> dp 00aff2c4+0x4 l1
2 00aff2c8  0000000b
继续验证,【b】的地址加上 0x8,就是【a】变量的值,为什么是加8呢,因为【b】占用8个字节,如下:
1 0:000> dp 00aff2c8+0x8 l1
2 00aff2d0  0000000a
当然,我们可以以【c】变量的地址为基准,算出【b】和【a】的值,如下:
1 0:000> dp 0x00aff2c4+0x4 l1(以c 的地址为基准,找到b的地址,加4)
2 00aff2c8  0000000b
3 0:000> dp 0x00aff2c4+0xc l1(以c 的地址为基准,找到a的地址,加12,十六进制就是0xc)
4 00aff2d0  0000000a
2.2、引用类型的布局
代码样例:Example_3_1_2
我们使用 Windbg Preview 调试器,通过【launch executable】菜单加载【Example_3_1_2.exe】项目,通过【g】命令,运行程序,调试器运行代【Console.ReadLine()】次会暂停执行,然后我们点击【break】按钮,进入调试状态。我们还需要通过【~0s】命令,切换到主线程,当然,我们可以使用【cls】命令清理一下调试器显示的过多信息,自己来决定,我是会清理的。
我们先使用【!clrstack -a】命令,查看线程栈的局部变量。
 1 0:000> !clrstack -a
 2 OS Thread Id: 0x3930 (0)
 3 Child SP       IP Call Site
 4 0133ee8c 778e10fc [InlinedCallFrame: 0133ee8c]
 5 0133ee88 6fee9b71
 6 ......
 7 0133ef88 018c08b1 Example_3_1_2.Program.Main(System.String[]) [E:\Visual Studio 2022\Source\Projects\......\Example_3_1_2\Program.cs @ 14]
 8     PARAMETERS:
 9         args (0x0133ef94) = 0x033b24bc
10     LOCALS:
11         0x0133ef90 = 0x033b24e0(0x0133ef90 是栈地址,0x033b24e0 person变量的引用地址)
12
13 0133f108 70f1f036 [GCFrame: 0133f108]
我们可以通过【dp】命令查看栈地址,值是 033b24e0,这个值就是 person变量引用的地址。
1 0:000> dp 0x0133ef90 l1
2 0133ef90  033b24e0(这个地址就是 person变量的地址)
我们可以使用【!do|!DumpObj】命令,查看对象的详情。
 1 0:000> !DumpObj /d 033b24e0
 2 Name:        Example_3_1_2.Person
 3 MethodTable: 01874e1c
 4 EEClass:     01871314
 5 Size:        16(0x10) bytes
 6 File:        E:\Visual Studio 2022\Source\Projects\......\Example_3_1_2\bin\Debug\Example_3_1_2.exe
 7 Fields:
 8       MT    Field   Offset                 Type VT     Attr    Value Name
 9 6fa424e4  4000001        4        System.String  0 instance 033b24c8 <Name>k__BackingField
10 6fa442a8  4000002        8         System.Int32  1 instance       20 <Age>k__BackingField
033b24c8 <Name>k__BackingField,这个是 string 类型的字段,033b24c8又是一个引用地址,我们继续【!do】,查看详情。
 1 0:000> !DumpObj /d 033b24c8
 2 Name:        System.String
 3 MethodTable: 6fa424e4
 4 EEClass:     6fb47690
 5 Size:        22(0x16) bytes
 6 File:        C:\Windows\Microsoft.Net\assembly\GAC_32\mscorlib\v4.0_4.0.0.0__b77a5c561934e089\mscorlib.dll
 7 String:      jack(这个就是我们赋值的)
 8 Fields:
 9       MT    Field   Offset                 Type VT     Attr    Value Name
10 6fa442a8  4000283        4         System.Int32  1 instance        4 m_stringLength
11 6fa42c9c  4000284        8          System.Char  1 instance       6a m_firstChar
12 6fa424e4  4000288       70        System.String  0   shared   static Empty
13     >> Domain:Value  0151ca70:NotInit  <<
每一个引用类型对象都包含两个附加字段,一个是同步块索引,另外一个就是类型句柄。我们通过 !clrstack -l 获取的 Program.Main 方法的句柄变量,我们可以通过【dp】命令查看一下细节,执行如下命令:dp 0x033b24e0-0x4 l4(LOCALS:0x0133ef90 = 0x033b24e0)
1 0:000> dp 0x033b24e0-0x4 l4
2 033b24dc  00000000 01874e1c 033b24c8 00000014
033b24dc 00000000 01874e1c 033b24c8 00000014,033b24dc 这个地址就是同步块的地址,0x033b24e0 person引用地址只想类型句柄01874e1c,类型句柄再用4个字节,所以 0x033b24e0-0x4,向前移动4个字节,就是同步块的指针地址。033b24c8这个部分就是person变量的实例字段了。
 1 0:000> !do 033b24c8
 2 Name:        System.String
 3 MethodTable: 6fa424e4
 4 EEClass:     6fb47690
 5 Size:        22(0x16) bytes
 6 File:        C:\Windows\Microsoft.Net\assembly\GAC_32\mscorlib\v4.0_4.0.0.0__b77a5c561934e089\mscorlib.dll
 7 String:      jack
 8 Fields:
 9       MT    Field   Offset                 Type VT     Attr    Value Name
10 6fa442a8  4000283        4         System.Int32  1 instance        4 m_stringLength
11 6fa42c9c  4000284        8          System.Char  1 instance       6a m_firstChar
12 6fa424e4  4000288       70        System.String  0   shared   static Empty
13     >> Domain:Value  0151ca70:NotInit  <<
00000014是十六进制的,表示的就是20。
1 0:000> ? 00000014
2 Evaluate expression: 20 = 00000014
如果我们想查看类型句柄的详情,我们可以使用【!dumpmt】命令。
 1 0:000> !dumpmt 01874e1c
 2 EEClass:         01871314
 3 Module:          01874044
 4 Name:            Example_3_1_2.Person
 5 mdToken:         02000003
 6 File:            E:\Visual Studio 2022\Source\Projects\......\Example_3_1_2\bin\Debug\Example_3_1_2.exe
 7 BaseSize:        0x10
 8 ComponentSize:   0x0
 9 Slots in VTable: 9
10 Number of IFaces in IFaceMap: 0
2.3、同步块包含对象散列码
代码样例:Example_3_1_3
我们使用 Windbg Preview 调试器,通过【launch executable】菜单加载【Example_3_1_3.exe】项目,通过【g】命令,运行程序,调试器运行代【Debugger.Break()】次会暂停执行,我们程序的输出结果是:hashcode=2bf8098。
接下来,我们看看对象头中是否散列码,就可以检验了。我们先使用【!clrstack -l】命令,看看线程栈。
 1 0:000> !clrstack -l
 2 OS Thread Id: 0x2600 (0)
 3 Child SP       IP Call Site
 4 00dcef18 7696f262 [HelperMethodFrame: 00dcef18] System.Diagnostics.Debugger.BreakInternal()
 5 00dcef94 705bf195 System.Diagnostics.Debugger.Break() [f:\dd\ndp\clr\src\BCL\system\diagnostics\debugger.cs @ 91]
 6
 7 00dcefbc 02f40905 Example_3_1_3.Program.Main(System.String[]) [E:\Visual Studio 2022\Source\Projects\......\Example_3_1_3\Program.cs @ 13]
 8     LOCALS:
 9         0x00dcefd0 = 0x030b2510
10         0x00dcefcc = 0x030b39ac
11         0x00dcefd8 = 0x02bf8098
12
13 00dcf154 70f1f036 [GCFrame: 00dcf154]
0x00dcefd0 = 0x030b2510,这个地址就是我们声明的 person 变量。既然由了对象的地址,只要用对象的地址,减去 0x4,就是同步块的地址,然后使用【dp】命令就可以查看了。
1 0:000> dp 0x030b2510-0x4 l4
2 030b250c  0ebf8098 01414e1c 030b24c8 00000014
第二行的第二列以前是0,表示没有任何数据,现在有值了。现在我们用这个值,减去我们得到的散列码,看看是什么。
1 0:000> ? 0ebf8098-2bf8098
2 Evaluate expression: 201326592 = 0c000000
0c000000它就是一个掩码,告诉CLR 这个字段中包含的是散列码的值,起到标识的作用,因为还可以存放其他东西。
2.4、同步块包含对象锁信息
代码样例:Example_3_1_4
我们使用 Windbg Preview 调试器,通过【launch executable】菜单加载【Example_3_1_4.exe】项目,通过【g】命令,运行程序,调试器运行代【Console.ReadLine()】次会暂停执行,然后我们点击【break】按钮,进入调试状态,此时,我们程序的输出是:tid=3进入锁了,说明 Person 被锁住了。
接下来,我们就要查看对象的对象头包含什么东西,意图很明显。
我们首先找到 Person 对象,可以使用【!dumpheap -type Person】命令获取对象。
1 0:001> !dumpheap -type Person
2  Address       MT     Size
3 033824c8 014d4e60       16
4
5 Statistics:
6       MT    Count    TotalSize Class Name
7 014d4e60        1           16 Example_3_1_4.Person
8 Total 1 objects
红色标记的就是Person 对象的地址,然后我们使用这个地址减去 0x4,就可以获取同步块索引了。
1 0:001> dp 033824c8-0x4 l4
2 033824c4  08000007 014d4e60 00000000 00000000
08000007 就是同步块索引的值,08是一个掩码,表示是同步块索引,07就是线程 Id。我们可以使用【!syncblk】命令来验证。
 1 0:001> !syncblk
 2 Index         SyncBlock MonitorHeld Recursion Owning Thread Info          SyncBlock Owner
 3     6 015670f0            3         1 01512ba8 3d4c   0   03388210 System.IO.TextReader+SyncTextReader
 4     7 01567124            3         1 0157c340 f8     9   033824c8 Example_3_1_4.Person(被锁的对象是 person)
3:(一个线程持有锁,一个等待锁)
 5 -----------------------------
 6 Total           7
 7 CCW             1
 8 RCW             2
 9 ComClassFactory 0
10 Free            0
这里是9,为什么我们的程序输出是3,3是托管线程的编号。9是windbg 标识的号码。
 1 0:001> !t
 2 ThreadCount:      4
 3 UnstartedThread:  0
 4 BackgroundThread: 3
 5 PendingThread:    0
 6 DeadThread:       0
 7 Hosted Runtime:   no
 8     (托管线程ID)                                                         Lock
 9        ID OSID ThreadOBJ    State GC Mode     GC Alloc Context  Domain   Count Apt Exception
10    0    1 3d4c 01512ba8     2a020 Preemptive  03388254:00000000 0150ca30 1     MTA
11    5    2 324c 0154f738     2b220 Preemptive  00000000:00000000 0150ca30 0     MTA (Finalizer)
12    9    3   f8 0157c340   3029220 Preemptive  03387214:00000000 0150ca30 1     MTA (Threadpool Worker)
13   11    4  264 0157cd28   3029220 Preemptive  0338A21C:00000000 0150ca30 0     MTA (Threadpool Worker)
我们可以切换到9好线程,看看他的线程栈。
 1 0:001> ~~[f8]s
 2 eax=00000000 ebx=00000001 ecx=00000000 edx=00000000 esi=00000001 edi=00000001
 3 eip=778e166c esp=05e2f0e8 ebp=05e2f278 iopl=0         nv up ei pl nz na pe nc
 4 cs=0023  ss=002b  ds=002b  es=002b  fs=0053  gs=002b             efl=00000206
 5 ntdll!NtWaitForMultipleObjects+0xc:
 6 778e166c c21400          ret     14h
 7
 8
 9 0:009> !clrstack
10 OS Thread Id: 0xf8 (9)
11 Child SP       IP Call Site
12 05e2f444 778e166c [GCFrame: 05e2f444]
13 05e2f524 778e166c [HelperMethodFrame_1OBJ: 05e2f524] System.Threading.Monitor.Enter(System.Object)
14 05e2f59c 7076377b System.IO.TextReader+SyncTextReader.ReadLine() [f:\dd\ndp\clr\src\BCL\system\io\textreader.cs @ 363]
15 05e2f5ac 705c1845 System.Console.ReadLine() [f:\dd\ndp\clr\src\BCL\system\console.cs @ 1984]
16 05e2f5b4 016f0ae8 Example_3_1_4.Program+c.b__1_0() [E:\Visual Studio 2022\Source\Projects\AdvancedDebug.NetFramework.Test\Example_3_1_4\Program.cs @ 17]
17 05e2f600 6fe8d4bb System.Threading.Tasks.Task.InnerInvoke() [f:\dd\ndp\clr\src\BCL\system\threading\Tasks\Task.cs @ 2884]
18 05e2f60c 6fe8b731 System.Threading.Tasks.Task.Execute() [f:\dd\ndp\clr\src\BCL\system\threading\Tasks\Task.cs @ 2498]
19 05e2f630 6fe8b6fc System.Threading.Tasks.Task.ExecutionContextCallback(System.Object) [f:\dd\ndp\clr\src\BCL\system\threading\Tasks\Task.cs @ 2861]
20 05e2f634 6fe28604 System.Threading.ExecutionContext.RunInternal(System.Threading.ExecutionContext, System.Threading.ContextCallback, System.Object, Boolean) [f:\dd\ndp\clr\src\BCL\system\threading\executioncontext.cs @ 980]
21 05e2f6a0 6fe28537 System.Threading.ExecutionContext.Run(System.Threading.ExecutionContext, System.Threading.ContextCallback, System.Object, Boolean) [f:\dd\ndp\clr\src\BCL\system\threading\executioncontext.cs @ 928]
22 05e2f6b4 6fe8b4b2 System.Threading.Tasks.Task.ExecuteWithThreadLocal(System.Threading.Tasks.Task ByRef) [f:\dd\ndp\clr\src\BCL\system\threading\Tasks\Task.cs @ 2827]
23 05e2f718 6fe8b357 System.Threading.Tasks.Task.ExecuteEntry(Boolean) [f:\dd\ndp\clr\src\BCL\system\threading\Tasks\Task.cs @ 2767]
24 05e2f728 6fe8b29d System.Threading.Tasks.Task.System.Threading.IThreadPoolWorkItem.ExecuteWorkItem() [f:\dd\ndp\clr\src\BCL\system\threading\Tasks\Task.cs @ 2704]
25 05e2f72c 6fdfeb7d System.Threading.ThreadPoolWorkQueue.Dispatch() [f:\dd\ndp\clr\src\BCL\system\threading\threadpool.cs @ 820]
26 05e2f77c 6fdfe9db System.Threading._ThreadPoolWaitCallback.PerformWaitCallback() [f:\dd\ndp\clr\src\BCL\system\threading\threadpool.cs @ 1161]
27 05e2f99c 70f1f036 [DebuggerU2MCatchHandlerFrame: 05e2f99c]
2.5、查看类型句柄
代码样例:Example_3_1_5
我们使用 Windbg Preview 调试器,通过【launch executable】菜单加载【Example_3_1_5.exe】项目,通过【g】命令,运行程序,调试器运行代【Console.ReadLine()】次会暂停执行,然后我们点击【break】按钮,进入调试状态。我们还需要通过【~0s】命令,切换到主线程,当然,我们可以使用【cls】命令清理一下调试器显示的过多信息,自己来决定,我是会清理的。
我们先去托管堆中查找一下 Person 对象,使用【!dumpheap -type Person】。红色标注的就是 Person 的引用地址。
1 0:000> !dumpheap -type Person
2  Address       MT     Size
3 02d72508 01004e1c       16
4
5 Statistics:
6       MT    Count    TotalSize Class Name
7 01004e1c        1           16 Example_3_1_5.Person
8 Total 1 objects
我们由了 Person 对象的指针地址,就可以通过这个地址查看它的方法表的信息了。
 1 0:000> !DumpObj /d 02d72508
 2 Name:        Example_3_1_5.Person
 3 MethodTable: 01004e1c
 4 EEClass:     01001318
 5 Size:        16(0x10) bytes
 6 File:        E:\Visual Studio 2022\Source\Projects\AdvancedDebug.NetFramework.Test\Example_3_1_5\bin\Debug\Example_3_1_5.exe
 7 Fields:
 8       MT    Field   Offset                 Type VT     Attr    Value Name
 9 6fa424e4  4000001        4        System.String  0 instance 02d724c8 <Name>k__BackingField
10 6fa442a8  4000002        8         System.Int32  1 instance       20 <Age>k__BackingField
当然,我们通过【dp】命令也能证明类型句柄的信息。标红的 01004e1c 就是方法表的地址。
1 0:000> dp 02d72508 l4
2 02d72508  01004e1c 02d724c8 00000014 00000000
我们可以【!dumpmt -md】列出所有的方法描述信息。
 1 0:000> !dumpmt -md 01004e1c
 2 EEClass:         01001318
 3 Module:          01004044
 4 Name:            Example_3_1_5.Person
 5 mdToken:         02000003
 6 File:            E:\Visual Studio 2022\Source\Projects\AdvancedDebug.NetFramework.Test\Example_3_1_5\bin\Debug\Example_3_1_5.exe
 7 BaseSize:        0x10
 8 ComponentSize:   0x0
 9 Slots in VTable: 9
10 Number of IFaces in IFaceMap: 0
11 --------------------------------------
12 MethodDesc Table
13    Entry MethodDe    JIT Name
14 6fe397b8 6fa3c838 PreJIT System.Object.ToString()
15 6fe396a0 6fb78978 PreJIT System.Object.Equals(System.Object)
16 6fe421f0 6fb78998 PreJIT System.Object.GetHashCode()
17 6fdf4f2c 6fb789a0 PreJIT System.Object.Finalize()
18 02c008d8 01004e08    JIT Example_3_1_5.Person..ctor()
19 02c0044d 01004dd8   NONE Example_3_1_5.Person.get_Name()
20 02c00910 01004de4    JIT Example_3_1_5.Person.set_Name(System.String)
21 02c00455 01004df0   NONE Example_3_1_5.Person.get_Age()
22 02c00950 01004dfc    JIT Example_3_1_5.Person.set_Age(Int32)
2.6、查看 MethodTable 详情(Net Framework是闭源的,看不到,NetCore是可以的)
代码样例:Example_3_1_5_1
我们使用 Windbg Preview 调试器,通过【launch executable】菜单加载【Example_3_1_5.exe】项目,通过【g】命令,运行程序,调试器运行代【Console.ReadLine()】次会暂停执行,然后我们点击【break】按钮,进入调试状态。当然,我们可以使用【cls】命令清理一下调试器显示的过多信息,自己来决定,我是会清理的。
进入调试状态后,我们先找到我们需要的 Person 对象,命令就是【!dumpheap -type Person】
1 0:006> !dumpheap -type Person
2          Address               MT           Size
3     026828409f60     7ffb8a239c50             32
4
5 Statistics:
6           MT Count TotalSize Class Name
7 7ffb8a239c50     1        32 Example_3_1_5_1.Person
8 Total 1 objects, 32 bytes
我们知道了对象的地址,可以执行【!do】命令,查看 Person 对象的详情。红色标注的就是方法表,我们可以使用【dt】命令查看结构。
 1 0:006> !do 026828409f60
 2 Name:        Example_3_1_5_1.Person
 3 MethodTable: 00007ffb8a239c50
 4 EEClass:     00007ffb8a222578
 5 Tracked Type: false
 6 Size:        32(0x20) bytes
 7 File:        E:\Visual Studio 2022\Source\Projects\.....\Example_3_1_5_1\bin\Debug\net7.0\Example_3_1_5_1.dll
 8 Fields:
 9               MT    Field   Offset                 Type VT     Attr            Value Name
10 00007ffb8a12fd10  4000004        8        System.String  0 instance 0000026828409f10 <Name>k__BackingField
11 00007ffb8a0ae8d0  4000005       10         System.Int32  1 instance               20 <Age>k__BackingField
执行命令 【dt coreclr!MethodTable 00007ffb8a239c50】,00007ffb8a239c50就是方法表的地址。
 1 0:006> dt coreclr!MethodTable 00007ffb8a239c50
 2    =00007ffb`e9f688a8 s_pMethodDataCache : 0x00000268`2424c440 MethodDataCache
 3    =00007ffb`e9f688b0 s_fUseParentMethodData : 0n1
 4    =00007ffb`e9f688a0 s_fUseMethodDataCache : 0n1
 5    +0x000 m_dwFlags        : 0x1000200
 6    +0x004 m_BaseSize       : 0x20
 7    +0x008 m_wFlags2        : 0x4088
 8    +0x00a m_wToken         : 7
 9    +0x00c m_wNumVirtuals   : 4
10    +0x00e m_wNumInterfaces : 0
11    +0x010 m_pParentMethodTable : 0x00007ffb`89f893b8 MethodTable
12    +0x018 m_pLoaderModule  : 0x00007ffb`8a20cf48 Module
13    +0x020 m_pWriteableData : 0x00007ffb`8a239cb8 MethodTableWriteableData
14    +0x028 m_pEEClass       : 0x00007ffb`8a222578 EEClass
15    +0x028 m_pCanonMT       : 0x00007ffb`8a222578
16    +0x030 m_pPerInstInfo   : 0x00007ffb`8a24a2d0  -> 0x8b4c0000`0ffa25ff Dictionary
17    +0x030 m_ElementTypeHnd : 0x00007ffb`8a24a2d0
18    +0x030 m_pMultipurposeSlot1 : 0x00007ffb`8a24a2d0
19    +0x038 m_pInterfaceMap  : (null)
20    +0x038 m_pMultipurposeSlot2 : 0
21    =00007ffb`e9ea9fb8 c_DispatchMapSlotOffsets : [0]  "080@"
22    =00007ffb`e9ea9fb0 c_NonVirtualSlotsOffsets : [0]  "080@8@@H080@"
23    =00007ffb`e9ea9fa0 c_ModuleOverrideOffsets : [0]  "080@8@@H8@@H@HHP080@8@@H080@"
24    =00007ffb`e9ebb648 c_OptionalMembersStartOffsets : [0]  "@@@@@@@H@@@H@HHP@@@H@HHP@HHPHPPX"
以上就是 MethodTable 在 CLR 级别的结构。
2.7、查看方法描述符 MethodDesc。代码样例:Example_3_1_5_1
我们使用 Windbg Preview 调试器,通过【launch executable】菜单加载【Example_3_1_5.exe】项目,通过【g】命令,运行程序,调试器运行代【Console.ReadLine()】次会暂停执行,然后我们点击【break】按钮,进入调试状态。当然,我们可以使用【cls】命令清理一下调试器显示的过多信息,自己来决定,我是会清理的。
进入调试状态后,我们先找到我们需要的 Person 对象,命令就是【!dumpheap -type Person】
1 0:006> !dumpheap -type Person
2          Address               MT           Size
3     026828409f60     7ffb8a239c50             32
4
5 Statistics:
6           MT Count TotalSize Class Name
7 7ffb8a239c50     1        32 Example_3_1_5_1.Person
8 Total 1 objects, 32 bytes
我们得到了红色标记的 Person 对象的地址,然后执行【!do】命令查看 Person 对象的详情。
 1 0:006> !do 026828409f60
 2 Name:        Example_3_1_5_1.Person
 3 MethodTable: 00007ffb8a239c50
 4 EEClass:     00007ffb8a222578
 5 Tracked Type: false
 6 Size:        32(0x20) bytes
 7 File:        E:\Visual Studio 2022\Source\Projects\......\Example_3_1_5_1\bin\Debug\net7.0\Example_3_1_5_1.dll
 8 Fields:
 9               MT    Field   Offset                 Type VT     Attr            Value Name
10 00007ffb8a12fd10  4000004        8        System.String  0 instance 0000026828409f10 <Name>k__BackingField
11 00007ffb8a0ae8d0  4000005       10         System.Int32  1 instance               20 <Age>k__BackingField
执行以上命令,我们得到了 Person 对象的方法表,然后我们使用【!dumpmt】查看方法表详情。
 1 0:006> !dumpmt -md 00007ffb8a239c50
 2 EEClass:             00007ffb8a222578
 3 Module:              00007ffb8a20cf48
 4 Name:                Example_3_1_5_1.Person
 5 mdToken:             0000000002000007
 6 File:                E:\Visual Studio 2022\Source\Projects\.....\Example_3_1_5_1\bin\Debug\net7.0\Example_3_1_5_1.dll
 7 AssemblyLoadContext: Default ALC - The managed instance of this context doesn't exist yet.
 8 BaseSize:            0x20
 9 ComponentSize:       0x0
10 DynamicStatics:      false
11 ContainsPointers:    true
12 Slots in VTable:     9
13 Number of IFaces in IFaceMap: 0
14 --------------------------------------
15 MethodDesc Table
16            Entry       MethodDesc    JIT Name
17 00007FFB8A0B0048 00007ffb89f89348   NONE System.Object.Finalize()
18 00007FFB8A0B0060 00007ffb89f89358   NONE System.Object.ToString()
19 00007FFB8A0B0078 00007ffb89f89368   NONE System.Object.Equals(System.Object)
20 00007FFB8A0B00C0 00007ffb89f893a8   NONE System.Object.GetHashCode()
21 00007FFB8A24A2D0 00007ffb8a239c28    JIT Example_3_1_5_1.Person..ctor()
22 00007FFB8A24A270 00007ffb8a239bc8   NONE Example_3_1_5_1.Person.get_Name()
23 00007FFB8A24A288 00007ffb8a239be0    JIT Example_3_1_5_1.Person.set_Name(System.String)
24 00007FFB8A24A2A0 00007ffb8a239bf8   NONE Example_3_1_5_1.Person.get_Age()
25 00007FFB8A24A2B8 00007ffb8a239c10    JIT Example_3_1_5_1.Person.set_Age(Int32)
执行命令后,红色标记的就是方法描述符,我们可以点击去查看 MethodDesc 详情。我们执行【!dumpmd】命令,查看 MethodDesc。
 1 0:006> !DumpMD /d 00007ffb8a239be0
 2 Method Name:          Example_3_1_5_1.Person.set_Name(System.String)
 3 Class:                00007ffb8a222578
 4 MethodTable:          00007ffb8a239c50
 5 mdToken:              0000000006000009
 6 Module:               00007ffb8a20cf48
 7 IsJitted:             yes
 8 Current CodeAddr:     00007ffb8a1407c0
 9 Version History:
10   ILCodeVersion:      0000000000000000
11   ReJIT ID:           0
12   IL Addr:            00000268240a20ef
13      CodeAddr:           00007ffb8a1407c0  (MinOptJitted)
14      NativeCodeVersion:  0000000000000000
由于代码已经编译了,所以是有地址的,我们可以执行【!u】命令查看set_Name()方法的汇编代码。
 1 E:\Visual Studio 2022\Source\Projects\AdvancedDebug.NetFramework.Test\Example_3_1_5_1\Program.cs @ 18:
 2 >>> 00007ffb`8a1407c0 55              push    rbp
 3 00007ffb`8a1407c1 57              push    rdi
 4 00007ffb`8a1407c2 4883ec28        sub     rsp,28h
 5 00007ffb`8a1407c6 488d6c2430      lea     rbp,[rsp+30h]
 6 00007ffb`8a1407cb 48894d10        mov     qword ptr [rbp+10h],rcx
 7 00007ffb`8a1407cf 48895518        mov     qword ptr [rbp+18h],rdx
 8 00007ffb`8a1407d3 833d16ca0c0000  cmp     dword ptr [00007ffb`8a20d1f0],0
 9 00007ffb`8a1407da 7405            je      00007ffb`8a1407e1
10 00007ffb`8a1407dc e8ef6bc15f      call    coreclr!JIT_DbgIsJustMyCode (00007ffb`e9d573d0)
11 00007ffb`8a1407e1 488b5510        mov     rdx,qword ptr [rbp+10h]
12 00007ffb`8a1407e5 488d4a08        lea     rcx,[rdx+8]
13 00007ffb`8a1407e9 488b5518        mov     rdx,qword ptr [rbp+18h]
14 00007ffb`8a1407ed e81ef8e2ff      call    00007ffb`89f70010 (JitHelp: CORINFO_HELP_ASSIGN_REF)
15 00007ffb`8a1407f2 90              nop
16 00007ffb`8a1407f3 4883c428        add     rsp,28h
17 00007ffb`8a1407f7 5f              pop     rdi
18 00007ffb`8a1407f8 5d              pop     rbp
19 00007ffb`8a1407f9 c3              ret
2.8、我们可以通过【!token2ee】命令根据指定的 token 查找 MethodDesc。
代码样例:Example_3_1_5_1
我们使用 Windbg Preview 调试器,通过【launch executable】菜单加载【Example_3_1_5.exe】项目,通过【g】命令,运行程序,调试器运行代【Console.ReadLine()】次会暂停执行,然后我们点击【break】按钮,进入调试状态。当然,我们可以使用【cls】命令清理一下调试器显示的过多信息,自己来决定,我是会清理的。
1 0:006> !token2ee Example_3_1_5 06000001
2 Module:      00e64044
3 Assembly:    Example_3_1_5.exe
4 Token:       06000001
5 MethodDesc:  00e64d58
6 Name:        Example_3_1_5.Program.Main(System.String[])
7 JITTED Code Address: 02990848
2.9、查看 EECLass 的结构。
代码样例:Example_3_1_5_1
我们使用 Windbg Preview 调试器,通过【launch executable】菜单加载【Example_3_1_5.exe】项目,通过【g】命令,运行程序,调试器运行代【Console.ReadLine()】次会暂停执行,然后我们点击【break】按钮,进入调试状态。当然,我们可以使用【cls】命令清理一下调试器显示的过多信息,自己来决定,我是会清理的。
 1 0:006> !dumpheap -type Person
 2  Address       MT     Size
 3 029d2508 00e64e1c       16
 4
 5 Statistics:
 6       MT    Count    TotalSize Class Name
 7 00e64e1c        1           16 Example_3_1_5.Person
 8 Total 1 objects
 9
10
11 0:006> !do 029d2508
12 Name:        Example_3_1_5.Person
13 MethodTable: 00e64e1c
14 EEClass:     00e61318
15 Size:        16(0x10) bytes
16 File:        E:\Visual Studio 2022\Source\Projects\AdvancedDebug.NetFramework.Test\Example_3_1_5\bin\Debug\Example_3_1_5.exe
17 Fields:
18       MT    Field   Offset                 Type VT     Attr    Value Name
19 6fa424e4  4000001        4        System.String  0 instance 029d24c8 <Name>k__BackingField
20 6fa442a8  4000002        8         System.Int32  1 instance       20 <Age>k__BackingField
21
22
23 0:006> !DumpClass /d 00e61318
24 Class Name:      Example_3_1_5.Person
25 mdToken:         02000003
26 File:            E:\Visual Studio 2022\Source\Projects\AdvancedDebug.NetFramework.Test\Example_3_1_5\bin\Debug\Example_3_1_5.exe
27 Parent Class:    6fa315c8
28 Module:          00e64044
29 Method Table:    00e64e1c
30 Vtable Slots:    4
31 Total Method Slots:  5
32 Class Attributes:    100001
33 Transparency:        Critical
34 NumInstanceFields:   2
35 NumStaticFields:     0
36       MT    Field   Offset                 Type VT     Attr    Value Name
37 6fa424e4  4000001        4        System.String  0 instance           <Name>k__BackingField
38 6fa442a8  4000002        8         System.Int32  1 instance           <Age>k__BackingField
四、总结
终于完成了,这篇文章写了好几天,看底层的东西,需要耐性和坚持。写完了,感觉还是收获不小的,对 Net 底层的细节了解更多了。学习是艰苦的过程,还挺费时费力的。就写到这里了,不忘初心,继续努力。