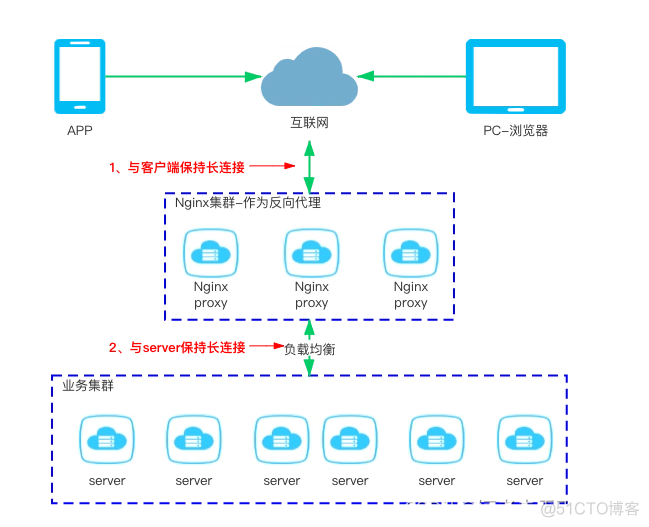
一、负载均衡 nginx+ keepalived +vip
1、在所有节点,安装nginx
cd /data/work
wget http://nginx.org/download/nginx-1.18.0.tar.gz
#编译
yum install gcc gcc-c++ pcre pcre-devel zlib zlib-devel openssl openssl-devel -y
tar -xzvf nginx-1.18.0.tar.gz
cd nginx-1.18.0
./configure --with-stream --without-http --prefix=/usr/local/nginx --without-http_uwsgi_module
make && make install


#################################################################
--without-http_scgi_module --without-http_fastcgi_module
--with-stream:开启 4 层透明转发(TCP Proxy)功能;
--without-xxx:关闭所有其他功能,这样生成的动态链接二进制程序依赖最小;
#################################################################
2、在所有节点,配置nginx
#配置
cat > /usr/local/nginx/conf/nginx.conf<<EOF
worker_processes 1;
events {
    worker_connections  1024;
}
stream {
    upstream rgw {
        hash $remote_addr consistent;
        server 192.168.1.70:81        max_fails=3 fail_timeout=30s;
        server 192.168.1.71:81        max_fails=3 fail_timeout=30s;
        server 192.168.1.72:81        max_fails=3 fail_timeout=30s;
    }

    upstream nfs {
        hash $remote_addr consistent;
        server 192.168.1.70:8080        max_fails=3 fail_timeout=30s;
        server 192.168.1.71:8080        max_fails=3 fail_timeout=30s;
        server 192.168.1.72:8080        max_fails=3 fail_timeout=30s;
    }

    server {
        listen *:80;
        proxy_connect_timeout 1s;
        proxy_pass rgw;
    }
    server {
        listen *:88;
        proxy_connect_timeout 1s;
        proxy_pass nfs;
    }
}
EOF
3、在所有节点,配置Nginx启动文件
cat > /etc/systemd/system/nginx.service <<EOF
[Unit]
Description=kube-apiserver nginx proxy
After=network.target
After=network-online.target
Wants=network-online.target
[Service]
Type=forking
ExecStartPre=/usr/local/nginx/sbin/nginx -t -c /usr/local/nginx/conf/nginx.conf
ExecStart=/usr/local/nginx/sbin/nginx -c /usr/local/nginx/conf/nginx.conf
ExecReload=/usr/local/nginx/sbin/nginx -s reload
ExecStop=/usr/local/nginx/sbin/nginx -s stop
PrivateTmp=true
Restart=always
RestartSec=5
StartLimitInterval=0
LimitNOFILE=65536
[Install]
WantedBy=multi-user.target
EOF


systemctl daemon-reload && systemctl enable nginx


systemctl restart nginx && systemctl status nginx |grep 'Active:'
4、 70和71安装keepalived
#安装keepalived
yum install -y keepalived


#创建健康检查脚本并分发
cat > /etc/keepalived/nginx_check.sh <<\EOF
#!/bin/bash

A=`ps -C nginx --no-header |wc -l`
if [ $A -eq 0 ];then
    /usr/sbin/nginx
    sleep 2
    if [ `ps -C nginx --no-header |wc -l` -eq 0 ];then
        killall keepalived
    fi
fi

EOF


#授权
chmod +xxx /etc/keepalived/nginx_check.sh
#查看
ll /etc/keepalived/nginx_check.sh
01配置
cat > /etc/keepalived/keepalived.conf <<EOF
! Configuration File for keepalived
global_defs {
    router_id nginx_server_1
}
vrrp_script chk_nginx {
    script "/etc/keepalived/nginx_check.sh"
    interval 2
    weight 20
    !weight为正数
    !如果脚本执行结果为0,,Master:weight+priority>Backup:weight+priority(不切换)
    !如果脚本执行结果不为0,Master:priority<Backup:priority+weight(切换)
    !weight为负数
    !如果脚本执行结果为0,,Master:priority>Backup:priority(不切换)
    !如果脚本执行结果不为0,Master:priority+weight<Backup:priority(切换)
    !一般来说,weight的绝对值要大于Master和Backup的priority之差
}
vrrp_instance VI_1 {
    state MASTER
    interface ens192 							#注意这里的网卡名称修改成你机器真实的内网网卡名称,可用命令ip addr查看
    virtual_router_id 51
    unicast_src_ip 192.168.1.70 	#本机IP
    unicast_peer {								#虚拟ip地址,可以有多个地址,每个地址占一行,不需要子网掩码
        192.168.1.71
    }
    priority 100
    nopreempt
    advert_int 1
    authentication {
        auth_type PASS
        auth_pass 1111 !认密码 两台nginx密码要一致
    }
    track_script {
        chk_nginx
    }
    virtual_ipaddress {						#VIP地址192.168.1.226
        192.168.1.226
    }
}
EOF


# 重启服务
systemctl restart keepalived.service


# 查看运行状态
systemctl status keepalived.service

# 添加开机自启动(haproxy默认安装好就添加了自启动)
systemctl enable keepalived.service

# 查看是否添加成功
systemctl is-enabled keepalived.service
#enabled就代表添加成功了

# 同时我可查看下VIP是否已经生成
ip a|grep 226
02配置
cat > /etc/keepalived/keepalived.conf <<EOF
! Configuration File for keepalived
global_defs {
    router_id nginx_server_1
}
vrrp_script chk_nginx {
    script "/etc/keepalived/nginx_check.sh"
    interval 2
    weight 20
    !weight为正数
    !如果脚本执行结果为0,,Master:weight+priority>Backup:weight+priority(不切换)
    !如果脚本执行结果不为0,Master:priority<Backup:priority+weight(切换)
    !weight为负数
    !如果脚本执行结果为0,,Master:priority>Backup:priority(不切换)
    !如果脚本执行结果不为0,Master:priority+weight<Backup:priority(切换)
    !一般来说,weight的绝对值要大于Master和Backup的priority之差
}
vrrp_instance VI_1 {
    state MASTER
    interface ens192 							#注意这里的网卡名称修改成你机器真实的内网网卡名称,可用命令ip addr查看
    virtual_router_id 51
    unicast_src_ip 192.168.1.71 	#本机IP
    unicast_peer {								#虚拟ip地址,可以有多个地址,每个地址占一行,不需要子网掩码
        192.168.1.70
    }
    priority 100
    nopreempt
    advert_int 1
    authentication {
        auth_type PASS
        auth_pass 1111 !认密码 两台nginx密码要一致
    }
    track_script {
        chk_nginx
    }
    virtual_ipaddress {						#VIP地址192.168.1.226
        192.168.1.226
    }
}
EOF


# 重启服务
systemctl restart keepalived.service


# 查看运行状态
systemctl status keepalived.service

# 添加开机自启动(haproxy默认安装好就添加了自启动)
systemctl enable keepalived.service

# 查看是否添加成功
systemctl is-enabled keepalived.service
#enabled就代表添加成功了

# 同时我可查看下VIP是否已经生成
ip a|grep 226