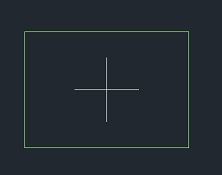
 1 ;用Lisp实现鼠标拖画
 2 (defun c:grr(/ halfLength halfWidth gr code p xx yy p1x p1y p2x p2y p3x p3y p4x p4y )
 3     (setq L(getreal "请输入矩形长度:"))
 4     (setq W(getreal "请输入矩形宽度:"))
 5     (while (/= code 3)
 6     (setq gr(grread 1 15 0) code(car gr)  p(cadr gr)  xx(car p)  yy(cadr p))
 7     (setq halfLength (/ L 2))
 8     (setq halfWidth (/ W 2))
 9     (setq p1x(- xx halfLength))
10     (setq p1y(- yy halfWidth))
11     (setq p2x(+ xx halfLength))
12     (setq p2y(- yy halfWidth))
13     (setq p3x(+ xx halfLength))
14     (setq p3y(+ yy halfWidth))
15     (setq p4x(- xx halfLength))
16     (setq p4y(+ yy halfWidth))
17         (cond
18             ((= code 5)    (redraw)
19                     (grvecs        (list
20                     81 (list  p1x    p1y) (list  p2x p2y)  ;81是颜色索引
21                     81 (list  p2x    p2y) (list  p3x p3y)
22                     81 (list  p3x    p3y) (list  p4x p4y)
23                     81 (list  p4x    p4y) (list  p1x p1y)
24                                )
25
26                 )
27             )
28         )
29     )
30 )
如果要用VBA实现,则将上述代码存为x.lsp后载入AutoCAD,然后写以下即可:
1 Dim L as double
2 Dim W as double
3 L=500
4 W=300
5 ThisDrawing.SendCommand "grr" & vbCr & L & vbCr & W & vbCr
效果就是一个矩形跟随光标移动: