背景
最近在写一个Vue项目,想要在登录界面加一个动态背景效果,搜索之后发现了 Vanta.js(https://www.vantajs.com/ )这个库。Vanta 可以借助 three.js (WebGL) 或 p5.js 渲染动态的3D背景效果,提供了多种预设。
几种效果都挺不错的,最终我决定采用clouds效果。
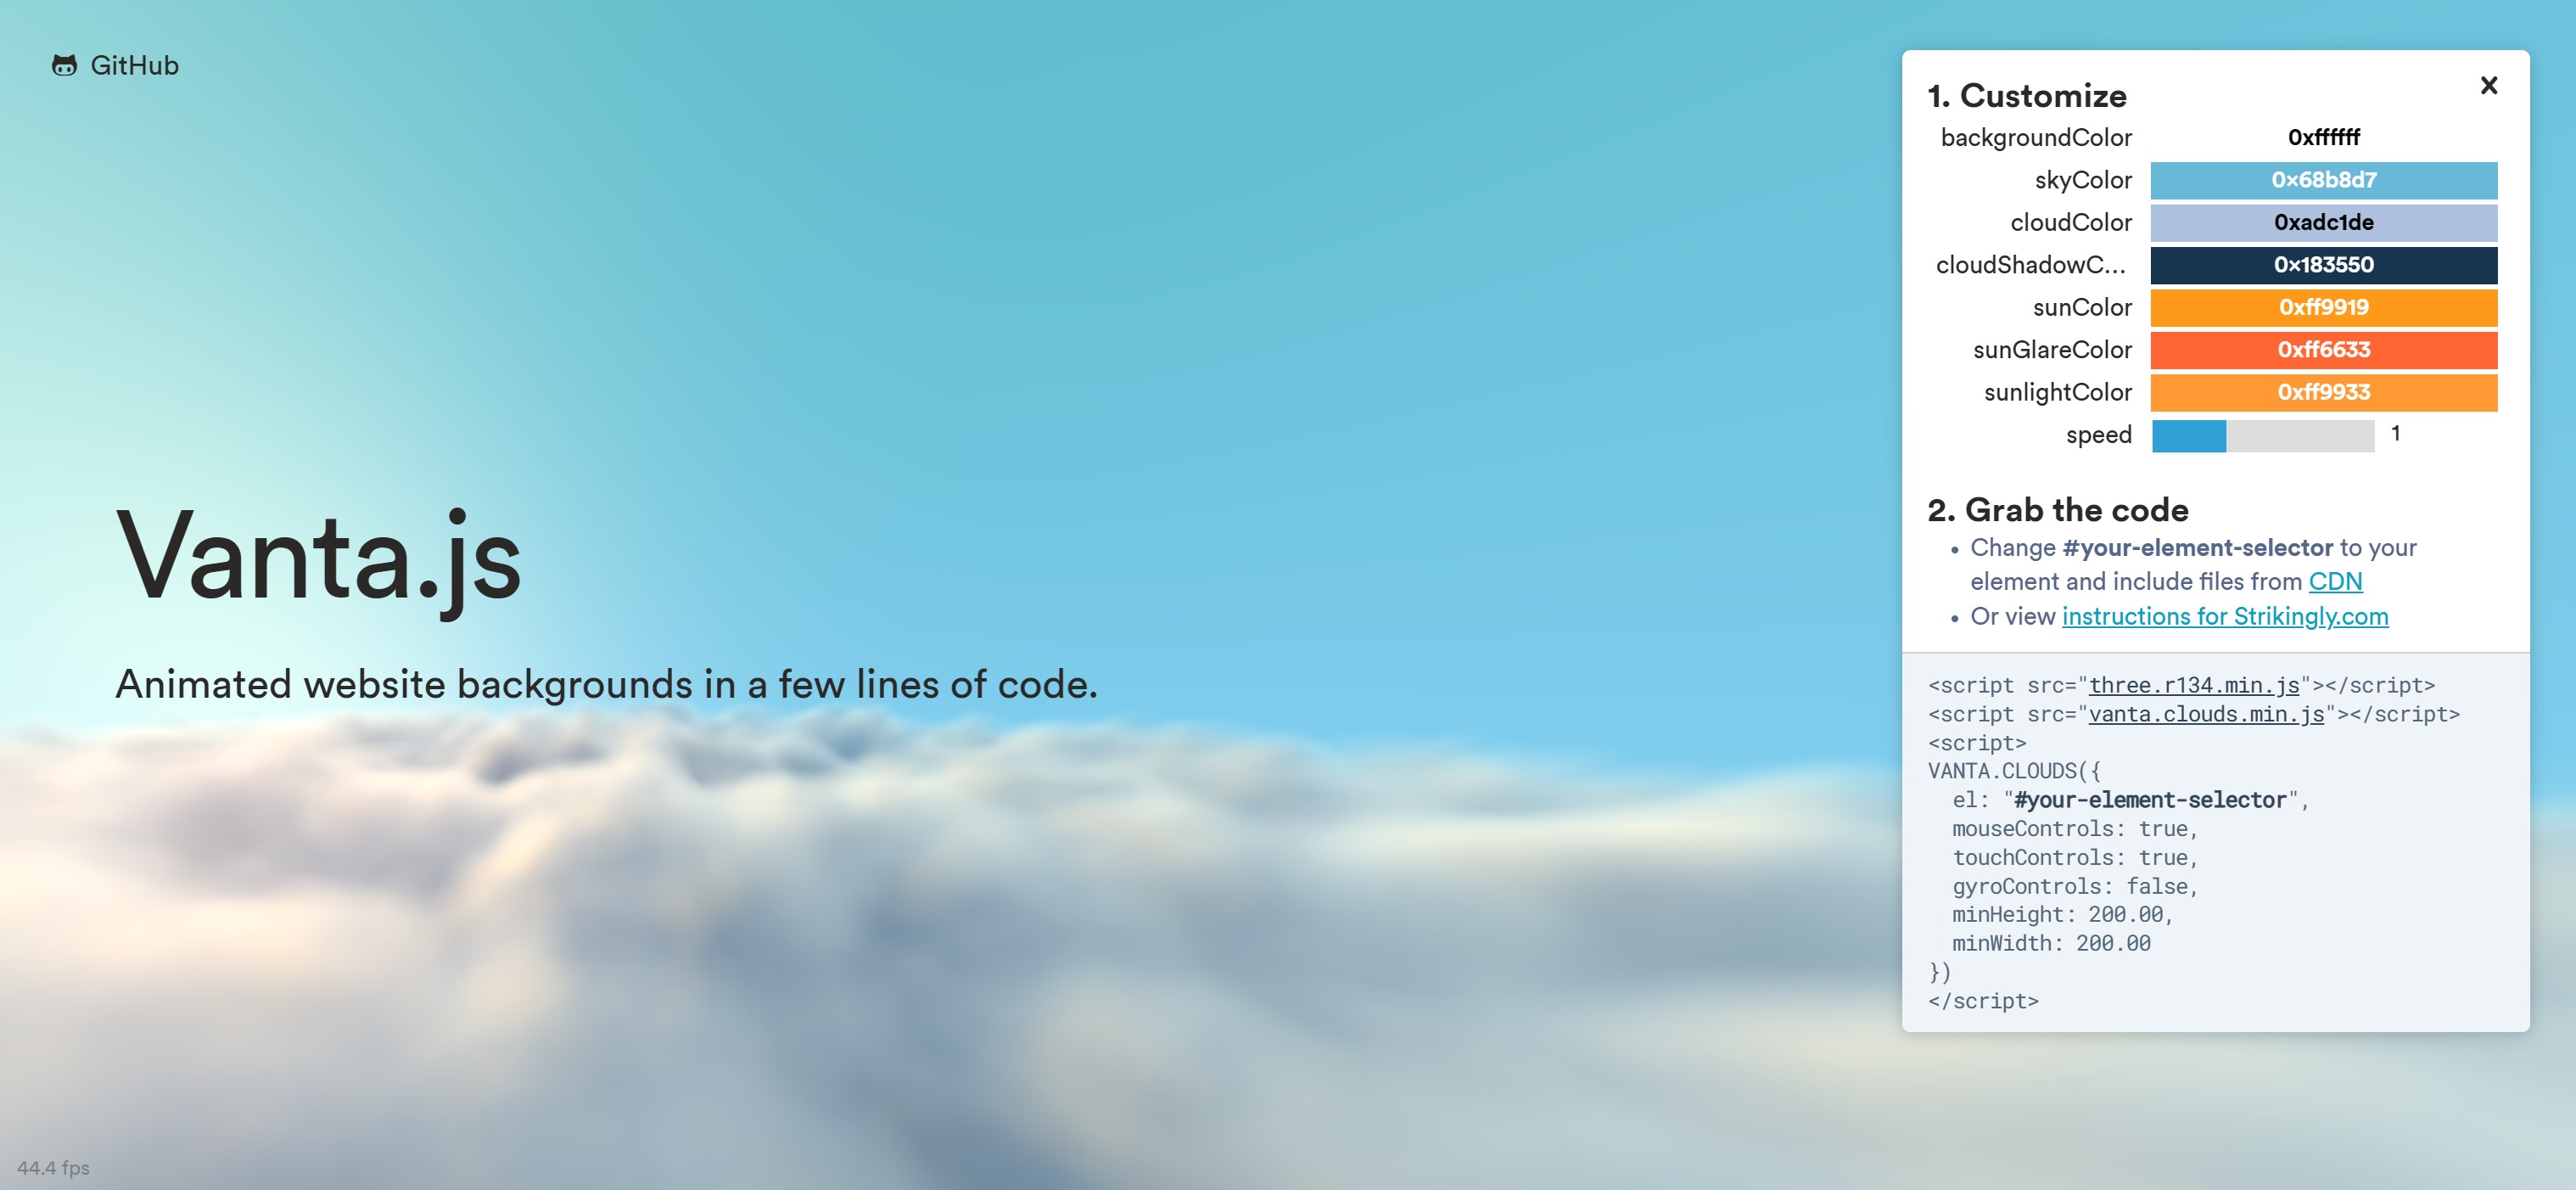
随即我发现这个效果是可以定制的,包括天空颜色、云的颜色、太阳的颜色、太阳光的颜色、太阳光晕的颜色、云的阴影颜色都是可以改的,只要向 Vanta 传递对应的颜色代码即可。
如果你玩过某知名开放世界二次元手游,你大概会像我一样想起该游戏登录界面的天空颜色会随着真实世界中的时间变化。于是我希望在 Vanta 的 clouds 效果中实现同样的效果。
思路
思路很简单,网页加载时,获取当前的时间,然后选定几个时间节点指定颜色,其他的时间的颜色根据这些节点,对RGB插值就可得到。插值得到的结果传给 Vanta 进行渲染。
经过一番查找,我找到了这个问答:https://stackoverflow.com/questions/60196138/lerp-background-colour-based-on-time-of-day
该问题的题主使用的是p5.js,不过目的和我们是一致的。我又找到了知乎上的这个问题:https://www.zhihu.com/question/38869928
这问题下面有答主提供了插值算法。于是我拿来进行修改,使其符合 TypeScript 语法。
实现
先介绍一下几种颜色大致影响什么效果:
- 天空颜色:不用多解释。
- 云层颜色:不用多解释。
- 太阳颜色:主要影响画面中高光部分(即太阳)的颜色。
- 太阳光线颜色:主要影响云层表面的部分,表现为太阳光投射在云层上。
- 太阳光晕颜色:主要影响画面中高光外围的天空部分的颜色。
- 云层阴影颜色:不用多解释。
有如下的工具函数:
// 获取 Vanta.js clouds 效果的颜色的模块
// 插值代码来自:https://www.zhihu.com/question/38869928/answer/78527903

// HTML颜色转RGB颜色
function parseColor(hexString: string) {
  return [
    hexString.substring(1, 3),
    hexString.substring(3, 5),
    hexString.substring(5, 7),
  ].map((s) => { return parseInt(s, 16); })
};

// 将一位补位到两位
function pad(s: string) {
  return (s.length === 1) ? '0' + s : s;
};

// 插值获得颜色
function gradientColors(startHTML: string, endHTML: string, steps: number, gamma: number) {
  let i, j, ms, me, output = [], so = [];
  gamma = gamma || 1;
  const normalize = (channel: number) => {
    return Math.pow(channel / 255, gamma);
  };
  const startRGB = parseColor(startHTML).map(normalize);
  const endRGB = parseColor(endHTML).map(normalize);
  for (i = 0; i < steps; i++) {
    ms = i / (steps - 1);
    me = 1 - ms;
    for (j = 0; j < 3; j++) {
      so[j] = pad(Math.round(Math.pow(startRGB[j] * me + endRGB[j] * ms, 1 / gamma) * 255).toString(16));
    }
    output.push('#' + so.join(''));
  }
  return output;
};

// 获取系统时间,从0点开始计数,以分钟为单位
function getCurrMinute(): number {
  const now = new Date()
  return now.getHours() * 60 + now.getMinutes()
}
Vanta 中 cloud 效果有多个颜色可以指定。对视觉效果影响最大的应该是天空颜色(skyColor)。使用上面的插值函数,可以得到如下的代码:
export function getSkyColor(): string {
  const black = '#121212'
  const purple = '#140248'
  const orange = '#fea443'
  const dusk = '#c88a46'
  const blue = '#58acfa'

  const currMinute = getCurrMinute()
  let currColor = black

  if (currMinute >= 0 && currMinute < 4 * 60) {
    currColor = black
  } else if (currMinute >= 4 * 60 && currMinute < 5 * 60) {
    currColor = gradientColors(black, purple, 60, 1)[currMinute - 4 * 60]
  } else if (currMinute >= 5 * 60 && currMinute < 6 * 60) {
    currColor = gradientColors(purple, orange, 60, 1)[currMinute - 5 * 60]
  } else if (currMinute >= 6 * 60 && currMinute < 9 * 60) {
    currColor = gradientColors(orange, blue, 3 * 60, 1)[currMinute - 6 * 60]
  } else if (currMinute >= 9 * 60 && currMinute < 16 * 60) {
    currColor = blue
  } else if (currMinute >= 16 * 60 && currMinute < 18 * 60) {
    currColor = gradientColors(blue, dusk, 2 * 60, 1)[currMinute - 16 * 60]
  } else if (currMinute >= 18 * 60 && currMinute < 19 * 60) {
    currColor = gradientColors(dusk, purple, 60, 1)[currMinute - 18 * 60]
  } else if (currMinute >= 19 * 60 && currMinute < 20 * 60) {
    currColor = gradientColors(purple, black, 60, 1)[currMinute - 19 * 60]
  } else if (currMinute >= 20 * 60 && currMinute < 24 * 60) {
    currColor = black
  }
  return currColor
}
实际上,不一定所有时间段都需要插值,白天的大部分时间天空颜色是可以保持不变的,深夜和凌晨同理。
白天时,云层应当呈现为白色;到了夜间,云层应该带有灰色,于是我们简单写出获取云层颜色的代码:
export function getCloudColor(): string {
  const grey = '#525252'
  const whiteblue= '#adc1de'

  const currMinute = getCurrMinute()
  let currColor = whiteblue

  if (currMinute >= 0 && currMinute < 4 * 60) {
    currColor = grey
  } else if (currMinute >= 4 * 60 && currMinute < 6 * 60) {
    currColor = gradientColors(grey, whiteblue, 2 * 60, 1)[currMinute - 4 * 60]
  } else if (currMinute >= 6 * 60 && currMinute < 17 * 60) {
    currColor = whiteblue
  } else if (currMinute >= 17 * 60 && currMinute < 19 * 60) {
    currColor = gradientColors(whiteblue, grey, 2 * 60, 1)[currMinute - 17 * 60]
  } else if (currMinute >= 19 * 60 && currMinute < 24 * 60) {
    currColor = grey
  }

  return currColor
}
同理,有获取太阳颜色的代码:
export function getSunColor(): string {
  const white = '#fef0c0'
  const lightorange = '#f5d0a9'
  const black = '#000000'	// 不能直接隐藏太阳,因此夜间必须将太阳设置为黑色来间接隐藏,否则夜间也会有光源,很不自然。

  const currMinute = getCurrMinute()
  let currColor = white

  if (currMinute >= 0 && currMinute < 4 * 60) {
    currColor = black
  } else if (currMinute >= 4 && currMinute < 6 * 60) {
    currColor = gradientColors(black, lightorange, 2 * 60, 1)[currMinute - 4 * 60]
  } else if (currMinute >= 6 * 60 && currMinute < 8 * 60) {
    currColor = gradientColors(lightorange, white, 2 * 60, 1)[currMinute - 6 * 60]
  } else if (currMinute >= 8 * 60 && currMinute < 16 * 60) {
    currColor = white
  } else if (currMinute >= 16 * 60 && currMinute < 18 * 60) {
    currColor = gradientColors(white, lightorange, 2 * 60, 1)[currMinute - 16 * 60]
  } else if (currMinute >= 18 * 60 && currMinute < 19 * 60) {
    currColor = gradientColors(lightorange, black, 60, 1)[currMinute - 18 * 60]
  } else if (currMinute >= 19 * 60 && currMinute < 24 * 60) {
    currColor = black
  }

  return currColor
}
和获取太阳光晕颜色的代码:
export function getSunGlareColor(): string {
  const white = '#fef0c0'
  const orange = '#ffa64d'
  const black = '#000000'	// 解释同上

  const currMinute = getCurrMinute()
  let currColor = white

  if (currMinute >= 0 && currMinute < 4 * 60) {
    currColor = black
  } else if (currMinute >= 4 && currMinute < 6 * 60) {
    currColor = gradientColors(black, orange, 2 * 60, 1)[currMinute - 4 * 60]
  } else if (currMinute >= 6 * 60 && currMinute < 7 * 60) {
    currColor = gradientColors(orange, white, 60, 1)[currMinute - 6 * 60]
  } else if (currMinute >= 7 * 60 && currMinute < 17 * 60) {
    currColor = white
  } else if (currMinute >= 17 * 60 && currMinute < 18 * 60) {
    currColor = gradientColors(white, orange, 60, 1)[currMinute - 17 * 60]
  } else if (currMinute >= 18 * 60 && currMinute < 19 * 60) {
    currColor = gradientColors(orange, black, 60, 1)[currMinute - 18 * 60]
  } else if (currMinute >= 19 * 60 && currMinute < 24 * 60) {
    currColor = black
  }

  return currColor
}
获取太阳光线颜色的我没写,直接用太阳本身颜色代替了。
将上面代码全部合起来,放进一个.ts文件作为一个模块。在需要使用 Vanta 的页面引入模块就可以了。我将这个文件命名为color.ts。
下面给出基于 Vue3 的示例。使用的是组合式API[1]。
基于 Vue3 的示例
你需要先安装 Vanta.js 和 three.js。
pnpm install vanta
pnpm install three
最新版本也许会有问题。我的 Vanta 版本是 0.5.24,three 版本是 0.121.0,实测是可以用的。
<template>
<!--写一个div作为背景,然后加上 ref="vantaRef" -->
  <div class="main-container" ref="vantaRef" style="height: 100vh;">
    <!-- 在这里编写你的前景模板代码 -->
  </div>
</template>

<script setup lang="ts">
import { onMounted, onBeforeUnmount, ref } from 'vue'
import * as THREE from 'three'
import CLOUDS from "vanta/dist/vanta.clouds.min"

import * as DynamicColor from '@/plugins/util/color';		// 上面的代码形成的color.ts文件

const vantaRef = ref(null)
let vantaEffect: any = null

onMounted(() => {
  const currSkyColor = DynamicColor.getSkyColor()
  const currCloudColor = DynamicColor.getCloudColor()
  const currSunColor = DynamicColor.getSunColor()
  const currSunGlareColor = DynamicColor.getSunGlareColor()

  vantaEffect = CLOUDS({
    el: vantaRef.value,
    THREE: THREE,	// 也可以换成 p5,但我没试过
    skyColor: currSkyColor,
    cloudColor: currCloudColor,
    cloudShadowColor: '#262646',	// 偷懒直接给了个固定值
    sunColor: currSunColor,
    sunlightColor: currSunColor,	// 偷懒用了太阳颜色
    sunGlareColor: currSunGlareColor,
    mouseControls: false,	// 是否允许动画和鼠标手势交互,想启用的话改成true
    touchControls: false,	// 触摸屏交互
    gyroControls: false,	// 加速度交互,应该是晃动手机的效果
    speed: 0.5,		// 动画速度,不喜欢太快的动画,所以设得小一些
  })
})

onBeforeUnmount(() => {
  if (vantaEffect) {
    vantaEffect.destroy()
  }
})

</script>
上面的例子中,有一些颜色偷懒没有写出来。你可以仿照本节的代码来编写。
这里面最有技术含量的可能是选取颜色。这些工具可能会帮到你:
HTML颜色和RGB颜色转换器 https://www.toolhelper.cn/Color/RGBToHex
HTML取色器 https://c.runoob.com/front-end/5449/
Vanta.js 是一个 JavaScript 库。如果你使用 TypeScript,为了正确导入 Vanta 的效果,需要做一个额外的操作(来源见此处):查找项目根目录的tsconfig.json文件,找到其中的include项,根据该项的配置,在合适的位置创建一个以.d.ts结尾的 TypeScript 文件,然后填入如下内容:
// 按照自己使用的效果名对代码进行修改
declare module 'vanta/dist/vanta.clouds.min' {
  const CLOUDS: any;
  export default CLOUDS;
}
具体来说,我在项目的src目录中创建了一个vanta.d目录,在其中创建了vanta.clouds.d.ts文件,然后填入了以上内容。如果你还想要使用其他 Vanta 动画,那么你可以在vanta.d中创建其他文件,如vanta.birds.d.ts,vanta.globe.d.ts等,然后对上面的代码进行对应的修改并填入文件。
我的tsconfig.js中include项如下:
"include": ["src/**/*.ts", "src/**/*.d.ts", "src/**/*.tsx", "src/**/*.vue"],
我的项目结构如下:
├─.vscode
├─node_modules
├─public
│  └─images
└─src
    └─assets
    ├─components
    │  ├─略
    │  └─略
    ├─plugins
    │  └─略
    └─vanta.d
    	└─vanta.clouds.d.ts
效果展示
我撰写这篇文章的时间(20:32)。其实20:00-次日5:00都是这个样子:

6点:

这个颜色确实不太真实,也许你可以改得更好?
8点:

9点-16点:

19点:

感谢你读到这里。实现很粗陋,权当抛砖引玉。感觉这些颜色应该是通过缜密的计算得出的,可惜的是我不会,只好凭感觉选一些颜色了。