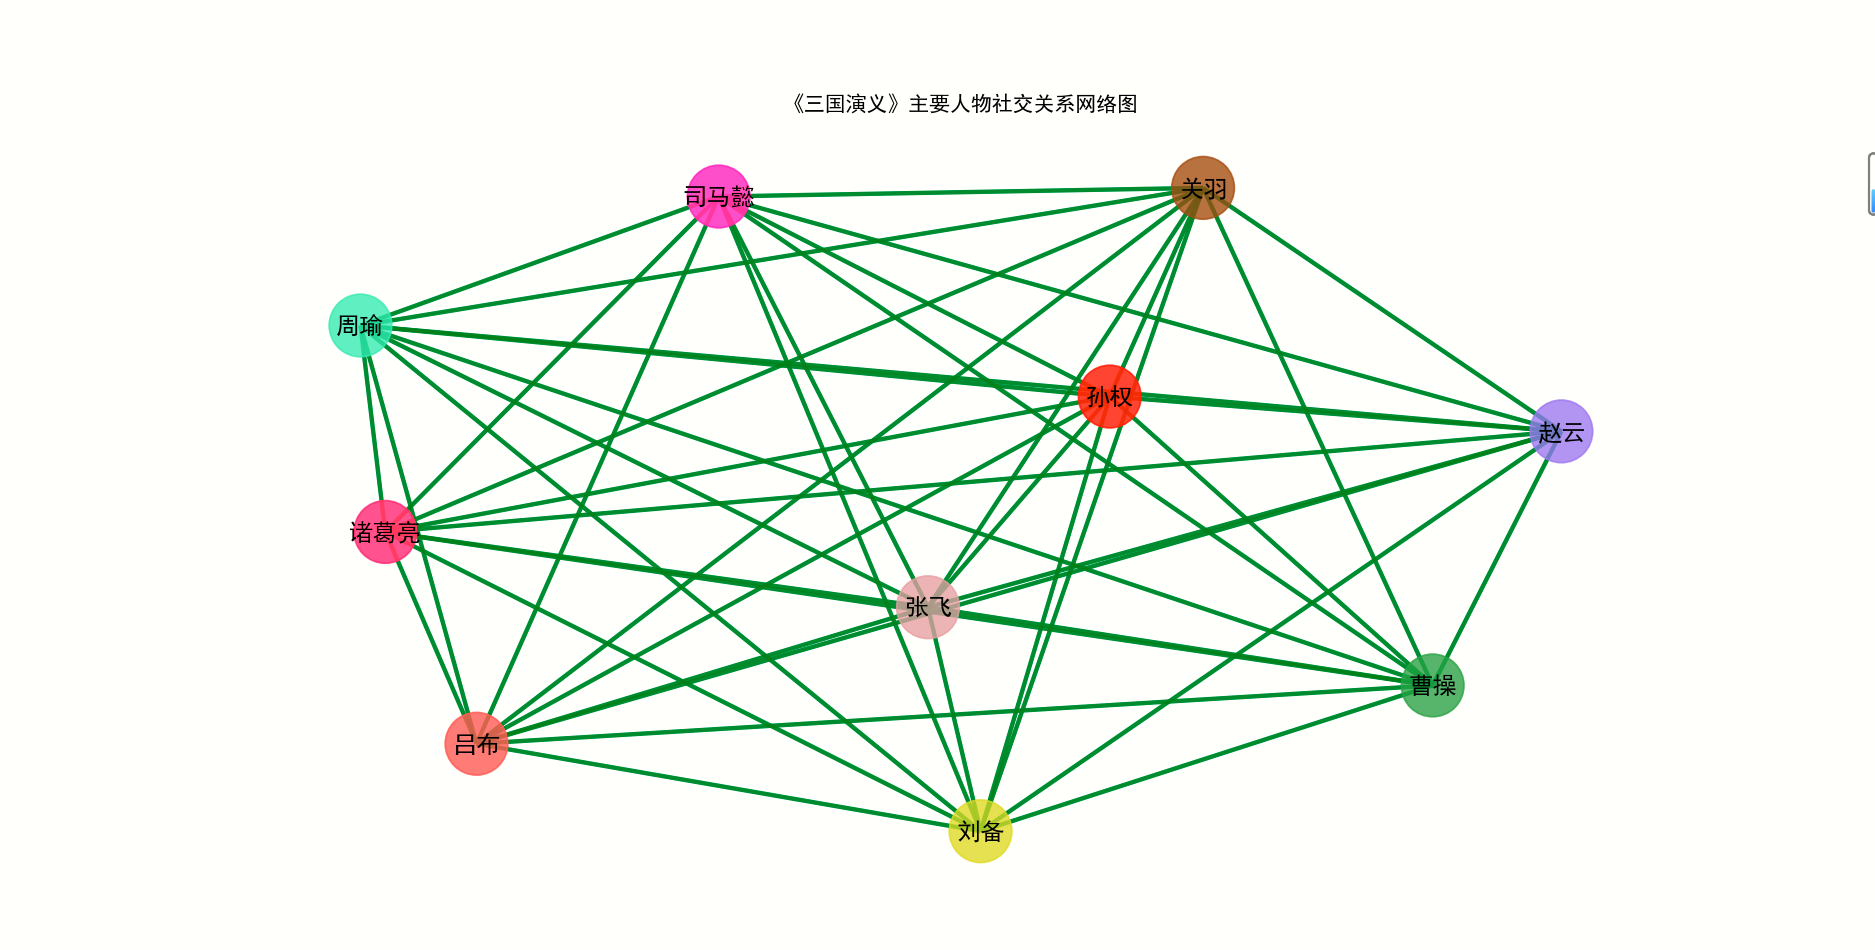
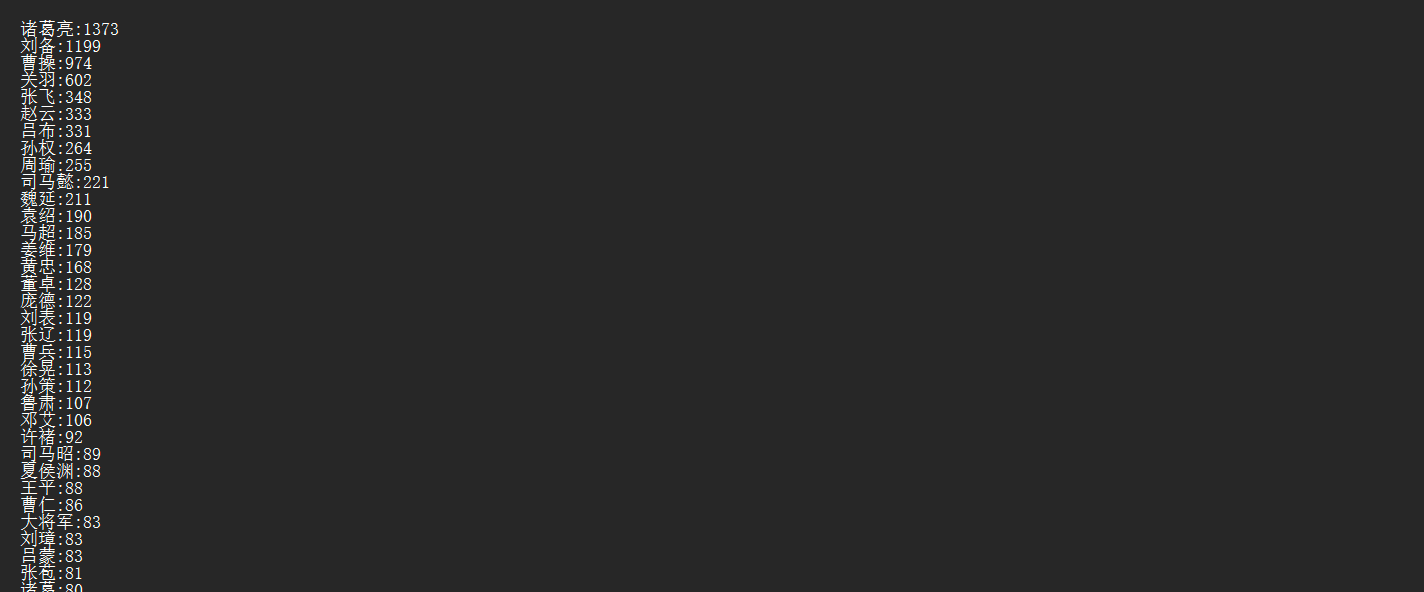
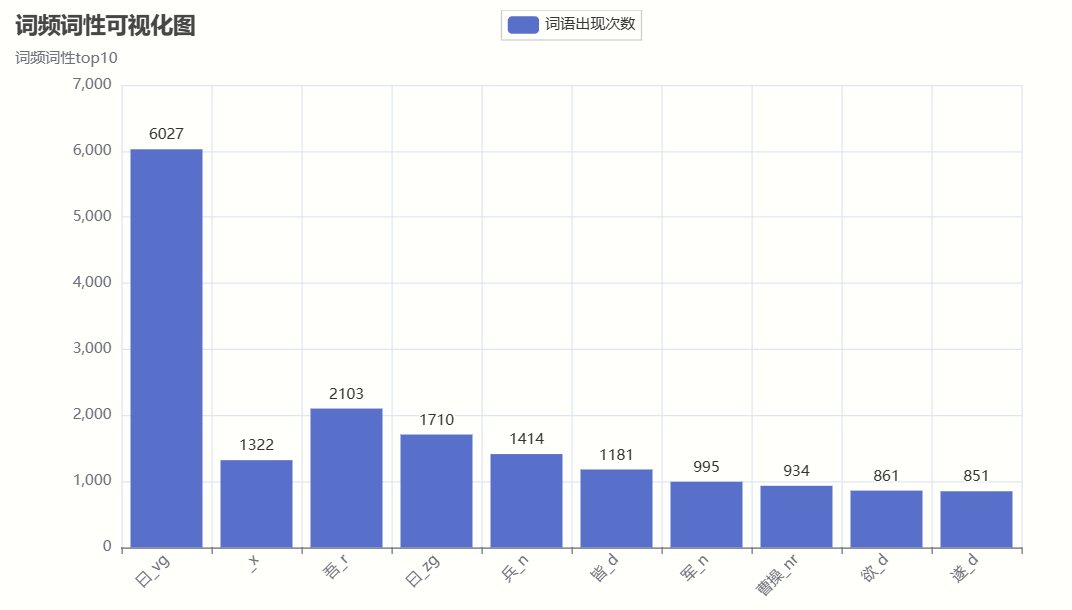
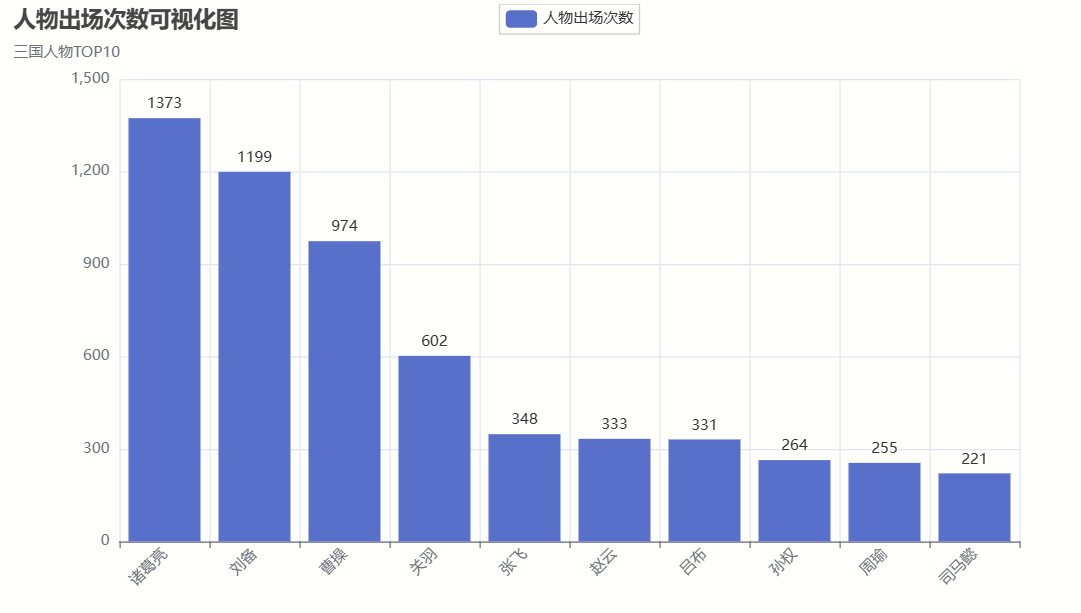
import codecs
import random
import re
import imageio
import jieba.posseg as pseg
import matplotlib.pyplot as plt
import networkx as nx
import wordcloud
from pyecharts import options as opts
from pyecharts.charts import Bar
from pyecharts.charts import WordCloud

# 定义主要人物的个数
keshihuaTop = 10  # 可视化人物图人数
mainTop = 100  # 人物词云图人物数
peopleTop = 10  # 人物关系图

# 获取小说文本
# 读取文件
fn = open('word/sgyy.txt', encoding="utf-8")
string_data = fn.read()  # 读出整个文件
fn.close()  # 关闭文件

# 文本预处理
pattern = re.compile(u'\t|\n|\.|-|:|;|\)|\(|\?|"')  # 定义正则表达式匹配模式
txt = re.sub(pattern, '', string_data)  # 将符合模式的字符去除
print('预处理完毕')


# 停词文档
def stopwordslist(filepath):
    stopwords = [line.strip() for line in open(filepath, 'r', encoding='utf-8').readlines()]
    return stopwords


stopwords = stopwordslist('word/tingyong.txt')

excludes = {'将军', '却说', '令人', '赶来', '徐州', '不见', '下马', '喊声', '因此', '未知', '大败', '百姓', '大事',
            '一军', '之后', '接应', '起兵',
            '成都', '原来', '江东', '正是', '忽然', '原来', '大叫', '上马', '天子', '一面', '太守', '不如', '忽报',
            '后人', '背后', '先主', '此人',
            '城中', '然后', '大军', '何不', '先生', '何故', '夫人', '不如', '先锋', '二人', '不可', '如何', '荆州',
            '不能', '如此', '主公', '军士',
            '商议', '引兵', '次日', '大喜', '魏兵', '军马', '于是', '东吴', '今日', '左右', '天下', '不敢', '陛下',
            '人马', '不知', '都督', '汉中',
            '一人', '众将', '后主', '只见', '蜀兵', '马军', '黄巾', '立功', '白发', '大吉', '红旗', '士卒', '钱粮',
            '于汉', '郎舅', '龙凤', '古之', '白虎',
            '古人云', '尔乃', '马飞报', '轩昂', '史官', '侍臣', '列阵', '玉玺', '车驾', '老夫', '伏兵', '都尉', '侍中',
            '西凉', '安民', '张曰', '文武',
            '白旗',
            '祖宗', '寻思'}  # 排除的词汇
# 通过键值对的形式存储词语及其出现的次数
counts1 = {}  # 存放词性词频
counts2 = {}  # 存放人物词频


# # 生成词频词性文件
def getWordTimes1():
    cutFinal = pseg.cut(txt)

    for w in cutFinal:
        if w.word in stopwords or w.word == None:
            continue
        else:
            real_word = w.word + '_' + w.flag
        counts1[real_word] = counts1.get(real_word, 0) + 1


getWordTimes1()

items1 = list(counts1.items())
# 进行降序排列 根据词语出现的次数进行从大到小排序
items1.sort(key=lambda x: x[1], reverse=True)


# 导出数据
# 分词生成人物词频(写入文档)
def wordFreq1(filepath, topn1):
    with codecs.open(filepath, "w", "utf-8") as f:
        for i in range(topn1):
            word, count = items1[i]
            f.write("{}:{}\n".format(word, count))


# 生成词频文件
wordFreq1("output/三国演义词频词性.txt", 300)

# 将txt文本里的数据转换为字典形式
fr1 = open('output/三国演义词频词性.txt', 'r', encoding='utf-8')
dic1 = {}
keys1 = []  # 用来存储读取的顺序
for line in fr1:
    # 去空白,并用split()方法返回列表
    v1 = line.strip().split(':')
    dic1[v1[0]] = v1[1]
    keys1.append(v1[0])
fr1.close()

list_name1 = list(dic1.keys())  # 人名
list_name_times1 = list(dic1.values())  # 提取字典里的数据作为绘图数据


def create_wordproperties():
    bar1 = Bar()
    bar1.add_xaxis(list_name1[0:keshihuaTop])
    bar1.add_yaxis("词语出现次数", list_name_times1)
    bar1.set_global_opts(title_opts=opts.TitleOpts(title="词频词性可视化图", subtitle="词频词性top10"),
                         xaxis_opts=opts.AxisOpts(axislabel_opts={"rotate": 45}))
    bar1.set_series_opts(label_opts=opts.LabelOpts(position="top"))

    # 生成 html 文件
    bar1.render("output/三国演义词频词性可视化图.html")


# 得到 分词和出现次数
def getWordTimes2():
    # 分词,返回词性
    poss = pseg.cut(txt)
    for w in poss:
        if w.flag != 'nr' or len(w.word) < 2 or w.word in excludes:
            continue  # 当分词长度小于2或该词词性不为nr(人名)时认为该词不为人名
        elif w.word == '孔明' or w.word == '孔明曰' or w.word == '卧龙先生':
            real_word = '诸葛亮'
        elif w.word == '云长' or w.word == '关公曰' or w.word == '关公':
            real_word = '关羽'
        elif w.word == '玄德' or w.word == '玄德曰' or w.word == '玄德甚' or w.word == '玄德遂' or w.word == '玄德兵' or w.word == '玄德领' \
                or w.word == '玄德同' or w.word == '刘豫州' or w.word == '刘玄德':
            real_word = '刘备'
        elif w.word == '孟德' or w.word == '丞相' or w.word == '曹贼' or w.word == '阿瞒' or w.word == '曹丞相' or w.word == '曹将军':
            real_word = '曹操'
        elif w.word == '高祖':
            real_word = '刘邦'
        elif w.word == '光武':
            real_word = '刘秀'
        elif w.word == '桓帝':
            real_word = '刘志'
        elif w.word == '灵帝':
            real_word = '刘宏'
        elif w.word == '公瑾':
            real_word = '周瑜'
        elif w.word == '伯符':
            real_word = '孙策'
        elif w.word == '吕奉先' or w.word == '布乃' or w.word == '布大怒' or w.word == '吕布之':
            real_word = '吕布'
        elif w.word == '赵子龙' or w.word == '子龙':
            real_word = '赵云'
        elif w.word == '卓大喜' or w.word == '卓大怒':
            real_word = '董卓'  # 把相同意思的名字归为一个人
        else:
            real_word = w.word
        counts2[real_word] = counts2.get(real_word, 0) + 1


getWordTimes2()
items2 = list(counts2.items())
# 进行降序排列 根据词语出现的次数进行从大到小排序
items2.sort(key=lambda x: x[1], reverse=True)


# 导出数据
# 分词生成人物词频(写入文档)
def wordFreq2(filepath, topn):
    with codecs.open(filepath, "w", "utf-8") as f:
        for i in range(topn):
            word, count = items2[i]
            f.write("{}:{}\n".format(word, count))


# 生成词频文件
wordFreq2("output/三国演义词频_人名.txt", 300)

# 将txt文本里的数据转换为字典形式
fr = open('output/三国演义词频_人名.txt', 'r', encoding='utf-8')
dic = {}
keys = []  # 用来存储读取的顺序
for line in fr:
    # 去空白,并用split()方法返回列表
    v = line.strip().split(':')
    dic[v[0]] = v[1]
    keys.append(v[0])
fr.close()
# 输出前几个的键值对
print("人物出现次数TOP", mainTop)
print(list(dic.items())[:mainTop])

#  绘图
# 人名列表 (用于人物关系图,pyecharts人物出场次数图)
list_name = list(dic.keys())  # 人名
list_name_times = list(dic.values())  # 提取字典里的数据作为绘图数据


# 可视化人物出场次数
def creat_people_view():
    bar = Bar()
    bar.add_xaxis(list_name[0:keshihuaTop])
    bar.add_yaxis("人物出场次数", list_name_times)
    bar.set_global_opts(title_opts=opts.TitleOpts(title="人物出场次数可视化图", subtitle="三国人物TOP10"),
                        xaxis_opts=opts.AxisOpts(axislabel_opts={"rotate": 45}))
    bar.set_series_opts(label_opts=opts.LabelOpts(position="top"))
    # bar.render_notebook()  # 在 notebook 中展示
    # make_snapshot(snapshot, bar.render(), "bar.png")
    # 生成 html 文件
    bar.render("output/三国演义人物出场次数可视化图.html")


# 生成词云
def creat_wordcloud():
    bg_pic = imageio.imread('word/alice_mask.png')
    wc = wordcloud.WordCloud(font_path='c:\Windows\Fonts\simhei.ttf',
                             background_color='white',
                             width=1000, height=800,
                             stopwords=excludes,  # 设置停用词
                             max_words=500,
                             mask=bg_pic  # mask参数设置词云形状
                             )
    # 从单词和频率创建词云
    wc.generate_from_frequencies(counts2)
    # generate(text)  根据文本生成词云
    # wc.generate(txt)
    # 保存图片
    wc.to_file('output/三国演义词云_人名.png')

    #  显示词云图片
    plt.imshow(wc)
    plt.axis('off')
    plt.show()


# 使用pyecharts 的方法生成词云
def creat_wordcloud_pyecharts():
    wordsAndTimes = list(dic.items())
    (
        WordCloud()
        .add(series_name="人物次数", data_pair=wordsAndTimes,
             word_size_range=[20, 100], textstyle_opts=opts.TextStyleOpts(font_family="cursive"), )
        .set_global_opts(title_opts=opts.TitleOpts(title="三国演义词云"))
        .render("output/三国演义词云_人名.html")
    )


# 颜色生成
colorNum = len(list_name[0:peopleTop])


# print('颜色数',colorNum)
def randomcolor():
    colorArr = ['1', '2', '3', '4', '5', '6', '7', '8', '9', 'A', 'B', 'C', 'D', 'E', 'F']
    color = ""
    for i in range(6):
        color += colorArr[random.randint(0, 14)]
    return "#" + color


def color_list():
    colorList = []
    for i in range(colorNum):
        colorList.append(randomcolor())
    return colorList


# 解决中文乱码
plt.rcParams['font.sans-serif'] = ['SimHei']  # 用来正常显示中文标签


# 生成人物关系图
def creat_relationship():
    # 人物节点颜色
    colors = color_list()
    Names = list_name[0:peopleTop]
    relations = {}
    # 按段落划分,假设在同一段落中出现的人物具有共现关系
    lst_para = (txt).split('\n')  # lst_para是每一段
    for text in lst_para:
        for name_0 in Names:
            if name_0 in text:
                for name_1 in Names:
                    if name_1 in text and name_0 != name_1 and (name_1, name_0) not in relations:
                        relations[(name_0, name_1)] = relations.get((name_0, name_1), 0) + 1
    maxRela = max([v for k, v in relations.items()])
    relations = {k: v / maxRela for k, v in relations.items()}
    # return relations

    plt.figure(figsize=(15, 15))
    # 创建无多重边无向图
    G = nx.Graph()
    for k, v in relations.items():
        G.add_edge(k[0], k[1], weight=v)
    # 筛选权重大于0.6的边
    elarge = [(u, v) for (u, v, d) in G.edges(data=True) if d['weight'] > 0.6]
    # 筛选权重大于0.3小于0.6的边
    emidle = [(u, v) for (u, v, d) in G.edges(data=True) if (d['weight'] > 0.3) & (d['weight'] <= 0.6)]
    # 筛选权重小于0.3的边
    esmall = [(u, v) for (u, v, d) in G.edges(data=True) if d['weight'] <= 0.3]
    # 设置图形布局
    pos = nx.spring_layout(G)  # 用Fruchterman-Reingold算法排列节点(样子类似多中心放射状)
    # 设置节点样式
    nx.draw_networkx_nodes(G, pos, alpha=0.8, node_size=1300, node_color=colors)
    # 设置大于0.6的边的样式
    nx.draw_networkx_edges(G, pos, edgelist=elarge, width=2.5, alpha=0.9, edge_color='g')
    # 0.3~0.6
    nx.draw_networkx_edges(G, pos, edgelist=emidle, width=1.5, alpha=0.6, edge_color='y')
    # <0.3
    nx.draw_networkx_edges(G, pos, edgelist=esmall, width=1, alpha=0.4, edge_color='b', style='dashed')
    nx.draw_networkx_labels(G, pos, font_size=14)

    plt.title("《三国演义》主要人物社交关系网络图")
    # 关闭坐标轴
    plt.axis('off')

    # 保存图表
    plt.savefig('output/《三国演义》主要人物社交关系网络图.png', bbox_inches='tight')
    plt.show()


def main():
    # 生成词频词性文件
    create_wordproperties()
    # 人物出场次数可视化图
    creat_people_view()

    # 词云图
    creat_wordcloud()
    creat_wordcloud_pyecharts()
    # 人物关系图
    creat_relationship()
if __name__ == '__main__':
    main()