推送这个功能之前接触过,用的是极光推送,是给web网站推送。这次是要给app推送。用uni-push2.0这个推送。现在把开发流程记录一下。
1 看文档
这应该是所有开发必须有的流程,先了解功能是否满足需求,熟悉对接流程。
文档链接 https://uniapp.dcloud.net.cn/unipush-v2.html
1 简介
uni-push是DCloud推出的、全端的、云端一体的统一推送服务。
- 客户端方面,
uni-push2支持App、web、小程序。
- App端,内置了苹果、华为、小米、OPPO、VIVO、魅族、谷歌FCM等手机厂商的系统推送和个推第三方推送
- 小程序端,内置了socket在线推送。如需模板消息/订阅消息,另见uni-subscribemsg
- web端,内置了socket在线推送 (uni-push1仅支持app,且app必须包含个推原生sdk。uni-push2在app端如不需要厂商推送,只需在线推送,无需集成个推原生sdk)
-
服务端方面,
uni-push2支持uniCloud云端一体,无需再编写复杂代码轻松完成push。 (uni-push1.0仅支持使用传统服务器开发语言如php,未和客户端有效协同,流程比uni-push2.0繁琐) -
uni-push还自带一个web控制台。不写代码也可以在web页面发推送。uni-push1.0的web控制台在dev.dcloud.net.cn。uni-push2.0的web控制台是开源的,属于uni-admin插件详见。
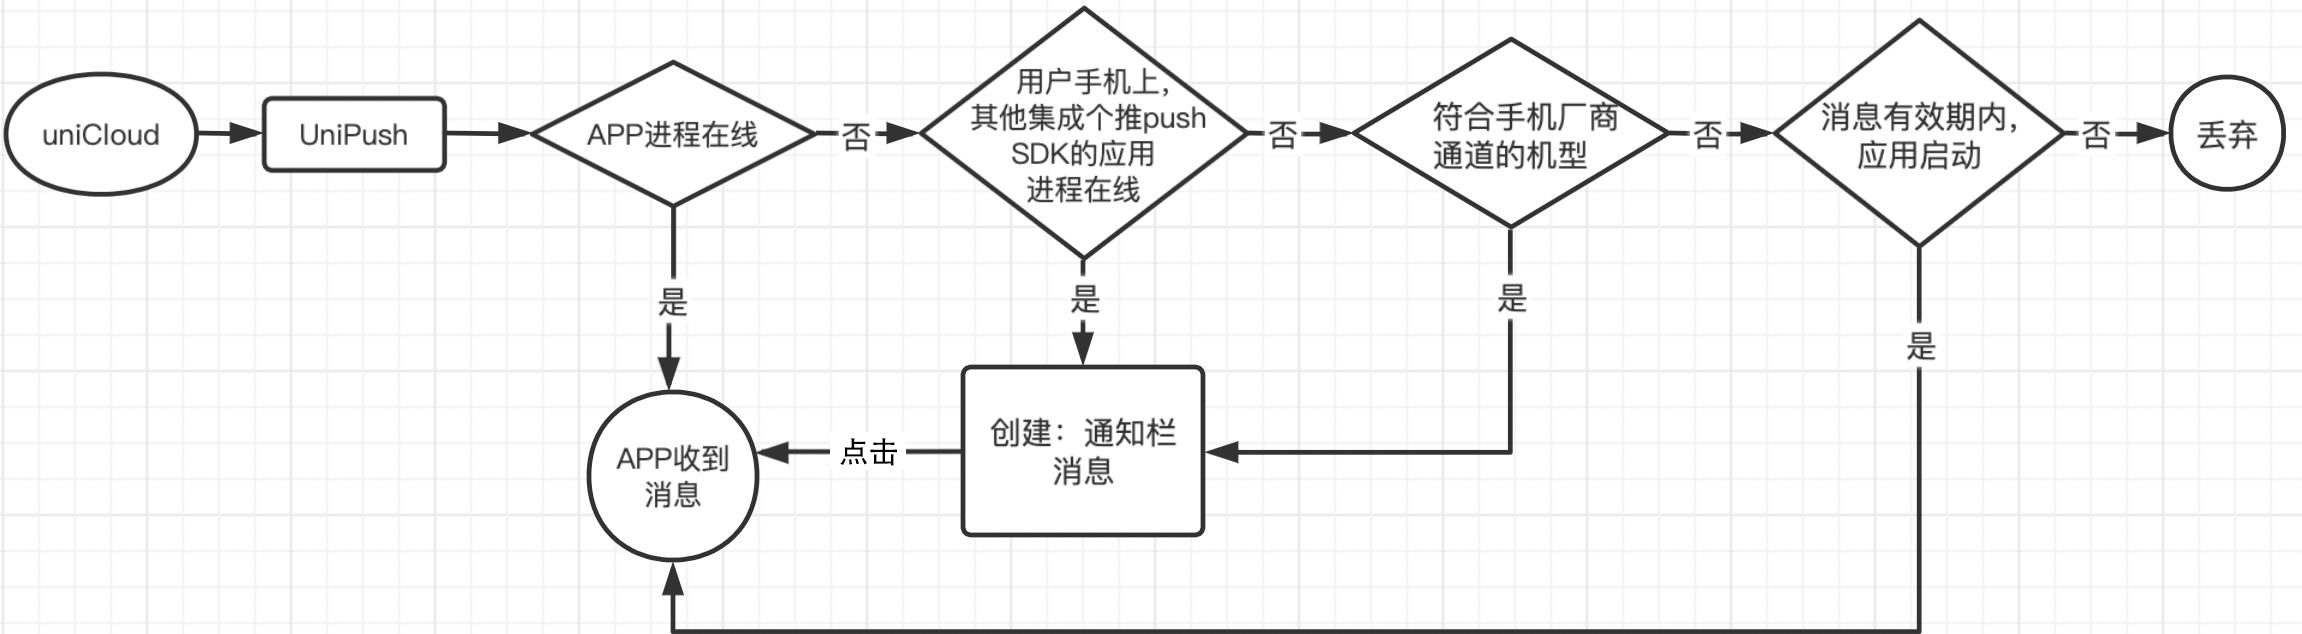
2 流程图
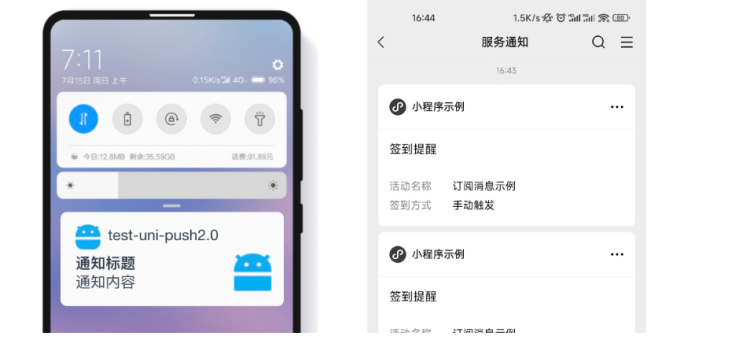
3 效果图
4 开通
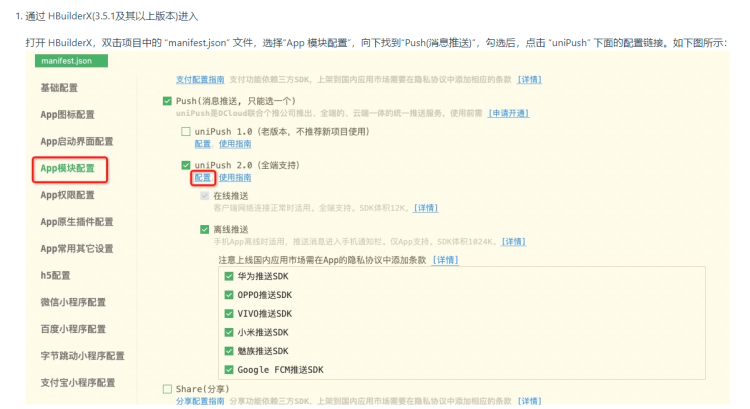
4.1 项目配置文件设置
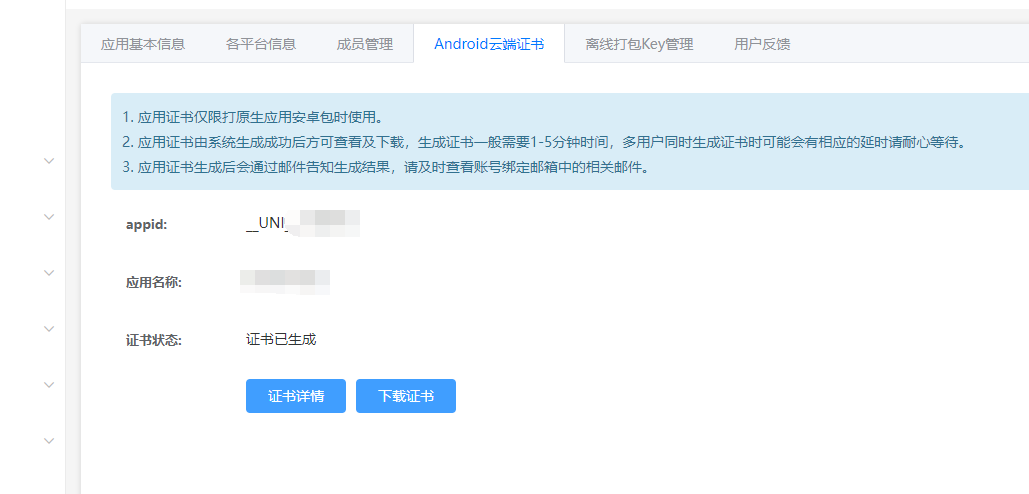
4.2 开发者中心
相关配置

这里有设置云端证书

平台信息设置就是从证书里获取
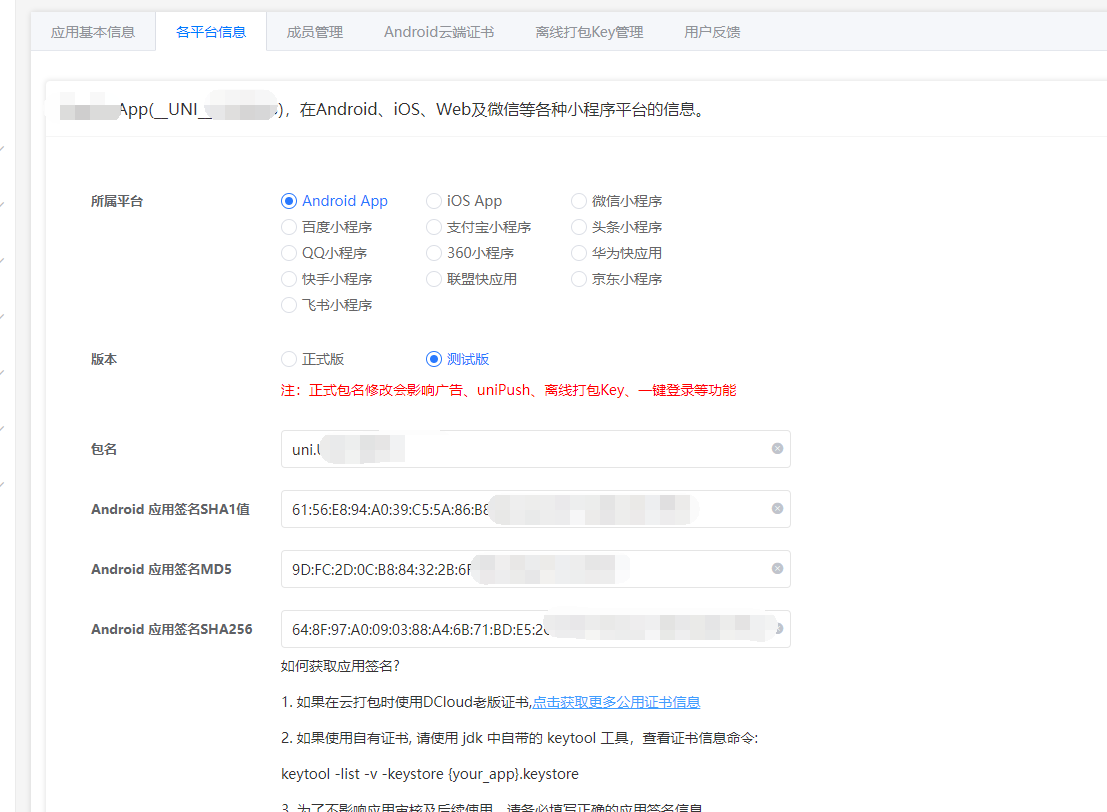
有离线需求的还需要在这里设置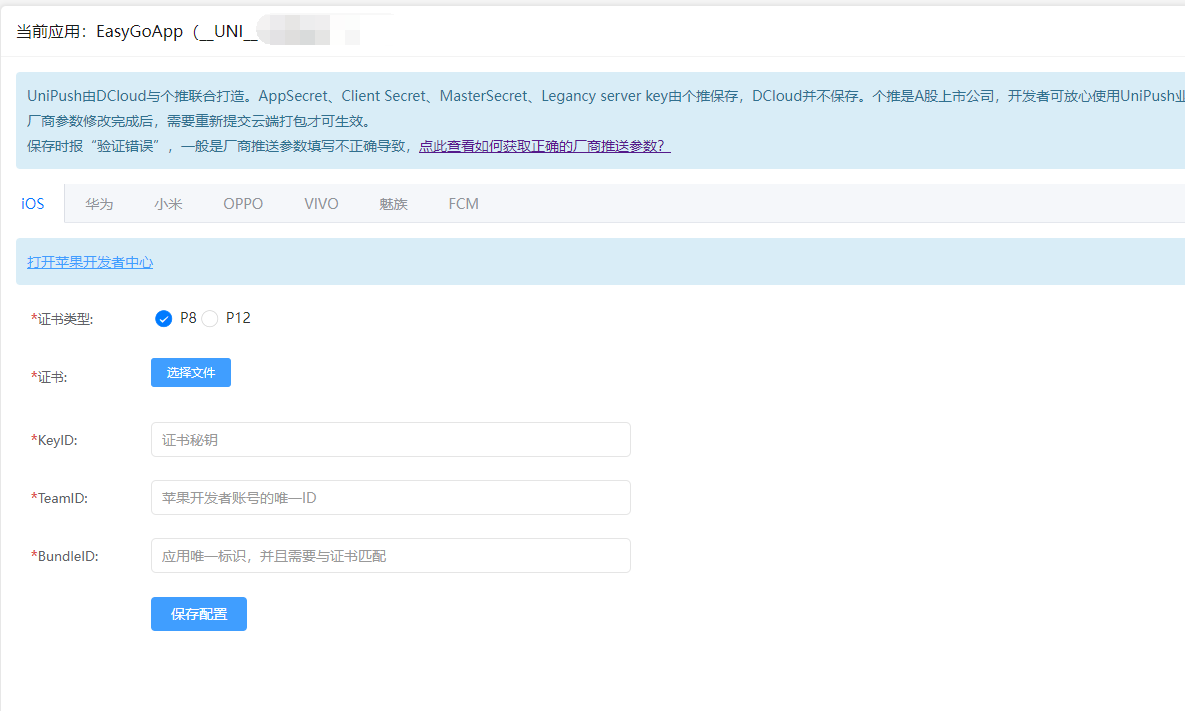
各种使用key ,秘钥需要从手机厂家平台注册获得。
对了,推送需要关联云空间,所以要先开通云空间,这个需要实名制,且需要花钱购买,当然开发过程可以免费一个月。
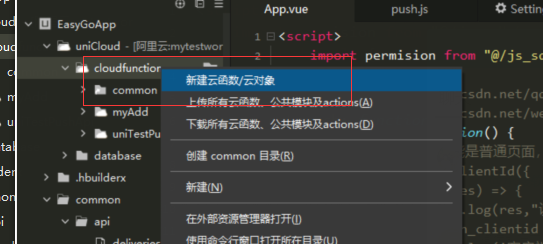
5 开发
5.1 客户端
就是在App.vue页面里设置
我这里是这样弄的,加了权限判断
<script>
	import permision from "@/js_sdk/wa-permission/permission.js"
	export default {
		//https://blog.csdn.net/qq_40745143/article/details/129282665
		//https://blog.csdn.net/weixin_42998230/article/details/127842430
		onLaunch: function() {
		//h5可以跳转 只能是普通页面,不能跳转tabBar页面
		// uni.getPushClientId({
		// 	success: (res) => {
		// 		console.log(res,"设备信息")
		// 		let push_clientid = res.cid
		// 		console.log('客户端推送标识77:', push_clientid)
		// 		uni.setStorageSync('push_clientid', push_clientid)//个推cid
		// 	},
		// 	fail(err) {
		// 		console.log(err)
		// 	}
		// })
	 //     uni.onPushMessage((res) => {
		// 			console.log("收到消息:", res) //监听推送消息
		// 			uni.navigateTo({
		// 				url: '/pages/delivery/orderCustomer?DoID=C2202%2F00248',
		// 				success() {

		// 				},
		// 				fail(err) {
		// 					console.log(err)
		// 				}
		// 			})
		// 		})


			//#ifdef APP-PLUS
			var main = plus.android.runtimeMainActivity();
			var pkName = main.getPackageName();
			var uid = main.getApplicationInfo().plusGetAttribute("uid");
			var NotificationManagerCompat = plus.android.importClass(
				"android.support.v4.app.NotificationManagerCompat"
			);
			//android.support.v4升级为androidx
			if (NotificationManagerCompat == null) {
				NotificationManagerCompat = plus.android.importClass(
					"androidx.core.app.NotificationManagerCompat"
				);
			}
			var areNotificationsEnabled = NotificationManagerCompat.from(main).areNotificationsEnabled();
			// 未开通‘允许通知’权限,则弹窗提醒开通,并点击确认后,跳转到系统设置页面进行设置
			if (!areNotificationsEnabled) {
				console.log('请开启权限:通知管理-允许通知')
				uni.showModal({
					title: '权限提示',
					content: '请前往 通知管理 开启权限',
					confirmColor: '#7287EA',
					success: function(res) {
						if (res.confirm) {
							permision.gotoAppPermissionSetting() // 跳转到APP设置,用户手动开启通知权限
						} else if (res.cancel) {
							console.log('用户点击取消');
						}
					}
				});
			}
			uni.getPushClientId({
				success: (res) => {
					//console.log(res,"设备信息")
					let push_clientid = res.cid
					console.log('客户77:', push_clientid)
					uni.setStorageSync('push_clientid', push_clientid)//个推cid
				},
				fail(err) {
					console.log(err)
				}
			})
			uni.onPushMessage((res) => {
				console.log("收到推送消息999999999:", res) //监听推送消息
				uni.switchTab({
					url: '/pages/receives/receives',
					success() {
					},
					fail(err) {
						console.log(err)
					}
				})
			})
			//#endif
		},
		onShow: function() {
			//console.log('App Show')
		},
		onHide: function() {
			//console.log('App Hide')
		}
	}
</script>

<style lang="scss">
	/* 注意要写在第一行,同时给style标签加入lang="scss"属性 */
	@import "@/uni_modules/uview-ui/index.scss";
</style>
里面有我参考的文章链接
5.2 服务端
先关联云空间,然后添加云函数或云对象

代码格式
'use strict';
const uniPush = uniCloud.getPushManager({appId:"__UNI__212B963"})
exports.main = async (event, context) => {
	//event为客户端上传的参数
	console.log('event : ', event)
	  let body = event.body;
	    if (event.isBase64Encoded) {
	        body = Buffer.from(body);
	    }
	    if(!body) {
	        return { message: 'no body'};
	    }
	    const param = JSON.parse(body);

	//返回数据给客户端

	const res = await uniPush.sendMessage({
	"push_clientid": param.push_clientid,
	"title": param.title,
	"content": param.content,
	"payload": param.payload,
	"force_notification": true,
	"request_id": param.request_id
	})
	return res
};
这里要注意的 ,URL化:get方法和post方法参数值
这里给大家说一下get和post请求云函数url化的区别,使用post方式进行请求时你填写的请求参数会放到event.body中,但是这个body是String格式的需要你自己进行一次转换才能去调用sendMessage方法,而get请求时你的参数会放到event.queryStringParameters中,这个queryStringParameters是json格式的不需要再进行转换就能调用sendMessage方法。
https://blog.csdn.net/weixin_42998230/article/details/127842430
在云函数文件目录右键(或按快捷键ctrl + r)-> 上传并运行云函数
添加三张表 扩展库依赖3张opendb表:opendb-tempdata,opendb-device,uni-id-device
5.3 接口url化设置
找到对应的函数,然后点击详情
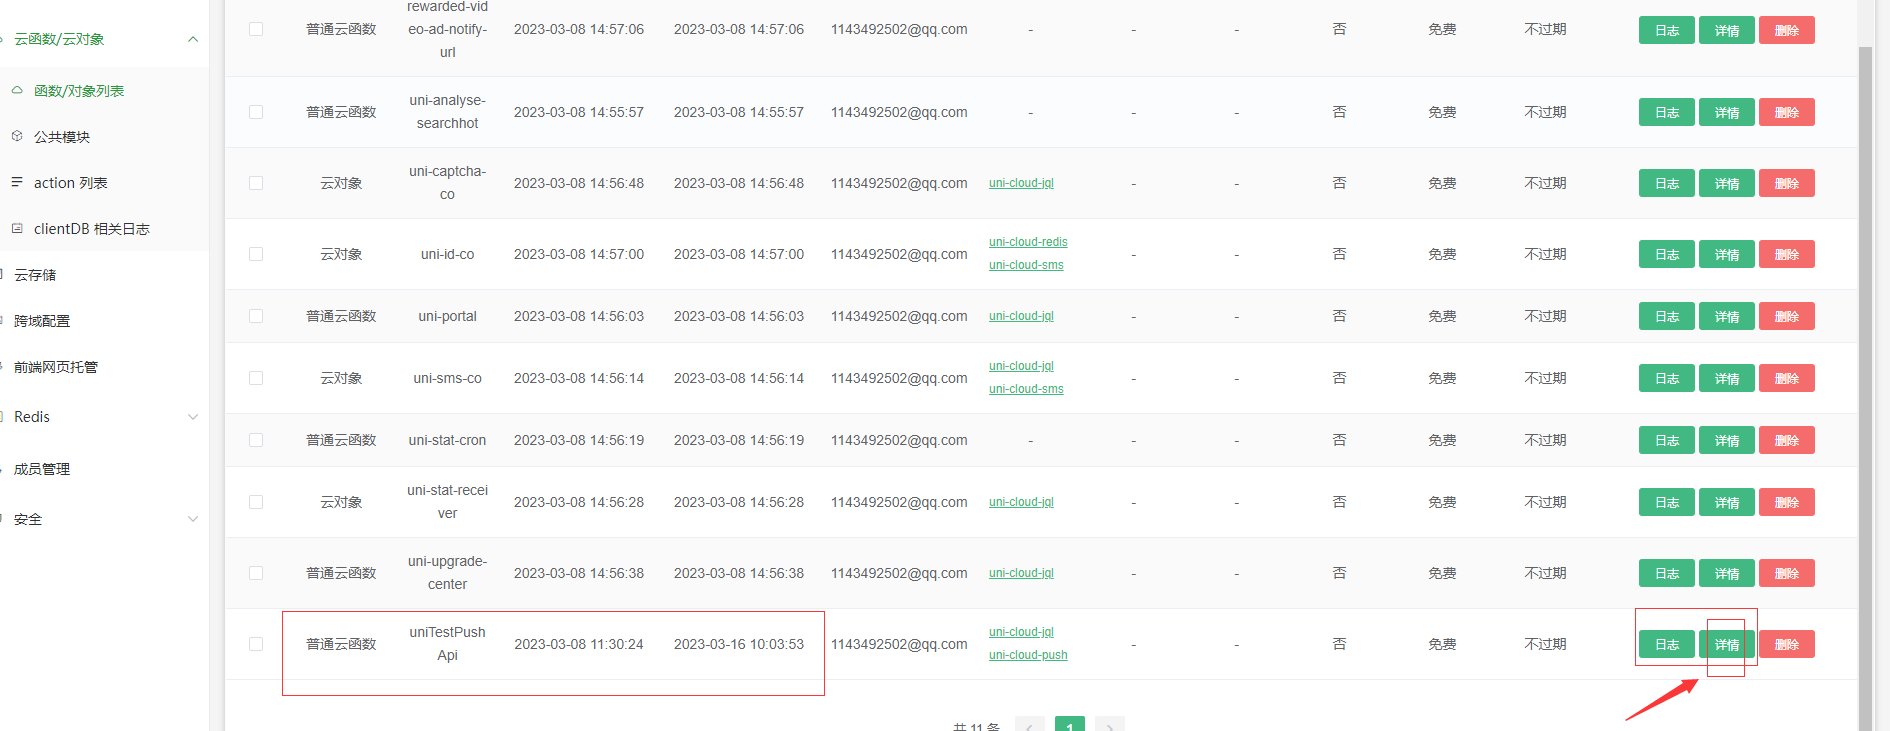
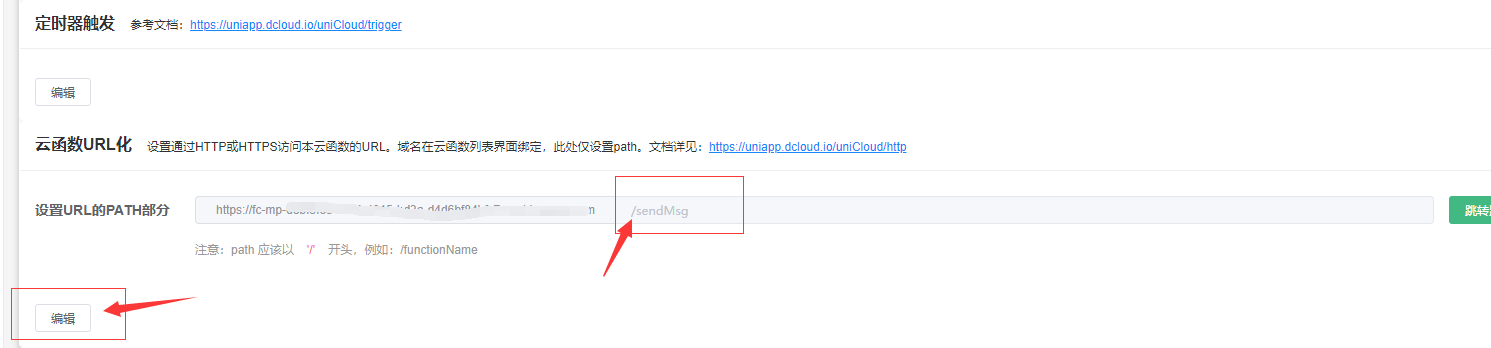
再点击编辑,设置名称
5.4 调用
代码
 [Route("send-pushmsg")]
        [HttpPost]
        public IHttpActionResult SendMsg([FromBody]PushMsgModel pushMsgModel)
        {
            startTime = System.DateTime.Now;//设置执行之前的时间
            try
            {
                var respondMsg = "";
                StringBuilder jsonRequestMsg = new StringBuilder("");
                if (pushMsgModel==null)
                {
                    return Error(HttpStatusCode.BadRequest, new ApiErrorModel(2004, "参数错误!"));
                }
                if ((string.IsNullOrEmpty(pushMsgModel.carId)) || string.IsNullOrEmpty(pushMsgModel.payload) || string.IsNullOrEmpty(pushMsgModel.title) || string.IsNullOrEmpty(pushMsgModel.content))
                {
                    return Error(HttpStatusCode.BadRequest, new ApiErrorModel(2004, "发送信息参数不能为空!"));
                }

                var userInfo = _userID_Push_ClientidService.GetListByCondition(x=>x.UserID==pushMsgModel.carId).FirstOrDefault();
                if (userInfo==null)
                {
                    return Error(HttpStatusCode.BadRequest, new ApiErrorModel(2004, "未找到用户信息!"));
                }
                else
                {
                    if (string.IsNullOrEmpty(userInfo.Push_Clientid)) //个推id没有绑定好
                    {
                        return Error(HttpStatusCode.BadRequest, new ApiErrorModel(2004, "个推绑定错误!"));
                    }
                    jsonRequestMsg.Append("{");
                    if (string.IsNullOrEmpty(userInfo.Old_Push_Clientid) || userInfo.Old_Push_Clientid == userInfo.Push_Clientid)
                    {
                        jsonRequestMsg.AppendFormat("\"push_clientid\":[\"{0}\"],",userInfo.Push_Clientid);
                    }
                    else
                    {
                        jsonRequestMsg.AppendFormat("\"push_clientid\":[\"{0},{1}\"],", userInfo.Push_Clientid,userInfo.Old_Push_Clientid);
                    }
                    jsonRequestMsg.AppendFormat("\"title\":\"{0}\",",pushMsgModel.title);
                    jsonRequestMsg.AppendFormat("\"content\":\"{0}\",", pushMsgModel.content);
                    jsonRequestMsg.AppendFormat("\"payload\":{0},", pushMsgModel.payload);
                    jsonRequestMsg.AppendFormat("\"request_id\":\"{0}\"", Guid.NewGuid().ToString());

                    jsonRequestMsg.Append("}");
                }

                bool flag = true;
                string url = "https://demoxxxxx.com/sendMsg";

                string jsonString = Post(url, jsonRequestMsg.ToString(), "application/json");
               // string jsonString = "{\"data\":{\"RASS_0317_17245befc8b5f7cb982cd7e11c441ce9\":{\"065dd58c97eef8e8723bcc43ab3ab5a8\":\"successed_online\"}},\"errCode\":0,\"errMsg\":\"success\"}";
                if (string.IsNullOrEmpty(jsonString))
                {
                    flag = false;
                    respondMsg = "";
                }
                else
                {
                    ResponseModel model = JsonConvert.DeserializeObject<ResponseModel>(jsonString);
                    if (model==null)
                    {
                        flag = false;
                        return Ok(new { status = true, message = "消息格式不对!" });
                    }
                    if (model.errCode=="0")
                    {
                        respondMsg = model.data.ToString();
                    }
                    else
                    {
                        flag = false;
                        respondMsg = model.errCode + model.errMsg;
                    }
                }
                if (flag)
                {
                    using (TransactionScope ts = new TransactionScope())
                    {
                            LG_Push_Msg push = new LG_Push_Msg();
                            push.CreateDate = DateTime.Now;
                            push.Prepared = User.Identity.Name;
                            push.UserID = pushMsgModel.carId;
                            push.RequestMsg = jsonRequestMsg.ToString();
                            push.RespondMsg = respondMsg;
                            push.ID = Guid.NewGuid();
                            _push_MsgService.Insert(push);
                        _userLogService.LogUserAction(startTime, User.Identity.Name, User.Identity.Name, clientIP, "MS", "发送消息", "添加", pushMsgModel.carId.ToString());
                        ts.Complete();
                    }
                }
                else
                {
                    return Ok(new { status = true, message = "发送失败!" });
                }
               return Ok(new { status = true, message = "发送成功!" });
            }
            catch (Exception ex)
            {

                 return Ok(new { status = false, message = "发送失败!" });
            }
        }

        private static string Post(string url, string postData, string contentType)
        {
            try
            {
                HttpWebRequest request = (HttpWebRequest)WebRequest.Create(url);
                request.ContentType = contentType;
                request.Method = "POST";
                request.Timeout = 300000;

                byte[] bytes = Encoding.UTF8.GetBytes(postData);
                request.ContentLength = bytes.Length;
                Stream writer = request.GetRequestStream();
                writer.Write(bytes, 0, bytes.Length);
                writer.Close();

                HttpWebResponse response = (HttpWebResponse)request.GetResponse();
                StreamReader reader = new StreamReader(response.GetResponseStream(), Encoding.UTF8);
                string result = reader.ReadToEnd();
                response.Close();
                return result;
            }
            catch (Exception ex)
            {

                return "";
            }

        }
 public class PushMsgModel
    {
        [Required]
        //public string[] carIds { get; set; } //当前车辆ID集合
        public string  carId { get; set; } //当前登录人员

        public string title { get; set; }//标题

        public string content { get; set; }//内容
        public string payload { get; set; }

       // public string request_id { get; set; }
    }
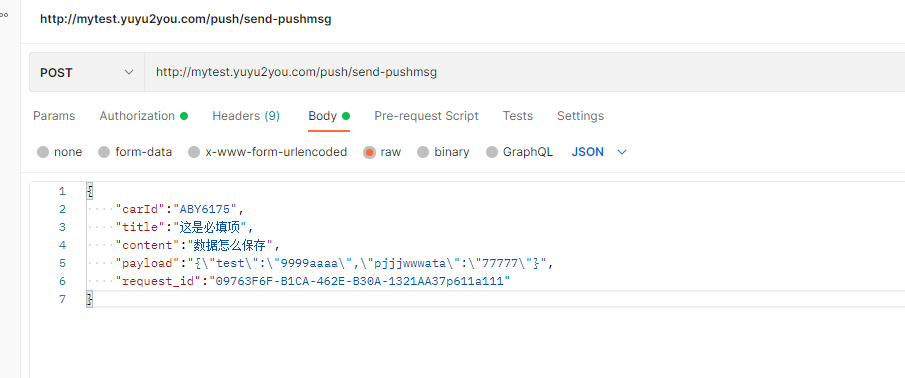
postman 格式
{
    "carId":"ABY6175",
    "title":"这是必填项",
    "content":"数据怎么保存",
    "payload":"{\"test\":\"9999aaaa\",\"pjjjwwwata\":\"77777\"}",
    "request_id":"09763F6F-B1CA-462E-B30A-1321AA37p611a111"
}
6 app客户端
6.1 打包

6.2 模拟器
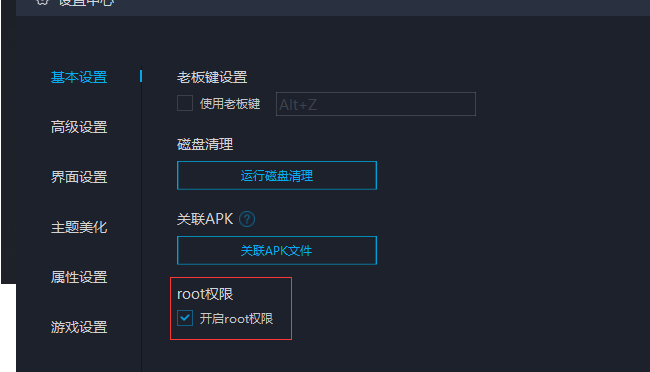
模拟器 网易的MuMu模拟器X
去这里下载模拟器 https://mumu.163.com/index.html
设置分辨率和root权限

安装好,再安装app
右击安装后的app,打开详情,设置相关权限

推送的消息效果
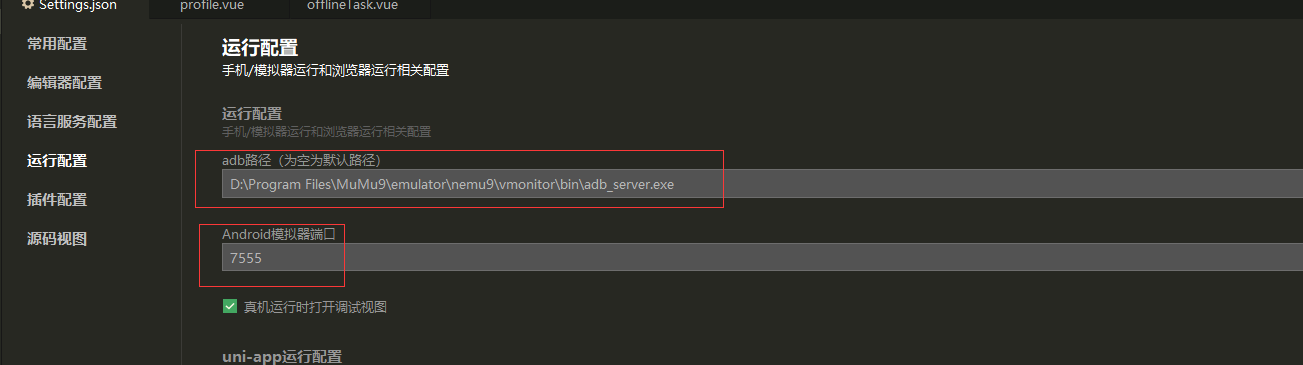
设置可调试
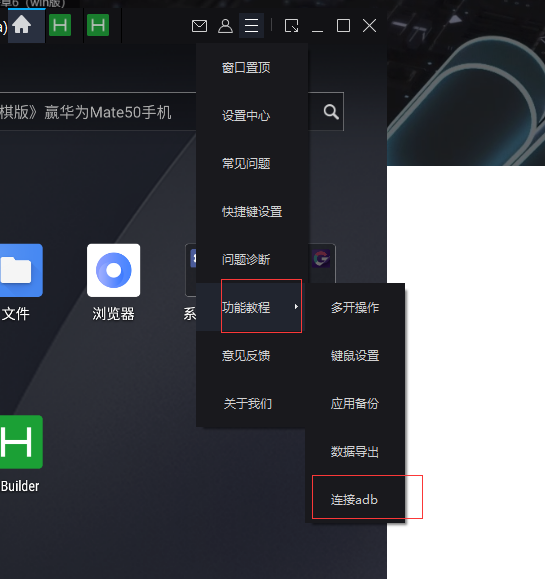
设置教程 https://mumu.163.com/help/20220721/35047_730476.html
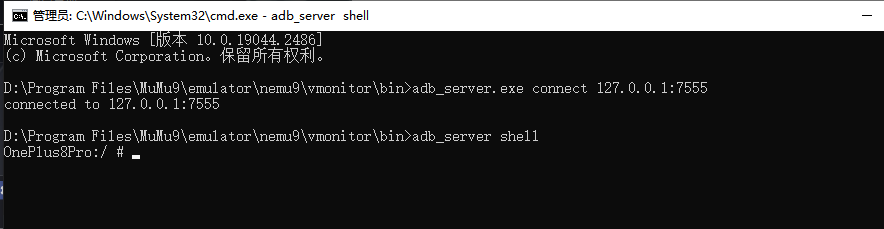
D:\Program Files\MuMu9\emulator\nemu9\vmonitor\bin
adb_server.exe connect 127.0.0.1:7555
adb_server shell
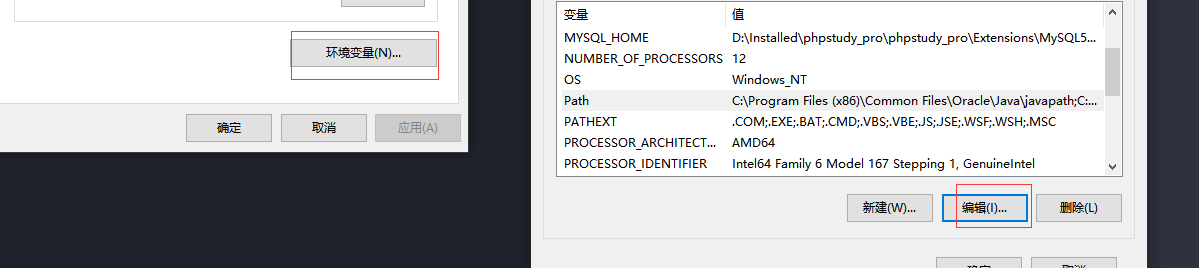
环境变量设置

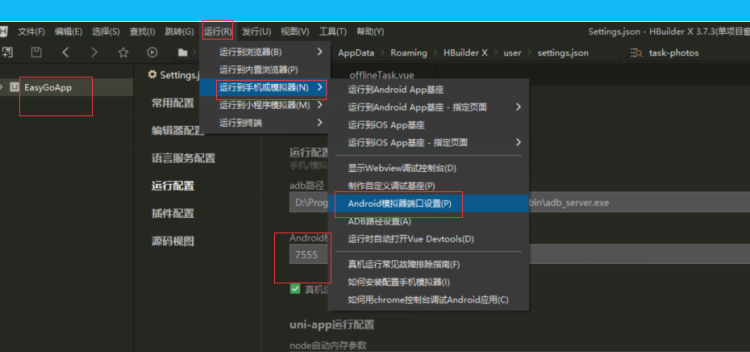
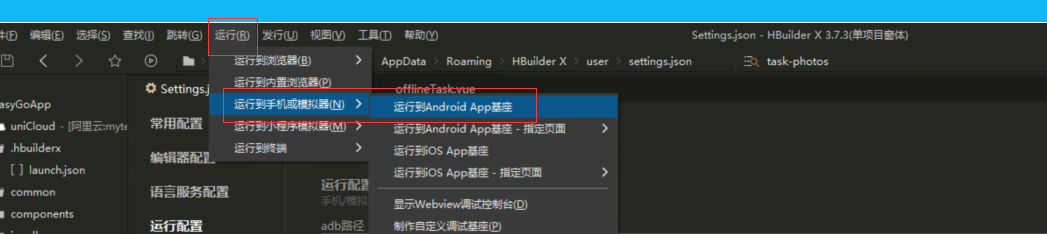
重启 HBuilderX
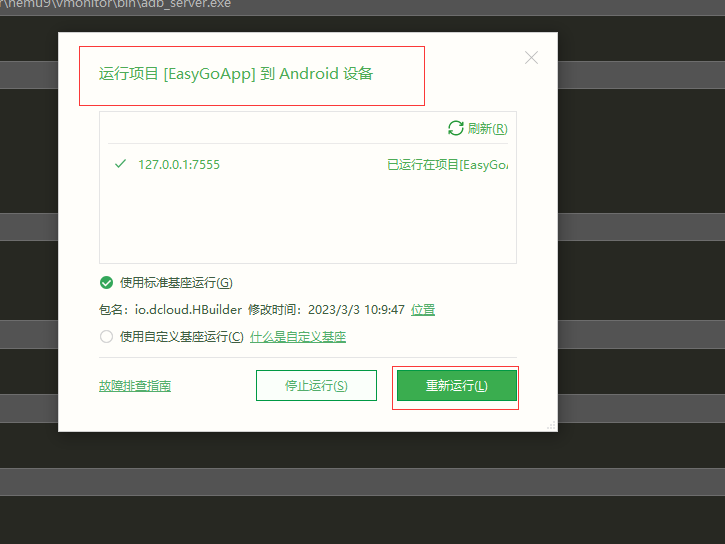
点击运行 ---》运行到Android App基座
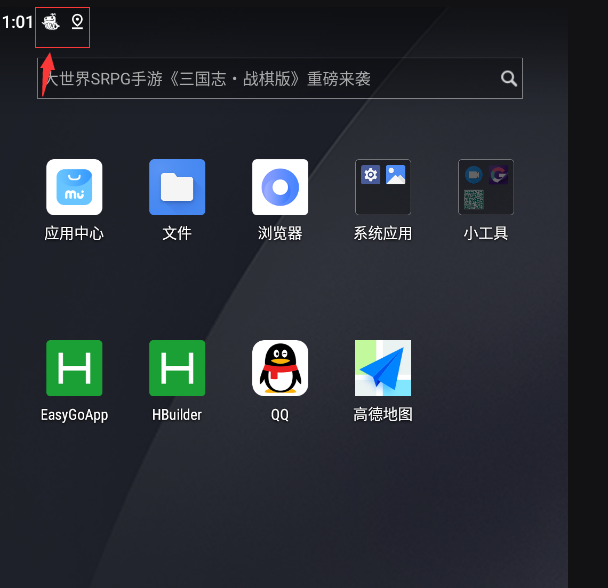
出现这个
向下滑动打开通知
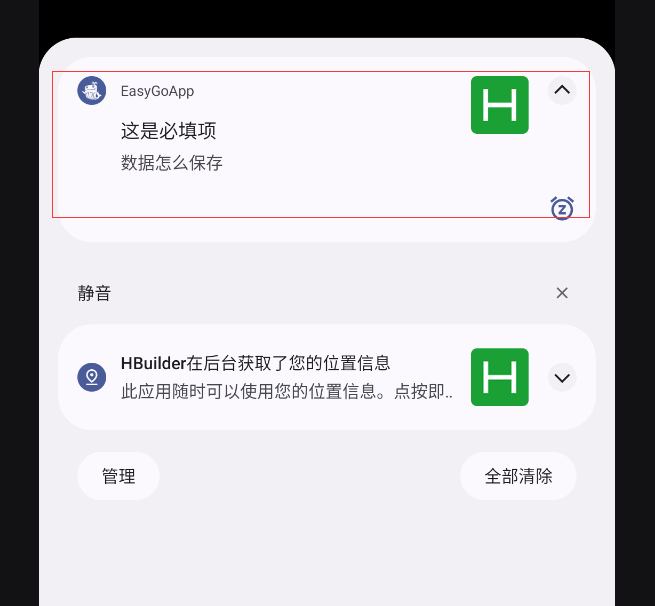
就是可以跳到指定页面了
6.3调试
调试页面之类的功能可以不用真实手机,推送消息,拍照这之类的功能必须真实手机。
调试不能用localhost 需要用ip地址
config.baseUrl = 'http://192.168.1.16:29671';
可能出现的问题解决办法
https://ask.dcloud.net.cn/question/110217
设置一个延迟展示时间
	if (response.statusCode == 200) {
							if (response.data.results.length > 0) {
								setTimeout(() => {
									that.tableList = that.tableList.concat(response.data.results);
									that.total = response.data.itemCount; //总条数
									that.pageCount = that.searchForm.pageIndex;
								}, 500)
							}

						} else {
							uni.showToast({
								title: response.data.ErrorInfo,
								icon: 'error'
							})
							return;
						}