一、PXE简介
对与运维人员来说,如何安装操作系统想必并不陌生;但当我们面对大量需要安装系统的环境时,自动化安装系统就成了一项必备的技能;下面就让我们一起走进PXE这项批量自动化安装操作系统的技术吧。
PXE(Pre-boot Execution Environment,预启动执行环境)是由Intel公司开发的最新技术,工作于Client/Server的网络模式,支持工作站通过网络从远端服务器下载映像,并由此支持通过网络启动操作系统,在启动过程中,终端要求服务器分配IP地址,再用TFTP(trivial file transfer protocol)或MTFTP(multicast trivial file transfer protocol)协议下载一个启动软件包到本机内存中执行,由这个启动软件包完成终端基本软件设置,从而引导预先安装在服务器中的终端操作系统。PXE可以引导和安装Windows,linux等多种操作系统。
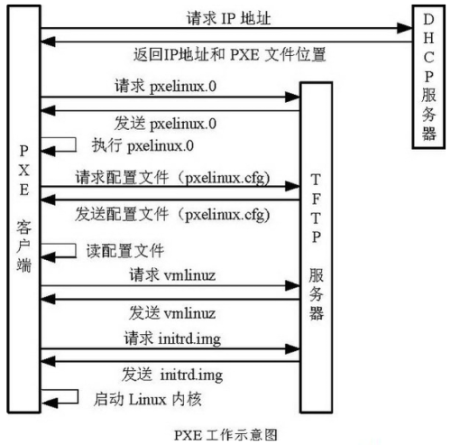
工作原理:
(1) Client向PXE Server上的DHCP发送IP地址请求消息,DHCP检测Client是 否合法(主要是检测Client的网卡MAC地址),如果合法则返回Client的 IP地址,同时将启动文件pxelinux.0的位置信息一并传送给Client (2) Client向PXE Server上的TFTP发送获取pxelinux.0请求消息,TFTP接收 到消息之后再向Client发送pxelinux.0大小信息,试探Client是否满意,当 TFTP收到Client发回的同意大小信息之后,正式向Client发送pxelinux.0 (3) Client执行接收到的pxelinux.0文件 (4) Client向TFTP Server发送针对本机的配置信息文件(在TFTP 服务的 pxelinux.cfg目录下),TFTP将配置文件发回Client,继而Client根据配 置文件执行后续操作。 (5) Client向TFTP发送Linux内核请求信息,TFTP接收到消息之后将内核文件 发送给Client Client向TFTP发送根文件请求信息,TFTP接收到消息之后返回Linux根文 件系统 (6) Client启动Linux内核 (7) Client下载安装源文件,读取自动化安装脚本

二、系统环境介绍
[root@centos-pxe ~]# hostnamectl
   Static hostname: centos-pxe
         Icon name: computer-vm
           Chassis: vm
        Machine ID: 6f77c9d820f543cfa504e66735016f42
           Boot ID: f1f784b4d24f476d8d120d93e7d376bf
    Virtualization: vmware
  Operating System: CentOS Linux 7 (Core)
       CPE OS Name: cpe:/o:centos:centos:7
            Kernel: Linux 3.10.0-1160.99.1.el7.x86_64
      Architecture: x86-64
关闭selinux
sed -i 's/^SELINUX=enforcing/SELINUX=disabled/g' /etc/selinux/config
重启系统之后查看
[root@centos-pxe ~]# sestatus
SELinux status:                 disabled
三、安装配置dhcp
1、安装dhcp服务
[root@centos-pxe ~]# yum install -y dhcp
2、配置
修改配置文件如下:
vim /etc/dhcp/dhcpd.conf
subnet  192.168.100.0  netmask 255.255.255.0 {                #指定为哪个网段分配网络参数
      option subnet-mask    255.255.255.0;                    #设置子网掩码
      option domain-name-servers  223.5.5.5,223.6.6.6;        #设置分配给客户端的DNS服务器地址
      range 192.168.100.201 192.168.100.254;                #设置准备为客户端分配的IP地址范围
      default-lease-time    21600;                            # 地址租赁时间 600秒后失效
      max-lease-time       43200;
      next-server         192.168.100.100;                    # 下一个要访问的地址,就是tftp地址。
      filename           "pxelinux.0";                        #要访问tftp上哪一个文件。
}
重启dhcp服务,并设为开机自启
systemctl restart  dhcpd.service
systemctl enable  dhcpd.service

在防火墙开放dhcp服务
firewall-cmd --permanent --zone=public --add-service=dhcp

重启firewalld使配置生效
systemctl restart firewalld

查看服务端口
ss -tulanp|grep -w 67
三、安装并TFTP文件共享服务,并进行配置
1、安装
yum install -y tftp tftp-server xinetd syslinux
2、配置
修改tftp服务配置文件
vim /etc/xinetd.d/tftp

service tftp
{
	socket_type		= dgram
	protocol		= udp						# TFTP默认使用UDP协议
	wait			= no						# no表示客户机可以多台一起连接,yes表示客户机只能一台一台连接
	user			= root
	server			= /usr/sbin/in.tftpd
	server_args		= -s /var/lib/tftpboot		# 指定TFTP根目录(引导文件的存储路径)
	disable			= no						# no表示开启TFTP服务
	per_source		= 11
	cps			= 100 2
	flags			= IPv4
}

重启xinetd服务并设为开机自启

systemctl restart xinetd.service
systemctl enable xinetd.service
systemctl start tftp.service
systemctl enable tftp.service
在防火墙开放tftp服务

firewall-cmd --permanent --zone=public --add-service=tftp

重启firewalld使配置生效
systemctl restart firewalld
四、准备pxe文件
PXE服务器上tftp服务要准备的启动文件如下:
pxe启动文件:/var/lib/tftpboot目录中的文件列如下
pxelinux.0 启动的引导程序。在系统中安装syslinux软件后得到的。(查:updatedb;locate pxelinux.0)
pxelinux.cfg/default 启动时的菜单文件,相当于grub.conf。从系统光盘的isolinux/isolinux.cfg复制得到。
vmlinuz 内核文件,从系统光盘的pxeboot/vmlinuz复制得到
initrd.img 系统映像文件,从系统光盘的pxeboot/initrd.img复制得到
*.msg 消息文件,从系统光盘的isolinux/*.msg复制得到。
vesamenu.c32 grub菜单的32位管理程序。从系统光盘的isolinux/ vesamenu.c32复制得到。
splash.jpg grub界面的背景图片。从系统光盘的isolinux/ splash.jpg复制得到。
1、挂载centos镜像
创建挂载目录
mkdir /{dvd,dvd1}

将centos7镜像挂载到/dvd目录,将centos8镜像挂载到/dvd目录
[root@centos-pxe ~]# mount CentOS-7.7-x86_64-Everything-1908.iso /dvd
mount: /dev/loop0 写保护,将以只读方式挂载

[root@centos-pxe ~]# mount CentOS-Stream-8-x86_64-20221222-dvd1.iso /dvd1
mount: /dev/loop0 写保护,将以只读方式挂载

[root@centos-pxe ~]# df -hT
文件系统                类型      容量  已用  可用 已用% 挂载点
devtmpfs                devtmpfs  1.9G     0  1.9G    0% /dev
tmpfs                   tmpfs     1.9G     0  1.9G    0% /dev/shm
tmpfs                   tmpfs     1.9G   12M  1.9G    1% /run
tmpfs                   tmpfs     1.9G     0  1.9G    0% /sys/fs/cgroup
/dev/mapper/centos-root xfs       194G   24G  171G   13% /
/dev/sda1               xfs       2.0G  197M  1.8G   10% /boot
tmpfs                   tmpfs     378M     0  378M    0% /run/user/0
/dev/loop0              iso9660    11G   11G     0  100% /dvd1
/dev/loop1              iso9660    11G   11G     0  100% /dvd


说明:如果系统内没有镜像文件,可以上传或下载一个镜像文件进行挂载
2、进入/var/lib/tftpboot目录,复制一些PXE启动需要的文件
进入/var/lib/tftpboot目录
cd  /var/lib/tftpboot

[root@centos-pxe /var/lib/tftpboot]# cp  -v  /usr/share/syslinux/pxelinux.0   ./
"/usr/share/syslinux/pxelinux.0" -> "./pxelinux.0"

复制/dvd/isolinux/* 下的所有文件到当前目录
[root@centos-pxe /var/lib/tftpboot]# cp  -v  /dvd/isolinux/*   ./
"/dvd/isolinux/boot.cat" -> "./boot.cat"
"/dvd/isolinux/boot.msg" -> "./boot.msg"
"/dvd/isolinux/grub.conf" -> "./grub.conf"
"/dvd/isolinux/initrd.img" -> "./initrd.img"
"/dvd/isolinux/isolinux.bin" -> "./isolinux.bin"
"/dvd/isolinux/isolinux.cfg" -> "./isolinux.cfg"
"/dvd/isolinux/memtest" -> "./memtest"
"/dvd/isolinux/splash.png" -> "./splash.png"
"/dvd/isolinux/TRANS.TBL" -> "./TRANS.TBL"
"/dvd/isolinux/vesamenu.c32" -> "./vesamenu.c32"
"/dvd/isolinux/vmlinuz" -> "./vmlinuz"

创建centos7和centos8目录
mkdir {centos7,centos8}

将initrd.img,vmlinuz移动到centos7目录下
mv {initrd.img,vmlinuz} centos7

复制centos8镜像中的initrd.img,vmlinuz文件到centos8目录下
cp /dvd1/isolinux/{initrd.img,vmlinuz} centos8/

[root@centos-pxe /var/lib/tftpboot]# tree ./
./
├── beijing.png
├── boot.cat
├── boot.msg
├── centos7
│   ├── initrd.img
│   └── vmlinuz
├── centos8
│   ├── initrd.img
│   └── vmlinuz
├── grub.conf
├── isolinux.bin
├── memtest
├── pxelinux.0
├── pxelinux.cfg
│   ├── default
│   └── default.bak
├── splash.png
├── TRANS.TBL
└── vesamenu.c32

3 directories, 16 files

创建pxelinux.cfg目录
[root@centos-pxe /var/lib/tftpboot]# mkdir  -v  pxelinux.cfg
mkdir: 已创建目录 "pxelinux.cfg"

将isolinux.cfg文件移动到pxelinux.cfg目录下并从命名为default
mv  isolinux.cfg  pxelinux.cfg/default
五、、编辑default文件
编辑default文件
vim /var/lib/tftpboot/pxelinux.cfg/default

default vesamenu.c32
# timout时间是引导时等待用户手动选择的时间,设为1可直接引导,单位为1/10秒。
timeout 600

display boot.msg

# Clear the screen when exiting the menu, instead of leaving the menu displayed.
# For vesamenu, this means the graphical background is still displayed without
# the menu itself for as long as the screen remains in graphics mode.
menu clear
# 菜单背景图片、标题、颜色。
#指定背景图片,要求是640*480像素的文件,可以使用windowsPC上画图打开重设图片大小调整像素
menu background splash.png
#menu title CentOS 7
menu title ======== Welcome to Install the Centos System ========
menu vshift 8
menu rows 18
menu margin 8
#menu hidden
menu helpmsgrow 15
menu tabmsgrow 13

# Border Area
menu color border * #00000000 #00000000 none

# Selected item
menu color sel 0 #ffffffff #00000000 none

# Title bar
menu color title 0 #ff7ba3d0 #00000000 none

# Press [Tab] message
menu color tabmsg 0 #ff3a6496 #00000000 none

# Unselected menu item
menu color unsel 0 #84b8ffff #00000000 none

# Selected hotkey
menu color hotsel 0 #84b8ffff #00000000 none

# Unselected hotkey
menu color hotkey 0 #ffffffff #00000000 none

# Help text
menu color help 0 #ffffffff #00000000 none

# A scrollbar of some type? Not sure.
menu color scrollbar 0 #ffffffff #ff355594 none

# Timeout msg
menu color timeout 0 #ffffffff #00000000 none
menu color timeout_msg 0 #ffffffff #00000000 none

# Command prompt text
menu color cmdmark 0 #84b8ffff #00000000 none
menu color cmdline 0 #ffffffff #00000000 none

# Do not display the actual menu unless the user presses a key. All that is displayed is a timeout message.

menu tabmsg Press Tab for full configuration options on menu items.

menu separator # insert an empty line
menu separator # insert an empty line

label Centos7
  menu label ^Install CentOS-7-x86_64-Everything_Server_2009
  kernel centos7/vmlinuz
  append initrd=centos7/initrd.img ks=http://192.168.100.100/ks/centos7_server_ks.cfg

label Centos7
  menu label ^Install CentOS-7-x86_64-Everything_Desktop_2009
  kernel centos7/vmlinuz
  append initrd=centos7/initrd.img ks=http://192.168.100.100/ks/centos7_desktop_ks.cfg

label Centos7
  menu label ^Install CentOS-7-x86_64-Everything_Minimal_2009
  kernel centos7/vmlinuz
  append initrd=centos7/initrd.img ks=http://192.168.100.100/ks/centos7_minimal_ks.cfg

label Centos8
  menu label ^Install CentOS-Stream-8-x86_64-latest_Server
  kernel centos8/vmlinuz
  append initrd=centos8/initrd.img inst.repo=http://192.168.100.100/os8 inst.ks=http://192.168.100.100/ks/centos8_server_ks.cfg

label Centos8
  menu label ^Install CentOS-Stream-8-x86_64-latest_Desktop
  kernel centos8/vmlinuz
  append initrd=centos8/initrd.img inst.repo=http://192.168.100.100/os8 inst.ks=http://192.168.100.100/ks/centos8_desktop_ks.cfg

label Centos8
  menu label ^Install CentOS-Stream-8-x86_64-latest_Minimal
  kernel centos8/vmlinuz
  append initrd=centos8/initrd.img inst.repo=http://192.168.100.100/os8 inst.ks=http://192.168.100.100/ks/centos8_minimal_ks.cfg

#本地磁盘引导
label local
  menu label Boot from ^local drive
  localboot 0xffff
六、安装Nginx服务,并配置使其显示目录文件列表
1、安装nginx
yum install -y nginx
2、修改Nginx服务配置文件,使其显示目录列表
修改Nginx服务配置文件,使其显示目录列表

找到http模块,修改如下
[root@centos-pxe ~]# vim /etc/nginx/nginx.conf
[root@centos-pxe ~]# grep -Ev '^$|#' /etc/nginx/nginx.conf
user nginx;
worker_processes auto;
error_log /var/log/nginx/error.log;
pid /run/nginx.pid;
include /usr/share/nginx/modules/*.conf;
events {
    worker_connections 1024;
}
http {
    log_format  main  '$remote_addr - $remote_user [$time_local] "$request" '
                      '$status $body_bytes_sent "$http_referer" '
                      '"$http_user_agent" "$http_x_forwarded_for"';
    access_log  /var/log/nginx/access.log  main;
    sendfile            on;							#自动显示目录
    tcp_nopush          on;							#人性化方式显示文件大小否则以byte显示
    tcp_nodelay         on;							#按服务器时间显示,否则以gmt时间显示
    keepalive_timeout   65;
    types_hash_max_size 4096;
    include             /etc/nginx/mime.types;
    default_type        application/octet-stream;
	autoindex on;
	autoindex_exact_size off;						#默认为on,显示出文件的确切大小,单位是bytes。改为off后,显示出文件的大概大小,单位是kB或者MB或者GB
	autoindex_localtime on;							#默认为off,显示的文件时间为GMT时间。改为on后,显示的文件时间为文件的服务器时间
	    server_names_hash_bucket_size 128;
    client_header_buffer_size 32k;
    large_client_header_buffers 4 32k;
    client_max_body_size 8m;
    limit_conn_zone  $binary_remote_addr zone=one:10m;
    gzip  on;
    gzip_min_length  1k;
    gzip_buffers     4 16k;
    gzip_http_version 1.0;
    gzip_comp_level 2;
    gzip_types       text/plain application/x-javascript text/css application/xml;
    gzip_vary on;
    log_format  wwwlogs  '$remote_addr - $remote_user [$time_local] $request $status $body_bytes_sent $http_referer $http_user_agent $http_x_forwarded_for';
    include /etc/nginx/conf.d/*.conf;
    server {
        listen       80;
        listen       [::]:80;
        server_name  _;
        root         /var/www/html;        #更改主目录
        include /etc/nginx/default.d/*.conf;
        error_page 404 /404.html;
        location = /404.html {
        }
        error_page 500 502 503 504 /50x.html;
        location = /50x.html {
        }
    }
}


检查语法是否正确
[root@centos-pxe ~]# nginx -t
nginx: the configuration file /etc/nginx/nginx.conf syntax is ok
nginx: configuration file /etc/nginx/nginx.conf test is successful

重启nginx服务并设为开机自启
[root@centos-pxe ~]# systemctl restart nginx.service
[root@centos-pxe ~]# systemctl enable nginx.service
Created symlink from /etc/systemd/system/multi-user.target.wants/nginx.service to /usr/lib/systemd/system/nginx.service.

防火墙开放nginx服务
[root@centos-pxe ~]# firewall-cmd --permanent --zone=public --add-service=http
success
[root@centos-pxe ~]# systemctl restart firewalld
[root@centos-pxe ~]#
七、准备centos安装源