自建的Gitlab服务器常常会因为使用时间的增长,其空间容量等硬件需求都需要升级,或者迁移至更高配置的服务器上。备份、迁移、恢复、升级过程如下
一、gitlab备份
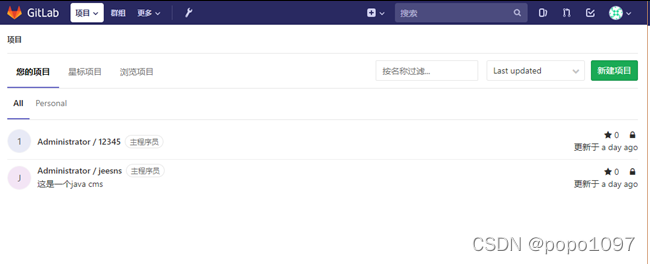
备份前gitlab的项目如图所示
1.1 修改仓库存储位置
gitlab通过rpm包安装后,默认存储位置在/var/opt/gitlab/git-data/repositories,通常需要更改此路径到单独的一个分区来存储仓库的数据。
例如我这里把数据存放到/data/gitlab目录下
创建/data/gitlab目录
mkdir -p /data/gitlab
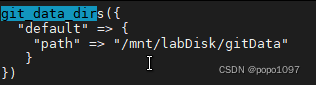
修改gitlab配置文件,找到git_data_dir
vim /etc/gitlab/gitlab.rb
在git_data_dir配置项修改如下:
git_data_dirs({
  “default” => {
    “path” => “/mnt/labDisk/gitData”
    }
})
停止当前gitlab,重新加载配置
gitlab-ctl stop
gitlab-ctl reconfigure
重新加载后,会发现在/data/gitlab目录下多出一个repositories目录
最后启动gitlab即可
gitlab-ctl start
1.2 修改备份文件目录
-
备份的位置可以更换,使用如下命令:(默认可以不修改,那么默认生成在/var/opt/gitlab/backups)
-
可以通过/etc/gitlab/gitlab.rb配置文件来修改默认存放备份文件的目录
-

找到gitlab_rails['backup_path'] = "/data/gitBackup" 取消注释并修改为自定义备份路径
sudo gitlab-ctl reconfigure 重读配置
sudo gitlab-ctl restart 重启
-
-
使用sudo gitlab-ctl reconfigure使得配置生效
-
:备份文件的名称中1537261122_2018_09_18_9.2.5是此次备份的编号。该编号我们会在后续恢复gitlab数据使用到。

1.4 通过gitlab-rake命令备份gitlab
-
备份时需要保持gitlab处于正常运行状态,直接执行gitlab-rake gitlab:backup:create进行备份(需要sudo权限,不然报错)
-
提供的备份命令为gitlab-rake,备份命令使用如下:
-
itlab-rake gitlab:backup:create
-
使用以上命令会在/var/opt/gitlab/backups目录下创建一个名称类似为1530156812\_2018\_06\_28\_10.8.4\_gitlab\_backup.tar的压缩包,
-
这个压缩包就是Gitlab整个的完整部分, 其中开头的1530156812\_2018\_06\_28\_10.8.4是备份创建的日期;


该命令会备份gitlab仓库、数据库、用户、用户组、用户密钥、权限等信息。
备份完成后备份文件会出现在/var/opt/gitlab/backups/

/etc/gitlab/gitlab.rb 配置文件须备份
/var/opt/gitlab/nginx/conf nginx配置文件
/etc/postfix/main.cfpostfix 邮件配置备份
红字部分表示 gitlab.rb 和 gitlab-secrets.json 两个文件包含敏感信息。未被备份到备份文件中。需要手动备份。

1.2 设置备份过期时间
-
[root@gitlab ~\]# vim /etc/gitlab/gitlab.rb
-
\_rails\['backup\_keep\_time'\] = 604800 #以秒为单位
Copy
1.3 gitlab自动备份
-
创建定时任务
-
\[root@gitlab ~\]# crontab -e
-
\* \* \* /opt/gitlab/bin/gitlab-rake gitlab:backup:create
Copy
1.5 定时备份gitlab
-
如果要使gitlab自动进行备份的话,我们可以通过crontab命令来实现自动备份。
-
强烈建议使用系统crontab命令,而不是用户crontab。
Copy
crontab e 进入编辑模式
crontable -l 列出计划任务
/sbin/service crond start //启动服务
/sbin/service crond stop //关闭服务
/sbin/service crond restart //重启服务 //ubutnu18测试不通过!!!!
/sbin/service crond reload //重新载入配置
$ service crond start //启动服务
$ service crond stop //关闭服务
$ service crond restart //重启服务
2.linux发行版本没有service这个命令时:
/etc/init.d/cron stop
/etc/init.d/cron start
/etc/init.d/cron restart //ubutnu18测试通过

minute: 表示分钟,可以是从0到59之间的任何整数。
hour: 表示小时,可以是从0到23之间的任何整数。
day: 表示日期,可以是从1到31之间的任何整数。
month: 表示月份,可以是从1到12之间的任何整数。
week: 表示星期几,可以是从0到7之间的任何整数,这里的0或7代表星期日。
command:要执行的命令,可以是系统命令,也可以是自己编写的脚本文件。
间隔2分钟执行
-
*/2 * * * * /bin/echo "xlglvc" >> /data/tarTest/test1
Copy
每月每天凌晨3点30分和中午12点20分执行test.sh脚本
,12 * * * /home/test.sh
Copy
每月每天每隔6小时的每30分钟执行test.sh脚本
30 */6 * * * /home/test.sh
Copy
每月每天早上8点到下午18点每隔2小时的每30分钟执行test.sh脚本
-18/2 * * * /etc/init.d/network restart
Copy
每月每天晚上21点30分执行test.sh脚本
30 21 * * * /etc/init.d/network restart
Copy
每月1号、10号、22号凌晨4点45分执行test.sh脚本
,10,22 * * /etc/init.d/network restart
Copy
8月份周一、周日凌晨1点10分执行test.sh脚本
10 1 * 8 6,0 /etc/init.d/network restart
Copy
每月每天每小时整点执行test.sh脚本
00 */1 * * * /etc/init.d/network restart
Copy
在书写 crontab 定时任务时,需要注意以下几个事项:
1、6 个选项都不能为空,必须填写。如果不确定,则使用"*"代表任意时间。
2、crontab 定时任务的最小有效时间是分钟,最大有效时间是月。像 2018 年某时执行、3 点 30 分 30 秒这样的时间都不能被识别。
3、在定义时间时,日期和星期最好不要在一条定时任务中出现,因为它们都以天为单位,非常容易让管理员混淆。
4、在定时任务中,不管是直接写命令,还是在脚本中写命令,最好都使用绝对路径。有时使用相对路径的命令会报错。
方法1.每天自动备份gitlab,并只保留近7天备份
-
编辑备份脚本vim /var/opt/gitlab/gitbackup.sh
-
# !/bin/bash
-
-rake gitlab:backup:create CRON=1
-
将该脚本加入crontab中执行,每天凌晨1点备份
-
b -e: //进入crontab编辑模式
-
0 1 * /var/opt/gitlab/gitbackup.sh &>/dev/null
-
-
-
找到gitlab_rails['backup_keep_time'] = 604800取消注释,
-
-ctl reconfigure 重读配置
-
-ctl restart 重启
Copy
方法2.以实现每天凌晨4点进行一次自动备份为例,系统的crontab配置如下:
-
/etc/crontab
-
0 4 * * * root /opt/gitlab/bin/gitlab-rake gitlab:backup:create CRON=1
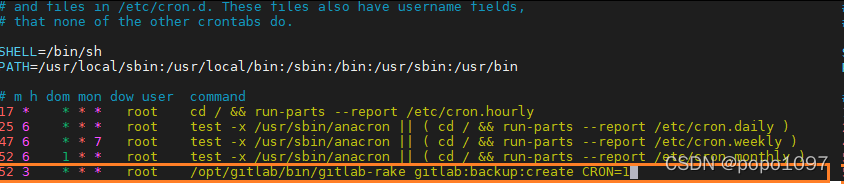
然后重启crontab服务,如下:
systemctl restart crond

1.6 保留部分备份文件
-
随着时间的推移gitlab备份文件越来越多,服务器的磁盘空间也不够大。
-
此时我们就要删除部分旧的备份文件,gitlab也提供了删除旧的备份文件功能。
-
该功能在gitlab的配置文件中,进行配置即可。
-
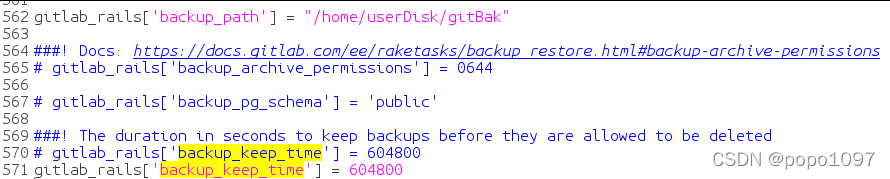
在此以保留7天之前的备份文件为例,如下:
-
/etc/gitlab/gitlab.rb
-
_rails[‘backup_keep_time’] = 604800
-
其中backup_keep_time是以秒为单位进行计算的,
-
执行命令gitlab-ctl reconfigure即可。
二、gitlab仓库恢复
-
要验证gitlab备份的有效性,我们可以把该备份文件复制到已经安装好gitlab服务器的/var/opt/gitlab/backups/目录下。
-
然后进行数据恢复,最后访问并查看其数据完整性即可。
-
通过gitlab备份文件可以恢复gitlab所有的信息,包括仓库、数据库、用户、用户组、用户密钥、权限等信息。
-
:新服务器上的gitlab的版本号必须与创建备份时的gitlab版本号相同。
-
数据恢复比较简单,具体步骤如下:
Copy
2.1 停止相关数据连接服务
在gitlab服务器上停止相关数据连接服务,命令如下:
停止gitlab数据服务
gitlab-ctl stop unicorn
gitlab-ctl stop sidekiq
2.2 恢复gitlab仓库
进入/var/opt/gitlab/backups
现在我们要从1537261122_2018_09_18_9.2.5这个备份编号中,恢复数据,命令如下:
gitlab-rake gitlab:backup:restore BACKUP=1537261122_2018_09_18_9.2.5
gitlab-rake gitlab:backup:restore BACKUP=1546916920_2019_01_08_10.5.1恢复数据
如果出现多个done的信息,说明整个gitlab数据就已经正常恢复完毕。
2.3 启动gitlab服务
恢复完毕以后,我们现在来启动gitlab,使用以下命令:
gitlab-ctl start
强烈建议:重启该新服务器。
三、References:
gitlab的备份与恢复
三、gitlab迁移
迁移的整体思路是:
1、在新服务器上安装相同版本的gitlab
2、将备份生成的备份文件发送到新服务器的相同目录下
这里在10.0.0.6的机器上安装了相同版本的gitlab并能正常运行使用
在老服务器上将备份文件发送至新服务器的相应目录下
[root@gitlab ~]# scp /var/opt/gitlab/backups/1530156812_2018_06_28_10.8.4_gitlab_backup.tar root@10.0.0.6:/var/opt/gitlab/backups/
四、gitlab恢复
[root@gitlab ~]# gitlab-ctl stop unicorn #停止相关数据连接服务
[root@gitlab ~]# gitlab-ctl stop sidekiq
[root@gitlab-new ~]# chmod 777 /var/opt/gitlab/backups/1530156812_2018_06_28_10.8.4_gitlab_backup.tar
#修改权限,如果是从本服务器恢复可以不修改
[root@gitlab ~]# gitlab-rake gitlab:backup:restore BACKUP=1530156812_2018_06_28_10.8.4
#从1530156812_2018_06_28_10.8.4编号备份中恢复
按照提示输入两次yes并回车

[root@gitlab ~]# gitlab-ctl start #启动gitlab
浏览器访问新服务器的地址进行查看,迁移成功

在实际情况中访问gitlab可能是用域名访问,我们可以修改gitlab配置文件中的url再进行备份,这样就不会影响迁移过程,恢复完成后需要进行的只是修改域名对应的dns解析ip地址
五、gitlab升级
[root@gitlab ~]# gitlab-ctl stop #关闭gitlab服务
[root@gitlab ~]# gitlab-rake gitlab:backup:create #备份
下载新版gitlab的rpm包安装,安装时选择升级
安装的过程中可能会出现报错
Error executing action `run` on resource 'ruby_block[directory resource: /var/opt/gitlab/git-data/repositories]'
解决方法为
[root@gitlab ~]# chmod 2770 /var/opt/gitlab/git-data/repositories
安装成功后重新加载配置并启动
[root@gitlab ~]# gitlab-ctl reconfigure
[root@gitlab ~]# gitlab-ctl restart
六、gitlab更改默认的nginx
[root@gitlab ~]# vim /etc/gitlab/gitlab.rb
nginx['enable'] = false #不启用nginx
检查默认nginx配置文件,并迁移至新Nginx服务
/var/opt/gitlab/nginx/conf/nginx.conf #nginx配置文件,包含gitlab-http.conf文件
/var/opt/gitlab/nginx/conf/gitlab-http.conf #gitlab核心nginx配置文件
重启 nginx、gitlab服务
[root@gitlab ~]# gitlab-ctl restart
[root@gitlab ~]# systemctl restart nginx.service
访问可能出现报502。原因是nginx用户无法访问gitlab用户的socket文件。 重启gitlab需要重新授权
[root@gitlab ~]# chmod -R o+x /var/opt/gitlab/gitlab-rails
=======================================================================================
GitLab备份
配置备份信息
gitlab配置文件/etc/gitlab/gitlab.rb:
gitlab_rails['manage_backup_path'] = true
gitlab_rails['backup_path'] = "/var/opt/gitlab/backups"      # 备份文件存放目录
gitlab_rails['backup_archive_permissions'] = 0644      # 备份文件权限
gitlab_rails['backup_keep_time'] = 604800      # 默认备份保留天数为7天(单位秒)
注意:如果备份目录不存在需要提前创建并授权gitlab访问
修改完配置文件后进行重载:
$ gitlab-ctl reconfigure
gitlab的备份
手动使用以下命令进行备份:
$ gitlab-rake gitlab:backup:create
输出如下内容:
...
2022-09-02 11:31:56 +0800 -- Dumping lfs objects ...
2022-09-02 11:31:56 +0800 -- done
2022-09-02 11:31:56 +0800 -- Dumping terraform states ...
2022-09-02 11:31:56 +0800 -- done
2022-09-02 11:31:56 +0800 -- Dumping container registry images ...
2022-09-02 11:31:56 +0800 -- [DISABLED]
2022-09-02 11:31:56 +0800 -- Dumping packages ...
2022-09-02 11:31:56 +0800 -- done
Creating backup archive: 1662089478_2022_09_02_14.9.3_gitlab_backup.tar ... done
Uploading backup archive to remote storage  ... skipped
Deleting tmp directories ... done
done
done
done
done
done
done
done
done
done
Deleting old backups ... done. (2 removed)
Warning: Your gitlab.rb and gitlab-secrets.json files contain sensitive data
and are not included in this backup. You will need these files to restore a backup.
Please back them up manually.
Backup task is done.
注意:输出最后有个警告,gitlab.rb和gitlab-secrets.json两个文件中包含敏感数据,需要手动备份。
执行完后查看备份目录下的备份文件:
[root@master_host backups]# ll -h
总用量 5.2G
-rw-r--r-- 1 git git 5.2G 9月   2 11:32 1662089478_2022_09_02_14.9.3_gitlab_backup.tar
以上需要手动执行命令进行备份,可以依靠Jenkins或crontab进行每天定时备份;
gitlab备份恢复
注意:gitlab只能把备份还原到相同版本的gitlab上。
停止相关数据连接服务
$ gitlab-ctl stop unicorn
$ gitlab-ctl stop sidekiq
$ gitlab-ctl stop nginx
查看gitlab状态
$ gitlab-ctl status
通过之前的备份文件进行恢复
$ gitlab-rake gitlab:backup:restore BACKUP=/var/opt/gitlab/backups/1662089478_2022_09_02_14.9.3
注意:gitlab的恢复操作会先将当前所有的数据清空后,再根据备份数据进行回复。
如果是在其他机器上进行恢复,需要将gitlab.rb和gitlab-secrets.json两个文件复制到相应目录下。
重新加载配置文件
$ gitlab-ctl reconfigure
重启gitlab
$ gitlab-ctl restart
查看gitlab 状态
$ gitlab-ctl status
检查恢复情况
$ gitlab-rake gitlab:check SANITIZE=true
恢复完成 。