IdentityServer4:简化(隐式)模式
IdentityServer4:简化(隐式)模式
简化(隐式)模式流程是:
用户从客户端跳转到认证服务器,然后输入用户名和密码, 密码验证通过后,进入授权界面,选择授权范围,最后同意后才跳转回客户端页面。而在返回的跳转Url链接中包含了:id_token 和 access_token, 客户端就是从这个返回的Url中提取到 access_token。
故:简化(隐式)模式模式比较适用于纯前端项目、微信开发等,比如前后端分离的项目中的 Vue、Angual、Rect 纯前端项目。
Api 资源项目
创建项目
打开 VS,创建一个“AspNet Core WebApi” 项目, 名为:Dotnet.WebApi.Ids4.CustomerApi
依赖包
添加依赖包
<PackageReference Include="Microsoft.AspNetCore.Authentication.JwtBearer" Version="7.0.3" />
添加认证方案
修改 Program.cs 为如下代码:
using Microsoft.AspNetCore.Authentication.JwtBearer;

namespace Dotnet.WebApi.Ids4.CustomerApi
{
    public class Program
    {
        public static void Main(string[] args)
        {
            Console.Title = "CustomerAPI服务器";

            var builder = WebApplication.CreateBuilder(args);

            builder.Services.AddControllers();

            builder.Services.AddAuthentication(JwtBearerDefaults.AuthenticationScheme)
                .AddJwtBearer(options =>
                {
                    //IdentityServer4地址
                    options.Authority = "https://localhost:6001";
                    //认证的ApiResource名称
                    options.Audience = "CustomerAPIResource";
                    //使用JWT认证类型
                    options.TokenValidationParameters.ValidTypes = new[] { "at+jwt" };
                });

            //配置跨域。
            builder.Services.AddCors(options =>
            {
                options.AddPolicy("AppCors", policy => policy.WithOrigins("https://localhost:6021")
                        .AllowAnyHeader()
                        .AllowAnyMethod()
                        .AllowCredentials()
                );
            });

            builder.Services.AddEndpointsApiExplorer();
            builder.Services.AddSwaggerGen();

            var app = builder.Build();

            // Configure the HTTP request pipeline.
            if (app.Environment.IsDevelopment())
            {
                app.UseSwagger();
                app.UseSwaggerUI();
            }

            app.Urls.Add("https://*:6011");
            app.UseHttpsRedirection();
            //启用跨域中间件
            app.UseCors("AppCors");
            //身份验证
            app.UseAuthentication();
            //授权
            app.UseAuthorization();

            app.MapControllers();

            app.Run();
        }
    }
}
其中,
(1)添加 JWT 认证:
            builder.Services.AddAuthentication(JwtBearerDefaults.AuthenticationScheme)
                .AddJwtBearer(options =>
                {
                    //IdentityServer4地址
                    options.Authority = "https://localhost:6001";
                    //认证的ApiResource名称
                    options.Audience = "CustomerAPIResource";
                    //使用JWT认证类型
                    options.TokenValidationParameters.ValidTypes = new[] { "at+jwt" };
                });
https://localhost:6001 是认证服务器地址。
(2) 纯前端项目存在跨域问题,故这里资源服务器为纯前端项目提供跨域支持。
            //配置跨域。
            builder.Services.AddCors(options =>
            {
                options.AddPolicy("AppCors", policy => policy.WithOrigins("https://localhost:6021")
                        .AllowAnyHeader()
                        .AllowAnyMethod()
                        .AllowCredentials()
                );
            });
           app.UseCors("AppCors");
这里,我们先假设纯前端项目的地址为:https://localhost:6021
添加 Api
新增文件:Controllers/CustomerController.cs
using Microsoft.AspNetCore.Authorization;
using Microsoft.AspNetCore.Http;
using Microsoft.AspNetCore.Mvc;

namespace Dotnet.WebApi.Ids4.CustomerApi.Controllers
{
    [Authorize]
    [Route("api/[controller]")]
    [ApiController]
    public class CustomerController : ControllerBase
    {
        /// <summary>
        /// 获取客户信息列表。
        /// </summary>
        /// <returns></returns>
        [HttpGet("GetList")]
        public IEnumerable<Customer> GetList()
        {
            return new List<Customer>
            {
                new Customer{ Id=1, Name="客户1", Phone="电话1"},
                new Customer{ Id=2, Name="客户2", Phone="电话2"},
                new Customer{ Id=3, Name="客户3", Phone="电话3"},
            };
        }
    }
}
其中:
(1)在控制器上添加特性:[Authorize],这样只有登录用户才能访问,这样就起到保护了Api资源的目的。
Customer.cs
namespace Dotnet.WebApi.Ids4.CustomerApi
{
    /// <summary>
    /// 客户实体模型
    /// </summary>
    public class Customer
    {
        public int Id { get; set; }
        public string? Name { get; set; }
        public string? Phone { get; set; }
    }
}
认证服务器
创建项目
打开 VS,创建一个“AspNet Core 空” 项目,名为:Dotnet.WebApi.Ids4.AuthService
依赖包
添加依赖包
<PackageReference Include="IdentityServer4" Version="4.1.2" />
配置 IdentityServer4
创建文件:IdentityConfig.cs,添加如下代码:
using IdentityModel;
using IdentityServer4;
using IdentityServer4.Models;
using IdentityServer4.Test;
using System.Security.Claims;

namespace Dotnet.WebApi.Ids4.AuthService
{
    public static class IdentityConfig
    {
        /// <summary>
        /// 配置IdentityResource。
        /// </summary>
        /// <returns></returns>
        public static IEnumerable<IdentityResource> GetIdentityResources()
        {
            return new List<IdentityResource> {
                new IdentityResources.OpenId(),
                new IdentityResources.Profile()
            };
        }

        /// <summary>
        /// 配置API作用域。
        /// </summary>
        /// <returns></returns>
        public static IEnumerable<ApiScope> GetApiScopes()
        {
            return new List<ApiScope>
            {
                //客户相关API作用域
                new ApiScope("Customer.Read","读取客户信息。"),
                new ApiScope("Customer.Add","添加客户信息。"),

                //共享API作用域
                new ApiScope("News","新闻信息。")
            };
        }

        /// <summary>
        /// 配置ApiResource。
        /// </summary>
        /// <returns></returns>
        public static IEnumerable<ApiResource> GetApiResources()
        {
            //将多个具体的APIScope归为一个ApiResource。
            return new List<ApiResource>()
            {
                new ApiResource("CustomerAPIResource", "客户资源")
                {
                    Scopes={ "Customer.Read", "Customer.Add", "News" }
                }
            };
        }

        /// <summary>
        /// 配置客户端应用。
        /// </summary>
        /// <returns></returns>
        public static IEnumerable<Client> GetClients()
        {
            #region 简化(隐式)模式

            return new List<Client>
            {
                new Client
                {
                    //客户端ID。
                    ClientId="WebClient",
                    //客户端名称。
                    ClientName="Web客户端",
                    //授权模式为Implicit,表示简化授权模式。
                    AllowedGrantTypes=GrantTypes.Implicit,
                    //授权操作页面支持,为true表示显示授权界面,否则不显示。
                    RequireConsent=true,
                    //身份认证成功之后重定向到客户端的回调地址。
                    RedirectUris={ "https://localhost:6021/callback.html"},
                    //退出时重定向到客户端的地址。
                    PostLogoutRedirectUris={"https://localhost:6021/home.html"},
                    //允许跨域操作,设置允许跨域的客户端地址。
                    AllowedCorsOrigins={"https://localhost:6021"},
                    //允许浏览器传递AccessToken。
                    AllowAccessTokensViaBrowser=true,
                    //设置AccessToken能访问的作用域。
                    AllowedScopes={
                        IdentityServerConstants.StandardScopes.OpenId,
                        IdentityServerConstants.StandardScopes.Profile,
                        "Customer.Read" ,//可访问的API。
                    }
                }
            };

            #endregion
        }

        /// <summary>
        /// 配置用户。
        /// </summary>
        /// <returns></returns>
        public static List<TestUser> GetUsers()
        {

            #region 简化模式

            return new List<TestUser>
            {
                new TestUser
                {
                        SubjectId="00001",
                        Username="Kevin",
                        Password="123456",
                        //添加声明信息
                        Claims =
                        {
                            new Claim(JwtClaimTypes.Name, "Kevin"),
                            new Claim(JwtClaimTypes.GivenName, "Mi"),
                            new Claim(JwtClaimTypes.FamilyName, "Kala"),
                            new Claim(JwtClaimTypes.Email, "Kevin@donet.com"),
                            new Claim(JwtClaimTypes.EmailVerified, "true", ClaimValueTypes.Boolean)
                    }
                }
            };

            #endregion
        }

    }
}
代码解析:
(1)简化模式通过在客户端和认证服务器往返的URL来传递数据,使用了 Openid Connect 协议,故得在IdentityServer中配置 Openid 信息, 这是简化模式必须得添加的:
        /// <summary>
        /// 配置IdentityResource。
        /// </summary>
        /// <returns></returns>
        public static IEnumerable<IdentityResource> GetIdentityResources()
        {
            return new List<IdentityResource> {
                new IdentityResources.OpenId(),
            };
        }
如果需要客户端要求能获取到用户信息,还得添加new IdentityResources.Profile(), 如下所示:
        public static IEnumerable<IdentityResource> GetIdentityResources()
        {
            return new List<IdentityResource> {
                new IdentityResources.OpenId(),
+               new IdentityResources.Profile()
            };
        }
(2)如下代码添加了 Client,并将其授权模式设置为:简化模式, 并设置密码,和 Scope:
                new Client
                {
                    //客户端ID。
                    ClientId="WebClient",
                    //客户端名称。
                    ClientName="Web客户端",
                    //授权模式为Implicit,表示简化授权模式。
                    AllowedGrantTypes=GrantTypes.Implicit,
                    //授权操作页面支持,为true表示显示授权界面,否则不显示。
                    RequireConsent=true,
                    //身份认证成功之后重定向到客户端的回调地址。
                    RedirectUris={ "https://localhost:6021/callback.html"},
                    //退出时重定向到客户端的地址。
                    PostLogoutRedirectUris={"https://localhost:6021/home.html"},
                    //允许跨域操作,设置允许跨域的客户端地址。
                    AllowedCorsOrigins={"https://localhost:6021"},
                    //允许浏览器传递AccessToken。
                    AllowAccessTokensViaBrowser=true,
                    //设置AccessToken能访问的作用域。
                    AllowedScopes={
                        IdentityServerConstants.StandardScopes.OpenId,
                        IdentityServerConstants.StandardScopes.Profile,
                        "Customer.Read" ,//可访问的API。
                    }
                }
其中:
(1)设置授权模式:AllowedGrantTypes=GrantTypes.Implicit
(2)身份认证成功之后重定向到客户端的回调地址: RedirectUris={ "https://localhost:6021/callback.html"},
(3)退出时重定向到客户端的地址:PostLogoutRedirectUris={"https://localhost:6021/home.html"},
(4)跨域支持: AllowedCorsOrigins={"https://localhost:6021"},
(5)设置Scope:AllowedScopes = { ... }
(3) 添加用户:因为简化模式需要用户参与,故得添加用户;
            return new List<TestUser>
            {
                new TestUser
                {
                        SubjectId="00001",
                        Username="Kevin",
                        Password="123456",
                        //添加声明信息
                        Claims =
                        {
                            new Claim(JwtClaimTypes.Name, "Kevin"),
                            new Claim(JwtClaimTypes.GivenName, "Mi"),
                            new Claim(JwtClaimTypes.FamilyName, "Kala"),
                            new Claim(JwtClaimTypes.Email, "Kevin@donet.com"),
                            new Claim(JwtClaimTypes.EmailVerified, "true", ClaimValueTypes.Boolean)
                    }
                }
            };
集成 IdentityServer4
添加 IdentityServer4的Quickstart UI
因为简化(隐式)模式流程是:
用户从客户端跳转到认证服务器,然后输入用户名和密码, 密码验证通过后,进入授权界面,选择授权范围,最后同意后才跳转回客户端页面。
在返回的跳转链接中包含了:id_token 和 access_token, 客户端就是从这个返回的Url中提取到 access_token。
从以上过程可以看到,IdentityServer4 认证服务器得有一个界面,好在已经一个开源项目:Quickstart UI,可以直接用即可。
下载 Quickstart UI:https://github.com/IdentityServer/IdentityServer4.Quickstart.UI,
然后把 Quickstart、Views、wwwroot 三个文件夹复制到 Dotnet.WebApi.Ids4.AuthService 项目根目录下。
由于 Quickstart UI 使用了 AspNet Core 的 MVC 框架,所以得在 Program.cs 开启 MVC 框架:
           //注册MVC服务。
            builder.Services.AddControllersWithViews();
            ......
            //终结点
            app.MapControllerRoute(
                name: "default",
                pattern: "{controller=Home}/{action=Index}/{id?}");
Program.cs
修改 Program.cs 为如下代码:
namespace Dotnet.WebApi.Ids4.AuthService
{
    public class Program
    {
        public static void Main(string[] args)
        {
            Console.Title = "认证和授权服务器";

            var builder = WebApplication.CreateBuilder(args);

            //注册MVC服务。
            builder.Services.AddControllersWithViews();

            //注册IdentityServer4组件
            builder.Services.AddIdentityServer()
                .AddInMemoryIdentityResources(IdentityConfig.GetIdentityResources())
                .AddInMemoryApiScopes(IdentityConfig.GetApiScopes())
                .AddInMemoryApiResources(IdentityConfig.GetApiResources())
                .AddInMemoryClients(IdentityConfig.GetClients())
                .AddTestUsers(IdentityConfig.GetUsers())
                .AddDeveloperSigningCredential(); // 添加临时内存中的证书

            var app = builder.Build();
            //修改端口号
            app.Urls.Add("https://*:6001");

            //启用静态文件
            app.UseStaticFiles();
            //启用HTTPS转向
            app.UseHttpsRedirection();
            //启用路由
            app.UseRouting();
            //添加IDS4中间件。
            //在浏览器中输入如下地址访问 IdentityServer4 的发现文档:https://localhost:6001/.well-known/openid-configuration
            app.UseIdentityServer();

            //授权
            app.UseAuthorization();

            //终结点
            app.MapControllerRoute(
                name: "default",
                pattern: "{controller=Home}/{action=Index}/{id?}");

            app.Run();
        }
    }
}
其中,app.Urls.Add("https://*:6001"); 设置认证服务器的监听端口为:6001
简化(隐式)模式客户端
创建项目
创建一个 “AspNet Core 空项目”,名为:Dotnet.WebApi.ImplicitClient。这个项目没用到 AspNet Core 的任何功能,仅仅只是作为一个静态文件站点,即:一个纯前端项目。
添加 JS 库
创建"wwwroot"文件夹,然后选择该文件夹,右键【添加/客户端库】,添加bootract.min.css、jquery.min.js、 oidc-client.js文件。
其中:oidc-client.js库用来处理 Openid connect 登录、获取保存AccesssToken、登出等功能。
创建页面:home.html
<!DOCTYPE html>
<html>
<head>
    <meta charset="utf-8" />
    <title>简化(隐式)模式 - Web客户端</title>
    <link href="/bootstrap/css/bootstrap.css" rel="stylesheet" />
    <script src="jquery/jquery.js"></script>
    <script src="oidc-client/oidc-client.js"></script>
</head>
<body>
    <div style="margin:20px;">
        <input type="button" class="btn btn-primary" onclick="login()" value="登录" />
        <input type="button" class="btn btn-primary" onclick="CallApi()" value="调用API" />
        <input type="button" class="btn btn-primary" onclick="Signout()" value="退出" />
    </div>
    <div id="apiData" style="margin:20px;"></div>
    <script>
       //客户端配置。
        this.config = {
            authority: "https://localhost:6001",
            client_id: "WebClient",
            redirect_uri: "https://localhost:6021/callback.html",
            response_type: "id_token token",
            scope: "openid profile Customer.Read", //访问权限范围。
            post_logout_redirect_uri: "https://localhost:6021/home.html",
        };
        //根据配置信息创建用户管理对象。
        this.userManager = new Oidc.UserManager(this.config);
        //登录
        function login() {
            //跳转到IDS4的登录页面。
            this.userManager.signinRedirect();
            this.userManager.getUser().then(function (user) {
                if (user) { //如果登录,在浏览器控制台输出用户信息。
                    console.log(user.profile)
                } else { //如果未登录,则提示请登录。
                    console.log("请登录");
                }
            });
        }
        //调用API
        function CallApi() {
            var that = this;
            //登录成功之后有了access_token,就可以调用API资源服务器上的API了。
            this.userManager.getUser().then(function (user) {
                //要调用的API资源URL地址。
                var url = 'https://localhost:6011/api/customer/getlist';
                var r = '';
                $.ajax({
                    type: 'get',
                    contentType: 'application/json',
                    url: url,
                    beforeSend: function (xhr) {
                        //获取Token
                        var accessToken = user.access_token;
                        //使用Token请求资源
                        xhr.setRequestHeader('Authorization', 'Bearer ' + accessToken);
                    },
                    //获取的数据[{},{},{}]
                    success: function (data) {
                        $.each(data, function (n, value) {
                            r += "<p>ID:" + value.id + "</p>" +
                                "<p>Name:" + value.name + "</p>" +
                                "<p>Phone:" + value.phone + "</p>";
                            $("#apiData").html(r);
                        });
                    },
                    error: function (xhr) {
                        console.log(xhr.statusCode);
                    }
                })
            });
        }
        //退出
        function Signout() {
            this.userManager.signoutRedirect();
        }</script>
</body>
</html>
创建页面:callback.html
<!DOCTYPE html>
<html>
<head>
    <meta charset="utf-8" />
    <title>回调页面</title>
    <script src="jquery/jquery.js"></script>
    <script src="oidc-client/oidc-client.js"></script>
</head>
<body>
    <h3>这是回调页面。</h3>
    <script>//获取回调后的用户信息。
        new Oidc.UserManager().signinRedirectCallback().then(function (user) {
            console.log(user);
            var u = "<p>AccessToken:" + user.access_token + "</p>" +
                "<p>IdToken:" + user.id_token + "</p>" +
                "<p>Scope:" + user.scope + "</p>" +
                "<p>SessionState:" + user.session_state + "</p>" +
                "<p>UserName:" + user.profile.name + "</p>";
            $("#userInfo").html(u);
        }).catch(function (e) {
            console.log(e);
        });</script>
    <h3>从服务器拿来的信息如下:</h3>
    <div id="userInfo"></div>
    <hr />
    <div>
        <a href="home.html">回到首页</a>
    </div>
</body>
</html>
Program.cs
将 Program.cs 的代码修改为;
namespace Dotnet.WebApi.ImplicitClient
{
    public class Program
    {
        public static void Main(string[] args)
        {
            var builder = WebApplication.CreateBuilder(args);
            var app = builder.Build();

            app.Urls.Add("https://*:6021");
            //启用静态文件
            app.UseStaticFiles();

            app.Run();
        }
    }
}
只是启用静态文件中间件,作为一个纯前端客户端。
运行结果
访问客户端主页:https://localhost:6021/home.html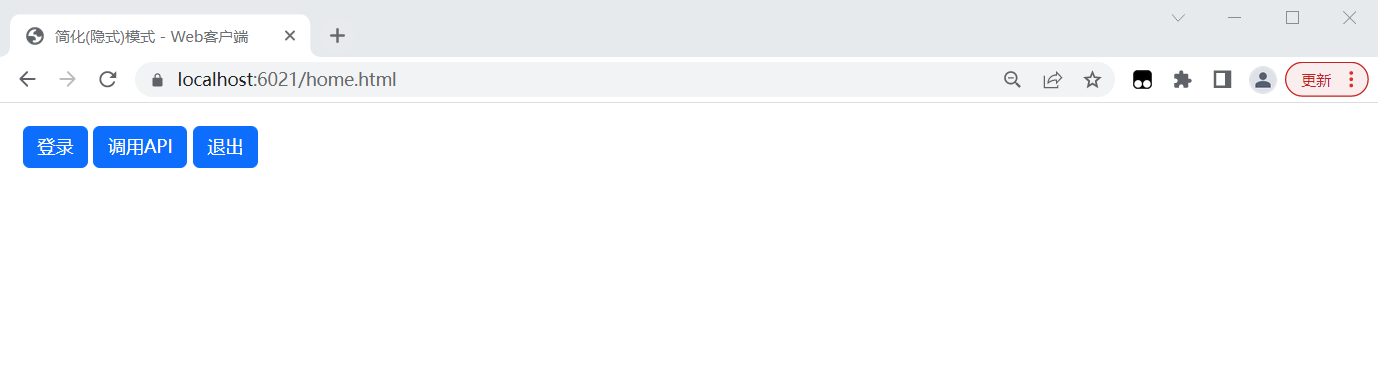
点击【登录】按钮,跳转到 IdentityServer4 认证服务器,
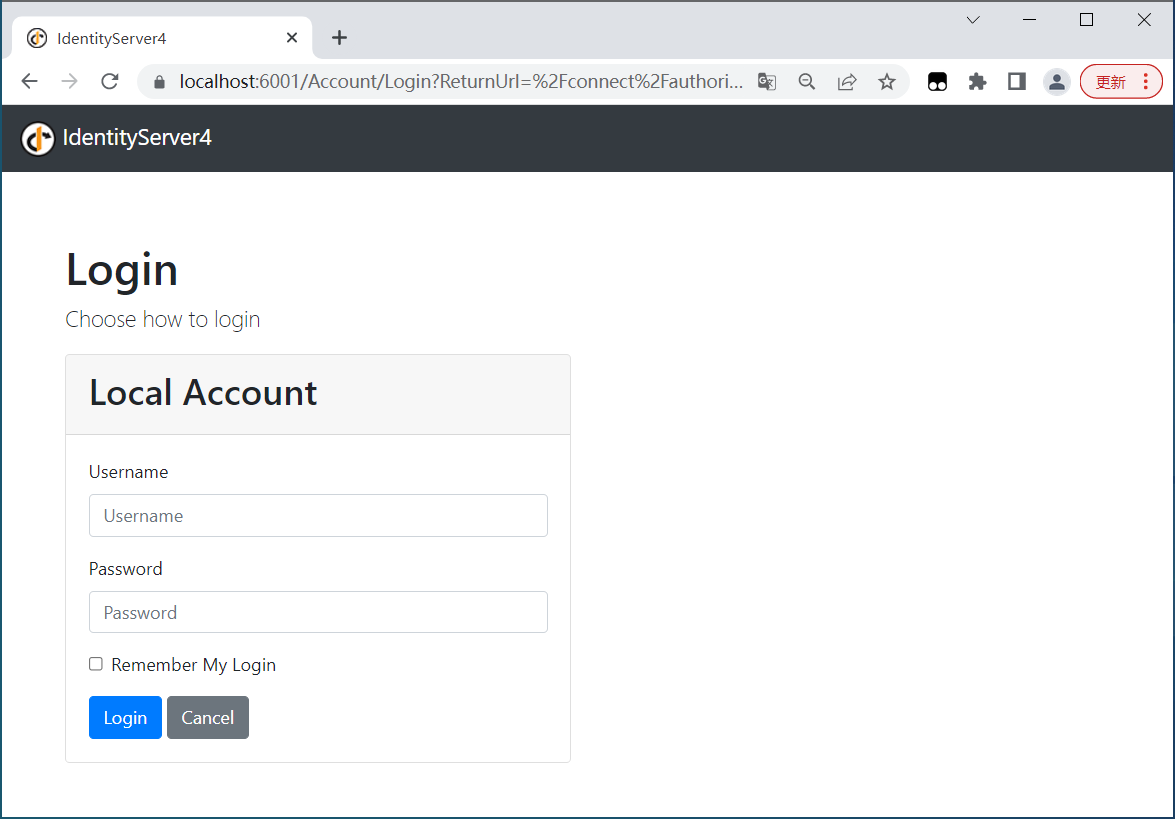
此时的 Url 为:
https://localhost:6001/Account/Login?ReturnUrl=/connect/authorize/callback?client_id=WebClient&redirect_uri=https://localhost:6021/callback.html&response_type=id_token token&scope=openid profile Customer.Read&state=0f388a11a35d484382298f04064f6f4c&nonce=cbee67183fb84a2b9546880028f51af8
Url中包含了 OAuth2.0 协议的简化(隐式)模式规定的相关参数,比如:
- ReturnUrl=/connect/authorize/callback
- client_id=WebClient
- redirect_uri=https://localhost:6021/callback.html
- response_type=id_token token
- scope=openid profile Customer.Read
- state=0f388a11a35d484382298f04064f6f4c&nonce=cbee67183fb84a2b9546880028f51af8
输入用户名和密码,点击登录:
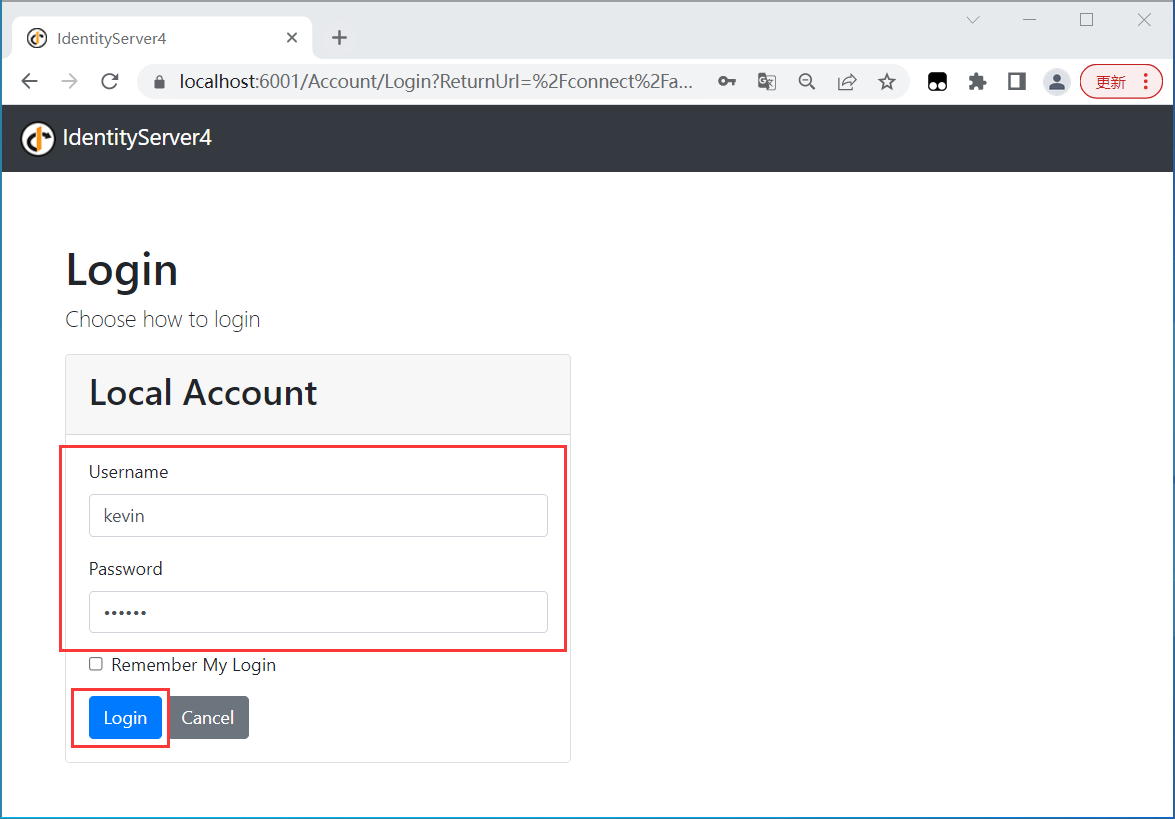
然后跳转到授权页面:
https://localhost:6001/consent?returnUrl=/connect/authorize/callback?client_id=WebClient&redirect_uri=https://localhost:6021/callback.html&response_type=id_token token&scope=openid profile Customer.Read&state=0f388a11a35d484382298f04064f6f4c&nonce=cbee67183fb84a2b9546880028f51af8

点击【Yes, Allow】进行授权。
授权成功后,返回客户端页面,返回的Url为:
https://localhost:6021/callback.html#id_token=eyJhbGciOiJSUzI1NiIsImtpZCI6IkJBRUUyOEI1NkFDNTFFMjI0RTgxQjE0OTI2RTU5REEwIiwidHlwIjoiSldUIn0.eyJuYmYiOjE2NzgzNTI4MDUsImV4cCI6MTY3ODM1MzEwNSwiaXNzIjoiaHR0cHM6Ly9sb2NhbGhvc3Q6NjAwMSIsImF1ZCI6IldlYkNsaWVudCIsIm5vbmNlIjoiY2JlZTY3MTgzZmI4NGEyYjk1NDY4ODAwMjhmNTFhZjgiLCJpYXQiOjE2NzgzNTI4MDUsImF0X2hhc2giOiJUbWlOUVBLMDhza0c1TzBlSm1XeTlnIiwic19oYXNoIjoiNS1xT2ZoRkJlSmFYVzVCZFhIV3VfQSIsInNpZCI6IkU0RkIwRjNDNTA2RDNFNTRGRkM2M0EyN0Q1ODE0MDU0Iiwic3ViIjoiMDAwMDEiLCJhdXRoX3RpbWUiOjE2NzgzNTI1NDMsImlkcCI6ImxvY2FsIiwiYW1yIjpbInB3ZCJdfQ.YkOxIOtlkYfjumDIo5ZxrbQaMmESWsi5Fm_VllWIXz6ICKoTAlV5JYG-rbDx-ECXUzkJIQSBrMN2s3c9-n7nQ4cs8McV5cC3SZ0AQpLMYAdm3BPKW9iNudryGgiQSnBr-P6DLx-LGuKpeezuC-WRjOpA-kumkBDoOTZHzkCeFCtwWWu6m5EV-bc7FtRwFGFFENsnjvprmczuRc7fsQUL8_57YOxKAGWV9OCAYxuGkpT0dkKWANyLvi8oYJW25hzu4rGOC486J03_xBskWm4QydV7ZXKndUUz910f1d0nioHisud8Ff1B_hOOqn6vb9NfLy77Vpqqo6AlZ5quzn8P0w&access_token=eyJhbGciOiJSUzI1NiIsImtpZCI6IkJBRUUyOEI1NkFDNTFFMjI0RTgxQjE0OTI2RTU5REEwIiwidHlwIjoiYXQrand0In0.eyJuYmYiOjE2NzgzNTI4MDUsImV4cCI6MTY3ODM1NjQwNSwiaXNzIjoiaHR0cHM6Ly9sb2NhbGhvc3Q6NjAwMSIsImF1ZCI6IkN1c3RvbWVyQVBJUmVzb3VyY2UiLCJjbGllbnRfaWQiOiJXZWJDbGllbnQiLCJzdWIiOiIwMDAwMSIsImF1dGhfdGltZSI6MTY3ODM1MjU0MywiaWRwIjoibG9jYWwiLCJqdGkiOiJCNDVCNzkwRjE2N0EzQzIwRERGQjk0MThEQzRBQUY1MiIsInNpZCI6IkU0RkIwRjNDNTA2RDNFNTRGRkM2M0EyN0Q1ODE0MDU0IiwiaWF0IjoxNjc4MzUyODA1LCJzY29wZSI6WyJvcGVuaWQiLCJwcm9maWxlIiwiQ3VzdG9tZXIuUmVhZCJdLCJhbXIiOlsicHdkIl19.OuOX-T10L0bKLOgWFMrVobzHFW4I-Qnvn-3jwV70ECQNKCKd3Bx3dN4_xgf4G4wox7gE2iXMVnOPPvllNYPPxyBaHj9lve3GiAng8EKGFVWe5sbvJAu_HPdPT0I0LmckTShNDi6HgBlevmTPzROLH_7bGg3jTpwQRBuZhJgaWxE29Fbqw6CynZTI22hsthPK0m66XGSz8o8ilpscFa04e6fxvvl-lmKK9O1mZzTBSi1DLbFsHAo1fMwgp5aMEcM7tAx5oSveJT7-lQIm7LSY6ZXz24sAcmZNEtJsdbzrOnpaK855ccE4IrHRRk18Spfy0haVKPC-hhLhbdyIZ_VnVA&token_type=Bearer&expires_in=3600&scope=openid profile Customer.Read&state=0f388a11a35d484382298f04064f6f4c&session_state=MmClIQIFgr0c_5qWPakrECkXpxGEHmghpjm_Z3mMibY.BF41E23BC65E6DC036F72B546E70122F
我们可以看到:返回的Url中包含了Openid Connect 协议和 OAuth2.0 协议的相关参数,比如:
- id_token=eyJhbGciOiJ...
- access_token=yJhbGciOi...
- token_type=Bearer
- scope=openid profile Customer.Read
- expires_in=3600
- state=0f388a11a35d484382298f04064f6f4c
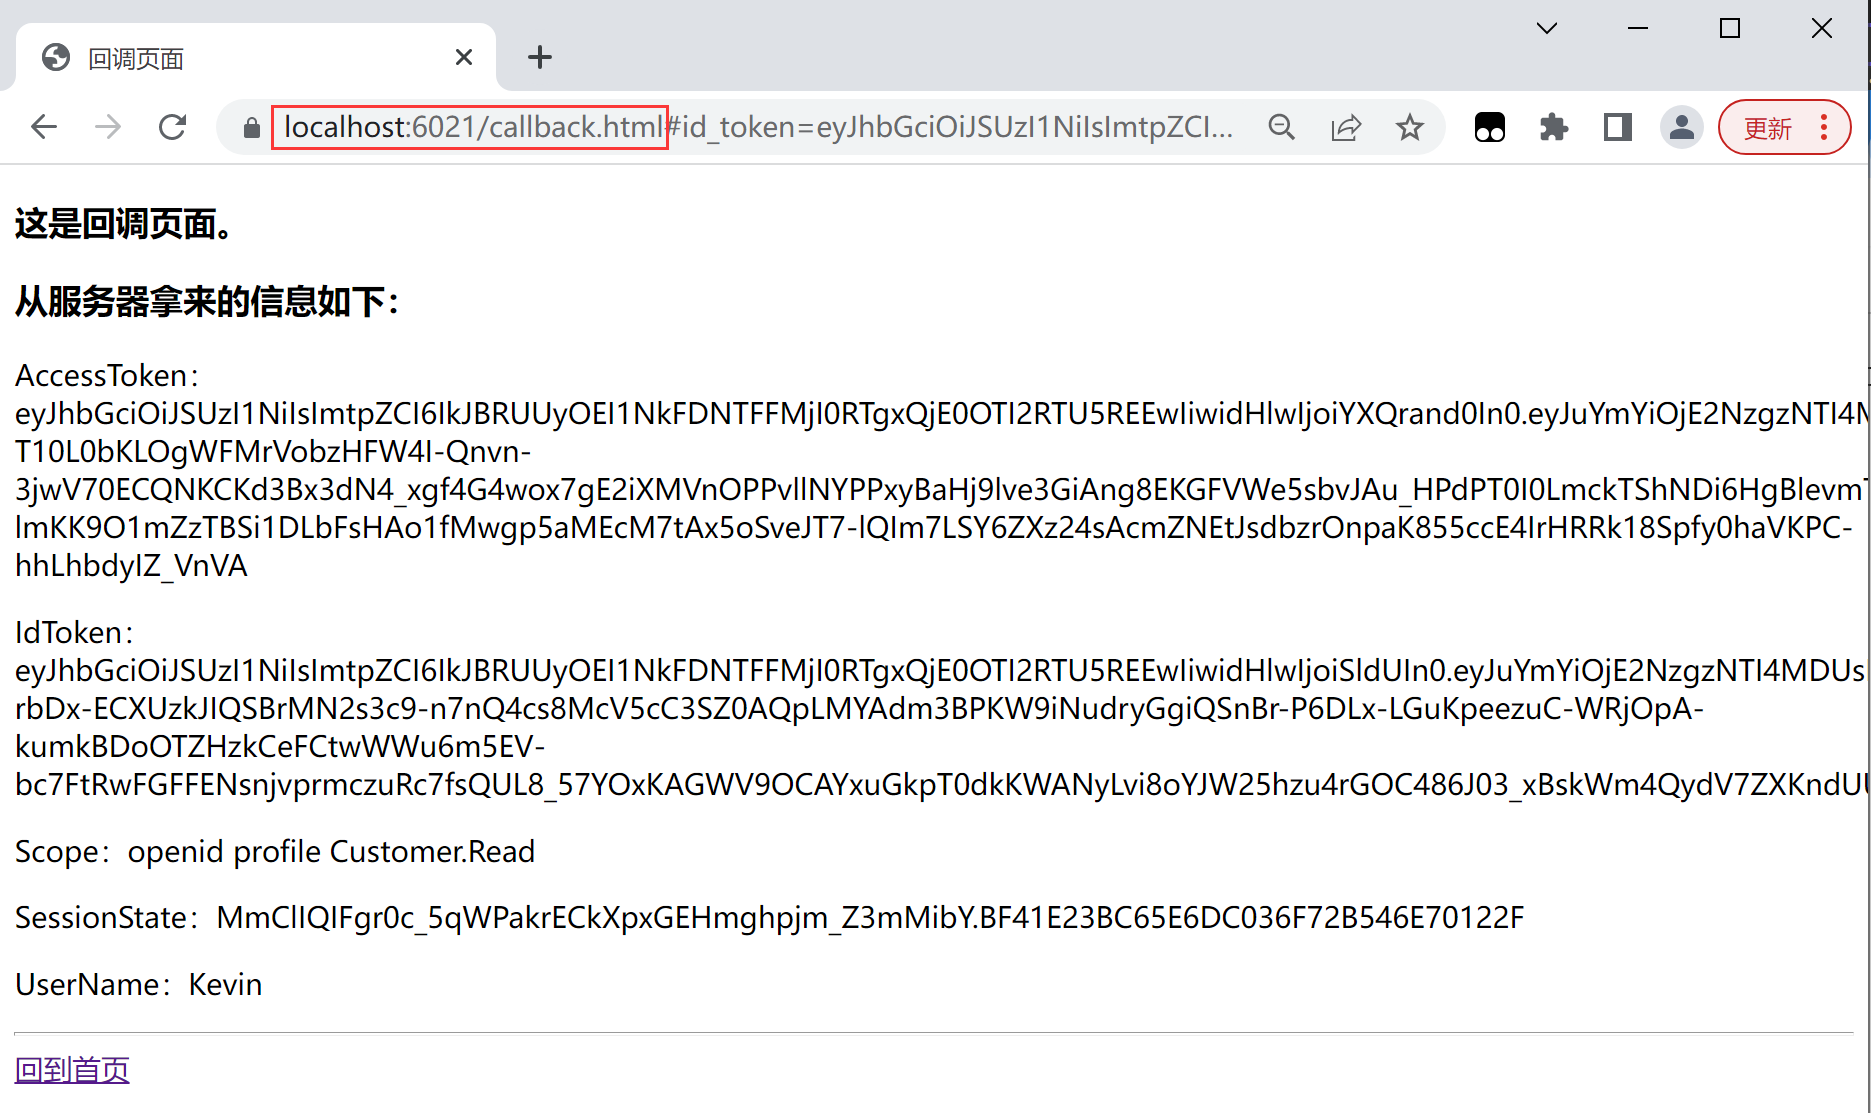
最后返回到主页,点击【调用API】按钮,我们可以看到通过 AccessToken 访问资源服务受保护的数据: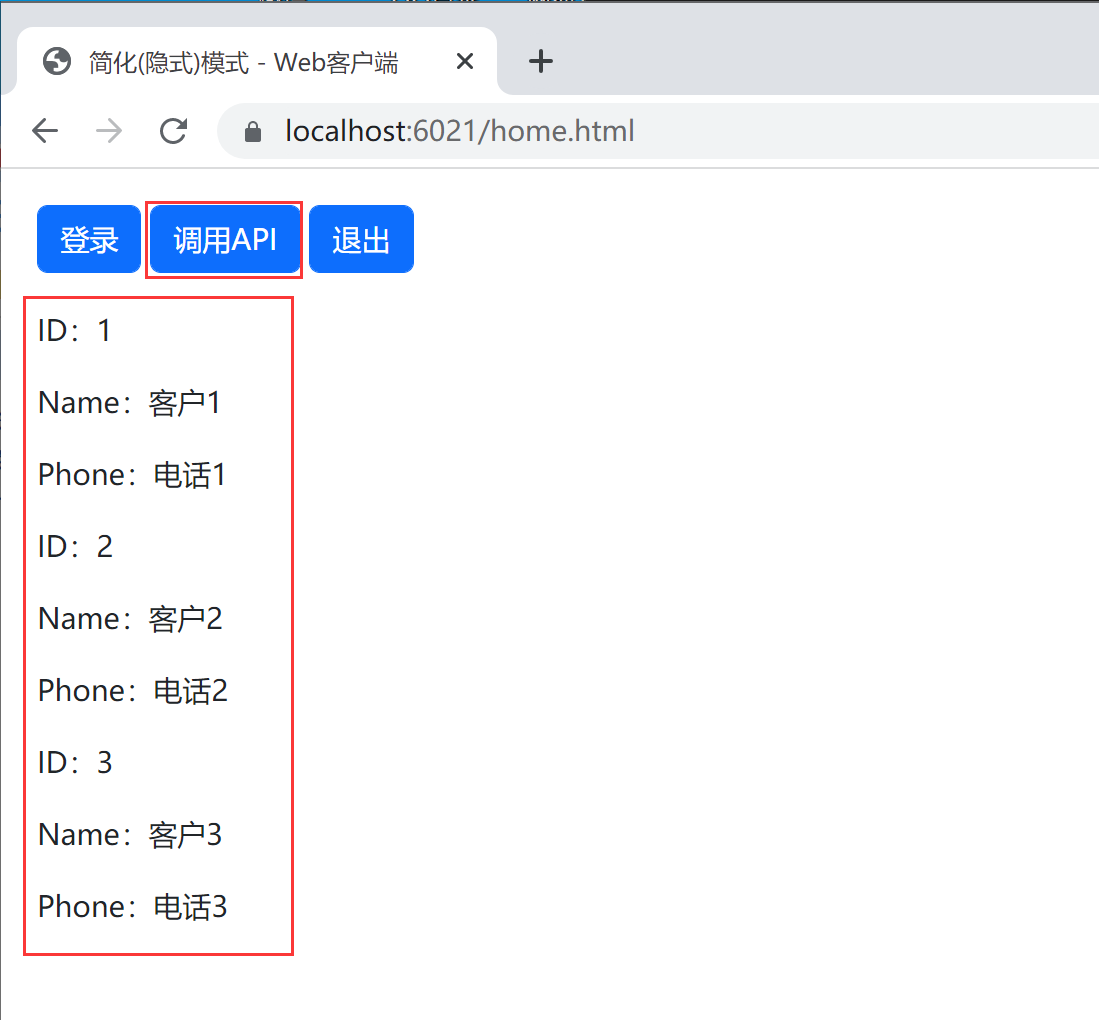
IdentityServer4 IdentityServer 模式identityserver4 identityserver密码 模式 identityserver4 identityserver客户端 模式 identityserver4 identityserver模式 identityserver4 identityserver4 identityserver tokenrequestvalidator identityserver4 identityserver identityserver4 identityserver ocelot net6 identityserver4 identityserver net v4 identityserver4 identityserver证书 问题 identityserver4 identityserver客户端 客户