今日主题内容:
----------------------------------------
1、What is RabbitMQ?
2、MQ的应用场景?
3、RabbitMQ运行部署
4、RabbitMQ工作模型
5、RabbitMQ交换机类型
6、RabbitMQ过期消息
7、RabbitMQ死信队列
8、RabbitMQ延迟队列
-------------------------------------------
1. What is RabbitMQ?
1.1简介
RabbitMQ是一个广泛使用的消息服务器,采用Erlang语言编写,是一种开源的实现 AMQP(高级消息队列协议)的消息中间件;
RabbitMQ最初起源于金融系统,它的性能及稳定性都非常出色;
AMQP协议(http://www.amqp.org),即 Advanced Message Queuing Protocol,高级消息队列协议,是应用层协议的一个开放标准,为面向消息的中间件设计;
我们学的协议有哪些:(http、ftp)
1.2 相关网址
Github:https://github.com/rabbitmq
镜像下载、域名解析、时间同步请点击 阿里云开源镜像站
下载安装启动RabbitMQ
环境准备:阿里云centos7.9 服务器,自行搭建
# 查看系统版本
[root@zsr ~]# lsb_release -a
LSB Version:    :core-4.1-amd64:core-4.1-noarch
Distributor ID:    CentOS
Description:    CentOS Linux release 7.9.1810 (Core)
Release:    7.9.1810
Codename:    Core
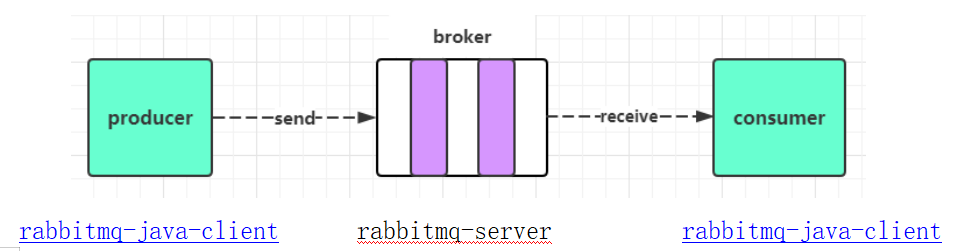
1.3 消息中间件(MQ=Message Queue):消息队列
简单来说,消息中间件就是指保存数据的一个容器(服务器),可以用于两个系统之间的数据传递。
消息中间件一般有三个主要角色:生产者、消费者、消息代理(消息队列、消息服务器);
下载Erlang
RabbitMQ是采用 Erlang语言开发的,所以系统环境必须提供 Erlang环境,需要是安装 Erlang
Erlang和RabbitMQ版本对照:https://www.rabbitmq.com/which-erlang.html
Erlang官网
Linux下载:
|
wget https://github.com/erlang/otp/releases/download/OTP-25.1.1/otp_src_25.1.1.tar.gz |
说明:wget 是linux命令,可以用来下载软件
安装Erlang
3.3.1 安装erlang前先安装Linux依赖库
|
yum -y install make gcc gcc-c++ kernel-devel m4 ncurses-devel openssl-devel |
说明:yum -y install 安装linux的一些依赖库的命令 ,-y表示自动确认;
3.3.2 解压erlang压缩包文件
|
tar -zxvf otp_src_25.1.1.tar.gz |
3.3.3 配置
切换到解压的目录下,运行相应命令
|
cd otp_src_25.1.1 ./configure |
3.3.4 编译
|
make |
3.3.5安装
|
make install |
安装好了erlang后可以将解压的文件夹删除:
|
rm -rf otp_src_25.1.1 |
3.3.6 验证erlang是否安装成功
在命令行输入: erl 如果进入了编程命令行则表示安装成功,然后按ctrl + z 退出编程命令行;

3.4 下载RabbitMQ
从RabbitMQ官网https://www.rabbitmq.com找到下载链接
Linux:下载3.10.11
|
wget https://github.com/rabbitmq/rabbitmq-server/releases/download/v3.10.11/rabbitmq-server-generic-unix-3.10.11.tar.xz |
generic 是通用的意思,这个版本也就是通用的unix版本
3.5 安装RabbitMQ
解压RabbitMQ的压缩包,即安装完成,无需再编译,xz不需要-zxvf
|
tar -xvf rabbitmq-server-generic-unix-3.10.11.tar.xz -C /usr/local/ |
说明 -C 选项是指定解压目录,如果不指定会解压到当前目录
此时rabbitmq就安装好了;
1. 启动及停止RabbitMQ
4.1启动RabbitMQ
切换到安装目录的sbin目录下:
|
#启动 ./rabbitmq-server -detached |
说明:
-detached 将表示在后台启动运行rabbitmq;不加该参数表示前台启动;
rabbitmq的运行日志存放在安装目录的var目录下;
现在的目录是:/usr/local/rabbitmq_server-3.10.11/var/log/rabbitmq

4.2 查看RabbitMQ的状态
切换到sbin目录下执行:
|
./rabbitmqctl -n rabbit status |
说明:-n rabbit 是指定节点名称为rabbit,目前只有一个节点,节点名默认为rabbit
此处-n rabbit 也可以省略
4.3 停止RabbitMQ
切换到sbin目录下执行:
|
./rabbitmqctl shutdown |
4.4 配置path环境变量
vi /etc/profile

|
RABBIT_HOME=/usr/local/rabbitmq_server-3.10.11 PATH=$PATH:$RABBIT_HOME/sbin
export RABBIT_HOME PATH |
刷新环境变量,命令如下
|
source /etc/profile |
5.RabbitMQ管理命令
./rabbitmqctl 是一个管理命令,可以管理rabbitmq的很多操作。
./rabbitmqctl help可以查看一下有哪些操作
查看具体子命令 可以使用 ./rabbitmqctl help 子命令名称
5.1 用户管理
用户管理包括增加用户,删除用户,查看用户列表,修改用户密码。
这些操作都是通过rabbitmqctl管理命令来实现完成。
查看帮助:
|
rabbitmqctl add_user --help |
相应的命令
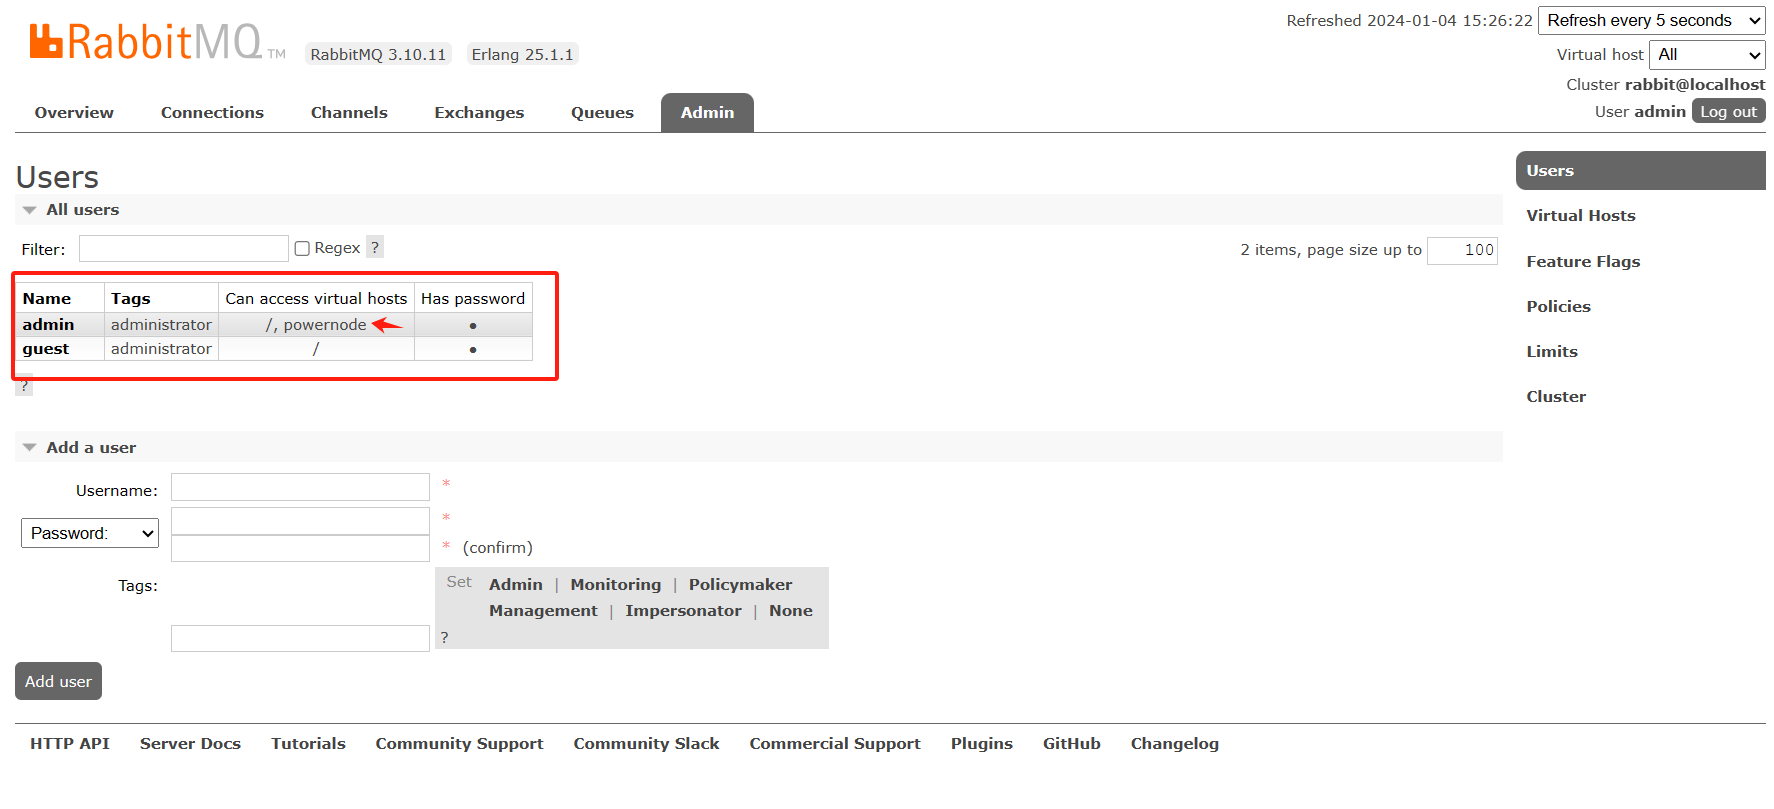
(1) 查看当前用户列表
|
rabbitmqctl list_users |
(2) 新增一个用户
|
语法:rabbitmqctl add_user Username Password 示例: rabbitmqctl add_user admin 123456 |

5.2 设置用户角色
|
rabbitmqctl set_user_tags User Tag 示例:rabbitmqctl set_user_tags admin administrator |
说明:此处设置用户的角色为管理员角色
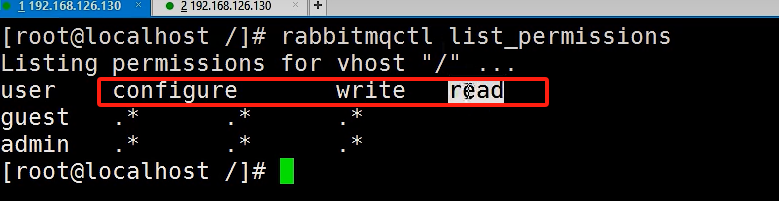
5.3 设置用户权限
|
rabbitmqctl set_permissions -p / admin ".*" ".*" ".*" |
说明:此操作是设置admin用户拥有操作虚拟主机/下的所有权限,读.写.配置
查看用户权限
|
./rabbitmqctl list_permissions |
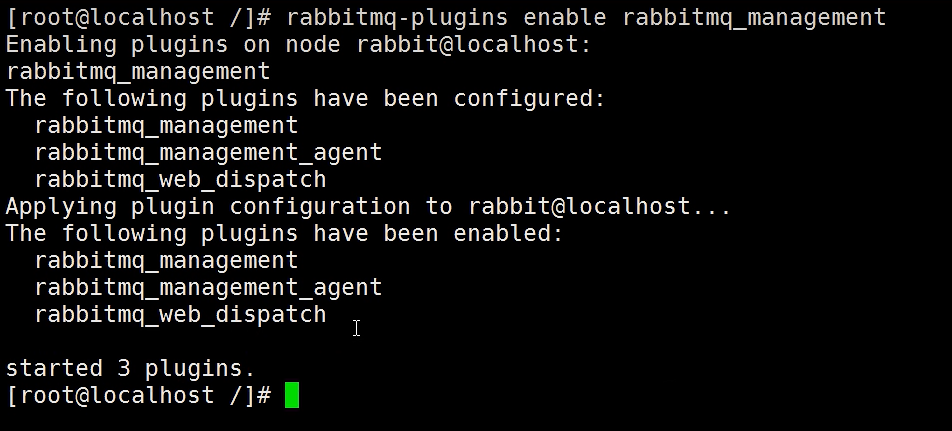
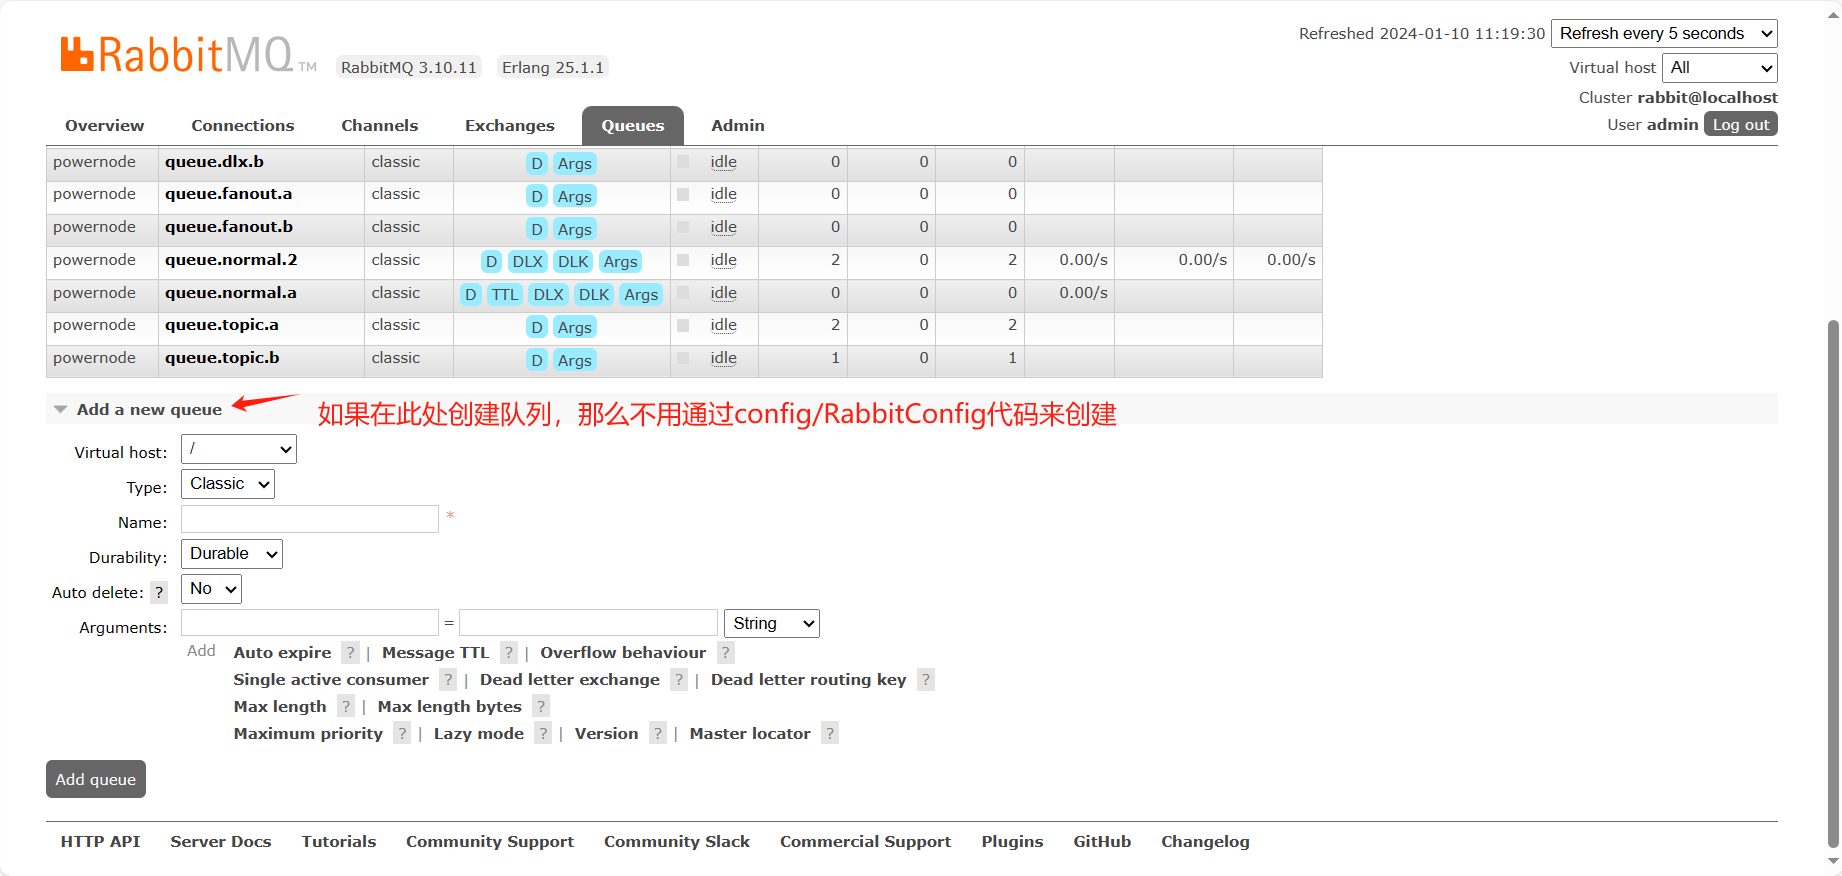
2. web管理后台
Rabbitmq有一个web管理后台,这个管理后台是以插件的方式提供的,启动后台web管理功能,切换到sbin目录下执行:
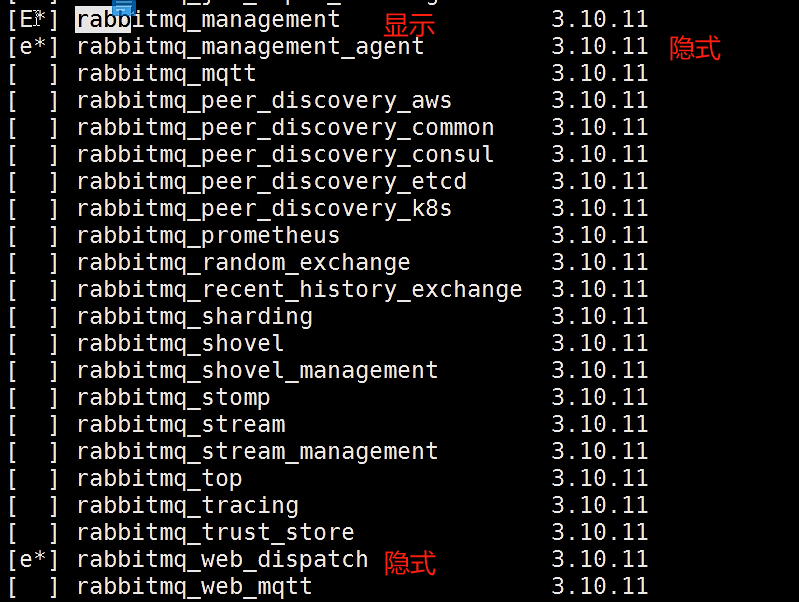
6.1 启用管理后台
|
# 查看rabbitmq 的插件列表 ./rabbitmq-plugins list #启用 ./rabbitmq-plugins enable rabbitmq_management #禁用 ./rabbitmq-plugins disable rabbitmq_management |
rabbitmq-plugins list
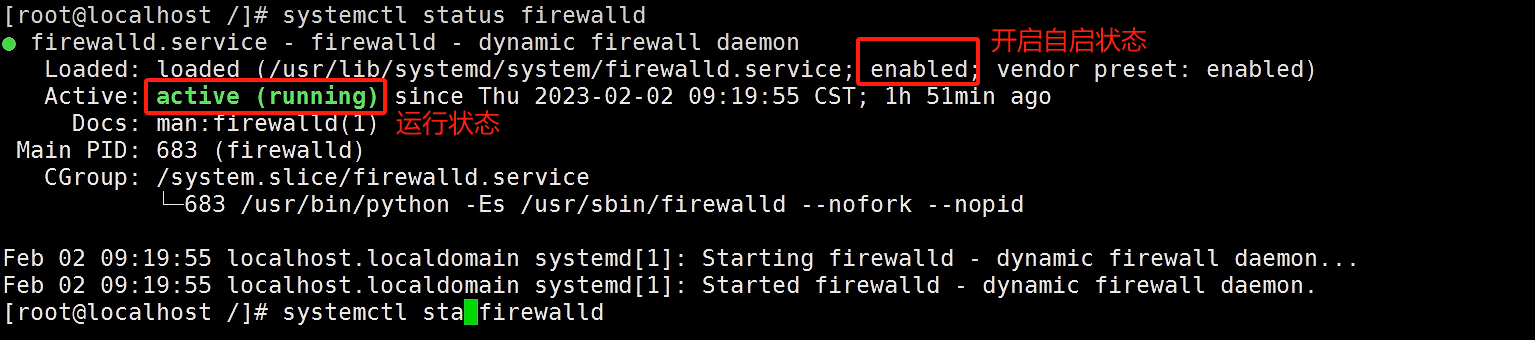
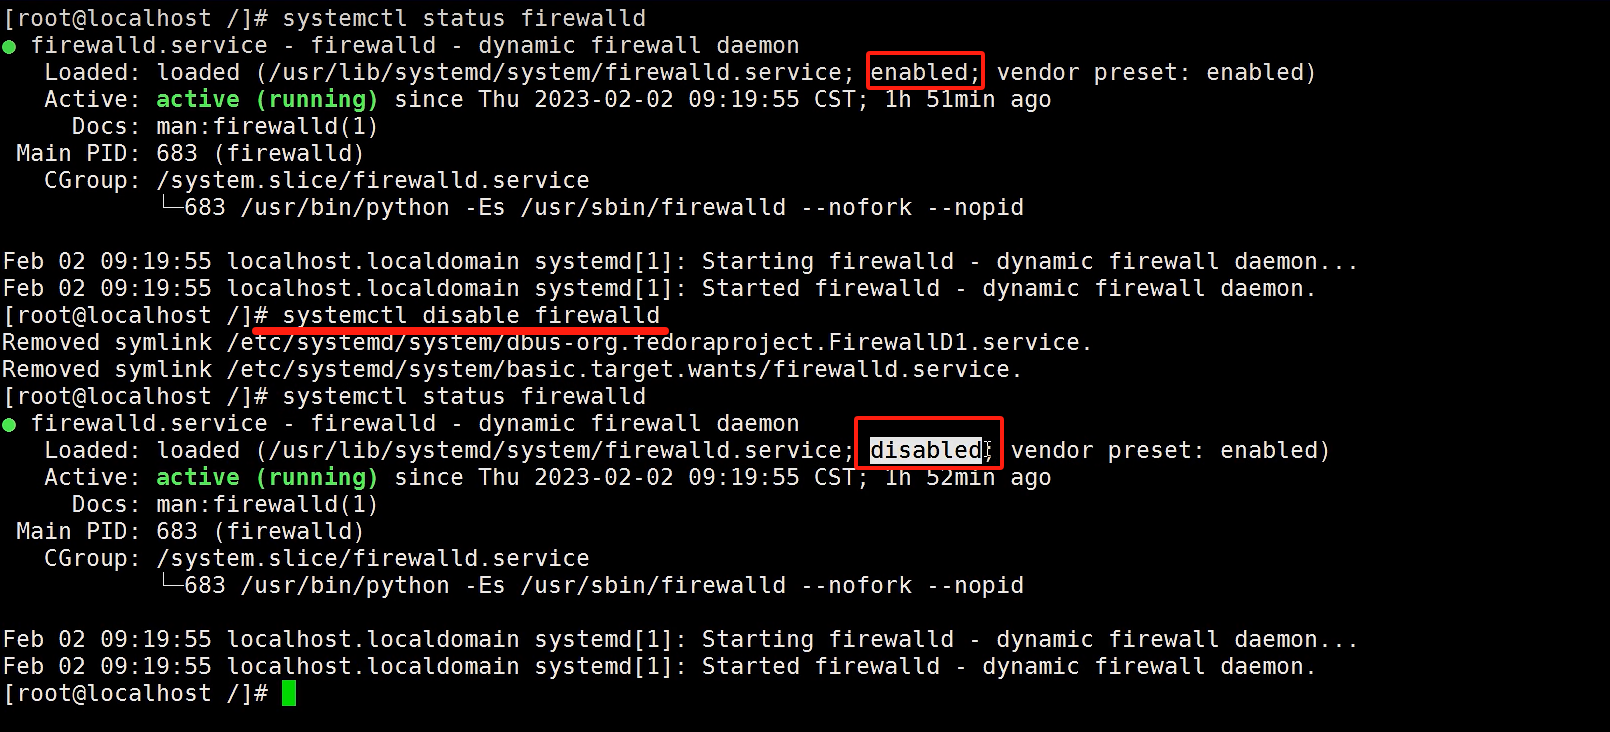
6.2防火墙操作
|
systemctl status firewalld --检查防火墙状态 systemctl stop firewalld --关闭防火墙,Linux重启之后会失效 systemctl disable firewalld --防火墙置为不可用,Linux重启后,防火墙服务不自动启动,依然是不可用 |
6.3 访问
|
用户名/密码为我们上面创建的admin/123456 注意上面改成你的虚拟主机的ip地址 |
备注:如果使用默认用户guest、密码guest登录,会提示User can only log in via localhost
说明guest用户只能从localhost本机登录,所以不要使用该用户。
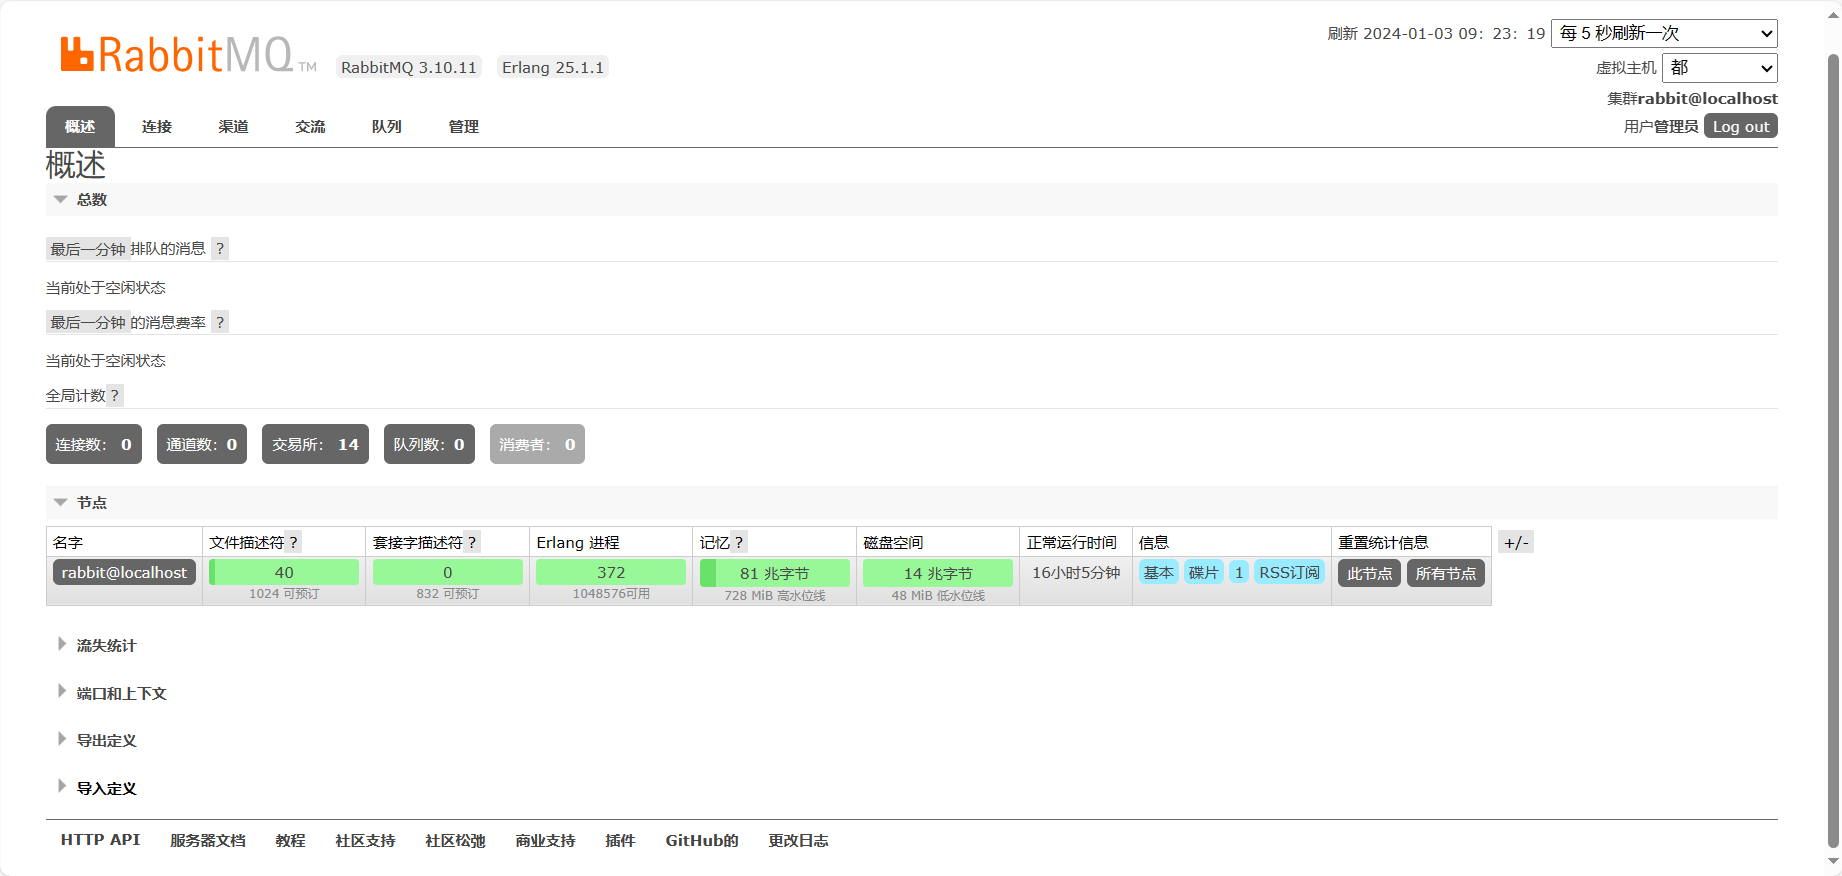
rabbitmqctl status

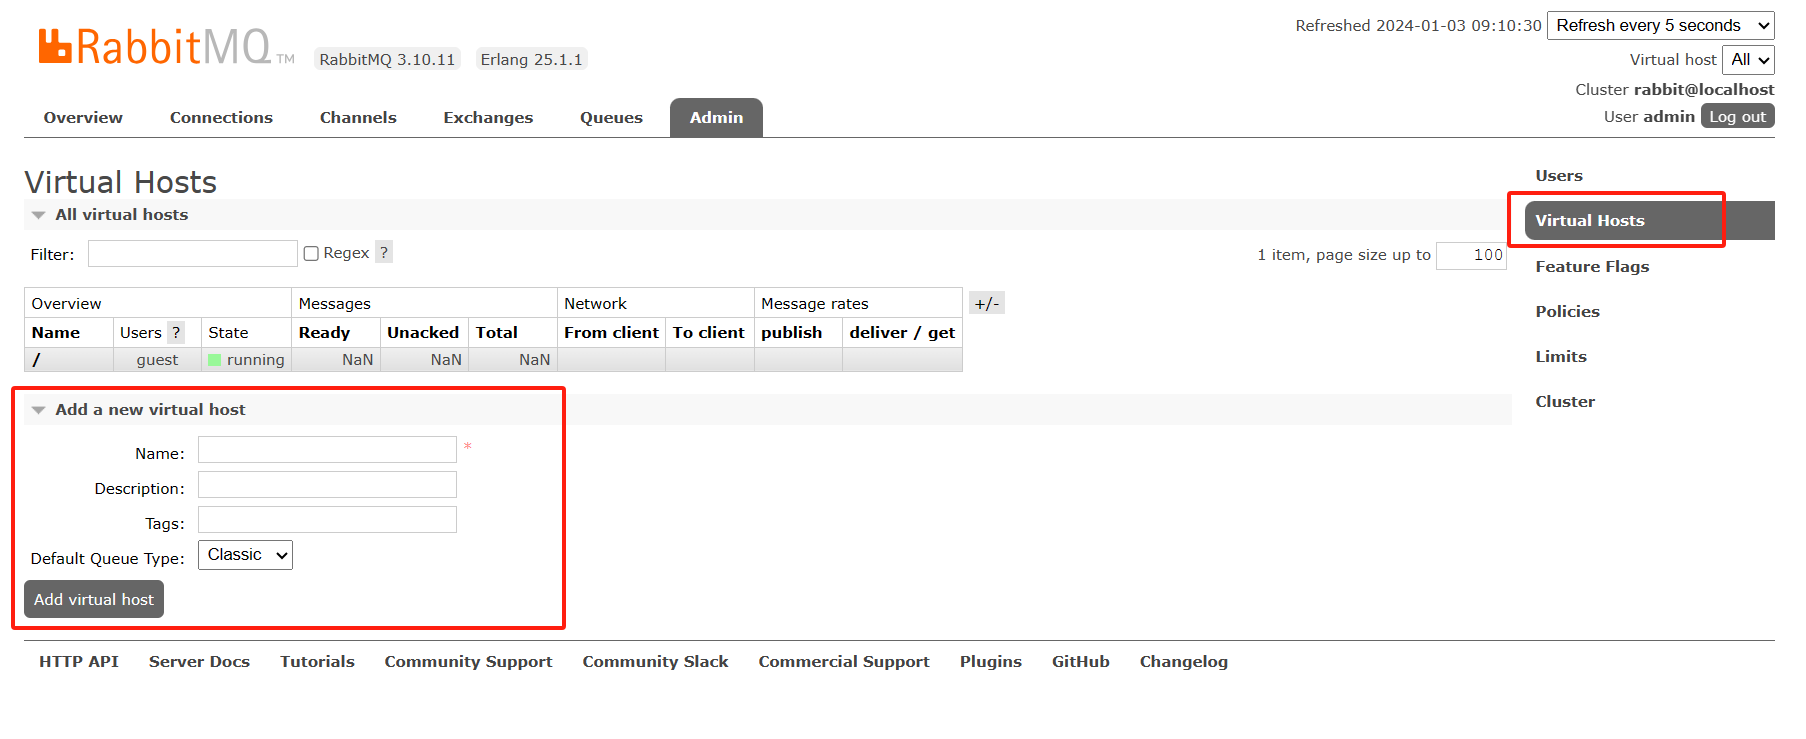
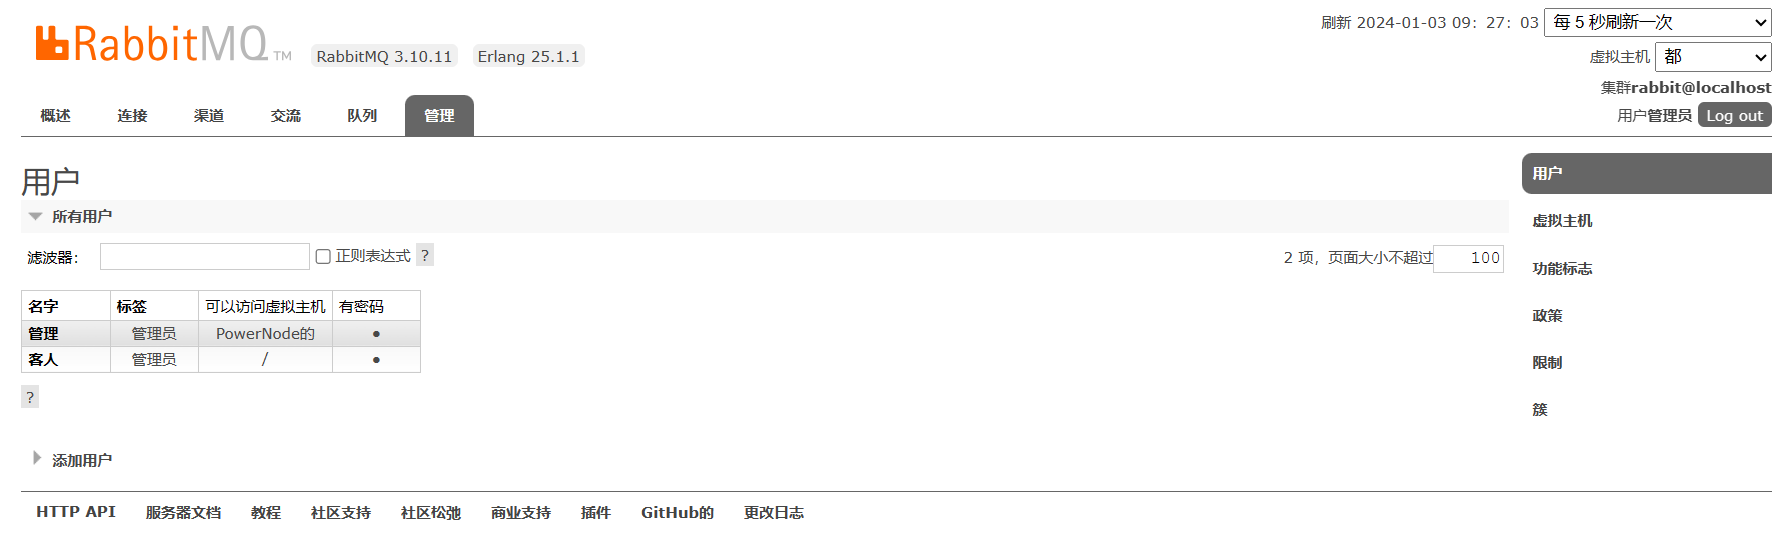
6.4 通过web页面新建虚拟主机
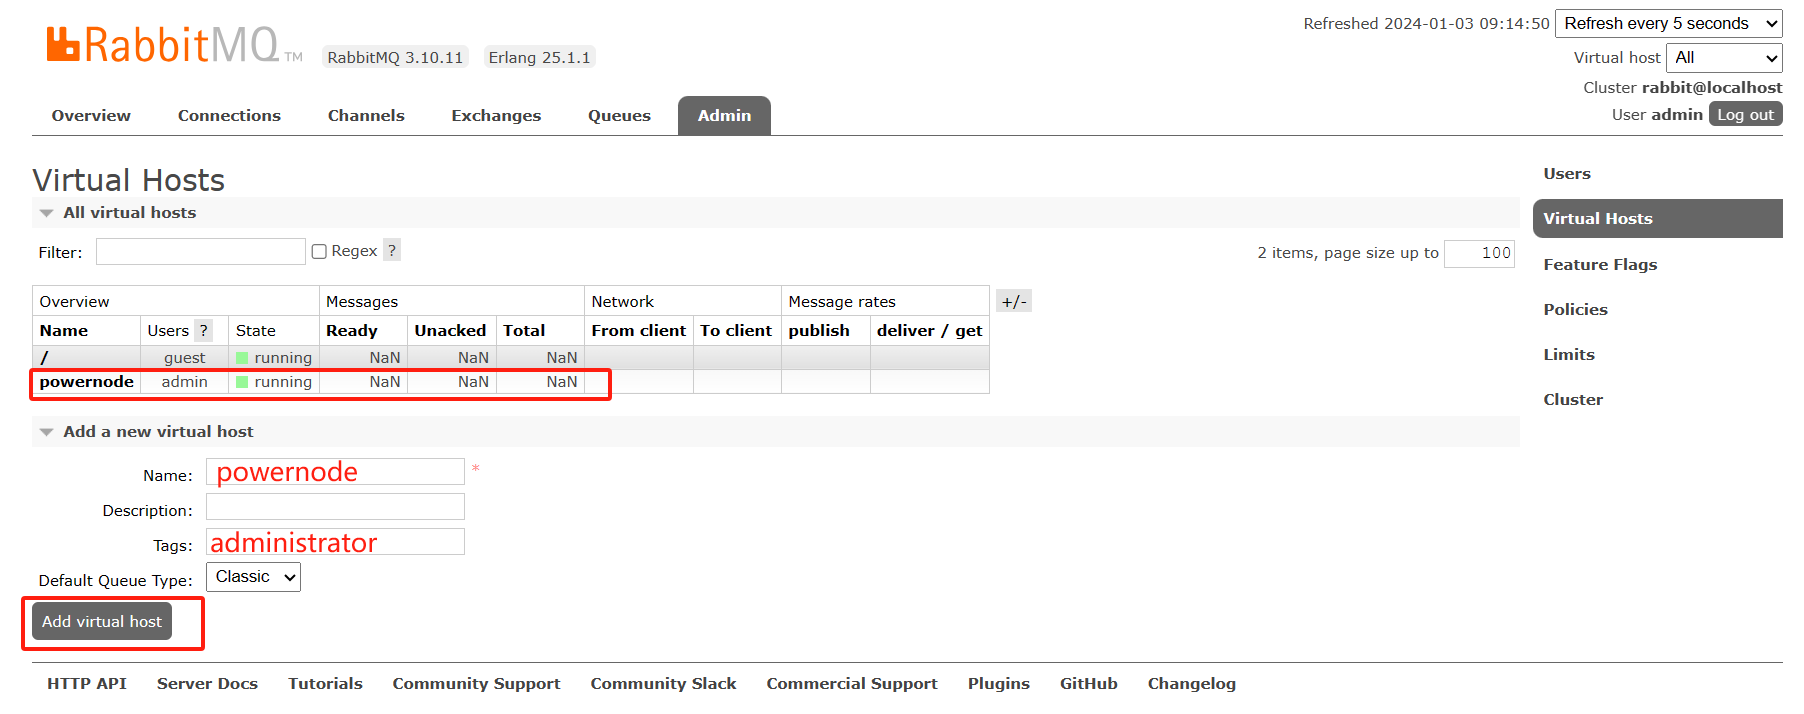
中文翻译
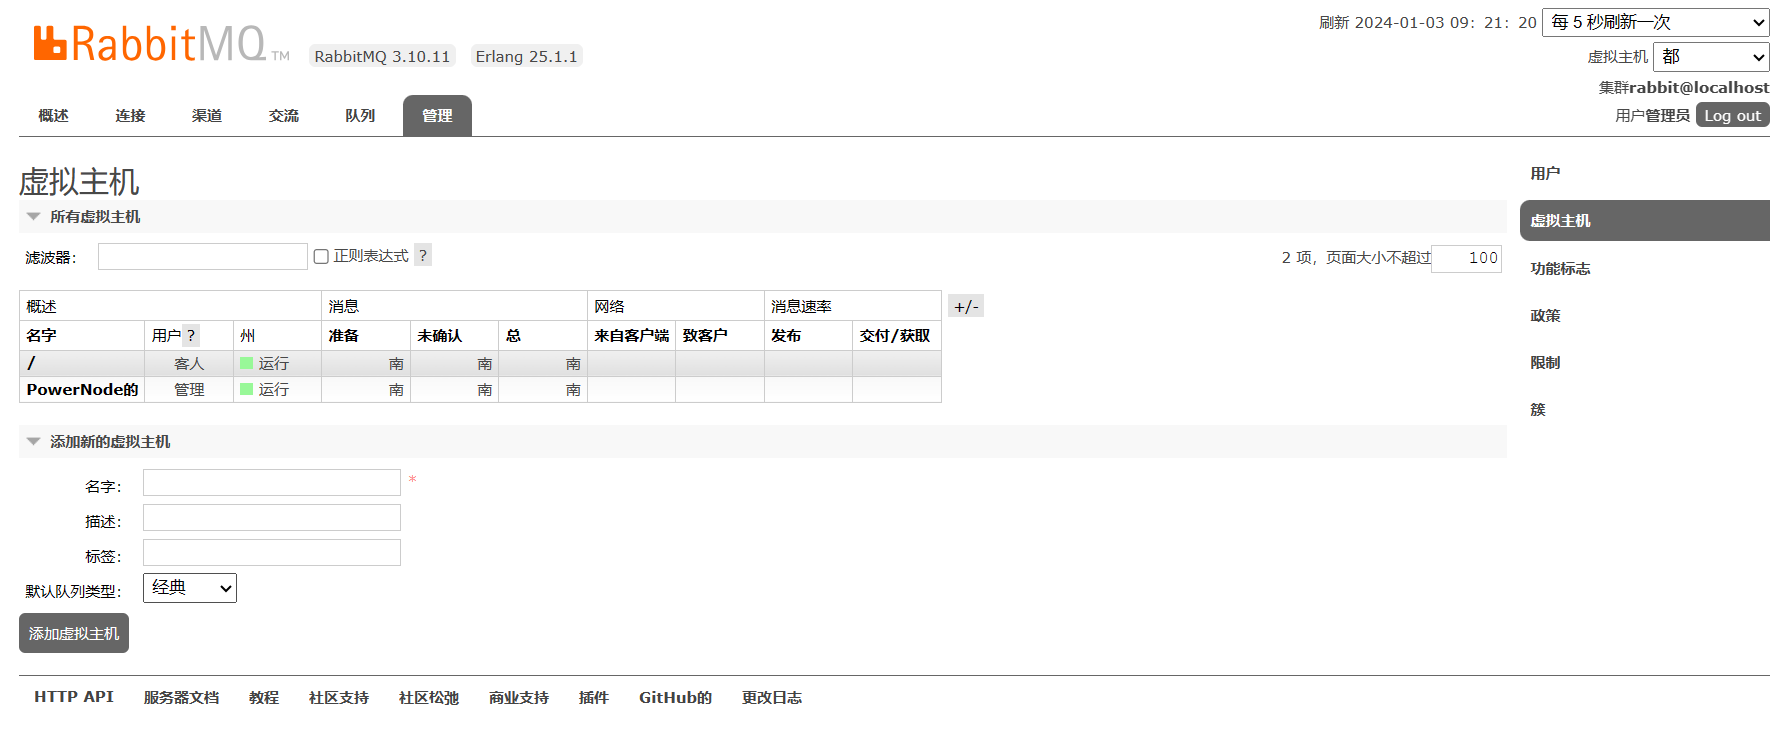
概述
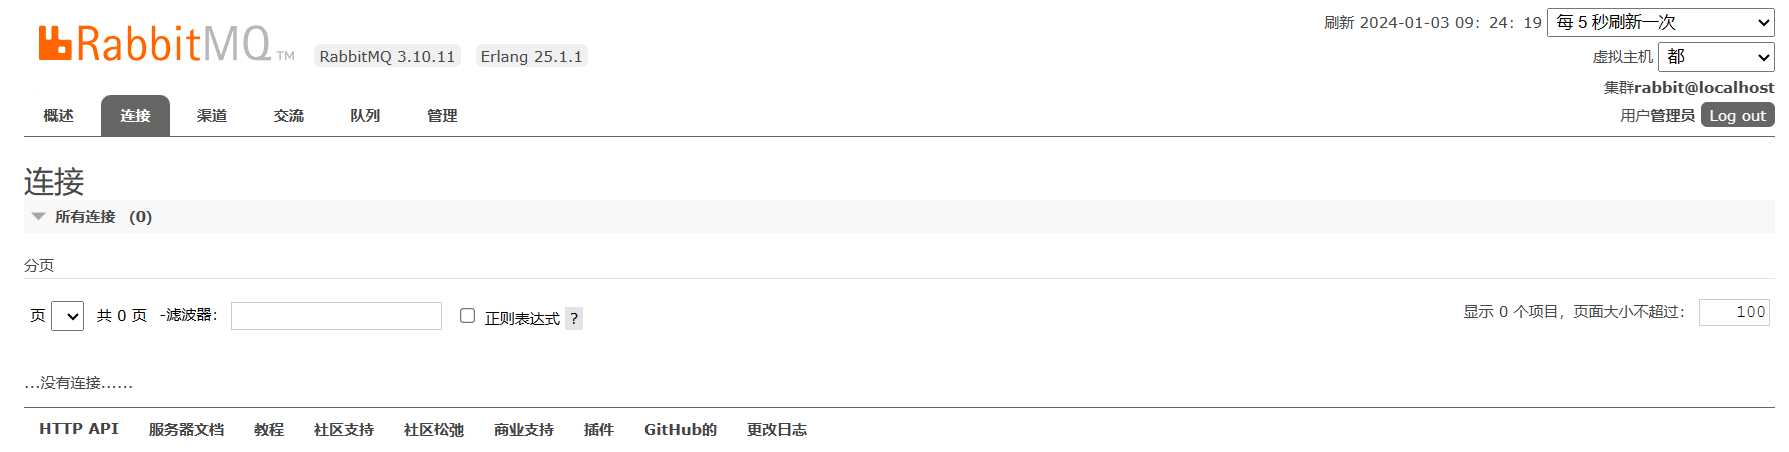
连接
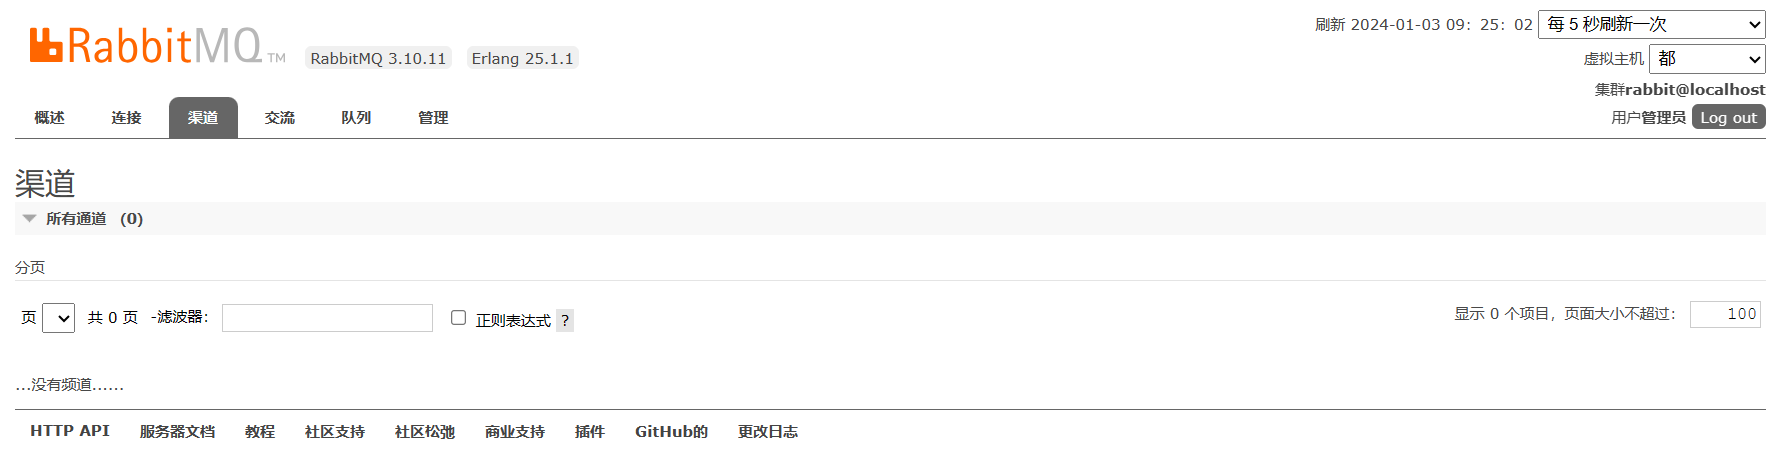
渠道
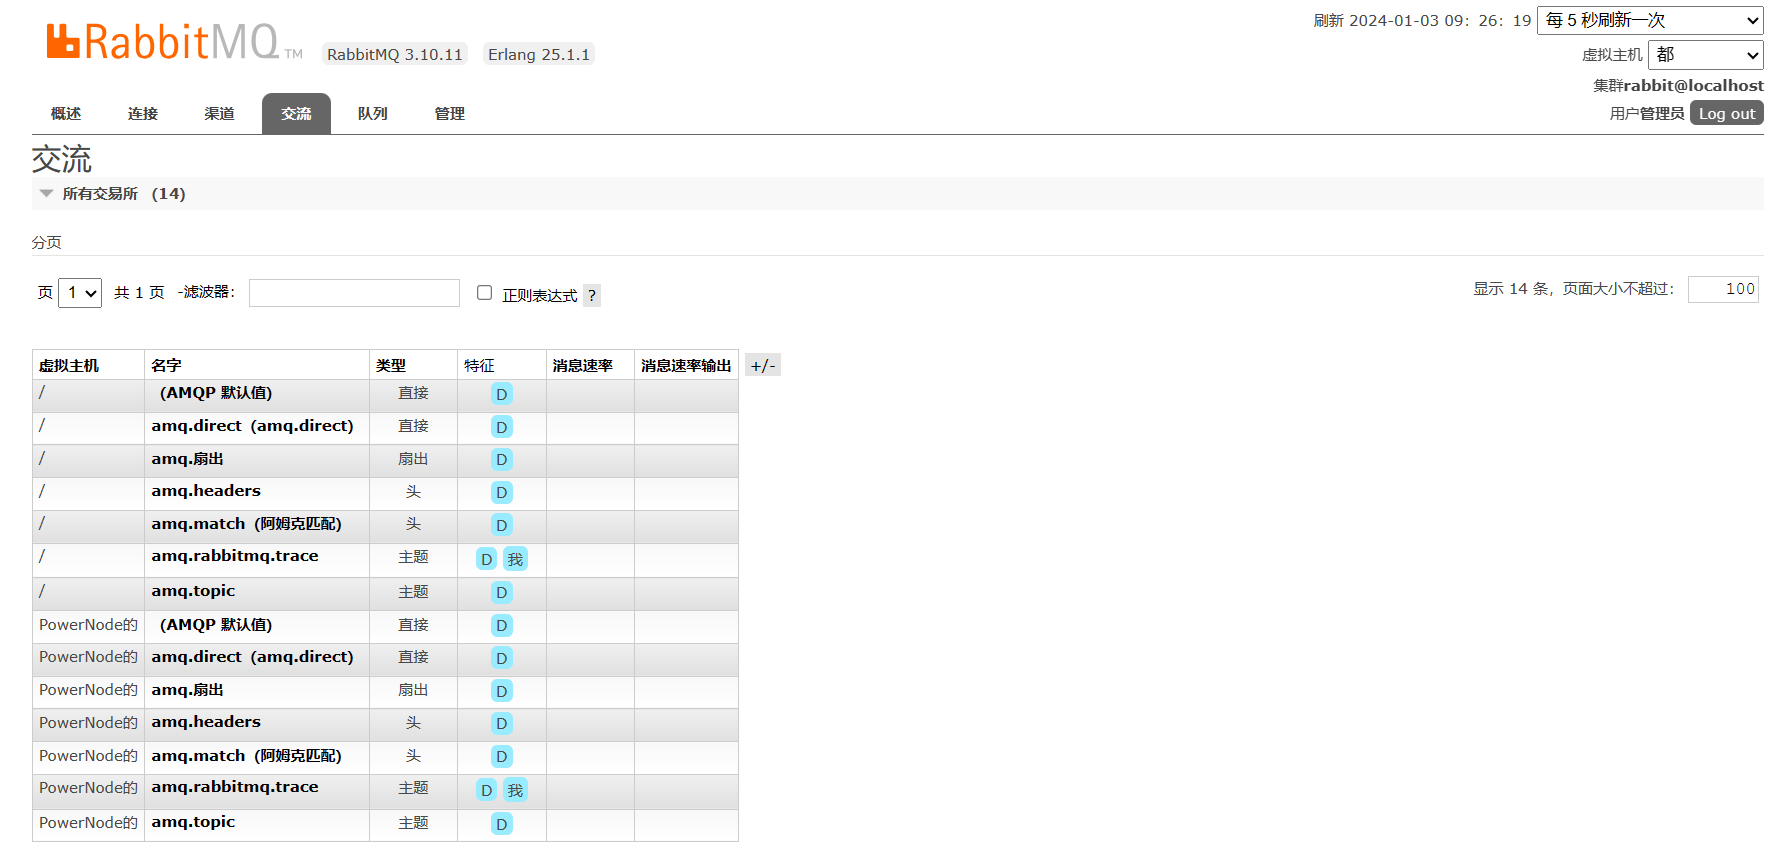
交流
7. RabbitMQ工作模型(核心知识点)
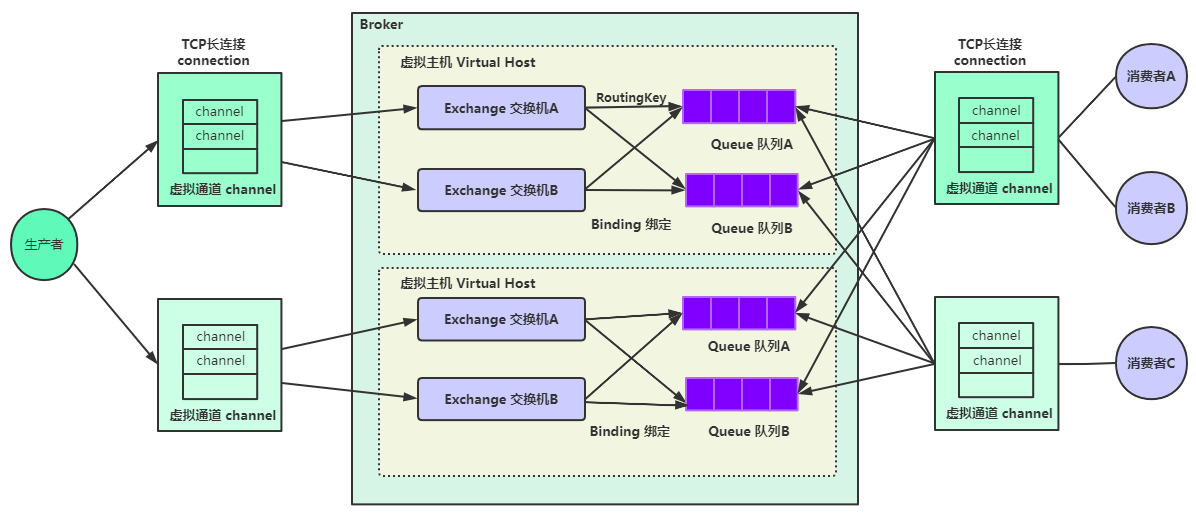
broker 相当于mysql服务器,virtual host相当于数据库(可以有多个数据库)
queue相当于表,消息相当于记录。
消息队列有三个核心要素: 消息生产者(发消息)、消息队列、消息消费者(接消息);
生产者(Producer):发送消息的应用;(java程序,也可能是别的语言写的程序)
消费者(Consumer):接收消息的应用;(java程序,也可能是别的语言写的程序)
代理(Broker):就是消息服务器,RabbitMQ Server就是Message Broker;
连接(Connection):连接RabbitMQ服务器的TCP长连接;
信道(Channel):连接中的一个虚拟通道,消息队列发送或者接收消息时,都是通过信道进行的;
虚拟主机(Virtual host):一个虚拟分组,在代码中就是一个字符串,当多个不同的用户使用同一个RabbitMQ服务时,可以划分出多个Virtual host,每个用户在自己的Virtual host创建exchange/queue等;(分类比较清晰、相互隔离)
交换机(Exchange):交换机负责从生产者接收消息,并根据交换机类型分发到对应的消息队列中,起到一个路由的作用;
路由键(Routing Key):交换机根据路由键来决定消息分发到哪个队列,路由键是消息的目的地址;
绑定(Binding):绑定是队列和交换机的一个关联连接(关联关系);
队列(Queue):存储消息的缓存;
消息(Message):由生产者通过RabbitMQ发送给消费者的信息;(消息可以任何数据,字符串、user对象,json串等等)
1. RabbitMQ交换机类型
Exchange(X) 可翻译成交换机/交换器/路由器
8.1 RabbitMQ交换器 (Exchange)类型
|
1、Fanout Exchange(扇形) 2、Direct Exchange(直连) 3、Topic Exchange(主题) 4、Headers Exchange(头部) |
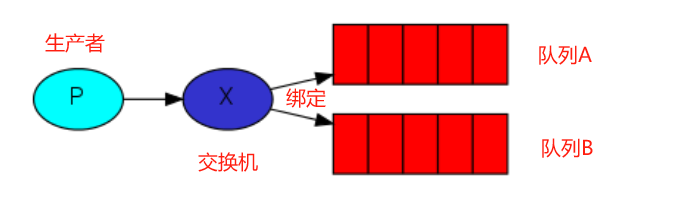
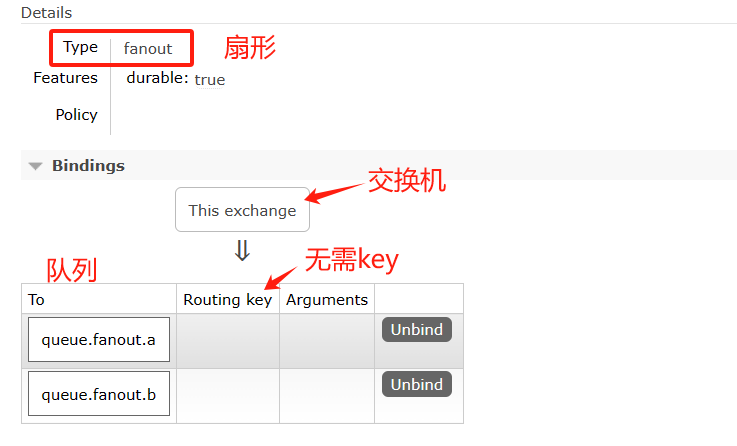
8.2 Fanout Exchange (扇形)
8.2.1 介绍
Fanout 扇形的,散开的; 扇形交换机
投递到所有绑定的队列,不需要路由键,不需要进行路由键的匹配,相当于广播、群发
8.2.2 示例
创建项目,添加依赖
<!--amqp依赖-->
        <dependency>
            <groupId>org.springframework.boot</groupId>
            <artifactId>spring-boot-starter-amqp</artifactId>
        </dependency>
application.yml配置
server:
  port: 8080
spring:
  application:
    name: fanout-learn

# 消息队列配置:
  rabbitmq:
    host: 192.168.0.67 # rabbitmq主机
    port: 5672 # 注:15672是控制台端口,接发消息使用5672
    username: admin
    password: 123456
    virtual-host: powernode #虚拟主机
rabbitmq三部曲
- 定义交换机
- 定义队列
- 绑定交换机和队列
Config/RabbitmqConfig
定义队列:2个队列
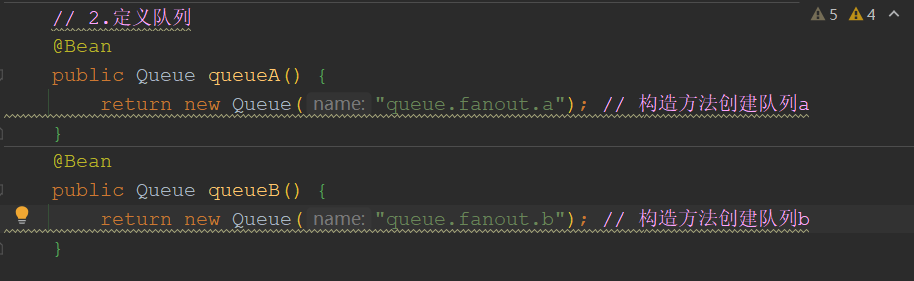
绑定模式:spring容器对象使用的kv键值对,Map(k,v),key=方法名=queueA(),value=返回的对象=Queue("queue.fanout.a")
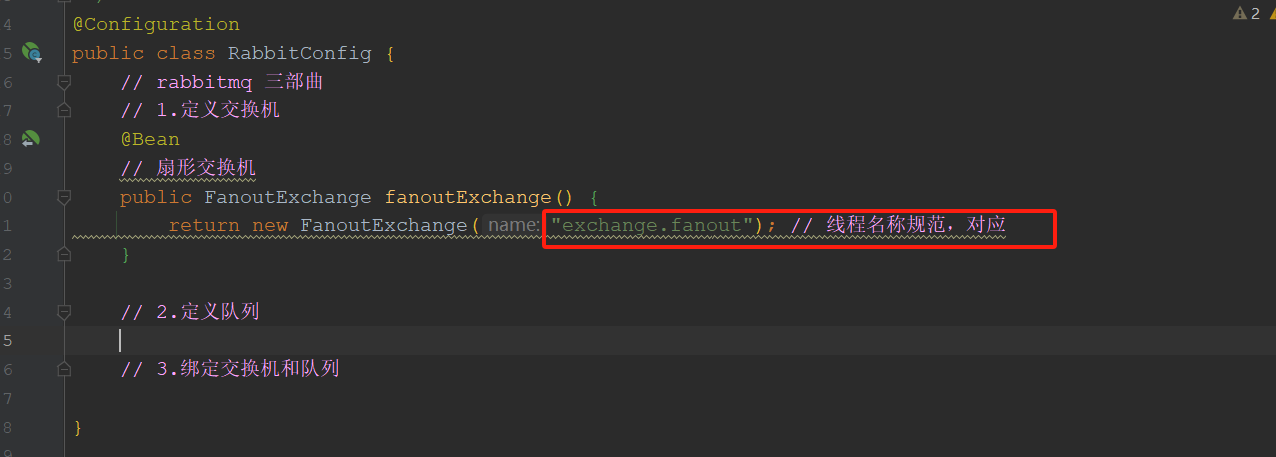
完整config/RabbitConfig
注意:import org.springframework.amqp.core 核心引入
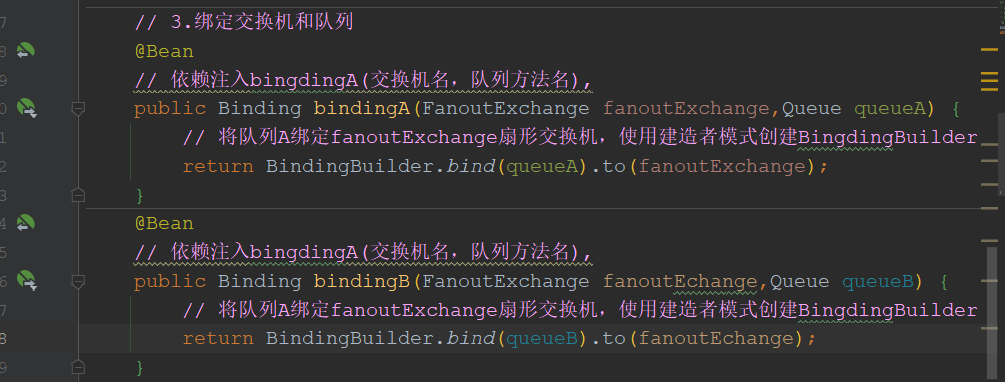
package com.tongda.config;

import org.springframework.amqp.core.Binding;
import org.springframework.amqp.core.BindingBuilder;
import org.springframework.amqp.core.FanoutExchange;
import org.springframework.amqp.core.Queue;
import org.springframework.context.annotation.Bean;
import org.springframework.context.annotation.Configuration;

import javax.naming.Name;

@Configuration
public class RabbitConfig {
    // rabbitmq 三部曲
    // 1.定义交换机
    @Bean
    // 扇形交换机
    public FanoutExchange fanoutExchange() {
        return new FanoutExchange("exchange.fanout"); // 线程名称规范,对应
    }

    // 2.定义队列
    @Bean
    public Queue queueA() {
        return new Queue("queue.fanout.a"); // 构造方法创建队列a
    }
    @Bean
    public Queue queueB() {
        return new Queue("queue.fanout.b"); // 构造方法创建队列b
    }

    // 3.绑定交换机和队列
    @Bean
    // 依赖注入bingdingA(交换机名,队列方法名),
    public Binding bindingA(FanoutExchange fanoutExchange,Queue queueA) {
        // 将队列A绑定fanoutExchange扇形交换机,使用建造者模式创建BingdingBuilder
        return BindingBuilder.bind(queueA).to(fanoutExchange);
    }
    @Bean
    // 依赖注入bingdingA(交换机名,队列方法名),
    public Binding bindingB(FanoutExchange fanoutEchange,Queue queueB) {
        // 将队列A绑定fanoutExchange扇形交换机,使用建造者模式创建BingdingBuilder
        return BindingBuilder.bind(queueB).to(fanoutEchange);
    }
}
发消息:service/MessageService
package com.tongda.config.service;

import jakarta.annotation.Resource;
import lombok.extern.slf4j.Slf4j;
import org.springframework.amqp.core.Message;
import org.springframework.amqp.rabbit.core.RabbitTemplate;
import org.springframework.beans.factory.annotation.Autowired;
import org.springframework.stereotype.Component;

import java.util.Date;


@Component
@Slf4j
public class MessageService {
    // 调用消息模版
    @Resource
    private RabbitTemplate rabbitTemplate;

    public void sendMsg() {
        // 定义要发送的消息
        String msg = "hello world";
        // 封装
        Message message = new Message(msg.getBytes());
        // 发消息:转换并且发送convertAndSend("交换机","路由key",message)
        rabbitTemplate.convertAndSend("exchange.fanout","",message);
        log.info("消息发送完毕,发送时间为:{}",new Date()); // {}占位符,时间
    }
}
启动类上继承 implements ApplicationRunner重写方法
package com.tongda;

import com.tongda.config.service.MessageService;
import jakarta.annotation.Resource;
import org.apache.logging.log4j.message.Message;
import org.springframework.beans.factory.annotation.Autowired;
import org.springframework.boot.ApplicationArguments;
import org.springframework.boot.ApplicationRunner;
import org.springframework.boot.SpringApplication;
import org.springframework.boot.autoconfigure.SpringBootApplication;

@SpringBootApplication
public class Rabbit01FanoutApplication implements ApplicationRunner {

    public static void main(String[] args) {
        SpringApplication.run(Rabbit01FanoutApplication.class, args);
    }

    @Resource
    private MessageService messageService;

    /**
     * 程序一启动就运行该方法
     *
     *
     * @param args
     * @return
     **/
    @Override
    public void run(ApplicationArguments args) throws Exception {
        messageService.sendMsg();
    }
}
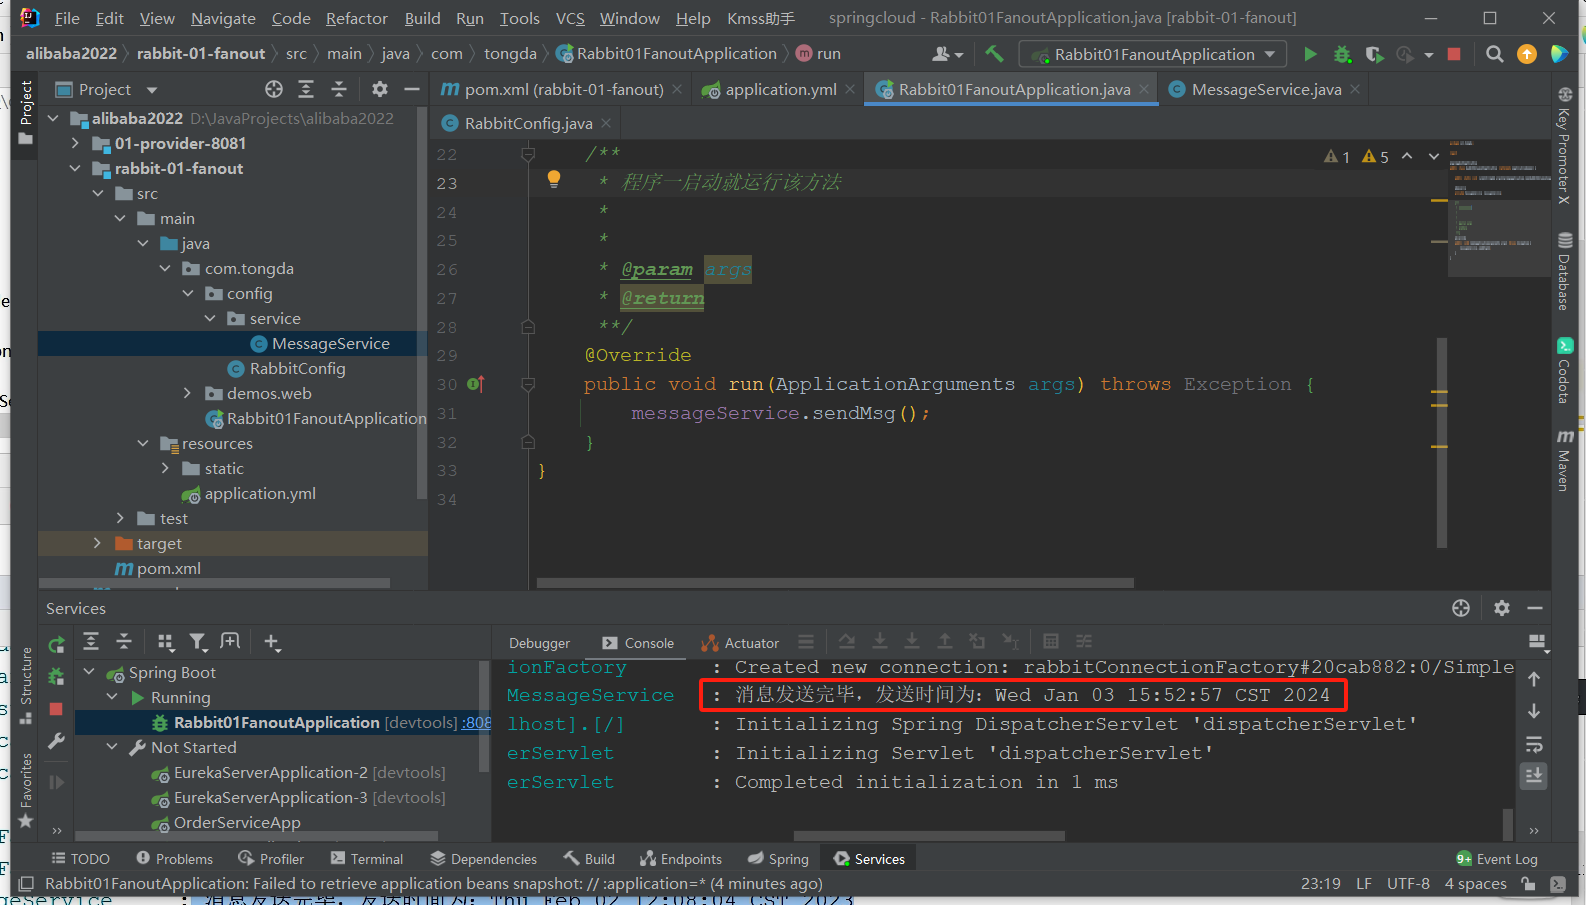
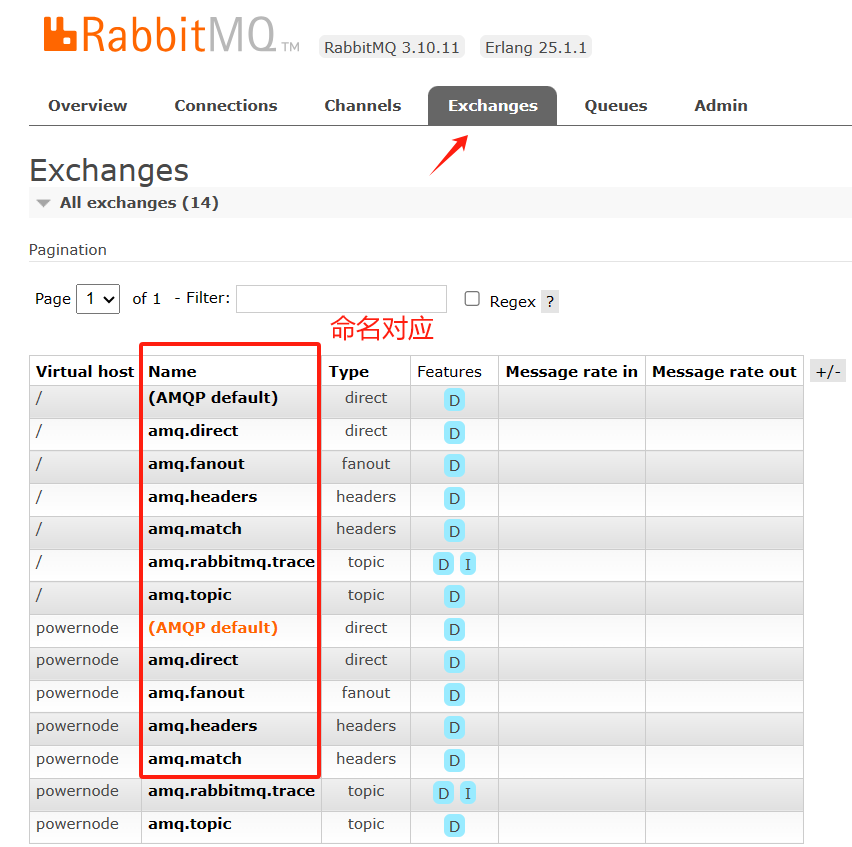
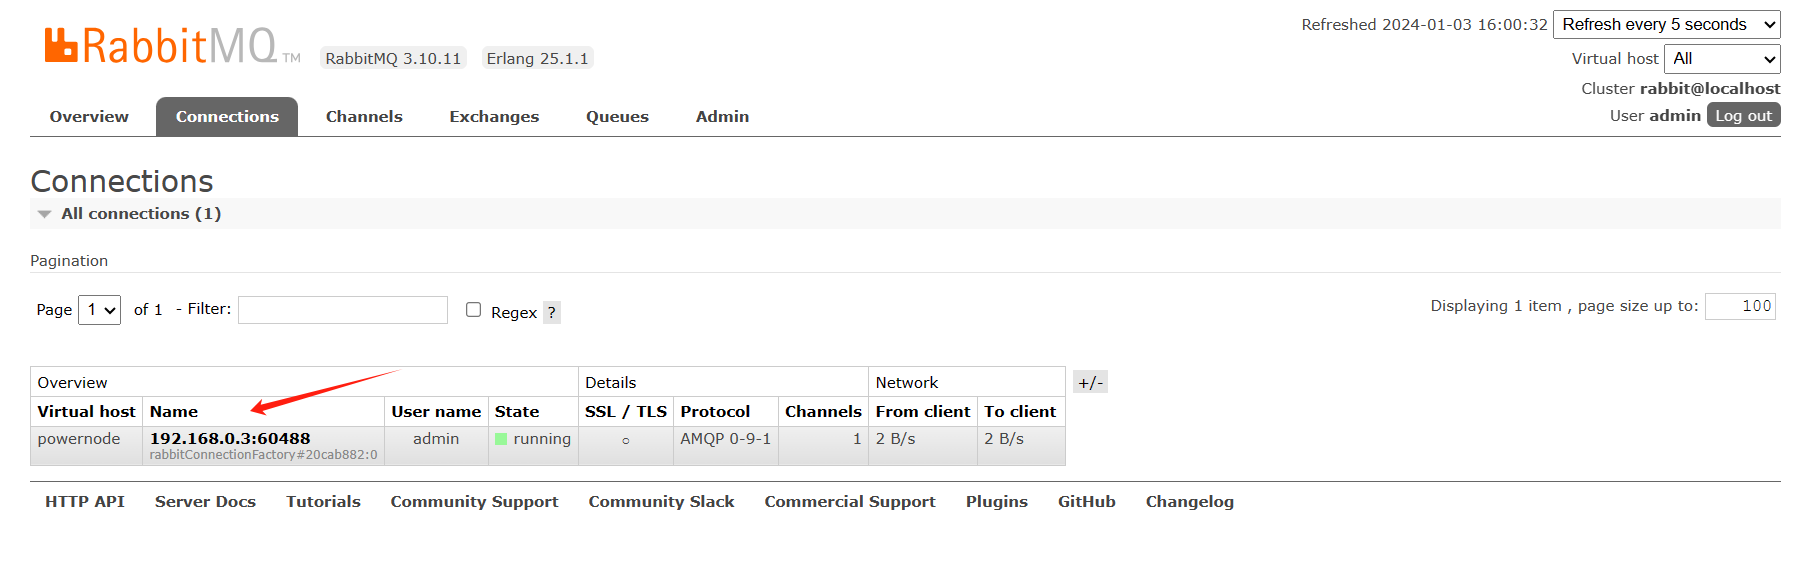
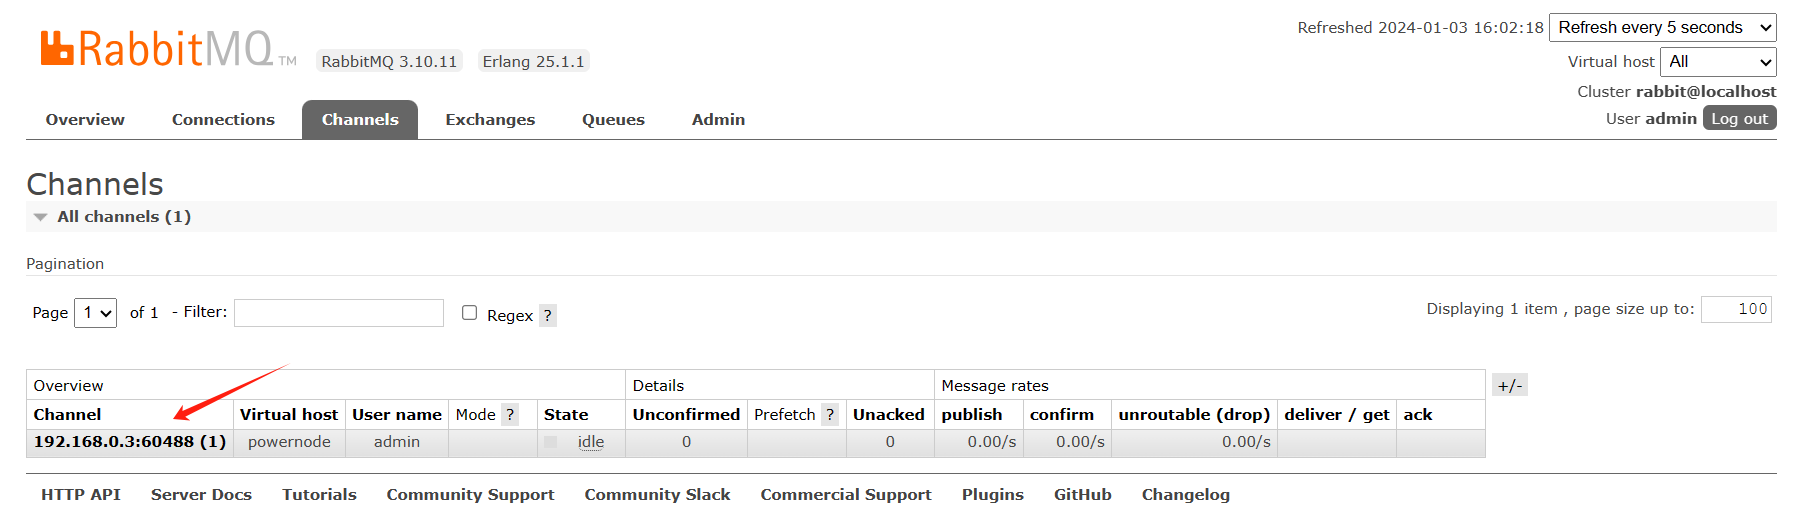
成功查看:Rabbitmq
信道
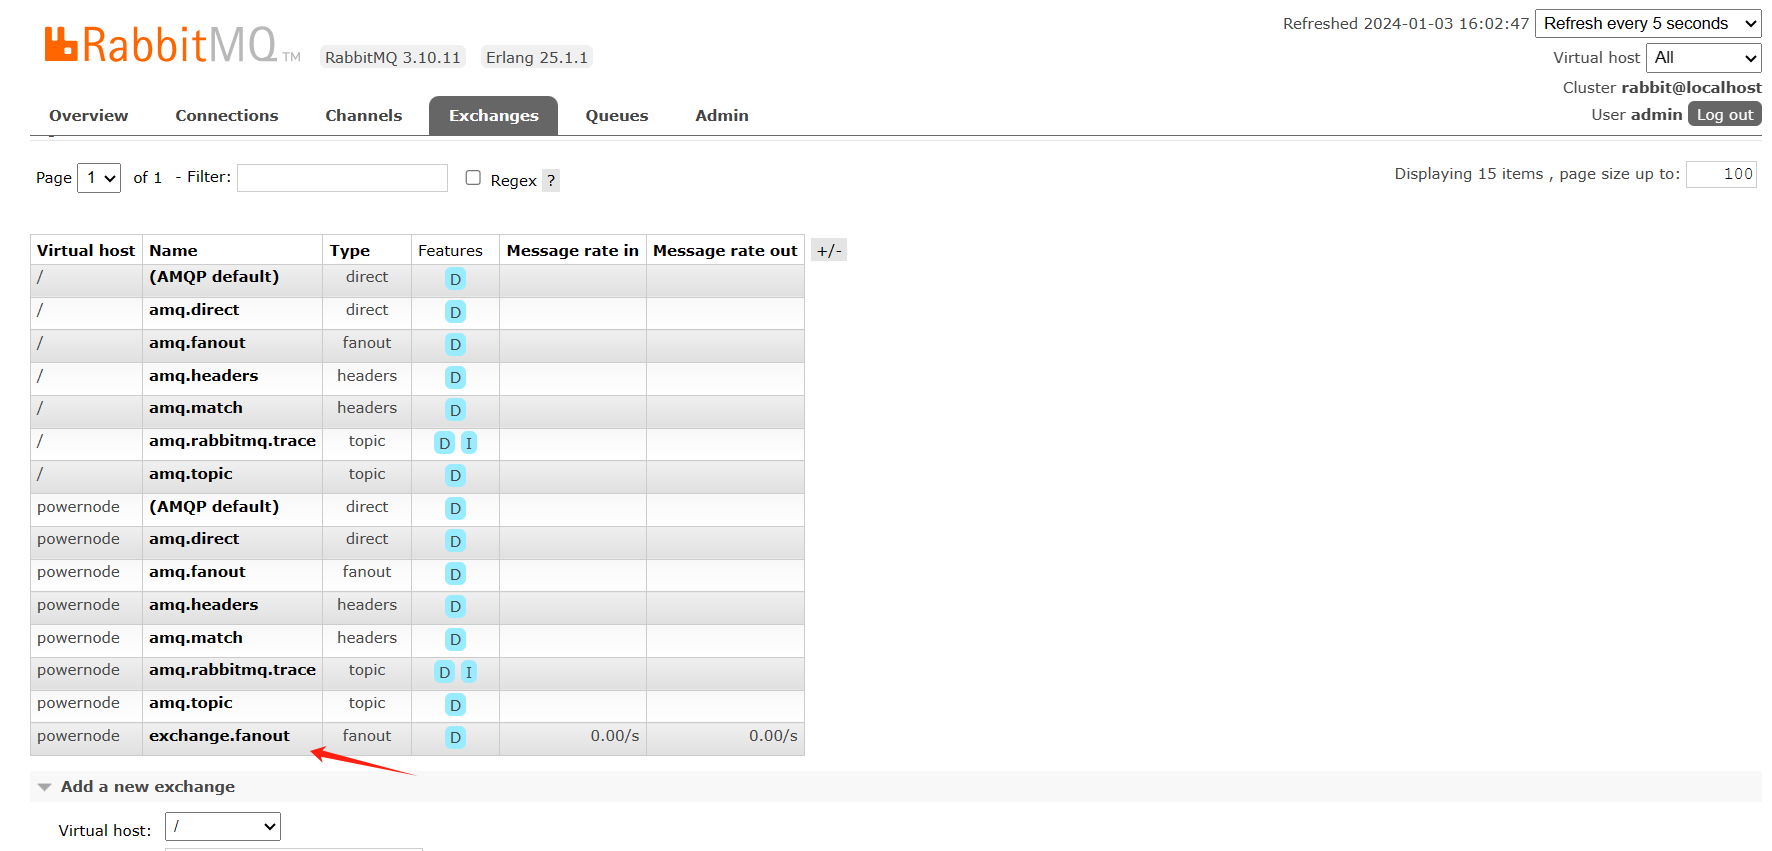
交换机
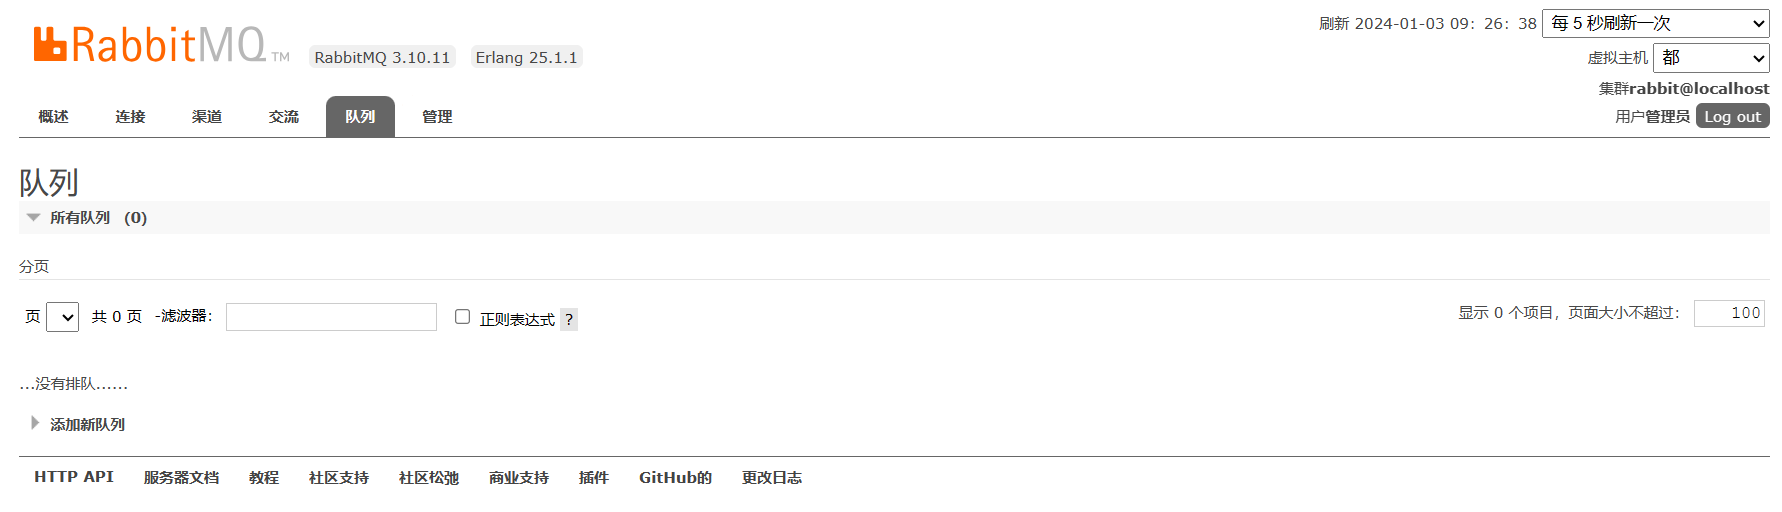
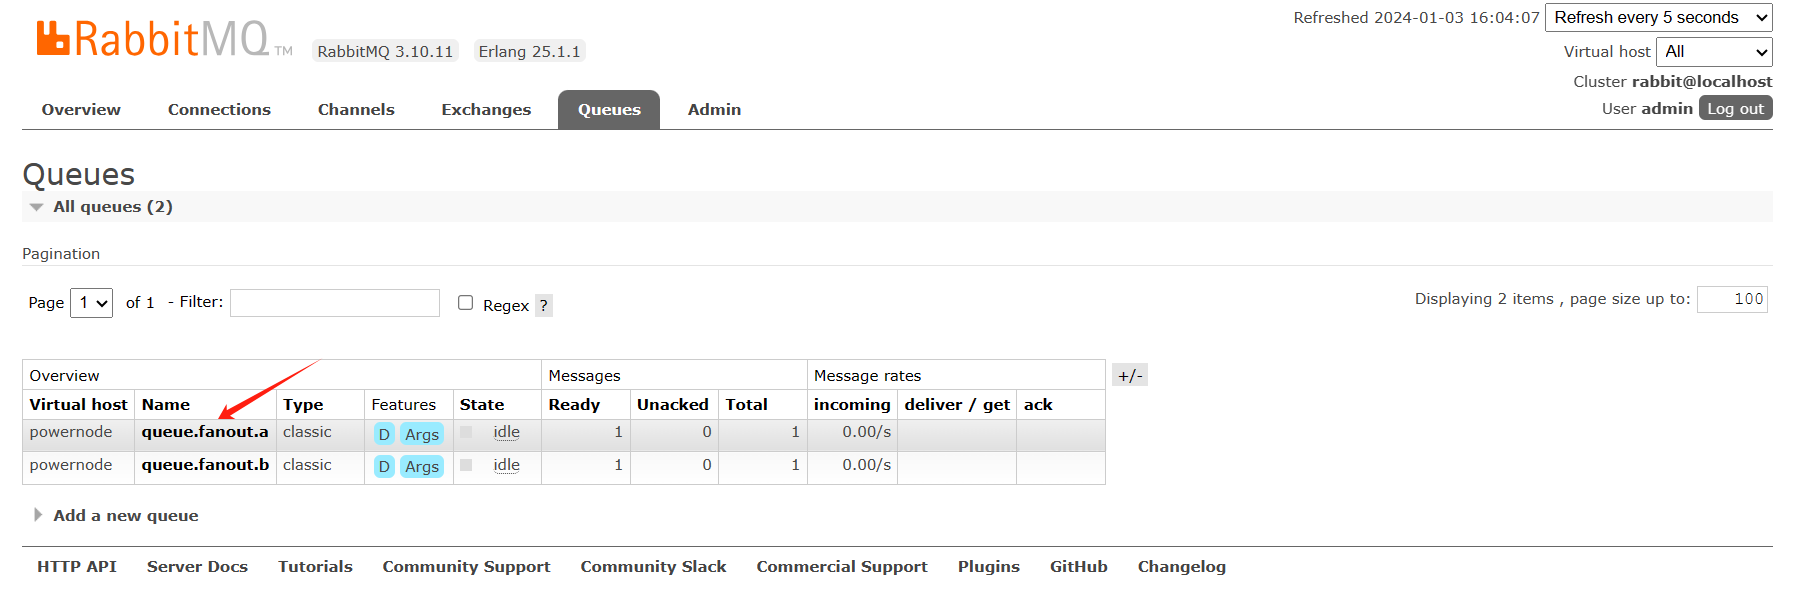
队列
以上是发消息
创建接消息模块:rabbit-01-receivemessage
 <!--amqp依赖-->
        <dependency>
            <groupId>org.springframework.boot</groupId>
            <artifactId>spring-boot-starter-amqp</artifactId>
        </dependency>
application.yml
server:
  port: 9090
spring:
  application:
    name: receive-message
  rabbitmq:
    host: 192.168.0.67
    port: 5672
    username: admin
    password: 123456
    virtual-host: powernode
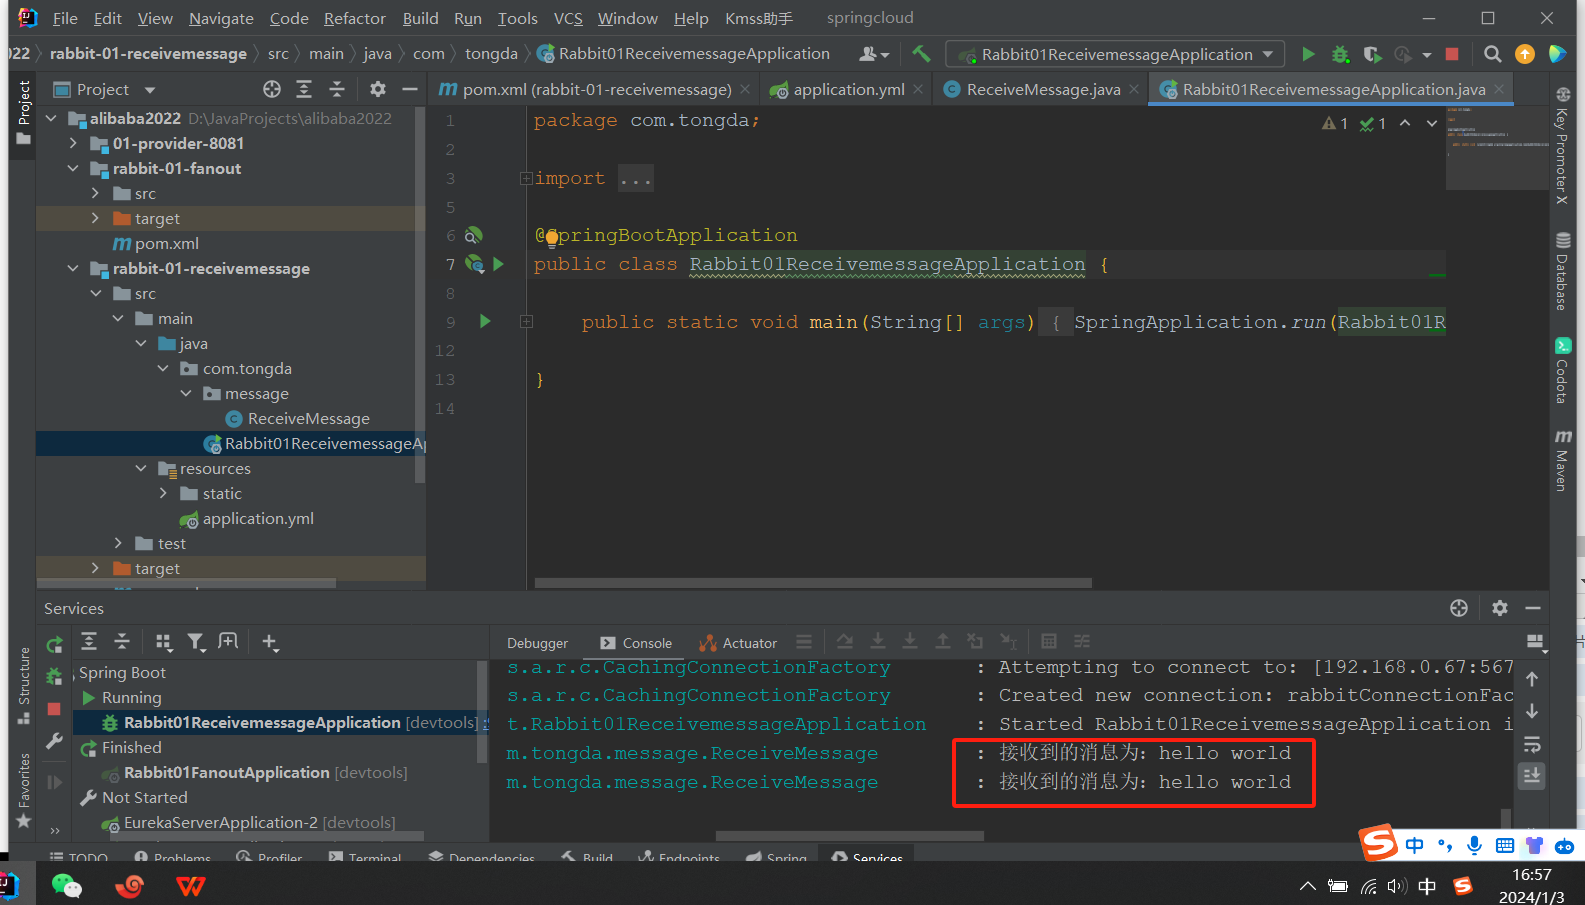
消息接收message/ReceiveMessage
package com.tongda.message;

import lombok.extern.slf4j.Slf4j;
import org.springframework.amqp.core.Message;
import org.springframework.amqp.rabbit.annotation.RabbitListener;
import org.springframework.stereotype.Component;

@Component // 加入spring容器管理
@Slf4j // 日志
public class ReceiveMessage {

    // 接收2个队列消息
    @RabbitListener(queues = {"queue.fanout.a","queue.fanout.b"}) // 监听队列{}
    public void receivemsg(Message message){
        byte[] body = message.getBody(); // 字节数组
        String msg = new String(body); // 将字节转字符串
        log.info("接收到的消息为:{}",msg); // 日志输出
    }
}
启动测试
查看RabbitMQ控制台:队列
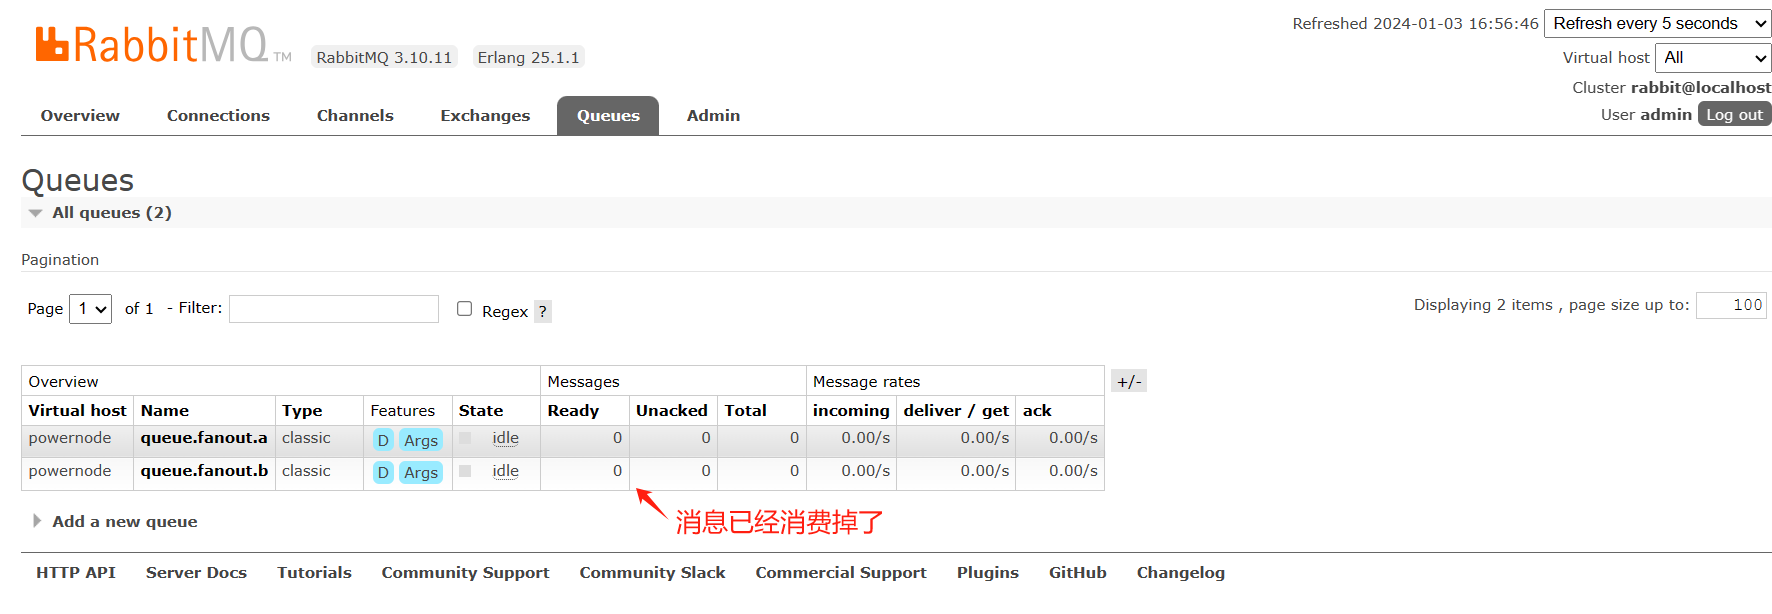
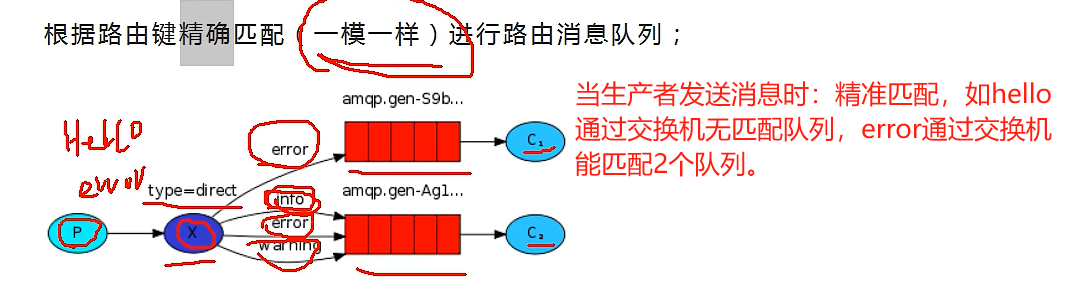
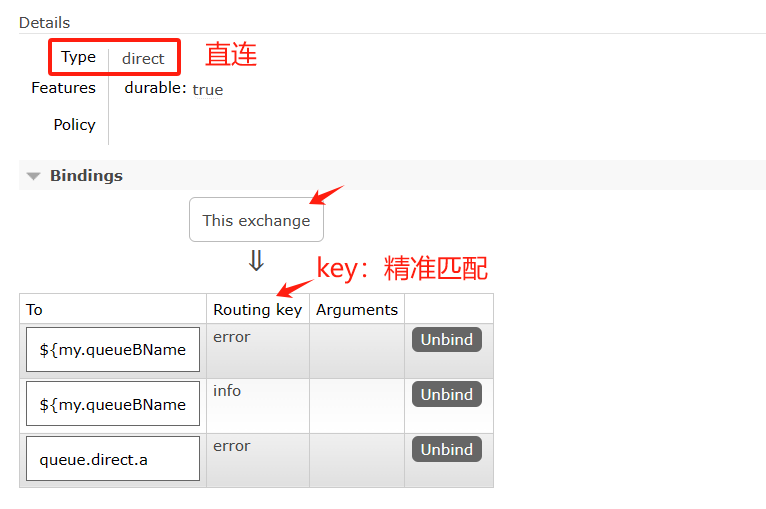
8.3 Direct Exchange(直连交换机)
8.3.1 介绍
根据路由键精确匹配(一模一样)进行路由消息队列;
8.3.2 示例
创建项目:rabbit-02-direct
<!--依赖amqp-->
        <dependency>
            <groupId>org.springframework.boot</groupId>
            <artifactId>spring-boot-starter-amqp</artifactId>
        </dependency>
application.yml
server:
  port: 8080
spring:
  application:
    name: direct-exchange

  rabbitmq:
    host: 192.168.0.67
    port: 5672
    username: admin
    password: 123456
    virtual-host: powernode
将队列信息放入yml配置中
server:
  port: 8080

spring:
  application:
    name: direct-exchange

  rabbitmq:
    host: 192.168.0.67
    port: 5672
    username: admin
    password: 123456
    virtual-host: powernode

my:
  exchangeName: exchange.direct
  queueAName: queue.direct.a
  queueBName: queue.direct.b
注意:import org.springframework.amqp.core 核心引入
package com.tongda.config;

import org.springframework.amqp.core.*;
import org.springframework.boot.context.properties.ConfigurationProperties;
import org.springframework.context.annotation.Bean;
import org.springframework.context.annotation.Configuration;


@Configuration
@ConfigurationProperties(prefix = "my") // yml配置属性
public class RabbitConfig {

    // 交换机的名字
    private String exchangeName;

    // 队列A名称
    private String queueAName;

    // 队列B名称
    private String queueBName;

    // 三部曲
    // 1.定义交换机
    @Bean
    public DirectExchange directExchange(){
        //使用建造者模式创建
        return ExchangeBuilder.directExchange(exchangeName).build();
    }
    // 2.定义队列
    @Bean
    public Queue queueA() {
        // 使用建造者模式创建
        return QueueBuilder.durable(quequeAName).build();
    }
    @Bean
    public Queue queueB() {
        //使用建造者模式创建
        return QueueBuilder.durable(quequeBName).build();
    }
    // 3.交换机绑定队列
    @Bean
    public Binding bindingA(DirectExchange directExchange,Queue queueA){
        // 直连交换:精准匹配error
        return BindingBuilder.bind(queueA).to(directExchange).with("error");
    }
    @Bean
    public Binding bindingB1(DirectExchange directExchange,Queue queueB){
        // 直连交换:精准匹配info
        return BindingBuilder.bind(queueB).to(directExchange).with("info");
    }
    @Bean
    public Binding bindingB2(DirectExchange directExchange,Queue queueB){
        // 直连交换:精准匹配info
        return BindingBuilder.bind(queueB).to(directExchange).with("error");
    }
    @Bean
    public Binding bindingB3(DirectExchange directExchange,Queue queueB){
        // 直连交换:精准匹配info
        return BindingBuilder.bind(queueB).to(directExchange).with("info");
    }
}
发消息:service/MessageService
技巧:使用创造者模式比new构造更好用
package com.tongda.service;

import jakarta.annotation.Resource;
import lombok.extern.slf4j.Slf4j;
import org.springframework.amqp.core.Message;
import org.springframework.amqp.core.MessageBuilder;
import org.springframework.amqp.rabbit.core.RabbitTemplate;
import org.springframework.stereotype.Service;

import java.util.Date;

@Service
@Slf4j
public class MessageService {
    @Resource
    private RabbitTemplate rabbitTemplate;

    public void sendMsg() {
        // 使用构造者builder.withbody(字符串.转换成字节数组).build()创建一个消息
        Message message = MessageBuilder.withBody("hello world".getBytes()).build();
        // 发送:重载方法参数("交换机","路由key",对象)
        rabbitTemplate.convertAndSend("exchange.direct","info",message);
        log.info("消息发送完毕,发送时间为:{}",new Date());
    }

}
修改启动类
package com.tongda;

import com.tongda.service.MessageService;
import org.springframework.beans.factory.annotation.Autowired;
import org.springframework.boot.ApplicationArguments;
import org.springframework.boot.ApplicationRunner;
import org.springframework.boot.SpringApplication;
import org.springframework.boot.autoconfigure.SpringBootApplication;

@SpringBootApplication
public class Rabbit02DirectApplication implements ApplicationRunner { // 重写启动

    public static void main(String[] args) {
        SpringApplication.run(Rabbit02DirectApplication.class, args);
    }

    @Autowired
    private MessageService messageService;
    @Override
    public void run(ApplicationArguments args) throws Exception {
        messageService.sendMsg(); // 项目启动发送消息
    }
}
启动报错:没有注入成功,name为空
org.springframework.beans.factory.BeanCreationException: Error creating bean with name 'queueA' defined in class path resource [com/tongda/config/RabbitConfig.class]: Failed to instantiate [org.springframework.amqp.core.Queue]: Factory method 'queueA' threw exception with message: 'name' cannot be null
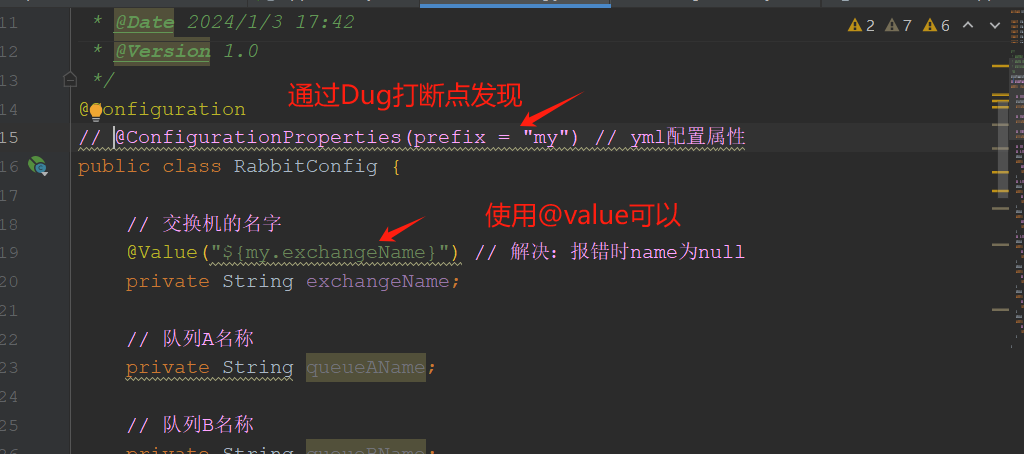
以上是我一开始的配置,使用lombok的@Data注解自动生成get,set等方法,但是这种情况下,测试调用sourceConfig为null,主要参考了stackflow的办法,
问题在于:当前springboot版本里面@ConfigurationProperties默认配置properties文件,而暂时不支持默认导入yml文件(以上yml文件改用properties文件导入是可行不会出现null)
解决办法:
package com.tongda.config;

import org.springframework.amqp.core.*;
import org.springframework.beans.factory.annotation.Value;
import org.springframework.boot.context.properties.ConfigurationProperties;
import org.springframework.context.annotation.Bean;
import org.springframework.context.annotation.Configuration;
import org.springframework.stereotype.Component;

@Configuration
// @ConfigurationProperties(prefix = "my") // yml配置属性
public class RabbitConfig {

    // 交换机的名字
    @Value("${my.exchangeName}") // 解决:报错时name为null
    private String exchangeName;

    // 队列A名称
    @Value("${my.queueAName}")
    private String queueAName;

    // 队列B名称
    @Value("${my.queueBName")
    private String queueBName;

    // 三部曲
    // 1.定义交换机
    @Bean
    public DirectExchange directExchange(){
        //使用建造者模式创建
        return ExchangeBuilder.directExchange(exchangeName).build();
    }
    // 2.定义队列
    @Bean
    public Queue queueA() {
        // 使用建造者模式创建
        return QueueBuilder.durable(queueAName).build();
    }
    @Bean
    public Queue queueB() {
        //使用建造者模式创建
        return QueueBuilder.durable(queueBName).build();
    }
    // 3.交换机绑定队列
    @Bean
    public Binding bindingA(DirectExchange directExchange,Queue queueA){
        // 直连交换:精准匹配error
        return BindingBuilder.bind(queueA).to(directExchange).with("error");
    }
    @Bean
    public Binding bindingB1(DirectExchange directExchange,Queue queueB){
        // 直连交换:精准匹配info
        return BindingBuilder.bind(queueB).to(directExchange).with("info");
    }
    @Bean
    public Binding bindingB2(DirectExchange directExchange,Queue queueB){
        // 直连交换:精准匹配info
        return BindingBuilder.bind(queueB).to(directExchange).with("error");
    }
    @Bean
    public Binding bindingB3(DirectExchange directExchange,Queue queueB){
        // 直连交换:精准匹配info
        return BindingBuilder.bind(queueB).to(directExchange).with("info");
    }
}
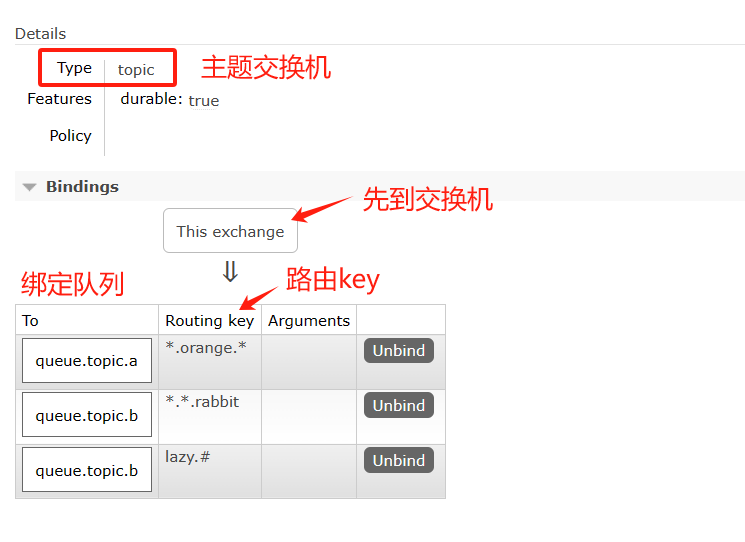
8.4 Topic Exchange(最复杂)主题交换机
8.4.1 介绍
通配符匹配,相当于模糊匹配;
# 匹配多个单词,用来表示任意数量(零个或多个)单词
* 匹配一个单词(必须有一个,而且只有一个),用 . 隔开的为一个单词:
beijing.# == beijing.queue.abc, beijing.queue.xyz.xxx
beijing.* == beijing.queue, beijing.xyz
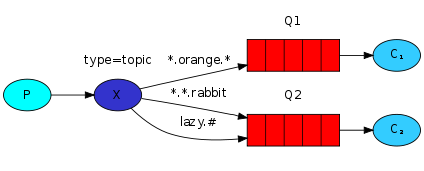
发送时指定的路由键:lazy.orange.rabbit,注:*.*.rabbit,lazy.#都符合,但数据只有1条进入Q2符合逻辑。
8.4.2 示例
三部曲:依赖rabbitmq:amqp,yml配置,核心引入:交换机三部曲
<dependency>
            <groupId>org.springframework.boot</groupId>
            <artifactId>spring-boot-starter-amqp</artifactId>
        </dependency>
server:
  port: 8080

spring:
  application:
    name: topic-exchange

  rabbitmq:
    host: 192.168.0.67
    port: 5672
    username: admin
    password: 123456

my:
  exchangeName: exchange.topic
  queueAName: queue.topic.a
  queueBName: queue.topic.b
config/RabbitConfig
package com.tongda.config;

import org.springframework.amqp.core.*;
import org.springframework.beans.factory.annotation.Value;
import org.springframework.context.annotation.Bean;
import org.springframework.context.annotation.Configuration;


@Configuration
public class RabbitConfig {
    // 对应yml配置
    @Value("${my.exchangeName}")
    // 交换机名字
    private String exchangeName;

    @Value("${my.queueAName}")
    // 队列A名字
    private String queueAName;

    @Value("${my.exchangeBName")
    // 队列B名字
    private String queueBName;

    // rabbitmq三部曲
    @Bean
    public TopicExchange topicExchange() {
        // 创造者模式创建交换机
        return ExchangeBuilder.topicExchange(exchangeName).build();
    }

    @Bean
    public Queue queueA(){
        // 创造队列.durble持久化
        return QueueBuilder.durable(queueAName).build();
    }
    @Bean
    public Queue queueB() {
        return QueueBuilder.durable(queueBName).build();
    }

    // 绑定3个队列
    @Bean
    public Binding bindingA(TopicExchange topicExchange,Queue queueA) {
        // 创造者模式绑定bind(队列A).to(topic交换机).with(通配符)
        return BindingBuilder.bind(queueA).to(topicExchange).with("*.orange.*");
    }
    @Bean
    public Binding bindingB1(TopicExchange topicExchange,Queue queueB){
        // 创造者模式绑定bind(队列A).to(topic交换机).with(通配符)
        return BindingBuilder.bind(queueB).to(topicExchange).with("*.*.rabbit");
    }
    @Bean
    public Binding bindingB2(TopicExchange topicexchange,Queue queueB){
        // 创造者模式绑定bind(队列A).to(topic交换机).with(通配符)
        return BindingBuilder.bind(queueB).to(topicexchange).with("lazy.#");
    }
}
发消息
package com.tongda.service;

import jakarta.annotation.Resource;
import org.springframework.amqp.core.AmqpTemplate;
import org.springframework.amqp.core.Message;
import org.springframework.amqp.core.MessageBuilder;
import org.springframework.amqp.rabbit.core.RabbitTemplate;
import org.springframework.stereotype.Service;


@Service
public class MessageService {

    @Resource
    private AmqpTemplate amqpTemplate; // amqp包含了RabbitTemplate

    public void sendMsg() {
        Message message = MessageBuilder.withBody("hello world".getBytes()).build();
        // 参数1:交换机,参数2:路由key,参数3:消息对象
        amqpTemplate.convertAndSend("exchange.topic","hello.world",message);
    }
}
修改启动类
package com.tongda;

import com.tongda.service.MessageService;
import jakarta.annotation.Resource;
import org.springframework.boot.ApplicationArguments;
import org.springframework.boot.ApplicationRunner;
import org.springframework.boot.SpringApplication;
import org.springframework.boot.autoconfigure.SpringBootApplication;

@SpringBootApplication
public class Rabbit03TopicApplication implements ApplicationRunner {

    public static void main(String[] args) {
        SpringApplication.run(Rabbit03TopicApplication.class, args);
    }

    @Resource
    private MessageService messageService;
    @Override
    public void run(ApplicationArguments args) throws Exception {
        messageService.sendMsg();
    }
}
解决RabbitMQ Caused by: org.springframework.amqp.AmqpIOException: java.io.IOException
解决 Caused by: org.springframework.amqp.AmqpIOException: java.io.IOException
安装好rabiitmq,创建了一个队列,然后启动监听后报错,现在记录一下。
Caused by: org.springframework.amqp.AmqpIOException: java.io.IOException
    at org.springframework.amqp.rabbit.support.RabbitExceptionTranslator.convertRabbitAccessException(RabbitExceptionTranslator.java:71) ~[spring-rabbit-1.7.4.RELEASE.jar:na]
    at org.springframework.amqp.rabbit.connection.RabbitAccessor.convertRabbitAccessException(RabbitAccessor.java:113) ~[spring-rabbit-1.7.4.RELEASE.jar:na]
    at org.springframework.amqp.rabbit.core.RabbitTemplate.doExecute(RabbitTemplate.java:1461) ~[spring-rabbit-1.7.4.RELEASE.jar:na]
    at org.springframework.amqp.rabbit.core.RabbitTemplate.execute(RabbitTemplate.java:1411) ~[spring-rabbit-1.7.4.RELEASE.jar:na]
    at org.springframework.amqp.rabbit.core.RabbitTemplate.execute(RabbitTemplate.java:1387) ~[spring-rabbit-1.7.4.RELEASE.jar:na]
    at org.springframework.amqp.rabbit.core.RabbitAdmin.initialize(RabbitAdmin.java:500) ~[spring-rabbit-1.7.4.RELEASE.jar:na]
    at org.springframework.amqp.rabbit.core.RabbitAdmin$11.onCreate(RabbitAdmin.java:419) ~[spring-rabbit-1.7.4.RELEASE.jar:na]
    at org.springframework.amqp.rabbit.connection.CompositeConnectionListener.onCreate(CompositeConnectionListener.java:33) ~[spring-rabbit-1.7.4.RELEASE.jar:na]
    at org.springframework.amqp.rabbit.connection.CachingConnectionFactory.createConnection(CachingConnectionFactory.java:579) ~[spring-rabbit-1.7.4.RELEASE.jar:na]
    at org.springframework.amqp.rabbit.core.RabbitTemplate.doExecute(RabbitTemplate.java:1430) ~[spring-rabbit-1.7.4.RELEASE.jar:na]
    at org.springframework.amqp.rabbit.core.RabbitTemplate.execute(RabbitTemplate.java:1411) ~[spring-rabbit-1.7.4.RELEASE.jar:na]
    at org.springframework.amqp.rabbit.core.RabbitTemplate.execute(RabbitTemplate.java:1387) ~[spring-rabbit-1.7.4.RELEASE.jar:na]
    at org.springframework.amqp.rabbit.core.RabbitAdmin.getQueueProperties(RabbitAdmin.java:336) ~[spring-rabbit-1.7.4.RELEASE.jar:na]
    at org.springframework.amqp.rabbit.listener.SimpleMessageListenerContainer.redeclareElementsIfNecessary(SimpleMessageListenerContainer.java:1171) ~[spring-rabbit-1.7.4.RELEASE.jar:na]
    ... 2 common frames omitted
发现都是说RabbitMQ 用户的访问权限没有打开。于是登录web端
发现admin账户确实没有设置主题权限(Topic permissions)
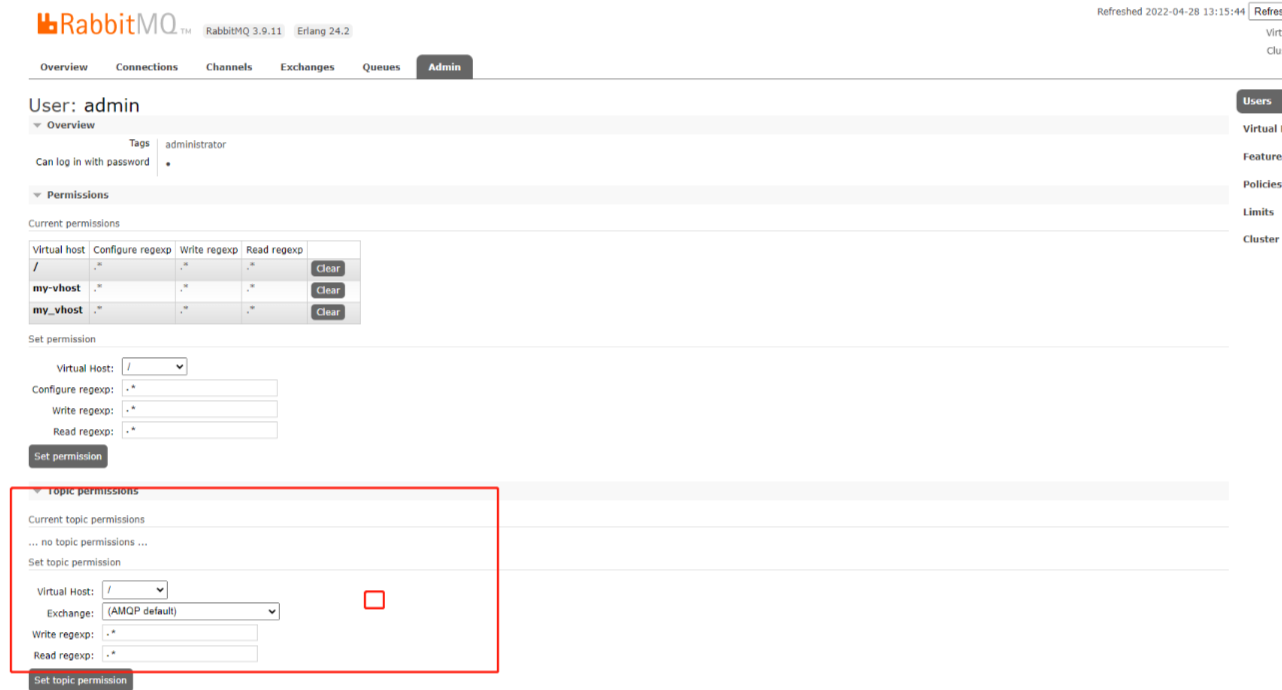
给admin添加Topic permissions 权限
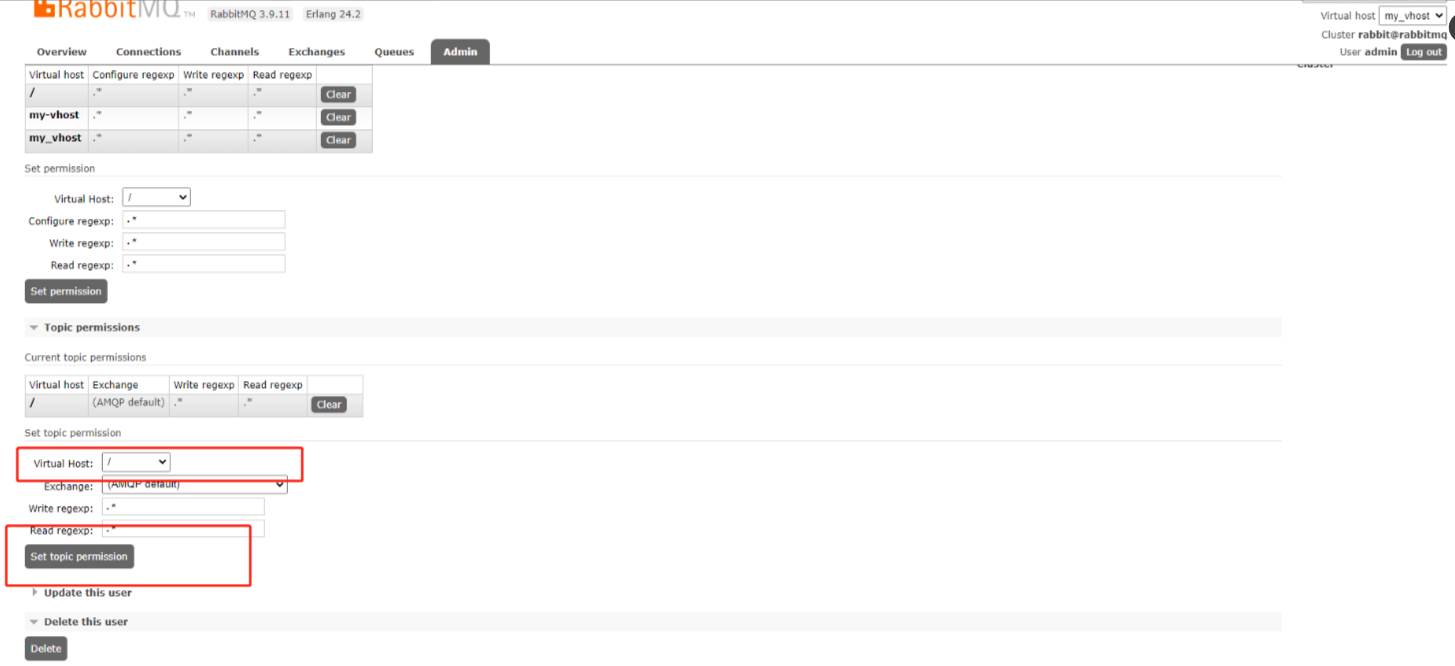
账户添加好权限后系统不在报错。
交换机之间的区别
8.5 Headers Exchange (用的比较少)头部交换机
8.5.1 介绍
基于消息内容中的headers属性进行匹配;

8.5.2 示例
绑定参考代码:
server:
  port: 8080
spring:
  application:
    name: headers-exchange

  rabbitmq:
    host: 192.168.0.67
    port: 5672
    username: admin
    password: 123456
    virtual-host: powernode

my:
  exchangeName: exchange.headers
  queueAName: queue.headers.a
  queueBName: queue.headers.b
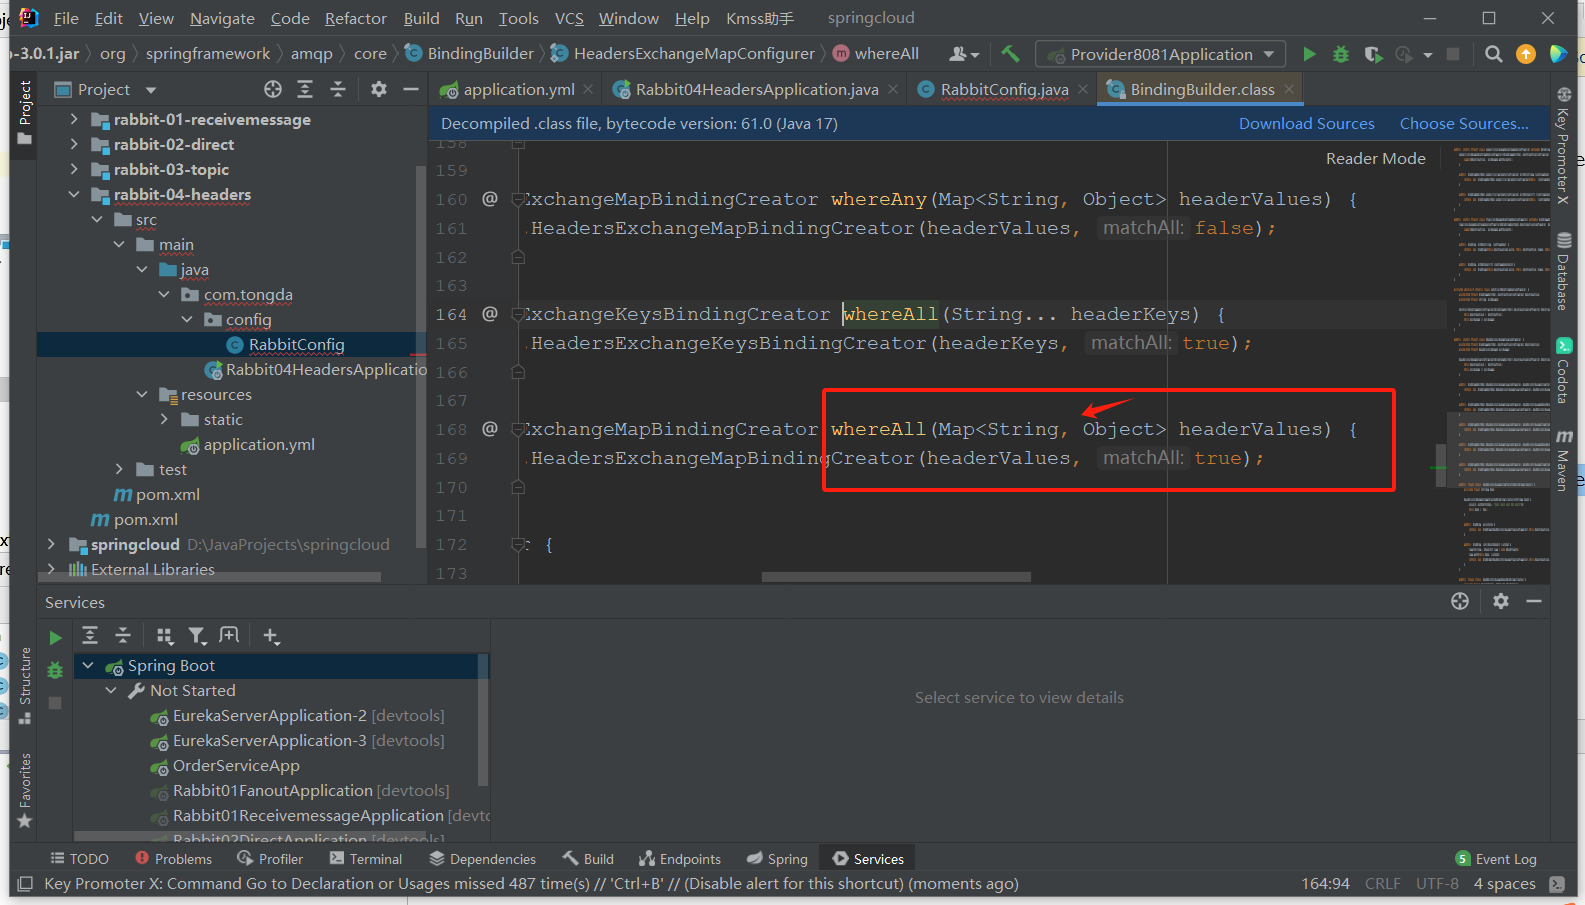
config/RabbitConfig
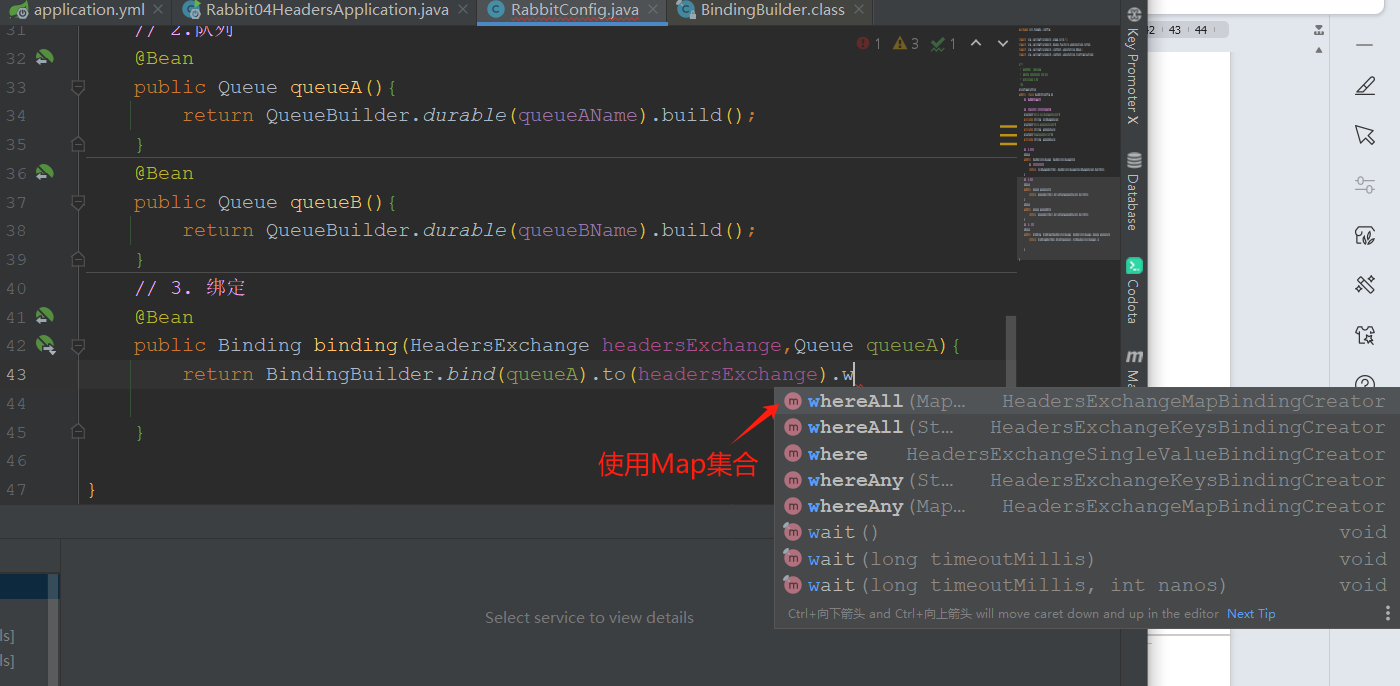
ctrl点击whereAll()进入,查找Map<String,Object> headerValues ,复制返回定义变量。
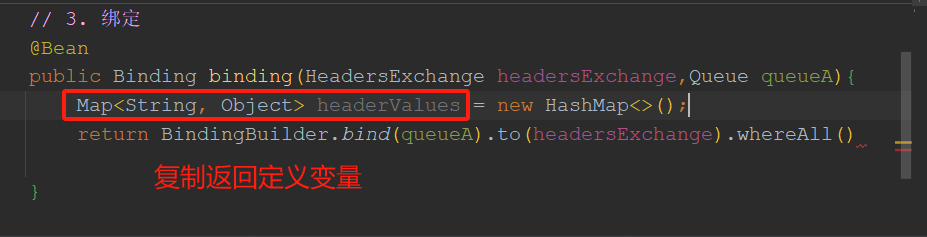
package com.tongda.config;

import org.springframework.amqp.core.*;
import org.springframework.beans.factory.annotation.Value;
import org.springframework.context.annotation.Bean;
import org.springframework.context.annotation.Configuration;


import java.util.HashMap;
import java.util.Map;

@Configuration
public class RabbitConfig {
    // Rabbitmq三部曲

    // 获取yml配置:交换机、队列A\队列B
    @Value("${my.exchanggeName}")
    private String exchangeName;
    @Value("${my.queueAName}")
    private String queueAName;
    @Value("${queueBName}")
    private String queueBName;

    // 1.交换机
    @Bean
    public HeadersExchange headersExchange(){
        // 使用建造者模式创建
        return ExchangeBuilder.headersExchange(exchangeName).build();
    }
    // 2.队列
    @Bean
    public Queue queueA(){
        return QueueBuilder.durable(queueAName).build();
    }
    @Bean
    public Queue queueB(){
        return QueueBuilder.durable(queueBName).build();
    }
    // 3. 绑定
    @Bean
    public Binding bindingA(HeadersExchange headersExchange,Queue queueA){
        Map<String, Object> headerValues = new HashMap<>();
        // 绑定头部指定参数
        headerValues.put("type","m");
        headerValues.put("status",1);
        return BindingBuilder.bind(queueA).to(headersExchange).whereAll(headerValues).match();
    }
    @Bean
    public Binding bindingB(HeadersExchange headersExchange,Queue queueB){
        Map<String, Object> headerValues = new HashMap<>();
        // 绑定头部指定参数
        headerValues.put("type","m");
        headerValues.put("status",1);
        return BindingBuilder.bind(queueB).to(headersExchange).whereAll(headerValues).match();
    }
}
servcie/MessageService
package com.tongda.service;


import jakarta.annotation.Resource;
import lombok.extern.slf4j.Slf4j;
import org.springframework.amqp.core.Message;
import org.springframework.amqp.core.MessageBuilder;
import org.springframework.amqp.core.MessageProperties;
import org.springframework.amqp.rabbit.core.RabbitTemplate;
import org.springframework.beans.factory.annotation.Value;
import org.springframework.stereotype.Service;

import java.util.HashMap;
import java.util.Map;

@Service
@Slf4j
public class MessageService {

    @Resource
    private RabbitTemplate rabbitTemplate;

    @Value("${my.exchangeName}")
    private String exchangeName;

    public void sendMsg(){
        // 消息属性
        MessageProperties messageProperties = new MessageProperties();
        Map<String, Object> headers = new HashMap<>();
        headers.put("type","s");
        headers.put("status",0);
        // 设置消息头
        messageProperties.setHeaders(headers);
        // 添加了消息属性
        Message message = MessageBuilder.withBody("hello world".getBytes())
                .andProperties(messageProperties).build();
        // 头部交换机,路由key无所谓
        rabbitTemplate.convertAndSend(exchangeName,"",message);
        log.info("消息发送完毕,发送时间:{}",message);
    }
}
修改启动
package com.tongda;

import com.tongda.service.MessageService;
import jakarta.annotation.Resource;
import org.springframework.boot.ApplicationArguments;
import org.springframework.boot.ApplicationRunner;
import org.springframework.boot.SpringApplication;
import org.springframework.boot.autoconfigure.SpringBootApplication;

@SpringBootApplication
public class Rabbit04HeadersApplication implements ApplicationRunner {

    public static void main(String[] args) {
        SpringApplication.run(Rabbit04HeadersApplication.class, args);
    }

    @Resource
    private MessageService messageService;
    @Override
    public void run(ApplicationArguments args) throws Exception {
        messageService.sendMsg();
    }
}
学习它的目的是:发消息时可以指定消息属性(MessageProperties)
9. RabbitMQ过期消息
过期消息也叫TTL消息,TTL:Time To Live
消息的过期时间有两种设置方式:(过期消息)
9.1 设置单条消息的过期时间
参考代码
MessageProperties messageProperties = new MessageProperties();
messageProperties.setExpiration("15000"); // 设置过期时间,单位:毫秒
Message message = new Message(json.getBytes(), messageProperties);
//发送消息
amqpTemplate.convertAndSend(RabbitConfig.DIRECT_EXCHANGE, RabbitConfig.DIRECT_ROUTINGKEY, message);
System.out.println("发送完毕:" + new Date());
单条消息的过期时间决定了在没有任何消费者消费时,消息可以存活多久;
package com.tongda.service;

import jakarta.annotation.Resource;
import lombok.extern.slf4j.Slf4j;
import org.springframework.amqp.core.Message;
import org.springframework.amqp.core.MessageBuilder;
import org.springframework.amqp.core.MessageProperties;
import org.springframework.amqp.rabbit.core.RabbitTemplate;
import org.springframework.context.annotation.Bean;
import org.springframework.stereotype.Service;

import java.util.Date;


@Service
@Slf4j
public class MessageService {

    @Resource
    private RabbitTemplate rabbitTemplate;

    @Bean
    public void sendMsg(){
        MessageProperties messageProperties = new MessageProperties();
        // 设置过期时间:setExpiration
        messageProperties.setExpiration("35000"); // 过期的毫秒数,35秒
        Message message = MessageBuilder.withBody("hello world".getBytes())
                .andProperties(messageProperties).build();
        rabbitTemplate.convertAndSend("exchange.ttl","info",message);
        log.info("消息发送时间{}",new Date());
    }
}
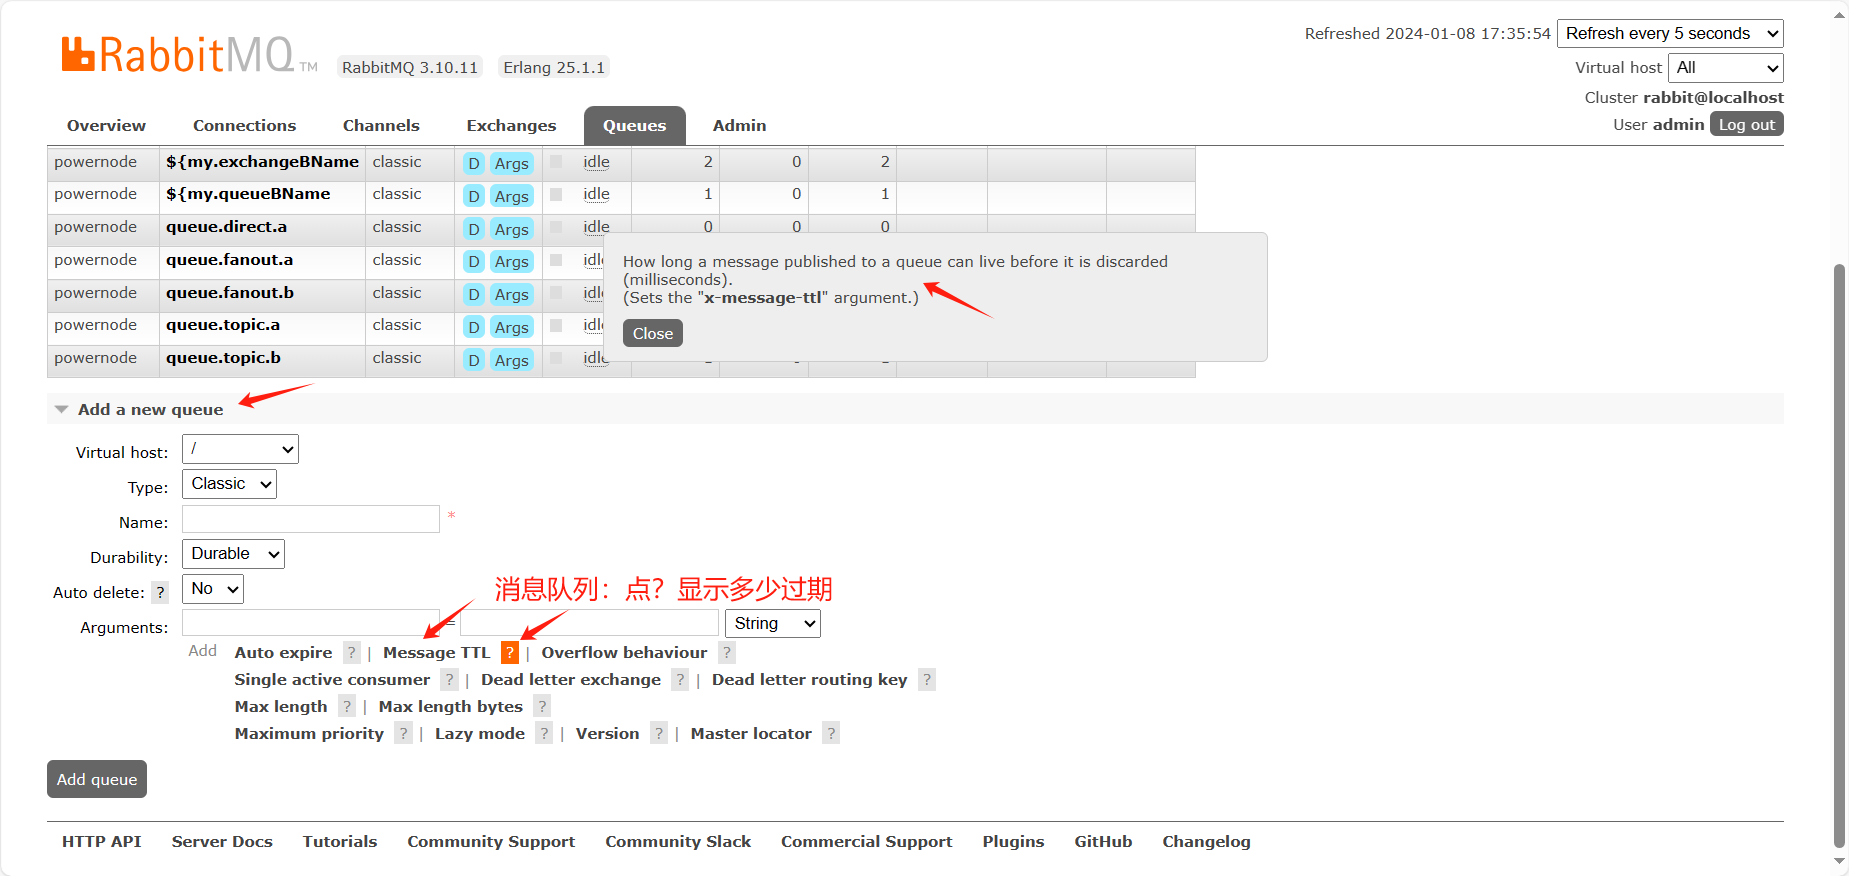
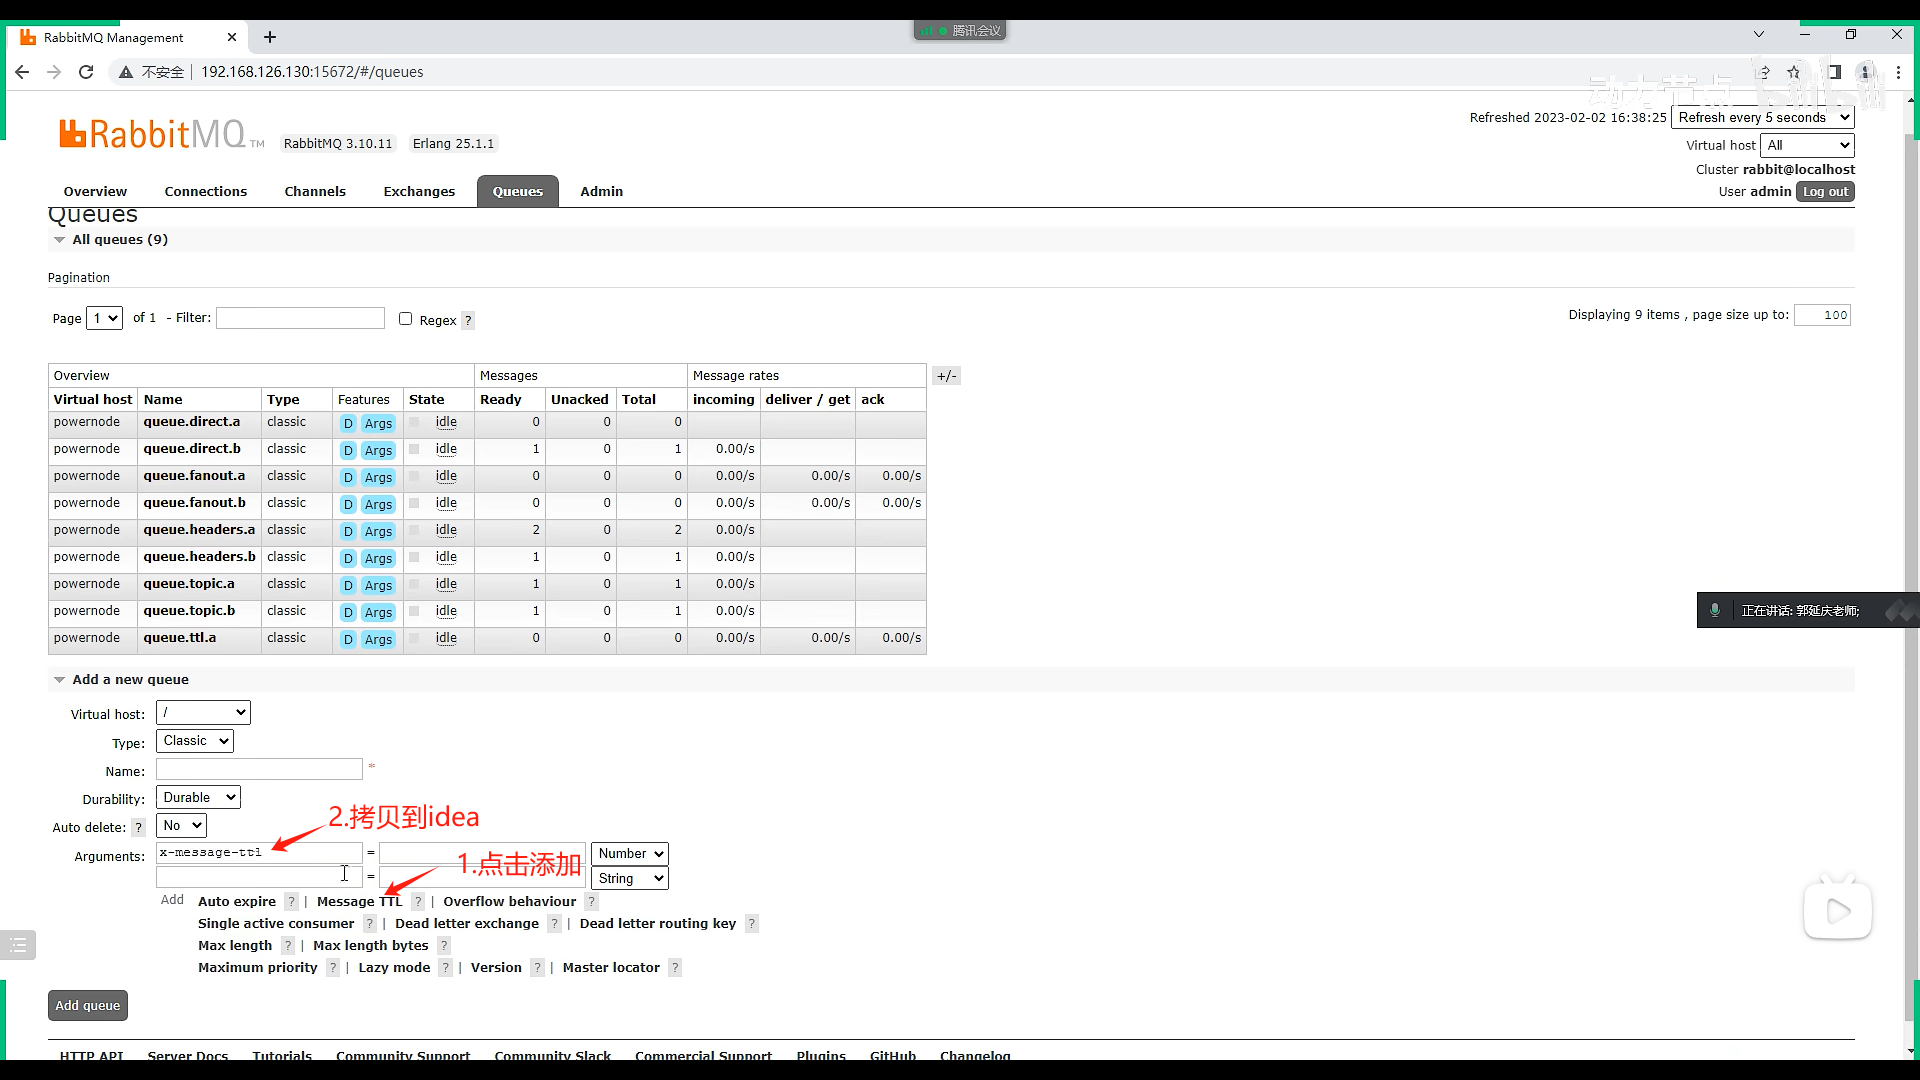
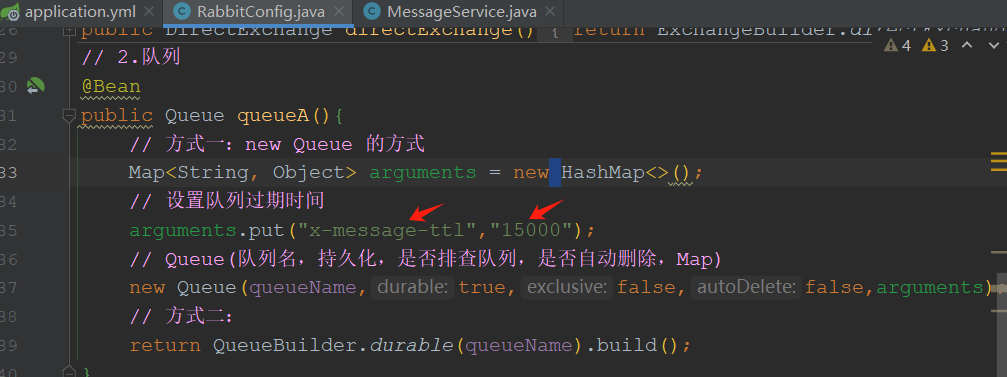
9.2 通过队列属性设置消息过期时间
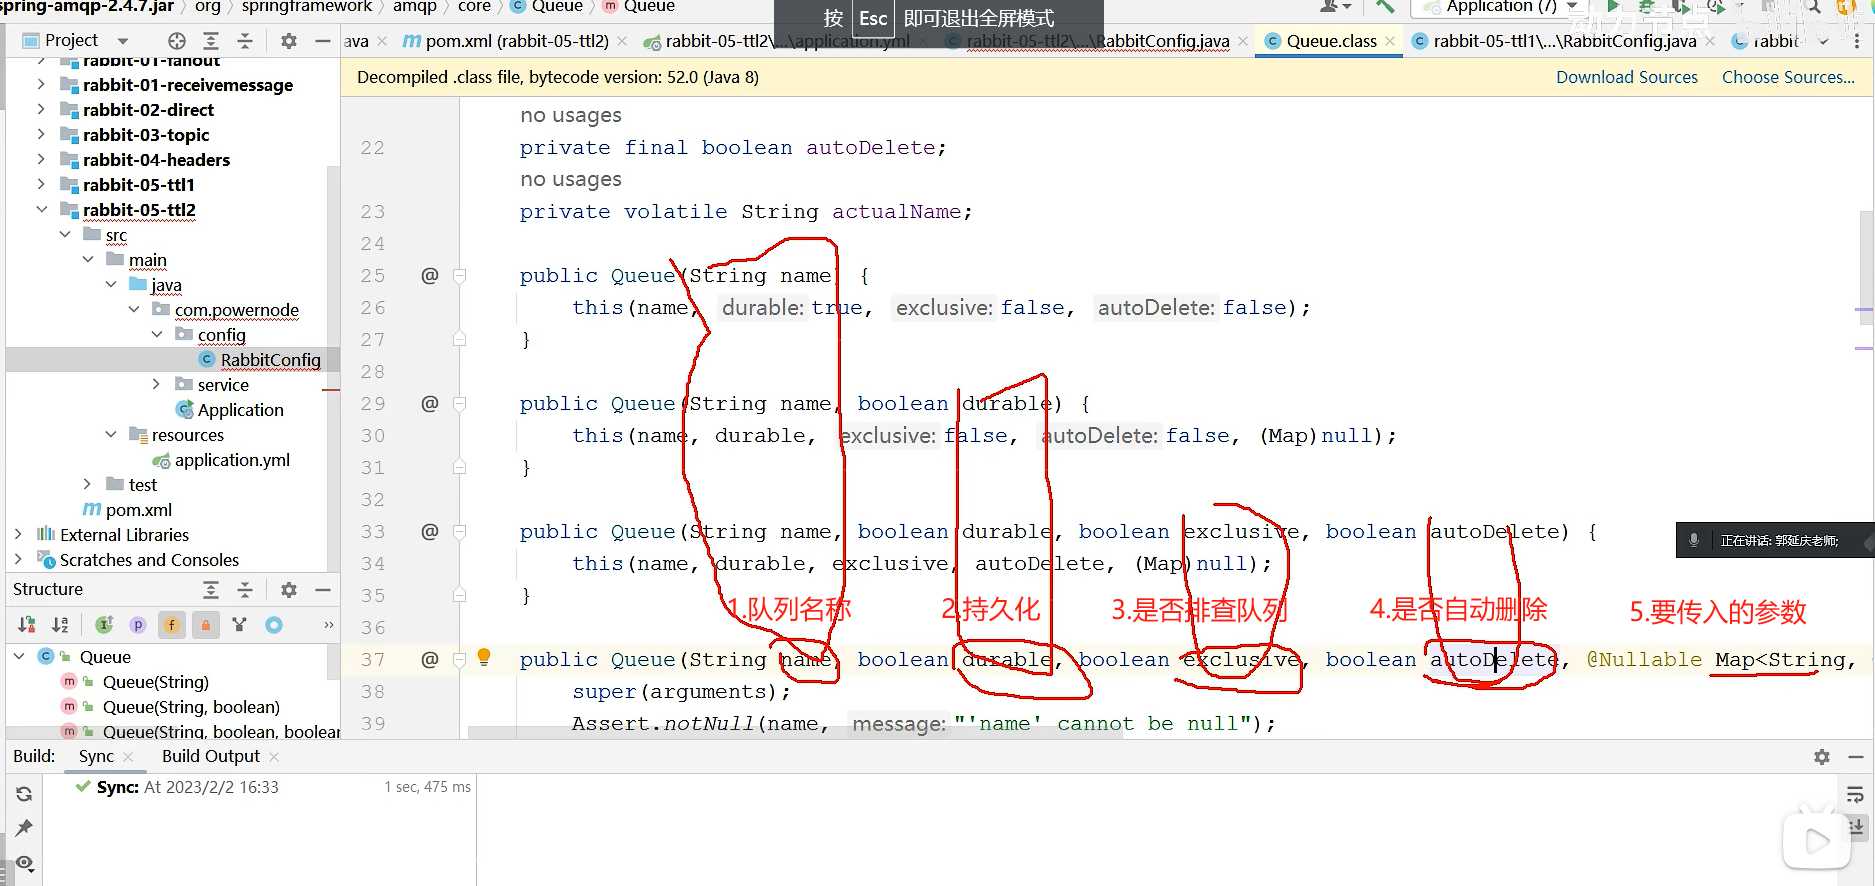
|
@Bean public Queue directQueue() { Map<String, Object> arguments = new HashMap<>(); arguments.put("x-message-ttl", 10000); return new Queue(DIRECT_QUEUE, true, false, false, arguments); } |
队列的过期时间决定了在没有任何消费者的情况下,队列中的消息可以存活多久;
注意事项:
如果消息和对列都设置过期时间,则消息的TTL以两者之间较小的那个数值为准。
config/RabbitConfig
package com.tongda.config;

import org.springframework.amqp.core.*;
import org.springframework.beans.factory.annotation.Value;
import org.springframework.context.annotation.Bean;
import org.springframework.context.annotation.Configuration;

import java.util.HashMap;
import java.util.Map;

@Configuration
public class RabbitConfig {
    @Value("my.exchangeName")
    private String exchangeName;

    @Value("my.queueNme")
    private String queueName;

    // 1.交换机
    @Bean
    public DirectExchange directExchange(){
        return ExchangeBuilder.directExchange(exchangeName).build();
    }
    // 2.队列
    @Bean
    public Queue queueA(){
        // 方式一:new Queue 的方式
        Map<String, Object> arguments = new HashMap<>();
        // 设置队列消息过期时间
        arguments.put("x-message-ttl","15000");
        // Queue(队列名,持久化,是否排查队列,是否自动删除,Map)
        return new Queue(queueName,true,false,false,arguments);
        // 方式二: 建造者模式
/*        return QueueBuilder
                .durable(queueName)
                .withArguments(arguments)
                .build();*/
    }
    // 3.绑定
    @Bean
    public Binding binding(DirectExchange directExchange,Queue queueA){
        return BindingBuilder.bind(queueA).to(directExchange).with("info");
    }
}
service/MessageService
package com.tongda.service;

import jakarta.annotation.Resource;
import lombok.extern.slf4j.Slf4j;
import org.springframework.amqp.core.Message;
import org.springframework.amqp.core.MessageBuilder;
import org.springframework.amqp.core.MessageProperties;
import org.springframework.amqp.rabbit.core.RabbitTemplate;
import org.springframework.context.annotation.Bean;
import org.springframework.stereotype.Service;

import java.util.Date;


@Service
@Slf4j
public class MessageService {

    @Resource
    private RabbitTemplate rabbitTemplate;

    @Bean
    public void sendMsg(){
/*        MessageProperties messageProperties = new MessageProperties();
        // 设置过期时间:setExpiration
        messageProperties.setExpiration("35000"); // 过期的毫秒数,35秒
        Message message = MessageBuilder.withBody("hello world".getBytes())
                .andProperties(messageProperties).build();*/
        Message message = MessageBuilder.withBody("hello world".getBytes()).build();
        rabbitTemplate.convertAndSend("exchange.ttl.b","info",message);
        log.info("消息发送时间{}",new Date());
    }
}
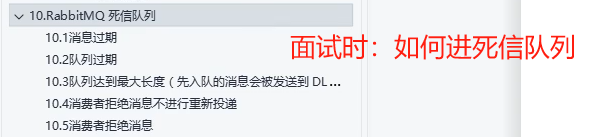
10. RabbitMQ死信队列(面试常问)
也有叫 死信交换机、死信邮箱等说法;
DLX: Dead-Letter-Exchange 死信交换器,死信邮箱
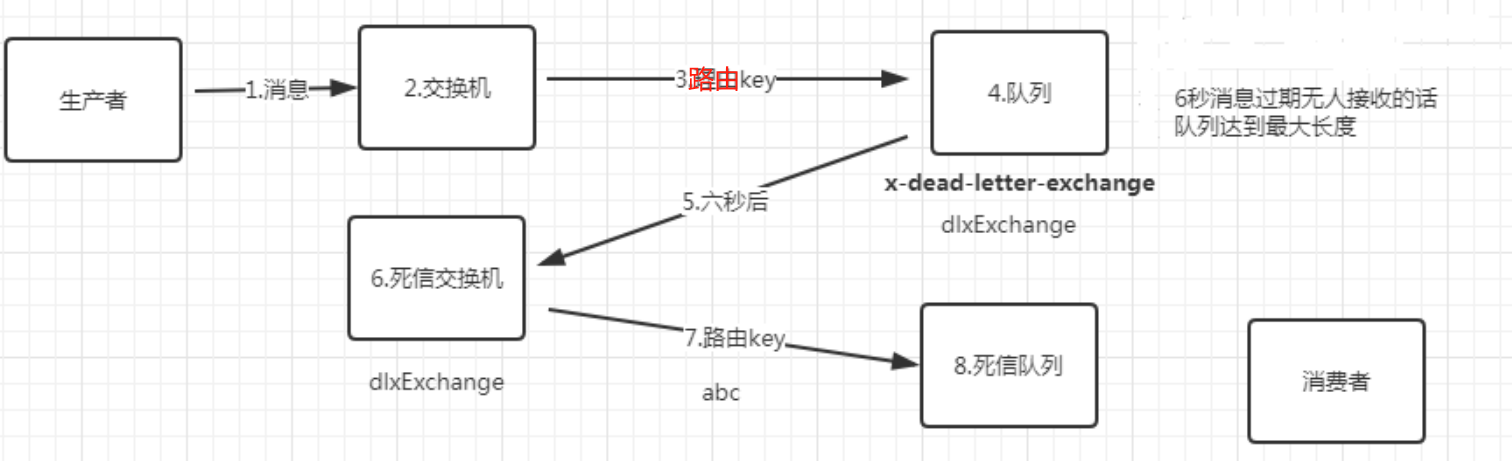
如下情况下一个消息会进入DLX(Dead Letter Exchange)死信交换机。
场景:如火车票购买倒计时,延迟队列就是在死信队列基础上实现的。当用户下订单时,消息通过交换机到队列,当前时间7点,ttl队列消息过期30分钟,7点30进入死信交换机到死信队列,消费者7点30收到消息,对比数据库订单号查询点单是否支付,如未支付订单状态改成取消,也不能继续支付。
10.1 消息过期
参考代码
application.yml
server:
  port: 8080
# 死信交换机
spring:
  application:
    name: dlx-learn1

  rabbitmq:
    host: 192.168.0.67
    port: 5672
    username: admin
    password: 123456
    virtual-host: powernode
# 死信有2个交换机,2个队列
my:
  exchangeNormalNameA: exchange.normal.a # 正常交换机
  exchangeDlxNameB: exchange.dlx.b  # 死信交换机
  queueNormalNameA: queue.normal.a  # 正常队列
  queueDlxNameB: queue.dlx.b  # 死信队列
config/RabbitConfig:1234和6789步骤按直连交换机和队列设置
package com.tongda.config;

import org.springframework.amqp.core.*;
import org.springframework.beans.factory.annotation.Value;
import org.springframework.context.annotation.Bean;
import org.springframework.context.annotation.Configuration;

@Configuration
public class RabbitConfig {

    // 获取yml中的配置
    @Value("${my.exchangNormalNameA}")
    public String exchangeNormalNameA;
    @Value("${my.queueNormalNameA}")
    public String queueNormalNameA;
    @Value("${my.exchangeDlxNameB}")
    public String exchangeDlxNameB;
    @Value("${my.queueDlxNameB}")
    public String queueDlxNameB;

    // Rabbitmq三部曲
    // 1.正常交换机: 直连
    /**
     * 正常交换机和正常队列绑定
     * @param
     * @return {@link DirectExchange}
     * @throws
     * @date 2024/1/9 14:37
     **/
    @Bean
    public DirectExchange normalExchange(){ // 正常交换机
        return ExchangeBuilder.directExchange(exchangeNormalNameA).build();
    }
    @Bean
    public Queue normalQueue(){ // 2.直连队列
        return QueueBuilder.durable(queueNormalNameA).build();
    }
    // 绑定交换机和队列
    @Bean
    public Binding bindingNormal(DirectExchange normalExchange,Queue normalQueue){
        return BindingBuilder.bind(normalQueue).to(normalExchange).with("order");

    }

    // 死信交换机:直连
    @Bean
    public DirectExchange dxlExchange(){ // 1.死信交换机
        return ExchangeBuilder.directExchange(exchangeDlxNameB).build();
    }
    @Bean
    public Queue dxlQueue(){ // 2. 死信队列
        return QueueBuilder.durable(queueDlxNameB).build();
    }
    // 3. 绑定死信交换机和队列
    @Bean
    // 依赖注入(dxlExchange,dxlQueue)
    public Binding bindingDxl(DirectExchange dxlExchange,Queue dxlQueue){
        return BindingBuilder.bind(dxlQueue).to(dxlExchange).with("error");
    }
}
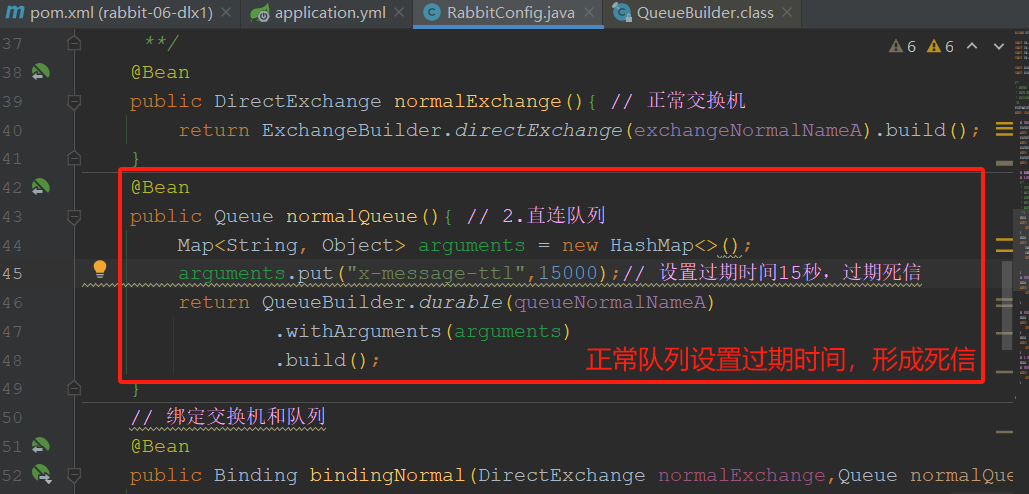
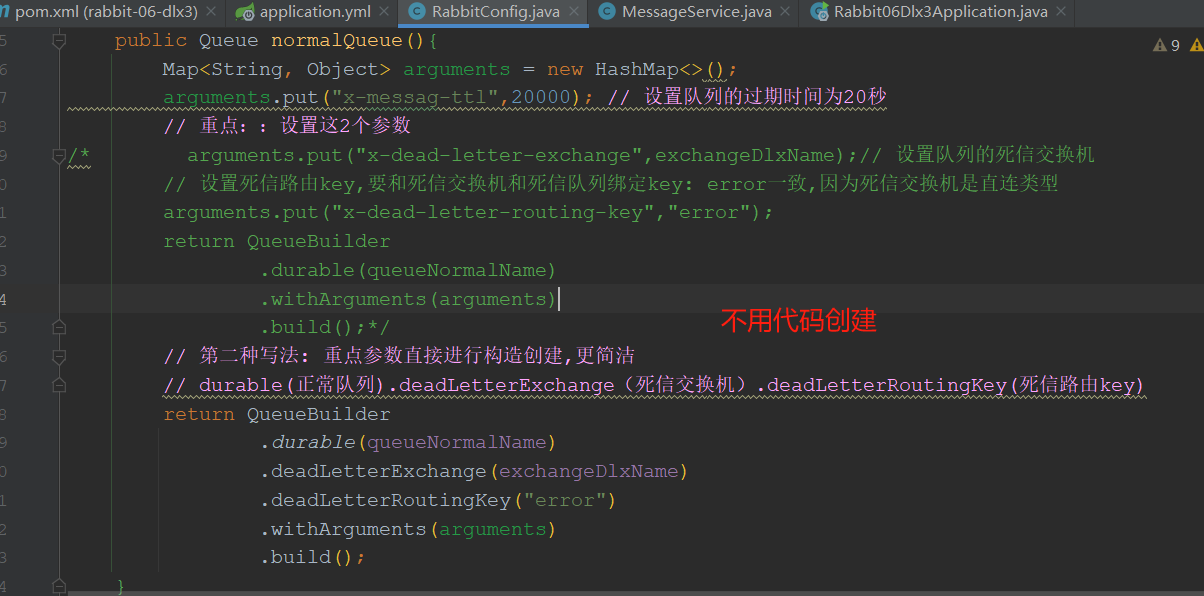
10.2 队列过期
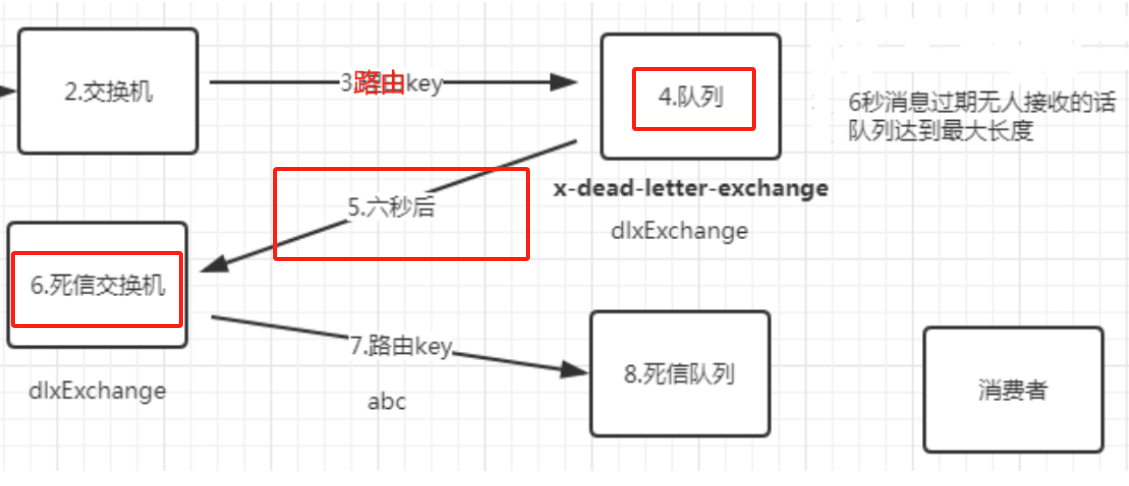
第一步:设置过期形成死信
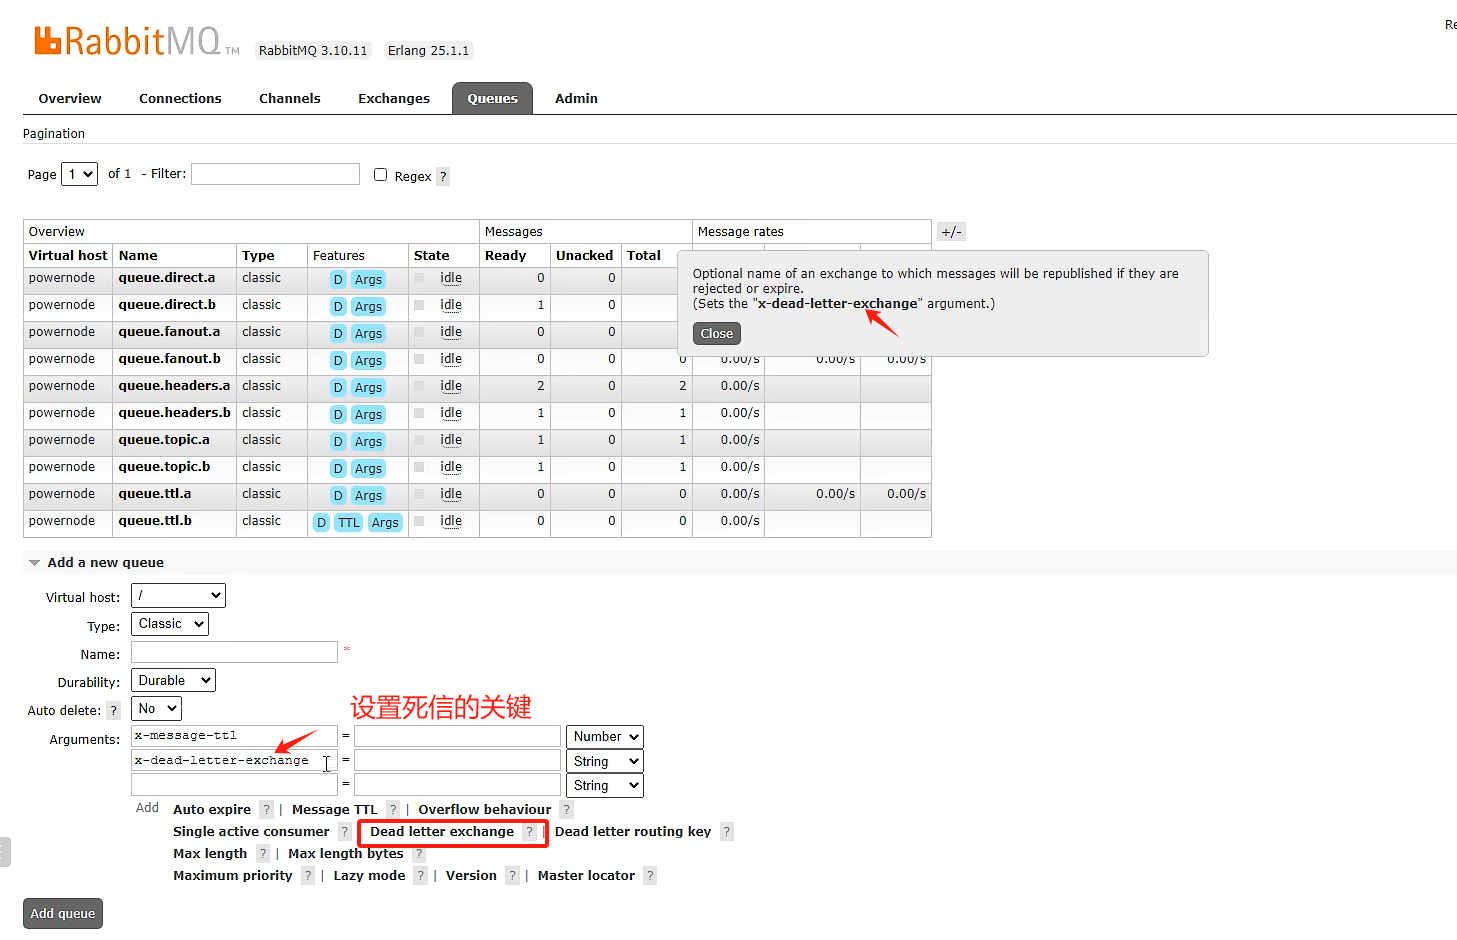
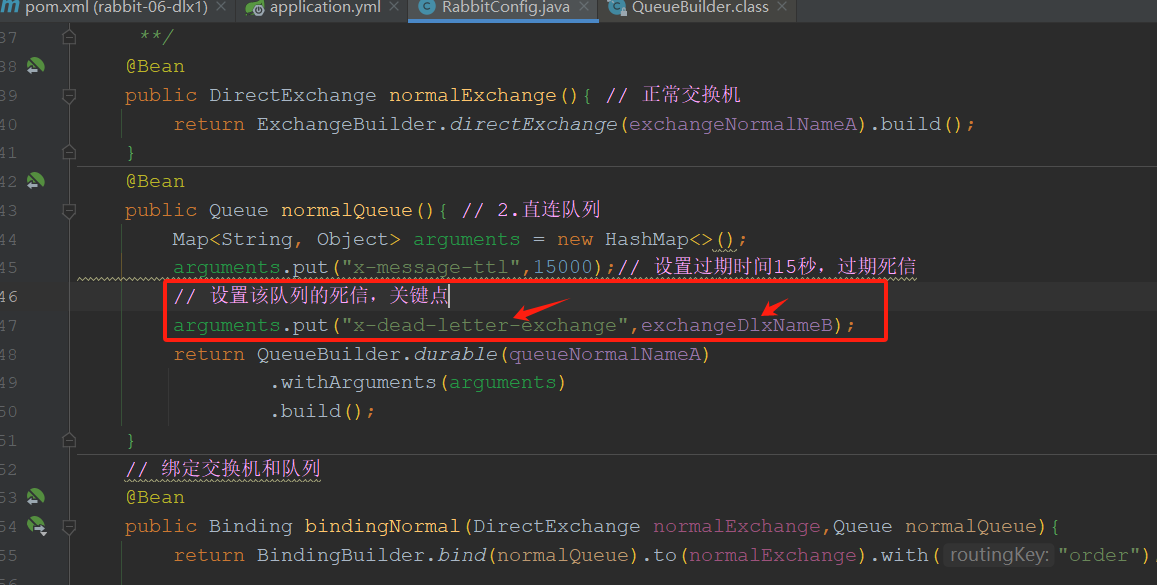
设置5到6死信的关键点
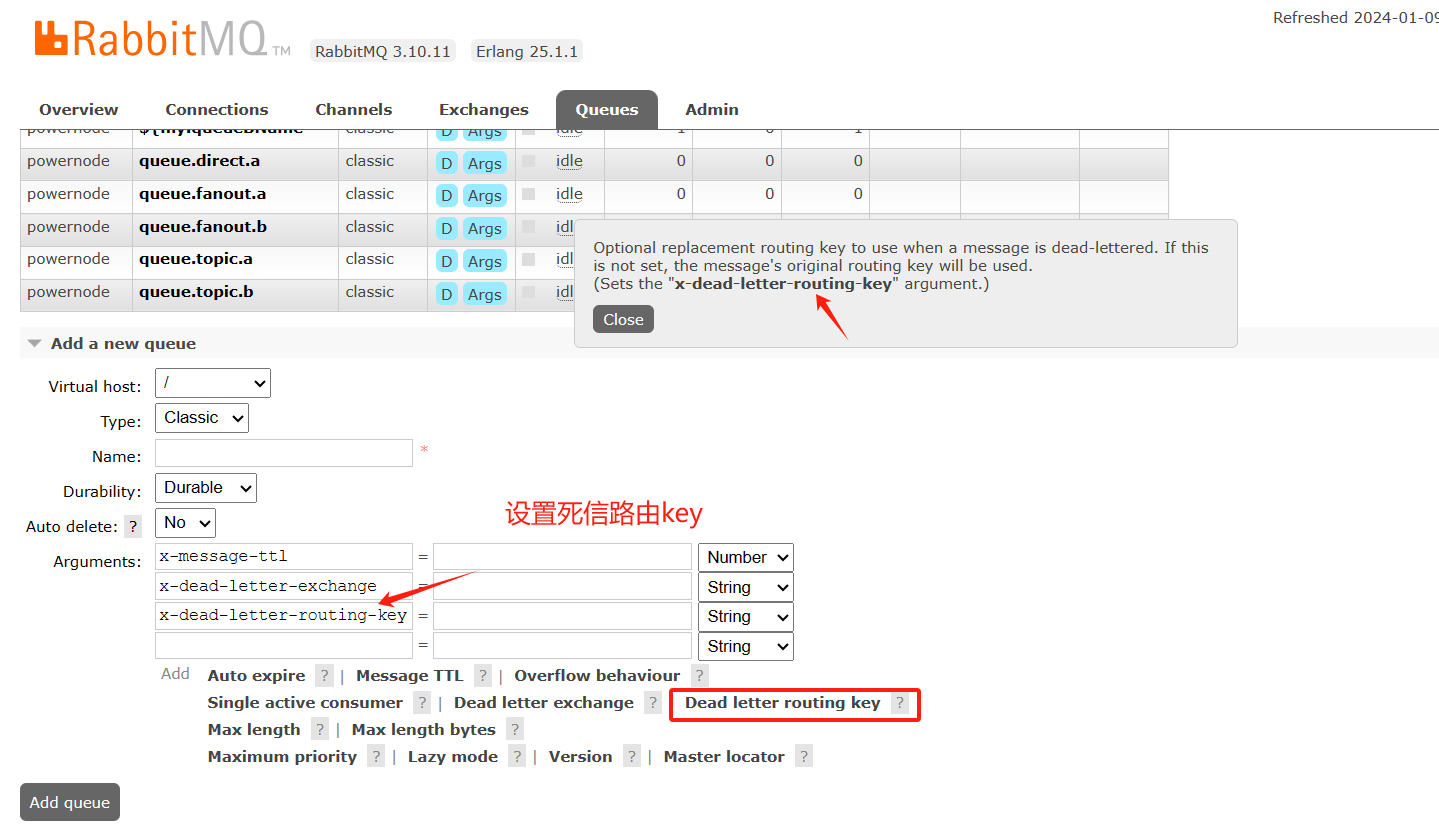
设置7死信路由key
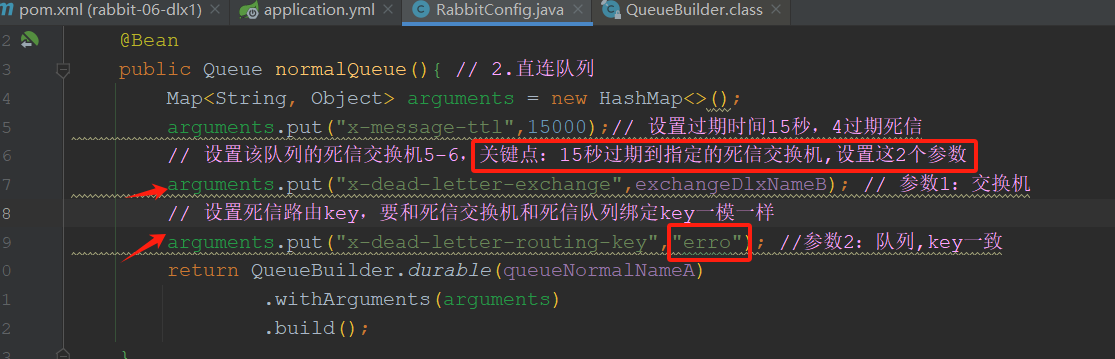

config/RabbitConfig
package com.tongda.config;

import org.springframework.amqp.core.*;
import org.springframework.beans.factory.annotation.Value;
import org.springframework.context.annotation.Bean;
import org.springframework.context.annotation.Configuration;

import java.util.HashMap;
import java.util.Map;


@Configuration
public class RabbitConfig {
    @Value("${my.exchangeNormalName}")
    private String exchangeNormalName;
    @Value("${my.queueNormalName}")
    private String queueNormalName;
    @Value("${my.exchangeDlxName}")
    private String exchangeDlxName;
    @Value("${my.queueDlxName}")
    private String queueDlxName;

    // rabbit三部曲
    // 1.正常交换机
    @Bean
    public DirectExchange normalexchange() {
        return ExchangeBuilder.directExchange(exchangeNormalName).build();
    }
    // 2.正常队列
    @Bean
    public Queue normalQueue(){
        Map<String, Object> arguments = new HashMap<>();
        // arguments.put("x-messag-ttl",20000); // 设置队列的过期时间为20秒
        // 重点::设置这2个参数
/*        arguments.put("x-dead-letter-exchange",exchangeDlxName);// 设置队列的死信交换机
        // 设置死信路由key,要和死信交换机和死信队列绑定key: error一致,因为死信交换机是直连类型
        arguments.put("x-dead-letter-routing-key","error");
        return QueueBuilder
                .durable(queueNormalName)
                .withArguments(arguments)
                .build();*/
        // 第二种写法: 重点2参数直接进行构造创建,更简洁durable(正常队列).deadLetterExchange(死信交换机).deadLetterRoutingKey(死信路由key)
        return QueueBuilder
                .durable(queueNormalName)
                .deadLetterExchange(exchangeDlxName)
                .deadLetterRoutingKey("error")
                .withArguments(arguments)
                .build();
    }
    // 3.绑定交换机和队列:注入依赖
    @Bean
    public Binding normalBinding(DirectExchange normalexchange,Queue normalQueue){
        return BindingBuilder.bind(normalQueue).to(normalexchange).with("order");
    }

    // 1.死信交换机
    @Bean
    public DirectExchange dlxExchange(){
        return ExchangeBuilder.directExchange(exchangeDlxName).build();
    }
    // 2.死信队列
    @Bean
    public Queue dlxQueue() {
        return QueueBuilder.durable(queueDlxName).build();
    }
    // 3.绑定交换机和队列
    @Bean
    public Binding dlxBinding(DirectExchange dlxExchange,Queue dlxQueue){
        return BindingBuilder.bind(dlxQueue).to(dlxExchange).with("error");
    }
}
service/MessageService发消息
package com.tongda.service;

import jakarta.annotation.Resource;
import lombok.extern.slf4j.Slf4j;
import org.springframework.amqp.core.Message;
import org.springframework.amqp.core.MessageBuilder;
import org.springframework.amqp.core.MessageProperties;
import org.springframework.amqp.rabbit.core.RabbitTemplate;
import org.springframework.stereotype.Component;

import java.util.Date;

@Component
@Slf4j
public class MessageService {

    @Resource
    private RabbitTemplate rabbitTemplate;

    public void sendMsg() {
        // 消息属性
        MessageProperties messageProperties = new MessageProperties();
        // 设置单条消息的过期时间,单位为毫秒,数据类型为字符串
        messageProperties.setExpiration("15000");
        // 构造发消息:字符串转字节
        Message message = MessageBuilder.withBody("hello world".getBytes())
                .andProperties(messageProperties)
                .build();
        rabbitTemplate.convertAndSend("exchange.normal.2","order",message);
        log.info("消息发送完毕,发送时间:{}",new Date());
    }
}
修改启动类:启动时发送消息
package com.tongda;

import com.tongda.service.MessageService;
import jakarta.annotation.Resource;
import org.springframework.boot.ApplicationArguments;
import org.springframework.boot.ApplicationRunner;
import org.springframework.boot.SpringApplication;
import org.springframework.boot.autoconfigure.SpringBootApplication;

@SpringBootApplication
public class Rabbit06Dlx1Application implements ApplicationRunner {

    public static void main(String[] args) {
        SpringApplication.run(Rabbit06Dlx1Application.class, args);
    }

    @Resource
    private MessageService messageService;
    @Override
    public void run(ApplicationArguments args) throws Exception {
        messageService.sendMsg();
    }
}
TTL: Time to Live的简称,过期时间
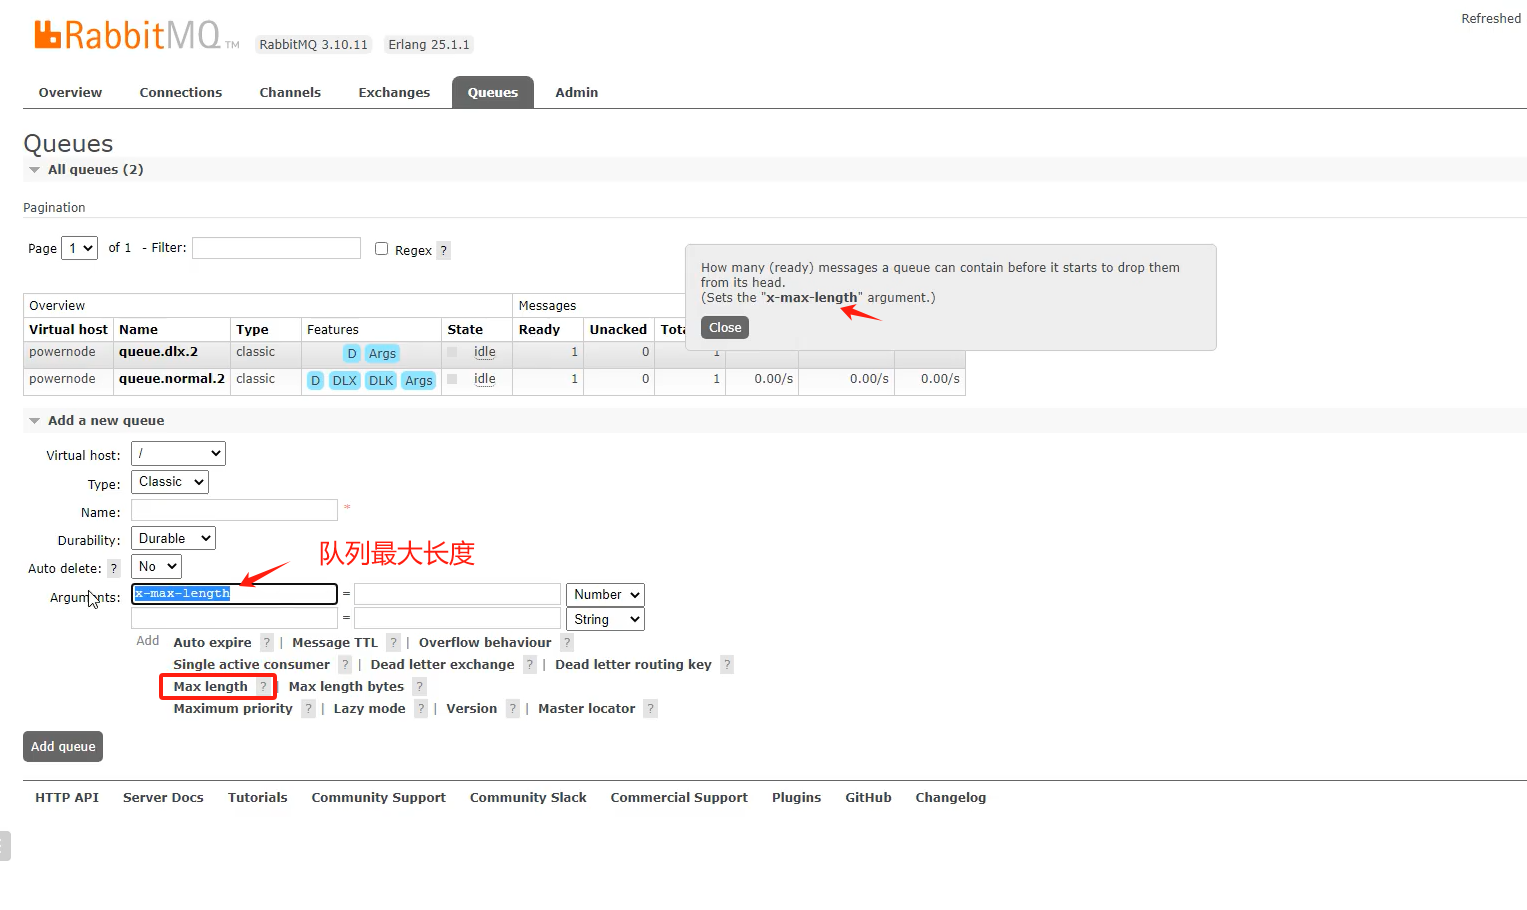
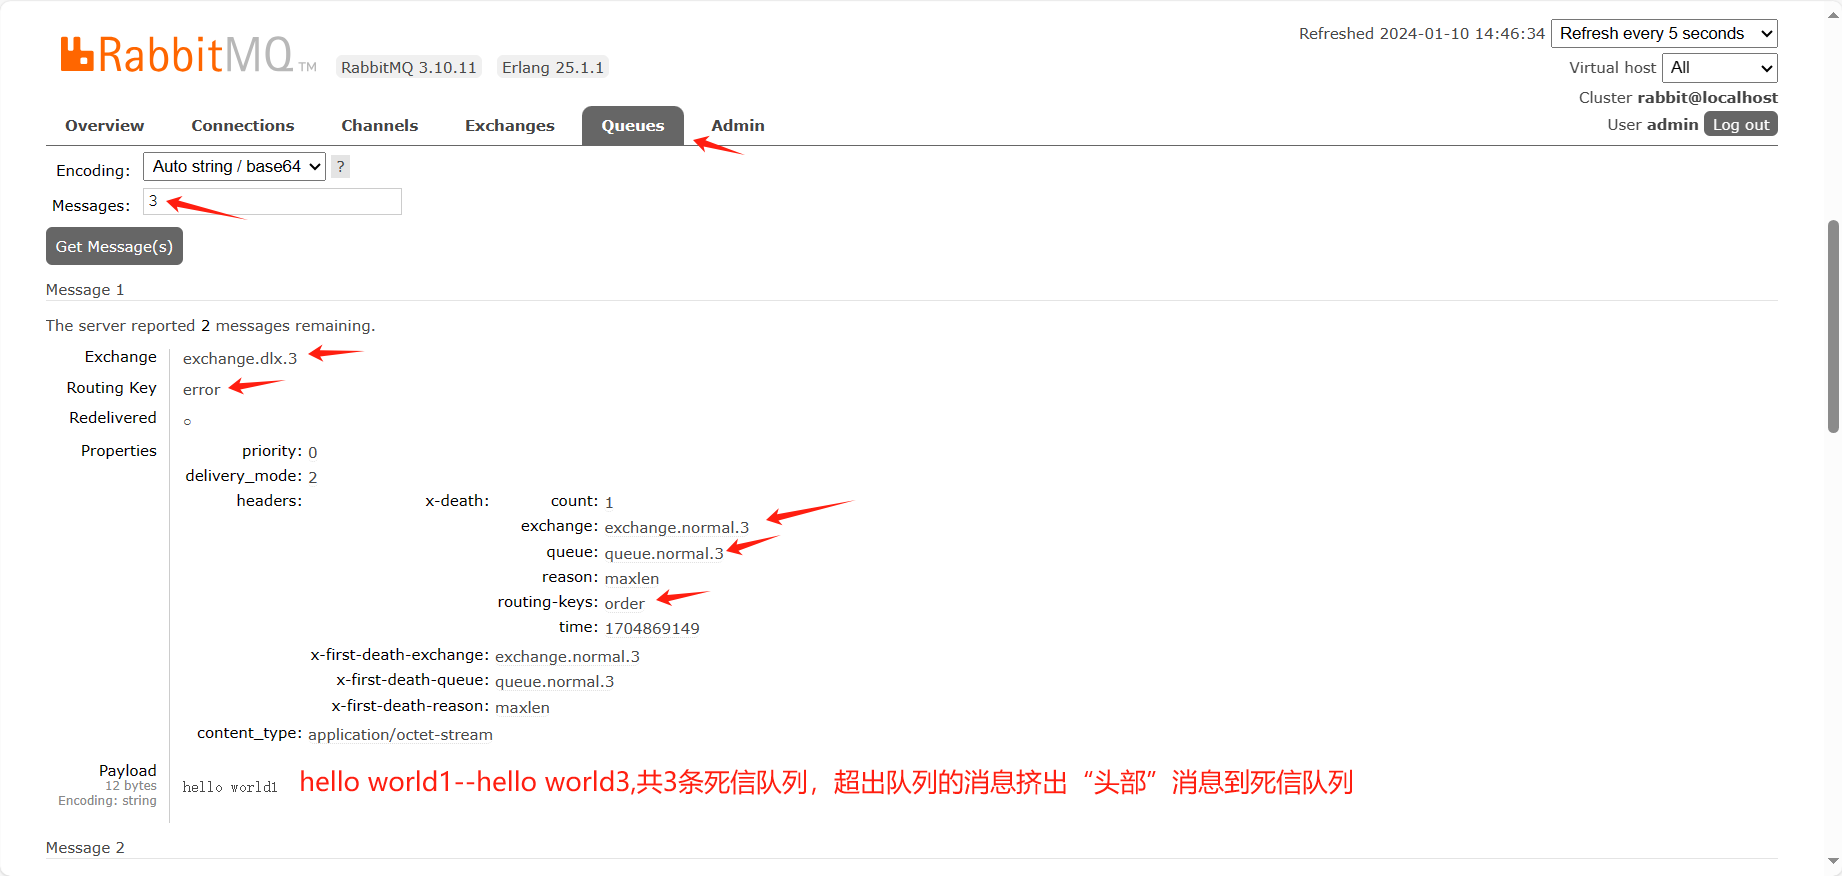
10.3 队列达到最大长度(先入队的消息会被发送到DLX)
Map<String, Object> arguments = new HashMap<String, Object>();
//设置队列的最大长度 ,对头的消息会被挤出变成死信
arguments.put("x-max-length", 5);
package com.tongda.config;

import org.springframework.amqp.core.*;
import org.springframework.beans.factory.annotation.Value;
import org.springframework.context.annotation.Bean;
import org.springframework.context.annotation.Configuration;

import java.util.HashMap;
import java.util.Map;

@Configuration
public class RabbitConfig {
    @Value("${my.exchangeNormalName}")
    private String exchangeNormalName;
    @Value("${my.queueNormalName}")
    private String queueNormalName;
    @Value("${my.exchangeDlxName}")
    private String exchangeDlxName;
    @Value("${my.queueDlxName}")
    private String queueDlxName;

    // rabbit三部曲
    // 1.正常交换机
    @Bean
    public DirectExchange normalexchange() {
        return ExchangeBuilder.directExchange(exchangeNormalName).build();
    }
    // 2.正常队列
    @Bean
    public Queue normalQueue(){
        Map<String, Object> arguments = new HashMap<>();
        // 设置队列的最大的长度
        arguments.put("x-max-length",5);
        // arguments.put("x-messag-ttl",20000); // 设置队列的过期时间为20秒
        // 重点::设置这2个参数
/*        arguments.put("x-dead-letter-exchange",exchangeDlxName);// 设置队列的死信交换机
        // 设置死信路由key,要和死信交换机和死信队列绑定key: error一致,因为死信交换机是直连类型
        arguments.put("x-dead-letter-routing-key","error");
        return QueueBuilder
                .durable(queueNormalName)
                .withArguments(arguments)
                .build();*/
        // 第二种写法: 重点参数直接进行构造创建,更简洁
        // durable(正常队列).deadLetterExchange(死信交换机).deadLetterRoutingKey(死信路由key)
        return QueueBuilder
                .durable(queueNormalName)
                .deadLetterExchange(exchangeDlxName)
                .deadLetterRoutingKey("error")
                .withArguments(arguments) // 设置队列的参数
                .build();
    }
    // 3.绑定交换机和队列:注入依赖
    @Bean
    public Binding normalBinding(DirectExchange normalexchange,Queue normalQueue){
        return BindingBuilder.bind(normalQueue).to(normalexchange).with("order");
    }

    // 1.死信交换机
    @Bean
    public DirectExchange dlxExchange(){
        return ExchangeBuilder.directExchange(exchangeDlxName).build();
    }
    // 2.死信队列
    @Bean
    public Queue dlxQueue() {
        return QueueBuilder.durable(queueDlxName).build();
    }
    // 3.绑定交换机和队列
    @Bean
    public Binding dlxBinding(DirectExchange dlxExchange,Queue dlxQueue){
        return BindingBuilder.bind(dlxQueue).to(dlxExchange).with("error");
    }
}
service/MessageService
package com.tongda.service;

import jakarta.annotation.Resource;
import lombok.extern.slf4j.Slf4j;
import org.springframework.amqp.core.Message;
import org.springframework.amqp.core.MessageBuilder;
import org.springframework.amqp.core.MessageProperties;
import org.springframework.amqp.rabbit.core.RabbitTemplate;
import org.springframework.stereotype.Component;

import java.util.Date;

@Component
@Slf4j
public class MessageService {

    @Resource
    private RabbitTemplate rabbitTemplate;

    public void sendMsg() {
/*        // 消息属性
        MessageProperties messageProperties = new MessageProperties();
        // 设置单条消息的过期时间,单位为毫秒,数据类型为字符串
        messageProperties.setExpiration("15000");
        // 构造发消息:字符串转字节
        Message message = MessageBuilder.withBody("hello world".getBytes())
                .andProperties(messageProperties)
                .build();*/
        // 队列的最大长度是5
        for (int i = 1; i <= 8; i++) {
            String str = "hello world" + i;
            Message message = MessageBuilder.withBody(str.getBytes()).build();
            rabbitTemplate.convertAndSend("exchange.normal.3","order",message);
        }
        log.info("消息发送完毕,发送时间:{}",new Date());
    }
    // 问题1:for循环1-8条消息,哪几条消息会进入死信队列,是123没进入队列还是678没进入
    // 问题2:发完消息多长时间进入队列,有3条会进入死信队列,没有过期时间直接进入
}
队列达到最大长度(先入队的消息会被发送到DLX)
|
Map<String, Object> arguments = new HashMap<String, Object>(); // 设置队列的最大长度 ,对头的消息会被挤出变成死信 arguments.put("x-max-length", 5); |
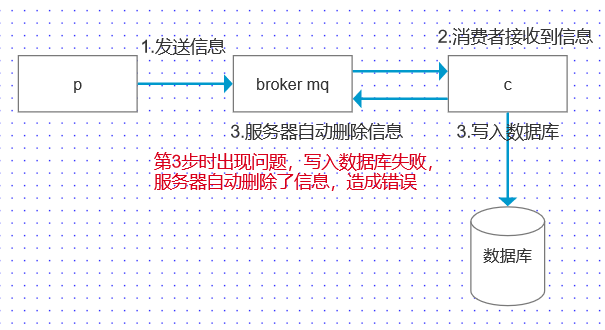
10.4 消费者拒绝消息不进行重新投递
从正常的队列接收消息,但是对消息不进行确认,并且不对消息进行重新投递,此时消息就进入死信队列。
创建消费者接收信息
application.yml
# 消费者(接收)
server:
  port: 9090

spring:
  application:
    name: dlx-receiver-msg
  #配置rabbitmq服务器的信息
  rabbitmq:
    host: 192.168.0.67
    port: 5672
    username: 123456
    virtual-host: powernode
# 自定义
message.MessageReceiver
package com.tongda.message;

import lombok.extern.slf4j.Slf4j;
import org.springframework.amqp.core.Message;
import org.springframework.amqp.rabbit.annotation.RabbitListener;
import org.springframework.stereotype.Component;

import java.util.Date;

@Component
@Slf4j
public class MessageReceiver {
    // 接收消息:监听dlx4正常队列中的消息
    @RabbitListener(queues = {"queue.normal.4"})
    public void sendMsg(Message message){
        // 获取消息体
        byte[] body = message.getBody();
        // 字节转字符串
        String str = new String(body);
        log.info("接收到的消息为:{},接收时间为:{}" , str,new Date());
    }
}
消费者的自动确认!但有问题
解决方法:消费者接收端配置
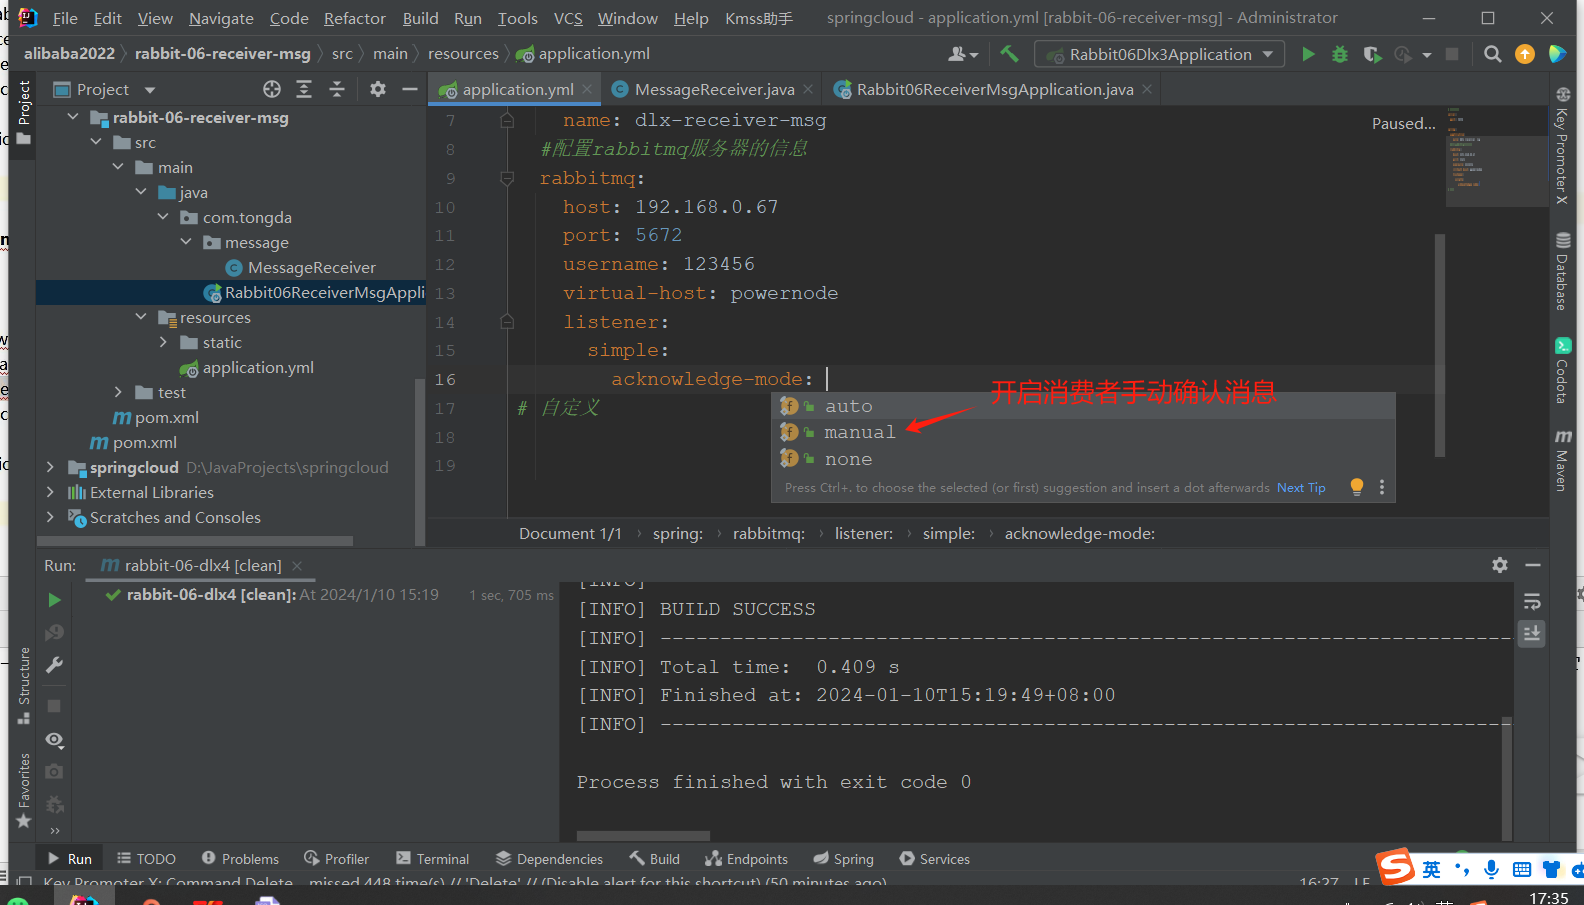
application.yml 启动手动确认
# 消费者(接收)
server:
  port: 9090

spring:
  application:
    name: dlx-receiver-msg
  #配置rabbitmq服务器的信息
  rabbitmq:
    host: 192.168.0.67
    port: 5672
    username: 123456
    virtual-host: powernode
    # 监听开启:消费者手动确认开启
    listener:
      simple:
        acknowledge-mode: manual
# 自定义

增加信道channel
package com.tongda.message;

import com.rabbitmq.client.Channel;
import lombok.extern.slf4j.Slf4j;
import org.springframework.amqp.core.Message;
import org.springframework.amqp.core.MessageProperties;
import org.springframework.amqp.rabbit.annotation.RabbitListener;
import org.springframework.stereotype.Component;

import java.io.IOException;
import java.util.Date;

@Component
@Slf4j
public class MessageReceiver {
    // 接收消息:监听dlx4正常队列中的消息
    @RabbitListener(queues = {"queue.normal.4"})
    public void sendMsg(Message message, Channel channel){
        // 获取消息属性
        MessageProperties messageProperties = message.getMessageProperties();
        // 获取消息属性唯一标识,长整型类似身份证或者学号
        long deliveryTag = messageProperties.getDeliveryTag();
        try {
            // 获取消息体
            byte[] body = message.getBody();
            // 字节转字符串
            String str = new String(body);
            log.info("接收到的消息为:{},接收时间为:{}" , str,new Date());
            // TODO 业务逻辑处理
            int a = 1/0; // 错误模拟
            // 消费者的手动确认,使用信道channel:告知服务器可以删除信息
            // deliveryTag唯一标识,false一次只确认当前一条,true为批量
            channel.basicAck(deliveryTag,false);
        } catch (Exception e) {
            log.error("接受者出现问题:{}",e.getMessage());
            try {
                // 信道.告诉服务器不要删(标识,当前信息,true重新入队列),不会进入死信队列
                // channel.basicNack(deliveryTag,false,true);
                // 信道.告诉服务器不要删(标识,当前信息,flash不重新入队),会进入死信队列
                channel.basicNack(deliveryTag,false,true);
            } catch (IOException ex) {
                ex.printStackTrace();
            }
            e.printStackTrace();
        }
    }
}
参考代码
/**
         * 参考代码
         * 监听正常的那个队列的名字,不是监听那个死信队列
         * 我们从正常的队列接收消息,但是对消息不进行确认,并且不对消息进行重新投递,此时消息就进入死信队列
         *
         * channel 消息信道(是连接下的一个消息信道,一个连接下有多个消息信息,发消息/接消息都是通过信道完成的)
         */
        @RabbitListener(queues = {RabbitConfig.QUEUE})
        public void process(Message message, Channel channel) {
            System.out.println("接收到的消息:" + message);
            //对消息不确认, ack单词是 确认 的意思
            // void basicNack(long deliveryTag, boolean multiple, boolean requeue)
            // deliveryTag:消息的一个数字标签
            // multiple:翻译成中文是多个的意思,如果是true表示对小于deliveryTag标签下的消息都进行Nack不确认,false表示只对当前deliveryTag标签的消息Nack
            // requeue:如果是true表示消息被Nack后,重新发送到队列,如果是false,消息被Nack后,不会重新发送到队列
            try {
                System.out.println("deliveryTag = " + message.getMessageProperties().getDeliveryTag());
                //要开启rabbitm消息消费的手动确认模式,然后才这么写代码;
                channel.basicNack(message.getMessageProperties().getDeliveryTag(), false, false);
            } catch (IOException e) {
                e.printStackTrace();
            }
        }
10.5 消费者拒绝消息
开启手动确认模式,并拒绝消息,不重新投递,则进入死信队列
    # 监听开启:消费者手动确认开启
    listener:
      simple:
        acknowledge-mode: manual
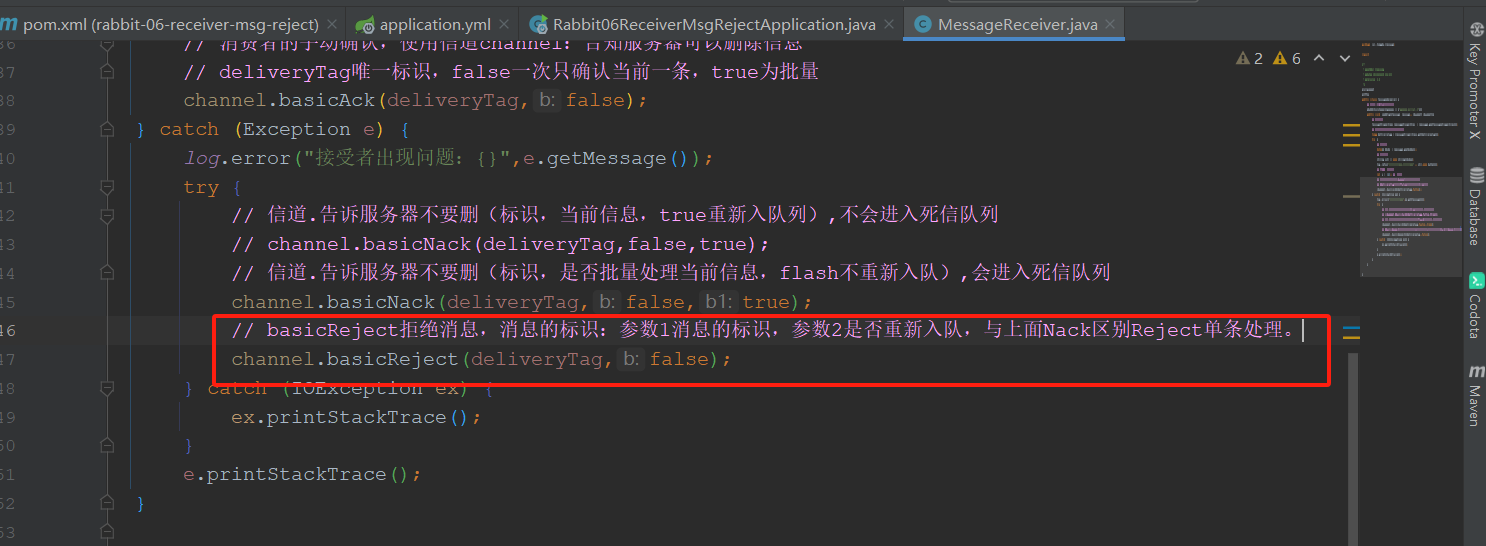
package com.tongda.message;

import com.rabbitmq.client.Channel;
import lombok.extern.slf4j.Slf4j;
import org.springframework.amqp.core.Message;
import org.springframework.amqp.core.MessageProperties;
import org.springframework.amqp.rabbit.annotation.RabbitListener;
import org.springframework.stereotype.Component;

import java.io.IOException;
import java.util.Date;

@Component
@Slf4j
public class MessageReceiver {
    // 接收消息:监听dlx4正常队列中的消息
    @RabbitListener(queues = {"queue.normal.5"})
    public void sendMsg(Message message, Channel channel){
        // 获取消息属性
        MessageProperties messageProperties = message.getMessageProperties();
        // 获取消息属性唯一标识,长整型类似身份证或者学号
        long deliveryTag = messageProperties.getDeliveryTag();
        try {
            // 获取消息体
            byte[] body = message.getBody();
            // 字节转字符串
            String str = new String(body);
            log.info("接收到的消息为:{},接收时间为:{}" , str,new Date());
            // TODO 业务逻辑处理
            int a = 1/0; // 错误模拟
            // 消费者的手动确认,使用信道channel:告知服务器可以删除信息
            // deliveryTag唯一标识,false一次只确认当前一条,true为批量
            channel.basicAck(deliveryTag,false);
        } catch (Exception e) {
            log.error("接受者出现问题:{}",e.getMessage());
            try {
                // 信道.告诉服务器不要删(标识,当前信息,true重新入队列),不会进入死信队列
                // channel.basicNack(deliveryTag,false,true);
                // 信道.告诉服务器不要删(标识,是否批量处理当前信息,flash不重新入队),会进入死信队列
                // channel.basicNack(deliveryTag,false,true);
                // basicReject拒绝消息,消息的标识:参数1消息的标识,参数2是否重新入队,与上面Nack区别Reject单条处理。
                channel.basicReject(deliveryTag,false);
            } catch (IOException ex) {
                ex.printStackTrace();
            }
            e.printStackTrace();
        }
    }
}
参考代码:
|
/** * 监听正常的那个队列的名字,不是监听那个死信队列 * 我们从正常的队列接收消息,但是对消息不进行确认,并且不对消息进行重新投递,此时消息就进入死信队列 * * channel 消息信道(是连接下的一个消息信道,一个连接下有多个消息信息,发消息/接消息都是通过信道完成的) */ @RabbitListener(queues = {RabbitConfig.QUEUE}) public void process(Message message, Channel channel) { System.out.println("接收到的消息:" + message); //对消息不确认, ack单词是 确认 的意思 // void basicNack(long deliveryTag, boolean multiple, boolean requeue) // deliveryTag:消息的一个数字标签 // multiple:翻译成中文是多个的意思,如果是true表示对小于deliveryTag标签下的消息都进行Nack不确认,false表示只对当前deliveryTag标签的消息Nack // requeue:如果是true表示消息被Nack后,重新发送到队列,如果是false,消息被Nack后,不会重新发送到队列 try { System.out.println("deliveryTag = " + message.getMessageProperties().getDeliveryTag()); //要开启rabbitm消息消费的手动确认模式,然后才这么写代码; channel.basicReject(message.getMessageProperties().getDeliveryTag(), false); } catch (IOException e) { e.printStackTrace(); } } } |
11. RabbitMQ延迟队列
场景:有一个订单,15分钟内如果不支付,就把该订单设置为交易关闭,那么就不能支付了,这类实现延迟任务的场景就可以采用延迟队列来实现,当然除了延迟队列来实现,也可以有一些其他办法实现;
11.1 定时任务方式
每隔3秒扫描一次数据库,查询过期的订单然后进行处理;
优点:
简单,容易实现;
缺点:
1、存在延迟(延迟时间不准确),如果你每隔1分钟扫一次,那么就有可能延迟1分钟;
2、性能较差,每次扫描数据库,如果订单量很大
1、被动取消
当用户查询订单的时候,判断订单是否超时,超时了就取消(交易关闭);
优点:
对服务器而言,压力小;
缺点:
1、用户不查询订单,将永远处于待支付状态,会对数据统计等功能造成影响;
2、用户打开订单页面,有可能比较慢,因为要处理大量订单,用户体验少稍差;
11.2 JDK延迟队列(单体应用,不能分布式下)
DelayedQueue
无界阻塞队列,该队列只有在延迟期满的时候才能从中获取元素
优点:
实现简单,任务延迟低;
缺点:
服务重启、宕机,数据丢失;
只适合单机版,不适合集群;
订单量大,可能内存不足而发生异常; oom:out of memory 内存溢出
11.3 采用消息中间件(rabbitmq)
1、RabbitMQ本身不支持延迟队列,可以使用TTL结合DLX的方式来实现消息的延迟投递,即把DLX跟某个队列绑定,到了指定时间,消息过期后,就会从DLX路由到这个队列,消费者可以从这个队列取走消息。
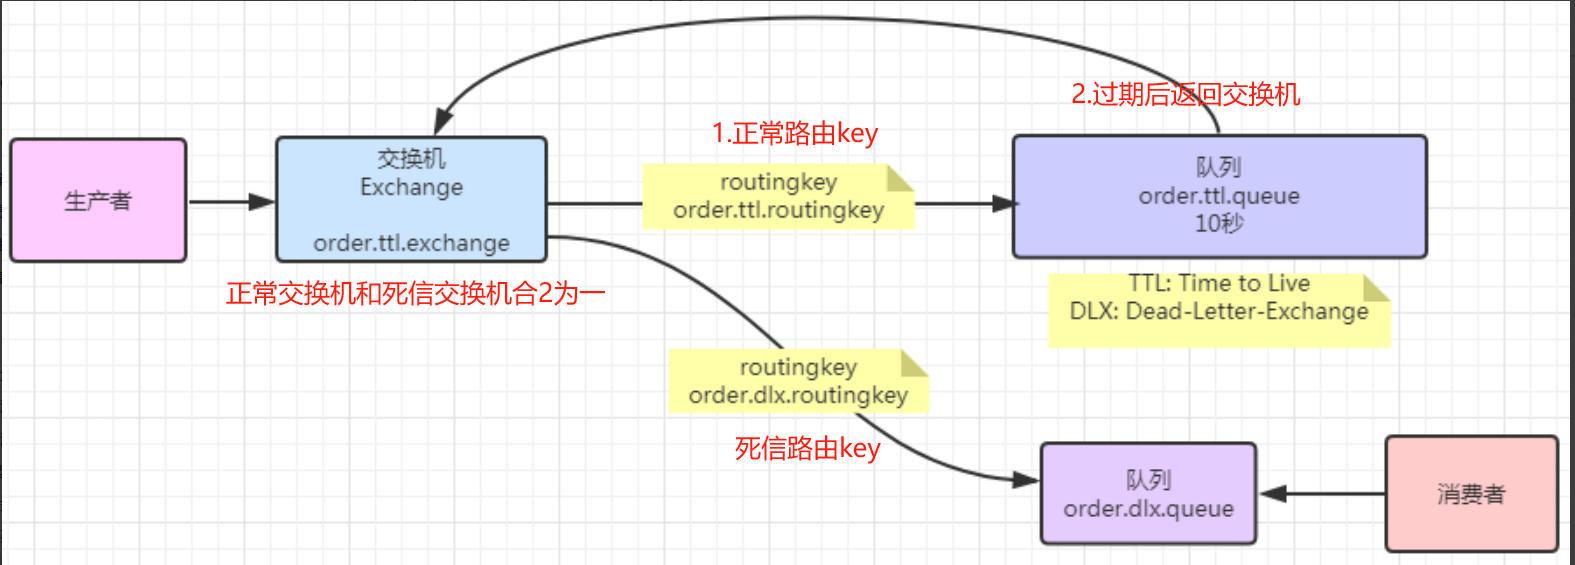
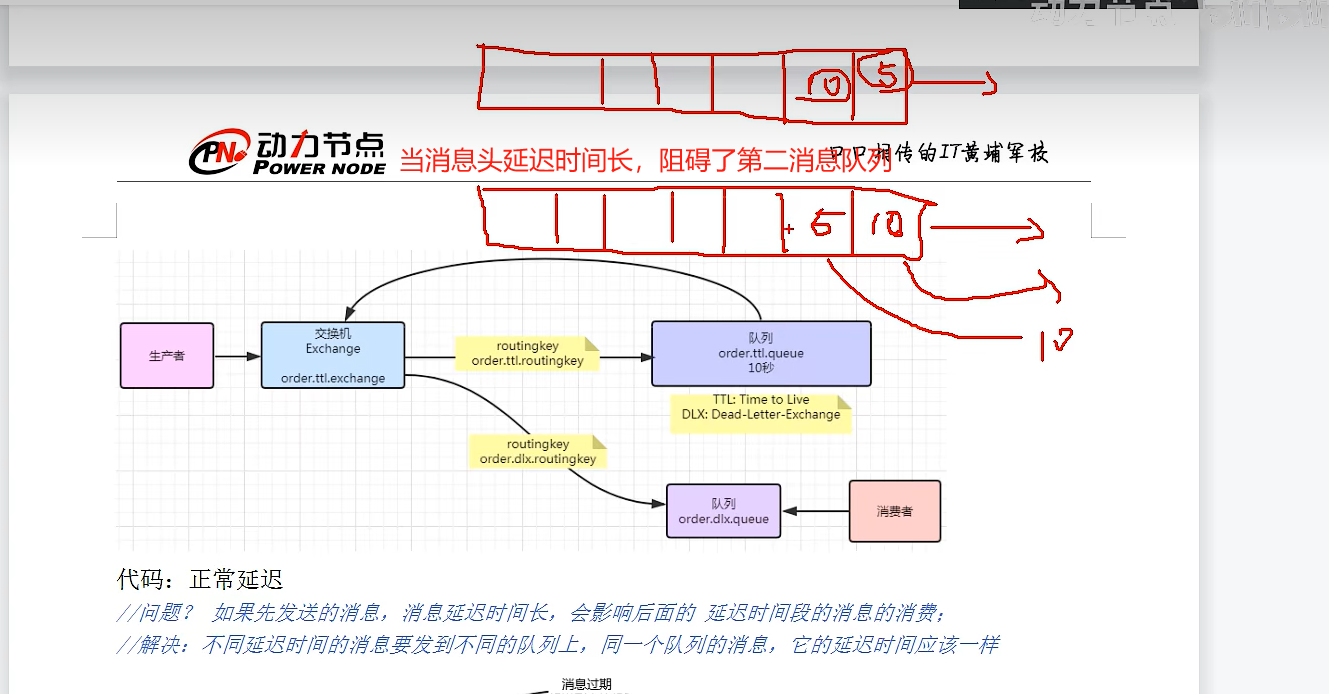
代码:正常延迟
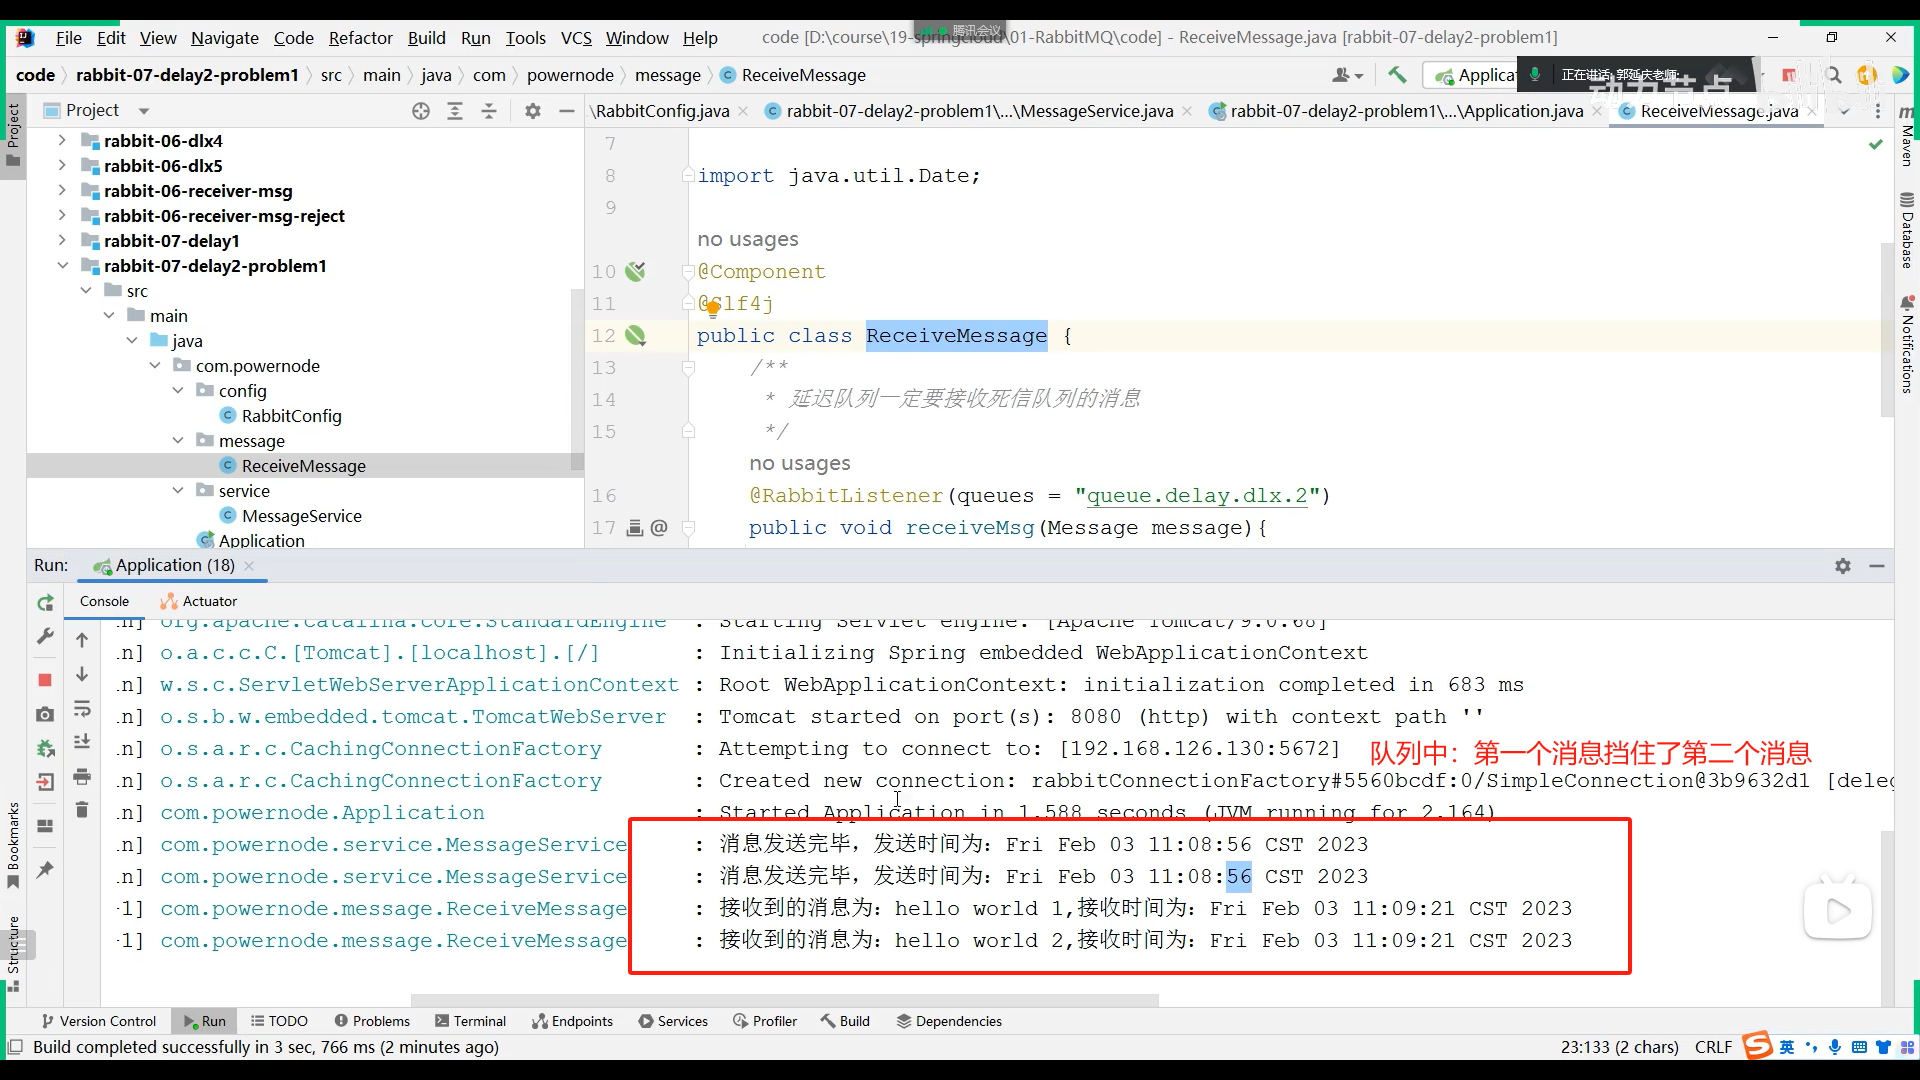
//问题? 如果先发送的消息,消息延迟时间长,会影响后面的 延迟时间段的消息的消费;
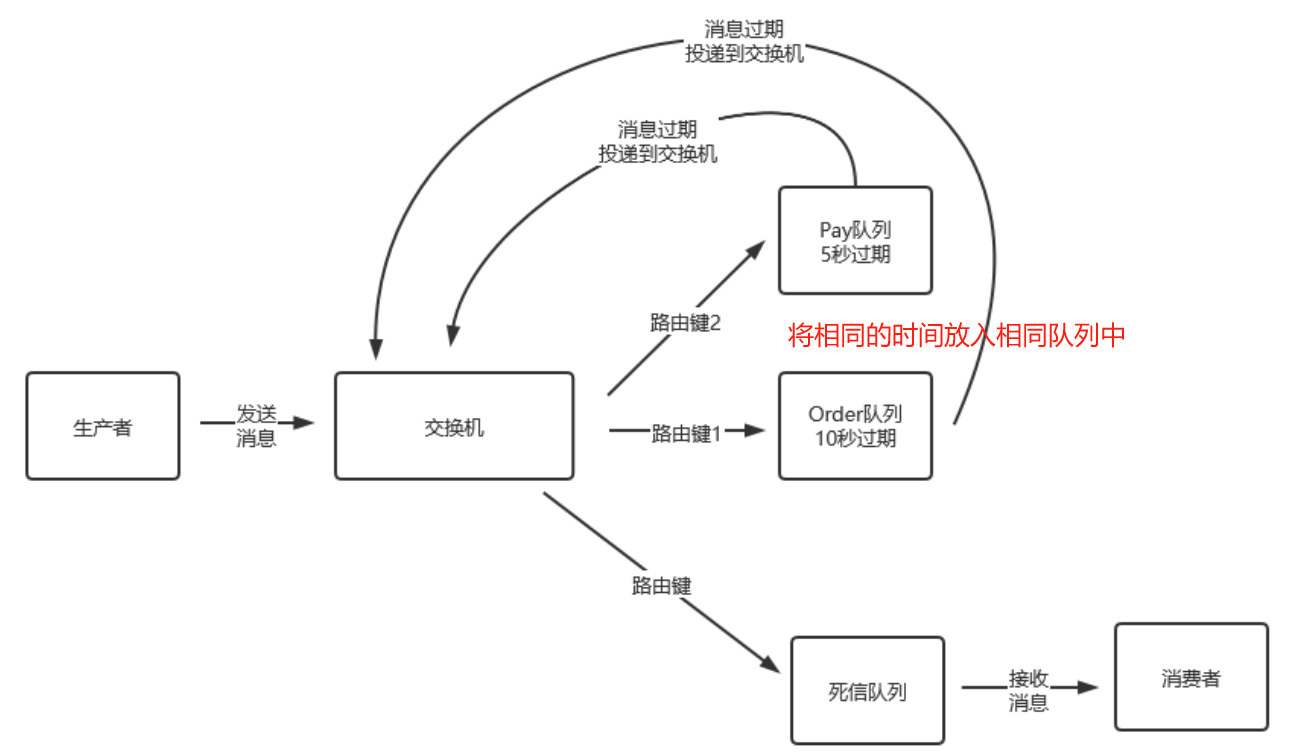
//解决:不同延迟时间的消息要发到不同的队列上,同一个队列的消息,它的延迟时间应该一样
问题模拟:
package com.tongda.config;

import org.springframework.amqp.core.*;
import org.springframework.beans.factory.annotation.Value;
import org.springframework.context.annotation.Bean;
import org.springframework.context.annotation.Configuration;

@Configuration
public class RabbitConfig {
    @Value("${my.exchangeName}")
    private String exchangeName;
    @Value("${queueNormalName}")
    private String queueNormalName;
    @Value("${my.queueDlxName}")
    private String queueDlxName;

    // RabbitMq三部曲
    // 1.交换机(正常和死信)
    @Bean
    public DirectExchange directExchange(){
        return ExchangeBuilder.directExchange(exchangeName).build();
    }
    // 2.队列
    @Bean
    public Queue normalQueue(){
        // 方法1 new Queue的方法
        /*Map<String, Object> arguments = new HashMap<>();
        arguments.put("x-message-ttl",25000); // 消息过期时间25秒
        return new Queue(queueNormalName,true,false,false,arguments);
        */
        // 方法2 建造者模式
        return QueueBuilder
                .durable(queueNormalName)
                // .ttl(25000) // 队列的过期时间
                .deadLetterExchange(exchangeName) // 过期返回到死信交换机,相同的交换机
                .deadLetterRoutingKey("error") // 设置死信路由key,设置成交换机和死信队列绑定的key
                .build();
    }
    @Bean
    public Queue dlxQueue(){
        return QueueBuilder.durable(queueDlxName).build();
    }
    // 绑定交换机和队列
    @Bean
    public Binding bindingNormal(DirectExchange directExchange,Queue normalQueue){
        return BindingBuilder.bind(normalQueue).to(directExchange).with("order");
    }
    @Bean
    public Binding bindingDlx(DirectExchange directExchange,Queue dlxQueue){
        return BindingBuilder.bind(dlxQueue).to(directExchange).with("error");
    }
}
service.MessageService,发送消息
package com.tongda.service;

import jakarta.annotation.Resource;
import lombok.extern.slf4j.Slf4j;
import org.springframework.amqp.core.Message;
import org.springframework.amqp.core.MessageBuilder;
import org.springframework.amqp.core.MessageProperties;
import org.springframework.amqp.rabbit.core.RabbitTemplate;
import org.springframework.stereotype.Service;

import java.util.Date;

@Service
@Slf4j
public class MessageService {

    @Resource
    private RabbitTemplate rabbitTemplate;

    public void sendMsg(){
        {// 设置单条消息过期时间
            MessageProperties messageProperties = new MessageProperties();
            messageProperties.setExpiration("25000"); // 当前消息大于第二条消息时间
            Message message = MessageBuilder
                    .withBody("hello world 1".getBytes())
                    .andProperties(messageProperties)
                    .build();
            rabbitTemplate.convertAndSend("exchange.delay.2", "error", message);
            log.info("消息发送完毕,发送时间:{}", new Date());
        }
        {// 设置单条消息过期时间
            MessageProperties messageProperties = new MessageProperties();
            messageProperties.setExpiration("15000"); // 第二条消息时间
            Message message = MessageBuilder
                    .withBody("hello world 2".getBytes())
                    .andProperties(messageProperties)
                    .build();
            rabbitTemplate.convertAndSend("exchange.delay.2", "error", message);
            log.info("消息发送完毕,发送时间:{}", new Date());
        }
    }
}
延迟队列一定要接收死信队列的消息,message.ReceiveMessage模拟接收者:注意接收死信队列里的消息,
package com.tongda.message;

import lombok.extern.slf4j.Slf4j;
import org.springframework.amqp.core.Message;
import org.springframework.amqp.rabbit.annotation.RabbitListener;
import org.springframework.stereotype.Component;

import java.util.Date;


@Component
@Slf4j
public class ReceiveMessage {
    // 监听:自发自接
    /**
     * 延迟队列一定要接收死信队列的消息
     * @date 2024/1/11 15:19
     **/
    @RabbitListener(queues = "queue.dlay.dlx.2")
    public void receiveMsg(Message message){
        // 消息以字节数组放入消息体中
        String body = new String((message.getBody()));
        log.info("接收到的消息为:{},接收时间为:{}",body,new Date());
    }


}
yml
server:
  port: 8080

spring:
  application:
    name: delay-learn3
  rabbitmq:
    host: 192.168.0.67
    port: 5672
    username: admin
    password: 123456
    virtual-host: powernode

my:
  exchangeName: exchange.delay.3 # 交换机(正常交换机、死信交换机)
  queueOrderName: queue.delay.normal.order.3 # 正常订单队列
  queuePayName: queue.delay.normal.pay.3 # 正常支付队列
  queueDlxName: queue.delay.dlx.3 # 死信队列
RabbitConfig
package com.tongda.config;

import org.springframework.amqp.core.*;
import org.springframework.beans.factory.annotation.Value;
import org.springframework.context.annotation.Bean;


@Configuration
public class RabbitConfig {

    @Value("${my.exchangeName}")
    private String exchangeName;
    @Value("${my.queueOrderName}")
    private String queueOrderName;
    @Value("${my.queuePayName}")
    private String queuePayName;
    @Value("${my.queueDlxName}")
    // @Value("queue.delay.dlx.3")
    private String queueDlxName;

    // RabbitMq三部曲
    // 1.交换机(正常交换机和死信交换机)
    @Bean
    public DirectExchange directExchange(){
        return ExchangeBuilder.directExchange(exchangeName).build();
    }
    // 2.消息队列: 正常和死信队列
    @Bean
    public Queue orderQueue() {
        // 方法1 new Queue的方法
        /*Map<String, Object> arguments = new HashMap<>();
        arguments.put("x-message-ttl",25000); // 消息过期时间25秒
        return new Queue(queueNormalName,true,false,false,arguments);
        */
        // 方法2 建造者模式
        return QueueBuilder
                .durable(queueOrderName)
                // .ttl(25000) // 队列的过期时间
                .deadLetterExchange(exchangeName) // 过期返回到死信交换机,相同的交换机
                .deadLetterRoutingKey("error") // 设置死信路由key,设置成交换机和死信队列绑定的key
                .build();
    }
    @Bean
    public Queue payQueue(){
        return QueueBuilder
                .durable(queuePayName)
                // .ttl(15000)
                .deadLetterExchange(exchangeName)
                .deadLetterRoutingKey("error")
                .build();
    }
    @Bean
    public Queue dlxQueue(){
        return QueueBuilder.durable(queueDlxName).build();
    }

    // 绑定交换机和队列
    @Bean
    public Binding orderNormalBinding(DirectExchange directExchange,Queue orderQueue){
        return BindingBuilder.bind(orderQueue).to(directExchange).with("order");
    }
    @Bean
    public Binding payNormalBinding(DirectExchange directExchange, Queue payQueue){
        return BindingBuilder.bind(payQueue).to(directExchange).with("pay");
    }
    @Bean
    public Binding dlxBinding(DirectExchange directExchange,Queue dlxQueue){
        return BindingBuilder.bind(dlxQueue).to(directExchange).with("error");
    }
}
MessageService
package com.tongda.service;


import jakarta.annotation.Resource;
import lombok.extern.slf4j.Slf4j;
import org.springframework.amqp.core.Message;
import org.springframework.amqp.core.MessageBuilder;
import org.springframework.amqp.core.MessageProperties;
import org.springframework.amqp.rabbit.core.RabbitTemplate;
import org.springframework.stereotype.Service;

import java.util.Date;

@Service
@Slf4j
public class MessageService {

    @Resource
    private RabbitTemplate rabbitTemplate;

    public void sendMsg() {
        {
            MessageProperties messageProperties = new MessageProperties();
            messageProperties.setExpiration("25000"); //第一条消息
            Message message = MessageBuilder.withBody("hello world 1".getBytes())
                    .andProperties(messageProperties)
                    .build();
            rabbitTemplate.convertAndSend("exchange.delay.3", "order", message);
            log.info("消息发送完毕,发送时间为:{}", new Date());
        }
        {
            MessageProperties messageProperties = new MessageProperties();
            messageProperties.setExpiration("15000"); //第二条消息
            Message message = MessageBuilder.withBody("hello world 2".getBytes())
                    .andProperties(messageProperties)
                    .build();
            rabbitTemplate.convertAndSend("exchange.delay.3", "pay", message);
            log.info("消息发送完毕,发送时间为:{}", new Date());
        }
    }
}
ReceiveMessage
package com.tongda.message;

import lombok.extern.slf4j.Slf4j;
import org.springframework.amqp.core.Message;
import org.springframework.amqp.rabbit.annotation.RabbitListener;
import org.springframework.stereotype.Component;

import java.util.Date;

@Component
@Slf4j
public class ReceiveMessage {

    /**
     * 延迟队列一定要接收死信队列的消息
     */
    @RabbitListener(queues = "queue.delay.dlx.3")
    public void receiveMsg(Message message){
        String body=new String(message.getBody());
        log.info("接收到的消息为:{},接收时间为:{}",body,new Date());
    }
}
启动测试
package com.tongda;

import com.tongda.service.MessageService;
import jakarta.annotation.Resource;
import org.springframework.boot.ApplicationArguments;
import org.springframework.boot.ApplicationRunner;
import org.springframework.boot.SpringApplication;
import org.springframework.boot.autoconfigure.SpringBootApplication;

@SpringBootApplication
public class Rabbit07Delay3ResolveApplication implements ApplicationRunner {

    @Resource
    private MessageService messageService;

    public static void main(String[] args) {
        SpringApplication.run(Rabbit07Delay3ResolveApplication.class, args);
    }

    @Override
    public void run(ApplicationArguments args) throws Exception {
        messageService.sendMsg();
    }
}
代码 延迟问题
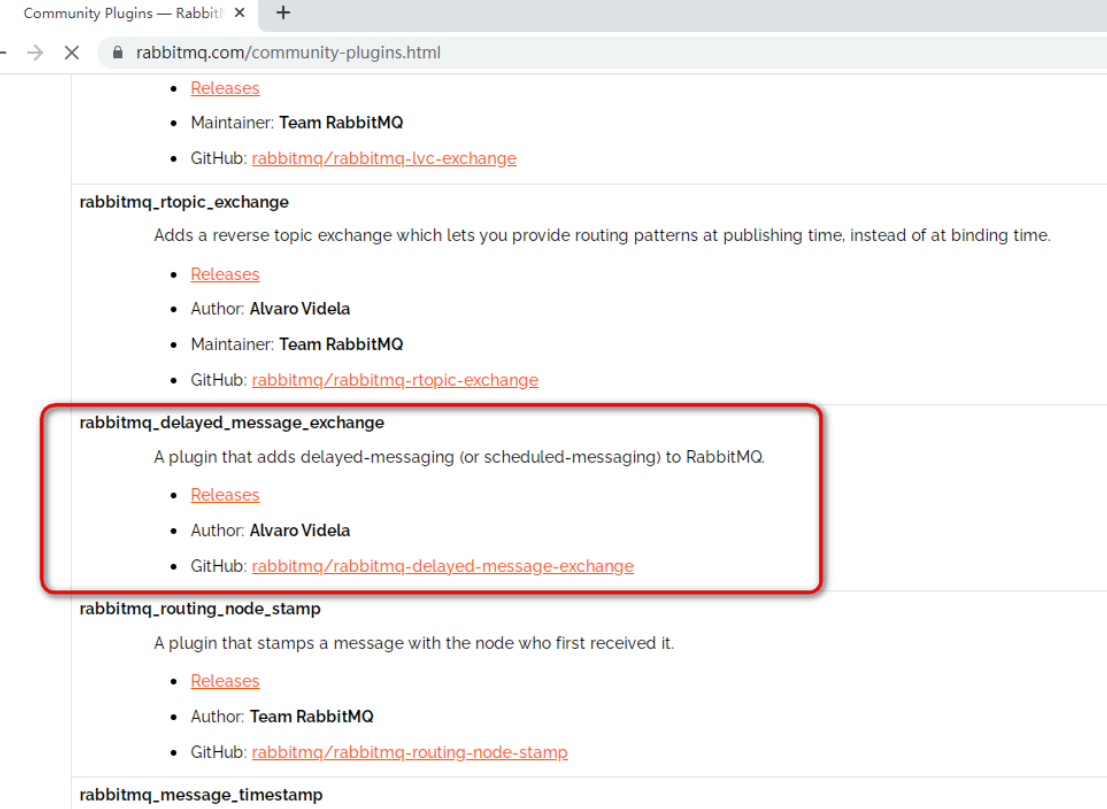
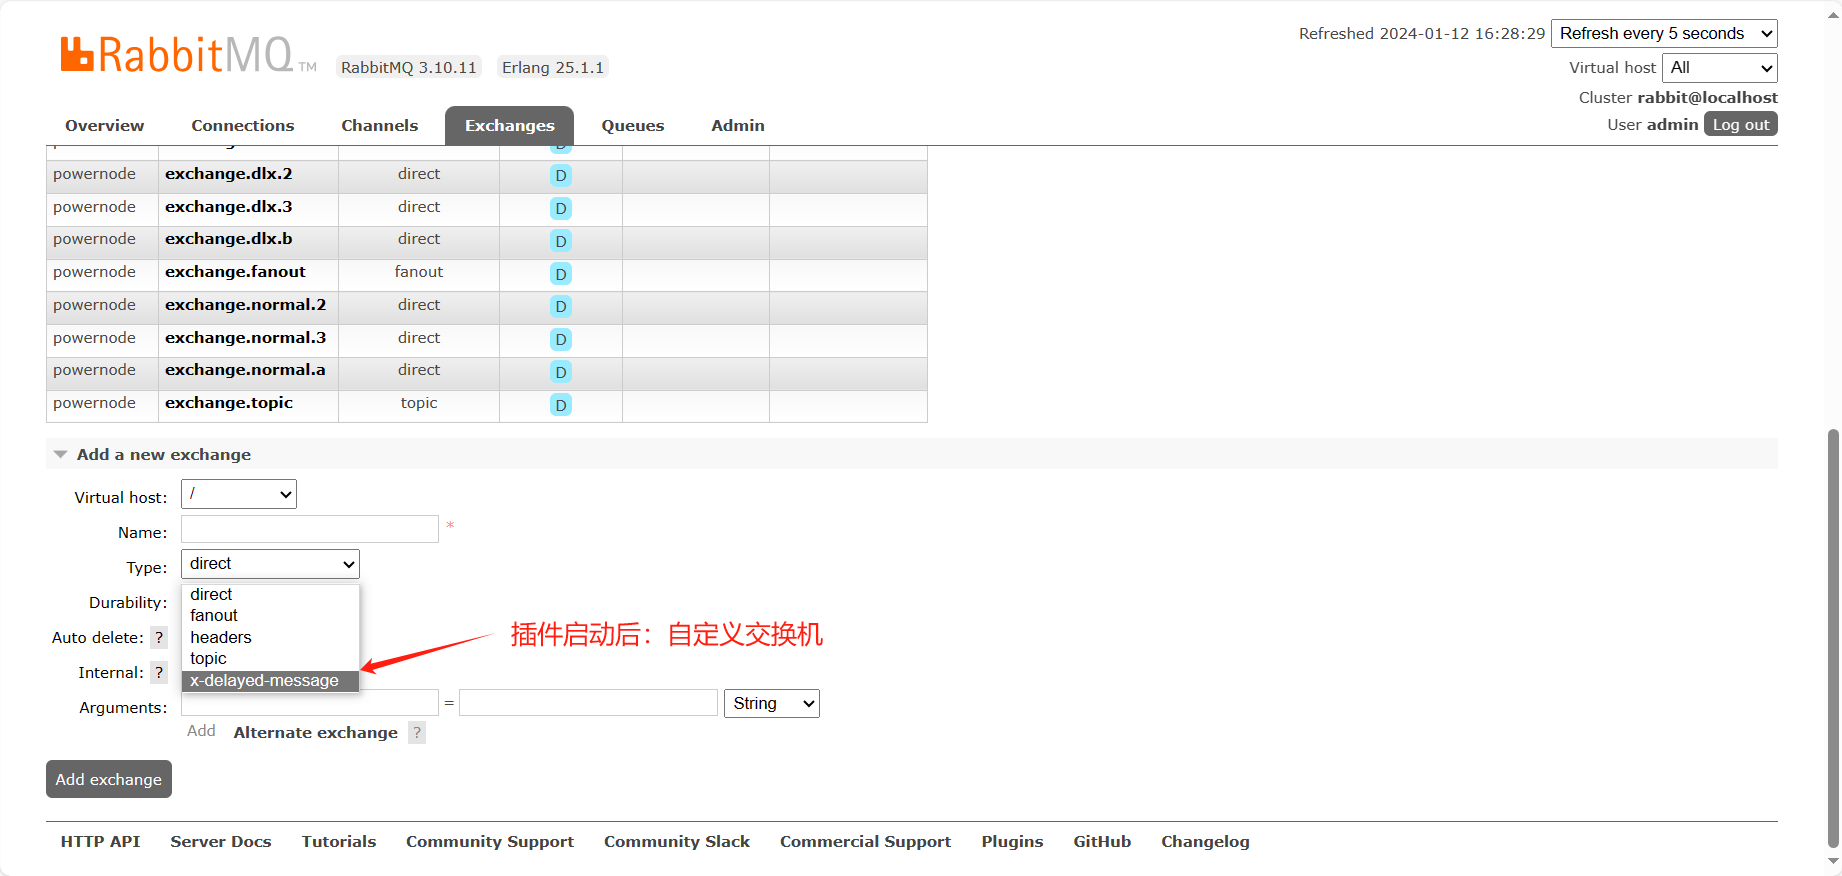
11.4 使用rabbitmq-delayed-message-exchange 延迟插件
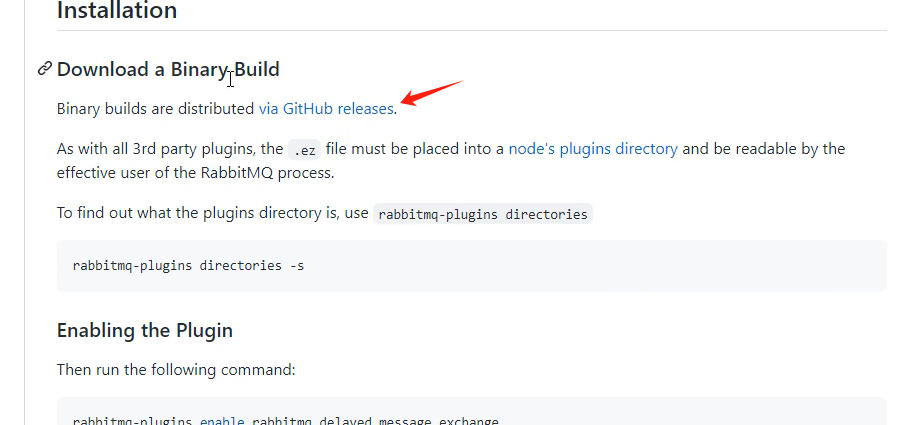
11.4.1 下载
选择对应的版本下载 rabbitmq-delayed-message-exchange 插件,下载地址:http://www.rabbitmq.com/community-plugins.html
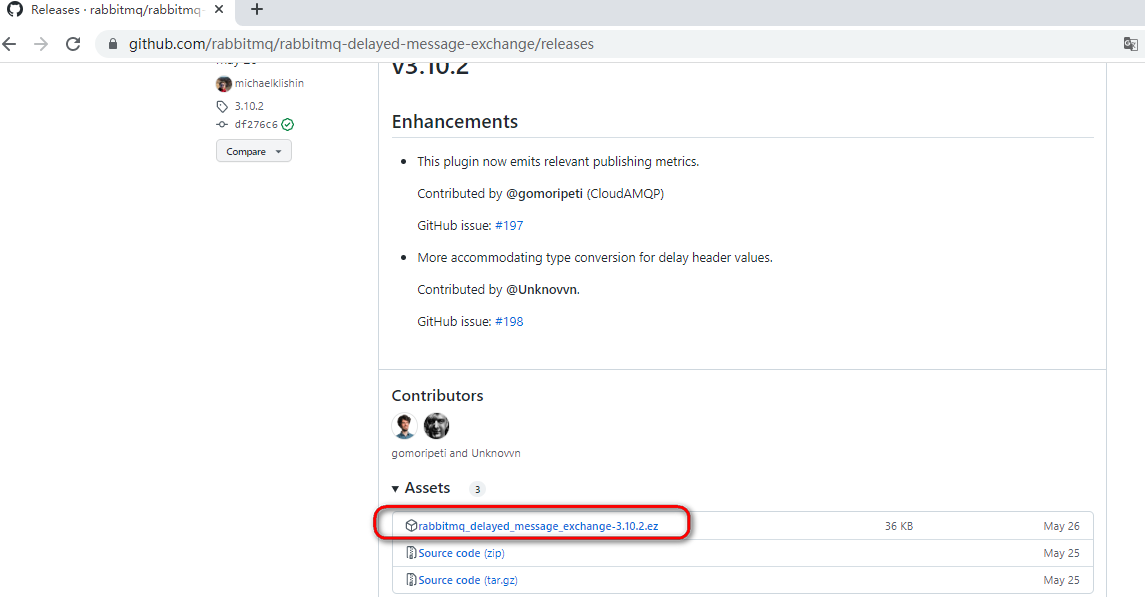
11.4.2 解压
|
unzip rabbitmq_delayed_message_exchange-3.10.2.ez |
如果unzip 没有安装,先安装一下
|
yum install unzip -y |
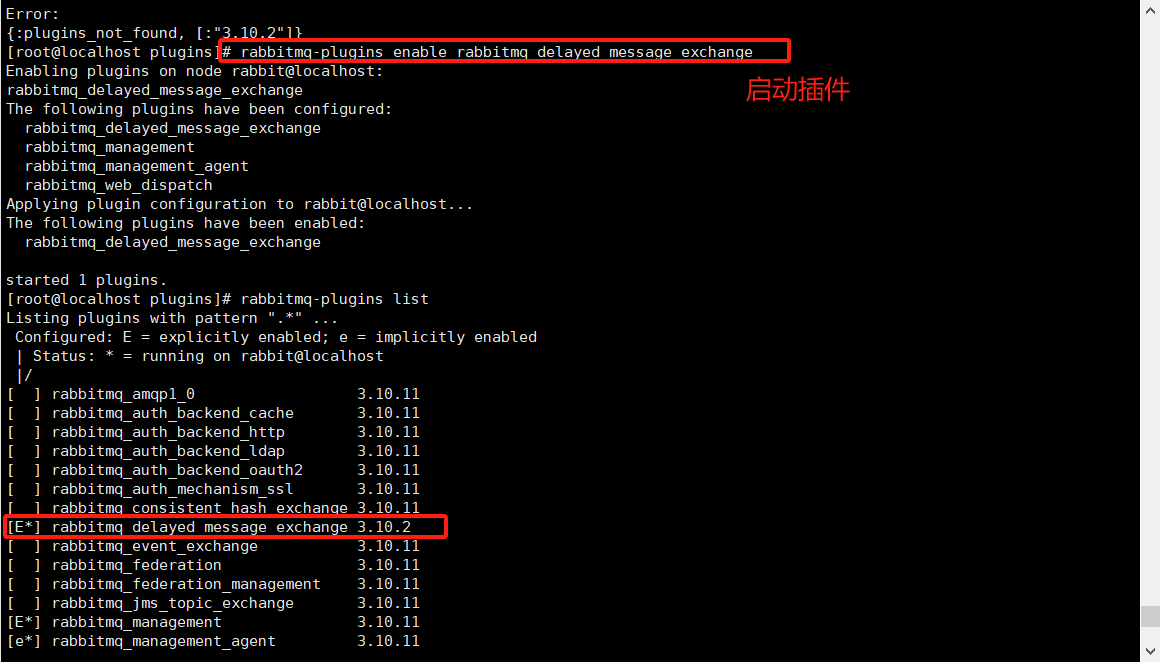
11.4.3 启用插件
./rabbitmq-plugins enable rabbitmq_delayed_message_exchange 开启插件;
11.4.4查询安装情况
./rabbitmq-plugins list 查询安装的所有插件;
重启rabbitmq使其生效;(此处也可以不重启)
看原理
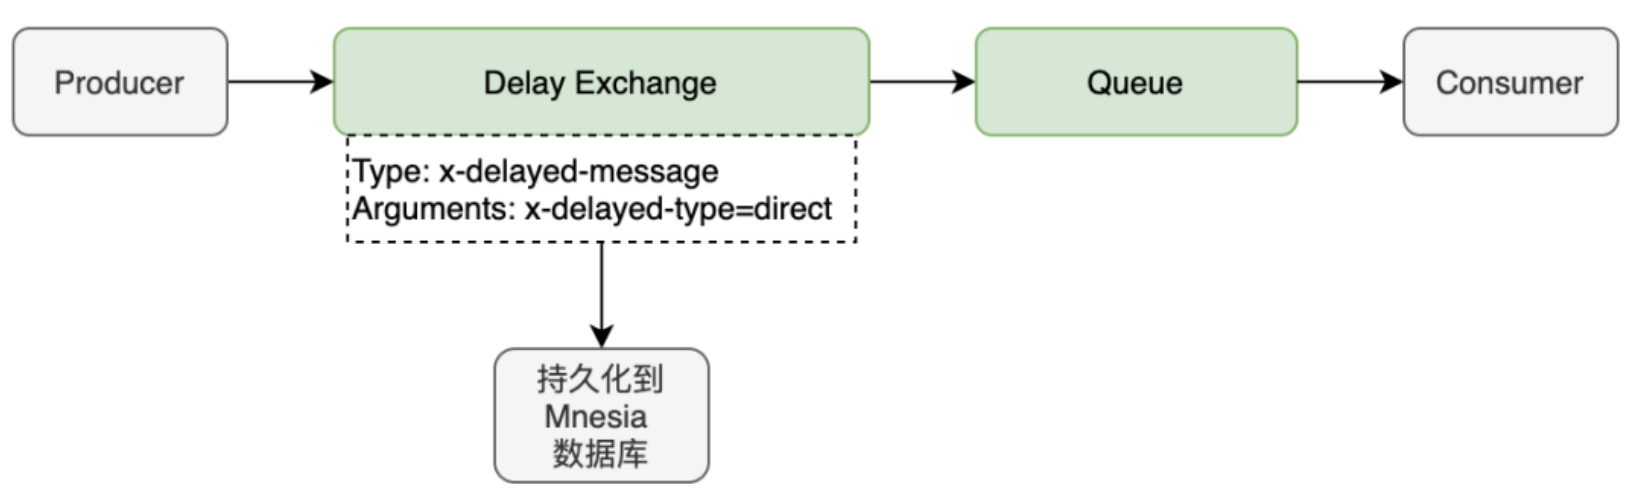
消息发送后不会直接投递到队列,
而是存储到 Mnesia(嵌入式数据库),检查 x-delay 时间(消息头部);
延迟插件在 RabbitMQ 3.5.7 及以上的版本才支持,依赖 Erlang/OPT 18.0 及以上运行环境;
Mnesia 是一个小型数据库,不适合于大量延迟消息的实现
解决了消息过期时间不一致出现的问题。
参考代码:
@Component
@Slf4j
public class RabbitConfig {
    public static final String EXCHANGE = "exchange:plugin";
    public static final String QUEUE = "queue.plugin";
    public static final String KEY = "plugin";

    @Bean
    public CustomExchange customExchange() {
        Map<String, Object> arguments = new HashMap<>();
        arguments.put("x-delayed-type", "direct");
        // CustomExchange(String name, String type, boolean durable, boolean autoDelete, Map<String, Object> arguments)
        return new CustomExchange(EXCHANGE, "x-delayed-message", true, false, arguments);
    }

    @Bean
    public Queue queue() {
        return QueueBuilder.durable(QUEUE).build();
    }

    @Bean
    public Binding binding(CustomExchange customExchange, Queue queue) {
        return BindingBuilder.bind(queue).to(customExchange).with(KEY).noargs();
    }
}
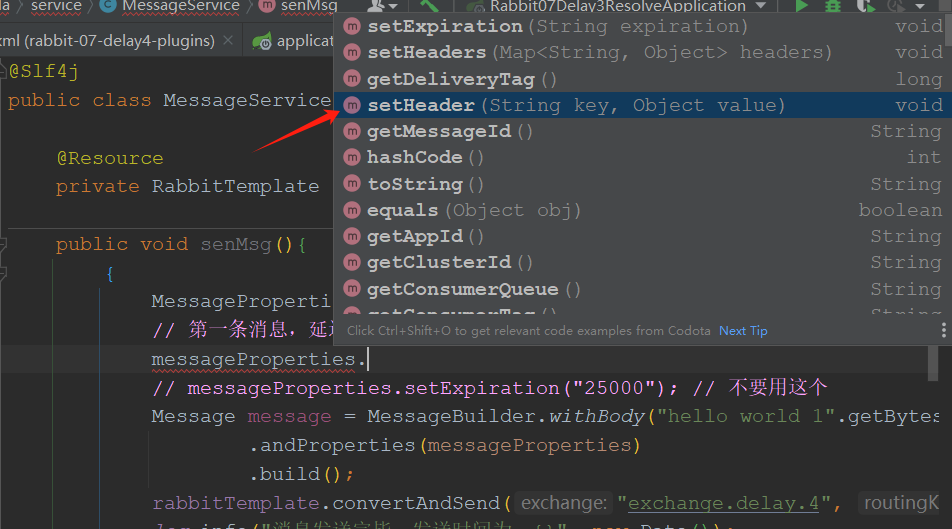
发消息参考代码
MessageProperties messageProperties=new MessageProperties();
messageProperties.setHeader("x-delay",16000);
String msg = "hello world";
Message message=new Message(msg.getBytes(),messageProperties);
rabbitTemplate.convertAndSend(RabbitConfig.EXCHANGE, "plugin", message);
log.info("发送完毕,发送时间为:{}",new Date());
完整项目代码
yml
server:
  port: 8080

spring:
  application:
    name: delay-learn4 # 消息延迟

  rabbitmq:
    host: 192.168.0.67
    port: 5672
    username: admin
    password: 123456
    virtual-host: powernode
# 使用delay延迟插件,
my:
  exchangeName: exchange.delay.4 # 延迟交换机
  queueDelayName: queue.delay.4 # 延迟队列
config.RabbitConfig
package com.tongda.config;

import org.springframework.amqp.core.*;
import org.springframework.beans.factory.annotation.Value;
import org.springframework.context.annotation.Bean;
import org.springframework.context.annotation.Configuration;

import javax.lang.model.element.NestingKind;
import java.util.HashMap;
import java.util.Map;

@Configuration
public class RabbitConfig {

    @Value("${my.exchangeName}")
    private String exchangeName;
    @Value("${my.queueDelayName}")
    private String queueDelayName;

    /**
     * 创建自定义交换机
     * @return
     */
    @Bean
    public CustomExchange customExchange() {
        Map<String, Object> arguments =new HashMap<>();
        arguments.put("x-delayed-type","direct"); //放一个参数
//        CustomExchange(String name, String type, boolean durable, boolean autoDelete, Map<String, Object> arguments)
        return  new CustomExchange(exchangeName,"x-delayed-message",true,false,arguments);

    }

    @Bean
    public Queue queue() {
        //方式2 建造者
        return QueueBuilder
                .durable(queueDelayName) //队列名称
                .build();
    }

    @Bean
    public Binding binding(CustomExchange customExchange, Queue queue) {
        //绑定,也指定路由key,加noargs 方法
        return BindingBuilder.bind(queue).to(customExchange).with("plugin").noargs();
    }
}
service.MessageService
package com.tongda.service;

import jakarta.annotation.Resource;
import lombok.extern.slf4j.Slf4j;
import org.springframework.amqp.core.Message;
import org.springframework.amqp.core.MessageBuilder;
import org.springframework.amqp.core.MessageProperties;
import org.springframework.amqp.rabbit.core.RabbitTemplate;
import org.springframework.stereotype.Service;

import java.util.Date;

@Service
@Slf4j
public class MessageService {

    @Resource
    private RabbitTemplate rabbitTemplate;

    public void senMsg(){
        {
            MessageProperties messageProperties = new MessageProperties();
            // 第一条消息,延迟时间
            messageProperties.setHeader("x-delay",25000); // 第一条消息,延迟时间
            // messageProperties.setExpiration("25000"); // 不要用这个
            Message message = MessageBuilder.withBody("hello world 1".getBytes())
                    .andProperties(messageProperties)
                    .build();
            rabbitTemplate.convertAndSend("exchange.delay.4", "plugin", message);
            log.info("消息发送完毕,发送时间为:{}", new Date());
        }
        {
            MessageProperties messageProperties = new MessageProperties();
            // 第一条消息,延迟时间
            messageProperties.setHeader("x-delay",15000); // 第一条消息,延迟时间
            // messageProperties.setExpiration("15000"); // 不要用这个
            Message message = MessageBuilder.withBody("hello world 2".getBytes())
                    .andProperties(messageProperties)
                    .build();
            rabbitTemplate.convertAndSend("exchange.delay.4", "plugin", message);
            log.info("消息发送完毕,发送时间为:{}", new Date());
        }
    }

}
message.ReceiveMessage
package com.tongda.message;

import lombok.extern.slf4j.Slf4j;
import org.springframework.amqp.core.Message;
import org.springframework.amqp.rabbit.annotation.RabbitListener;
import org.springframework.stereotype.Component;

import java.util.Date;

@Component
@Slf4j
public class ReceiveMessage {
    /**
     * 延迟队列的消息,延迟队列使用的是延迟交换机
     * @param
     * @return {@link null}
     * @date 2024/1/12 15:37
     **/
    @RabbitListener(queues = "queue.delay.4")
    public void receiveMsg(Message message){
        String body = new String(message.getBody());
        log.info("接收到的消息为:{},接收时间为:{}",body,new Date());
    }
}
application
package com.tongda;

import com.tongda.service.MessageService;
import jakarta.annotation.Resource;
import org.springframework.boot.ApplicationArguments;
import org.springframework.boot.ApplicationRunner;
import org.springframework.boot.SpringApplication;
import org.springframework.boot.autoconfigure.SpringBootApplication;

@SpringBootApplication
public class Rabbit07Delay4Application implements ApplicationRunner {

    @Resource
    private MessageService messageService;

    public static void main(String[] args) {
        SpringApplication.run(Rabbit07Delay4Application.class, args);
    }

    @Override
    public void run(ApplicationArguments args) throws Exception {
        messageService.senMsg();
    }
}