1.在idea中对thymeleaf的配置与依赖引入
首先我们选择创建新项目,如果使用后端框架springboot进行开发可以使用Spring Initializr

注意红框圈出的几个地方需要结合自己的环境进行配置。
接下来选择合适的springboot版本和依赖项。笔者这里习惯选择热部署工具devtools,使用注解简化代码量的插件lombok,以及提示配置文件的processor。web选择Spring Web,

因为本次使用ThymeLeaf进行开发,所以需要在模版引擎中选择thymeleaf,如下图红框:
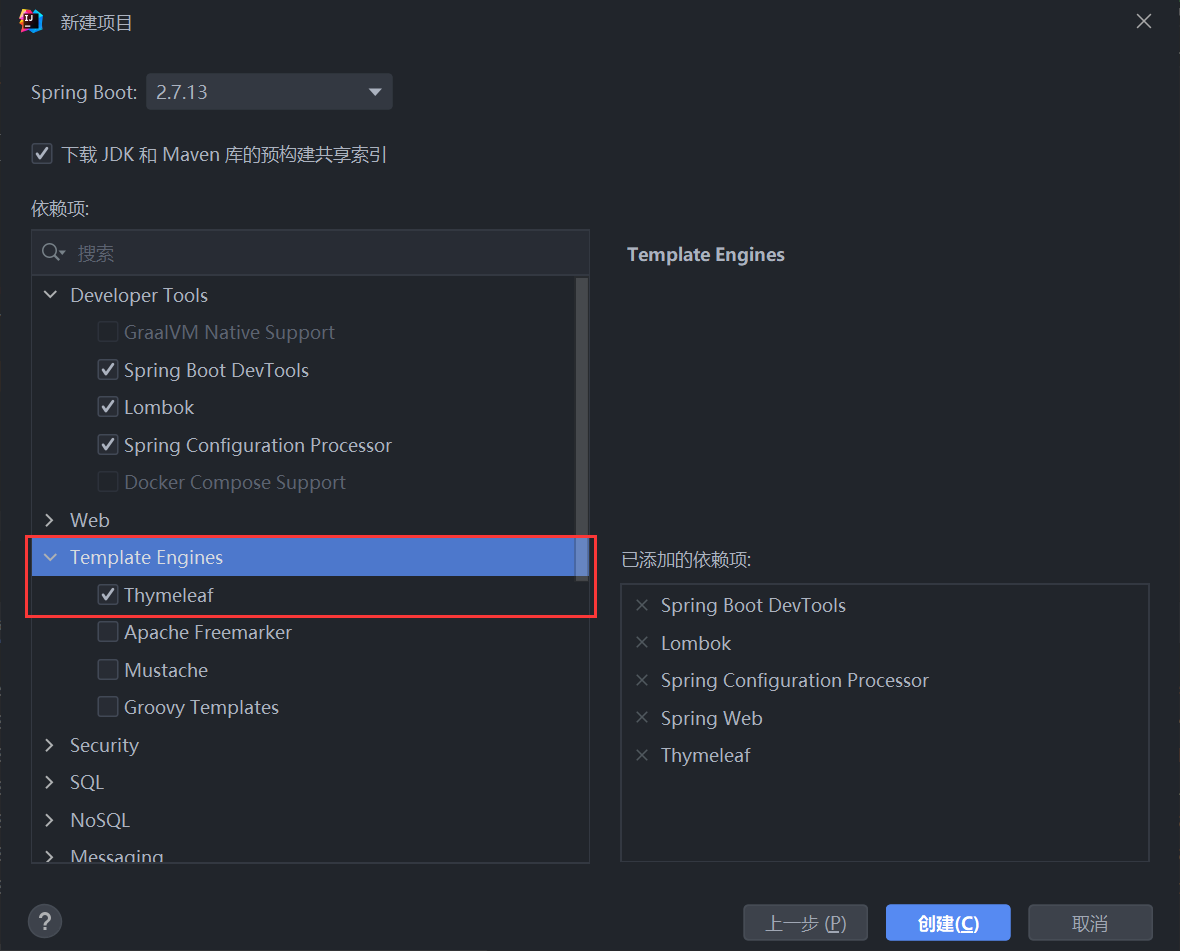
点击创建,一个简易的thymeleaf项目就搭建完成了,这之后我们还需要添加一些设置。
在properties配置文件中添加如下设置:
server.port=8080
# 关闭Thymeleaf的缓存
spring.thymeleaf.cache=false
spring.thymeleaf.prefix=classpath:/templates/
spring.thymeleaf.suffix=.html
由于Model本身不能设置页面跳转的url地址别名或者物理跳转地址,那么我们可以通过控制器方法的返回值来设置跳转url
注意此时前缀设定为templates目录下,所以我们的html文件都要放在该目录下,否则返回的文件名字符串不会跳转。
在templates目录下新建一个html文件welcome.html
<!DOCTYPE html>
<html lang="en" xmlns:th="http://www.thymeleaf.org">
<head>
    <meta charset="UTF-8"/>
<!--    <title>index</title>-->
</head>
<body>
    <h1>111222</h1>
    <h1 th:text="${msg}">welcome!</h1>
</body>
</html>
注意,新建html以后需要对<html>标签进行修改!这样才能使用th:*这类标签!
你可能会发现在默认配置下,thymeleaf对.html的内容要求很严格,比如<meta charset="UTF-8" />,
如果少最后的标签封闭符号/,就会报错而转到错误页。也比如你在使用Vue.js这样的库,然后有<div v-cloak></div>这样的html代码,
也会被thymeleaf认为不符合要求而抛出错误。
因此,建议增加下面这段:
spring.thymeleaf.mode = LEGACYHTML5
spring.thymeleaf.mode的默认值是HTML5,其实是一个很严格的检查,改为LEGACYHTML5可以得到一个可能更友好亲切的格式要求。
需要注意的是,LEGACYHTML5需要搭配一个额外的库NekoHTML才可用。
<dependency>
       <groupId>net.sourceforge.nekohtml</groupId>
       <artifactId>nekohtml</artifactId>
       <version>1.9.22</version>
</dependency>
最后重启项目就可以感受到不那么严格的thymeleaf了。
接下来看一下ThymeLeaf的两种标准表达式
1. 变量表达式——${ }
变量表达式是最常用的表达式,变量表达式其实也就是ONGL表达式,后端通过model的addAttributes方法添加属性,前端通过变量表达式进行调用。
2.选择表达式——*{ }
选择表达式与变量表达式比较相似,但是必须要与th:object标签一起使用才可以,这个表达式的作用实际上就是对对象的属性进行调用,例如传入一个对象user,user有name、age等属性,我们先通过th:object标签调用user对象,再通过选择表达式*{name},实现直接调用user的name属性。
<div class="user" th:object="${user}">
    <p th:text="'ur name is'+' '+*{name}">welcome!</p>
    <p th:text="'ur age is'+' '+*{age}"></p>
    <p th:text="'ur address is'+' '+*{address}"></p>
</div>
注意:此处使用的字符拼接还有另一种更简洁的方法(只能包含表达式变量,而不能有条件判断等!)
<p th:text="|ur email is *{email}|"></p>常用th标签
| 关键字 | 功能介绍 | 案例 |
|---|---|---|
| th:id | 替换id | <input th:id="'xxx' + ${collect.id}"/> |
| th:text | 文本替换 | <p th:text="${collect.description}">description</p> |
| th:utext | 支持html的文本替换 | <p th:utext="${htmlcontent}">conten</p> |
| th:object | 替换对象 | <div th:object="${session.user}"> |
| th:value | 属性赋值 | <input th:value="${user.name}" /> |
| th:with | 变量赋值运算 | <div th:with="isEven=${prodStat.count}%2==0"></div> |
| th:style | 设置样式 | th:style="'display:' + @{(${sitrue} ? 'none' : 'inline-block')} + ''" |
| th:onclick | 点击事件 | th:onclick="'getCollect()'" |
| th:each | 属性赋值 | tr th:each="user,userStat:${users}"> |
| th:if | 判断条件 | <a th:if="${userId == collect.userId}" > |
| th:unless | 和th:if判断相反 | <a th:href="@{/login}" th:unless=${session.user != null}>Login</a> |
| th:href | 链接地址 | <a th:href="@{/login}" th:unless=${session.user != null}>Login</a> /> |
| th:switch | 多路选择 配合th:case 使用 | <div th:switch="${user.role}"> |
| th:case | th:switch的一个分支 | <p th:case="'admin'">User is an administrator</p> |
| th:fragment | 布局标签,定义一个代码片段,方便其它地方引用 | <div th:fragment="alert"> |
| th:include | 布局标签,替换内容到引入的文件 | <head th:include="layout :: htmlhead" th:with="title='xx'"></head> /> |
| th:replace | 布局标签,替换整个标签到引入的文件 | <div th:replace="fragments/header :: title"></div> |
| th:selected | selected选择框 选中 | th:selected="(${xxx.id} == ${configObj.dd})" |
| th:src | 图片类地址引入 | <img class="img-responsive" alt="App Logo" th:src="@{/img/logo.png}" /> |
| th:inline | 定义js脚本可以使用变量 | <script type="text/javascript" th:inline="javascript"> |
| th:action | 表单提交的地址 | <form action="subscribe.html" th:action="@{/subscribe}"> |
| th:remove | 删除某个属性 | <tr th:remove="all"> 1.all:删除包含标签和所有的孩子。 |
| th:attr | 设置标签属性,多个属性可以用逗号分隔 | 比如 th:attr="src=@{/image/aa.jpg},title=#{logo}",此标签不太优雅,一般用的比较少。 |