cbv分析
基于类的视图
cbv写法
from flask import Flask,request
# 视图基类
from flask.views import MethodView

app = Flask(__name__)

app.DEBUG = True


# 视图类,继承MethodView
class IndexView(MethodView):
    def get(self):
        print(request.method)
        return 'get'

    def post(self):
        return 'post'


app.add_url_rule('/', endpoint='index', view_func=IndexView.as_view('index'))

if __name__ == '__main__':
    app.run()
源码分析
Indexview.as_view('index') 执行完的结果,return反回了view方法
as_view(c1s,name,*class_args,**class_kwargs):
	def view(**kwargs: t.Any) -> ft.ResponseReturnValue:
       # 本质是在执行self.dispatch_request 用异步
		return current_app.ensure_sync(self.dispatch_request)(**kwargs)
   return view

# 请求来了就是在执行 MethodView里的 dispatch_request
    def dispatch_request(self, **kwargs):
        # 去self(视图类的对象) 拿到请求方法
        meth = getattr(self, request.method.lower(), None)
        if meth is None and request.method == "HEAD":
            meth = getattr(self, "get", None)
        assert meth is not None, f"Unimplemented method {request.method!r}"
        # 用异步执行meth()
        return current_app.ensure_sync(meth)(**kwargs)
总结
1 as_view 执行流程跟djagno一样
2 路径如果不传别名,别名就是函数名(endpoint)
3 视图函数加多个装饰器
# 上下顺序(放在下面)和必须传endpoint(不传其实用的都是装饰器内部的函数,所以需要传)
4 视图类必须继承MethodView,否则需要重写dispatch_request
5 视图类加装饰器:类属性decorators = [auth,]
模板
py文件
from flask import Flask, render_template,Markup

app = Flask(__name__, template_folder='templates', static_folder='static')  # 模板的路径必须是templates,因为实例化app对象时,传入的
app.debug=True


def add(a,b):
    return a+b
@app.route('/')
def index():
    a='<a href="http://www.baidu.com">点我看美女</a>'  # 不存在xss攻击,处理了xss
    a=Markup(a)  # 可以在这包,模板里就可以不用safa了
    return render_template('index.html',name='lqz',a=a,add=add)


if __name__ == '__main__':
    app.run()
html
<!DOCTYPE html>
<html lang="en">
<head>
    <meta charset="UTF-8">
    <title>Title</title>
</head>
<body>
<h1>模板语法,static</h1>
<img src="/static/1.jpg" alt="">

<h1>模板语法,if</h1>
{% if name %}
<h1>Hello {{ name }}!</h1>
{% else %}
<h1>Hello World!</h1>
{% endif %}

<h1>模板语法,标签渲染</h1>
{{a|safe}}
{{a}}

<h1>模板语法,执行函数</h1>
{{add(4,5)}}

</body>
</html>
请求与响应
请求: 全局的request
from flask import Flask, request,make_response

app = Flask(__name__)
app.debug = True


@app.route('/',methods=['GET','POST'])
def index():
    print(request.method)    # 请求方式
    print(request.args)      # 获取get请求参数   是个字典
    print(request.form)      # 获取post请求参数
    print(request.values)    # 获取get和post请求参数
    print(request.cookies)   # 获取cookie
    print(request.headers)   # 获取请求头
    print(request.path)      # 获取根路径
    print(request.full_path) # 获取完整的请求路径 带过滤参数
    print(request.url)       # 获取请求url
    print(request.base_url)   # 获取请求的基础url
    print(request.url_root)   # 获取请求的根路径
    print(request.host_url)   # 获取请求的主机路径
    print(request.host)      # 获取请求的主机
    print(request.files)     # 获取上传的文件
    # 保存文件
    obj=request.files.get('file')
    obj.save(obj.filename)  #  obj.filename获取文件名,以文件名保存

if __name__ == '__main__':
    app.run()
响应: 新手四件套
from flask import Flask, request,make_response

app = Flask(__name__)
app.debug = True


@app.route('/',methods=['GET','POST'])
def index():
    # 响应就是四件套, render_template,redirect,return,jsonify
    # 1 . 往响应里面添加cookie,先产生一个response对象
    res = make_response('hello world')  # make_response,需要导入,返回的是一个response对象
    # 修改
    res.set_cookie('name','tank')
    # 2. 响应头中写数据
    res.headers['name']='tank'
    return res


if __name__ == '__main__':
    app.run()
session使用及源码分析
from flask import Flask, request, session,render_template,redirect

app = Flask(__name__)
app.debug = True

# 用session,必须设置secret_key
app.secret_key = '21312sadasd35'


@app.route('/login', methods=['GET', 'POST'])
def login():
    if request.method == 'GET':
        return render_template('login.html')
    else:
        name = request.form.get('name')
        pwd = request.form.get('pwd')
        # 添加session
        session['name'] = name
        return redirect('/index')


@app.route('/index', methods=['GET', 'POST'])
def index():
    return 'hello %s' % session.get('name','游客')

if __name__ == '__main__':
    app.run()
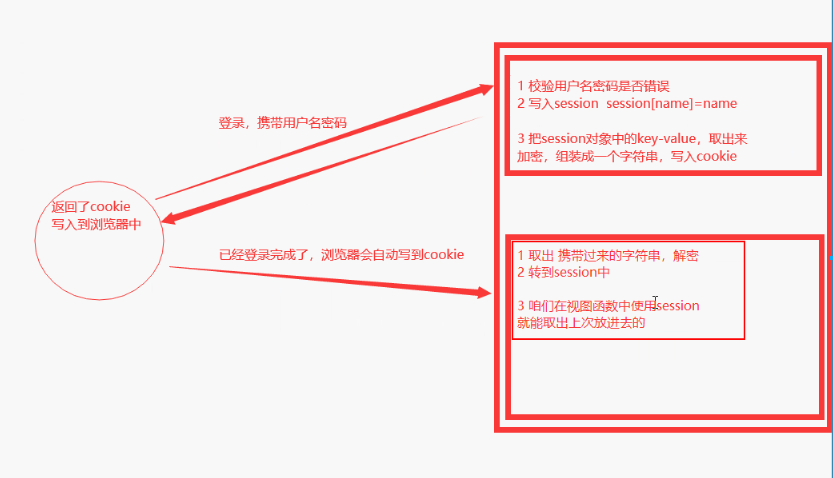
cookie与session
cookie 存在与客户端浏览器的键值对
session 存在于服务端的键值对 ,在django中放在了django_session表中
flask 把session加密后放到了cookie中,存入的是一个字符串,session发生了变化cookie里存入的字符串也会跟着变化。
session执行原理
session源码分析
从 app.session_interface 进入 ,发现配置了一个类的对象,它就是session的执行流程
session_interface: SessionInterface = SecureCookieSessionInterface()
SecureCookieSessionInterface 类中有两个重要的方法
open_session与save_session
    def open_session(self, app, request):
        s = self.get_signing_serializer(app)
        if s is None:
            return None
        # 根据config里配置的session名字取出前端传入的cookie的value值
        val = request.cookies.get(self.get_cookie_name(app))
        # 如果没有值, 狗仔一个空的session对象
        if not val:
            return self.session_class()
        max_age = int(app.permanent_session_lifetime.total_seconds())
        try:
            # 如果没过期,解密做成session对象
            data = s.loads(val, max_age=max_age)
            return self.session_class(data)
        except BadSignature:
         # 若果过期了也是空的session
            return self.session_class()
 def save_session(self, app, session, response):
	`	 # session没有直接删除cookie
        if not session:
            if session.modified:
                response.delete_cookie(
                    name,
                    domain=domain,
                    path=path,
                    secure=secure,
                    samesite=samesite,
                    httponly=httponly,
                )

            return
        if session.accessed:
            response.vary.add("Cookie")

        if not self.should_set_cookie(app, session):
            return
		 # 取出过期时间,把session加密转成字符串,放到cookie中
        expires = self.get_expiration_time(app, session)
        val = self.get_signing_serializer(app).dumps(dict(session))
        response.set_cookie(
            name,
            val,
            expires=expires,
            httponly=httponly,
            domain=domain,
            path=path,
            secure=secure,
            samesite=samesite,
        )
扩展
把session放到redis/mysql 中,需要重写个类,重写open_session与save_session 方法,已经有一个模板帮助我们写好了。 后面说
闪现
什么是闪现
flash 翻译过来的
 当次请求把 数据放入到某个位置,下一次请求,去那个位置把数据取出来,后那个位置数据就没了。
作用
跨请求保存数据
当次请求访问出现错误,被重定向到别的网页,重定向到这个网页里,向拿到元网页出现错误的信息。
django中的message框架也可以做到 不叫闪现 叫消息框架
用法
学习设置闪现与使用闪现
from flask import Flask, flash, get_flashed_messages,request

app = Flask(__name__)
app.secret_key = '21312sasdsa'

# 设置闪现
@app.route('/set_flash')
def set_flash():
    name = request.args.get('name')
    flash('%s我跳出来啦,你打我呀' % name)  # 也要加上secret_key,本质写在session里,可以设置多次会放在一个列表中
    flash('超时',category='debug')  # 分类存
    return '写入了闪现消息'

# 获取闪现
@app.route('/get_flash')
def get_flash():
    res = get_flashed_messages()  # 只会获取一次,获取完就没了
    get_flashed_messages(category_filter=['debug']) # 分类取
    print(res)
    return '获取了闪现消息'


if __name__ == '__main__':
    app.run()

"本质就是放在session中"
请求扩展
请求扩展中 : 在请求来或走,可以设置一些函数,到这里就会执行函数。类似与django中间件
在flask 中用请求扩展 代替django的中间件。
from flask import Flask

app = Flask(__name__)


# 请求来执行函数,可以写多个,从上到下执行,多个中间件有一个反回了,就不会执行下面的了,直接走响应回去
@app.before_request
def before_request():
    print('我先摸了她一下')


# 请求走了执行函数,可以写多个,从下到上执行
@app.after_request
def after_request(response):
    print('走了我又摸了她一下')
    return response


# 请求报错了执行函数,可以做错误日志记录
@app.teardown_request
def teardown(e):
    print(e)
    print('报错就会执行我')


# errorhandler 监听响应状态码,404报错就会执行
@app.errorhandler(404)
def error(arg):
    return '404'


@app.route('/')
def index():
    a = [1, 2]
    # print(a[4])
    return 'hello world'


if __name__ == '__main__':
    app.run()