一、视图层之必会三板斧
之前我们简单学习了三板斧的使用,这里我们进行一些深入的了解。
视图函数不写返回值会报错,报错信息如下:
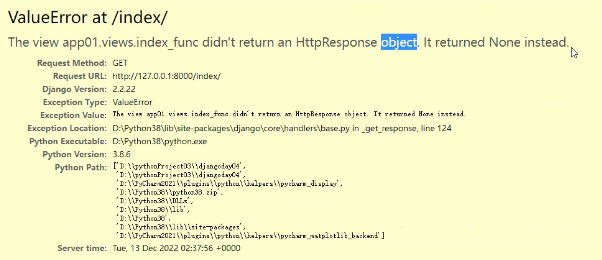
这里就引出了今天的话题。这里我们需要记住一个定论:用来处理请求的视图函数都必须返回HttpResponse对象
在之前学习的时候我们对HttpResponse的作用仅限于知道他是用来给网页传递字符数据的。
从正面不容易证明上面的定论,我们可以从三板斧的源码中进行确认。
render
def render(request, template_name, context=None, content_type=None, status=None, using=None):
    content = loader.render_to_string(template_name, context, request, using=using)
    return HttpResponse(content, content_type, status)
这里是render的内部源码,在他的返回值中我们可以发现他的返回值也是用HttpResponse类产生的一个对象。
redirect
def redirect(to, *args, permanent=False, **kwargs):
    redirect_class = HttpResponsePermanentRedirect if permanent else HttpResponseRedirect
    return redirect_class(resolve_url(to, *args, **kwargs))
这里我们可以直接的看到返回的结果时redirect_class这个变量,而这个变量的值是有两种情况,用三元表达式进行简写了,依旧是用ctrl+鼠标左键,我们点击他们,会发现他两分别是两个不同的类,但是同时继承了一个名叫HttpResponseRedirectBase的父类
class HttpResponseRedirect(HttpResponseRedirectBase):
    status_code = 302


class HttpResponsePermanentRedirect(HttpResponseRedirectBase):
    status_code = 301
接下来我们去看这个父类有什么花头。
我们可以在这两个类的源代码上方找到这个父类,咋们也不用管他干了什么,首先我们就会发现这个类他的父类是HttpResponse
class HttpResponseRedirectBase(HttpResponse):
    allowed_schemes = ['http', 'https', 'ftp']

    def __init__(self, redirect_to, *args, **kwargs):
        super().__init__(*args, **kwargs)
        self['Location'] = iri_to_uri(redirect_to)
        parsed = urlparse(str(redirect_to))
        if parsed.scheme and parsed.scheme not in self.allowed_schemes:
            raise DisallowedRedirect("Unsafe redirect to URL with protocol '%s'" % parsed.scheme)

    url = property(lambda self: self['Location'])

    def __repr__(self):
        return '<%(cls)s status_code=%(status_code)d%(content_type)s, url="%(url)s">' % {
            'cls': self.__class__.__name__,
            'status_code': self.status_code,
            'content_type': self._content_type_for_repr,
            'url': self.url,
        }
当一个类的爷爷继承了HttpResponse,那么这个类产生的对象其实就是由HttpResponse产生的(如果不理解的可以回头看看类的双下new方法产生对象的过程)。
HttpResponse
他就是用类名加括号的形式返回值,相当于是返回了一个对象,符合上面的定论。
通过上面的一圈论证,我们就可以证明我们的定论是正确的。
二、JsonResponse对象
当我们给前端页面传递数据的时候,有些时候可能会出现跨语言交互数据的情况,这时候我们需要使用json模块来序列化数据,让数据实现跨语言传输。
在html网页中我们使用js语言中的JSON对象进行序列化和反序列化
JSON.stringify()
JSON.parse()
python中我们使用json模块进行序列化和反序列化
json.dumps()
json.loads()
两种序列化数据的方式
方式一:使用json模块
def index_func(request):
    # 返回给浏览器一个json格式的字符串
    user_dict = {'name': 'jason老师', 'age': 18}
    import json
    user_json = json.dumps(user_dict, ensure_ascii=False)
    return HttpResponse(user_json)
使用json序列化数据需要先转换格式,再交给HttpResponse返回给浏览器
方式二:使用JsonResponse对象
from django.http import JsonResponse
def index_func(request):
    user_dict = {'name': 'jason老师', 'age': 18}
    return JsonResponse(user_dict)
使用JsonResponse对象,直接输出数据就好了,他的源代码中已经用json模块处理过数据了。同时也省去了调用HttpResponse返回给浏览器数据的步骤。
ps:以后写代码很多时候可能需要参考源码及所学知识扩展功能
使用JsonResponse对象序列化除字典外的数据类型
接下去当我们尝试使用不同数据类型的数据,通过JsonResponse对象返回给浏览器的时候,除了字典类型的数据都会出现报错,通过查看源码我们得知是safe参数导致的主动报错。
这里是JsonResponse部分源码
class JsonResponse(HttpResponse):
    def __init__(self, data, encoder=DjangoJSONEncoder, safe=True,
                 json_dumps_params=None, **kwargs):
        if safe and not isinstance(data, dict):
            raise TypeError(
                'In order to allow non-dict objects to be serialized set the '
                'safe parameter to False.'
            )
因为JsonResponse主要序列化字典,所以针对非字典的其他可以被序列化的数据需要修改safe参数为False
如果给JsonResponse对象内部的json代码传参
解决了数据类型的传递问题,我们又想到针对字符编码需要使用ensure_ascii=False让中文字符不变成二进制。通过观察源码,我们发现如果想要传参,是通过json_dumps_params这个变量来传递其他参数的。通过查看源码的运行,我们发现直接用关键字参数的形式在JsonResponse对象的括号内传参即可。
完整源码如下
class JsonResponse(HttpResponse):
    def __init__(self, data, encoder=DjangoJSONEncoder, safe=True,
                 json_dumps_params=None, **kwargs):
        if safe and not isinstance(data, dict):
            raise TypeError(
                'In order to allow non-dict objects to be serialized set the '
                'safe parameter to False.'
            )
        if json_dumps_params is None:
            json_dumps_params = {}
        kwargs.setdefault('content_type', 'application/json')
        data = json.dumps(data, cls=encoder, **json_dumps_params)
        super().__init__(content=data, **kwargs)
三、视图层之request对象获取文件
我们使用表单标签中的input标签接收用户的输入以及其他数据
form表单携带文件类型的数据需要做到以下几点
1.method必须是post
2.enctype必须是multipart/form-data
    <form action="" method="post" enctype="multipart/form-data">
        <p>file:
            <input type="file" name="file">
        </p>
        <input type="submit" value="选我">
        <button>点我</button>
    </form>
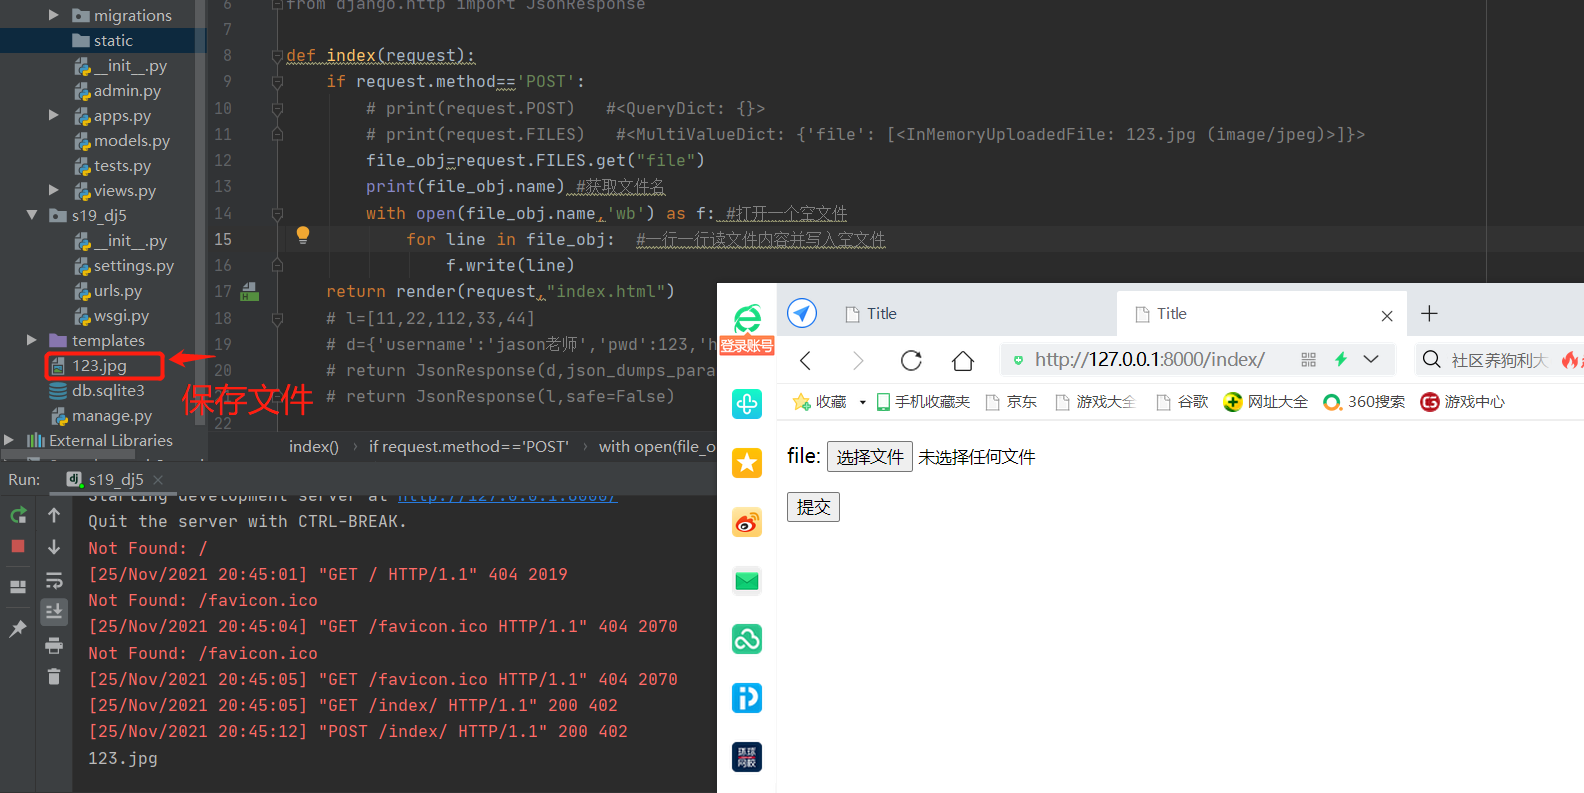
django后端需要通过request.FILES获取文件类型的数据
def index_func(request):
    if request.method == 'POST':
        # print(request.POST)  # 获取普通数据(输入、选择)
        # print(request.FILES)  # 获取文件数据(上传)
        file_obj = request.FILES.get('file')
        print(file_obj.name)  # 获取文件名称
        with open(r'%s' % file_obj.name, 'wb') as f:
            for line in file_obj:  # 文件对象支持for循环一行行读取内容
                f.write(line)
    return render(request, 'indexPage.html')

四、视图层之FBV与CBV
概念介绍
视图是可调用的,用来处理请求(request)并且返回响应(response),django的视图有两种形式:FBV和CBV
1、FBV基于函数的视图(Function base views),我们之前一直介绍的都是FBV
2、CBV基于类的视图(Class base views),我们本节主要介绍它
视图函数可以是函数也可以是类
代码展示:
FBV
# urls.py
urlpatterns = [
    path('admin/', admin.site.urls),
    path('fbv/', views.test_fbv),
]
# views.py
def index(request):return HttpResponse对象
CBV
# urls.py
from django import views
urlpatterns = [
    path('login/', views.MyLoginView.as_view())
]
这里就是CBV形式,也就是类的路由导入,这时候我们就不需要写对应的对象内的方法了,会自动匹配并执行
# views.py
"""只要是处理业务逻辑的视图函数 形参里面肯定要有request"""
from django import views
class MyLoginView(views.View):
    def get(self, request):
        return HttpResponse('from CBV get function')

    def post(self, request):
        return HttpResponse('from CBV post function')
五、CBV源码剖析(重要)
1.从CBV的路由匹配切入
path('login/', views.MyLoginView.as_view())
1.类名点名字(名字的查找问题)
2.类名点名字并加括号调用(静态方法、绑定给类的方法)
2.函数名加括号执行优先级最高 项目一启动就会自动执行as_view方法
部分View源码
class View:

    http_method_names = ['get', 'post', 'put', 'patch', 'delete', 'head', 'options', 'trace']

    @classonlymethod
    def as_view(cls, **initkwargs):
        """Main entry point for a request-response process."""
        for key in initkwargs:
            if key in cls.http_method_names:
                raise TypeError("You tried to pass in the %s method name as a "
                                "keyword argument to %s(). Don't do that."
                                % (key, cls.__name__))
            if not hasattr(cls, key):
                raise TypeError("%s() received an invalid keyword %r. as_view "
                                "only accepts arguments that are already "
                                "attributes of the class." % (cls.__name__, key))

        def view(request, *args, **kwargs):
            self = cls(**initkwargs)
            if hasattr(self, 'get') and not hasattr(self, 'head'):
                self.head = self.get
            self.setup(request, *args, **kwargs)
            if not hasattr(self, 'request'):
                raise AttributeError(
                    "%s instance has no 'request' attribute. Did you override "
                    "setup() and forget to call super()?" % cls.__name__
                )
            return self.dispatch(request, *args, **kwargs)
        view.view_class = cls
        view.view_initkwargs = initkwargs
我们可以看到在源码中as_view返回的结果时view,而view是as_view内部的一个闭包函数。因此CBV路由导入的结果其实和FBV的路由导入代码一样,相当于FBV中的路由导入:
path('login/', views.view)
# as_view 可以看成view
因此可以得出结论:CBV路由本质还是FBV
3.浏览器地址栏访问login路由需要执行view函数
1.产生我们自己编写类的对象
部分源码
def view(request, *args, **kwargs):
            self = cls(**initkwargs)
            if hasattr(self, 'get') and not hasattr(self, 'head'):
                self.head = self.get
            self.setup(request, *args, **kwargs)
            if not hasattr(self, 'request'):
                raise AttributeError(
                    "%s instance has no 'request' attribute. Did you override "
                    "setup() and forget to call super()?" % cls.__name__
                )
            return self.dispatch(request, *args, **kwargs)
首先是开头的self变量,他相当于产生了一个对象,而这个对象使用我们自己定义的那个类来产生的,接着中间的都不重要,在末尾return的位置我们发现产生的这个对象调用了dispatch方法。
2.对象调用dispatch方法(注意查找顺序)
4.研究父类中的dispatch方法
获取当前请求方法并转小写,之后利用反射获取类中对应的方法并执行。
因为我们没有定义这个dispatch方法,所以会调用父类中的dispatch方法,第一个if语句判断的是我们的请求方法,判断他是否在view类中定义的第一行的变量名内。如果有这个方法名称就用反射获取结果,没有结果就返回报错信息。
	http_method_names = ['get', 'post', 'put', 'patch', 'delete', 'head', 'options', 'trace']
	def dispatch(self, request, *args, **kwargs):
        # Try to dispatch to the right method; if a method doesn't exist,
        # defer to the error handler. Also defer to the error handler if the
        # request method isn't on the approved list.
        if request.method.lower() in self.http_method_names:
            handler = getattr(self, request.method.lower(), self.http_method_not_allowed)
        else:
            handler = self.http_method_not_allowed
        return handler(request, *args, **kwargs)