@
目录
文件和目录路径
os库是Python内置的标准库,包含了上百个函数,常用路径操作、进程管理、环境参数等几类,os.path子库是以path为入口,用于操作和处理文件路径
import os           # 导入os模块

print(os.getcwd())  # 打印当前工作目录
print(os.path.abspath("."))         # 打印当前工作目录的绝对路径
print(os.path.abspath(".."))        # 打印上一级目录的绝对路径
print(os.path.abspath("test.py"))   # 打印当前文件的绝对路径

print(os.path.relpath("D:\\"))              # 打印当前工作目录至D:\的相对路径
print(os.path.relpath("D:\\Code\\Java"))    # 打印当前工作目录至特定path的相对路径
print(os.path.relpath("D:\\","test.py"))    # 打印当前文件至D:\的相对路径

print("判断当前工作目录下是否存在输入的文件或目录:",os.path.exists("test.py"))
print("判断当前工作目录下是否存在输入的文件或目录:",os.path.exists("Java"))
print("判断当前工作目录下是否存在输入的文件或目录:",os.path.exists("D:\\Code"))

print("判断当前输入的是否为绝对路径:",os.path.isabs("test.py"))
print("判断当前输入的是否为绝对路径:",os.path.isabs("D:\\Code\\Java"))

print("判断当前输入的是否为文件名:",os.path.isfile("D:\\Code\\Python\\test.py"))
print("判断当前输入的是否为文件名:",os.path.isfile("D:\\Code\\Java"))

print("判断当前输入的是否为目录名:",os.path.isdir("D:\\Code\\Python\\test.py"))
print("判断当前输入的是否为目录名:",os.path.isdir("D:\\Code\\Java"))

my_dir = "test.txt"
if os.path.exists(my_dir):
    print(f"已存在名为{my_dir}目录")
else:
    os.mkdir(my_dir)
    print(f"在当前工作目录下成功创建名为{my_dir}目录")

if os.path.exists(my_dir):
    os.rmdir(my_dir)                # 只能删除空目录
    print(f"成功删除名为{my_dir}目录")
else:
    print(f"名为{my_dir}目录不存在")

my_file = "test.txt"
if os.path.exists(my_file):
    os.remove(my_file)
    print(f"成功删除名为{my_file}文件")
else:
    print(f"不存在名为{my_file}文件")

new_dir = "D:\\Code\\Python\\testdir"
cureentdir = os.getcwd()
print("打印当前工作目录路径:",cureentdir)
if os.path.exists(new_dir):
    print(f"已存在名为{new_dir}目录")
else:
    os.mkdir(new_dir)
    print(f"成功创建名为{new_dir}目录")
os.chdir(new_dir)       # 将当前工作目录改至new_dir
print("打印最新的工作目录路径:",os.getcwd())
os.chdir(cureentdir)    # 改回至原来的工作目录
print("打印改回后的工作目录路径:",os.getcwd())

print(os.path.join("D:\\","Code","test.py"))    #传回文件路径,将字符串结合为一个文件路径,至少包含两个参数
files = ["test1.py","dyd.py","yd.py"]
for i in files:
    print(os.path.join("D:\\Code\\Python\\testdir",i))

print("获取指定文件的大小:",os.path.getsize("D:\\Code\\Cypress_test\\cypress.json"))
print("获取当前工作目录下指定文件的大小",os.path.getsize("test.py"))

print("使用绝对路径获取指定目录下的内容",os.listdir("D:\\Code\\Python"))
print("使用相对路径获取指定目录下的内容",os.listdir("../../Download"))

totalsizes = 0
for i in os.listdir("."):
    totalsizes += os.path.getsize(os.path.join(".",i))
print("当前工作目录D:\\Code\\Python下全部文件大小总和为:",totalsizes)

import glob           # 导入glob模块,与listdir的不同是glob可以使用通配符,比如只获取txt格式文件,就可以用”*.txt“

for i in glob.glob("D:\\Code\\Python\*.*"):
    print("打印D:\\Code\\Python目录下所有的文件:",i)

for i in glob.glob("test*.py"):
    print("打印当前目录下以test开头以.py为后缀的文件:",i)

for dirName,subdirNames,fileNames in os.walk("D:\\Code\\Python"):
    print("当前根工作目录名:",dirName)
    print("当前子目录名列表:",subdirNames)
    print("当前文件名列表:",fileNames)
文件的读取、写入、复制、删除、变更位置及修改名称
# 读取文件
file = "../../Download/test.txt"                # 设置欲开启的文件,绝对相对路径都可以
file_Obj = open(file,"r",encoding="UTF-8")      # 使用只读模式并以UTF8格式开启文件,传给file_Obj
data = file_Obj.read()                          # 读取文件内容并赋值给变量data
print(data)                     # 输出变量data,即输出文件内容
file_Obj.close()                # 建议使用close()将文件关闭,否则未来此文件内容可能会出现不可预期的损害

with open(file,"r",encoding="UTF-8") as file_Obj:   # 使用只读模式并以UTF8格式开启文件,传给file_Obj
    data = file_Obj.read()      # 读取文件内容并赋值给变量data
    print(data)                 # 输出变量data,即输出文件内容

with open(file,"r",encoding="UTF-8") as file_Obj:   # 使用只读模式并以UTF8格式开启文件,传给file_Obj
    for i in file_Obj:          # 逐行读取文件内容并赋值给变量data
        print(i.rstrip())       # 输出变量i,即输出文件内容,rstrip()的作用是删除末端换行符号,也可以使用end=""

with open(file,"r",encoding="UTF-8") as file_Obj:   # 使用只读模式并以UTF8格式开启文件,传给file_Obj
    data = file_Obj.readlines() # 逐行读取文件内容,并将结果存储到列表中,注意:每行的换行符也会一并存储到列表中
    print(data)                 # 输出变量data,以列表的形式输出结果

str1 = ""                       # 设置一个空字符串
for i in data:                  # 将各行字符串存入到str1,组合数据
    str1 += i.rstrip()          # 数据存入时去掉换行符
print(str1)                     # 打印组合后的字符串

with open(file,"r",encoding="UTF-8") as file_Obj:   # 使用只读模式并以UTF8格式开启文件,传给file_Obj
    data = file_Obj.read()                          # 读取文件内容并赋值给变量data
    new_data = data.replace("test","ceshi")         # 将test替换为【ceshi】
    print(new_data)                                 # 打印文件新内容

 findstr = input("请输入要查询的字符串:")
 if findstr in str1:
     print(f"查找的{findstr}字符串,{file}文件中存在!")
 else:
     print(f"查找的{findstr}字符串,{file}文件中不存在!")

 findstr = input("请输入要查询的字符串:")
 index = str1.find(findstr)
 if index >=0:
     print(f"查找的{findstr}字符串,{file}文件中存在,出现在索引{index}位置!")
 else:
     print(f"查找的{findstr}字符串,{file}文件中不存在!")

# 写入文件
f = "text1.txt"
str2 = "这句是写入文件的!"
num = 123
with open(f,"w",encoding="UTF-8") as file_Obj1:     # w表示写入模式
    file_Obj1.write(str2)

with open(f,"a",encoding="UTF-8") as file_Obj2:     # a表示追加模式
    file_Obj2.write(str(num))                       # 输入数值时必须先转为字符串,否则报TypeError

with open(f,"r+",encoding="UTF-8") as file_Obj3:    # r+ 表示读取并写入,也可以写作rw
    file_Obj3.write(str2+"\n")                      # 使用换行符输入多行数据
    file_Obj3.write(str(num))

import shutil   # 导入shutil模块

shutil.copy("text1.txt","cy_text.txt")                          # 在当前目录复制文件并命名为cy_text.txt
shutil.copy("text1.txt","../../Download")                       # 从当前目录复制文件到Download目录下,绝对/相对路径都可以
shutil.copy("D:\\Download\\test.docx","testdir/cy_test.docx")   # 不同目录的文件复制,复制Download下的test.docx文件到testdir目录下

shutil.copytree("testdir","cy_testdir")             # 在当前目录复制目录,当文件已存在时,无法创建该文件,报FileExistsError
shutil.copytree("D:\\Download\\Edge","./cy_Edge")   # 不同目录下的复制目录,复制Download下的Edge目录到当前目录并命名为cy_Edge

shutil.move("cy_text.txt","testdir")                  # 移动cy_text.txt文件到testdir目录下
shutil.move("testdir/cy_text.txt","./test123.txt")    # 若移动目标目录路径中包含文件名,则表示移动此文件并重命名
shutil.move("cy_Edge","D:\\Download\\Edge123")        # 也可以移动目录,将cy_Edge目录移动到Download目录下并重命名为Edge123

shutil.rmtree("cy_testdir")         # 上文有介绍os.rmdir()只能删除空目录,可以使用此方式删除有数据的目录

# 使用shutil.rmtree()直接删除有数据的文件太危险,所以可以使用第三方模块send2trash,先使用pip命令安装后再导入使用
import send2trash

send2trash.send2trash("test123.txt")              # 将test123.txt放到回收站
send2trash.send2trash("D:\\Download\\Edge123")    # 将Download目录下Edge123目录放到回收站
解压缩zip格式的文件
Python中有内置zipFile模块,用于将文件或目录解压缩,直接导入使用即可
import zipfile  # 导入zipfile模块
# 压缩文件
fileZip = zipfile.ZipFile("dydtest.zip","w")        # 压缩文件,命名为dydtest.zip,将结果赋值fileZip对象
for name in glob.glob("D:\\Code\\Python\*.*"):      # 通过循环获取D:\\Code\\Python\目录下的所有文件
    fileZip.write(name,os.path.basename(name),zipfile.ZIP_DEFLATED) # 使用ZIP_DEFLATED压缩方式,压缩D:\\Code\\Python\整个目录

fileZip.close() # 关闭压缩包

# 解压文件
listZipinfo = zipfile.ZipFile("dydtest.zip","r")    # 读取压缩文件dydtest.zip中的内容
print(listZipinfo.namelist())                       # 以列表方式查看压缩包中的文件

for name in listZipinfo.infolist():                 # 通过for循环获取每一个文件
    print(name.filename,name.file_size,name.compress_size)  # 打印每个文件的文件名、原文件大小,压缩后的文件大小

fileUnzip = zipfile.ZipFile("dydtest.zip")          # 解压缩包,获取dydtest.zip中的文件
fileUnzip.extractall("undydtest")                   # 解压到当前目录下的名为undydtest目录中
fileUnzip.close()       # 关闭压缩包
剪切板的应用
剪切板功能是属于第三方pyperclip模块内,使用前需先安装pip install pyperclip,该模块仅可用于复制粘贴文本
import pyperclip    			# 导入模块
str3 = "测试123!@#"
pyperclip.copy(str3.split("123")[0])        # 将字符串str3中的【测试】二字复制到剪切板
str4 = pyperclip.paste()    	# 粘贴剪切板内容并赋值给str4
print(str4)     				# 打印str4的值,结果为“测试”
pyperclip.copy(str3[2:])        # 将字符串str3中的【123!@#】复制到剪切板
str5 = pyperclip.paste()    	# 粘贴剪切板内容并赋值给str5
print(str5)     				# 打印str4的值,结果为“123!@#”
pyperclip.copy(str3)        	# 将字符串str3所有字符复制到剪切板
str6 = pyperclip.paste()    	# 粘贴剪切板内容并赋值给str6
print(str6)     				# 打印str4的值,结果为“测试123!@#”
使用python-docx处理Word文档
python-docx是用于创建或修改Word的一个第三方python库,使用前需先安装pip install python-docx,python-docx中将Word文件结构分为三层:
Document:代表整个Word文件Paragraph:一个Word文件由多个段落组成,每单击一次Enter键就会产生一个段落,所有段落以Paragraph对象列表方式存在Run:Word文件中可设置字体、字号、色彩等,这些称之为样式,一个Run对象所指的是Paragraph对象汇总相同样式的连续文字,若文字样式发生变化,则将以新的Run对象表示
以下代码同时运行可能出现报错或部分页面样式被覆盖等问题,故请按需获取,写在一起记录,仅是为方便以后查找使用,更多功能实现方法请查看官方文档
from docx import Document
from docx.enum.section import WD_SECTION_START, WD_ORIENTATION
from docx.enum.style import WD_STYLE_TYPE
from docx.enum.table import WD_TABLE_ALIGNMENT
from docx.oxml.ns import qn
from docx.shared import Cm, Pt, RGBColor, Mm
from docx.enum.text import WD_PARAGRAPH_ALIGNMENT, WD_COLOR_INDEX

wd = Document()					# 定义一个新的文档对象
p = wd.add_paragraph("风度翩翩") # 添加段落
print(p)						# 打印段落
p.text = "玉树临风"				 # 修改段落内容

# p.text = ""     # 删除段落内容,此方式其实段落仍存在只是无内容
# print(len(wd.paragraphs))

# 彻底删除段落
for i in wd.paragraphs:         # 通过遍历获取所有段落
    p = i._element              # 每个段落都是由一个个标签组成,获取段落中的标签
    # print(p)
    p.getparent().remove(p)     # 获取标签的父标签,然后通过父标签删除当前标签,标签不能自己删除自己
    p._parent = None            # 然后父标签也设置为空
print(f"共有{len(wd.paragraphs)}段落")       # 获取总段落,结果为0

# 添加段落并设置段落对齐方式
p1 = wd.add_paragraph("左对齐,也是默认对齐样式")
p2 = wd.add_paragraph("右对齐")
p3 = wd.add_paragraph("居中对齐")
p4 = wd.add_paragraph("两端对齐,即最后一行未占满时,以左对齐的方式显示")
p5 = wd.add_paragraph("分散对齐,即最后一行未占满时,分散文字占满此行")

p1.alignment = WD_PARAGRAPH_ALIGNMENT.LEFT
p2.alignment = WD_PARAGRAPH_ALIGNMENT.RIGHT
p3.alignment = WD_PARAGRAPH_ALIGNMENT.CENTER
p4.alignment = WD_PARAGRAPH_ALIGNMENT.JUSTIFY
p5.alignment = WD_PARAGRAPH_ALIGNMENT.DISTRIBUTE

p6 = wd.add_paragraph("这是段落①")
p7 = wd.add_paragraph("这是段落②")
p8 = wd.add_paragraph("这是段落③")
p9 = wd.add_paragraph("这是段落④",style="List Bullet")
p9.style.delete()       # 删除段落样式,会恢复默认样式,即style="Normal"

p6.paragraph_format.line_spacing = Cm(2)     # 行间距为2cm
p7.paragraph_format.first_line_indent = Cm(1)   # 首行缩进1cm
p8.paragraph_format.space_before = Cm(2)        # 段落前空出2cm
p9.paragraph_format.space_after = Cm(3)         # 段落后空出3cm

p10 = wd.add_paragraph("这是段落⑤")
r1 = p10.add_run("追加文字0")             # 此时段落5和追加的文字属于同一个run
r1.font.bold = True                      # 加粗,此时”追加文字0“字体加粗,与段落5不再属于同一个run
r2 = p10.add_run("追加文字1")              # 此时段落5和追加文字1属于同一个run,但与追加文字不属于同一个run
r2.font.italic = True                     # 斜体,此时三者不属于同一个run
r3 = p10.add_run("追加文字2")              # 此时段落5和追加文字2属于同一个run,但与其它的不属于同一个run
r3.font.underline = True                  # 下划线,此时四者不属于同一个run
# r3.font.underline = WD_UNDERLINE.DOUBLE # r3设为双下划线
# r3.font.underline = WD_UNDERLINE.THICK  # r3设为下划线加粗
# r3.font.underline = WD_UNDERLINE.WAVY   # r3下划线设为波浪线
# ↓ 查看所有下划线类型
# for line_type in WD_UNDERLINE.__members__:
#     print(line_type.name)

r4 = p10.add_run("追加文字3")             # 此时段落5和追加文字3属于同一个run,但与其它的不属于同一个run
r4.font.strike = True                    # 中划线,此时五者不属于同一个run
# r4.font.double_strike = True           # r4设为双中划线
r5 = p10.add_run("追加文字4")             # 此时段落5和追加文字4属于同一个run,但与其它的不属于同一个run
r5.font.shadow = True                    # 阴影,此时五者不属于同一个run

r6 =p10.add_run("追加文字5,five")      	 # 此时段落5和追加文字5属于同一个run,但与其它的不属于同一个run
r6.font.name = "Arial"                  # 设置英文字体为Arial
r6.element.rPr.rFonts.set(qn("w:eastAsia"),"楷体")   # 设置中文字体为楷体,注意:即使run中没有英文,在设置中文字体前也必须先设置英文字体
r6.font.size = Pt(18)                   # 设置字号为18磅
# ↑ 此时六者不属于同一个run,因为“这是追加文字5”和“five”设置的样式是相同的,且二者是连续的,中间没有其它样式的run,所以它俩属于同一个run
r7 =p10.add_run("测试123")
r7.text = "\n这是换行追加的文字6"    				  # 修改了r7的文本内容
# r7.font.color.rgb = RGBColor(251,139,5)           # 设置字体颜色,使用rgb值
r7.font.color.rgb = RGBColor.from_string("9933FA")  # 使用十六进制rgb值设置字体颜色
r8 =p10.add_run("追加文字7")
r8.font.highlight_color = WD_COLOR_INDEX.PINK       # 设置字体背景色
# ↓ 查看所有支持的背景色
# for color in WD_COLOR_INDEX.__members__:
#     print(color.name)

print(f"共有{len(wd.paragraphs)}段落")                # 统计段落数
for pa in wd.paragraphs:                			# 通过遍历打印各段落内容
    print(pa.text)									# 打印段落内容
print(f"共有{len(wd.paragraphs[9].runs)}run")        # 统计段落10中的run数
for run in wd.paragraphs[9].runs:       			# 通过遍历打印各段落10中各run的内容
    print(run.text)									# 打印run内容

pic = wd.add_picture(r"E:\b2b5ab6.jpeg",width=Cm(3),height=Cm(2))    # 添加图片,可自定义长宽
wd.paragraphs[10].runs[0].add_picture(r"E:\5fa8f7d8aa67e.jpg",Cm(5)) # 添加图片和pic在同一行,不指定长宽时默认设置为宽度,高度同比例缩放
pic1 = wd.add_picture(r"E:\5165027.png")           		 # 添加图片,默认情况一张图为一个段落,后加的图片不会与之前添加的图片在同一行
print(f"宽:{pic1.width.cm}Cm,高:{pic1.height.cm}Cm")     # 打印pic1图片的原有宽度和高度,单位可选择cm和mm,或者不带单位
pic1.width = int(pic1.width * 0.2)      			# 设置pic1宽度为原有的20%
pic1.height = int(pic1.height * 0.2)    			# 设置pic1高度为原有的20%
print(f"当前文档中共{len(wd.inline_shapes)}张图")  	   # 统计文档中共有几张图片

# 因为默认情况一张图就是一个段落,所以图片的对齐方式和段落对齐方式一样,默认左对齐
wd.paragraphs[10].alignment = WD_PARAGRAPH_ALIGNMENT.RIGHT  	# 将pic图片靠右对齐
wd.paragraphs[11].alignment = WD_PARAGRAPH_ALIGNMENT.CENTER  	#将pic1图靠居中对齐
wd.paragraphs[10].alignment = WD_PARAGRAPH_ALIGNMENT.DISTRIBUTE # 将pic两张图分散对齐

# 新建表格
tab = wd.add_table(rows=2,cols=3)
tab.add_row()           					 # 添加一行,无需参数
tab.add_column(Cm(5))   					 # 添加一列,必须指定一个宽度
print(f"共{len(tab.rows)}行")    				# 统计表格行数
print(f"共{len(tab.columns)}列") 				# 统计表格列数
count = 0
for r in tab.rows:                            # 通过行获取各个单元格
    for j,rcell in enumerate(r.cells):        # enumerate可用于获取索引列表
        print(f"单元格:{r._index, j}", rcell) # 打印单元格坐标
        count +=1
print(count)                                 # 统计单元格个数,因tab表为3行4列,故共12个

for c in tab.columns:                       # 通过列获取各个单元格
    for j,ccell in enumerate(c.cells):
        print(f"单元格:{c._index, j}")      # 打印单元格坐标

for c in tab.rows[1:3]:                     # 通过切片方式,获取指定区域的单元格坐标
    for j,ccell in enumerate(c.cells):
        print(f"单元格:{c._index, j}")      # 打印单元格坐标

row = tab.rows[0]                    # 获取表格第1行并赋值给row
row.cells[0].text = "通过标准"        # 在单元格(0,0)输入
row.cells[1].text = "实际执行结果"     # 在单元格(0,1)输入
row.cells[2].text = "测试结果"        # 在单元格(0,2)输入

print("打印指定单元格中的内容:",tab.cell(0, 0).text)
for cell in tab.row_cells(0):
    print("打印第1行单元格中的内容:",cell.text)

for cell in tab.column_cells(0):
    print("打印第1列单元格中的内容:",cell.text)

for row in tab.rows:                # 通过嵌套循环打印所有单元格中的内容
    for cell in row.cells:
        print(cell.text)

cell1 = tab.cell(1,2)                # 获取单元格(0,2)并赋值给cell1
cell1.add_paragraph("通过")           # 在单元格(0,2)填写内容
cell1.add_paragraph().add_run().add_picture(r"E:\0fa202.jpeg",Mm(15))   # 单元格(0,2)换行添加图片

tab.add_row()                       # tab表添加一行
tab.cell(3,2).merge(cell1)          # 合并单元格

tab.rows[2]._element.getparent().remove(tab.rows[2]._element)   # 删除第3行

col = tab.columns[3]                # 删除第4列
for cell in col.cells:              # 通过for循环获取第4列的每个单元格后删除
    cell._element.getparent().remove(cell._element)

# ↓通过列表推导式获取表格样式
tab_styles = [s for s in wd.styles if s.type == WD_STYLE_TYPE.TABLE]
for style in tab_styles:    # 通过循环打印样式名称
    print(style.name)

tab1 = wd.add_table(2, 2,style="Table Grid")    # 新建表格,并设置表格网线
tab1.alignment = WD_TABLE_ALIGNMENT.CENTER      # 表格居中,默认居左,亦可设为居右
tab1.cell(0,0).text = "右对齐"
tab1.cell(0,0).paragraphs[0].alignment = WD_PARAGRAPH_ALIGNMENT.RIGHT
tab1.cell(0,1).text = "居中对齐"
tab1.cell(0,1).paragraphs[0].alignment = WD_PARAGRAPH_ALIGNMENT.CENTER
tab1.cell(1,0).text = "两端对齐"
tab1.cell(1,0).paragraphs[0].alignment = WD_PARAGRAPH_ALIGNMENT.JUSTIFY
tab1.cell(1,1).text = "分散对齐"
tab1.cell(1,1).paragraphs[0].alignment = WD_PARAGRAPH_ALIGNMENT.DISTRIBUTE

for r in tab1.rows:             #通过for循环每个单元格都设为居中对齐
    for j,rcell in enumerate(r.cells):
        tab1.cell(r._index, j).paragraphs[0].alignment = WD_PARAGRAPH_ALIGNMENT.CENTER

# 设置行宽行高
# tab.autofit = False           # 设置为不自动调整时,行宽行高设置才能同时生效
tab.rows[1].height = Mm(15)   # 设置第一行单元格高度
# tab.columns[0].width = Mm(15) # 设置第一列单元格宽度

# 分节符
wd.add_section(WD_SECTION_START.NEW_PAGE)   # 新的分页符
wd.add_section(WD_SECTION_START.CONTINUOUS) # 连续的分页符
wd.add_section(WD_SECTION_START.NEW_COLUMN) # 新的列分页符
wd.add_section(WD_SECTION_START.EVEN_PAGE)  # 偶数页分页符
wd.add_section(WD_SECTION_START.ODD_PAGE)   # 奇数页分页符
print(f"共有{len(wd.sections)}页")

# 设置第5页纸
section = wd.sections[4]
print(section.page_width.cm)
print(section.page_height.cm)
# 改为A4纸大小
section.page_width = Cm(21)
section.page_height = Cm(29.7)
print(section.orientation)
# 设置为横向纸,然后对调纸张的长宽
section.orientation = WD_ORIENTATION.LANDSCAPE
section.page_width,section.page_height = section.page_height,section.page_width
print(section.orientation)

# 设置第6页纸
section1 = wd.sections[5]
# 获取当前页边距
print(section1.top_margin.cm)
print(section1.bottom_margin.cm)
print(section1.left_margin.cm)
print(section1.right_margin.cm)
# 修改页边距
section1.top_margin = Cm(2)
section1.bottom_margin = Cm(2)
section1.left_margin = Cm(3)
section1.right_margin = Cm(3)
# 设置装订线
section1.gutter = Cm(2.5)

# 强制换页,即新建空白页
wd.add_page_break()

# 设置页眉页脚
wd.sections[0].header.paragraphs[0].add_run("每页纸上都显示该页眉")
wd.sections[0].footer.paragraphs[0].add_run("每页纸上都显示该页脚")
# 修改页眉页脚
wd.sections[0].header.paragraphs[0].text = "这是页眉"
wd.sections[0].footer.paragraphs[0].text = "这是页脚"
# 修改第5页及之后的纸张的页眉页脚
wd.sections[4].header.is_linked_to_previous = False     # 此代码的目的是不让它继承上一个页眉
wd.sections[4].header.paragraphs[0].text = "这是页眉2"
wd.sections[4].footer.is_linked_to_previous = False
wd.sections[4].footer.paragraphs[0].text = "这是页脚2"
# 页眉页脚中也可以添加图片、表格,设置字体样式等
wd.sections[0].header.paragraphs[0].add_run().add_picture(r"E:\190339.png",Cm(1))

wd.settings.odd_and_even_pages_header_footer = True     # 此代码的目的开启区分奇数页和偶数页的页眉页脚
wd.sections[0].header.paragraphs[0].text = "这是奇数页眉"
wd.sections[0].footer.paragraphs[0].text = "这是奇数页脚"
wd.sections[0].even_page_footer.paragraphs[0].text = "这是偶数页页眉"
wd.sections[0].even_page_footer.paragraphs[0].text = "这是偶数页页脚"
wd.add_page_break()     # 强行换页,也可以理解为添加一个空白页

wd.sections[0].different_first_page_header_footer = True    # 此代码的目的是让其可设置首页与其它页的页眉页脚不同
wd.sections[0].first_page_header.paragraphs[0].text = "这是首页页眉"
wd.sections[0].first_page_footer.paragraphs[0].text = "这是首页页脚"
wd.sections[0].header.paragraphs[0].text = "这是其它页的页眉"
wd.sections[0].footer.paragraphs[0].text = "这是其它页的页脚"

wd.save("dydtest.docx")
使用openpyxl处理Excel文档
openpyxl是支持读写Excel的python库,支持xlsx格式的Excel文件,能够同时读取和修改Excel文档,使用前需先安装pip install openpyxl
以下代码同时运行可能报错或部分页面样式被覆盖,故请按需获取,写在一起记录,仅是为方便以后查找使用,更多功能请查看官方文档
import openpyxl
from openpyxl.styles import PatternFill, GradientFill
from openpyxl.styles.borders import Border, Side
from openpyxl.styles.alignment import Alignment
from openpyxl.styles.fonts import Font
from openpyxl.utils import get_column_letter, column_index_from_string

wb = openpyxl.Workbook("E:/test_data.xlsx")   # 创建Excel文件
wb.save("E:/test_data.xlsx")

# 打开已存在的Excel文件,有些表格数据是通过函数计算的,data_only=True表示只查看最终数据
wb = openpyxl.load_workbook("E:/dydtest.xlsx",data_only=True)
# sheet = wb["成绩表"]			    # 指定打开名为“成绩”的工作表
sheet = wb[wb.sheetnames[0]]	    # 也可以使用下标的方式打开工作表

row = sheet.max_row				# 获取总行数
row1 = len(tuple(sheet.rows))	# 或者使用此方式获取总行数
col = sheet.max_column			# 获取总列数
col1 = len(tuple(sheet.columns))# 或者使用此方式获取总列数

wb.create_sheet("日历表")              # 新建工作表

copy_wb_st = wb.copy_worksheet(wb["成绩表"])  # 复制成绩表
copy_wb_st.title = "复制的成绩表"              # 指定表名,未指定时会在使用原表名并加上Copy

for i in wb.worksheets:         # 获取所有工作表
    print(i.title)              # 打印所有工作表名称
    if i.title != "成绩表":
        wb.remove(wb[i.title])  # 删除工作表,只保留“成绩表”

print(sheet["A1"].value)        # 打印单元格的值
print(sheet.cell(1,1).value)	# 或者使用坐标方式,先行后列,或使用参数名row=,column=
# sheet["A2"].value = int(126)    # 修改数据,默认是字符串格式
sheet.cell(6,8,value="测试")

for row in sheet["B2:E9"]:      # 获取指定区域的行
    for cell in row:            # 然后获取指定行中的单元格
        print(cell.value)       # 最后获取单元格中的内容

# ↓也可以使用此方式,iter_rows表示按行获取单元格,iter_cols表示按列获取单元格
ran = sheet.iter_rows(min_row=1,max_row=10,min_col=1,max_col=8)
for row in ran:               # 获取指定区域的行
    for cell in row:            # 然后获取指定行中的单元格
        if cell.value != None:  # 若单元格不为空则打印结果
            print(cell.value)

# 动态获取文档中所有的数据,即使增删了行列,也无需修改代码
for row in sheet.iter_rows(1,sheet.max_row,1,sheet.max_column):
    print([cell.value for cell in row if cell.value != None])# 使用列表推导式直接打印列表中的数据

# [1:]是使用切片的方式去掉顶部和左侧的表头
for row in list(sheet.iter_rows(1,sheet.max_row,1,sheet.max_column))[1:]:
    print([cell.value for cell in row[1:] if cell.value != None])

sheet.insert_rows(idx=2,amount=3)# 从第2行插入3行,idx=表示位置,amount=表示行/列数
sheet.delete_rows(2,3)        	 # 从第2行删除3行
sheet.insert_cols(2,3)        	 # 从第2列插入3列
sheet.delete_cols(2,3)        	 # 从第2列删除3列

list1 = ["张珊",136,128,98,286]
# 插入一行数据
for r in range(len(list1)):     # 获取列表元素总个数,做为列数
    # ↓ 在最后一行插入数据,list1列表中每拿到1个数据,列数就加1,然后赋值给对应单元格
    sheet.cell(row=sheet.max_row,column=r+1).value=list1[r]

sheet.insert_rows(idx=2,amount=1)# 在第2行插入1空行
for r in range(len(list1)):      # 在插入的空行填写数据
    sheet.cell(row=2,column=r+1).value=list1[r]

list2 = ["文综",268,188,288]
# 插入一列数据
for c in range(len(list2)):     # 获取列表元素总个数,做为行数
    sheet.cell(row=c+1,column=sheet.max_column).value=list2[c]

sheet.merge_cells("A2:B6")      # 合并单元格
sheet.unmerge_cells("A2:B6")    # 取消合并单元格

sheet.move_range("A1:C8",rows=10,cols=8)    # 移动单元格

sheet.freeze_panes = "B2"       # 冻结窗口

for row in sheet["A1:H1"]:      # 设置第一行(表头)样式
    for cell in row:
        cell.font = Font(name=u"宋体",bold=True,italic=True,size=18)  # 设置字体样式
        cell.fill = PatternFill(fill_type="solid",fgColor="FCFC0C")  # 设置背景色,实心填充

#渐变填充,type分为两种:linear表示线性渐变,path表示中心扩散;degree指旋转角度,stop中是颜色RGB值
sheet["D6"].fill=GradientFill(type="linear",degree=25,stop=("4158D0","C850C0","FFCC70"))

# 边框设置,可设置边框线的样式和颜色
l_side = Side(style='thin', color="EE0000")
r_side = Side(style='double', color="3608FC")
t_side = Side(style='dashed', color="0AFA38")
b_side = Side(style='hair', color="000000")
sheet["G6"].border = Border(left=l_side,right=r_side,top=t_side,bottom=b_side)

# 设置行高列宽,若低于Excel默认大小会失效
sheet.row_dimensions[2].height = 25
sheet.column_dimensions["C"].width = 15

# 通过for循环遍历所有单元格,然后设置统一的样式
for row in sheet.iter_rows(1,sheet.max_row,1,sheet.max_column):
    for cell in row:
        cell.font = Font(name=u"楷体",bold=True,size=15)      # 设置字体样式和大小
        cell.alignment = Alignment(horizontal="center",vertical="center",wrap_text=False)   # 字体水平垂直都居中,不自动换行
        cell.border = Border(left=Side(style='thin'), right=Side(style='thin'),top=Side(style='thin'),bottom=Side(style='thick'))

# 数字与字母转换,获取第几列时会用到
print(f"数字转换成字母:{get_column_letter(26)}")
print(f"字母转换成数字:{column_index_from_string('A')}")

wb.save("E:/dydtest.xlsx")	# 保存文件
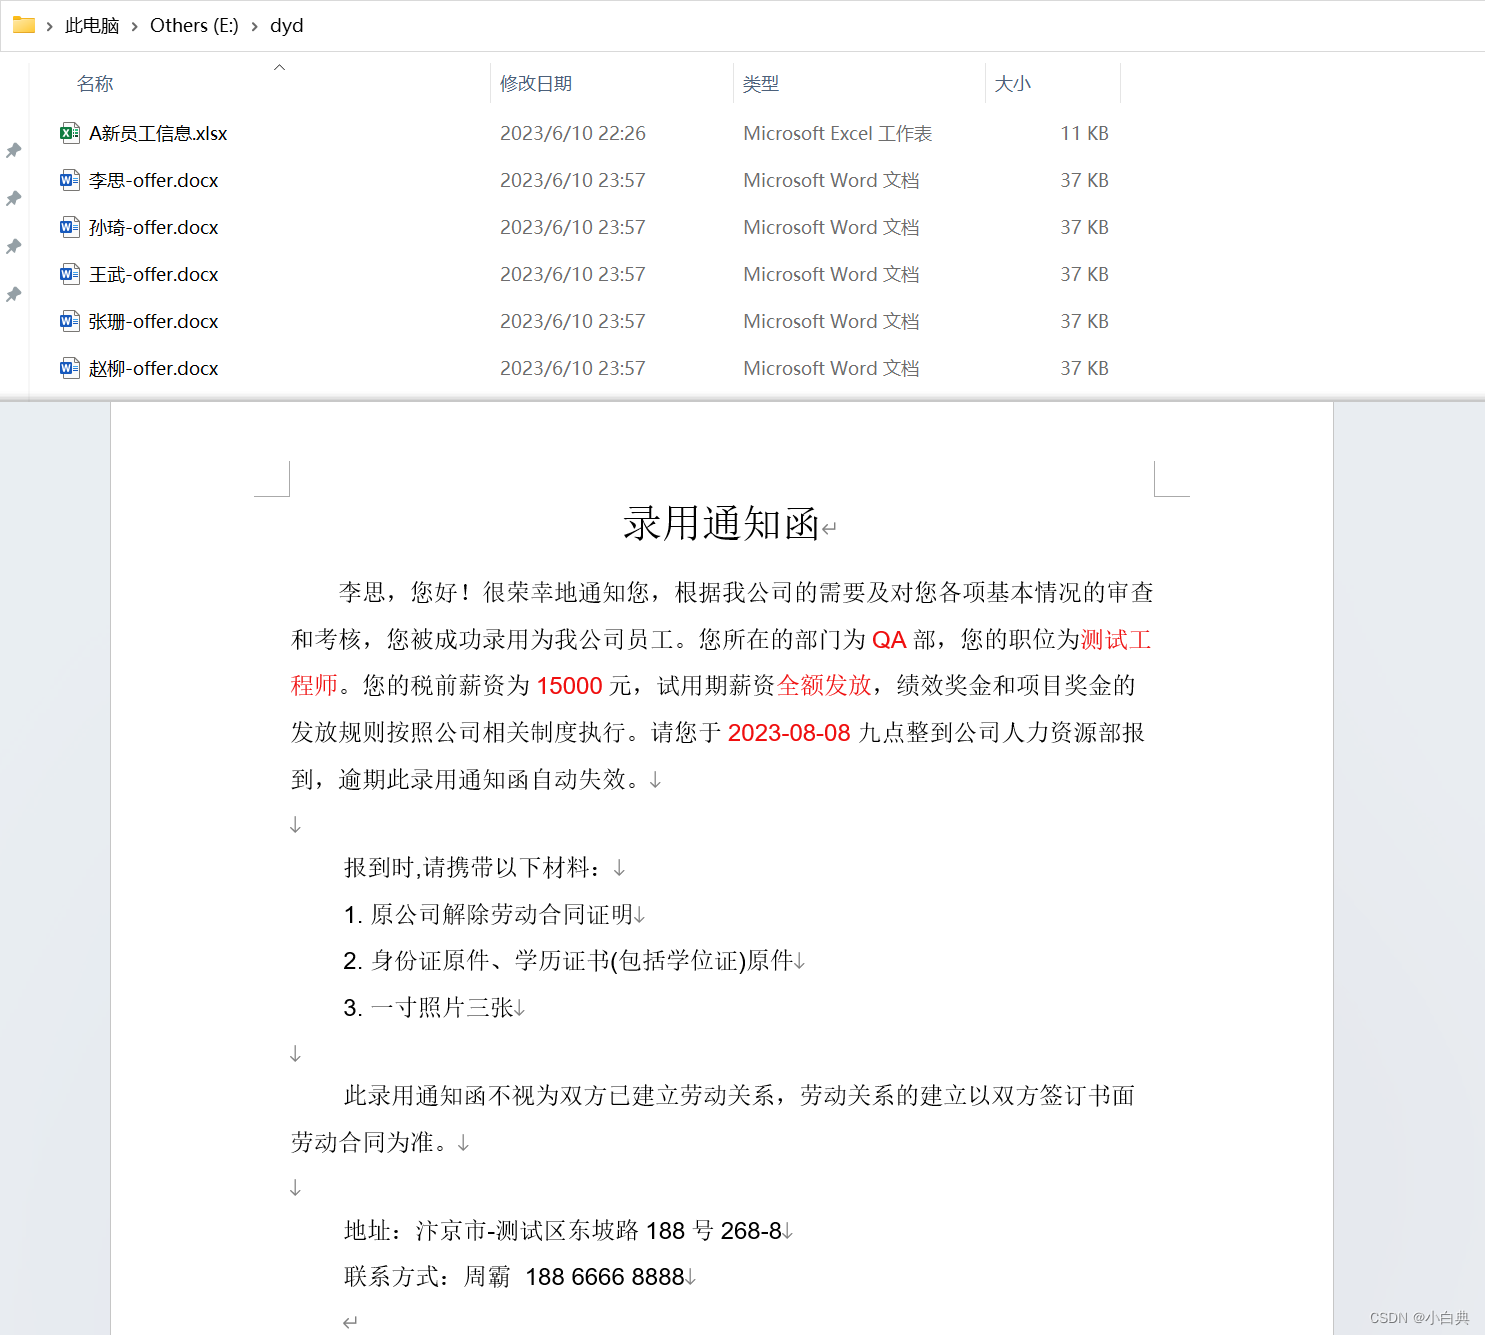
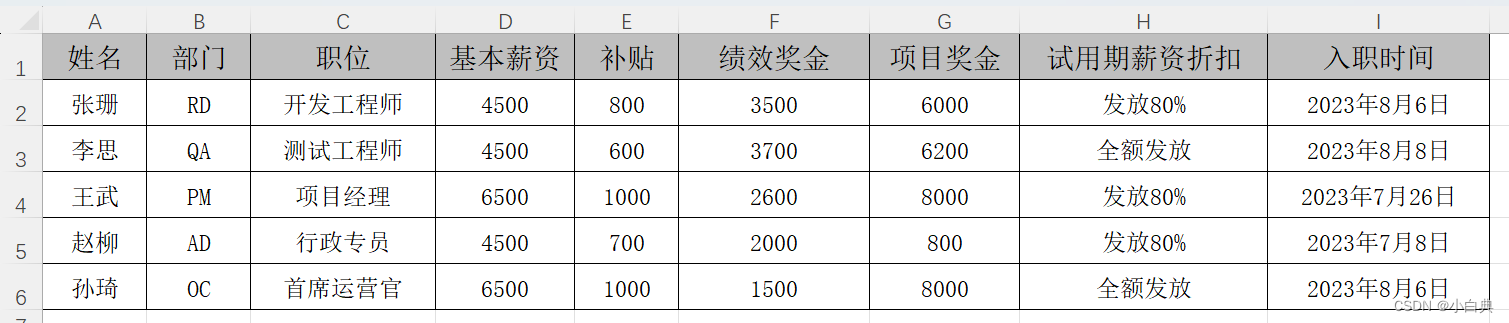
示例:获取Excel文档中的数据生成Word文档
Excel文件的数据如图所示:
import datetime
from docx import Document
from docx.enum.text import WD_PARAGRAPH_ALIGNMENT
from docx.oxml.ns import qn
from docx.shared import Pt, RGBColor
from openpyxl import load_workbook


wb = load_workbook("E:/dyd/A新员工信息.xlsx")	# 打开Excel文件
sheet = wb[wb.sheetnames[0]]	# 打开第一个工作表

employees= []  		# 新建一个空列表,将读取出来的每行数据存放到列表中
for x in range(2, int(sheet.max_row)+1):        # 获取可用数据行数,跳过表头
    employee_info = []  		                # 组装每行数据,形成一个列表
    for y in range(1,int(sheet.max_column)+1):  # 获取可用数据共几列
        employee_info.append(sheet.cell(row=x, column=y).value) # 将每个单元格数据添加到employee_info列表中
    employees.append(employee_info)             # 将每行数据添加到employees列表中

for r in range(0, int(sheet.max_row)-1):        # 获取可用数据行数,作为下标值,决定了内循环次数
    for i in employees[r]:                      # 通过下标获取嵌套列表中的每个列表
        employee_name = employees[r][0]         # 获取员工姓名
        department = employees[r][1]            # 获取部门
        job = employees[r][2]                   # 获取职位
        total_salary = sum(employees[r][3:7])   # 获取各项薪资并计算总金额
        salary_ratio = employees[r][7]          # 获取薪资发放比例
        entry_time = datetime.datetime.strptime(str(employees[r][8]),"%Y-%m-%d %H:%M:%S").date()    # 获取日期,去掉时分秒

        doc = Document()                        # 新建Word文档
        title = doc.add_paragraph()             # 添加一个段落作为标题
        title.alignment = WD_PARAGRAPH_ALIGNMENT.CENTER # 标题居中
        title_run = title.add_run("录用通知函")       # 添加标题内容
        title_run.font.size = Pt(20)                # 设置标题字号为20磅
        title_run.font.name = "Arial"               # ←↓设置字体样式
        title_run.element.rPr.rFonts.set(qn("w:eastAsia"),"宋体")

        # 正文段落
        text = doc.add_paragraph()                  # 添加一个段落
        run_list = list()  # 保存需要设置颜色的数据,即对从Excel文件获取的数据进行样式修改
        text.add_run(f"{employee_name},您好!")      # 使用Excel文件中的【姓名】
        text.add_run("很荣幸地通知您,根据我公司的需要及对您各项基本情况的审查和考核,您被成功录用为我公司员工。您所在的部门为")
        run_list.append(text.add_run(f"{department}"))  # 使用Excel文件中的【部门】,并将其添加到run_list列表中
        text.add_run("部,您的职位为")
        run_list.append(text.add_run(f"{job}"))
        text.add_run("。您的税前薪资为")
        run_list.append(text.add_run(f"{total_salary}"))
        text.add_run("元,试用期薪资")
        run_list.append(text.add_run(f"{salary_ratio}"))
        text.add_run(",绩效奖金和项目奖金的发放规则按照公司相关制度执行。请您于")
        run_list.append(text.add_run(f"{entry_time}"))
        text.add_run(""" 九点整到公司人力资源部报到,逾期此录用通知函自动失效。

        报到时,请携带以下材料:
        1. 原公司解除劳动合同证明
        2. 身份证原件、学历证书(包括学位证)原件
        3. 一寸照片三张

        此录用通知函不视为双方已建立劳动关系,劳动关系的建立以双方签订书面劳动合同为准。

        地址:汴京市-测试区东坡路188号268-8
        联系方式:周霸  188 6666 8888
        """)
        for run in run_list:        # 获取run_list列表中的数据,并设置样式
            run.font.color.rgb = RGBColor.from_string("EF0F0F") # 设置字体为红色

        text.style.font.size = Pt(12)                           # 设置正文字体为12磅
        text.paragraph_format.first_line_indent = Pt(24)        # 设置正文首行缩进2个字
        text.paragraph_format.line_spacing = 1.5                # 设置正文行距为1.5
        text.style.font.name = "Arial"                          # ←↓设置正文字体样式
        text.style.element.rPr.rFonts.set(qn("w:eastAsia"),"宋体")

        doc.save(f"E:/dyd/{employee_name}-offer.docx")          # 没遍历完一行数据就另存为一个Word文档
生成的word结果如下图所示,Excel中有几行数据就会生成几个Word文档