基础环境
| 主机名 | 配置 | 角色 | 系统版本 | IP | 安装的组件 |
|---|---|---|---|---|---|
| 220903master | 4核4G | master | openEuler22.09 | 10.0.0.3 | apiserver、controller-manager、scheduler、kubelet、etcd、kube-proxy、容器运行时、calico |
| 220904node1 | 4核4G | worker | openEuler22.09 | 10.0.0.4 | Kube-proxy、 calicocoredns、容器运行时、kubelet |
系统初始化配置
配置本地解析
集群内主机都需要执行
$ cat >> /etc/hosts << EOF
10.0.0.3 220903master
10.0.0.4 220904node1
EOF
配置互信
集群内主机都需要执行
ssh-keygen
ssh-copy-id 220903master
ssh-copy-id 220904node1
关闭防火墙、selinux
集群内主机都需要执行
systemctl stop firewalld && systemctl disable firewalld
setenforce 0
sed -i "s/SELINUX=enforcing/SELINUX=disabled/g" /etc/selinux/config
关闭系统的交换分区swap
集群内主机都需要执行
sed -ri 's/^([^#].*swap.*)$/#\1/' /etc/fstab && grep swap /etc/fstab && swapoff -a && free -h
设置内核参数
集群内主机都需要执行
cat >> /etc/sysctl.conf <<EOF
vm.swappiness = 0
net.bridge.bridge-nf-call-iptables = 1
net.ipv4.ip_forward = 1
net.bridge.bridge-nf-call-ip6tables = 1
EOF

#加载模块
modprobe  br_netfilter
#让配置生效
sysctl -p
安装docker
集群内主机都需要执行
#安装yum源
yum-config-manager --add-repo https://mirrors.ustc.edu.cn/docker-ce/linux/centos/docker-ce.repo
# 这本是centos的安装源,如果直接使用会报错,因为其中的 $releasever 会替换成22.09
# 所以,使用前需要先把$releasever都修改成7
yum makecache
#安装docker
yum install docker-ce -y
#设置开机自启
systemctl enable docker
#启动docker
systemctl start docker
#配置加速
cat <<EOF > /etc/docker/daemon.json
{
  "registry-mirrors": [
    "https://docker.mirrors.ustc.edu.cn",
   "https://hub-mirror.c.163.com",
   "https://reg-mirror.qiniu.com",
    "https://registry.docker-cn.com"
  ],
  "exec-opts": ["native.cgroupdriver=systemd"],
  "data-root": "/data/docker",
  "log-driver": "json-file",
  "log-opts": {
	 "max-size": "200m",
	 "max-file": "5"
	}
}
EOF
#重启docker
systemctl restart docker
安装最新版本的kubeadm、kubelet 和 kubectl
集群内主机都需要执行
配置安装源
cat <<EOF > /etc/yum.repos.d/kubernetes.repo
[kubernetes]
name=Kubernetes
baseurl=https://mirrors.aliyun.com/kubernetes/yum/repos/kubernetes-el7-x86_64/
enabled=1
gpgcheck=0
EOF

# 刷新yum的元数据
yum makecache
安装kubelet、kubeadm 和 kubectl
yum install -y kubelet kubeadm kubectl
设置kubelet自启
此时,还不能启动kubelet,因为集群还没有配置起来,现在仅仅设置开机自启动
systemctl enable kubelet
cri-dockerd
集群内主机都需要执行
Kubernetes自v1.24移除了对docker-shim的支持,而Docker Engine默认又不支持CRI规范,因而二者将无法直接完成整合。为此,Mirantis和Docker联合创建了cri-dockerd项目,用于为Docker Engine提供一个能够支持到CRI规范的垫片,从而能够让Kubernetes基于CRI控制Docker 。
项目地址:https://github.com/Mirantis/cri-dockerd
cri-dockerd项目提供了rpm包

安装 cri-dockerd
wget https://github.com/Mirantis/cri-dockerd/releases/download/v0.3.4/cri-dockerd-0.3.4-3.el7.x86_64.rpm
yum install cri-dockerd-0.3.4-3.el7.x86_64.rpm -y
配置 cri-dockerd
从国内 cri-dockerd 服务无法下载 k8s.gcr.io上面相关镜像,导致无法启动,所以需要修改cri-dockerd 使用国内镜像源
修改配置文件,设置国内镜像源
$ sed -ri 's@^(.*fd://).*$@\1 --pod-infra-container-image registry.aliyuncs.com/google_containers/pause@' /usr/lib/systemd/system/cri-docker.service
# 重启
$ systemctl daemon-reload && systemctl restart cri-docker && systemctl enable cri-docker

在master节点上初始化
集群内master主机需要执行
生成初始化配置文件
kubeadm config print init-defaults > kubeadm.yaml
修改配置文件
vim kubeadm.yaml

apiVersion: kubeadm.k8s.io/v1beta3
bootstrapTokens:
- groups:
  - system:bootstrappers:kubeadm:default-node-token
  token: abcdef.0123456789abcdef
  ttl: 24h0m0s
  usages:
  - signing
  - authentication
kind: InitConfiguration
localAPIEndpoint:
  # 修改成本master的ip
  advertiseAddress: 10.0.0.3
  bindPort: 6443
nodeRegistration:
  # 修改成cri-dockerd的sock
  criSocket: unix:///run/cri-dockerd.sock
  imagePullPolicy: IfNotPresent
  # 修改成本master的主机名
  name: 220903master
  taints: null
---
apiServer:
  timeoutForControlPlane: 4m0s
apiVersion: kubeadm.k8s.io/v1beta3
certificatesDir: /etc/kubernetes/pki
clusterName: kubernetes
controllerManager: {}
dns: {}
etcd:
  local:
    dataDir: /var/lib/etcd
imageRepository: registry.aliyuncs.com/google_containers
kind: ClusterConfiguration
# 修改成具体对应的版本好
kubernetesVersion: 1.27.4
networking:
  dnsDomain: cluster.local
  serviceSubnet: 10.96.0.0/12
  # 添加pod的IP地址
  podSubnet: 10.244.0.0/16
scheduler: {}
# 在最后添加上下面两部分
---
apiVersion: kubeproxy.config.k8s.io/v1alpha1
kind: KubeProxyConfiguration
mode: ipvs
---
apiVersion: kubelet.config.k8s.io/v1beta1
kind: KubeletConfiguration
cgroupDriver: systemd
初始化集群
kubeadm init --config=kubeadm.yaml --ignore-preflight-errors=SystemVerification
出现下面这种类似的情况,就说明初始化成功了
[certs] Generating "apiserver-etcd-client" certificate and key
[certs] Generating "sa" key and public key
[kubeconfig] Using kubeconfig folder "/etc/kubernetes"
[kubeconfig] Writing "admin.conf" kubeconfig file
[kubeconfig] Writing "kubelet.conf" kubeconfig file
[kubeconfig] Writing "controller-manager.conf" kubeconfig file
[kubeconfig] Writing "scheduler.conf" kubeconfig file
[kubelet-start] Writing kubelet environment file with flags to file "/var/lib/kubelet/kubeadm-flags.env"
[kubelet-start] Writing kubelet configuration to file "/var/lib/kubelet/config.yaml"
[kubelet-start] Starting the kubelet
[control-plane] Using manifest folder "/etc/kubernetes/manifests"
[control-plane] Creating static Pod manifest for "kube-apiserver"
[control-plane] Creating static Pod manifest for "kube-controller-manager"
[control-plane] Creating static Pod manifest for "kube-scheduler"
[etcd] Creating static Pod manifest for local etcd in "/etc/kubernetes/manifests"
[wait-control-plane] Waiting for the kubelet to boot up the control plane as static Pods from directory "/etc/kubernetes/manifests". This can take up to 4m0s
[apiclient] All control plane components are healthy after 7.502122 seconds
[upload-config] Storing the configuration used in ConfigMap "kubeadm-config" in the "kube-system" Namespace
[kubelet] Creating a ConfigMap "kubelet-config" in namespace kube-system with the configuration for the kubelets in the cluster
[upload-certs] Skipping phase. Please see --upload-certs
[mark-control-plane] Marking the node 220903master as control-plane by adding the labels: [node-role.kubernetes.io/control-plane node.kubernetes.io/exclude-from-external-load-balancers]
[mark-control-plane] Marking the node 220903master as control-plane by adding the taints [node-role.kubernetes.io/control-plane:NoSchedule]
[bootstrap-token] Using token: abcdef.0123456789abcdef
[bootstrap-token] Configuring bootstrap tokens, cluster-info ConfigMap, RBAC Roles
[bootstrap-token] Configured RBAC rules to allow Node Bootstrap tokens to get nodes
[bootstrap-token] Configured RBAC rules to allow Node Bootstrap tokens to post CSRs in order for nodes to get long term certificate credentials
[bootstrap-token] Configured RBAC rules to allow the csrapprover controller automatically approve CSRs from a Node Bootstrap Token
[bootstrap-token] Configured RBAC rules to allow certificate rotation for all node client certificates in the cluster
[bootstrap-token] Creating the "cluster-info" ConfigMap in the "kube-public" namespace
[kubelet-finalize] Updating "/etc/kubernetes/kubelet.conf" to point to a rotatable kubelet client certificate and key
[addons] Applied essential addon: CoreDNS
[addons] Applied essential addon: kube-proxy

Your Kubernetes control-plane has initialized successfully!

To start using your cluster, you need to run the following as a regular user:

  mkdir -p $HOME/.kube
  sudo cp -i /etc/kubernetes/admin.conf $HOME/.kube/config
  sudo chown $(id -u):$(id -g) $HOME/.kube/config

Alternatively, if you are the root user, you can run:

  export KUBECONFIG=/etc/kubernetes/admin.conf

You should now deploy a pod network to the cluster.
Run "kubectl apply -f [podnetwork].yaml" with one of the options listed at:
  https://kubernetes.io/docs/concepts/cluster-administration/addons/

Then you can join any number of worker nodes by running the following on each as root:

kubeadm join 10.0.0.3:6443 --token abcdef.0123456789abcdef \
	--discovery-token-ca-cert-hash sha256:0deaa9ceed7266c28c5f5241ed9efea77c798055ebcc7a27dc03f6c97323c8a0
按照提示要求,创建配置文件目录以及复制配置文件
mkdir -p $HOME/.kube
sudo cp -i /etc/kubernetes/admin.conf $HOME/.kube/config
sudo chown $(id -u):$(id -g) $HOME/.kube/config
加入worker节点
集群内只在worker主机需要执行
kubeadm join 10.0.0.3:6443 \
--token abcdef.0123456789abcdef \
--discovery-token-ca-cert-hash sha256:0deaa9ceed7266c28c5f5241ed9efea77c798055ebcc7a27dc03f6c97323c8a0 \
--cri-socket unix:///run/cri-dockerd.sock
注意,一定要加上 --cri-socket unix:///run/cri-dockerd.sock
指定容器运行时
执行完成,查看节点
kubectl get node
NAME           STATUS     ROLES           AGE     VERSION
220903master   NotReady   control-plane   9m26s   v1.27.4
220904node1    NotReady   <none>          5m41s   v1.27.4

kubectl get cs
Warning: v1 ComponentStatus is deprecated in v1.19+
NAME                 STATUS    MESSAGE   ERROR
etcd-0               Healthy
controller-manager   Healthy   ok
scheduler            Healthy   ok
安装pod网络calico
可以看到,虽然worker节点虽然添加上去了,但是状态时NotReady的,所以需要安装网络
只需要在其中一个master节点上执行
下载资源清单文件
在线下载配置文件地址是: https://docs.projectcalico.org/manifests/calico.yaml
wget https://docs.projectcalico.org/manifests/calico.yaml
修改资源清单文件
查找 DaemonSet
找到下面的容器containers部分
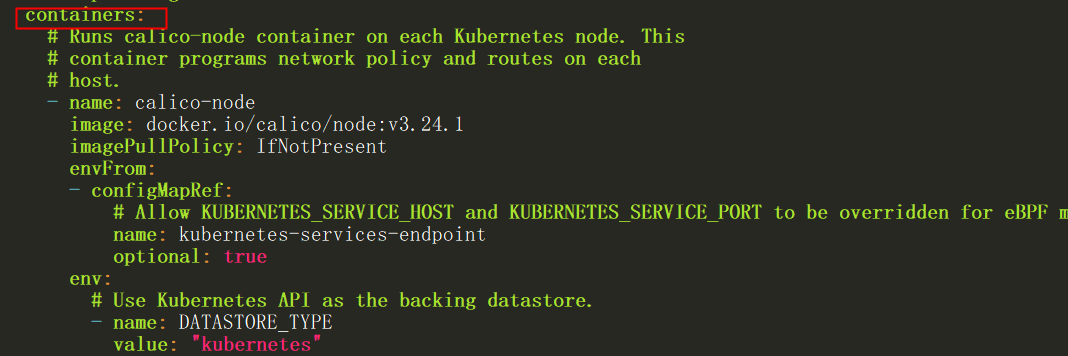
如果有多个网卡,需要添加网卡
- name: CLUSTER_TYPE
  value: "k8s,bgp"
# Auto-detect the BGP IP address.
- name: IP
  value: "autodetect"
# Enable IPIP
- name: CALICO_IPV4POOL_IPIP
  value: "Always"
#在这里指定网卡 添加下面两行
- name: IP_AUTODETECTION_METHOD
  value: "interface=ens33"
# Enable or Disable VXLAN on the default IP pool.
- name: CALICO_IPV4POOL_VXLAN
  value: "Never"
修改CIDR,将CIDR修改成上面初始化时pod的内部网段
对应项:
- --pod-network-cidr=10.244.0.0/16
- podSubnet: 10.244.0.0/16
# The default IPv4 pool to create on startup if none exists. Pod IPs will be
# chosen from this range. Changing this value after installation will have
# no effect. This should fall within `--cluster-cidr`.
#
#这部分原本是注释的,需要去掉#号,将192.168.0.0/16修改成10.244.0.0/16
- name: CALICO_IPV4POOL_CIDR
  value: "10.244.0.0/16"
# Disable file logging so `kubectl logs` works.
- name: CALICO_DISABLE_FILE_LOGGING
  value: "true"
安装calico
kubectl apply -f calico.yaml
可用命令观察各服务容器的状态
watch kubectl get pods --all-namespaces -o wide
查看节点状态
当看到pod都正常运行了,就可以查看状态了
kubectl get nodes
NAME           STATUS   ROLES           AGE   VERSION
220903master   Ready    control-plane   96m   v1.27.4
220904node1    Ready    <none>          93m   v1.27.4
测试集群网络是否正常
kubectl run busybox --image busybox:1.28 --restart=Never --rm -it busybox -- sh
/ # nslookup kubernetes.default.svc.cluster.local
Server:    10.96.0.10
Address 1: 10.96.0.10 kube-dns.kube-system.svc.cluster.local

Name:      kubernetes.default.svc.cluster.local
Address 1: 10.96.0.1 kubernetes.default.svc.cluster.local
10.96.0.10 就是我们coreDNS的clusterIP,说明coreDNS配置好了。
解析内部Service的名称,是通过coreDNS去解析的。
注意:
busybox要用指定的1.28版本,不能用最新版本,最新版本,nslookup会解析不到dns和ip