环境准备
启动 Easysearch 服务:
# Make sure your vm.max_map_count meets the requirement
  sudo sysctl -w vm.max_map_count=262144
  docker run -it --rm -p 9200:9200 \
  -e "discovery.type=single-node" \
  -e ES_JAVA_OPTS="-Xms512m -Xmx512m" \
  infinilabs/easysearch:1.3.0-24 \
  -E "security.enabled=false"
安装 Python 依赖项:
pip install -r requirements.txt
启动服务器:
ES_SERVER=http://localhost:9200 python main.py
后端功能实现
我们实现的主要功能是接收用户上传的图片,然后将图片进行处理和向量化,利用 Easysearch 进行图像搜索,并将搜索结果渲染到模板页面上展示给用户。用户可以通过访问 /req 路由来上传图片,然后提交表单进行搜索。搜索结果将在模板页面 search.html 中展示。
本次服务,我们主要使用的是 Flask 和 Easysearch 这两个工具是 Flask 是一个流行的 Python Web 框架,它提供了简单而灵活的方式来构建 Web 应用程序。而 Easysearch 是一个分布式的搜索引擎,它具有强大的全文搜索和分析功能,并支持使用 kNN 检索 API 来进行向量查询。结合这两个工具,我们可以构建一个功能完善的图像搜索服务。
首先,我们使用 Flask 框架创建一个应用程序实例,并定义几个路由和视图函数。其中,/req 路由用于展示一个包含表单的页面,用户可以在该页面上上传图像。/search 路由用于处理图像搜索请求,并返回搜索结果。
在 /search 路由中,我们首先连接到 Easysearch 搜索引擎,然后获取用户上传的图像文件。接下来,我们对图像进行处理和向量化,以便能够在向量空间中进行相似度匹配。然后,我们构建一个查询体,使用 Easysearch 的查询语法来描述我们的搜索需求。通过调用 Easysearch 的 search 方法,我们可以执行搜索操作,并获取搜索结果。
在获取到搜索结果后,我们从中提取需要的字段,并将结果传递给模板进行渲染。我们使用 Flask 提供的 render_template 函数,将搜索结果传递给一个名为 search.html 的 HTML 模板。该模板可以根据搜索结果动态生成页面内容,并将结果展示给用户。
通过这个简单而高效的图像搜索服务,用户可以方便地上传图像,系统将快速地在图像库中进行搜索,并返回与上传图像相似的结果。
from PIL import Image
from elasticsearch import Elasticsearch
from flask import Flask, request, jsonify, render_template
from img2vec_pytorch import Img2Vec
import io
import os

DEFAULT_INDEX = "img-test"
app = Flask(__name__)
es = Elasticsearch(os.environ.get("ES_SERVER") or "http://localhost:9200")


def rgba2rgb(image_file):
    # Open the image file
    img = Image.open(image_file)

    # Check if the image is in RGBA mode
    if img.mode == "RGBA":
        # Convert the image to RGB mode
        img = img.convert("RGB")

        # Create a BytesIO object and save the image to it
        image_io = io.BytesIO()
        img.save(image_io, format="JPEG")

        # Seek to the beginning of the BytesIO object
        image_io.seek(0)

        return image_io

    return image_file


def vectorize(input):
    img2vec = Img2Vec()
    try:
        img = Image.open(input)
        vec = img2vec.get_vec(img, tensor=True)
        vec_np = vec.cpu().numpy().flatten().tolist()
        return vec_np
    except Exception as e:
        print(f"Error processing image: {e}")
        return None


def init_indicies(index: str):
    if es.indices.exists(index):
        return
    # 初始化 kNN 索引
    print(f"Initializing {index}")
    es.indices.create(
        index,
        body={
            "settings": {"index.knn": True},
            "mappings": {
                "properties": {
                    "my_vec": {
                        "type": "knn_dense_float_vector",
                        "knn": {
                            "dims": 512,
                            "model": "lsh",
                            "similarity": "cosine",
                            "L": 99,
                            "k": 1,
                        },
                    }
                }
            },
        },
    )
    img_dir = "static/img"
    for title in os.listdir(img_dir):
        print(f"Indexing {title}")
        my_vec = vectorize(os.path.join(img_dir, title))
        body = {"title": title, "my_vec": my_vec}
        es.index(index=index, body=body)


@app.route("/search", methods=["POST"])
def search_service():
    # 获取表单数据
    index_name = request.form.get("index_name") or DEFAULT_INDEX  # 索引名

    # 获取上传的图片文件
    image_file = request.files.get("image")

    if not index_name or not image_file:
        return jsonify({"error": "Both index_name and image are required."}), 400

    # 处理图片
    image0 = rgba2rgb(image_file)
    vector_arr = vectorize(image0)

    if vector_arr is None:
        return jsonify({"error": "Error processing image."}), 400

    query_body = {
        "size": 50,
        "_source": "title",
        "query": {
            "bool": {
                "must": [
                    {
                        "knn_nearest_neighbors": {
                            "field": "my_vec",
                            "vec": {"values": vector_arr},
                            "model": "lsh",
                            "similarity": "cosine",
                            "candidates": 50,
                        }
                    }
                ]
            }
        },
    }

    if not index_name or not vector_arr:
        return jsonify({"error": "Both index_name and query are required."}), 400

    # 执行搜索
    response = es.search(index=index_name, body=query_body)

    # 使用模板显示搜索结果
    results = response["hits"]["hits"]
    print([r["_source"]["title"] for r in results], len(results))
    return render_template("search.html", results=results)


@app.route("/", methods=["GET"])
def home():
    return render_template("home.html")


if __name__ == "__main__":
    init_indicies(DEFAULT_INDEX)
    app.run(port=5000, debug=True)
前端页面实现
目前需要实现的是一个即时搜索页面的前端部分。思路非常明确,实现一个简洁漂亮的页面展示功能即可。一些基础的内容就简单略过,我们下面重点描述思路以及实现。
首先,我们创建一个 HTML 文档,并指定文档类型为 HTML5。在文档头部,我们设置了页面的标题为 "Easysearch Search Service",以便清晰地表达页面的用途。
接下来,我们使用 CSS 样式定义了页面的外观和布局。在 <style> 样式中我们设置了背景图片、字体、边距和阴影效果等,以提升页面的美观性和用户体验。
 <style>
      #searchForm {
        background-image: url("/static/background/bluewhite.jpg");
        background-repeat: no-repeat;
        background-size: cover;
      }
      body {
        font-family: Arial, sans-serif;
        background-color: #f9f8f8;
        margin: 0;
        padding: 20px;
      }
      .searchImage {
        max-width: 600px;
        max-height: 500px;
      }

      .container {
        max-width: 100%;
        margin: 0 auto;
        /* background: linear-gradient(to right, #8aa0ee, #3838ee); */
        background: #fff;
        padding: 20px;
        border-radius: 5px;
        box-shadow: 0 2px 5px rgba(0, 0, 0, 0.1);
      }

      h1 {
        text-align: center;
        margin-bottom: 20px;
        color: #000;
      }

      h2 {
        margin-bottom: 10px;
      }

      form {
        max-width: 400px;
        margin: 0 auto;
        background-color: #fff;
        padding: 20px;
        border-radius: 5px;
        box-shadow: 0 2px 5px rgba(0, 0, 0, 0.1);
      }

      label {
        display: block;
        font-weight: bold;
        margin-bottom: 5px;
      }

      input[type="text"],
      input[type="file"] {
        width: 100%;
        padding: 8px;
        margin-bottom: 10px;
        border: 1px solid #ccc;
        border-radius: 4px;
        box-sizing: border-box;
      }

      input[type="submit"] {
        width: 100%;
        padding: 10px;
        background-color: #4caf50;
        color: #fff;
        border: none;
        border-radius: 4px;
        cursor: pointer;
        transition: background-color 0.3s ease;
      }

      input[type="submit"]:hover {
        background-color: #45a049;
      }

      pre {
        background-color: #f5f5f5;
        padding: 10px;
        border-radius: 5px;
        white-space: pre-wrap;
      }

      #result {
        text-align: center;
        margin-top: 20px;
      }
    </style>
    <style>
      body {
        font-family: Arial, sans-serif;
        /* background-color: #f2f2f2; */
        margin: 0;
        padding: 20px;
      }

      .container {
        max-width: 100%;
        margin: 0 auto;
        background-image: url("/static/background/daziran.png");
      }

      .waterfall-container {
        display: flex;
        flex-wrap: wrap;
      }

      .waterfall-item {
        display: inline-block;
        border-radius: 5px;
        box-shadow: none;
        margin-bottom: 20px;
        text-align: center;
        width: 25%; /* 每行显示 4 个搜索结果,可以根据需要进行调整 */
        padding: 10px;
        box-sizing: border-box;
      }

      .waterfall-item img {
        max-width: 100%;
        max-height: 250px;
        border-radius: 5px;
      }

      .waterfall-item p {
        margin-top: 10px;
        font-size: 25px;
        font-weight: bold;
        color: black;
        background-color: white;
      }
    </style>
JavaScript 部分 ,我们引入了 jQuery 库和自定义的 JavaScript 文件。这些脚本将用于处理页面的交互逻辑。通过 jQuery 库,我们可以方便地处理表单的提交事件,实现异步请求和数据处理。当用户提交表单时,将发送 AJAX 请求到指定的 URL,并将索引名称和图像文件作为请求的参数。在成功返回 AJAX 响应后,我们通过解析返回的 HTML 数据,提取出图片和段落元素,并按照一定的格式进行组合。最后,将组合后的结果添加到结果容器中,以展示搜索结果。
前端 JavaScript 代码
 <script src="/static/jquery-3.5.1.min.js"></script>
    <script src="/static/m.js"></script>
    <script>
      $(document).ready(function () {
        $("#searchForm").on("submit", function (event) {
          event.preventDefault();
          var indexName = $("#indexName").val();
          // 检查索引名是否为空或未定义
          if (!indexName) {
            indexName = "img-test"; // 设置默认值为 "默认索引名"
          }
          var formData = new FormData();
          formData.append("index_name", indexName);
          formData.append("image", $("#image")[0].files[0]);

          $.ajax({
            url: "/search",
            method: "POST",
            processData: false, // Important!
            contentType: false, // Important!
            data: formData,
            success: function (data) {
              // Clear the previous results
              $("#result").empty();

              // Parse the returned HTML and extract image and paragraph elements
              var parsedData = $.parseHTML(data);

              // Group image and paragraph elements
              var imageAndParagraphPairs = [];
              var currentPair = [];
              $(parsedData).each(function () {
                if ($(this).is("img.searchImage")) {
                  if (currentPair.length === 1) {
                    currentPair.push(this);
                    imageAndParagraphPairs.push(currentPair);
                    currentPair = [];
                  } else {
                    currentPair.push(this);
                  }
                } else if ($(this).is("p")) {
                  if (currentPair.length === 0) {
                    currentPair.push(this);
                  } else {
                    currentPair.push(this);
                    imageAndParagraphPairs.push(currentPair);
                    currentPair = [];
                  }
                } else if ($(this).is("h1")) {
                  // Add the <h1> element back to the results

                  $("#resultTitle").html($(this));
                }
              });

              // Create and append the waterfall items
              $.each(imageAndParagraphPairs, function (index, pair) {
                var $item = $("<div>").addClass("waterfall-item");
                $.each(pair, function (i, element) {
                  $item.append(element);
                });
                $("#result").append($item);
              });
            },
          });
        });
      });
    </script>
页面主体部分 ,我们将内容包裹在一个名为 "container" 的 <div> 元素中。页面包含一个标题和一个搜索表单。搜索表单包括一个文件选择框用于选择图像文件。还有一个提交按钮,当用户点击该按钮时,将触发 JavaScript 代码中的事件处理程序。
搜索结果部分 ,我们使用一个 <div> 元素来显示搜索结果的标题,并使用另一个 <div> 元素作为瀑布流容器,用于展示搜索结果的图片和相关的段落。
代码如下
  <body>
    <div class="container">
      <h1>Easycsearch Search Service</h1>
      <form id="searchForm" enctype="multipart/form-data">
        <label for="image">Image:</label><br />
        <input type="file" id="image" name="image" /><br />
        <input type="submit" value="Search" />
      </form>
      <div id="resultTitle"></div>
      <div id="result" class="waterfall-container"></div>
    </div>
  </body>
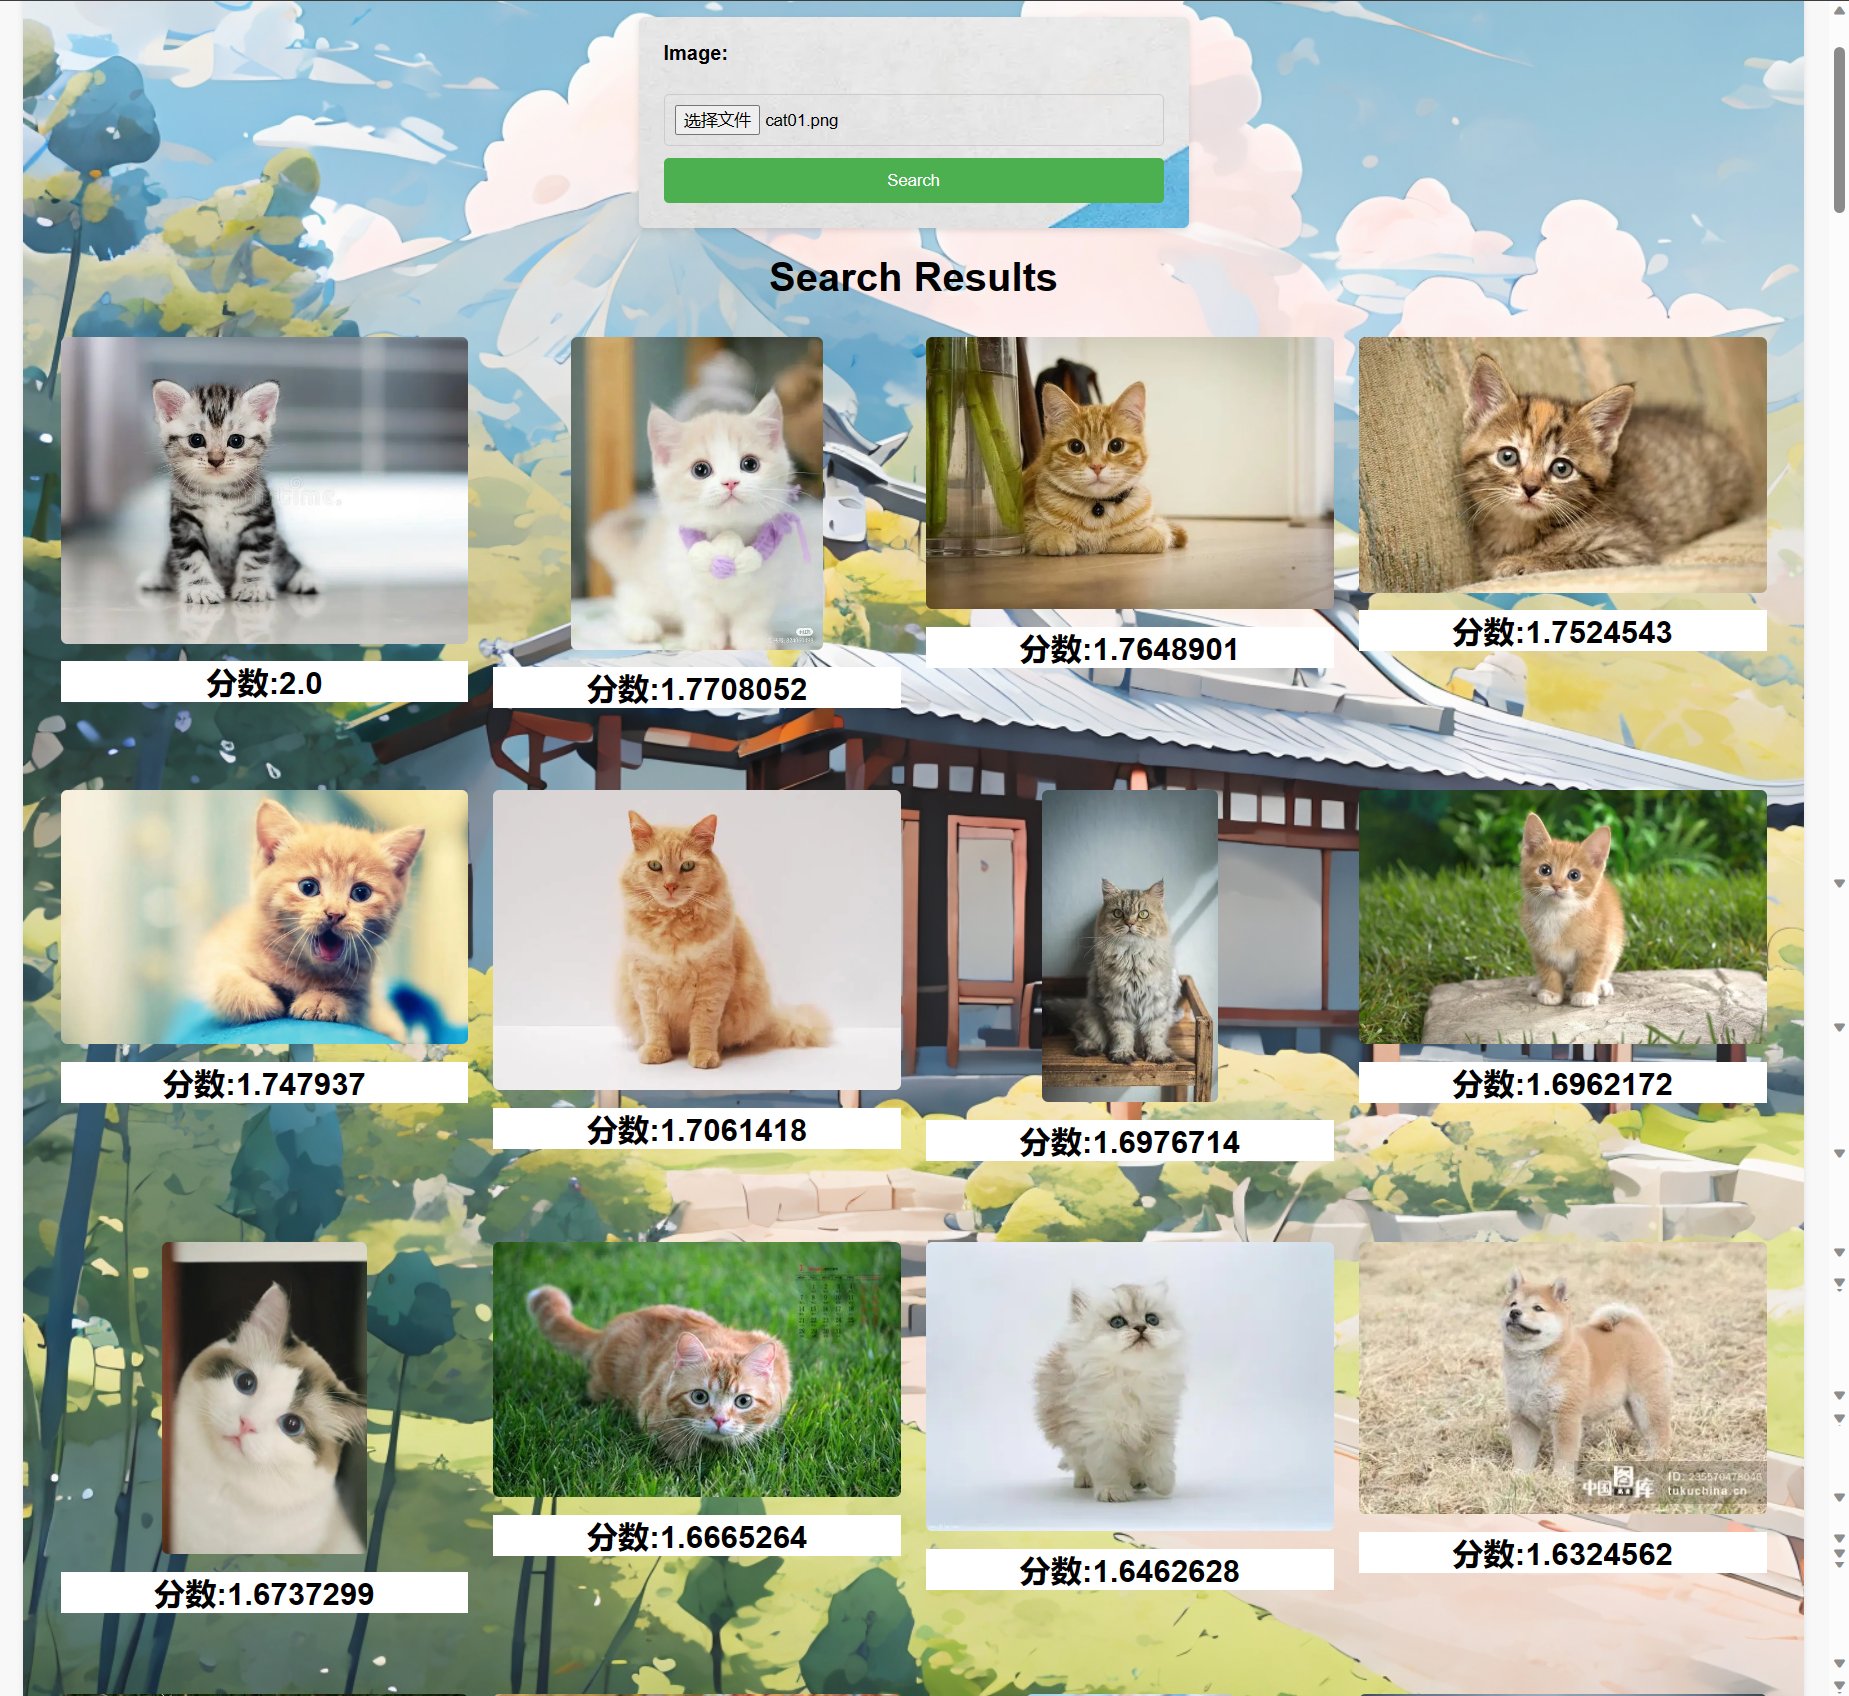
最终结果如图所示
搜索前

搜索后
总结
通过这个简单的基于 Easysearch kNN 搜索服务网页 ,我们可以方便地上传图像文件,进行搜索操作,并以瀑布流的形式展示搜索结果。
项目 Github 地址:https://github.com/infinilabs/image-search-demo
关于 Easysearch

INFINI Easysearch 是一个分布式的近实时搜索与分析引擎,核心引擎基于开源的 Apache Lucene。Easysearch 的目标是提供一个轻量级的 Elasticsearch 可替代版本,并继续完善和支持更多的企业级功能。与 Elasticsearch 相比,Easysearch 更关注在搜索业务场景的优化和继续保持其产品的简洁与易用性。