* python脚本很难应用于收费工具领域。
那么如果我想对一个Python工具的使用加以限制,有没有什么方法可以实现呢?本文提供一种简易的License授权机制实现思路,它主要包括如下几部分内容:
-如何生成一个加密的License文件。
-如何做License内容核验。
-如何加密Python代码。
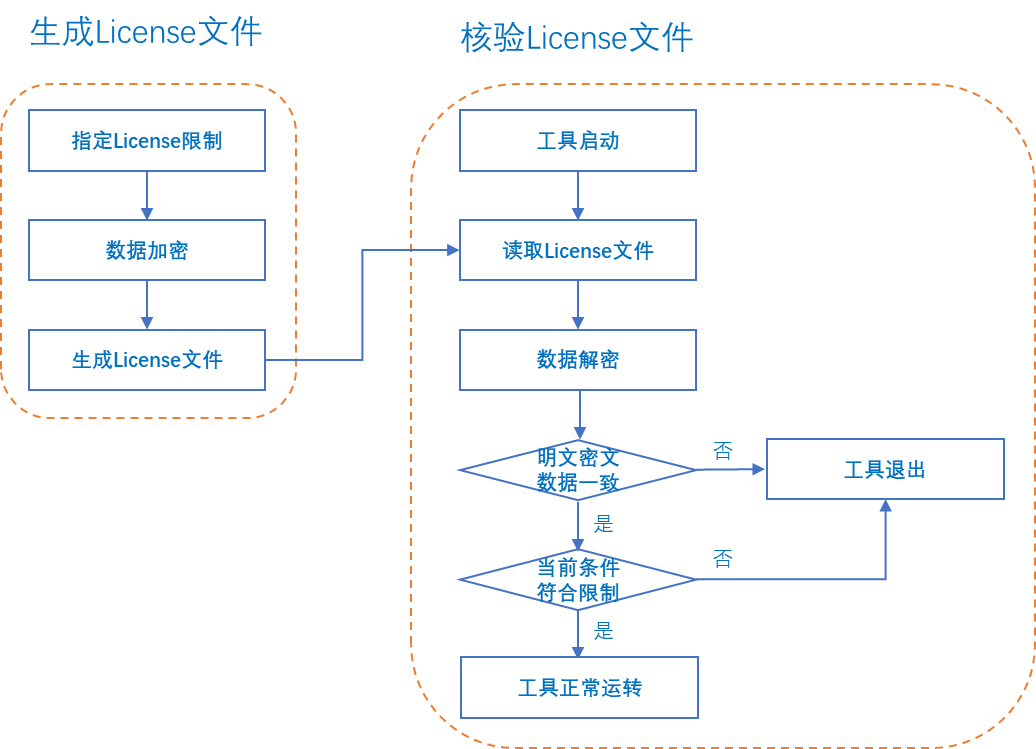
其主要流程逻辑如下:
一、引题
我写了一个python脚本eda.py,内容如下。

#!/usr/bin/env python3


def function():

    print('I am an EDA tool!')

function()
我在Linux操作系统中执行了这个程序,成功了,输出如下。
 $ ./eda.py

  I am an EDA tool!
我决定把这个“牛逼”的脚本分享给别人使用。但是主要的障碍在于,我不希望别人随便传播这个脚本,不希望别人无限期使用这个脚本,不希望别人学会这几行代码的写法,于是我决定对它加上License限制。
二、生成License文件
工具License常在如下方面对工具的使用加以限制:
- 使用的MAC地址。(防止工具被随意拷贝使用)
- 使用期限。(过期失效)
更加复杂的应用场景,还可以对License使用数量、用户列表、工具feature等因素加以限制。
按照这个需求,我们要设计一个简化的License文件,它需要包含以下内容:
- MAC :允许工具启动的机器的MAC地址。
- Date :工具有效期。
- Sign :签名,对以上明文内容的加密,用作内容核验。
首先,我们可以用下面的Linux指令获取机器的MAC地址。
 $ ifconfig -a

  ens33: flags=4163<UP,BROADCAST,RUNNING,MULTICAST>  mtu 1500

        inet 192.168.246.128  netmask 255.255.255.0  broadcast 192.168.246.255

        inet6 fe80::7e02:97:820d:1bd3  prefixlen 64  scopeid 0x20<link>

        ether 00:0c:29:4a:d4:6c  txqueuelen 1000  (Ethernet)

        RX packets 1491722  bytes 1542769755 (1.4 GiB)

        RX errors 0  dropped 0  overruns 0  frame 0

        TX packets 533500  bytes 32951033 (31.4 MiB)

        TX errors 0  dropped 0 overruns 0  carrier 0  collisions 0
在centos7系统下,可以从ether行抓取机器的MAC地址。其他的操作系统略有不同。
我们限制工具的使用期限,比如2021.05.20。
最后我们将如上信息加密。
常见的加密算法有AES(对称加密)和RSA(非对称加密),其中AES因执行速度快和硬件支持(部分Intel的处理器支持ASE指令加速)常用作批量内容的数据加密,RSA则由于其公钥-私钥机制常用于秘钥传输。此处我们选择AES加密方式来加密MAC /Date信息。
下面直接给出生成License文件的脚本gen_license_file.py。
#!/usr/bin/env python3

from Crypto.Cipher import AES
from binascii import b2a_hex

def encrypt(content):
    # content length must be a multiple of 16.
    while len(content) % 16:
        content += ' '

    content = content.encode('utf-8')

    # Encrypt content.
    aes = AES.new(b'2021052020210520', AES.MODE_CBC, b'2021052020210520')
    encrypted_content = aes.encrypt(content)
    return(b2a_hex(encrypted_content))

def gen_license_file():
    license_file = './License.dat'
    with open(license_file, 'w') as LF:
        LF.write('MAC : 00:0c:29:4a:d4:6c\n')
        LF.write('Date : 20210520\n')
        sign = encrypt('00:0c:29:4a:d4:6c#20210520')
        LF.write('Sign : ' + str(sign.decode('utf-8')) + '\n')

if __name__ == '__main__':
    gen_license_file()
我们利用这个脚本可以生成一个添加了限定条件的License文件。
  $ ./gen_license_file.py

  $ cat License.dat

  MAC : 00:0c:29:4a:d4:6c

  Date : 20210520

  Sign : 6ccda9297714c2b0c9877625ad6d38aacae4d6d97a0652c926c11ff42fc30d1c
其中Sign部分是以上明文信息的加密,用作校验。
三、核验license文件
在原始的eda.py脚本中,我们需要载入这个License文件,并做如下几件事情:
- 解析License文件,获取MAC/Date/Sign信息。
- 解密Sign信息。
- 对比解密的Sign信息和MAC/Date信息,看License文件是否被篡改。
- 获取当前机器MAC信息和当前Date信息。
- 将当前机器MAC信息和当前Date信息同Sign的解密信息核验,看是否超限。
那么我们把如上的License核验步骤加入到eda.py中,得到了新的代码如下。
#!/usr/bin/env python3
import os
import re
import sys
import datetime
import subprocess

from Crypto.Cipher import AES
from binascii import a2b_hex

## License check
def license_check():
    license_dic = parse_license_file()
    sign = decrypt(license_dic['Sign'])
    sign_list = sign.split('#')
    mac = sign_list[0].strip()
    date = sign_list[1].strip()

    # Check license file is modified or not.
    if (mac != license_dic['MAC']) or (date != license_dic['Date']):
        print('*Error*: License file is modified!')
        sys.exit(1)

    # Check MAC and effective date invalid or not.
    if len(sign_list) == 2:
        mac = get_mac()
        current_date = datetime.datetime.now().strftime('%Y%m%d')
        # Must run this script under specified MAC.
        if sign_list[0] != mac:
            print('*Error*: Invalid host!')
            sys.exit(1)

        # Current time must be before effective date.
        if sign_list[1] > current_date:
            print('*Error*: License is expired!')
            sys.exit(1)
    else:
        print('*Error*: Wrong Sign setting on license file.')
        sys.exit(1)

def parse_license_file():
    license_dic = {}
    license_file = './License.dat'

    with open(license_file, 'r') as LF:
        for line in LF.readlines():
            if re.match('^\s*(\S+)\s*:\s*(\S+)\s*$', line):
                my_match = re.match('^\s*(\S+)\s*:\s*(\S+)\s*$', line)
                license_dic[my_match.group(1)] = my_match.group(2)

    return(license_dic)


def decrypt(content):
    aes = AES.new(b'2021052020210520', AES.MODE_CBC, b'2021052020210520')
    decrypted_content = aes.decrypt(a2b_hex(content.encode('utf-8')))
    return(decrypted_content.decode('utf-8'))

def get_mac():
    mac = ''
    SP = subprocess.Popen('/sbin/ifconfig', shell=True, stdin=subprocess.PIPE, stdout=subprocess.PIPE, stderr=subprocess.PIPE)
    (stdout, stderr) = SP.communicate()

    for line in str(stdout, 'utf-8').split('\n'):
        if re.match('^\s*ether\s+(\S+)\s+.*$', line):
            my_match = re.match('^\s*ether\s+(\S+)\s+.*$', line)
            mac = my_match.group(1)
            break

return(mac)


# Main function.
def function():
    print('I am an EDA tool!')


license_check()
function()
执行一下,效果如下。
  $ ./eda.py
  *Error*: License is expired!
License过期了,工具被禁止启动,限制成功!
四、Python加密
上述的License限制机制生效了,但是Python工具代码是明文的,所有的限制都可以通过篡改工具代码而绕过去,头疼。
为此我们需要将Python工具代码加密,才能保证License的实现机制不被随便篡改。Python代码常见的5中加密机制如下:
1. 将.py文件转为.pyc文件,.pyc文件是二进制文件,不具备可读性,从而实现了代码隐藏。
问题:.pyc文件很容易被反编译,python有一个库compileall就可以轻松实现。
2. 代码混淆。
问题:只是降低了代码可读性,并不能完全隐藏代码逻辑和核心内容的明文信息。
3. 通过py2exe将python代码打包成二进制可执行文件。
问题:只能在windows平台上使用。
4. 使用Cython将.py文件编译.so文件,内容就被加密了且较难破解。
问题:部分代码可能存在不兼容的问题。
5. 修改Python解释器。
问题:难度太高!
考虑到加密效果,综合考量实现难度,我们选择#4基于Cython的加密方案。
基于Cython的加密方案需要注意两点:
- .so文件可以被Python文件import,但是不可以直接运行。
- 执行Cython加密脚本的Python版本需要同执行Python工具的Python版本保持一致,能够显著减少代码兼容性问题。
第一步,我们需要改造eda.py,将核心代码移到新文件(比如top.py),顶层脚本eda.py只保留一个空壳,同时把核心功能通过import的方式引入。
改造后,核心脚本top.py的内容如下。同原先的eda.py相比,执行函数license_check()和function()被移除了,其它一致。
而改造后的eda.py则成了一个空壳子,如下。
#!/usr/bin/env python3
import top

top.license_check()
top.function()
然后我们尝试通过Cython将top.py的内容加密。这个过程主要是借助Cython和disutils两个pyton库来实现。
首先,我们写一个setup.py文件。
import os

from distutils.core import setup
from Cython.Build import cythonize

py_files = ['top.py',]

setup(ext_modules = cythonize(py_files),)
然后用指定Python脚本来执行setup.py。
  $ python3 setup.py build_ext --inplace

  Compiling top.py because it changed.

  [1/1] Cythonizing top.py

  running build_ext

  building 'top' extension

  creating build

  creating build/temp.linux-x86_64-3.6

  gcc -pthread -B /ic/tools/anaconda3/anaconda3.5.2/compiler_compat -Wl,--sysroot=/ -Wsign-compare -DNDEBUG -g -fwrapv -O3 -Wall -Wstrict-prototypes -fPIC -I/ic/tools/anaconda3/anaconda3.5.2/include/python3.6m -c top.c -o build/temp.linux-x86_64-3.6/top.o

  gcc -pthread -shared -B /ic/tools/anaconda3/anaconda3.5.2/compiler_compat -L/ic/tools/anaconda3/anaconda3.5.2/lib -Wl,-rpath=/ic/tools/anaconda3/anaconda3.5.2/lib -Wl,--no-as-needed -Wl,--sysroot=/ build/temp.linux-x86_64-3.6/top.o -o /home/liyanqing/test/license/top.cpython-36m-x86_64-linux-gnu.so
我们看到新生成了.c .so文件和build目录,其中只有.so文件对我们是有用的。
  $ ls
  build  eda.py  gen_license_file.py  License.dat  setup.py  top.c  top.cpython-36m-x86_64-linux-gnu.so  top.py
我们清理无用文件(包括top.py),然后将.so文件更名为top.so(去掉cpython***那一堆字符串)
  $ ls

  backup  eda.py  License.dat  top.so
这下清爽多了。
然后重新执行eda.py。
  $ ./eda.py
  *Error*: License is expired!
Good!还能正常执行。
而此时我们看一下.so文件中的核心代码。
^?ELF^B^A^A^@^@^@^@^@^@^@^@^@^C^@>^@^A^@^@^@ð6^@^@^@^@^@^@@^@^@^@^@^@^@^@è^T^F^@^@^@^@^@^@^@^@^@@^@8^@^G^@@^@%^@$^@^A^@^@^@^E^@^@^@^@^@^@^@^@^@^@^@^@^@^@^@^@^@^@^@^@^@^@^@^@^@^@^@l^S^... ...既然你们都看不懂这些乱码,我就放心了,哈哈。