序言
在Cocos Creator游戏开发中,组件是使用是非常频繁,对于组件的入口函数、常用属性、组件的操作等,必须做到非常熟悉。
一、组件入口函数
1: onLoad: 组件加载的时候调用, 保证了你可以获取到场景中的其他节点,以及节点关联的资源数据 2: start: 也就是第一次执行 update 之前触发 3: update(dt):组件每次刷新的时候调用,距离上一次刷新的时间(会在所有画面更新前执行) 4: lateUpdate(dt) 刷新完后调用(会在所有画面更新后执行); 5: onEnable: 启用这个组件的时候调用; 6: onDisable: 禁用这个组件的时候调用; 7: onDestroy: 组件实例销毁的时候调用;
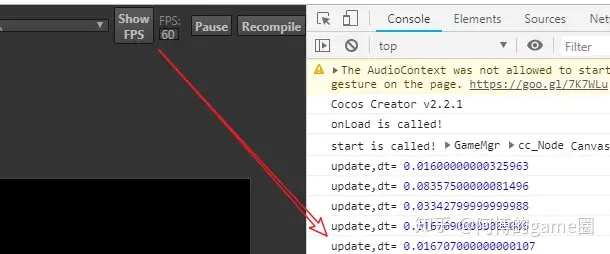
1.  `    onLoad () {`

2.  `        console.log("onLoad is called!");`

3.  `    }`

5.  `    start () {`

6.  `        // this表示当前组件实例,this.node 当前组件实例挂载的节点,父类Component的属性`

7.  `        console.log("start is called!", this, this.node, this.node.name);`

8.  `    }`
1.  `    // dt:每次更新的时间间隔`

2.  `    // dt不是固定的值 |---|------|--|`

3.  `    // dt与设备帧频有关FPS:frame per second 60FPS,1/60=0.0167s`

4.  `    // 使用注意事项:60FPS 0.0167s, 30FPS 0.033s`

5.  `    // [1] 60×50,30×50,保证在不同设备运行效果一致`

6.  `    // [2] 保证在同一设备上匀速运动`

7.  `    // [3] 通过dt累计时间,做到定时周期运动`

8.  `    update (dt) {`

9.  `        console.log("update,dt=", dt);`

10.  `        this.player.x += this.speed * dt;`

11.  `    }`
二、cc.Component属性
1: 组件类: 所有组件的基类; 2: node: 指向这个组件实例所挂载的这个节点(cc.Node); 3: name: 这个组件实例所挂载的节点的名字<组件的名字>; 4: properties: { } 属性列表; (1) name: value, 数,bool, 字符串; (2) 位置,颜色, 大小: cc.v2(0, 0), cc.color(0, 0), cc.size(100, 100) (3) 组件:{
type: 组件类型, 系统类型,也可以require自己编写的组件类型 default: null or []
(4)其他: 打开cocos creator源码,找到参考,然后移动到代码里面;
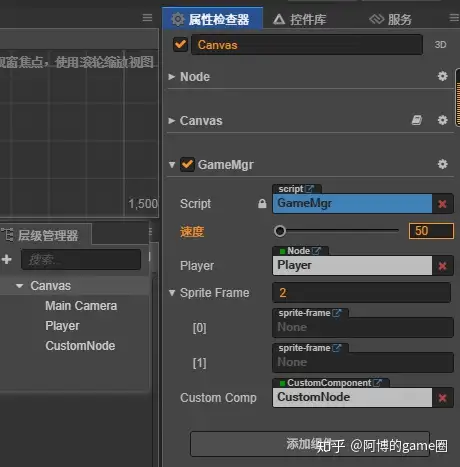
1.  `import CustomComponent from "./CustomComponent";`

2.  `const {ccclass, property} = cc._decorator;`

4.  `@ccclass`

5.  `export default class GameMgr extends cc.Component {`

7.  `    @property({type:cc.Integer, tooltip:"方块运动速度",displayName:"速度",slide:true,step:5,min:50, max:200,})`

8.  `speed : number = 50;`

10.  `    @property({type:cc.Node, tooltip:"要运动的节点",})`

11.  `player : cc.Node = null;`

13.  `    @property({type:[cc.SpriteFrame], tooltip:"图片数组"})`

14.  `spriteFrame : Array<cc.SpriteFrame> = [];`

16.  `//label : cc.Label = null;  // 查API文档源码,学习`

18.  `    @property({type:CustomComponent, tooltip:"自定义的组件类"})`

19.  `    customComp : CustomComponent = null;`
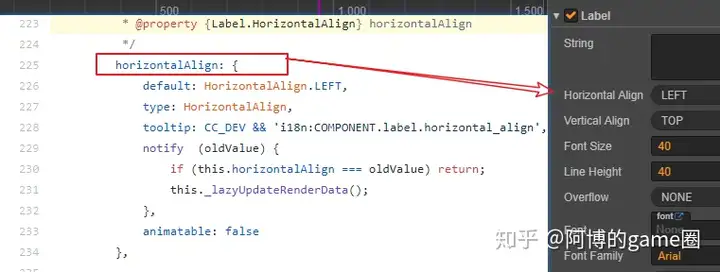
通过官网API查看Label源码,以及通过Cocos Creator编辑器比对,学习,方法如上。
三、组件添加查找删除
1: addComponent(组件的类型): 向节点上添加一个组件实例, 返回添加好的组件实例; 2: getComponent(组件类型): 查找一个为指定类型的组件实例(如果有多个,第一个匹配); 3: getComponents(组件类型): 查找这个节点上所有这个类型的组件实例; [inst1, inst2, inst3, ...] 4: getComponentInChildren(组件类型): 在自己与孩子节点里面查找; 5: getComponentsInChildren (组件类型): 在自己与孩子节点里面查找; 6: destroy(): 从节点中删除这个组件的实例;
四、Shedule定时器操作
1: sheduleOnce(函数, time): time秒后启动一次定时器; 2: schedule(函数, time, 次数, 多长时间后开始); 执行的次数为(次数 + 1), cc.macro.REPEAT_FOREVER 3: unschedule(函数); // 取消这个定时器操作; 4: unscheduleAllCallbacks 取消所有的定时器操作; 注意,如果节点或组件没有激活是不会调用的;
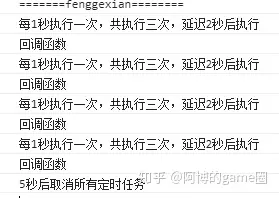
1.  `        console.log("=======fenggexian========");`

2.  `        this.schedule(function(){`

3.  `            console.log("每1秒执行一次,共执行三次,延迟2秒后执行");`

4.  `        }, 1, 20, 2);    // 执行3+1次`

6.  `        // this.scheduleOnce(function(){`

7.  `        //     console.log("定时执行一次,延迟1秒后执行!");`

8.  `        // }, 1);`

10.  `        let callback = function(){`

11.  `            console.log("回调函数");`

12.  `        };`

13.  `        this.schedule(callback, 1, cc.macro.REPEAT_FOREVER, 2);`

14.  `        //this.unschedule(callback);`

15.  `        //this.unscheduleAllCallbacks();`

17.  `        // 特定的时间之后再取消定时任务`

18.  `        this.scheduleOnce(function(){`

19.  `            //console.log("5秒后取消callback定时任务");`

20.  `            //this.unschedule(callback);`

21.  `            console.log("5秒后取消所有定时任务");`

22.  `            this.unscheduleAllCallbacks();`

23.  `        }.bind(this), 5);`