1.结构目录

2.新建request目录
type.ts
import type { AxiosRequestConfig, AxiosResponse } from 'axios';

// 拦截器的类型
export interface InRequestInterceptors<T = AxiosResponse> {
  requestInterceptor?: (config: AxiosRequestConfig) => AxiosRequestConfig,
  // requestInterceptor?: ((config: AxiosRequestConfig<any>) => AxiosRequestConfig<any>) | undefined,
  requestInterceptorCatch?: (error: any) => any
  responseInterceptor?: (res: T) => T
  responseInterceptorCatch?: (error: any) => any
}

// 进行类型的继承并添加属性值;如: showLoading是否展示loading的dom
export interface InRequestConfig<T = AxiosResponse> extends AxiosRequestConfig {
  interceptors?: InRequestInterceptors<T>
  showLoading?: boolean
}
index.ts
import axios from 'axios';
import type { AxiosInstance } from 'axios'; // axios里面有对应的第三方库的类型
import type { InRequestInterceptors, InRequestConfig } from './type';

// import { ElLoading } from 'element-plus'; // 进行导入element的loading的加载事件使用
// // loading的类型,会在安装的使用安装到文件中
// import { ILoadingInstance } from 'element-plus/lib/el-loading/src/loading.type';

const DEAFULT_LOADING = true; // 默认是否显示load
// 自定义导出的类 - InRequest
class InRequest{
  instance: AxiosInstance
  interceptors?: InRequestInterceptors // 拦截器的可选
  showLoading: boolean
  // loading?: ILoadingInstance

  constructor(config: InRequestConfig) {
    // 创建axios实例 - 为了创建出来不同的实例
    this.instance = axios.create(config);

    // 保存基本信息
    this.showLoading = config.showLoading ?? DEAFULT_LOADING
    this.interceptors = config.interceptors; // 拦截信息

    // 使用拦截器
    // 1.从config中取出的拦截器是对应的实例的拦截器
    // 请求的拦截
    this.instance.interceptors.request.use(
      this.interceptors?.requestInterceptor,
      this.interceptors?.requestInterceptorCatch
    );
    // 响应的拦截
    this.instance.interceptors.response.use(
      this.interceptors?.responseInterceptor,
      this.interceptors?.responseInterceptorCatch
    );

    // 2.添加所有的实例都有的拦截器 - 请求拦截
    this.instance.interceptors.request.use(
      (config) => {
        console.log('所有的实例都有的拦截器: 请求成功拦截');
        // 是否添加loading的引用
        if (this.showLoading) {
          // this.loading = ElLoading.service({
          //   lock: true,
          //   text: '正在请求数据....',
          //   background: 'rgba(0, 0, 0, 0.5)'
          // })
        }
        return config;
      },
      (err) => {
        console.log('所有的实例都有的拦截器: 请求失败拦截');
        return err;
      }
    )
    // 添加所有的实例都有的拦截器 - 响应拦截
    this.instance.interceptors.response.use(
      (res) => {
        console.log('所有的实例都有的拦截器: 响应成功拦截')

        // 将loading移除
        // this.loading?.close();

        const data = res.data; //
        if (data.returnCode === '-1001') {
          console.log('请求失败~, 错误信息')
        } else {
          return data;
        }
      },
      (err) => {
        console.log('所有的实例都有的拦截器: 响应失败拦截');
        // 将loading移除
        // this.loading?.close();

        // 例子: 判断不同的HttpErrorCode显示不同的错误信息
        if (err.response.status === 404) {
          console.log('404的错误~');
        }
        return err;
      }
    )
  }

  request<T>(config: InRequestConfig<T>): Promise<T> {
    return new Promise((resolve, reject) => {
      // 1.单个请求对请求config的处理
      if (config.interceptors?.requestInterceptor) {
        config = config.interceptors.requestInterceptor(config);
      }

      // 2.判断是否需要显示loading
      if (config.showLoading === false) {
        this.showLoading = config.showLoading;
      }

      this.instance
        .request<any, T>(config)
        .then((res) => {
          // 1.单个请求对数据的处理
          if (config.interceptors?.responseInterceptor) {
            res = config.interceptors.responseInterceptor(res);
          }
          // 2.将showLoading设置true, 这样不会影响下一个请求
          this.showLoading = DEAFULT_LOADING;

          // 3.将结果resolve返回出去
          resolve(res);
        })
        .catch((err) => {
          // 将showLoading设置true, 这样不会影响下一个请求
          this.showLoading = DEAFULT_LOADING;
          reject(err);
          return err;
        })
    })
  }
  // 不同请求的方法
  get<T>(config: InRequestConfig<T>): Promise<T> {
    return this.request<T>({ ...config, method: 'GET' });
  }

  post<T>(config: InRequestConfig<T>): Promise<T> {
    return this.request<T>({ ...config, method: 'POST' });
  }

  delete<T>(config: InRequestConfig<T>): Promise<T> {
    return this.request<T>({ ...config, method: 'DELETE' });
  }

  patch<T>(config: InRequestConfig<T>): Promise<T> {
    return this.request<T>({ ...config, method: 'PATCH' });
  }
}
// 导出request的对象
export default InRequest
config.ts
let BASE_URL = ''
const TIME_OUT = 10000

if (process.env.NODE_ENV === 'development') {
  BASE_URL = 'http://123.207.32.32:8000/'
} else if (process.env.NODE_ENV === 'production') {
  BASE_URL = 'http://****.org/prod'
} else {
  BASE_URL = 'http://****.org/test'
}
// 将配置不同环境下的值进行导出使用
export { BASE_URL, TIME_OUT }
3.最外层index.ts
// service统一出口
import InRequest from './request';
import { BASE_URL, TIME_OUT } from './request/config'; // 进行导入环境配置变量的使用;

const inRequest= new InRequest({
  baseURL: BASE_URL, //
  timeout: TIME_OUT,
  interceptors: {
    requestInterceptor: (config) => {
      // 携带token的拦截
      const token = '';
      if (token && config && config?.headers) {
        // 添加头部的授权
        config.headers.Authorization = `Bearer ${token}`;
      }

      console.log('请求成功的拦截');
      return config;
    },
    requestInterceptorCatch: (err) => {
      console.log('请求失败的拦截');
      return err;
    },
    responseInterceptor: (res) => {
      console.log('响应成功的拦截');
      return res;
    },
    responseInterceptorCatch: (err) => {
      console.log('响应失败的拦截');
      return err;
    }
  }
});

export default inRequest;
以上转自 https://blog.csdn.net/weixin_42369598/article/details/125832152 技术文章。
4.出现的错误情况
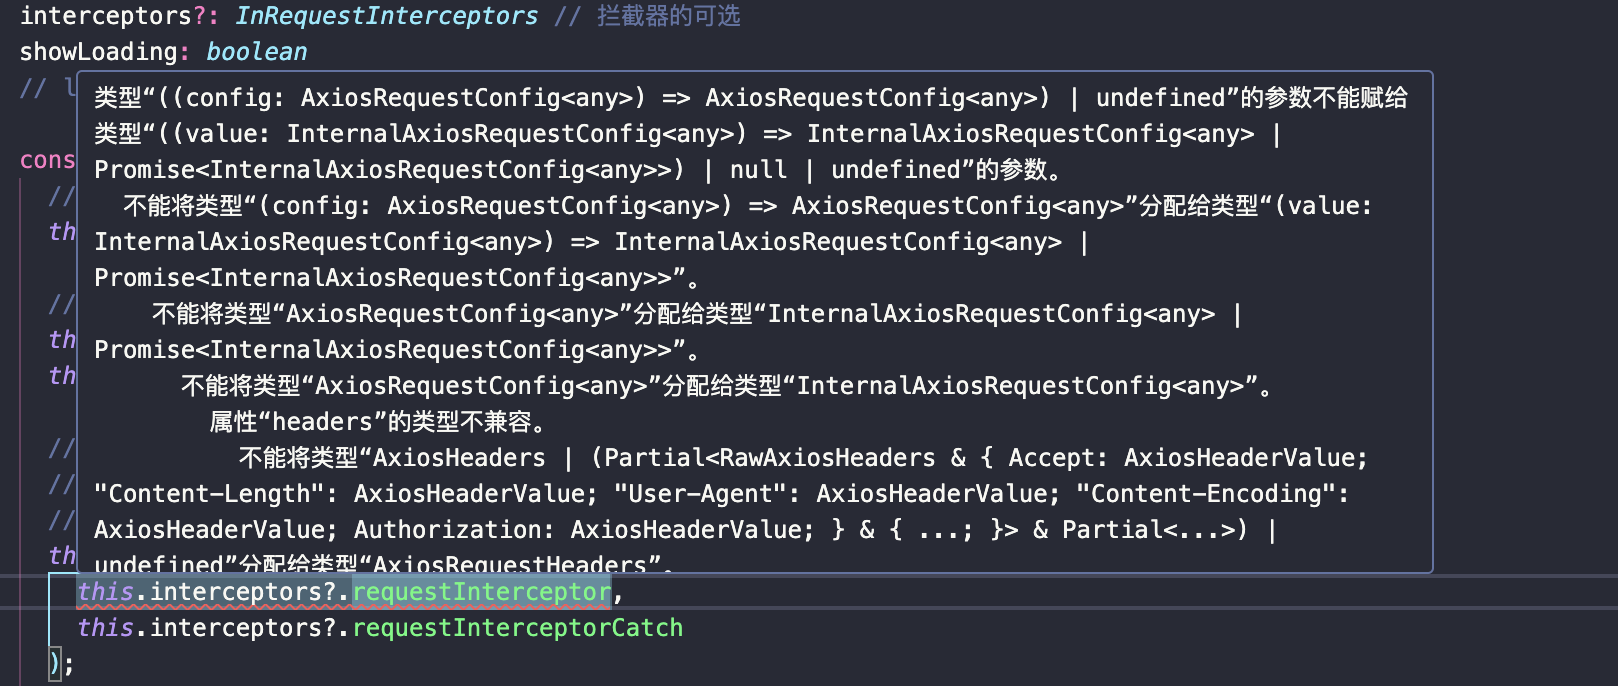
是因为axios版本问题,可以自行百度 InternalAxiosRequestConfig和AxiosRequestConfig的版本问题。
解决方法就是
npm i axios@next