FFmpeg: How To Convert MP4 Video To MP3 Audio?

发布时间 2023-09-09 22:12:06作者: freedragon

FFmpeg: How To Convert MP4 Video To MP3 Audio?

Learn how to Convert an MP4 Video to MP3 Audio with FFmpeg from this guide.


FFmpeg is one of the best Media type converters that allows the user to extract audio from a video source. It is a super simple process once you get a hang of it as FFmpeg is not that easy to understand. Don’t fret as all you have to do is type two lines of code and your job will be done. In this guide, I will show you how to Convert MP4 Video to MP3 Audio with FFmpeg.

How to Convert an MP4 Video to MP3 Audio with FFmpeg?


convert mp4 mp3 ffmpeg

FFmpeg is a free & open source program that allows the user to record, convert and stream audio and video. It is one of the best software out there that can do all media-related processes with relative ease. The only catch to it is that you will need to have some form of understanding of command line language. But once you learn how to use the command line & all of its code, FFmpeg will be a breeze to use. To convert an MP4 Video to MP3 Audio with FFmpeg, you will have to perform the following steps:

  • Open up CMD on your PC.
  • Once that is done, get the MP4 Video file to a specific folder.
  • Copy the Address of the Folder holding the MP4 video file.
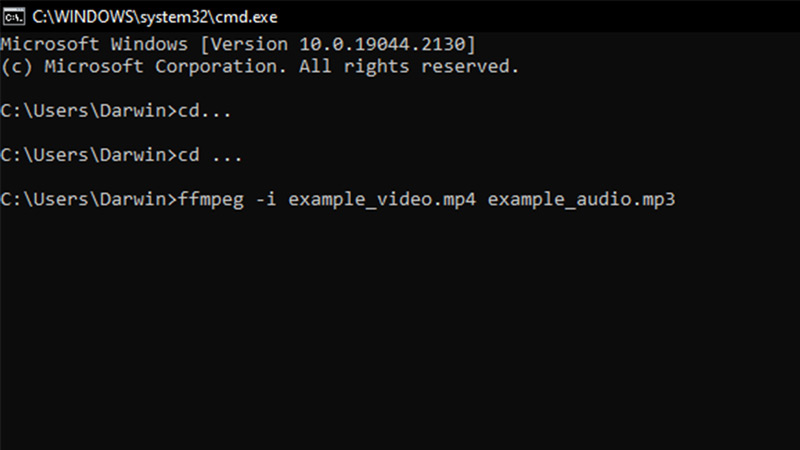
  • Now in CMD, you will have to type this command:
    • cd [Address of the folder containing the MP4 Video file]
  • After that, type the below command:
    • ffmpeg -i [Video File Name].mp4 [Audio File Name].mp3
      • The Video File Name in the command is the name of the MP4 video file that you want to convert.
      • The Audio File Name in the command is the name of the MP3 audio file that you want.
      • FFmpeg is the command to initiate the process & -i is the input variable.
  • If any of the above is missing in the command, it will not work.
  • Alternatively:
    • ffmpeg -i [Video File Name].mp4 -b:a 192K -vn [Audio File Name].mp3
  • After a while, the MP4 video file will get converted into an MP3 audio file and will get saved as a new file.
  • You can use the basic command as it will work just the same.
  • You can also use the same command for other Video File Types like MOV, MKV, AVI, etc.
  • Just change the .mp4 to the extension of the source file like .mov, .mkv, .avi, etc.
 

This was all about how to Convert an MP4 Video to MP3 Audio with FFmpeg. Hopefully, this guide has helped you. You can also check out our other guides like How To Convert MOV To MP4.


How to Set Alexa Your Default Assistant on Android

Check out the steps to set up Alexa as the default assistant on your Android devices with the help of the Amazon Alexa application.


On Android devices with Google Mobile Services (GMS), the Google application is pre-installed, and consequently, the Google Assistant is also pre-installed, which is a digital assistant that you can rely on to receive information on weather, traffic, events, sports scores and more simply by holding down the Home button. However, those who have started to get to know Alexa, Amazon’s assistant, because they perhaps use it at home on Echo devices, have had to install the Amazon Alexa application on their smartphone to manage everything via Alexa. Well, those who have installed the Amazon Alexa app on their smartphone can choose to have Alexa as the default voice assistant on their smartphone instead of Google Assistant. So in this guide, we will tell you how to set Alexa as the default digital assistant on your Android device.

How to Set Alexa as the Default Assistant on Android (2023)


set Alexa as the default assistant on Android

It is very easy to set Alexa as your default digital assistant on your Android devices, just follow the steps given below.

  • First, you need to enter the Settings of your Android device.
  • Then look for the option to customize the Home button (physical or virtual doesn’t matter) for when you hold it down and enter.
  • On Samsung Galaxy phones the steps to follow are Settings > Advanced Features > Phone Assistant App: here you should find three options such as None (if you don’t want to activate a digital assistant when you press and hold the Home button), Google (to recall the Google Assistant), Alexa (to call the Amazon Alexa Assistant).
  • By default Google should be selected, so simply press on ‘Alexa’ to switch the setting; you will be asked “Set Alexa as an assistance application? The device assistance application can display the applications used and related information,” then press Accept.
  • The device may also ask you to give Alexa permission to access the microphone, you must accept otherwise it will not be able to hear the commands and therefore carry out what is asked of it.
 

We remind you that it is also possible not to call an assistant by pressing and holding the Home button: to do this, simply select ‘None’ on the device assistance settings page.

As an alternative to holding down the Home button to call up Alexa, the ‘Alexa’ widget is available from the Amazon Alexa app which can be inserted as an icon on a home screen which, when pressed, enables listening to Alexa. This widget can be added like any other widget.

Once you have granted Alexa the necessary permissions, simply press and hold the Home button (or press the widget on the home screen) to see the bottom of the screen light up blue (equivalent to the blue circle on Echo devices to signal that Alexa is listening) to ask you to do things like call and text friends and family, control compatible smart home devices, get search results, traffic and weather information, and more. By releasing the Home button (or pressing the X that appears at the bottom of the screen) Alexa stops listening.

And that’s all there is to know about how to set Alexa as the default Assistant on Android. While you are here, check out our other Android Guides here: Fixing Google Apps Crashing on Samsung Galaxy Android Devices, and Changing App Icons on Android.