1、系统要求
- Java 8 & 兼容java14 .
- Maven 3.3+
- idea 2019.1.2+(示例采用的idea2023.01)
- Spring Boot 的文档:https://spring.io/projects/spring-boot
- SpringBoot2.7.13版本文档:https://docs.spring.io/spring-boot/docs/2.7.13/reference/html/
1.1、修改maven配置settings.xml
 1 <mirrors>
 2       <mirror>
 3         <id>nexus-aliyun</id>
 4         <mirrorOf>central</mirrorOf>
 5         <name>Nexus aliyun</name>
 6         <url>http://maven.aliyun.com/nexus/content/groups/public</url>
 7       </mirror>
 8   </mirrors>
 9
10   <profiles>
11          <profile>
12               <id>jdk-1.8</id>
13               <activation>
14                 <activeByDefault>true</activeByDefault>
15                 <jdk>1.8</jdk>
16               </activation>
17               <properties>
18                 <maven.compiler.source>1.8</maven.compiler.source>
19                 <maven.compiler.target>1.8</maven.compiler.target>
20                 <maven.compiler.compilerVersion>1.8</maven.compiler.compilerVersion>
21               </properties>
22          </profile>
23   </profiles>
2、建HelloWorld项目
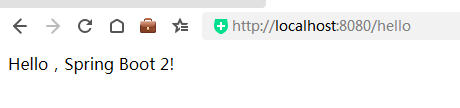
需求:浏览发送/hello请求,响应 Hello,Spring Boot 2
2.1、创建boot-01-helloworld工程
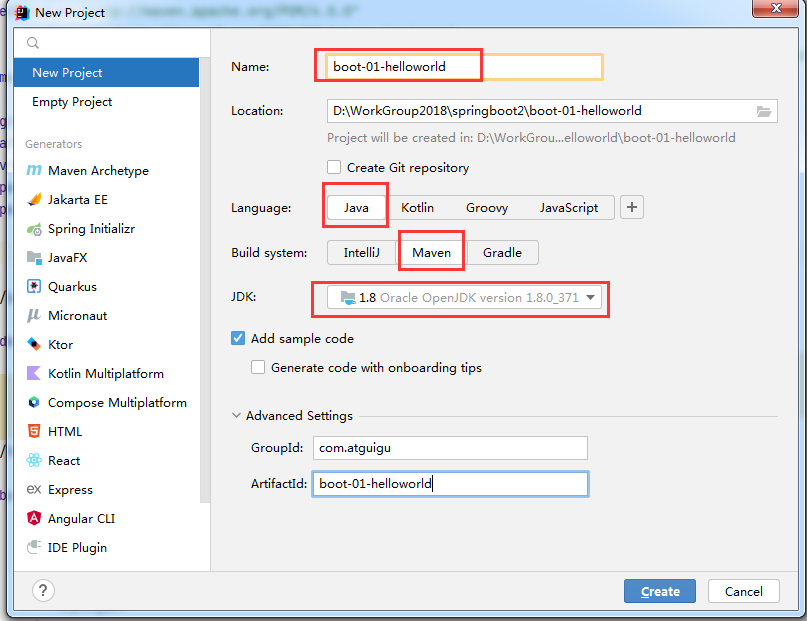
2.2、修改Maven配置

2.3、引入依赖(修改pom)
 1 <?xml version="1.0" encoding="UTF-8"?>
 2 <project xmlns="http://maven.apache.org/POM/4.0.0"
 3          xmlns:xsi="http://www.w3.org/2001/XMLSchema-instance"
 4          xsi:schemaLocation="http://maven.apache.org/POM/4.0.0 http://maven.apache.org/xsd/maven-4.0.0.xsd">
 5     <modelVersion>4.0.0</modelVersion>
 6
 7     <groupId>com.atguigu</groupId>
 8     <artifactId>boot-01-helloworld</artifactId>
 9     <version>1.0-SNAPSHOT</version>
10     <packaging>jar</packaging>
11     <!--采用的是2.0的最后一个版本-->
12     <parent>
13         <groupId>org.springframework.boot</groupId>
14         <artifactId>spring-boot-starter-parent</artifactId>
15         <version>2.7.13</version>
16     </parent>
17
18     <dependencies>
19         <dependency>
20             <groupId>org.springframework.boot</groupId>
21             <artifactId>spring-boot-starter-web</artifactId>
22         </dependency>
23     </dependencies>
24
25     <build>
26         <plugins>
27             <plugin>
28                 <groupId>org.springframework.boot</groupId>
29                 <artifactId>spring-boot-maven-plugin</artifactId>
30             </plugin>
31         </plugins>
32     </build>
33
34 </project>
2.4、创建主程序MainApplication
 1 package com.atguigu;
 2
 3 import org.springframework.boot.SpringApplication;
 4 import org.springframework.boot.autoconfigure.SpringBootApplication;
 5
 6 @SpringBootApplication
 7 public class MainApplication {
 8     public static void main(String[] args) {
 9         System.out.println("Hello world!");
10         SpringApplication.run(MainApplication.class,args);
11     }
12 }
2.5、编写业务类

代码:
 1 package com.atguigu.controller;
 2
 3 import org.springframework.web.bind.annotation.RequestMapping;
 4 import org.springframework.web.bind.annotation.RestController;
 5
 6 @RestController
 7 public class HelloController {
 8
 9     @RequestMapping("/hello")
10     public String SayHello()
11     {
12         return "Hello,Spring Boot 2!";
13     }
14 }
2.6、测试
直接运行MainApplication方法
2.7、简化配置
在resources文件夹下新建application.properties配置文件
配置上端口:server.port=8888
运行项目,启动后在8888下测试
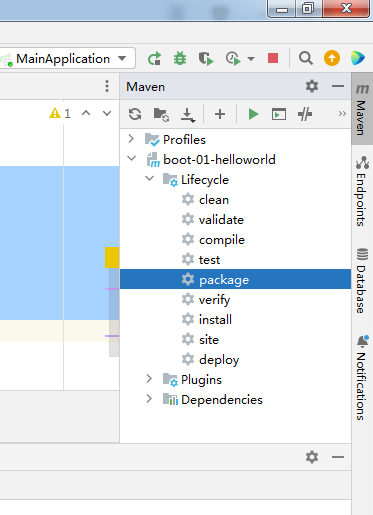
2.8、简化部署,将项目打成jar包
pom将打包方式修改
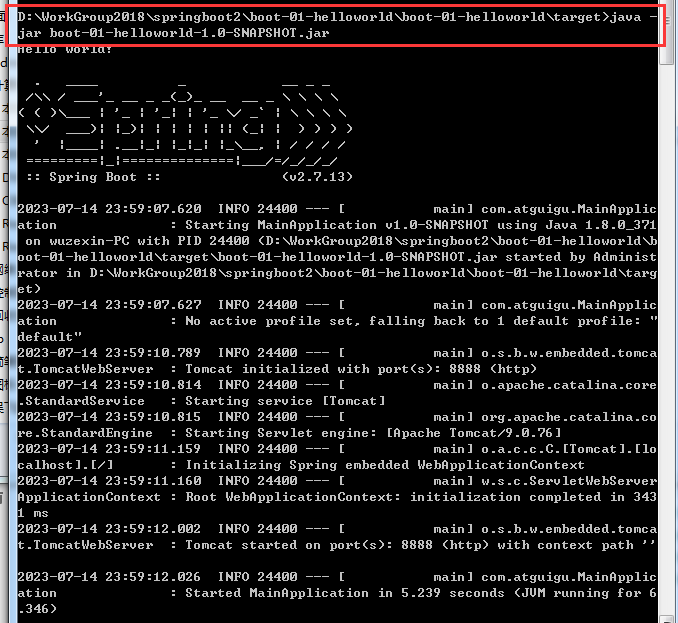
打成jar包好处:部署环境不需要安装Tomcat,只需要直接运行jar包,命令为:java -jar 文件名.jar
 1 <!--打包方式-->
 <packaging>jar</packaging>
 2
 3 <!---->
 4 <build>
 5         <plugins>
 6             <plugin>
 7                 <groupId>org.springframework.boot</groupId>
 8                 <artifactId>spring-boot-maven-plugin</artifactId>
 9             </plugin>
10         </plugins>
11     </build>
使用idea打包,打开idea右侧的Maven,双击package
打好的包在项目的target文件夹下

使用java -jar 文件名.jar运行启动。
- SpringBoot2 SpringBootspringboot2 springboot2 springboot springboot2 springboot swagger3 swagger springboot2 springboot mybatis springboot2 springboot lettuce redis springboot2 springboot spring3 spring springboot2 springboot后台 管理系统 springboot2 springcache springboot springboot2 springboot mybatis3 mybatis connectionimpl springboot2 springboot connection