工作队列模式
工作队列模式结构图:

这种模式非常适合多个工人等待任务到来的场景。任务有多个,一个一个丢进消息队列,工人也有很多个,就可以将这些任务分配个各个工人,让他们各自负责一些任务,并且做的快的工人还可以多完成一些(能者多劳)。
要实现这种模式,只需要创建多个监听器即可。
先监听再发消息
这里先介绍先监听再发送消息的情况。
-
定义配置类。
import org.springframework.amqp.core.Binding; import org.springframework.amqp.core.BindingBuilder; import org.springframework.amqp.core.Exchange; import org.springframework.amqp.core.ExchangeBuilder; import org.springframework.amqp.core.Queue; import org.springframework.amqp.core.QueueBuilder; import org.springframework.beans.factory.annotation.Qualifier; import org.springframework.context.annotation.Bean; import org.springframework.context.annotation.Configuration; /** * RabbitMQ配置类 * * @author CodeSail */ @Configuration public class RabbitMqConfig { /** * 定义交换机,可以很多个 * @return 交换机对象 */ @Bean("directExchange") public Exchange exchange(){ return ExchangeBuilder.directExchange("amq.direct").build(); } /** * 定义消息队列 * @return 消息队列对象 */ @Bean("testQueue") public Queue queue(){ return QueueBuilder // 非持久化类型 .nonDurable("test_springboot") .build(); } /** * 定义绑定关系 * @return 绑定关系 */ @Bean public Binding binding(@Qualifier("directExchange") Exchange exchange, @Qualifier("testQueue") Queue queue){ // 将定义的交换机和队列进行绑定 return BindingBuilder // 绑定队列 .bind(queue) // 到交换机 .to(exchange) // 使用自定义的routingKey .with("test_springboot_key") // 不设置参数 .noargs(); } } -
创建两个监听器,监听同一队列。
import org.springframework.amqp.rabbit.annotation.RabbitListener; import org.springframework.stereotype.Component; /** * 工作队列监听器 * * @author 廖航 */ @Component public class WorkListener { @RabbitListener(queues = "test_springboot") public void receiver1(String message) { System.out.println("1号监听器:" + message); } @RabbitListener(queues = "test_springboot") public void receiver2(String message) { System.out.println("2号监听器:" + message); } } -
定义生产者。
import org.junit.jupiter.api.Test; import org.springframework.amqp.rabbit.core.RabbitTemplate; import org.springframework.beans.factory.annotation.Autowired; import org.springframework.boot.test.context.SpringBootTest; import java.util.concurrent.TimeUnit; @SpringBootTest class RabbitMqSpringBootTests { /** * RabbitTemplate封装了大量的RabbitMQ操作,已经由Starter提供,因此直接注入使用即可 */ @Autowired private RabbitTemplate rabbitTemplate; /** * 生产者 */ @Test void producer() throws InterruptedException { for (int i = 0; i < 10; i++) { TimeUnit.SECONDS.sleep(1); rabbitTemplate.convertAndSend("amq.direct", "test_springboot_key", "Hello World"); } } } -
启动生产者发送消息。
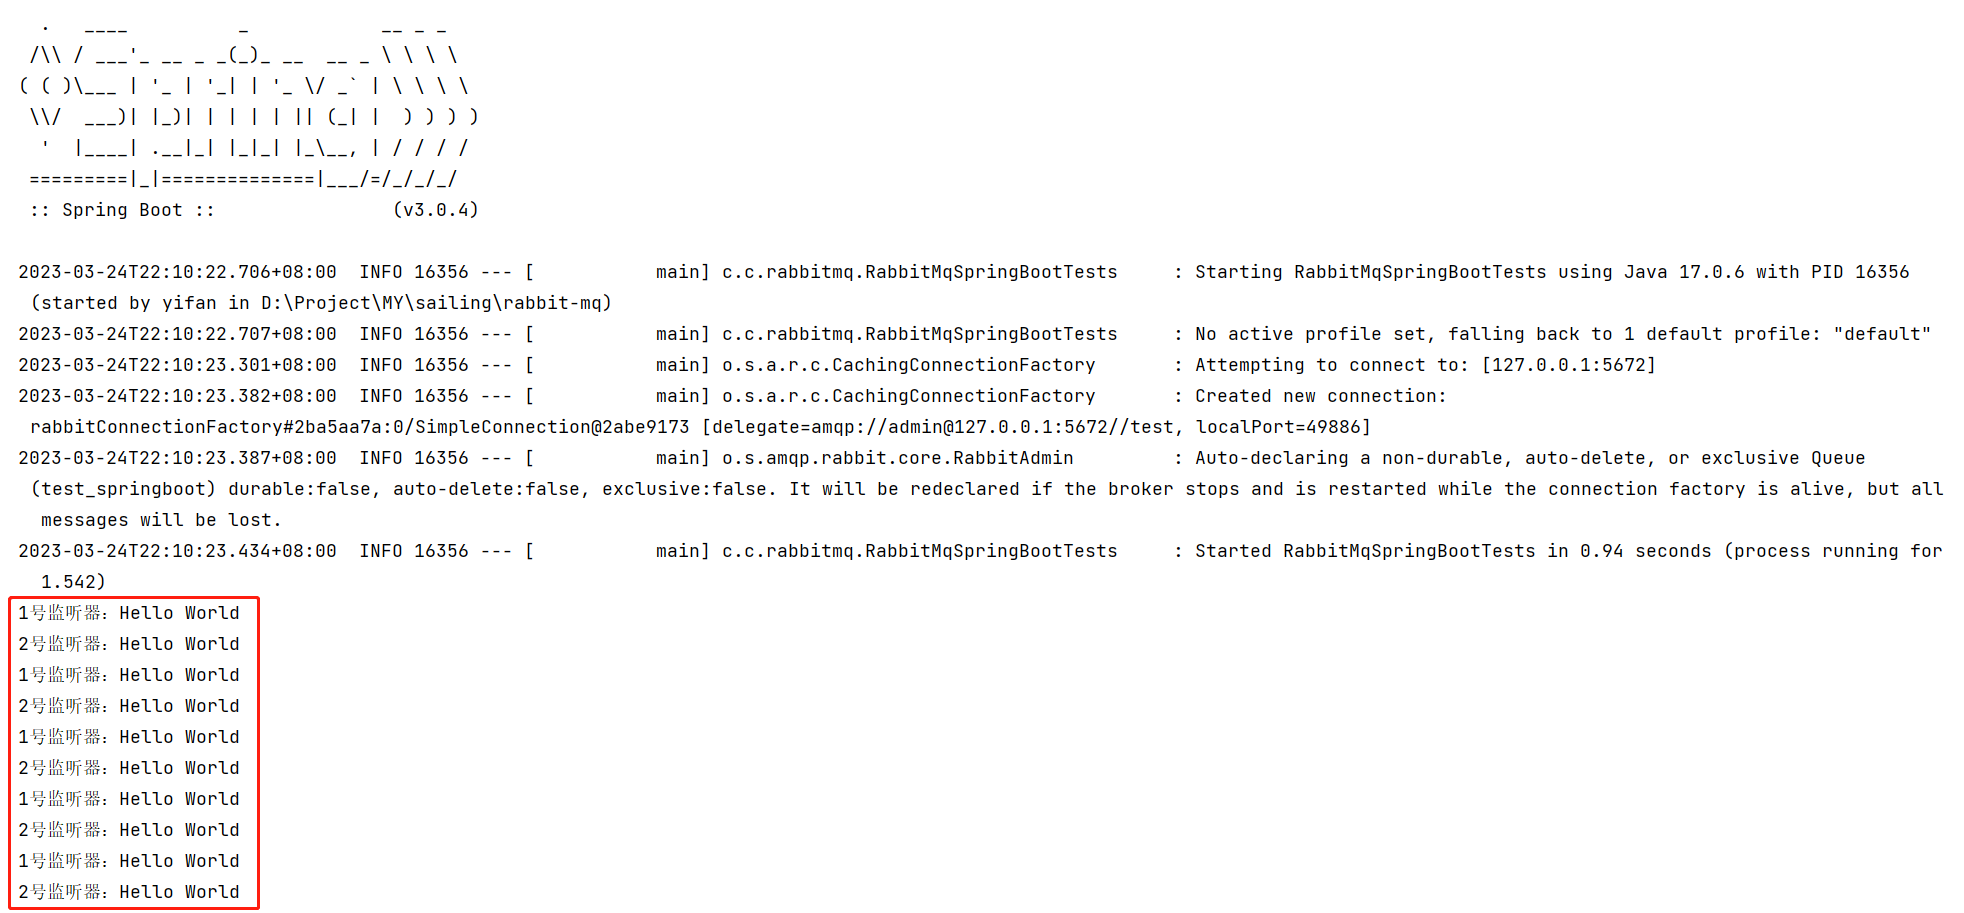
可以看到,当同一个队列有多个监听器时,默认采用轮询的方式消费消息。
先发消息再监听
前面介绍了先监听再发消息的情况,下面介绍先发消息再监听的情况。
-
向队列中发送10条消息。
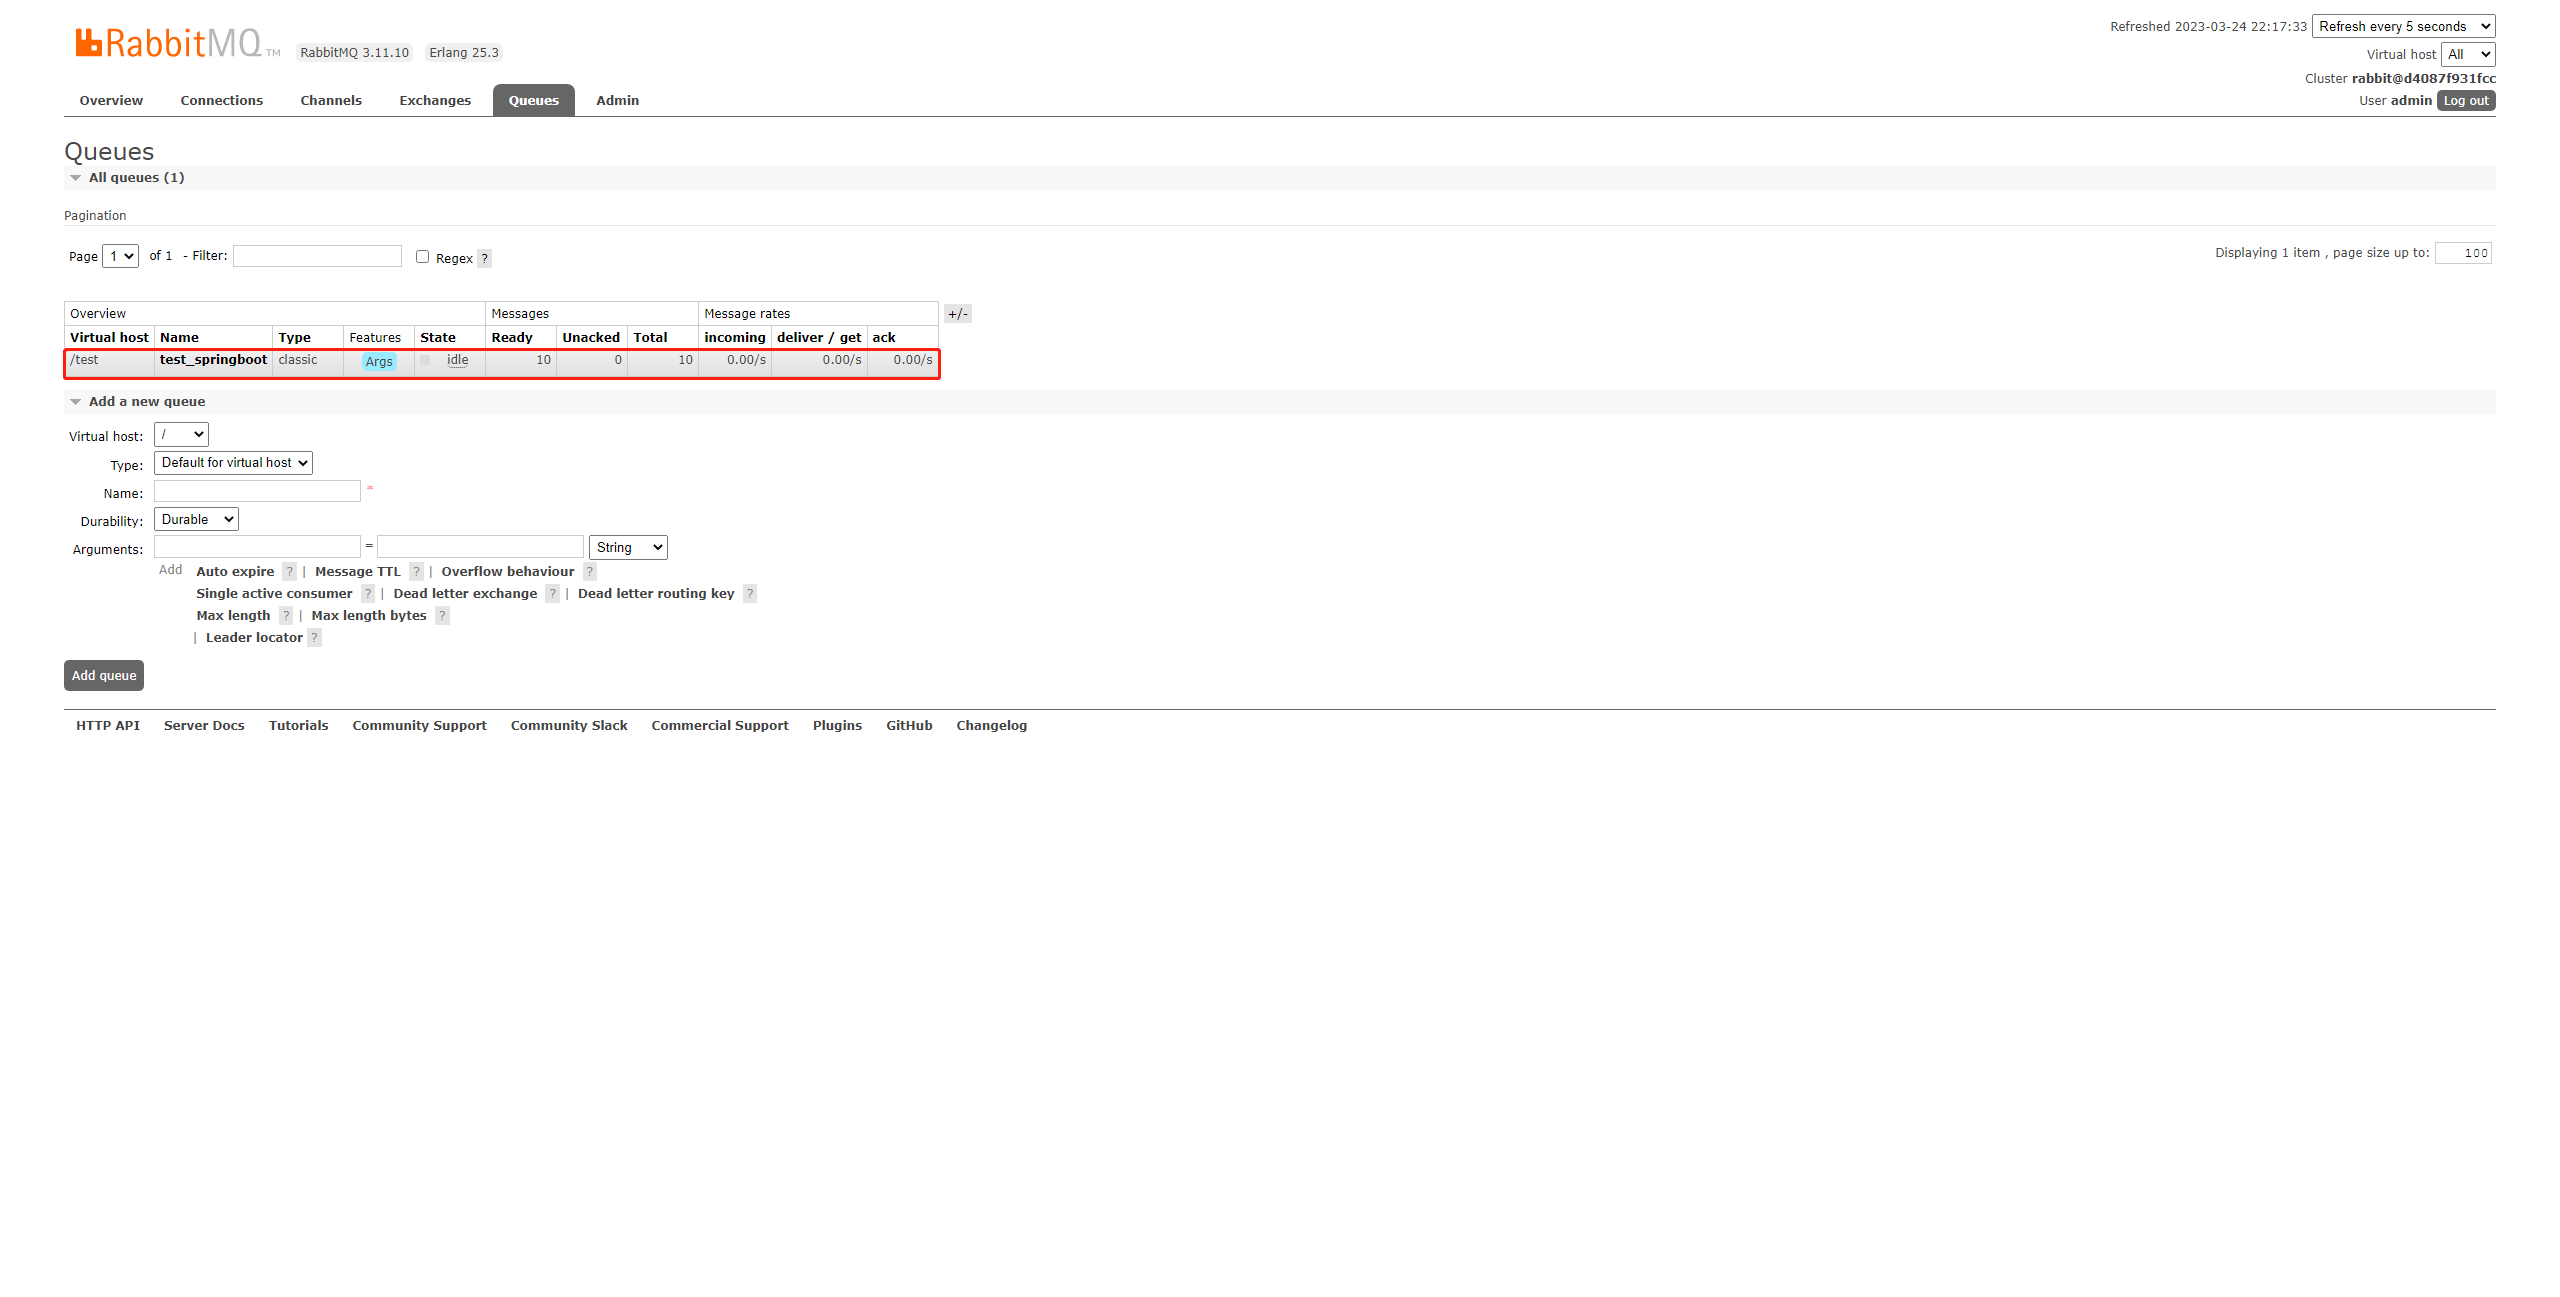
-
启动服务消费消息。

可以看到,如果是一开始就存在消息,会被一个消费者一次性全部消费,这是因为没有对消费者的Prefetch count(预获取数量,一次性获取消息的最大数量)进行限制。
默认的Prefetch count为250。
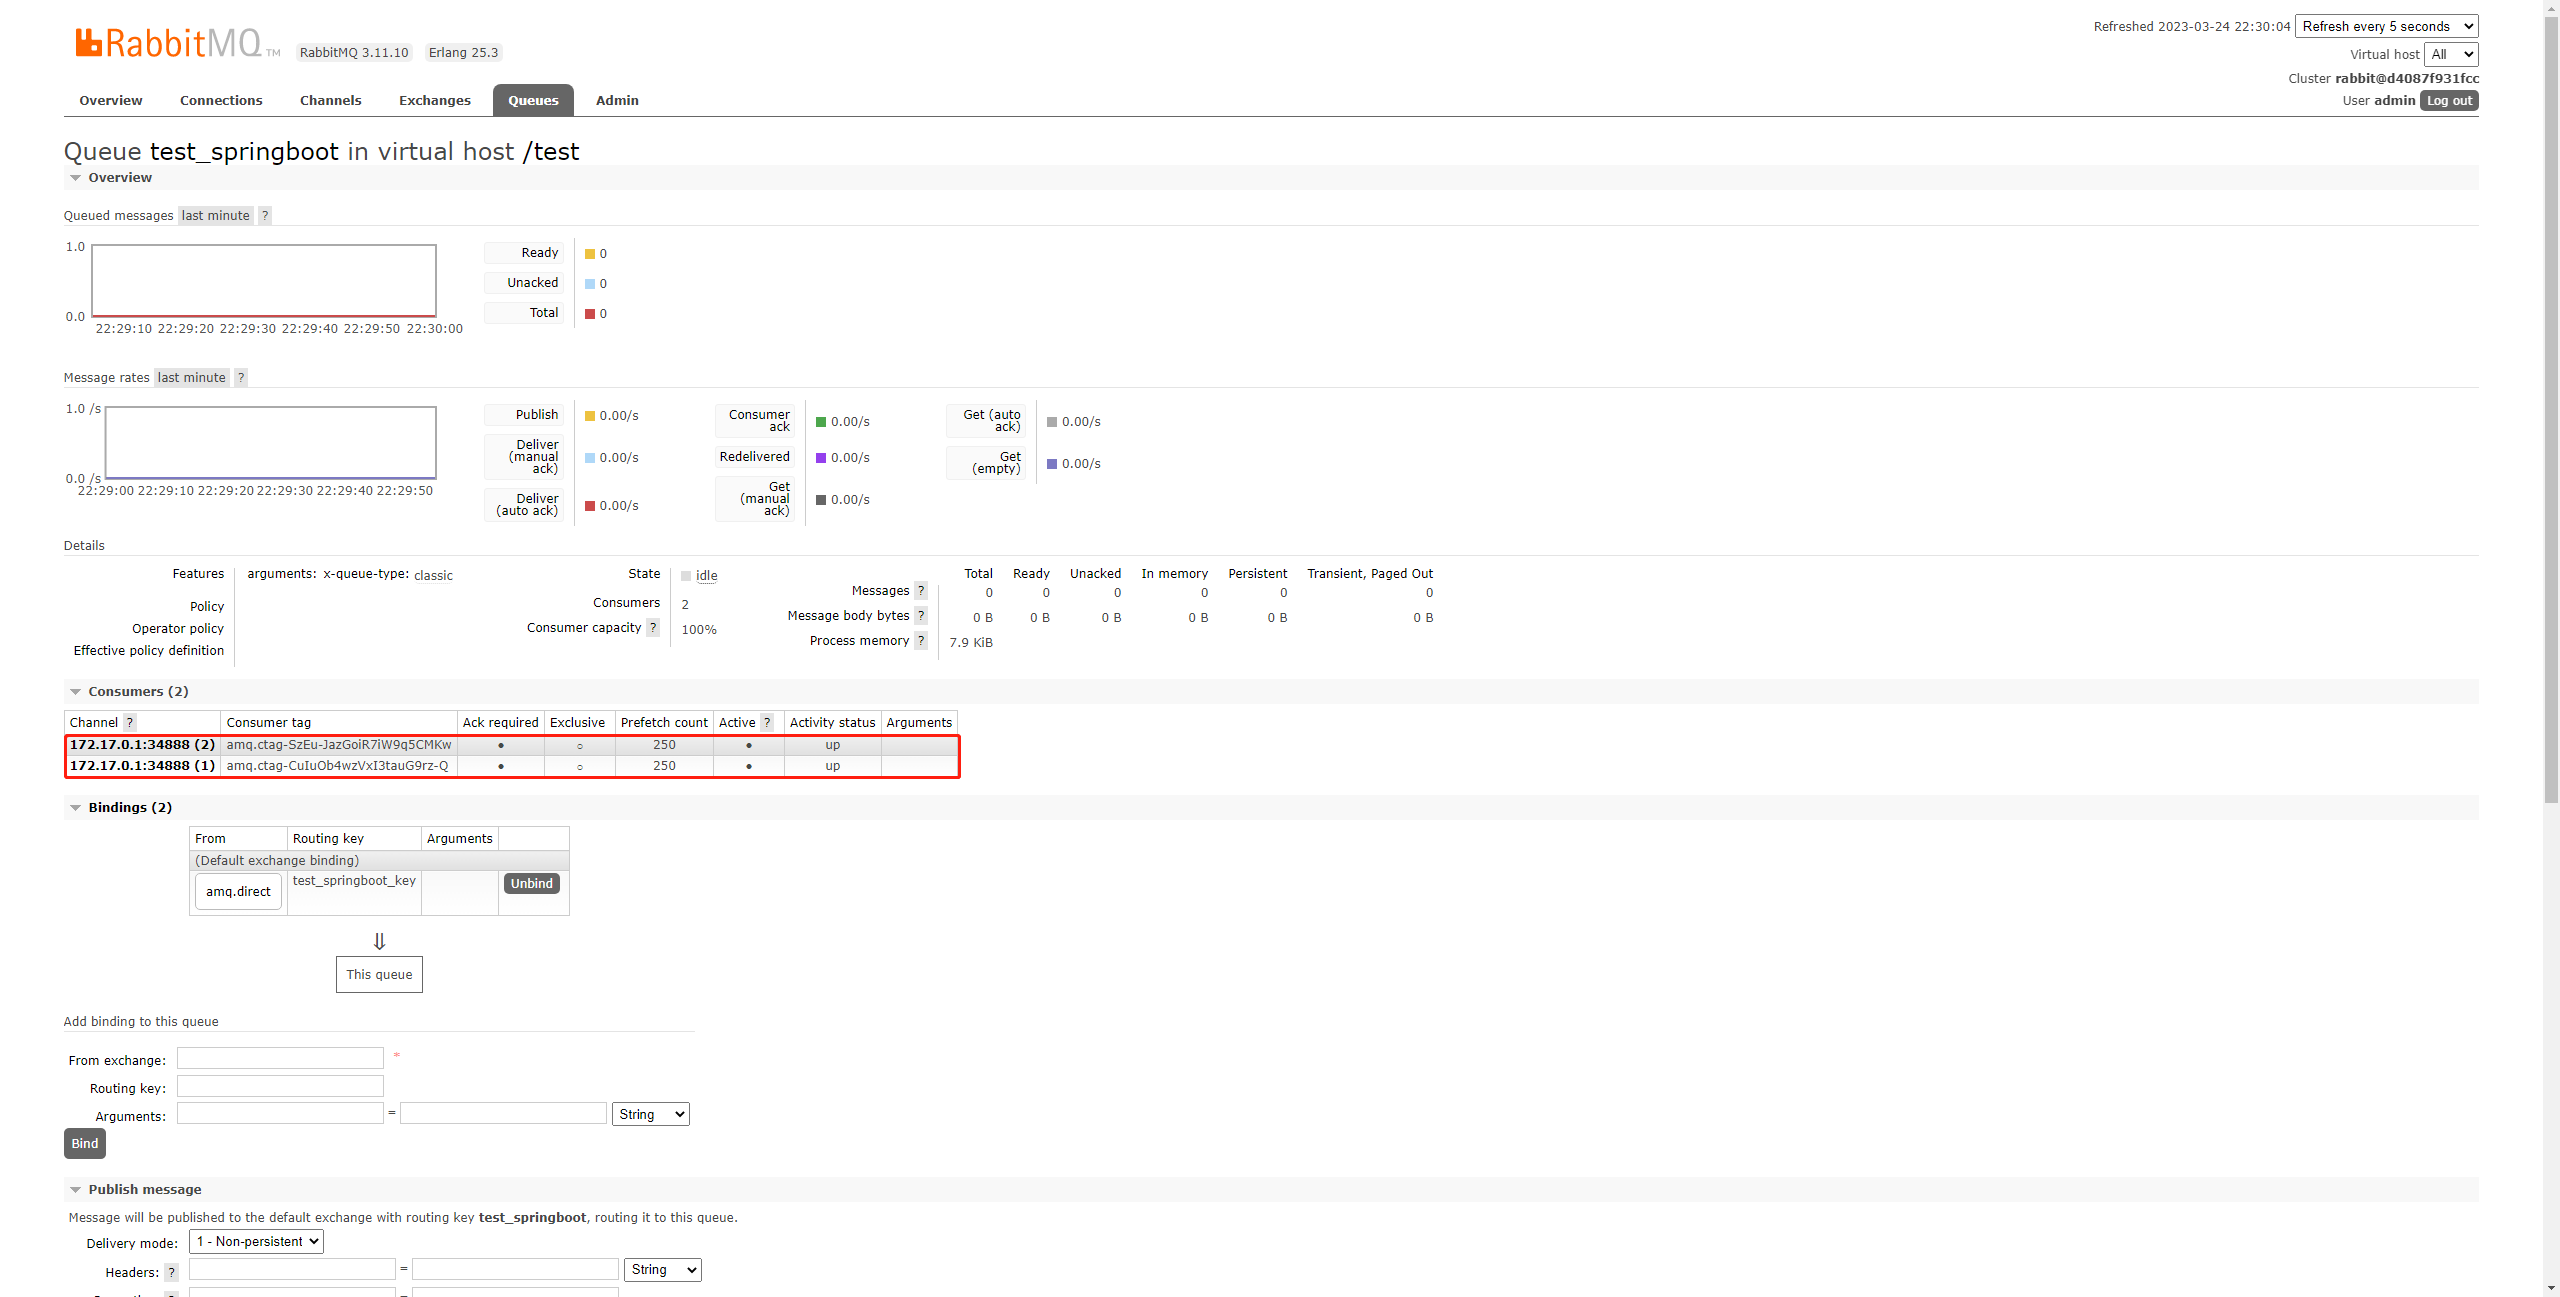
也就是说如果希望消费者一次只拿一个消息,而不是将所有的消息全部都获取,需要设置Prefetch count。
要对这个数量进行配置,需要在配置类中定义一个自定义的ListenerContainerFactory,可以在这里设置消费者Channel的PrefetchCount的大小。
-
配置类中定义
ListenerContainerFactory。import org.springframework.amqp.core.Binding; import org.springframework.amqp.core.BindingBuilder; import org.springframework.amqp.core.Exchange; import org.springframework.amqp.core.ExchangeBuilder; import org.springframework.amqp.core.Queue; import org.springframework.amqp.core.QueueBuilder; import org.springframework.amqp.rabbit.config.SimpleRabbitListenerContainerFactory; import org.springframework.amqp.rabbit.connection.CachingConnectionFactory; import org.springframework.beans.factory.annotation.Autowired; import org.springframework.beans.factory.annotation.Qualifier; import org.springframework.context.annotation.Bean; import org.springframework.context.annotation.Configuration; /** * RabbitMQ配置类 * * @author CodeSail */ @Configuration public class RabbitMqConfig { @Autowired private CachingConnectionFactory connectionFactory; ... @Bean(name = "listenerContainer") public SimpleRabbitListenerContainerFactory listenerContainer(){ SimpleRabbitListenerContainerFactory factory = new SimpleRabbitListenerContainerFactory(); factory.setConnectionFactory(connectionFactory); // 将PrefetchCount设定为1表示一次只能取一个 factory.setPrefetchCount(1); return factory; } } -
监听器中指定。
import org.springframework.amqp.rabbit.annotation.RabbitListener; import org.springframework.stereotype.Component; /** * 工作队列监听器 * * @author 廖航 */ @Component public class WorkListener { @RabbitListener(queues = "test_springboot", containerFactory = "listenerContainer") public void receiver1(String message) { System.out.println("1号监听器:" + message); } @RabbitListener(queues = "test_springboot", containerFactory = "listenerContainer") public void receiver2(String message) { System.out.println("2号监听器:" + message); } } -
向队列中发送10条消息。

-
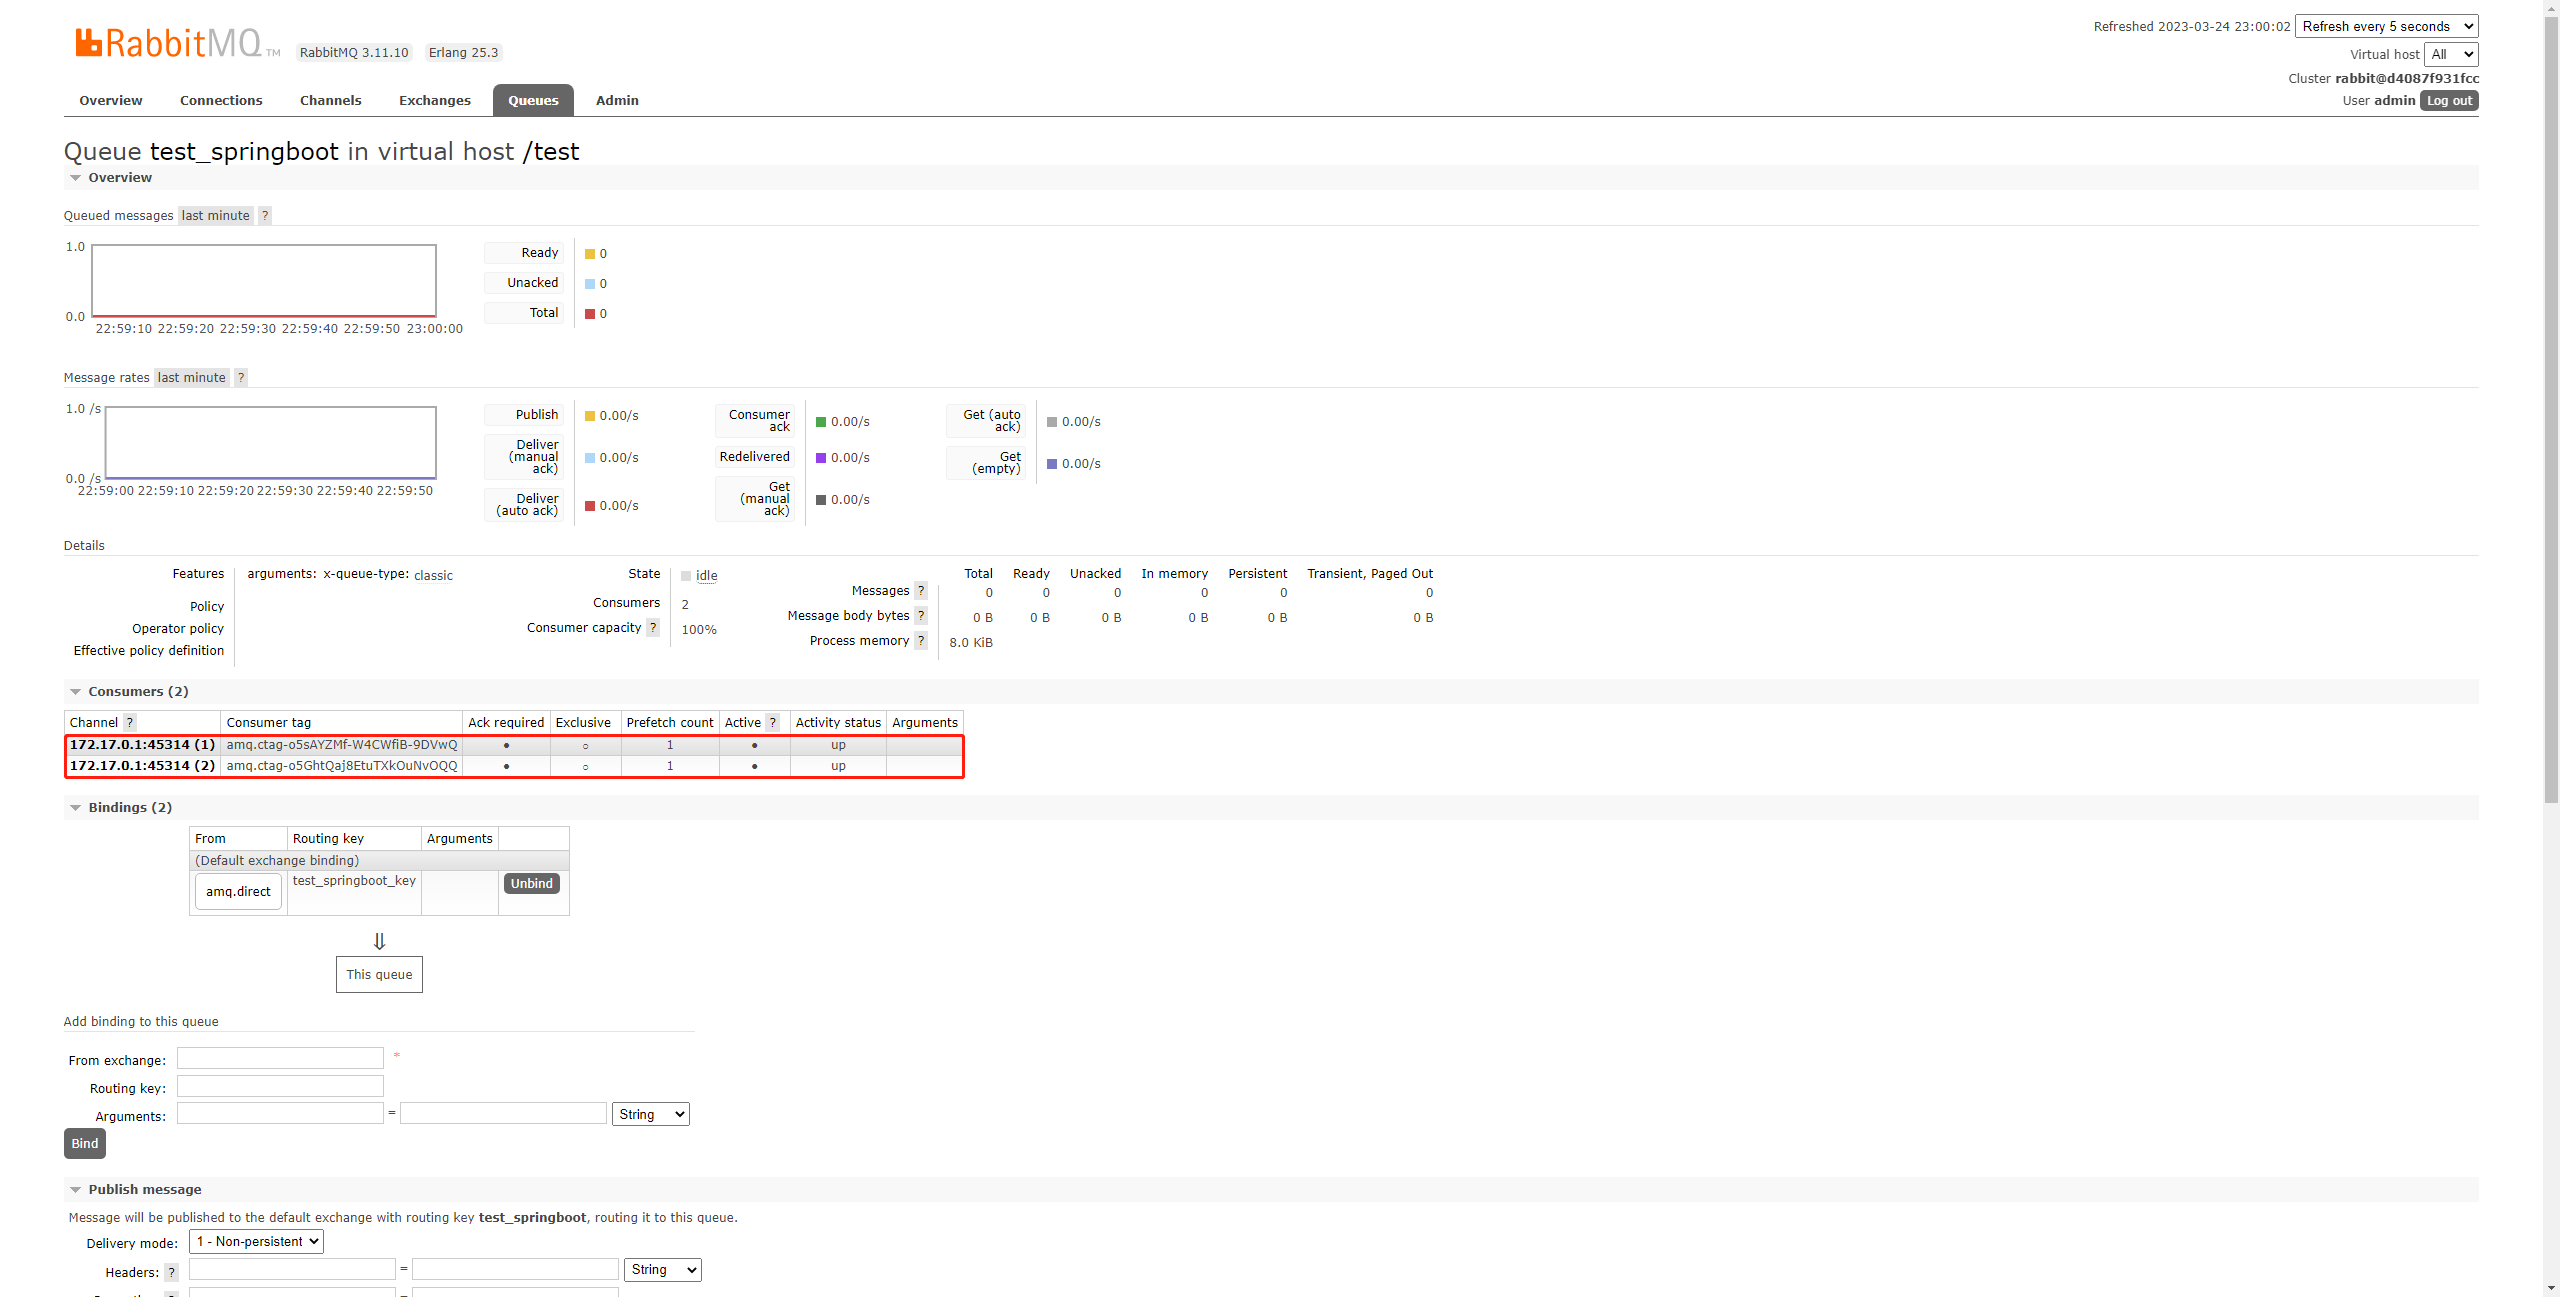
启动服务消费消息。

可以看到,两个监听器又实现了轮询消费消息。
Prefetch count设为了1。
至此,工作队列模式的两种情况就介绍完毕了。
- 环境
- JDK 17.0.6
- Maven 3.6.3
- SpringBoot 3.0.4
- spring-boot-starter-amqp 3.0.4
- 参考