说明
HUAWEI CT6100 作为一款老旧的瘦客户机,要从硬盘启动系统仅支持 Legacy 引导的系统。若要重装系统,则需要一些软硬件的帮助。
需求环境:
| 项目 | 数量 | 备注 |
|---|---|---|
| Linux 主机/虚拟机 | 1 | 安装好 gzip 、 parted 、 df 等 |
| Windows 主机 | 1 | |
| 有硬盘的目标物理主机 | 1 | |
| U盘 | 1 | 装有微PE |
| physdiskwrite(Windows)写盘工具 | 1 | 在U盘内 |
| 目标安装镜像(ISO) | 1 | 在U盘内,本文使用 OpenWRT |
| ventoy 写盘工具 | 1 | 可以自己探索下比较简单 |
特殊说明:
physdiskwrite 写盘工具只能将固定大小的镜像文件写入硬盘,且仅占镜像大小的空间。若硬盘空间足够大或镜像文件太小无法实现功能,则需要 parted 等工具对镜像文件扩容。
镜像扩容
-
Linux 中解压镜像文件。
ubuntu@ubuntu:~$ gzip -kd 20230608-Ipv6-Plus-6.1-x86-64-generic-squashfs-combined-efi.img.gz ubuntu@ubuntu:~$ ls 20230608-Ipv6-Plus-6.1-x86-64-generic-squashfs-combined-efi.img 20230608-Ipv6-Plus-6.1-x86-64-generic-squashfs-combined-efi.img.gz -
parted 查看镜像分区。
ubuntu@ubuntu:~$ parted 20230608-Ipv6-Plus-6.1-x86-64-generic-squashfs-combined-efi.img
WARNING: You are not superuser.  Watch out for permissions.
GNU Parted 3.3
Using /home/ubuntu/20230608-Ipv6-Plus-6.1-x86-64-generic-squashfs-combined-efi.img
Welcome to GNU Parted! Type 'help' to view a list of commands.
(parted)
输入命令 print 查看镜像内部分区。
OK确认,选择Fix,Q推出。(parted) print Error: The backup GPT table is corrupt, but the primary appears OK, so that will be used. OK/Cancel? OK Warning: Not all of the space available to /home/ubuntu/20230608-Ipv6-Plus-6.1-x86-64-generic-squashfs-combined-efi.imgappears to be used, you can fix the GPT to use all of the space (an extra 30 blocks) or continue with the current setting? Fix/Ignore? FiX Model: (file) Disk /home/ubuntu/20230608-Ipv6-Plus-6.1-x86-64-generic-squashfs-combined-efi.img: 1038MB Sector size (logical/physical): 512B/512B Partition Table: gpt Disk Flags: Number Start End Size File system Name Flags 128 17.4kB 1049kB 1031kB bios_grub 1 1049kB 68.2MB 67.1MB fat16 legacy_boot 2 68.2MB 1038MB 970MB (parted) Q ubuntu@ubuntu:~$可以看到一共总计 1G (970MB+67.1MB)的大小。
Number 1的分区为 boot 分区,无需扩容。Number 2为/overlay分区,用于系统运行、docker容器、文件存储等,对其扩容。若不扩容直接写入硬盘:
-
dd进行镜像扩容。因我硬盘只有 7.6G ,所以在原镜像 1G 基础上添加 6G 左右的空数据。
ubuntu@ubuntu:~$ dd if=/dev/zero bs=1M count=6144 >> 20230608-Ipv6-Plus-6.1-x86-64-generic-squashfs-combined-efi.img 6144+0 records in 6144+0 records out 6442450944 bytes (6.4 GB, 6.0 GiB) copied, 11.7543 s, 548 MB/s ubuntu@ubuntu:~$ -
parted 将空数据分至
Number 2。resizepart 2 100%:将Number 2占据所有空闲空间。ubuntu@ubuntu:~$ parted 20230608-Ipv6-Plus-6.1-x86-64-generic-squashfs-combined-efi.img WARNING: You are not superuser. Watch out for permissions. GNU Parted 3.3 Using /home/ubuntu/20230608-Ipv6-Plus-6.1-x86-64-generic-squashfs-combined-efi.img Welcome to GNU Parted! Type 'help' to view a list of commands. (parted) resizepart 2 100% (parted)再次查看分区。
(parted) PRINT Model: (file) Disk /home/ubuntu/20230608-Ipv6-Plus-6.1-x86-64-generic-squashfs-combined-efi.img: 7481MB Sector size (logical/physical): 512B/512B Partition Table: gpt Disk Flags: Number Start End Size File system Name Flags 128 17.4kB 1049kB 1031kB bios_grub 1 1049kB 68.2MB 67.1MB fat16 legacy_boot 2 68.2MB 7481MB 7412MB (parted) q ubuntu@ubuntu:~$ -
也可用
ls -lh确认文件大小。ubuntu@ubuntu:~$ ls -lh total 7.3G -rw-rw-r-- 1 ubuntu ubuntu 7.0G Jun 13 11:50 20230608-Ipv6-Plus-6.1-x86-64-generic-squashfs-combined-efi.img -rw-rw-r-- 1 ubuntu ubuntu 291M Jun 13 11:45 20230608-Ipv6-Plus-6.1-x86-64-generic-squashfs-combined-efi.img.gz ubuntu@ubuntu:~$ -
通过
scp等工具将镜像文件转出,存入 微PE U盘。
写入硬盘
-
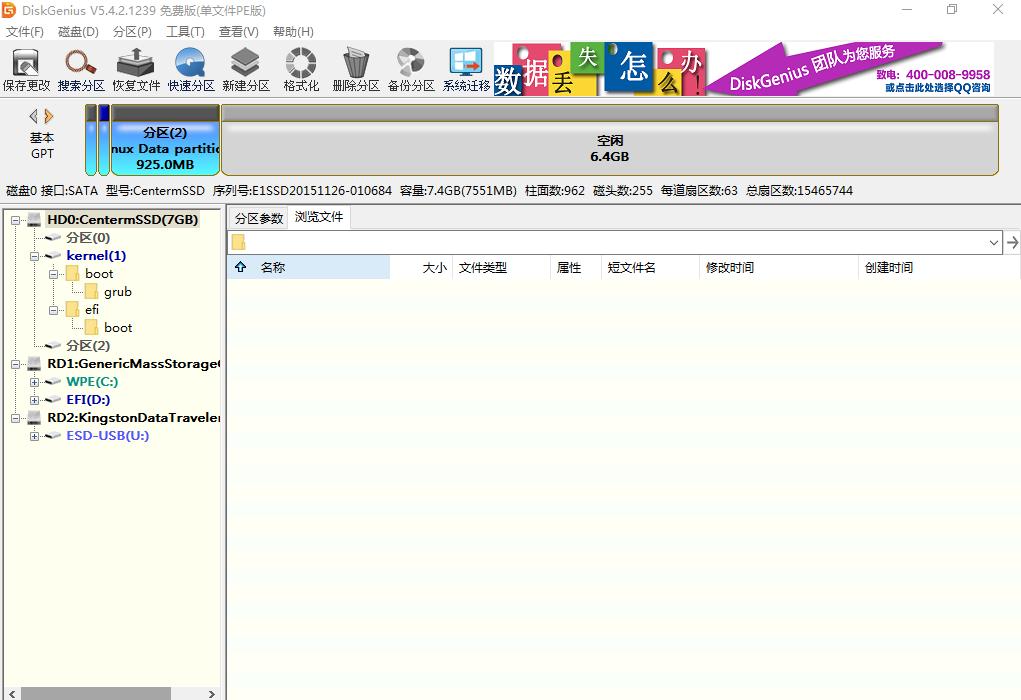
通过 微PE 启动,DiskGenius 删除硬盘分区,不创建新分区。

-
在 微PE Windows 环境中,使用
physdiskwrite将镜像文件写入硬盘。physdiskwrite -u 20230608-Ipv6-Plus-6.1-x86-64-generic-squashfs-combined-efi.img-u参数用于超过 physdiskwrite 默认只写小于 2G 大小镜像的限制。每个存储设备对应一个
PhysicalDrive,其后的数字0/1/2为索引号。图中PhysicalDrive0为 msata 硬盘,PhysicalDrive1和PhysicalDrive2为 U盘。选择对应序号0进行硬盘写入。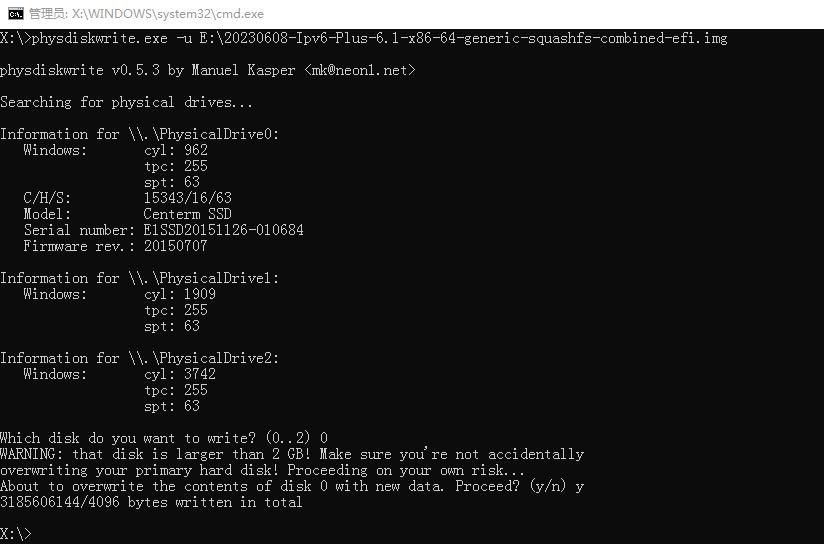
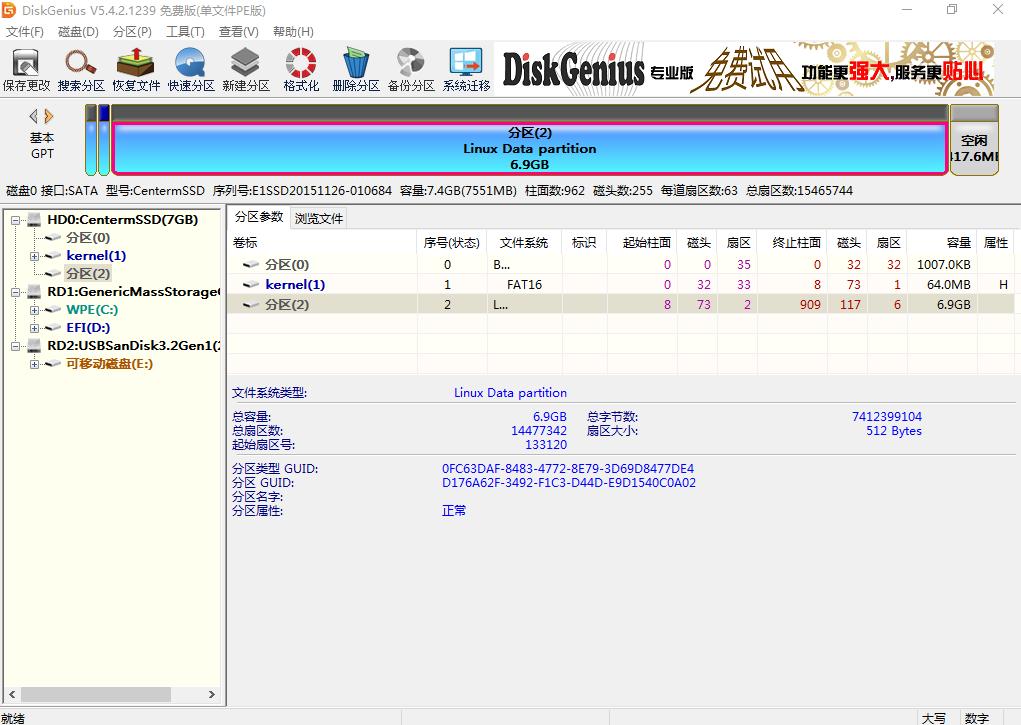
查看写入结果:
-
写入完成后即可关机,拔出U盘,开机即可。
参考
本文参考原视频(非我上传所做,可以支持下):OpenWrt完美扩容Overlay 硬核新方法,真扩容,零空间浪费,专治强迫症!
该视频中一共有三种方式。