create database MvcUnit4;
go
use MvcUnit4;
go
create table Product
(
    Id bigint primary key,
    ProductName varchar(30),
    CategoryName varchar(30),
    Price decimal(10,2),
    Remark varchar(200),
    CreatedUserId bigint,
    UpdatedUserId bigint,
    CreatedTime datetime,
    UpdatedTime datetime,
    Deleted bit
);
insert into Product values(1,'C# 入门','.Net 开发',25,'',1,1,getdate(),getdate(),0);
insert into Product values(2,'Sql基础','数据库',25,'',1,1,getdate(),getdate(),0);
insert into Product values(3,'SQL高级','数据库',120,'',1,1,getdate(),getdate(),0);
insert into Product values(4,'Ado.Net','数据库访问技术',25,'',1,1,getdate(),getdate(),0);
insert into Product values(5,'EntityFramework','数据库访问技术',120,'',1,1,getdate(),getdate(),0);
insert into Product values(6,'C#高级','.Net 开发',140,'',1,1,getdate(),getdate(),0);
insert into Product values(7,'Asp.net Mvc Core','.Net 开发',25,'',2,2,getdate(),getdate(),0);
insert into Product values(8,'MySql基础','数据库',25,'',2,2,getdate(),getdate(),0);
go
create table UserInfo
(
    Id bigint primary key,
    UserName varchar(30),
    NickName varchar(30),
    Pwd varchar(50),
    CreatedUserId bigint,
    UpdatedUserId bigint,
    CreatedTime datetime,
    UpdatedTime datetime,
    Deleted bit
);
insert into UserInfo values(1,'renwoxing','任我行','123456',0,0,getdate(),getdate(),0);
insert into UserInfo values(2,'xiaoming','小明','123456',0,0,getdate(),getdate(),0);
1. 视图模型-ViewModel
1. 为什么要建立视图模型
不同的业务场景,我们最好是建立不同的ViewModel来与与之对应。我们弄个实际开发的例子来进行说明。
// 父类数据实体 public class BaseEntity { public long Id{ get;set;} public long CreatedUserId { get; set;} public long UpdatedUserId { get; set;} public DateTime CreatedTime { get; set; }= DateTime.Now; public DateTime UpdatedTime { get; set; }= DateTime.Now; public bool Deleted { get; set; } = false; } // 商品数据实体 class Product : BaseEntity { public String ProductName {get; set;} public decimal Price { get; set; } public String CategoryName { get; set; } public String Remark { get; set; } } // 用户数据实体 class UserInfo : BaseEntity{ public String UserName { get;set;} public String NickName { get;set;} public String Pwd { get;set;} }
此时前端需要展示的数据项如下:
商品名,价格,分类,添加人,维护人,最后维护时间
此时你的商品视图模型应该是:
class ProductViewModel{
    public long Id;
    public String ProductName {get; set;}
    public decimal Price { get; set; }
    public String CategoryName { get; set; }
    public String CreatedNickName { get; set; }
    public String UpdatedNickName { get; set; }
    public DateTime UpdatedTime { get; set; }
}
使用视图模型的好处:
面对那些业务场景不需要的字段我们不应该返回给前端,
-
方便此业务场景的维护,就算将来当前业务场景发生变化,也不至于影响到其他同学的调用。
-
字段太多,对于其他调用者来说不太友好,别人不知道这个字段是干嘛用的,特别是现在流行微服务开发,当我们给别人提供接口时,切记要记得“按需所给” ,否则别人可能会为了你这些“没用的字段” 而 去大费周章的去东挪西凑。
-
更符合当前的DDD开发模式。
添加或者修改的视图:
// 父类输入数据
class BaseInput{
    public long Id{ get;set;}
    public long CreatedUserId { get; set;}
    public long UpdatedUserId { get; set;}
    public DateTime CreatedTime => DateTime.Now;
    public DateTime UpdatedTime => DateTime.Now;
    public bool Deleted => false;
}
class ProductInput : BaseInput{
    public String ProductName {get; set;}
    public decimal Price { get; set; }
    public String CategoryName { get; set; }
    public String Remark {get;set;}
}
BaseInput 与 BaseEntity 虽然 字段一样,但是所处的业务领域不一样。比如我们可能会在BaseEntity 类中对字段Id 标识 [Key] 特性来说明它是主键字段,而BaseInput 类中的Id 则只是作为一个输入参数而已,换句话说,此Id而非彼Id。
ProductInput 类 虽然 与 Product 类 字段一样,但这只是个例,事实在微服务开发过程中,很多时候方法的入参字段列表与数据实体的字段列表是不一样的。目前大家只需要掌握这种思想即可,随着大家的开发经验的积累,会慢慢的体会到这种模式的好处。
2. 属性映射
虽然建立视图模型给我们带来了业务领域驱动的好处,但是同样也给我们带来了一些编码上的麻烦,代码如下:
public class ProductController:Controller
{
    private readonly IdWorker _idWorker;
    private readonly IProductService _productService;
    public ProductController(IProductService productService)
    {
        _productService = productService;
        _idWorker = SnowflakeUtil.CreateIdWorker();
    }
    public IActionResult Create(ProductInput input)
    {
        // 将ProductInput 转换为 Product 数据实体对象
         // (实际开发场景下,Input实体转换为数据实体过程应放至业务逻辑层)
        Product entity = new()
        {
            Id = _idWorker.NextId(), // 雪花Id
            CategoryName = input.CategoryName,
            Price = input.Price,
            ProductName = input.ProductName
        };
        _productService.Save(entity);

        return Ok("添加成功");
    }
}
如果我们每一个业务对象都需要这样手动的为每个属性赋值的话,那对于我们程序员来说简直就是把技术活变成了体力活了。接下来我们需要介绍另外一款组件:AutoMap自动映射
2. AutoMap 组件-自动映射
需要安装的包:
-
AutoMapper.Extensions.Microsoft.DependencyInjection
快速开始
首先,配置映射关系
public class OrganizationProfile : Profile
{
    public OrganizationProfile()
    {
        CreateMap<Foo, FooDto>();
    }
}
如果是控制台应用,则:
var configuration = new MapperConfiguration(cfg => {
    //cfg.CreateMap<Foo, Bar>();
    cfg.AddProfile<OrganizationProfile>();//或者cfg.AddProfile(new OrganizationProfile());
});
var mapper=configuration.CreateMapper();//或者var mapper=new Mapper(configuration);

var dest=mapper.Map<OrderDto>(order);
如果ASP.NET Core应用,则(需安装AutoMapper.Extensions.Microsoft.DependencyInjection):
//1. 配置服务里Add,入参类型为params
build.Services.AddAutoMapper(typeof(OrganizationProfile));

//2. 然后在Controller里使用即可:
public XXXController(IMapper mapper)
{
    _mapper = mapper;
    var dest=mapper.Map<OrderDto>(order);
}
1.常见配置
1.1 Profile的配置
除了上述的手动添加profile,还可以自动扫描profile并添加:
//方法1
var configuration = new MapperConfiguration(cfg => cfg.AddMaps(myAssembly));

//方法2:通过程序集名
var configuration = new MapperConfiguration(cfg =>
    cfg.AddMaps(new [] {
        "Foo.UI", // 程序集名称
        "Foo.Core"
    });
);
1.2 命名方式 camelCase/PascalCase
作用:驼峰命名与Pascal命名的兼容。
以下全局配置会映射property_name到PropertyName
builder.Services.AddAutoMapper(cfg =>
{
    cfg.AddProfile<CustomerProfile>();
    // propertyName ------> PropertyName 默认是支持的
    cfg.SourceMemberNamingConvention = new LowerUnderscoreNamingConvention();
    cfg.DestinationMemberNamingConvention = new PascalCaseNamingConvention();
});
或者针对某个profile进行配置(这种方式全局通用):
public class OrganizationProfile : Profile
{
    public OrganizationProfile()
    {
        SourceMemberNamingConvention = new LowerUnderscoreNamingConvention();
        DestinationMemberNamingConvention = new PascalCaseNamingConvention();
        //Put your CreateMap... Etc.. here
    }
}
1.3 映射时针对某些字符进行替换
var configuration = new MapperConfiguration(c =>
{
    c.ReplaceMemberName("Ä", "A");
    c.ReplaceMemberName("í", "i");
    c.ReplaceMemberName("Airlina", "Airline");
});
进行以上配置之后,会自动将Äbc映射到Abc上,将íng映射到ing上,将AirlinaMark映射到AirlineMark上。
1.4 映射时匹配前缀或后缀
var configuration = new MapperConfiguration(cfg => {
    cfg.RecognizePrefixes("frm");
    //cfg.RecongizePostfixes("后缀");
    cfg.CreateMap<Source, Dest>();
});
这样frmValue就可以map到Value上。
Automapper默认匹配了Get前缀,如果不需要可以清除:
cfg.ClearPrefixes();//清除所有前缀
★1.5控制哪些属性和字段能够被映射
使用ShouldMapField和ShouldMapProperty
cfg.ShouldMapField = fi => false;
cfg.ShouldMapProperty = pi =>pi.GetMethod != null && (pi.GetMethod.IsPublic || pi.GetMethod.IsPrivate);
默认所有public的field和property都会被map,也会map private 的setter,但是不会map整个property都是internal/private的属性。
1.6 提前编译
默认是调用的时候才编译映射,但是可以要求AutoMapper提前编译,但是可能会花费点时间:
var configuration = new MapperConfiguration(cfg => {});
configuration.CompileMappings();
2. Projection(映射)
AutoMapper只会映射扁平的类,嵌套的类,继承的类,需要进行手动配置。成员名称不一致时,也要手动配置映射。
AutoMapper默认会自动映射以下类型,并且映射时会先清空dest对应成员的数据:
-
IEnumerable
-
IEnumerable<T>
-
ICollection
-
ICollection<T>
-
IList
-
IList<T>
-
List<T>
-
Arrays
这几个集合之间可以相互映射,如:
mapper.Map<Source[], IEnumerable<Destination>>(sources);
★2.1 手动控制某些成员的映射
ForMember+MapFrom
// Configure AutoMapper
var configuration = new MapperConfiguration(cfg =>
  cfg.CreateMap<CalendarEvent, CalendarEventForm>()
    .ForMember(dest => dest.EventDate, opt => opt.MapFrom(src => src.Date.Date))
    .ForMember(dest => dest.EventHour, opt => opt.MapFrom(src => src.Date.Hour))
    .ForMember(dest => dest.EventMinute, opt => opt.MapFrom(src => src.Date.Minute))
);
将src的Date.Date映射到dest的EventDate成员上
★2.2 嵌套(Nested)类和继承类映射
某些成员可能是一个类,那么这个类也要配置映射。同理一个类的父类也要配置映射。
var config = new MapperConfiguration(cfg => {
    cfg.CreateMap<OuterSource, OuterDest>();
    cfg.CreateMap<InnerSource, InnerDest>();
});
★2.3 映射继承与多态 Include/IncludeBase
假如ChildSource继承ParentSource,ChildDestination继承ParentDestination。并且有这么一个业务,ParentSource src=new ChildSource()需要把src转为ParentDestination。
直接转的话肯定会有member丢失,所以要进行如下配置:
var configuration = new MapperConfiguration(c=> {
    c.CreateMap<ParentSource, ParentDestination>()
         .Include<ChildSource, ChildDestination>();
    c.CreateMap<ChildSource, ChildDestination>();
});
或者也可以这么写:
CreateMap<ParentSource,ParentDestination>();
CreateMap<ChildSource,ChildDestination>()
    .IncludeBase<ParentSource,ParentDestination>();
如果有几十个类都继承了ParentSource和ParentDestination,那么上述两种方法就太啰嗦了,可以这么写:
CreateMap<ParentSource,ParentDestination>().IncludeAllDerived();
CreaetMap<ChildSource,ChildDestination>();
更复杂的用法参考:Mapping-inheritance
2.4 构造函数映射
如果dest构造函数的入参名和src的某个member一致,则不用手动配置,automapper会自动支持:
public class Source{
    public Source(int value) {
        this.Value = value;
    }
   public int Value { get; set; }
}
public class SourceDto {
    public SourceDto(int value) {
        _value = value;
    }
    private int _value;
    public int Value {
        get { return _value; }
    }
}
如果这里构造的入参不叫value而叫value2,则要进行如下配置:
var configuration = new MapperConfiguration(cfg =>
  cfg.CreateMap<Source, SourceDto>()
    .ForCtorParam("value2", opt => opt.MapFrom(src => src.Value))
);
也可以禁用构造函数映射:
var configuration = new MapperConfiguration(cfg => cfg.DisableConstructorMapping());
也可以配置什么情况下不用构造函数映射:
var configuration = new MapperConfiguration(cfg => cfg.ShouldUseConstructor = ci => !ci.IsPrivate);//不匹配私有构造函数
2.5 复杂类映射成扁平类
public class Src
{
    public Customer Customer {get;set;}
    public int GetTotal()
    {
        return 0;
    }
}
public class Customer
{
    public string Name {get;set;}
}
public class Dest
{
    public string CustomerName {get;set;}
    public int Total {get;set;}
}
则src可以自动映射成dest,包括CustomerName和Total字段。这种与手动配置
cfg.CreateMap<Src,Dest>().ForMember(d=>d.CustomerName,opt=>opt.MapFrom(src=>src.Customer.Name))
然后进行映射的方式类似。
映射时AutoMapper发现,src里没有CustomerName这个成员,则会将dest的CustomerName按照PascalCase的命名方式拆分为独立的单词。所以CustomerName会映射到src的Customer.Name。如果想禁用这种自动映射,则调用cfg.DestinationMemberNamingConvention = new ExactMatchNamingConvention();使用精确映射。
如果感觉AutoMapper的这种基于PascalCase命名拆分的自动映射没法满足你的需要,则还可以手动指定某些成员的映射:
class Source
{
    public string Name { get; set; }
    public InnerSource InnerSource { get; set; }
    public OtherInnerSource OtherInnerSource { get; set; }
}
class InnerSource
{
    public string Name { get; set; }
    public string Description { get; set; }
}
class OtherInnerSource
{
    public string Name { get; set; }
    public string Description { get; set; }
    public string Title { get; set; }
}
class Destination
{
    public string Name { get; set; }
    public string Description { get; set; }
    public string Title { get; set; }
}

cfg.CreateMap<Source, Destination>().IncludeMembers(s=>s.InnerSource, s=>s.OtherInnerSource);
cfg.CreateMap<InnerSource, Destination>(MemberList.None);
cfg.CreateMap<OtherInnerSource, Destination>();

var source = new Source { Name = "name", InnerSource = new InnerSource{ Description = "description" }, OtherInnerSource = new OtherInnerSource{ Title = "title",Description="descpripiton2" } };
var destination = mapper.Map<Destination>(source);
destination.Name.ShouldBe("name");
destination.Description.ShouldBe("description");
destination.Title.ShouldBe("title");
IncludeMembers参数的顺序很重要,这也就是dest的Description为“description”而不是“description2”的原因,因为InnerSource的Description属性最先匹配到了Destination的Description属性。
IncludeMembers相当于把子类打平添加到了src里,并进行映射。
★2.6 映射反转(Reverse Mapping)
reverse mapping一般在CreateMap方法或者ForMember等方法之后,相当于src和dest根据你自己的配置可以相互映射,少写一行代码:
cfg.CreateMap<Order, OrderDto>().ReverseMap();
//等同于以下两句
cfg.CreateMap<Order,OrderDto>();
cfg.CreateMap<OrderDto,Order>();
如果还想对reverse map进行自定义(大多数情况下都不需要),则可以使用ForPath:
cfg.CreateMap<Order, OrderDto>()
  .ForMember(d => d.CustomerName, opt => opt.MapFrom(src => src.Customer.Name))
  .ReverseMap()
  .ForPath(s => s.Customer.Name, opt => opt.MapFrom(src => src.CustomerName));
注意:
如果reverse之前定义了一些诸如ForMember之类的约束,这些约束是不会自动reverse的,需要手动配置。以下代码配置了不管从Order映射到OrderDto还是从OrderDto映射到Order,都忽略CustomerName属性。
cfg.CreateMap<Order, OrderDto>()
    .ForMember(d => d.CustomerName, opt => opt.Ignore())
    .ReverseMap()
    .ForMember(d => d.CustomerName, opt => opt.Ignore())
2.7 使用特性映射
(C#称作特性,Java叫注解)
[AutoMap(typeof(Order))]
public class OrderDto {}
等同于CreateMap<Order,OrderDto>()。然后配置的时候用AddMaps方法:
var configuration = new MapperConfiguration(cfg => cfg.AddMaps("MyAssembly"));
var mapper = new Mapper(configuration);
特性里还有如下参数供设置:
ReverseMap (bool)
ConstructUsingServiceLocator (bool)
MaxDepth (int)
PreserveReferences (bool)
DisableCtorValidation (bool)
IncludeAllDerived (bool)
TypeConverter (Type)
TypeConverter (Type)映射注解的更多信息参考:Attribute-mapping
2.8 动态类型Dynamic到普通类型的映射
默认就支持,不用手动CreateMap
★2.9 泛型映射
public class Source<T> {}
public class Destination<T> {}
var configuration = new MapperConfiguration(cfg => cfg.CreateMap(typeof(Source<>), typeof(Destination<>)));
注意:CreateMap不需要传具体的T
★3. 扩展IQueryable(与EF等ORM配合使用)
需要安装nuget包:AutoMapper.EF6
这个功能存在的意义是为了解决一些orm框架返回的是IQueryable类型,使用一般的mapper.Map做转换时,会查询出来整行数据,然后再挑选出来某些字段做映射,会降低性能的问题。解决方法是使用ProjectTo:
public class OrderLine
{
    public int Id { get; set; }
    public int OrderId { get; set; }
    public Item Item { get; set; }
    public decimal Quantity { get; set; }
}
public class Item
{
    public int Id { get; set; }
    public string Name { get; set; }
}
public class OrderLineDTO
{
    public int Id { get; set; }
    public int OrderId { get; set; }
    public string Item { get; set; }
    public decimal Quantity { get; set; }
}

var configuration = new MapperConfiguration(cfg =>
                                            cfg.CreateMap<OrderLine, OrderLineDTO>()
                                            .ForMember(dto => dto.Item, conf => conf.MapFrom(ol => ol.Item.Name)));

public List<OrderLineDTO> GetLinesForOrder(int orderId)
{
    using (var context = new orderEntities())
    {
        return context.OrderLines.Where(ol => ol.OrderId == orderId)
            .ProjectTo<OrderLineDTO>(configuration).ToList();
    }
}
//这样查Item表的时候,只会select name字段。
3.1 枚举映射
大多数情况下都不需要进行此项的配置。考虑以下两个枚举:
public enum Source
{
    Default = 0,
    First = 1,
    Second = 2
}

public enum Destination
{
    Default = 0,
    Second = 2
}
如果想把Source.First映射到Destination.Default上,则需要安装AutoMapper.Extensions.EnumMapping nuget包,然后进行如下配置:
internal class YourProfile : Profile
{
    public YourProfile()
    {
        CreateMap<Source, Destination>()
            .ConvertUsingEnumMapping(opt => opt
                // optional: .MapByValue() or MapByName(), without configuration MapByValue is used
                .MapValue(Source.First, Destination.Default)
            )
            .ReverseMap();
    }
}
默认情况下AutoMapper.Extensions.EnumMapping 会将源枚举里所有的数据根据枚举值或枚举名称映射到目标枚举上。如果找不到且启用了EnumMappingValidation,则会抛出异常。
4.进阶
★4.1 类型转换(可针对所有的maps生效)
当从可空类型与不可空类型相互转换时,当string与int等转换时,就需要自定义类型转换。一般有以下三种方法:
void ConvertUsing(Func<TSource, TDestination> mappingFunction);
void ConvertUsing(ITypeConverter<TSource, TDestination> converter);
void ConvertUsing<TTypeConverter>() where TTypeConverter : ITypeConverter<TSource, TDestination>;
简单情景下使用第一种,复杂情景下自定义类去实现ITypeConverter接口。综合举例如下:
public class Source
{
    public string Value1 { get; set; }
    public string Value2 { get; set; }
    public string Value3 { get; set; }
}
public class Destination
{
    public int Value1 { get; set; }
    public DateTime Value2 { get; set; }
    public Type Value3 { get; set; }
}
public void Example()
{
    var configuration = new MapperConfiguration(cfg => {
        cfg.CreateMap<string, int>().ConvertUsing(s => Convert.ToInt32(s));
        cfg.CreateMap<string, DateTime>().ConvertUsing(new DateTimeTypeConverter());
        cfg.CreateMap<string, Type>().ConvertUsing<TypeTypeConverter>();
        cfg.CreateMap<Source, Destination>();
    });
    configuration.AssertConfigurationIsValid();
    var source = new Source
    {
        Value1 = "5",
        Value2 = "01/01/2000",
        Value3 = "AutoMapperSamples.GlobalTypeConverters.GlobalTypeConverters+Destination"
    };

    Destination result = mapper.Map<Source, Destination>(source);
    result.Value3.ShouldEqual(typeof(Destination));
}

public class DateTimeTypeConverter : ITypeConverter<string, DateTime>
{
    public DateTime Convert(string source, DateTime destination, ResolutionContext context)
    {
        return System.Convert.ToDateTime(source);
    }
}

public class TypeTypeConverter : ITypeConverter<string, Type>
{
    public Type Convert(string source, Type destination, ResolutionContext context)
    {
        return Assembly.GetExecutingAssembly().GetType(source);
    }
}
4.2 通过MapFrom自定义值解析(Value Resolve )
针对的是某一个map的某一个member,有3种写法:
MapFrom<TValueResolver>
    MapFrom(typeof(CustomValueResolver))
    MapFrom(new CustomResolver())
    public class Source
    {
        public int Value1 { get; set; }
        public int Value2 { get; set; }
    }
public class Destination
{
    public int Total { get; set; }
}
public class CustomResolver : IValueResolver<Source, Destination, int>
{
    public int Resolve(Source source, Destination destination, int member, ResolutionContext context)
    {
        //可以添加其他逻辑
        return source.Value1 + source.Value2;
    }
}
var configuration = new MapperConfiguration(cfg =>
                                            cfg.CreateMap<Source, Destination>()
                                            .ForMember(dest => dest.Total, opt => opt.MapFrom<CustomResolver>()));
configuration.AssertConfigurationIsValid();

var source = new Source
{
    Value1 = 5,
    Value2 = 7
};

var result = mapper.Map<Source, Destination>(source);
result.Total.ShouldEqual(12);
这种与一般的MapFrom(src=>src.Value1+src.Value2)区别是可以添加更加复杂的逻辑。
如果想要一个更通用的CustomResolver,不管src和dest是什么类型的都能用,则可以实现IValueResolver<object,object,int>接口。但是这个resolver里没法获取dest的value,如果有这种需要的话,可以实现ImemberValueResolver接口,进行更细粒度的控制。
4.3 映射时传入数据
只支持传入键值对格式的数据
cfg.CreateMap<Source, Dest>()
    .ForMember(dest => dest.Foo, opt => opt.MapFrom((src, dest, destMember, context) => context.Items["Foo"]));
mapper.Map<Source, Dest>(src, opt => opt.Items["Foo"] = "Bar");
4.4 条件映射 (Conditions和Preconditions)
符合某些条件时才映射
var configuration = new MapperConfiguration(cfg => {
    cfg.CreateMap<Foo,Bar>()
        .ForMember(dest => dest.baz, opt => opt.Condition(src => (src.baz >= 0)));
});
var configuration = new MapperConfiguration(cfg => {
    cfg.CreateMap<Foo,Bar>()
        .ForMember(dest => dest.baz, opt => {
            opt.PreCondition(src => (src.baz >= 0));
            opt.MapFrom(src => {
                //有了Precondition,这里的操作有可能不执行,节省资源
            });
        });
});
Condition()方法会在MapFrom方法后执行,而Preconditions会在MapFrom前执行
4.5 空值替换
作用:如果src为null的话,就给dest一个默认值
var config = new MapperConfiguration(cfg => cfg.CreateMap<Source, Dest>()
                                     .ForMember(destination => destination.Value, opt => opt.NullSubstitute("Other Value")));
var source = new Source { Value = null };
var mapper = config.CreateMapper();
var dest = mapper.Map<Source, Dest>(source);

dest.Value.ShouldEqual("Other Value");

source.Value = "Not null";
dest = mapper.Map<Source, Dest>(source);
dest.Value.ShouldEqual("Not null");
4.6 ValueTransformers 映射点缀(自己起的名字)
作用:在赋值的时候,我想额外在值上加点东西
var configuration = new MapperConfiguration(cfg => {
    cfg.ValueTransformers.Add<string>(val => val + "!!!");
});

var source = new Source { Value = "Hello" };
var dest = mapper.Map<Dest>(source);

dest.Value.ShouldBe("Hello!!!");
可以应用到全局、某个Profile、某个Map或某个member。
4.7 映射前或映射后干点额外的事 MapAction
可以提前配置:
var configuration = new MapperConfiguration(cfg => {
    cfg.CreateMap<Source, Dest>()
        .BeforeMap((src, dest) => src.Value = src.Value + 10)
        .AfterMap((src, dest) => dest.Name = "John");
});
也可以在map时进行配置:
int i = 10;
mapper.Map<Source, Dest>(src, opt => {
    opt.BeforeMap((src, dest) => src.Value = src.Value + i);
    opt.AfterMap((src, dest) => dest.Name = HttpContext.Current.Identity.Name);
});
MapAction也可以创建全局的。
详细用法:Before-and-after-map-actions
5.AutoMapper的一些默认行为
当映射集合时,如果src的成员为null,则dest的成员会new一个默认值,而不是直接复制为null。如果真要映映射为null,则如下修改:
var configuration = new MapperConfiguration(cfg => {
    cfg.AllowNullCollections = true;
    cfg.CreateMap<Source, Destination>();
});
这个功能可以配置成全局的、某个profile的或某个member的。
CreateMap<SRC,DEST>,创建映射时前后书写顺序不重要。 映射集合时,会把dest的数据给清除掉,如果不想要这么做,参考github项目AutoMapper.Collection。 假如某个成员的名称为NameAAA,则名为NameAAA的field,与名为NameAAA的property,与名为GetNameAAA的方法,三者之间可以自动相互映射。 类型转换:AutoMapper支持.NET Framework自带的一些基本的类型转换。所以当src的member是非string类型,dest的是string类型时,映射的时候AutoMapper会调用ToString方法。对于那些不支持的类型转换,需要自己定义Type Converter。
6.常见问题
6.1 某一个功能用ITypeConverter、IValueConverter、IValueResolver、IMemberValueResover好像都可以实现,我应该用哪个? 这几个的释义如下:
Type converter = Func<TSource, TDestination, TDestination>
Value resolver = Func<TSource, TDestination, TDestinationMember>
Member value resolver = Func<TSource, TDestination, TSourceMember, TDestinationMember>
Value converter = Func<TSourceMember, TDestinationMember>
这四个的使用方式都是使用ConvertUsing()方法,区别是type converter 是针对全局的,其它三个是针对某个member的。 入参出参也不一样。
6.2 什么时候需要手动调用CreateMap<Src,Dest>()? 虽然AutoMapper的官方文档,一直都写着在映射之前要先用CreateMap方法进行配置。但在实际使用过程中,我发现并不是任何时候都需要先配置才能用。
假如dest里的每一个member(属性、字段、Get方法)都能在src里找得到,则不需要额外的配置,即下属代码也可以正常运行:
class Person
{
    public string Name { get; set; }
    public int Age { get; set; }
}
class Person2
{
   public string Name { get; set; }
   public int? Age { get; set; }
   public DateTime BirthTime { get; set; }
}
public class NormalProfile : Profile
{
    public NormalProfile()
    {
       //CreateMap<Person2, Person>();//
    }
}

var cfg = new MapperConfiguration(c =>
{
    c.AddProfile<NormalProfile>();
});
//cfg.AssertConfigurationIsValid();
var mapper = cfg.CreateMapper();
var s3 = mapper.Map<Person>(new Person2 { Name = "Person2" });
6.3 ReverseMap到底能Reverse哪些东西? 可以Reverse像PascalCase的命名方式拆分的member,就像CreateMap可以自动处理Customer.Name与CustomerName的映射一样。即:CreateMap不需要额外配置正向就能映射的,那 ReverseMap也可以自动反向映射。 opt.MapForm()操作可以被reverse,如CreateMap<Person2, Person>().ForMember(dest => dest.Name2, opt => opt.MapFrom(src => src.Name)).ReverseMap();,当从Person映射到Person2的时候,Name2也可以直接映射到Name上。 不支持opt.Ignore()反向映射,即CreateMap<Person2, Person>().ForMember(dest => dest.Name, opt => opt.Ignore()).ReverseMap()支持Person2->Person时,忽略Name属性,但是从Person->Person2时,不会忽略,如果要忽略的话,还需要再加上.ForMember(dest => dest.Name, opt => opt.Ignore())。
6.4 映射时如何跳过某些成员? 使用CreateMap<src,dest>().ForMember(dest=>dest.AAA,opt=>opt.Ignore()),跳过成员AAA的映射。 使用ShouldMapField委托跳过某些字段,使用ShouldMapProperty委托跳过某些属性。
public class NormalProfile : Profile
{
    public NormalProfile()
    {
        ShouldMapField = fi => false;
        CreateMap<Person2, Person>().ReverseMap();
    }
}
或者

var cfg = new MapperConfiguration(c =>
{
    c.AddProfile<XXXXProfile>();
    c.ShouldMapField = fi => false;
});
3. Html 辅助标签
1、使用HTML辅助方法输出超链接
1.Html.ActionLink
@Html.ActionLink("链接文字","ActionName") 这是最基本的用法,要跳转的控制器为本视图所在的控制器。链接文字不可以为空字符串、空白字符串或null值,否则会抛出The Value cannot be null or empty的异常
@Html.ActionLink("链接文字","ActionName","ControllerName") 指定链接文字,动作,控制器
@Html.ActionLink("链接文字","ActionName",new{id=123,page=5}) 当需要设定额外的RouteValue时,可以在第三个参数传入object类型的数据
@Html.ActionLink("链接文字","ActionName",null,new{@class="btnLink"}) 当需要传入超链接额外的HTML属性时,可以将参数加载到第四个参数上。
@Html.ActionLink("链接文字","ActionName","ControllerName", null,new{@class="btnLink"}) 5个参数
2.Html.RouteLink
其用法与Html.ActionLink非常相似,但是RouteLink只可以接收路由名称,而不能接收控制器名称和操作名称
@Html.ActionLink("Link Text","AnotherAction")
@Html.RouteLink("Link Text",new {action = "AnotherAction"})
2、使用HTML辅助方法输出表单
常用表单输入元素
Html.BeginForm(),输出<form>标签
Html.EndForm(),输出</form>标签
Html.Label(),输出<label>标签
Html.TextBox(),输出<input type="text">标签
Html.TextArea(),输出<textarea>标签
Html.Password(),输出<input type="password">标签
Html.CheckBox(),输出<input type="checkbox">标签
Html.RadionButton(),输出<input type="radio">标签
Html.DropDownList(),输出<select>标签。
Html.ListBox(),输出<select multiple>标签
Html.Hidden(),输出<input type="hidden">标签
Html.ValidationSummary(),输出表单验证失败时的错误信息摘要
1.Html.BeginForm
@using (Html.BeginForm("Search" , "Home" , FormMethod.Get , new{ target = "_blank" })){
    <input type="text" name="q" />
    <input type="submit" value="Search" />
}
本辅助方法主要是用来产生<form>标签,可以通过using语句来使用。也可以配合Html.EndForm()使用以产生适当的</form>表单结尾
a.使用using语法产生表单标签
b.使用Html.BeginForm辅助方法输出的表单预设输出的method属性是POST,如果想指定为GET的话,可以输入第三个参数
c.每一个HTML辅助方法都包含htmlAttrebutes参数。参数的类型是IDictionary<string,object>,辅助方法利用字典条目(在对象参数的情形下,就是对象的属性名称和属性值)创建辅助方法生成元素的的特性。
当属性名称遇到C#语言中的保留关键字时,要加一个@符号作为前缀; 带有连字符的C#属性名是无效的,可以用下划线替代。
2.Html.Label
@Html.Label("Username","账户")
@Html.TextBox("Username")
<label for="Username">账户</label>
<input id="Username" name="Username" type="text" value="">
<label>专为input元素服务,为其定义标记。for属性规定label与哪个表单元素绑定,label和表单控件绑定方式有两种:
1.将表单控件作为label的内容,这就是隐式绑定,此时不需要for属性,绑定的控件也不需要id属性
2.为<label>标签下的for属性命名一个目标表单的id,这就是显示绑定。
给<label>加了for属性绑定了input控件后,可以提高鼠标用户的用户体验。如果在label元素内点击文本,就会触发此控件。就是说,当用户渲染该标签时,浏览器就会自动将焦点转到和标签相关的表单控件上。
3.Html.TextBox 和 Html.TextArea
Html.TextBox的重载如下:
@Html.TextBox("Username") id,name的值为Username
@Html.TextBox("Username","will") id,name的值为Username,value的值为will
@Html.TextBox("Username","will",new{ size=32 }) id,name的值为Username,value的值为will,html属性值size=32
如果要传递多个html属性值,并且在多处使用,可以按照下面的例子来做
public ActionResult HelperSample1()
{
    IDictionary<string, object> attr = new Dictionary<string, object>();
    attr.Add("size", "32");
    attr.Add("style", "color:red;");
    ViewData["Dictionary"] = attr;
    return View();
}

@{
    var htmlAttribute = ViewData["Dictionary"] as IDictionary<string, object>;
}

@Html.TextBox("name","Value",htmlAttribute)<br />

    @Html.Password("password","Value",htmlAttribute)<br />

    @Html.TextBox("email","Value",htmlAttribute)<br />

    @Html.TextBox("tel","Value",htmlAttribute)<br />

    @Html.Hidden("id","1")
使用TextArea方法渲染一个能够显示多行文本的<textarea>元素
@Html.TextArea("text","hello world")
可以通过指定显示的行数和列数来控制文本区域的大小
@Html.TextArea("text","hello world",10,80,null) 最后一项为指定的HTML特性
4.Html.Hidden 、Html.Password 、Html.RadioButton 、Html.CheckBox
Html.Hidden辅助方法用于渲染隐藏的输入元素 @Html.Hidden("hidetext","1")
<input id = "hidetext" name = "hidetext" type = "hidden" value = "1" />
Html.Password辅助方法用于渲染密码字段,不保留提交值,显示密码掩码 @Html.Password("UserPassword")
<input id="UserPassword" name="UserPassword" type ="password" value = "" />
密码框的明密文(显示和隐藏) :
$("#id").prop("type","text") $("#id").prop("type","password")
Html.RadioButton一般组合使用,为用户的单项选择提供一组可选项
@Html.RadioButton("color","red")
@Html.RadioButton("color","blue",true)
@Html.RadioButton("color","green")
<input id="color" name="color" type="radio" value="red">
<input checked="checked" id="color" name="color" type="radio" value="blue">
<input id="color" name="color" type="radio" value="green">
Html.CheckBox辅助方法是唯一一个渲染两个输入元素的辅助方法
<input id="test" name="test" type="checkbox" value="true">
<input name="test" type="hidden" value="false">
5.Html.DropDownList 和 Html.ListBox
DropDownList和Html.ListBox辅助方法都返回一个<select>元素,DropDownList允许进行单项选择,而ListBox支持多项选择(在要渲染的标记中,把multiple特性的值设置为multiple)
1)不读取数据库的下拉列表
public ActionResult HelperSample2()

{

    List<SelectListItem> listItem = new List<SelectListItem>();

    listItem.Add(new SelectListItem { Text = "是", Value = "1" });

    listItem.Add(new SelectListItem { Text = "否", Value = "0" });

    ViewData["List"] = new SelectList(listItem, "Value", "Text", "");

    return View();

}
@Html.DropDownList("List",ViewData["List"] as SelectList,"请选择") 参数依次为下拉列表的名字,指定的列表项,默认选择项的值
2)数据来自数据库的下拉列表
public ActionResult Index()
{
    var list = new SelectList(db.Students, "Id", "Age", "3"); //参数依次为数据集合,数据值,数据文本,选中项的值

    ViewBag.List = list;
    return View();
}

@Html.DropDownList("List")
6.Html.ValidationSummary
ValidationSummary辅助方法配合数据注解进行验证。(等到讲模型校验时再详讲)
3、强类型辅助方法
基本上,属于强类型的辅助方法命名方式皆为“原先的名称最后加上For”,使用强类型辅助方法,在View页面的最上方一定要用@model定义出这个View页面的参考数据模型,如果没有生命就无法正常使用强类型辅助方法。
Html.LabelFor(),输出<label>标签,显示字段的名字。
Html.TextBoxFor()
Html.TextAreaFor()
Html.PasswordFor()
Html.CheckBoxFor()
Html.RadioButtonFor()
Html.DropDownListFor(),输出<select>标签。
Html.ListBoxFor(),输出<select multiple>标签。
Html.HiddenFor() ,生成HTML窗体的隐藏域。
Html.DisplayNameFor(),显示数据模型在Metadata定义的显示名称。
Html.DisplayTextFor(),显示数据模型的文字资料。
Html.ValidationMessageFor(),显示数据模型当输入验证失败时显示的错误信息。
Html.EditorFor(),用来输出表单域可编辑文本框。
4、使用HTML辅助方法载入分部视图
使用Html.Partial载入分布视图
@Html.Partial("Page")
@Html.Partial("Page",Model)
@Html.Partial("Page",ViewData["Model"])
@Html.Partial("Page",Model,ViewData["Model"])
RenderPartial辅助方法与Partial非常相似,但RenderPartial不是返回字符串,而是直接写入响应输出流。出于这个原因,必须把RenderPartial放入代码块中,而不能放在代码表达式中,为了说明这一点,下面两行代码向输出流写入相同的内容:
@{Html.RenderPartial("Page");}
@Html.Partial("Page")
一般情况下,因为Partial相对于RenderPartial来说更方便,所以应该选择Partial。然而,RenderPartial拥有较好的性能,因为它是直接写入响应流的,但这种性能优势需要大量的使用才能看出来。
使用Html.Action辅助方法,从控制器载入分布视图
Action和RenderAction类似于Partial和RenderPartial辅助方法。Partial辅助方法通常在单独的文件中应用视图标记来帮助视图渲染视图模型的一部分。另一方面,Action执行单独的控制器操作,并显示结果。Action提供了更多的灵活性和重用性,因为控制器操作可以建立不同的模型,可以利用单独的控制器上下文。
public ActionResult GetPartialView()
{
    return PartialView();
}
利用Controller类型中的PartialView辅助方法来载入分布视图,而这种载入方式与用View辅助方法唯一的差别,仅在于它不会套用母版页面,其它则完全相同。
@Html.Action("GetPartialView");
通过Html.Action与Html.Partial载入分部视图结果是一样的,但载入的过程却差别很大。若使用Html.Partial载入分部视图是通过HtmlHelper直接读取*.cshtml文件,直接执行该视图并取得结果。若使用Html.Action的话,则会通过HtmlHelper对IIS再进行一次处理要求(通过Server.Execute方法),因此,使用Html.Action会重新执行一遍Controller的生命周期
4. 模型校验
无论你编写什么样的网页程序,都需要对用户的数据进行验证,以确数据的有效性和完整性。
ASP.NET MVC3允许你采用一种被称之为“数据注释”的方式来进行数据验证,这种验证包含了客户端浏览器
和服务器端的双重验证。或许你会问为什么要进行两次验证?首先,客户端验证能够直接响应客户,减少了服务
器压力的同时还提高了用户体验,但是你永远不能信任来自客户端的信息(用户可以关闭浏览器的脚本功能,
让你的js验证彻底不起作用),所以服务器端验证也是必须的。如下图所示:

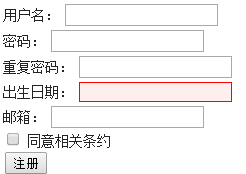
1,常规验证(必填字段、字符串长度、正则表达式验证、范围验证<数值、日期>)
先看一个添加界面的反馈的错误信息

图片仅供参考
模型校验分类
[Display(Name = "账号")]
[Required(ErrorMessage = "请输入账号")]
public String? Account { get; set; }

[Display(Name = "密码")]
[DataType(DataType.Password)]
[Required(ErrorMessage = "请输入密码")]
public String? Password { get; set; }

[Display(Name = "确认密码")]
[DataType(DataType.Password)]
[Compare("Password",ErrorMessage = "两次输入的密码不一致")]
public String? ConfirmPassword { get; set; }

[Display(Name = "爱好")]
public String[]? Hobby { get; set; }

[Display(Name = "性别")]
public bool? Gender { get; set; }

[Display(Name = "祖籍")]
public int Province { get; set; }

[Display(Name = "生日")]
[DataType(DataType.Date)]
[Required(ErrorMessage = "请选择你的生日")]
public DateTime Birthday { get; set; }

[Display(Name = "简介")]
public string? Description { get; set; }

public OrderState OrderState { get; set; }


public enum OrderState{
    WaitPay,
    WaitSend,
    WaitReceive,
    Finish,
    Cancel
}


Required(必填)

[Display(Name = "昵称"),Required(ErrorMessage = "请您输入昵称")]

public string NickName { get; set; }
StringLength(字段串长度)

[Display(Name = "密码"),StringLength(16,MinimumLength = 6,ErrorMessage = "密码长度6-16位")]

public string  Password { get; set; }
ErrorMessage:需要显示的错误消息,如:密码长度6-16位
maxinumLength:最大长度
MininumLength:最小长度
-
RegularExpression正则校验
pattern:正则表达式
ErrorMessage:需要显示的错误消息,如:邮箱格式错误
[Display(Name = "邮箱"),Required(ErrorMessage = "请输入邮箱"),RegularExpression(@"[\w-]+(\.[\w-]+)*@[\w-]+(\.[\w-]+)+", ErrorMessage = "请输入正确的邮箱地址")]

public string Email { get; set; }
Mvc 框架提供了专门用于做邮箱校验的类:
EmailAddress
-
Compare 比较校验
ErrorMessage:需要显示的错误消息,如:两次输入的密码不一致
otherProperty:需要对比的属性,如:Password
[StringLength(16,MinimumLength = 6,ErrorMessage = "密码长度6-16位")]
public string  Password { get; set; }

[Compare(otherProperty = "Password",ErrorMessage="确认密码不一致" )]
public string ConfirmPwd { get; set; }
-
Range 范围约束
[Display(Name = "年龄"),Range(15,35,ErrorMessage = "年龄只能是15-35周岁")]
public int Age { get; set; }
ErrorMessage:需要显示的错误消息,如:年龄只能为15-35岁 maxinum:最大数值 mininum:最小数值
校验错误信息
[HttpPost]
public ActionResult Index(Register reg)
{
    // 因为我们已经做了模型校验了,所以这些判断我们都不需要加了

    /*if (String.IsNullOrEmpty(reg.UserName))
    {
        ModelState.AddModelError("UserName", "用户名不能为空");
    }
    else if (reg.UserName.Length < 6)
    {
        ModelState.AddModelError("UserName", "用户名长度不能小于6位");
    }
    if (ModelState.IsValidField("BirthDate") && reg.BirthDate > DateTime.Now)
    {
        ModelState.AddModelError("BirthDate", "生日不能为将来的时间");
    }*/


    if (ModelState.IsValid) // 只有当所有的表单都校验通过了,IsValid 才为true
    {
        //保存数据
    }
    return View();
}
ModelState.IsValid :只有当所有的表单都校验通过了,IsValid 才为true
上面我们简单的判断了用户名是否为空,长度是否小于6,以及出生日期是否填写的为将来的日期,接着我们还要在Index视图中加入@Html.ValidationSummary(),这样我们才能够看到最后的输出的错误信息,编译然后不输入任何内容点击注册之后将会出现下面的情况:
我们会发现表单压根就提交不了,这是因为客户端验证在工作。获取读者会很奇怪这节只是常规验证,这个是因为出生日期的格式是DateTime是不能为NULL的,而ASP.NET MVC默认情况下就已经为我们做好了。随便输入123到出生日期然后点击注册,页面会反馈下面的错误信息:
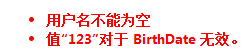
第一个信息就是我们在控制器中通过if判断语句加进去的,而第二个似乎你会困惑是怎么回事,这是因为模型绑定器中会为我们进行简单的验证,比如日期不能为空,并且日期的格式要正确,这个都是默认的行为。我们可以尝试在用户名中输入123,同时出生日期输入2020/1/1,点击注册,这时候的错误信息都是我们添加的了:

读者使用过很多系统,错误信息基本上都是显示在对应的输入框的右边,在ASP.NET MVC中一样可以判断,下面我们修改Index视图:
<div>
    用户名:
    @Html.EditorFor(m => m.UserName)
    @Html.ValidationMessageFor(m => m.UserName)
</div>
<div>
    出生日期:
    @Html.EditorFor(m => m.BirthDate)
    @Html.ValidationMessageFor(m => m.BirthDate)
</div>
这个时候我们在重新提交,错误信息就到右边了。但是笔者还不打算结束掉这节,我如果限制用户名不能为100000怎么办呢?或许读者马上就能写出来,但是这个是模型级的错误,并不是针对这个字段,所以我们在Home控制器的Index方法(响应Post的那个)中继续追加:
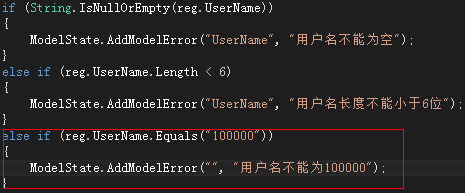
接着修改Index视图:

特别需要注意:
ModelState.AddModelError() 左边一定要是空键值名,才能在@Html.ValidationSumary() 区域中显示错误
然后重新编译,用户名输入100000就可以看到下面的结果:
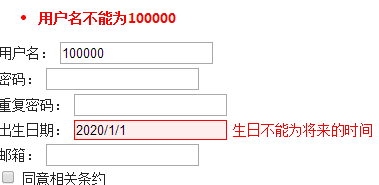
这样我们就可以结束这节了。
5. 模型绑定
<a href="product/detail/3">详情</a> // 路由传值
<a href="product/detail?id=3">详情</a> <!--url方式传值-->
public IActionResult Detail(int id) // id=3
{

}
上述案件就是最简单的一种模型绑定(Model-Binding)。
Model Binder
-
Form 表单值
-
路由的值
-
QueryString的值
1. Model 自动绑定
视图标签中name属性与Model对象中的属性如果名称一样,则会自动绑定(Model-Binding)。Model-Binding底层原理还是运用反射来实现。
<form asp-action="Submit" asp-controller="Product">
    <div class="form-group row">
        <label for="Id">主键:</label>
        <input class="form-control" name="Id" id="Id"/>
    </div>
    <div class="form-group row">
        <label for="ProductName">商品名称</label>
        <input class="form-control" id="ProductName" name="ProductName"/>
    </div>
    <div class="form-group">
        <label for="ProductName">商品名称</label>
        <input class="form-control" id="Price" name="Price"/>
    </div>
    <div class="form-group">
        <label for="ProductCategory">分类名称</label>
        @Html.TextBoxFor(p=>p.ProductCategory.CategoryName,new{@class="form-control"})
    </div>
    <div class="form-group">
        <input type="submit" class="btn btn-primary" value="提交"/>
    </div>
</form>
public class Category
{
    public int Id { get; set;}
    public String CategoryName { get;set;}
}
public class ProductInput
{
    public int Id { get; set;}
    public String ProductName { get;set;}
    public decimal Price { get;set;}
    public Category ProductCategory { get; set; }
}

public IActionResult Create()
{
    return View();
}

[HttpPost]
public IActionResult Submit(ProductInput input)
{
    return Ok("添加成功");
}
2. 使用特性绑定
BindAttribute
表示有选择性的绑定
-
绑定所有属性
[HttpPost]
public IActionResult Submit([Bind] ProductInput input)
{
    return Ok("添加成功");
}
绑定部分属性
[HttpPost]
public IActionResult Submit([Bind("ProductName","Id")] ProductInput input)
{
    return Ok("添加成功");
}
此时只有ProductName 与 Id属性能绑定成功。
BindNeverAttrubte
作用在Model属性上,表示此属性不应该绑定上。
public class ProductInput
{
    [BindNever] // 表示Id永远不会被绑定上
    public int Id { get; set;}
    public String ProductName { get;set;}
    public String Price { get;set;}
    public Category ProductCategory { get; set; }
}
BindRequeiredAttribute
作用在Model属性上,与 BindNever 刚好相反,它表示某属性必须要被绑定
public class ProductInput
{
    [BindNever] // 表示Id永远不会被绑定上
    public int Id { get; set;}
    public String ProductName { get;set;}
    [BindRequired]
    public decimal Price { get;set;}
    public Category ProductCategory { get; set; }
}
3. 指定Binding来源
默认情况下,模型绑定以键值对的形式从 HTTP 请求中的以下源中获取数据:
-
表单域
-
请求正文(对于[具有
-
路由数据
-
查询字符串参数
-
上传的文件
对于每个目标参数或属性,按照之前列表中指示的顺序扫描源。 有几个例外情况:
-
路由数据和查询字符串值仅用于简单类型。
-
上传的文件仅绑定到实现
IFormFile或IEnumerable的目标类型。
如果默认源不正确,请使用下列属性之一来指定源:
-
FromQuery- 从查询字符串中获取值。Request.QueryString
-
FromRoute - 从路由数据中获取值。Request.RouteValues
-
FromForm - 从发布的表单域中获取值。Request.Form
-
FromBody - 从请求正文中获取值。 Request.Body
-
FromHeader - 从 HTTP 标头中获取值。 Rqueset.Headers
特别需要注意:
FromQuery,FromForm,FromBody ,FromHeader ,FromRoute 不要将他们 应用于每个操作方法的多个参数 。如果有多个参数,请将多个参数封装到一个对象中去接收。
FromQuery
指定应使用请求查询字符串绑定参数或属性。
-
Name : 查询字符串字段的名称。
public class ProductQuery
{
    public String Name { get; set;}
    public int StartPrice { get; set;}
    public int EndPrice { get; set;}
}
// 商品查询方法
public IActionResult Search([FromQUery] ProductQuery condition)
{

}
FromBody
一般用于WebApi中。客户端如果是提交json数据时候建议都加上[FromBody]。
如果客户端提交的数据Content-Type如果不为application/json时,会报错,如果要解决报错,需要在接口上加上[FromForm]。
将 [FromBody] 特性应用于一个参数,以便从一个 HTTP 请求的正文填充其属性。
将 [FromBody] 应用于复杂类型参数时,应用于其属性的任何绑定源属性都将被忽略。 例如,以下 Create 操作指定从正文填充其 pet 参数:
public ActionResult<Pet> Create([FromBody] Pet pet)
Pet 类指定从查询字符串参数填充其 Breed 属性:
public class Pet
{
    public string Name { get; set; } = null!;

    [FromQuery] // Attribute is ignored.
    public string Breed { get; set; } = null!;
}
在上面的示例中:
-
[FromQuery]特性被忽略。 -
Breed属性未从查询字符串参数进行填充。
输入格式化程序只读取正文,不了解绑定源特性。 如果在正文中找到合适的值,则使用该值填充 Breed 属性。
FormForm
指定在请求正文中使用表单数据绑定参数或属性。
[HttpPost]
public IActionResult Submit([FromForm] ProductInput input)
{

    return Ok("添加成功");
}
4. 文件上传-IFormFile
表示使用 HttpRequest 发送的文件。 ASP.NET Core 支持使用缓冲的模型绑定(针对较小文件)和无缓冲的流式传输(针对较大文件)上传一个或多个文件。
属性
| 获取上传文件的原始 Content-Disposition 标头。 | |
|---|---|
| 获取上传文件的原始 Content-Type 标头。 | |
| 从 Content-Disposition 标头中获取文件名。 | |
| 获取上传文件的标头字典。 | |
| 获取文件长度(以字节为单位)。 | |
| 从 Content-Disposition 标头中获取窗体字段名称。 |
方法
将上传的文件的内容复制到 target 流中。 | |
|---|---|
异步将上传的文件的内容复制到 target 流。 |
|
| 打开用于读取上传文件的请求流。 |
上传前需要注意的知识点:
-
<input type="file" name="HeadPhoto"/> 这个name 一定后端接收的参数名(或者属性名)一致
-
enctype 表示表单传输加密类型:
解析:关于HTML <form> 标签的 enctype 属性 application/x-www-form-urlencoded:在发送前编码所有字符(默认) multipart/form-data:不对字符编码,或在使用包含文件上传控件的表单时,必须使用该值 text/plain:空格转换为 "+" 加号,但不对特殊字符编码。 enctype:规定了form表单在发送到服务器时候编码方式,有如下的三个值。 1、application/x-www-form-urlencoded。默认的编码方式。但是在用文本的传输和MP3等大型文件的时候,使用这种编码就显得 效率低下。 2、multipart/form-data 。 指定传输数据为二进制类型,比如图片、mp3、文件。 3、text/plain。纯文体的传输。空格转换为 “+” 加号,但不对特殊字符编码
安全注意事项
向用户提供向服务器上传文件的功能时,必须格外小心。 攻击者可能会尝试执行以下操作:
-
执行
-
上传病毒或恶意软件。
-
以其他方式破坏网络和服务器。
降低成功攻击可能性的安全措施如下:
-
将文件上传到专用文件上传区域,最好是非系统驱动器。 使用专用位置便于对上传的文件实施安全限制。 禁用对文件上传位置的执行权限。†
-
请勿将上传的文件保存在与应用相同的目录树中。†
-
使用应用确定的安全的文件名。 请勿使用用户提供的文件名或上传的文件的不受信任的文件名。† 当显示不受信任的文件名时 HTML 会对它进行编码。 例如,记录文件名或在 UI 中显示(Razor 自动对输出进行 HTML 编码)。
-
按照应用的设计规范,仅允许已批准的文件扩展名。†
-
验证是否对服务器执行客户端检查。 客户端检查易于规避。
-
检查已上传文件的大小。 设置一个大小上限以防止上传大型文件。†
-
文件不应该被具有相同名称的上传文件覆盖时,先在数据库或物理存储上检查文件名,然后再上传文件。
-
先对上传的内容运行病毒/恶意软件扫描程序,然后再存储文件。
FormOptions
启用完整请求正文缓冲。 如果多个组件需要读取原始流,请使用此方法。 默认值为 false。 | |
|---|---|
| 如果 | |
| 单个键长度的限制。 包含超出此限制的键的窗体将在分析时引发 | |
| 如果 | |
| 每个上传文件正文的长度限制。 超出此限制的窗体节将在分析时引发 | |
| 边界标识符长度的限制。 具有超出此限制的边界的窗体将在分析时引发 | |
| 每个上传文件允许的标头数限制。 将合并同名的标头。 超出此限制的窗体节将在分析时引发 | |
| 每个上传文件中标头键和值的总长度限制。 超出此限制的窗体节将在分析时引发 | |
| 允许的表单条目数的限制。 超出此限制的窗体会在分析时引发 | |
| 单个窗体值的长度限制。 包含超出此限制的值的窗体将在分析时引发 |
1. 单文件上传
<form enctype="multipart/form-data" method="post" action="/student/add">
    <div>
        头像:<input type="file" name="HeadPhoto"/>
    </div>

    <input type="submit" value="提交"/>
</form>
private readonly IWebHostEnvironment _hostEnvironment;

public StudentController(IWebHostEnvironment hostEnvironment)
{
    _hostEnvironment = hostEnvironment;
}

public IActionResult Add()
{
    return View();
}

[HttpPost]
public IActionResult Add(IFormFile headPhoto)
{
    // 获取文件后缀名
    var extension = Path.GetExtension(headPhoto.FileName);
    // 为文件重命名,防止文件重名
    var fileName = DateTime.Now.ToString("yyyyMMddHHmmssfff")+"."+extension ;

    using FileStream fileStream = new FileStream(
        // 拼接上传路径(upload文件夹必须事先存在)
        Path.Combine(_hostEnvironment.ContentRootPath, "upload", fileName),
        FileMode.Create, FileAccess.Write);
    // 上传
    headPhoto.CopyTo(fileStream);

    return Content("上传成功");
}
2. 多文件上传
<form enctype="multipart/form-data" method="post" action="/student/add">
    <div>
        头像:<input type="file" name="HeadPhoto" multiple="multiple"/>
    </div>

    <input type="submit" value="提交"/>
</form>


[HttpPost]
public IActionResult Add(IFormFile[] headPhoto)
{
    foreach (var formFile in headPhoto)
    {
        // 获取文件后缀名
        var extension = Path.GetExtension(formFile.FileName);
        // 为文件重命名,防止文件重名
        var fileName = DateTime.Now.ToString("yyyyMMddHHmmssfff")+"."+extension ;

        using FileStream fileStream = new FileStream(
            // 拼接上传路径(upload文件夹必须事先存在)
            Path.Combine(_hostEnvironment.ContentRootPath, "upload", fileName),
            FileMode.Create, FileAccess.Write);

        formFile.CopyTo(fileStream);
    }

    return Content("上传成功");
}
3. 组合其他表单信息
<form enctype="multipart/form-data" method="post" action="/student/add">
    <div>
        姓名:<input asp-for="Name"/>
    </div>
    <div>
        头像:<input type="file" name="HeadPhoto"/>
    </div>

    <input type="submit" value="提交"/>
</form>
public class Student
{
    public int Id { get; set; }
    public string? Name { get; set; }
    // 需要上传的文件
    public IFormFile? HeadPhoto { get; set; }
}
// 使用Student对象接收
[HttpPost]
public IActionResult Add(Student student)
{
    // 获取文件后缀名
    var extension = Path.GetExtension(student.HeadPhoto?.FileName);
    // 为文件重命名,防止文件重名
    var fileName = DateTime.Now.ToString("yyyyMMddHHmmssfff") + "." + extension;

    using FileStream fileStream = new FileStream(
        // 拼接上传路径(upload文件夹必须事先存在)
        Path.Combine(_hostEnvironment.ContentRootPath, "upload", fileName),
        FileMode.Create, FileAccess.Write);

    student.HeadPhoto?.CopyTo(fileStream);


    return Content("上传成功");
}
4. 大文件上传
将默认最大支持的限制修改为209715200B, 200M。
[RequestFormLimits(MultipartBodyLengthLimit = 209715200)]
[RequestSizeLimit(209715200)]
[HttpPost]
public IActionResult Add(IFormFile headPhoto)
{
    // ...
}
虽然这种方式可以暂时解决大文件上传,但是这种方式 本质还是使用缓冲的模型绑定,不太推荐使用这种方式来进行大文件上传, 文件上传使用的磁盘和内存取决于并发文件上传的数量和大小。 如果应用尝试缓冲过多上传,站点就会在内存或磁盘空间不足时崩溃。 如果文件上传的大小或频率会消耗应用资源,请使用流式传输。我们推荐使用无缓冲的流式传输
无缓冲的流式传输
[HttpPost] [RequestFormLimits(MultipartBodyLengthLimit = 609715200)] [RequestSizeLimit(609715200)] public async Task<IActionResult> UploadLargeFile() { var request = HttpContext.Request; if (!request.HasFormContentType || !MediaTypeHeaderValue.TryParse(request.ContentType, out var mediaTypeHeader) || string.IsNullOrEmpty(mediaTypeHeader.Boundary.Value)) { return new UnsupportedMediaTypeResult(); } var reader = new MultipartReader(mediaTypeHeader.Boundary.Value, request.Body); var section = await reader.ReadNextSectionAsync(); while (section != null) { var hasContentDispositionHeader = ContentDispositionHeaderValue.TryParse(section.ContentDisposition, out var contentDisposition); if (hasContentDispositionHeader && contentDisposition.DispositionType.Equals("form-data") && !string.IsNullOrEmpty(contentDisposition.FileName.Value)) { // 获取文件后缀名 var extension = Path.GetExtension(contentDisposition.FileName.Value); // 为文件重命名,防止文件重名 var fileName = DateTime.Now.ToString("yyyyMMddHHmmssfff") + "." + extension; var saveToPath = Path.Combine(_hostEnvironment.ContentRootPath, "upload", fileName); using var targetStream = System.IO.File.Create(saveToPath); await section.Body.CopyToAsync(targetStream); } section = await reader.ReadNextSectionAsync(); } return Ok("上传成功"); }
CopyToAsync() 默认以80KB(81920)/次的速度复制至targetStream目标流中,所以大家放心使用,并不是一下子将流量全部占满。
配套视频链接:【Asp.Net Core Mvc 进阶】.Net 6 系列 详细讲解,Mvc进阶讲解(已完结)_哔哩哔哩_bilibili