VisionPro脚本学习练习笔记
练习1 零件的匹配分数显示
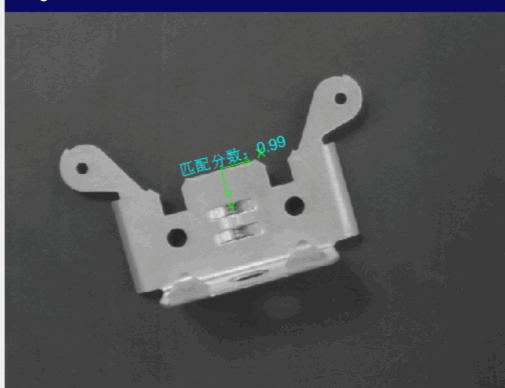
练习重点:模板匹配工具
关于CogPMAlignTool工具心得:
- 首先明确一点,模板匹配的分数是通过匹配的特征来确定的。匹配的特征越多,获得的分数越高。
- 我们为了让匹配的模板分数越高,可以在做模板的时候适当考虑选取必要的特征
实操PatMax算法:
步骤1:找到必要的特征
-
匹配算法调到PatMax,在输出图像中勾选显示训练特征


-
观察训练的模板的黄绿线条

显然这些特征区域我们不需要,所以我们可以采用以下几个方法来去除这些匹配特征
方法1:修改前景和背景的对比度
方法2:使用掩膜
方法3:使用建模器(扣选图像轮廓,直接去除当前非必需区域)
这里我们使用方法1进行尝试(思路:提到物料和背景的对比度阈值,让当前特征不能作为匹配特征)
(Why? 明确一点黑的灰度基本为0,白的基本到180以上;灰色的基本在0-150,我们保留黑与白,去除灰与白)
步骤1:进入浮动窗体

步骤2:找到待去除当前区域的前后灰度值


注意到一点对比度扩大一定数量以后进行尝试,注意一点(边缘阈值参数不是直接的背景和物料对比,不能直接使用)


实操PatQuick算法:
首先一点,PatQuick定位精度上比PatMax精度差了很多。
验证如下:
使用PatMax,然后把训练模板的时候:将坐标轴的水平和物料的水平方向保持一致:观察输出图像的坐标轴是否和训练模板的时候保持一致。这个我在项目上有亲身的经历,一定不会一样,甚至会出现坐标轴和定位框跑飞的现象。(但是当前图像的图像效果好,估计差异会没那么大)。所以一般有的人会说:使用模板匹配定位是粗定位,在我个人的认知中,使用PatQuick的模板就是粗定位,为了更好的定位(精定位)是可以使用Blob等工具构造辅助线然后在使用Fixture工具来定位物料基准,获取真实的物料基准轴。
这里先预先留下一个小坑,等后期去填(手上项目资料涉密,抱歉哈,没法做演示)
待填坑-- 见第二篇练习(已填坑)
可视化
好了言归正传,我们接下来进行可视化


文本格式写法,参考C# string的格式化案例,就是C#写法
http://www.jb51.net/article/57216.htm
最终显示结果(本案例其实需要测量零件的距离的)

练习2 零件定位与卡尺测量(精定位)
简单说明
使用粗定位和精定位结合,来确定物料的中心位置。(就是为了弥补粗定位定位不精确的问题)
基本思想:首先使用模板匹配进行粗糙定位。这时候,基本可以让物料大致定位到定位框的内部或者附近。然后研究图像,找到图像的特征用来判断物料的中心点坐标(最好是物料中心,其他稳定的定位特征也行,下图中案例既可以使用左右两个耳朵的孔洞也能使用物料中央的两个空,关键是稳定就好!!!既能使用卡尺等工具也能使用blob等工具进行区域粗糙定位),然后得到新的定位参考系,这个坐标系基本就能牢牢锁定物料的位置。

我打算选取物料中间区域的两个圆形的中点坐标作为整个精定位坐标系的基准。
(使用五个步骤进行精确定位,注意一点:找圆和找线以及重新建立坐标系的图像都是来自于第二步粗糙定位后的Fixture输出图像,我们是从粗糙定位的基础上进行精定位)
第一步:进行模板匹配
第二步:Fixture进行粗糙定位,获取Fixture坐标空间


第三步:使用找圆工具,获取圆心
注意一点,使用找圆工具,需要使用Fixture坐标空间


第四步:使用两个圆心获取中心坐标值作为偏移参考系的X与Y。
  public override bool GroupRun(ref string message, ref CogToolResultConstants result)
  {
    // To let the execution stop in this script when a debugger is attached, uncomment the following lines.
    // #if DEBUG
    // if (System.Diagnostics.Debugger.IsAttached) System.Diagnostics.Debugger.Break();
    // #endif


    // Run each tool using the RunTool function
    foreach(ICogTool tool in mToolBlock.Tools)
      mToolBlock.RunTool(tool, ref message, ref result);

    double X1 = (double)mToolBlock.Inputs["X1"].Value;
    double X2 = (double)mToolBlock.Inputs["X2"].Value;
    double Y1 = (double)mToolBlock.Inputs["Y1"].Value;
    double Y2 = (double)mToolBlock.Inputs["Y2"].Value;
    mToolBlock.Outputs["X"].Value = (X1+X2)/2;
    mToolBlock.Outputs["Y"].Value = (Y1+Y2)/2;
    return false;
  }
第四步:使用两个圆心建立一条直线,利用直线的偏转角度作为偏移参考系的旋转角

第五步:建立新的坐标空间


第六步:在使用新的定位空间前提下,使用卡尺或者找线等工具


练习3 骰子的点数统计
练习重点:Blob工具的几种阈值的使用
设置界面参数理解

连通性参数
- 用于分割图像最简单的方法是选择一个像素值。低于阈值的灰度值的所有象素被作为为目
标象素,高于阈值的所有像素被指定为背景像素。这种技术被称为二进制阈值或硬阈值。
在硬阈值中将图像的像素分为对象和背景两种,这时,优点是速度快,缺点是产生空
间量化误差。
- 为了消除空间量化误差,引入了软阈值。软阈值将图像中的像素分为对
象、边缘和背景三种。为此,引入了像素加权来表示可能性,像素加权使用 0~1来表示像素,0代表是背景,
1代表是对象,0<像素加权<1代表的是对象的边缘。
硬阈值固定

这个会按照阈值进行分割
-
按照极性进行划分:那么让小于阈值的作为黑色,大于阈值的作为白色。
白色是斑点


-
按照极性进行划分:那么让小于阈值的作为白色,大于阈值的作为黑色。
此时黑色的灰度值被拉高,黑色是斑点


硬阈值相对
相对硬阈值使用两组参数指定。首先,尾部像素是图像内的那些像素具有最低和最高值。
在像素值的直方图中,尾部像素出现在直方图的左侧和右侧。这些像素值被称为右尾像素
值和左侧尾像素值。
您指定一个相对硬阈值的第二个参数是阈值百分比。斑点工具确定位于在两个尾部像素值
之间的距离的指定百分比的像素值。

大致说明一下:这里是先通过尾部,确定阈值区域,然后再阈值区域里面根据阈值比例再进行划分
此时黑点作为斑点,白色作为孔洞
硬阈值动态

相当于在低尾部和高尾部的数值平分以后,获取到的结果数值。


(32+55)/2=44

软阈值固定
首先说明一点:因为直接硬性分割导致物料的尺寸提取发生形变。所以我们引入了边缘这个概念,边缘的像素会乘以系数(0<系数<1),这个系数就是权重。我们引入权重以后,切割会显得更加柔性。看下面三张图,第一种在边缘像素切割的时候,没有权重值,是硬阈值的情况,而且是非常理想的物料像素情况。第二张图,和第三张。物料的尺寸比较特殊。那么在切割图像的时候,就需要考虑到软阈值的使用情况。系数值设置的越大或者越小都会有影响,目前尚未明白系数值设置到多少比较合适,但是明确一点,当前背景和物料对比度比较低的时候,那么一定要设置软阈值。


说明一点,如果柔和度越高,那么下降的阶梯越小。如果柔和度越低,下降的阶梯越快。
当前时柔和度为10的

当前时柔和度为100

软阈值相对
这个相当于在在硬阈值相对的基础上设置了低阈值与高阈值与柔和度。
像素映射
二进制阈值,只有当斑点的所有部分比背景区的所有部分更亮(或更暗)的工作原理。当出现 blob有孔且灰度与背景不一致时,二值分割的方法就会有问题。
示意图如下:

像素映射就能让指定灰度的区域变为物体或者背景
这个和IPOneImage基本相同,不过需要你手动去修改txt映射关系。
一般情况下是0-255灰度,所以选择尺寸设置为9。然后保存文件。生成对应的映射的txt文件。

当你手动进行修改结束以后,再点击一次加载。那么就能让指定的映射灰度变为0或者1了。
修改前的像素映射

修改后的像素映射

减影图像

这种图像就无法使用简单的阈值分割工具进行分割
-
当对象与背景有相同的灰阶范围
-
阈值图像只有背景信息
-
在 blob区域中所有的像素的灰度值与相对应的阈值图像的灰度值是不同的

使用阈值图像分割图像涉及提供对象不存在的场景的阈值图像和阈值。
在对实际图像进行分割时,待分割图像中与所提供的阈值图像中的相应像素不同的每个像素都被视为目标像素。所有与阈值图像中相应像素不不同的像素都被视为背景像素
目前没试出来具体咋用,后续再去研究。(待填坑)
形态学调整
灰度形态学是将一个简单的算子应用于图像中相邻像素的过程。
Blob工具提供的操作符允许您将图像中的每个像素替换为该像素的特定邻域内的最小像素值或最大像素值。下表列出了每个邻域和操作符,以及操作的典型用途,以及操作对图像效果的理想表示。
注意:请记住,形态运算符考虑对象和背景像素。哪些图像像素成为对象像素,哪些成为背景像素取决于您指定的分割参数。形态学运算通常将白色像素解释为对象,黑色像素解释为背景。


水平方向膨胀;将图像中的每个像素替换为该像素及其两个水平相邻像素的最大值;减少或消除物体内部的垂直形孔,增加垂直形物体特征的厚度。

水平方向腐蚀;将图像中的每个像素替换为该像素及其两个水平相邻像素的最小值;增加或锐化物体内部的垂直形孔,减少垂直形物体特征的厚度。


正方形膨胀:将图像中的每个像素替换为该像素及其八个垂直和水平相邻像素的最大值:减少或消除物体内部的孔洞,增加物体特征的厚度。
正方形腐蚀:将图像中的每个像素替换为该像素及其八个垂直和水平相邻像素的最小值:减少物体特征,增加物体内部的孔洞厚度。

水平开操作:通过水平方向腐蚀,然后水平膨胀;保留物体内部垂直形状的孔,同时消除垂直形状的物体特征。
水平闭操作:通过水平方向膨胀,然后水平腐蚀;保留对象内垂直形状的特征,同时消除对象内垂直形状的孔。

竖直开操作:通过竖直方向腐蚀,然后竖直膨胀;保留物体内部水平形状的孔,同时消除水平形状的物体特征。
竖直闭操作:通过竖直方向膨胀,然后竖直腐蚀;保留对象内水平形状的特征,同时消除对象内水平形状的孔。

正方形开操作:通过正方形腐蚀,然后正方形膨胀;保留物体内部的孔洞,同时消除物体的小特征。
正方形闭操作:通过正方形膨胀,然后正方形腐蚀;保留物体的小特征,同时消除物体内部的孔洞。
连通性设置
模式
整个图像:将所有的 blob作为一个 blob,即使有些 blob原本是不连通的。这种情况下,就只会有一个区域

灰度:根据连通性标准,将对象的像素分为离散的,或联通的 blob。通常将连通的区域作为同一个 blob。

有多个区域
已标记:目前的大致理解
当您对经过标记分割的图像执行连接性分析时,连接性分析将具有相同标签的所有像素连接起来。有了标签连接,就没有对象和背景的概念。
就是原先依赖于4邻域或者8邻域才能产生的背景或者对象这个条件被破坏了。我们现在不用把这些都连接在一起进行分析,所以分析的区域比以前更大,获得的斑点和孔也会比以前更多。(明显多于灰度的情况)

清除
清除较小特征的方法。

修剪:小特征被清除以后,不会计入blob面积中
填充:小特征被清除以后,会计入blob面积中
测得尺寸

目前看来多是一些显示的区域特征参数,然后进行一些初级的过滤操作。

这里是针对某些参数进行排序
极值模式:这个没作用。待填坑
练习4 形状标注

点
CogPointMarker PointMarker1 = new CogPointMarker();
PointMarker1.X = 200;
PointMarker1.Y = 200;//点坐标
PointMarker1.Color = CogColorConstants.Red;
PointMarker1.LineWidthInScreenPixels = 20;
线
CogLine Line1 = new CogLine();
Line1.X = 10;
Line1.Y = 10;
Line1.Color = CogColorConstants.Red;
Line1.LineWidthInScreenPixels = 20;
圆
CogCircle Circle1 = new CogCircle();////创建对象,矩形CogRectangle
Circle1.CenterX = 192;
Circle1.CenterY = 100;//圆坐标
Circle1.Radius = 10;//圆半径
Circle1.Color = CogColorConstants.Red;//圆颜色
Circle1.LineWidthInScreenPixels = 20;//圆线宽度
矩形
CogRectangle Rectangle1 = new CogRectangle();//创建对象,矩形CogRectangle
Rectangle1.X = 200;
Rectangle1.Y = 100;//矩形坐标
Rectangle1.Width = 100;
Rectangle1.Height = 100;//矩形长宽,也可以用 Rectangle1.Rotation设置角度
Rectangle1.Color = CogColorConstants.Red;//颜色
Rectangle1.LineWidthInScreenPixels = 20;
主要记住一点:最后显示在哪个图层要写
案例演示:
#region namespace imports
using System;
using System.Collections;
using System.Drawing;
using System.IO;
using System.Windows.Forms;
using Cognex.VisionPro;
using Cognex.VisionPro.ToolBlock;
using Cognex.VisionPro3D;
using Cognex.VisionPro.PMAlign;
using Cognex.VisionPro.CalibFix;
using Cognex.VisionPro.Blob;
#endregion

public class CogToolBlockAdvancedScript : CogToolBlockAdvancedScriptBase
{
  #region Private Member Variables
  private Cognex.VisionPro.ToolBlock.CogToolBlock mToolBlock;

  //1.在此处写代码  添加两个仿射矩形框    Cog  Rectangle 矩形 Affine仿射 可以旋转 形变 的矩形
  CogRectangleAffine rect1 = new CogRectangleAffine();
  CogRectangleAffine rect2 = new CogRectangleAffine();


  #endregion

  /// <summary>
  /// Called when the parent tool is run.
  /// Add code here to customize or replace the normal run behavior.
  /// </summary>
  /// <param name="message">Sets the Message in the tool's RunStatus.</param>
  /// <param name="result">Sets the Result in the tool's RunStatus</param>
  /// <returns>True if the tool should run normally,
  ///          False if GroupRun customizes run behavior</returns>
  public override bool GroupRun(ref string message, ref CogToolResultConstants result)
  {
    // To let the execution stop in this script when a debugger is attached, uncomment the following lines.
    // #if DEBUG
    // if (System.Diagnostics.Debugger.IsAttached) System.Diagnostics.Debugger.Break();
    // #endif


    // Run each tool using the RunTool function
    foreach(ICogTool tool in mToolBlock.Tools)
      mToolBlock.RunTool(tool, ref message, ref result);

     //2.在此处写代码 获取结果
     CogBlobTool  blob1 =  (CogBlobTool) mToolBlock.Tools["CogBlobTool1"];   //等价写法   mToolBlock.Tools["CogBlobTool1"]  as  CogBlobTool

    rect1.Color = CogColorConstants.Red;//红色
    rect1.LineWidthInScreenPixels = 2;//线宽为2个像素
    rect1.CenterX = blob1.Results.GetBlobs()[0].CenterOfMassX;
    rect1.CenterY = blob1.Results.GetBlobs()[0].CenterOfMassY;
    rect1.SideXLength = 50;
    rect1.SideYLength = 70;//矩形框的长度和宽度


    rect2.Color = CogColorConstants.Green;//绿色
    rect2.LineWidthInScreenPixels = 2;//线宽为2个像素
    rect2.CenterX = blob1.Results.GetBlobs()[1].CenterOfMassX;
    rect2.CenterY = blob1.Results.GetBlobs()[1].CenterOfMassY;
    rect2.SideXLength = 50;
    rect2.SideYLength = 70;//矩形框的长度和宽度


    return false;
  }

  #region When the Current Run Record is Created
  /// <summary>
  /// Called when the current record may have changed and is being reconstructed
  /// </summary>
  /// <param name="currentRecord">
  /// The new currentRecord is available to be initialized or customized.</param>
  public override void ModifyCurrentRunRecord(Cognex.VisionPro.ICogRecord currentRecord)
  {
  }
  #endregion

  #region When the Last Run Record is Created
  /// <summary>
  /// Called when the last run record may have changed and is being reconstructed
  /// </summary>
  /// <param name="lastRecord">
  /// The new last run record is available to be initialized or customized.</param>
  public override void ModifyLastRunRecord(Cognex.VisionPro.ICogRecord lastRecord)
  {

    //3.在此处写代码
    mToolBlock.AddGraphicToRunRecord(rect1, lastRecord, "CogFixtureTool1.OutputImage", "");
    mToolBlock.AddGraphicToRunRecord(rect2, lastRecord, "CogFixtureTool1.OutputImage", "");


  }
  #endregion

  #region When the Script is Initialized
  /// <summary>
  /// Perform any initialization required by your script here
  /// </summary>
  /// <param name="host">The host tool</param>
  public override void Initialize(Cognex.VisionPro.ToolGroup.CogToolGroup host)
  {
    // DO NOT REMOVE - Call the base class implementation first - DO NOT REMOVE
    base.Initialize(host);


    // Store a local copy of the script host
    this.mToolBlock = ((Cognex.VisionPro.ToolBlock.CogToolBlock)(host));
  }
  #endregion

}
多边形和外接矩形
网上的有个很好的案例:
案例链接:https://www.bilibili.com/read/cv26773849/

CogRectangleAffine RectangleAffine1 = new CogRectangleAffine();
CogBlobTool Blob1 = mToolBlock.Tools["CogBlobTool1"] as CogBlobTool;
foreach(ICogTool tool in mToolBlock.Tools)
 mToolBlock.RunTool(tool, ref message, ref result);
for(int i = 0;i < Blob1.Results.GetBlobs().Count;i++)
 {
  RectangleAffine1 = Blob1.Results.GetBlobs()[i].GetBoundingBox(CogBlobAxisConstants.ExtremaAngle);
  RectangleAffine1.Color = CogColorConstants.Red;
  RectangleAffine1.LineStyle = CogGraphicLineStyleConstants.Solid;
  RectangleAffine1.LineWidthInScreenPixels = 3;
 }
RectangleAffine1 = Blob1.Results.GetBlobs()[i].GetBoundingBox(CogBlobAxisConstants.ExtremaAngle);

RectangleAffine1 = Blob1.Results.GetBlobs()[i].GetBoundingBox(CogBlobAxisConstants.Principal);

CogPolygon Polygon1 = new CogPolygon();
Polygon1 = Blob1.Results.GetBlobs()[i].GetBoundary();
Polygon1.Color = CogColorConstants.Red;
Polygon1.LineStyle = CogGraphicLineStyleConstants.Solid;
Polygon1.LineWidthInScreenPixels = 3;

#region namespace imports
using System;
using System.Collections;
using System.Drawing;
using System.IO;
using System.Windows.Forms;
using Cognex.VisionPro;
using Cognex.VisionPro.ToolBlock;
using Cognex.VisionPro3D;
using Cognex.VisionPro.Blob;
#endregion

public class CogToolBlockAdvancedScript : CogToolBlockAdvancedScriptBase
{
  #region Private Member Variables
  private Cognex.VisionPro.ToolBlock.CogToolBlock mToolBlock;
  //1.图形集合
  CogGraphicCollection  GraphicList = new  CogGraphicCollection();


  #endregion

  /// <summary>
  /// Called when the parent tool is run.
  /// Add code here to customize or replace the normal run behavior.
  /// </summary>
  /// <param name="message">Sets the Message in the tool's RunStatus.</param>
  /// <param name="result">Sets the Result in the tool's RunStatus</param>
  /// <returns>True if the tool should run normally,
  ///          False if GroupRun customizes run behavior</returns>
  public override bool GroupRun(ref string message, ref CogToolResultConstants result)
  {
    // To let the execution stop in this script when a debugger is attached, uncomment the following lines.
    // #if DEBUG
    // if (System.Diagnostics.Debugger.IsAttached) System.Diagnostics.Debugger.Break();
    // #endif


    // Run each tool using the RunTool function
    foreach(ICogTool tool in mToolBlock.Tools)
      mToolBlock.RunTool(tool, ref message, ref result);

    //2.获取blob工具以及结果
    CogBlobTool blob = mToolBlock.Tools["CogBlobTool1"]   as  CogBlobTool;  //得到了blob工具

    GraphicList.Clear(); //清空图形集合
    //foreach 获取结果
    foreach(CogBlobResult    item  in  blob.Results.GetBlobs()   )  //每一个斑点信息
    {
      /// 标注 圆心
      CogPointMarker PointMarker1 = new CogPointMarker();
      PointMarker1.X = item.CenterOfMassX;
      PointMarker1.Y = item.CenterOfMassY;
      PointMarker1.Color = CogColorConstants.Green;
      PointMarker1.LineWidthInScreenPixels = 10;

      /// 标注 指定大小矩形
       CogRectangleAffine rect1 = new CogRectangleAffine();
      rect1.Color = CogColorConstants.Cyan;//
      rect1.LineWidthInScreenPixels = 2;//线宽为2个像素
      rect1.CenterX = item.CenterOfMassX;
      rect1.CenterY = item.CenterOfMassY;
      rect1.SideXLength = 20;
      rect1.SideYLength = 15;//矩形框的长度和宽度

      /// 标注外接矩形
      CogRectangleAffine RectangleAffine1 = new CogRectangleAffine();
      /// CogBlobAxisConstants.ExtremaAngle 外接矩形
      ///CogBlobAxisConstants.Principal 衍射矩形
      RectangleAffine1 = item.GetBoundingBox(CogBlobAxisConstants.ExtremaAngle);
      RectangleAffine1.Color = CogColorConstants.Blue;
      RectangleAffine1.LineStyle = CogGraphicLineStyleConstants.Solid;
      RectangleAffine1.LineWidthInScreenPixels = 3;


      /// 标注 外接多边形

       CogPolygon Polygon1 = new CogPolygon();
      Polygon1 = item.GetBoundary();
      Polygon1.Color = CogColorConstants.Orange;
      Polygon1.LineStyle = CogGraphicLineStyleConstants.Solid;
      Polygon1.LineWidthInScreenPixels = 3;


      GraphicList.Add(PointMarker1); //添加到图形集合当中
      GraphicList.Add(rect1);
      GraphicList.Add(RectangleAffine1);
      GraphicList.Add(Polygon1);
    }


    return false;
  }

  #region When the Current Run Record is Created
  /// <summary>
  /// Called when the current record may have changed and is being reconstructed
  /// </summary>
  /// <param name="currentRecord">
  /// The new currentRecord is available to be initialized or customized.</param>
  public override void ModifyCurrentRunRecord(Cognex.VisionPro.ICogRecord currentRecord)
  {
  }
  #endregion

  #region When the Last Run Record is Created
  /// <summary>
  /// Called when the last run record may have changed and is being reconstructed
  /// </summary>
  /// <param name="lastRecord">
  /// The new last run record is available to be initialized or customized.</param>
  public override void ModifyLastRunRecord(Cognex.VisionPro.ICogRecord lastRecord)
  {
    //3.
    //foreach
    foreach(  ICogGraphic    item     in  GraphicList )  //item 图形集合中的任意一个元素
    {
       mToolBlock.AddGraphicToRunRecord( item  ,lastRecord , "CogBlobTool1.InputImage","" );
    }


  }
  #endregion

  #region When the Script is Initialized
  /// <summary>
  /// Perform any initialization required by your script here
  /// </summary>
  /// <param name="host">The host tool</param>
  public override void Initialize(Cognex.VisionPro.ToolGroup.CogToolGroup host)
  {
    // DO NOT REMOVE - Call the base class implementation first - DO NOT REMOVE
    base.Initialize(host);


    // Store a local copy of the script host
    this.mToolBlock = ((Cognex.VisionPro.ToolBlock.CogToolBlock)(host));
  }
  #endregion

}