Stanford CS 144, Lab 0: networking warmup
>>> lsb_release -a // 运行环境展示
No LSB modules are available.
Distributor ID: Ubuntu
Description:    Ubuntu 22.04 LTS
Release:        22.04
Codename:       jammy

>>> g++ -v
gcc version 8.4.0 (Ubuntu 8.4.0-3ubuntu2)
2 Networking by hand
2.1 Fetch a Web page
visit http://cs144.keithw.org/hello and observe the result:

Now, we want to do same things by our hand.
-
telnet cs144.keithw.org httpThis tells the telnet program to open a reliable byte stream between your computer and another computer (named \(\texttt{cs144.keithw.org}\)), and with a particular service running on that computer: the “http” service, for the Hyper-Text Transfer Protocol, used by the World Wide Web. Then, i saw the output in the terminal:>>> user$ telnet cs144.keithw.org http Trying 104.196.238.229... Connected to cs144.keithw.org. Escape character is '^]'. Connection closed by foreign host.Telnet是一种网络协议,用于远程登录到计算机或其他设备上并在其上执行命令。通过Telnet,用户可以通过网络连接到远程主机并像本地主机一样进行命令行操作。在Linux系统中,Telnet客户端程序和服务器程序可以使用telnet命令来启动和连接。
Telnet协议使用客户端/服务器模型。Telnet客户端向Telnet服务器建立连接并提供凭据以进行身份验证。一旦连接建立,Telnet客户端可以像使用本地终端一样在远程系统上运行命令。
尽管Telnet协议在过去很受欢迎,但由于其不安全性,现在已被SSH协议取代。因为Telnet协议在传输数据时未加密,所以可能会泄露用户的敏感信息(例如用户名和密码)。SSH协议提供了加密和身份验证功能,可以更安全地远程连接到Linux系统。
-
Type
GET /hello HTTP/1.1 ⏎ -
Type
Host: cs144.keithw.org ⏎ -
Type
Connection: close ⏎ -
Hit the Enter key one more times:
⏎This sends an empty line and tells the server that you are done with your HTTP request. -
If all went well, you will see the same response that your browser saw, preceded by HTTP headers that tell the browser how to interpret(explain) the response.
>>> user$ telnet cs144.keithw.org http
Trying 104.196.238.229...
Connected to cs144.keithw.org.
Escape character is '^]'.
GET /hello HTTP/1.1
Host: cs144.keithw.org
Connection: close

HTTP/1.1 200 OK
Date: Mon, 20 Mar 2023 11:23:14 GMT
Server: Apache
Last-Modified: Thu, 13 Dec 2018 15:45:29 GMT
ETag: "e-57ce93446cb64"
Accept-Ranges: bytes
Content-Length: 14
Connection: close
Content-Type: text/plain

Hello, CS144!
Connection closed by foreign host.
Then, we'll explain the meaning of each step.
GET /hello HTTP/1.1 This tells the server the path part of the URL(The starting with the third slash, like: http://cs144.keithw.org/hello.)
这段命令是 HTTP 协议中客户端向服务器发送 HTTP 请求的一部分,它由三部分组成:
- 请求方法(Request Method):在这里是 GET。它指定了客户端请求的动作类型,常见的方法有 GET、POST、PUT、DELETE 等。
- 请求 URI(Uniform Resource Identifier):在这里是 /hello。它指定了客户端要请求的资源的位置,URI 由路径和查询参数组成。例如,在这个例子中,URI 是 /hello,表示客户端请求位于服务器根目录下的名为 hello 的资源。
- 协议版本(Protocol Version):在这里是 HTTP/1.1。它指定了客户端使用的 HTTP 协议版本。在 HTTP/1.1 中,客户端和服务器之间的通信是持久连接的,这意味着客户端可以在同一连接上发送多个请求,并且服务器可以在同一连接上返回多个响应。
因此,GET /hello HTTP/1.1 这个命令的意思是客户端使用 HTTP/1.1 协议,向服务器发送一个 GET 请求,请求服务器位于根目录下的名为 hello 的资源。服务器在收到请求后将返回相应的响应,包括状态码、头部信息和响应内容等。
Host: cs144.keithw.org This tells the server the host part of the URL. (The part between http:// and the third slash.)
这段命令是HTTP请求中的一个头部信息(header),用于指定客户端请求的目标服务器。
在这个例子中,Host: cs144.keithw.org 指定了客户端要请求的服务器主机名为 cs144.keithw.org。HTTP/1.1 引入了“虚拟主机”(Virtual Host)的概念,使得多个域名可以共享同一个IP地址,并根据 Host 头部信息将请求路由到正确的服务器。因此,Host 头部信息对于客户端请求的处理非常重要。
除了 Host 头部信息,HTTP请求还可以包含许多其他头部信息,用于传递关于客户端、请求内容、请求处理方式和请求接受格式等方面的信息。这些头部信息通常使用“键值对”的形式表示,例如“Content-Type: application/json”表示请求中包含的数据类型为JSON格式。
Connection: close This tells the server that you are finished making requests, and it should close the connection as soon as if finishes replying.
这段命令是HTTP请求中的一个头部信息(header),用于指定客户端和服务器之间的连接类型。
在这个例子中,Connection: close 指定了客户端和服务器之间的连接类型为“关闭连接”。这意味着,在客户端发送完请求并收到服务器的响应后,连接将被立即关闭,而不是保持打开状态以等待其他请求。这种连接类型称为“短连接”(short-lived connection)。
在HTTP/1.1中,默认情况下,客户端和服务器之间的连接类型为“持久连接”(persistent connection),也称为“长连接”(long-lived connection)。这意味着客户端可以在同一连接上发送多个请求,并且服务器可以在同一连接上返回多个响应。在这种情况下,Connection头部信息应设置为“Connection: keep-alive”。
在HTTP/2中,连接类型默认为“持久连接”,而不需要显式指定 Connection头部信息。
因此,Connection头部信息用于指定客户端和服务器之间的连接类型,通常包括“关闭连接”和“保持连接”两种类型。它对于HTTP请求和响应的处理和性能优化非常重要。
Assignment:
>>> user$ telnet cs144.keithw.org http
Trying 104.196.238.229...
Connected to cs144.keithw.org.
Escape character is '^]'.
GET /lab0/sunetid HTTP/1.1
Host: cs144.keithw.org
Connection: close

HTTP/1.1 200 OK
Date: Mon, 20 Mar 2023 11:59:46 GMT
Server: Apache
X-You-Said-Your-SunetID-Was: sunetid
X-Your-Code-Is: 746452
Content-length: 111
Vary: Accept-Encoding
Connection: close
Content-Type: text/plain

Hello! You told us that your SUNet ID was "sunetid". Please see the HTTP headers (above) for your secret code.
2.2 Send yourself an email
Now that you know how to fetch a Web page, it’s time to send an email message, again using a reliable byte stream to a service running on another computer. (Since we don't have a Stanford email, we have to use our own, such as QQ email.)
QQ 邮箱授权码 tuplkrnwplxtbage
由于我们没有 Stanford 的邮箱?,所以我们用 QQ 邮箱进行测试。首先确保:
为什么需要 base64 编码?
SMTP 协议使用 Base64 编码格式是为了在传输邮件时保证邮件内容的完整性和可靠性。
SMTP 协议是一种文本协议,只能传输 ASCII 字符。如果邮件中包含了非 ASCII 字符,例如二进制数据或其他字符集中的字符,那么这些字符就需要进行编码,才能在 SMTP 协议中进行传输。Base64 编码是一种将任意二进制数据转换为 ASCII 字符的编码方式,因此在 SMTP 协议中广泛使用。
使用 Base64 编码后,邮件中的非 ASCII 字符会被转换成 ASCII 字符,从而可以在 SMTP 协议中进行传输。在 SMTP 协议中,邮件头和邮件正文都需要使用 Base64 编码进行编码,以保证邮件内容的完整性和可靠性。同时,SMTP 协议中还规定了最大行长和最大行数等限制,以便于邮件传输过程中的处理和识别。
需要注意的是,使用 Base64 编码会增加邮件的大小,从而增加传输的时间和带宽消耗。因此,在实际应用中,需要根据邮件的具体情况和传输的环境选择合适的编码方式,以便实现高效的邮件传输。
具体实现:
- 每次选 3 个字节共 24 位去进行编码
- 将 24 位从高到低划分成四个不同的 6 位进行输出。
// 将 3 个字节的二进制数据编码为 4 个 Base64 字符
void encode_triplet(const char *triplet, char *output) {
  // Base64 编码使用的字符集
  const char encoding_table[] = "ABCDEFGHIJKLMNOPQRSTUVWXYZ"
                                 "abcdefghijklmnopqrstuvwxyz"
                                 "0123456789+/";

  // 分别获取 3 个字节的 6 个比特的值
  int byte1 = triplet[0] & 0xFF;
  int byte2 = triplet[1] & 0xFF;
  int byte3 = triplet[2] & 0xFF;

  // 将 3 个字节的 24 个比特拆分为 4 个 6 位的数字
  int sextet1 = byte1 >> 2;
  int sextet2 = ((byte1 & 0x3) << 4) | (byte2 >> 4);
  int sextet3 = ((byte2 & 0xF) << 2) | (byte3 >> 6);
  int sextet4 = byte3 & 0x3F;

  // 将 4 个 6 位的数字转换为对应的 Base64 字符
  output[0] = encoding_table[sextet1];
  output[1] = encoding_table[sextet2];
  output[2] = encoding_table[sextet3];
  output[3] = encoding_table[sextet4];
}
Next is the process of sending e-mail by SMTP.
Step 1. telnet smtp.qq.com smtp(or 25)
The port number of SMTP is \(25\).
>>> user$ telnet smtp.qq.com smtp
Connected to smtp.qq.com.
Escape character is '^]'.
220 newxmesmtplogicsvrsza10-0.qq.com XMail Esmtp QQ Mail Server.
Step 2. helo qq.com
To identify your computer to the email server.
helo qq.com (our input)
250-newxmesmtplogicsvrsza10-0.qq.com-11.137.201.48-65426365
250-SIZE 73400320
250 OK
Extra Step. Authorization our qq-mail
auth login (out input)
334 VXNlcm5hbWU6 // base64 =(decode)> 334 Username:
MTM0MzAzMzA4MkBxcS5jb20= (out input, base64)
334 UGFzc3dvcmQ6 // base64 =(decode)> 334 Password:
dHVwbGtybndwXXXXYmFnZQ== (out input, base64)
235 Authentication successful
We just need to get ready for QQ Mail and the base64 code of the authorization code.
Step 3. Send your email
mail from: <1343033082@qq.com> (our input)
250 OK
rcpt to: <whuwkl@gmail.com> (our input)
250 OK
data (ourinput)
354 End data with <CR><LF>.<CR><LF>.
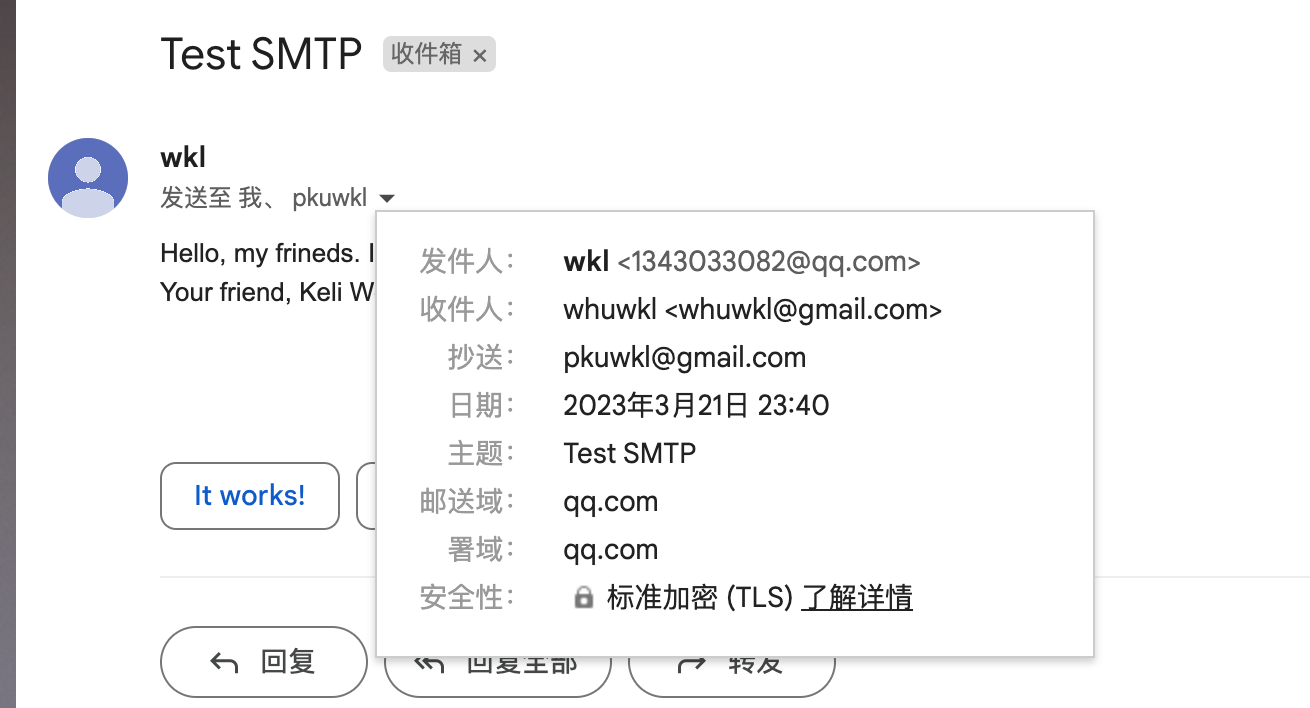
from: wkl <1343033082@qq.com> // Here are all our inputs.
to: whuwkl <whuwkl@gmail.com>
Cc: pkuwkl@gmail.com
Data: Tue, 15 Jan 2023
Subject: Test SMTP
Hello, my frineds. I'm testing SMTP protocal
Your friend, Keli Wen
.
250 OK: queued as.
mail from: <xx@xx.com>denote who is sending?rcpt to: <xx@xx.com>denote who is receiving?datatell server you're ready to start. end with⏎ . ⏎
Result ✅
Listening and connection
netcat -v -l -p 9090 on server side.
>>> $ netcat -v -l -p 9090
Listening on [0.0.0.0] (family 0, port 9090)
talnet localhost 9090 on client side. will received Connected to localhost.
Then, you'll notice that anything you type in one window appear in the other, and vice versa.
netcat是一种网络工具,可以在不同的网络设备之间建立 TCP 或 UDP 连接,用于传输数据。在命令行中输入netcat命令可以启动netcat程序,并使用不同的参数配置其行为。在给定的命令
netcat -v -l -p 9090中,使用了以下三个参数:
-v:表示启用详细模式(verbose mode),在传输数据时显示更多的信息。例如,可以显示连接建立的细节、传输的数据大小、传输速度等。-l:表示将netcat程序设置为监听模式(listen mode),等待其他设备建立连接并传输数据。在监听模式下,netcat会一直等待连接,直到接收到连接请求为止。-p 9090:表示指定监听的端口号为 9090。在 TCP/IP 网络中,端口号用于标识不同的网络应用程序,例如 Web 服务器、SMTP 服务器等。netcat使用指定的端口号进行监听,等待其他设备连接并传输数据。因此,执行
netcat -v -l -p 9090命令后,netcat会启动并进入监听模式,等待其他设备连接到本机的 9090 端口并传输数据。在传输数据时,netcat会显示详细的传输信息,例如连接建立的细节、传输的数据大小、传输速度等。如果带了参数
-u则是 UDP,反之则是默认的 TCP。
3 Writing a network program using an OS stream socket
在这个热身实验的下一部分中,您将编写一个简短的程序,通过互联网获取Web页面。您将利用Linux内核以及大多数其他操作系统提供的功能:在您的计算机上运行一个程序,另一个程序在互联网上的另一台计算机上运行,它们之间可以创建可靠的双向字节流(例如,像Apache或nginx这样的Web服务器或netcat程序)。
这个功能被称为流式套接字(stream socket)。对于您的程序和Web服务器,套接字看起来像一个普通的文件描述符(类似于磁盘上的文件或标准输入输出流)。当两个流式套接字连接在一起时,写入一个套接字的任何字节最终都会以相同的顺序从另一个计算机的另一个套接字中出现。
但实际上,互联网并没有提供可靠的字节流服务。相反,互联网实际上只是尽力将称为互联网数据报的短数据块传递到其目标。每个数据报包含一些元数据(标头),用于指定诸如源地址和目标地址之类的内容 - 它来自哪台计算机以及它将前往哪台计算机,以及要传递到目标计算机的一些负载数据(最多约1500个字节)。
虽然网络尝试传递每个数据报,但在实践中,数据报可能会(1)丢失,(2)无序传递,(3)传递的内容发生改变,甚至(4)重复并传递多次。通常,连接两端的操作系统的任务是将“尽力而为的数据报”(互联网提供的抽象)转换为“可靠的字节流”(应用程序通常想要的抽象)。
两台计算机必须合作,以确保流中的每个字节最终都按其在行中的正确位置传递到另一侧的流式套接字。它们还必须告诉彼此它们准备从另一台计算机接受多少数据,并确保不发送超过另一侧愿意接受的数据量。所有这些都是使用1981年制定的约定方案完成的,称为传输控制协议(TCP,Transmission Control Protocal)。
在本实验中,您只需使用操作系统对传输控制协议的预先存在的支持。您将编写一个名为“webget”的程序,创建一个TCP流式套接字,连接到Web服务器并获取页面 - 就像您在本实验的早期所做的那样。在未来的实验中,您将从不太可靠的数据报中,通过自己实现传输控制协议来创建可靠的字节流,从而实现此抽象的另一侧。
3.1 Let's get started
两个要点:
git clone https://github.com/cs144/sponge。make -j4to use four processors.jmeans jobs in parallel.
3.2 Morden C++: mostly safe but still fast and low-level
LAB将使用现代C ++风格完成,使用最近(2011年)的功能来尽可能安全地编程。这可能与您以前被要求编写C ++的方式不同。有关此样式的参考,请参阅C ++核心指南(http://isocpp.github.io/CppCoreGuidelines/CppCoreGuidelines)。
基本思想是确保每个对象的设计具有可能的最小公共接口,具有大量的内部安全检查,并且很难被不正确使用,并且知道如何在自身清理之后进行清理。我们希望避免“配对”操作(例如,malloc / free或new / delete),其中第二个操作可能不会发生(例如,如果函数提前返回或抛出异常)。相反,操作发生在对象的构造函数中,相反的操作发生在析构函数中。这种风格称为“资源获取即初始化”(RAII, resource acquisition is initialization)。
具体来说:
- 使用 cppreference 作为文档
- 不要使用
malloc(),free(),new和delete。(有点好奇两者的区别) - 不要使用裸露的指针
*,使用智能指针如:unique_ptrandshared_ptr,当然在 CS144 用不太到。 - 避免使用 templates, threads, locks and virtual functions. will not need to use these in CS 144.
- 避免使用 C-style 的字符串(\(\texttt{char *str}\))或字符串函数(\(\texttt{strlen(), strcpy()}\))。它们很容易出错。改用 \(\texttt{std::string}\)。
- 永远不要使用 C-style 转换(例如,\(\texttt{(FILE *) x}\))。如果必须使用,请使用 C++ \(\texttt{static\_cast}\)(在 CS144 中通常不需要)。
- 优先通过
const引用传递函数参数(例如:\(\texttt{const Address&address}\))。 - 除非需要改变,否则将每个变量设置为
const。 - 除非需要改变对象,否则将每个方法设置为
const。 - 避免使用全局变量,并使每个变量具有最小的作用域。
- 在提交作业之前,请运行
make format以规范化编码样式。
3.3 Reading the Sponge documentation
在 CS144 计算机网络课程中,Sponge 是一个网络模拟器(Network Emulator)库,用于模拟计算机网络中的数据包传输和路由过程。Sponge 可以在单个计算机上模拟多个网络节点,每个节点可以运行自己的应用程序,通过模拟器进行通信。Sponge 还提供了丰富的网络调试和分析工具,例如抓包工具、流量监控工具等,可以帮助学生理解和调试网络协议。
在 CS144 课程中,学生可以使用 Sponge 模拟各种网络场景,例如带宽受限、延迟抖动、拥塞控制等,从而深入理解计算机网络中的各种原理和技术。Sponge 还提供了丰富的网络协议库,例如 TCP、UDP、IP 等,可以帮助学生实现自己的网络应用程序。
为了支持这种编程风格,Sponge的类将操作系统函数(可从C中调用)包装在“现代”C ++中。
- 使用 Web 浏览器阅读起始代码的文档,网址为 \(\texttt{https://cs144.github.io/doc/lab0}\)。
- 特别注意\(\texttt{FileDescriptor}\),\(\texttt{Socket}\),\(\texttt{TCPSocket}\)和\(\texttt{Address}\)类的文档。(注意,\(\texttt{Socket}\) 是 \(\texttt{FileDescriptor}\) 的一种类型,而 \(\texttt{TCPSocket}\) 是 \(\texttt{Socket}\) 的一种类型。)
- 现在,在\(\texttt{libsponge/util}\)目录中找到并阅读描述这些类接口的头文件:\(\texttt{file\_descriptor.hh}\),\(\texttt{socket.hh}\) 和 \(\texttt{address.hh}\)。
3.4 Writing webget
It’s time to implement webget, a program to fetch Web pages over the Internet using the operating system’s TCP support and stream-socket abstraction-just like you did by hand earlier in this lab.
后续的操作就是按照 lab 的指导进行的,我就不重复性描述了,记录几点我当时出现问题的地方:
- 首先,我是参考
TCPSocket部分的示例文档进行第一步的。 - 注意,换行符应该是
\r\n。而且,最后结束需要连续两个\r\n。 - 其他就是一些 API 的应用了。
代码如下:
void get_URL(const string &host, const string &path) {
    // Your code here.

    // You will need to connect to the "http" service on
    // the computer whose name is in the "host" string,
    // then request the URL path given in the "path" string.

    // Then you'll need to print out everything the server sends back,
    // (not just one call to read() -- everything) until you reach
    // the "eof" (end of file).

    Address HostAddress(host, "http");
    TCPSocket Socket1;
    // connect a socket to a specified peer address with connect(2)
    Socket1.connect(HostAddress);

    // create a HTTP Request. Remember you should add space.
    std::string HTTPrequest = "GET " + path + " HTTP/1.1\r\n" + \
                              "Host: " + host + " \r\n" + \
                              "Connection: close\r\n" + \
                              "\r\n";

    Socket1.write(HTTPrequest);

    while (!Socket1.eof()){
        auto recv = Socket1.read();
        std::cout << recv;
    }

    Socket1.close();
}
需要注意的是:
在网络编程中,
connect(2)是一个函数调用,用于将一个套接字(socket)连接到一个指定的网络地址(peer address),以建立一个网络连接。具体来说,
connect(2)函数通常用于客户端程序,用于连接到一个运行在远程主机上的服务器程序。在调用connect(2)函数时,需要指定连接目标的 IP 地址和端口号,这个目标地址就是所谓的 "peer address"。例如,下面是一个简单的客户端程序,它使用
connect(2)函数连接到远程服务器:
下面是代码日志:
>>> $ make
[ 33%] Built target sponge
Consolidate compiler generated dependencies of target webget
[ 36%] Building CXX object apps/CMakeFiles/webget.dir/webget.cc.o
[ 40%] Linking CXX executable webget
[ 40%] Built target webget
[ 46%] Built target spongechecks
[ 53%] Built target byte_stream_construction
[ 60%] Built target byte_stream_one_write
[ 66%] Built target byte_stream_two_writes
[ 73%] Built target byte_stream_capacity
[ 80%] Built target byte_stream_many_writes
[ 86%] Built target address_dt
[ 93%] Built target parser_dt
[100%] Built target socket_dt

>>> $ ./apps/webget cs144.keithw.org /hello
HTTP/1.1 200 OK
Date: Tue, 28 Mar 2023 15:02:24 GMT
Server: Apache
Last-Modified: Thu, 13 Dec 2018 15:45:29 GMT
ETag: "e-57ce93446cb64"
Accept-Ranges: bytes
Content-Length: 14
Connection: close
Content-Type: text/plain

Hello, CS144!

>>> $ make check_webget
[100%] Testing webget...
Test project /home/xxx/CS144/lab0/sponge/build
    Start 31: t_webget
1/1 Test #31: t_webget .........................   Passed    1.54 sec

100% tests passed, 0 tests failed out of 1

Total Test time (real) =   1.55 sec
[100%] Built target check_webget
4 An in-memory reliable byte stream
By now, you’ve seen how the abstraction of a reliable byte stream can be useful in communicating across the Internet, even though the Internet itself only provides the service of “best-effort” (unreliable) datagrams.
To finish off this week’s lab, you will implement, in memory on a single computer, an object that provides this abstraction. (You may have done something similar in CS 110.) Bytes are written on the “input” side and can be read, in the same sequence, from the “output” side. The byte stream is finite: the writer can end the input, and then no more bytes can be written. When the reader has read to the end of the stream, it will reach “EOF” (end of file) and no more bytes can be read.
Your byte stream will also be flow-controlled to limit its memory consumption at any given time. The object is initialized with a particular “capacity”: the maximum number of bytes it’s willing to store in its own memory at any given point. The byte stream will limit the writer in how much it can write at any given moment, to make sure that the stream doesn’t exceed its storage capacity. As the reader reads bytes and drains them from the stream, the writer is allowed to write more. Your byte stream is for use in a single thread—you don’t have to worry about concurrent writers/readers, locking, or race conditions.
To be clear: the byte stream is finite, but it can be almost arbitrarily long 4 before the writer ends the input and finishes the stream. Your implementation must be able to handle streams that are much longer than the capacity. The capacity limits the number of bytes that are held in memory (written but not yet read) at a given point, but does not limit the length of the stream. An object with a capacity of only one byte could still carry a stream that is terabytes and terabytes long, as long as the writer keeps writing one byte at a time and the reader reads each byte before the writer is allowed to write the next byte.
到现在为止,您已经了解到可靠字节流的抽象可以在互联网上进行通信时非常有用,即使互联网本身只提供“尽力而为”的(不可靠的)数据包服务。
为了完成本周的实验,您将在单台计算机的内存中实现一个提供此抽象的对象。 (您可能已经在CS 110中做过类似的事情。)字节在“输入”端被写入,可以按相同顺序从“输出”端读取。字节流是有限的:作者可以结束输入,然后不能再写入更多字节。当读者读取到流的末尾时,它将达到“EOF”(文件结束)状态,不能再读取更多字节。
您的字节流还将进行流量控制,以限制其在任何给定时间的内存消耗。该对象使用特定的“容量”进行初始化:它愿意在任何给定时刻存储在自己的内存中的最大字节数。字节流将限制作者在任何给定时刻写入的数量,以确保流不超过其存储容量。随着读者读取字节并从流中排除它们,作者被允许写更多内容。您的字节流用于单个线程 - 您不必担心并发作者/读者、锁定或竞争条件。(暂时不需要考虑线程安全)。
要明确:字节流是有限的,但在作者结束输入并完成流之前,它可以几乎任意长。您的实现必须能够处理比容量长得多的流。容量限制在给定点保留在内存中的字节数(已写入但尚未读取),但不限制流的长度。容量仅为一个字节的对象仍然可以携带数千亿个字节长的流,只要作者一次写入一个字节并且读者在作者被允许写入下一个字节之前读取每个字节。
接下来是一些我们需要去实现的 interface,具体的文件可以打开 \(\texttt{libsponge/byte\_stream.hh}\) 和 \(\texttt{libsponge/byte\_stream.cc}\)。具体每个成员函数需要实现什么功能同样在文档中可以查找。
由于,我们需要同时入队,出队,并且还需要遍历 buffer 中的元素,所以我们选择使用 deque 来作为主要数据结构。下面是我们定义的类的私有变量,主要意思如变量名所示。
/* byte_stream.hh file */
class ByteStream {
  private:
    size_t _capacity;
    size_t _buffer_read_count;
    size_t _buffer_written_count;
    std::deque<char> _buffer;
    // Hint: This doesn't need to be a sophisticated data structure at
    // all, but if any of your tests are taking longer than a second,
    // that's a sign that you probably want to keep exploring
    // different approaches.
    bool _end_input{}; //?< Flag indicating that the stream has end the input.
    bool _error{};  //!< Flag indicating that the stream suffered an error.
  public:
    /* omit */
};
4.x 实验问题解析
随后是源代码,我遇到了其中如下几个问题:
这个问题,是一个编译器错误。指出类的构造函数中某个成员变量应该在成员初始化列表中进行初始化,而不应该在构造函数的函数体中进行初始化。
这两个都很重要,这代表了我在类的构造函数方面知识的缺失。以下知识均来自 《C++ primer V5》知识的总结(P258)。首先,我们了解问题2,构造函数中,冒号:和第一个左花括号{ 之间的内容是构造函数初始值列表。理论上,这是在无论何种情况下更好的编程习惯,但有时候是必须使用构造函数初始值列表。我们将列举几个必须使用的情况。
首先,我们要分清楚两种不同构造函数之间的区别,case1 是直接进行初始化,而 case2 相当于先初始化再进行赋值,如果没有在构造函数初始值列表的话,就会直接调用默认的构造函数再进行赋值。稍微灵敏一些的话,不难发现此处应该存在好几个问题:
- 先构造,再赋值,会存在一些特殊的情况是不能进行赋值的,并且有些成员变量并没有默认构造函数/初始化方法。
- 先构造,再赋值,在效率方面也会存在很多问题。
class Test{
public:
    Test(int ii): i(ii), ci(ii), ri(i) {} // case1
    Test(int ii){ // case2
        i = ii; // 正确
        ci = ii; // 错误,不能给 const 赋值
        ri = i; // 错误,ri 没有被初始化
    }
private:
    int i;
    const int ci;
    int &ri;
}
所以,如果成员是 const,引用或者属于某种未提供默认构造函数的类类型,我们必须通过构造函数初始值列表为这些成员变量提供初值。
其次,初始化和赋值的区别事关底层效率问题,建议读者养成使用构造函数初始值的习惯。
此时,,回到问题1,需要知道的是,在使用构造函数初始值时,初始化的顺序,一定和类定义中出现的顺序一致,和代码顺序无关。一般来说,不存在问题,但是如果出现了一个成员是用另一个成员来初始化的话,这个初始化顺序就很关键里,如下面的例子。这也是为什么 CS144 要求大家必须按照类中定义好的顺序进行初始化。
class X{
	int i;
    int j;
public:
    // undefine: i 在 j 之前进行初始化
    X(int val): j(val), i(j) { }
}
/* byte_stream.cc file */
ByteStream::ByteStream(const size_t capacity):
    _capacity(capacity),
    _buffer_read_count(0),
    _buffer_written_count(0),
    _buffer(deque<char>()),
    _end_input(false),
    _error(false) { }

size_t ByteStream::write(const string &data) {
    if (input_ended()) // input is ended
        return 0;
    size_t data_len = data.length();
    size_t write_len = 0;
    // while the _buffer not full
    while (_buffer.size() < _capacity && write_len < data_len){
        _buffer.push_back(data[write_len]);
        ++ write_len;
    }
    _buffer_written_count += write_len; // update
    return write_len;
}

//! \param[in] len bytes will be copied from the output side of the buffer
string ByteStream::peek_output(const size_t len) const {
    size_t _buffer_len = _buffer.size();
    std::string output = "";
    for (int i = 0, _lim = std::min(_buffer_len, len);
        i < _lim; ++ i){
            output.push_back(_buffer[i]);
        }
    return output;
}

//! \param[in] len bytes will be removed from the output side of the buffer
void ByteStream::pop_output(const size_t len) {
    size_t _buffer_len = _buffer.size();
    for (int i = 0, _lim = std::min(_buffer_len, len);
        i < _lim; ++ i){
            _buffer.pop_front(); // removed from the output side
        }
    _buffer_read_count += std::min(_buffer_len, len); //! pop count not read count
}

//! Read (i.e., copy and then pop) the next "len" bytes of the stream
//! \param[in] len bytes will be popped and returned
//! \returns a string
std::string ByteStream::read(const size_t len) {
    auto output = peek_output(len);
    pop_output(len);
    return output;
}

void ByteStream::end_input() { _end_input = true; }

bool ByteStream::input_ended() const { return _end_input; }

size_t ByteStream::buffer_size() const { return _buffer.size(); }

bool ByteStream::buffer_empty() const { return _buffer.empty(); }
//TODO:看的网上的
bool ByteStream::eof() const { return input_ended() && buffer_empty(); }

size_t ByteStream::bytes_written() const { return _buffer_written_count; }

size_t ByteStream::bytes_read() const { return _buffer_read_count; }

size_t ByteStream::remaining_capacity() const { return _capacity - _buffer.size(); }
最开始,一直在这个 test 上报错,后面参考了网上的一些设计才过关。
在 C++ 中,return {} 语句表示返回一个值初始化的对象,具体取决于函数的返回类型。
对于类类型,返回的是一个默认构造函数创建的对象;对于内置类型,返回的是默认值 0 或者 nullptr。
例如,如果函数返回类型为 int,则 return {} 表示返回整数值 0。如果函数返回类型为
std::vector<int>,则 return {} 表示返回一个空的 int 类型的 vector 对象。这种方式的语法称为 "值初始化",它可以确保返回的对象在被创建时被初始化为默认值,从而避免了可能存在的未初始化值的问题。使用这种方式还可以避免手动编写默认构造函数或特殊处理默认情况的代码,从而简化了代码实现的复杂度。
需要注意的是,return {} 语句仅适用于 C++11 及以上版本,之前的 C++ 版本可能需要使用其他语法来实现相同的效果。
4. x 实验结果
>>> $ make check_lab0 -j10
[100%] Testing Lab 0...
Test project /home/wkl/CS144/lab0/sponge/build
    Start 26: t_byte_stream_construction
1/9 Test #26: t_byte_stream_construction .......   Passed    0.00 sec
    Start 27: t_byte_stream_one_write
2/9 Test #27: t_byte_stream_one_write ..........   Passed    0.00 sec
    Start 28: t_byte_stream_two_writes
3/9 Test #28: t_byte_stream_two_writes .........   Passed    0.00 sec
    Start 29: t_byte_stream_capacity
4/9 Test #29: t_byte_stream_capacity ...........   Passed    0.44 sec
    Start 30: t_byte_stream_many_writes
5/9 Test #30: t_byte_stream_many_writes ........   Passed    0.01 sec
    Start 31: t_webget
6/9 Test #31: t_webget .........................   Passed    1.04 sec
    Start 53: t_address_dt
7/9 Test #53: t_address_dt .....................   Passed    0.04 sec
    Start 54: t_parser_dt
8/9 Test #54: t_parser_dt ......................   Passed    0.00 sec
    Start 55: t_socket_dt
9/9 Test #55: t_socket_dt ......................   Passed    0.01 sec

100% tests passed, 0 tests failed out of 9

Total Test time (real) =   1.55 sec
[100%] Built target check_lab0
Reference
后记
在转型 Infra 的路径,Network 一直是我最弱的地方,这算是第一个外国的 LAB,也是 Dream 中的 Dream 的 Stanford,这辈子估计没啥机会去四大。按理来说是一周之内完成一个 LAB,但是 LAB0 就做了已经很久了。不过希望会越来越有效率吧。