一、环境搭建
1、下载源码:https://gitee.com/apolloconfig/apollo.git
2、以1.8.2版本为例,切到1.8.2分支,scripts文件夹下有两个sql文件apolloconfigdb.sql,apolloportaldb.sql,放入数据库执行
3、配置启动类ApolloApplication,vm opitions配置如下:
-Dapollo_profile=github
-Dspring.datasource.url=jdbc:mysql://localhost:3306/apolloconfigdb?useUnicode=true&characterEncoding=utf-8&serverTimezone=UTC
-Dspring.datasource.username=root
-Dspring.datasource.password=123456
-Dlogging.file=c:/project/xc-apollo/apollo-assembly.log
program arguments配置如下:--configservice --adminservice
4、配置启动类PortalApplication,vm opitions配置如下:
-Dapollo_profile=github,auth
-Ddev_meta=http://localhost:8080/
-Dserver.port=8070
-Dspring.datasource.url=jdbc:mysql://localhost:3306/apolloportaldb?useUnicode=true&characterEncoding=utf-8&serverTimezone=UTC
-Dspring.datasource.username=root
-Dspring.datasource.password=123456-Dlogging.file=c:/project/xc-apollo/apollo-portal.log
5、先运行ApolloApplication,再运行PortalApplication,访问localhost:8070,即可打开控制台。
二、服务端源码
服务端控制台主要就是通过创建APP,Namespace,添加我们项目所需要的配置,所以服务端也就相当于一个web服务。流程如下:
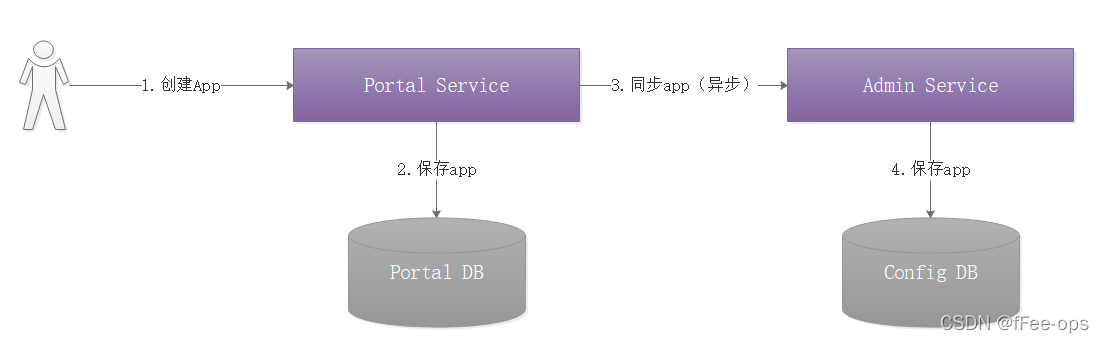
跟控制台交互的controller主要在apollo-portal模块,然后数据会异步发送给apollo-adminservice模块。
根据两个数据库中的表也能够区分他们分别保存了哪些数据,服务端的功能较为直白简单,就不一步步分析源码了,理解其过程就可以了。
三、客户端源码
根据我们分析源码的习惯,有注解线分析注解,Apollo是通过@EnableApolloConfig开启的,我们就从他入手。
@Import(ApolloConfigRegistrar.class)
public @interface EnableApolloConfig {
  //Namespace 名字的集合
  String[] value() default {ConfigConsts.NAMESPACE_APPLICATION};

  // 优先级
  int order() default Ordered.LOWEST_PRECEDENCE;
}
关键类ApolloConfigRegistrar
public class ApolloConfigRegistrar implements ImportBeanDefinitionRegistrar, EnvironmentAware {

  // 加载注册协助类
  private final ApolloConfigRegistrarHelper helper = ServiceBootstrap.loadPrimary(ApolloConfigRegistrarHelper.class);

  // 注册bean
  @Override
  public void registerBeanDefinitions(AnnotationMetadata importingClassMetadata, BeanDefinitionRegistry registry) {
    helper.registerBeanDefinitions(importingClassMetadata, registry);
  }

  @Override
  public void setEnvironment(Environment environment) {
    this.helper.setEnvironment(environment);
  }

}
注册一些关键的bd
  public void registerBeanDefinitions(AnnotationMetadata importingClassMetadata, BeanDefinitionRegistry registry) {
    // 解析 @EnableApolloConfig 注解
    AnnotationAttributes attributes = AnnotationAttributes
        .fromMap(importingClassMetadata.getAnnotationAttributes(EnableApolloConfig.class.getName()));
    final String[] namespaces = attributes.getStringArray("value");
    final int order = attributes.getNumber("order");
    // EnableApolloConfig value值 默认application
    final String[] resolvedNamespaces = this.resolveNamespaces(namespaces);
    // 添加到 NAMESPACE_NAMES 中
    PropertySourcesProcessor.addNamespaces(Lists.newArrayList(resolvedNamespaces), order);

    // PropertySourcesPlaceholderConfigurer 优先于 PropertyPlaceholderConfigurer
    Map<String, Object> propertySourcesPlaceholderPropertyValues = new HashMap<>();
    // to make sure the default PropertySourcesPlaceholderConfigurer's priority is higher than PropertyPlaceholderConfigurer
    propertySourcesPlaceholderPropertyValues.put("order", 0);

    // 注册 PropertySourcesPlaceholderConfigurer
    BeanRegistrationUtil.registerBeanDefinitionIfNotExists(registry, PropertySourcesPlaceholderConfigurer.class.getName(),
        PropertySourcesPlaceholderConfigurer.class, propertySourcesPlaceholderPropertyValues);
    // 注册 PropertySourcesProcessor 解析application.properties 给所有namesapce添加监听
    BeanRegistrationUtil.registerBeanDefinitionIfNotExists(registry, PropertySourcesProcessor.class.getName(),
        PropertySourcesProcessor.class);
    // 注册 ApolloAnnotationProcessor 解析 @ApolloConfig @ApolloConfigChangeListener @ApolloJsonValue
    BeanRegistrationUtil.registerBeanDefinitionIfNotExists(registry, ApolloAnnotationProcessor.class.getName(),
        ApolloAnnotationProcessor.class);
    // 注册 SpringValueProcessor 解析@Value注解   注册到本地注册表Map<BeanFactory, Multimap<String, SpringValue>> registry
    BeanRegistrationUtil.registerBeanDefinitionIfNotExists(registry, SpringValueProcessor.class.getName(),
        SpringValueProcessor.class);
    // 注册 SpringValueDefinitionProcessor
    BeanRegistrationUtil.registerBeanDefinitionIfNotExists(registry, SpringValueDefinitionProcessor.class.getName(),
        SpringValueDefinitionProcessor.class);
  }
这里注册的bd,后续在spring容器初始化的时候会生成bean,并且这里的bean不是普通的bean,而是一个个的后置处理器,我们就只看关键的几个后置处理器。
1、ApolloAnnotationProcessor
public class ApolloAnnotationProcessor extends ApolloProcessor implements BeanFactoryAware,
    EnvironmentAware {

    ···········
}
public abstract class ApolloProcessor implements BeanPostProcessor, PriorityOrdered {

  @Override
  public Object postProcessBeforeInitialization(Object bean, String beanName)
      throws BeansException {
    Class clazz = bean.getClass();
    // 调用子类 处理字段
    for (Field field : findAllField(clazz)) {
      processField(bean, beanName, field);
    }
    // 处理注解的方法
    for (Method method : findAllMethod(clazz)) {
      processMethod(bean, beanName, method);
    }
    return bean;
  }

  ········
}
处理字段上的注解
  @Override
  protected void processField(Object bean, String beanName, Field field) {
    // 处理@ApolloConfig注解
    this.processApolloConfig(bean, field);
    // 处理@ApolloJsonValue
    this.processApolloJsonValue(bean, beanName, field);
  }

  private void processApolloConfig(Object bean, Field field) {
    // 寻找字段上有@ApolloConfig注解的值
    ApolloConfig annotation = AnnotationUtils.getAnnotation(field, ApolloConfig.class);
    if (annotation == null) {
      return;
    }

    Preconditions.checkArgument(Config.class.isAssignableFrom(field.getType()),
        "Invalid type: %s for field: %s, should be Config", field.getType(), field);
    // 通过注解获取命名空间
    final String namespace = annotation.value();
    final String resolvedNamespace = this.environment.resolveRequiredPlaceholders(namespace);
    // 从配置管理里面 获取命名空间对应的key-value
    Config config = ConfigService.getConfig(resolvedNamespace);
    // 判断是否可被设置值
    ReflectionUtils.makeAccessible(field);
    // 反射设置值
    ReflectionUtils.setField(field, bean, config);
  }

  private void processApolloJsonValue(Object bean, String beanName, Field field) {
    // 字段被@ApolloJsonValue注解
    ApolloJsonValue apolloJsonValue = AnnotationUtils.getAnnotation(field, ApolloJsonValue.class);
    if (apolloJsonValue == null) {
      return;
    }
    String placeholder = apolloJsonValue.value();
    Object propertyValue = placeholderHelper
        .resolvePropertyValue(this.configurableBeanFactory, beanName, placeholder);

    // propertyValue will never be null, as @ApolloJsonValue will not allow that
    if (!(propertyValue instanceof String)) {
      return;
    }

    boolean accessible = field.isAccessible();
    field.setAccessible(true);
    // 设置值
    ReflectionUtils
        .setField(field, bean, parseJsonValue((String) propertyValue, field.getGenericType()));
    field.setAccessible(accessible);

    if (configUtil.isAutoUpdateInjectedSpringPropertiesEnabled()) {
      Set<String> keys = placeholderHelper.extractPlaceholderKeys(placeholder);
      for (String key : keys) {
        SpringValue springValue = new SpringValue(key, placeholder, bean, beanName, field, true);
        // 注册进springValueRegistry
        springValueRegistry.register(this.configurableBeanFactory, key, springValue);
        logger.debug("Monitoring {}", springValue);
      }
    }
  }
处理方法上的注解
 @Override
  protected void processMethod(final Object bean, String beanName, final Method method) {
    // 处理@ApolloConfigChangeListener
    this.processApolloConfigChangeListener(bean, method);
    // 处理@ApolloJsonValue
    this.processApolloJsonValue(bean, beanName, method);
  }

  private void processApolloConfigChangeListener(final Object bean, final Method method) {
    ApolloConfigChangeListener annotation = AnnotationUtils
        .findAnnotation(method, ApolloConfigChangeListener.class);
    if (annotation == null) {
      return;
    }
    // 获取方法的参数类型
    Class<?>[] parameterTypes = method.getParameterTypes();
    // 只能有一个参数 并且为ConfigChangeEvent
    Preconditions.checkArgument(parameterTypes.length == 1,
        "Invalid number of parameters: %s for method: %s, should be 1", parameterTypes.length,
        method);
    Preconditions.checkArgument(ConfigChangeEvent.class.isAssignableFrom(parameterTypes[0]),
        "Invalid parameter type: %s for method: %s, should be ConfigChangeEvent", parameterTypes[0],
        method);

    ReflectionUtils.makeAccessible(method);
    // 只有此配置的namespace 才会触发
    String[] namespaces = annotation.value();
    // 只有设置了此参数的key修改了值 才会触发
    String[] annotatedInterestedKeys = annotation.interestedKeys();
    // 只有修改此设置前缀的值 才会触发
    String[] annotatedInterestedKeyPrefixes = annotation.interestedKeyPrefixes();
    // 创建一个监听器
    ConfigChangeListener configChangeListener = new ConfigChangeListener() {
      @Override
      public void onChange(ConfigChangeEvent changeEvent) {
        ReflectionUtils.invokeMethod(method, bean, changeEvent);
      }
    };
    // 转成set 去重
    Set<String> interestedKeys =
        annotatedInterestedKeys.length > 0 ? Sets.newHashSet(annotatedInterestedKeys) : null;
    Set<String> interestedKeyPrefixes =
        annotatedInterestedKeyPrefixes.length > 0 ? Sets.newHashSet(annotatedInterestedKeyPrefixes)
            : null;

    for (String namespace : namespaces) {
      final String resolvedNamespace = this.environment.resolveRequiredPlaceholders(namespace);
      // 根据namespace获取config
      Config config = ConfigService.getConfig(resolvedNamespace);

      if (interestedKeys == null && interestedKeyPrefixes == null) {
        // 添加监听器
        config.addChangeListener(configChangeListener);
      } else {
        // 添加监听器 值是interestedKeyPrefixes、interestedKeys转的Hashset
        config.addChangeListener(configChangeListener, interestedKeys, interestedKeyPrefixes);
      }
    }
  }

  private void processApolloJsonValue(Object bean, String beanName, Method method) {
    ApolloJsonValue apolloJsonValue = AnnotationUtils.getAnnotation(method, ApolloJsonValue.class);
    if (apolloJsonValue == null) {
      return;
    }
    // 获取key
    String placeHolder = apolloJsonValue.value();
    // 获取value
    Object propertyValue = placeholderHelper
        .resolvePropertyValue(this.configurableBeanFactory, beanName, placeHolder);

    // propertyValue will never be null, as @ApolloJsonValue will not allow that
    if (!(propertyValue instanceof String)) {
      return;
    }
    // 方法参数类型
    Type[] types = method.getGenericParameterTypes();
    // 只能有一个
    Preconditions.checkArgument(types.length == 1,
        "Ignore @Value setter {}.{}, expecting 1 parameter, actual {} parameters",
        bean.getClass().getName(), method.getName(), method.getParameterTypes().length);

    boolean accessible = method.isAccessible();
    method.setAccessible(true);
    // 执行目标方法
    ReflectionUtils.invokeMethod(method, bean, parseJsonValue((String) propertyValue, types[0]));
    method.setAccessible(accessible);
    // 是否支持动态刷新
    if (configUtil.isAutoUpdateInjectedSpringPropertiesEnabled()) {
      Set<String> keys = placeholderHelper.extractPlaceholderKeys(placeHolder);
      for (String key : keys) {
        SpringValue springValue = new SpringValue(key, apolloJsonValue.value(), bean, beanName,
            method, true);
        springValueRegistry.register(this.configurableBeanFactory, key, springValue);
        logger.debug("Monitoring {}", springValue);
      }
    }
  }
2、SpringValueProcessor处理@value注解,逻辑同上面类似,我们直接看实现部分
protected void processField(Object bean, String beanName, Field field) {
    Value value = field.getAnnotation(Value.class);
    if (value == null) {
      return;
    }
    // 处理注解的key 必须要有 ${
    Set<String> keys = placeholderHelper.extractPlaceholderKeys(value.value());
    if (keys.isEmpty()) {
      return;
    }
    for (String key : keys) {
      SpringValue springValue = new SpringValue(key, value.value(), bean, beanName, field, false);
      // 把@value注解的字段的信息封装成SpringValue 注册到registry
      springValueRegistry.register(beanFactory, key, springValue);
      logger.debug("Monitoring {}", springValue);
    }
  }

  @Override
  protected void processMethod(Object bean, String beanName, Method method) {
    Value value = method.getAnnotation(Value.class);
    if (value == null) {
      return;
    }
    // 跳过被@Bean 注解方法
    if (method.getAnnotation(Bean.class) != null) {
      return;
    }
    // 方法的参数个数必须为1
    if (method.getParameterTypes().length != 1) {
      logger.error("Ignore @Value setter {}.{}, expecting 1 parameter, actual {} parameters",
          bean.getClass().getName(), method.getName(), method.getParameterTypes().length);
      return;
    }
    // 获取key集合
    Set<String> keys = placeholderHelper.extractPlaceholderKeys(value.value());

    if (keys.isEmpty()) {
      return;
    }

    for (String key : keys) {
      SpringValue springValue = new SpringValue(key, value.value(), bean, beanName, method, false);
      // 把@value注解的字段的信息封装成SpringValue 注册到registry
      springValueRegistry.register(beanFactory, key, springValue);
      logger.info("Monitoring {}", springValue);
    }
  }
可以看到这里只是注册StringValue,并没有往bean里面set字段值,说明@value的值设置不在这个后置处理器中。
四、自动装配
看完了注解的逻辑,看一下spring.factories中的一些配置。
org.springframework.boot.autoconfigure.EnableAutoConfiguration=\
com.ctrip.framework.apollo.spring.boot.ApolloAutoConfiguration
org.springframework.context.ApplicationContextInitializer=\
com.ctrip.framework.apollo.spring.boot.ApolloApplicationContextInitializer
org.springframework.boot.env.EnvironmentPostProcessor=\
com.ctrip.framework.apollo.spring.boot.ApolloApplicationContextInitializer
关键部分就是ApolloApplicationContextInitializer这个类了,怎么执行加载的,这里就不说了,自行去了解,我们直接看逻辑。
  public class ApolloApplicationContextInitializer implements
    ApplicationContextInitializer<ConfigurableApplicationContext> , EnvironmentPostProcessor, Ordered {

    // 初始化环境
    public void postProcessEnvironment(ConfigurableEnvironment configurableEnvironment, SpringApplication springApplication) {

    // 添加app.id,apollo.cluster,apollo.cacheDir,apollo.accesskey.secret,apollo.meta,
    // apollo.property.order.enable 到system
    initializeSystemProperty(configurableEnvironment);
    // 将Apollo配置加载提到初始化日志系统之前
    Boolean eagerLoadEnabled = configurableEnvironment.getProperty(PropertySourcesConstants.APOLLO_BOOTSTRAP_EAGER_LOAD_ENABLED, Boolean.class, false);

    //EnvironmentPostProcessor should not be triggered if you don't want Apollo Loading before Logging System Initialization
    if (!eagerLoadEnabled) {
      return;
    }

    Boolean bootstrapEnabled = configurableEnvironment.getProperty(PropertySourcesConstants.APOLLO_BOOTSTRAP_ENABLED, Boolean.class, false);

    if (bootstrapEnabled) {
      // 加载apollo配置
      initialize(configurableEnvironment);
    }

  }

  public void initialize(ConfigurableApplicationContext context) {
    ConfigurableEnvironment environment = context.getEnvironment();

    // apollo.bootstrap.enabled 为 true 才会接着执行
    if (!environment.getProperty(PropertySourcesConstants.APOLLO_BOOTSTRAP_ENABLED, Boolean.class, false)) {
      return;
    }
    // 初始化环境
    initialize(environment);
  }

  protected void initialize(ConfigurableEnvironment environment) {
    // 防重复加载
    if (environment.getPropertySources().contains(PropertySourcesConstants.APOLLO_BOOTSTRAP_PROPERTY_SOURCE_NAME)) {
      //already initialized
      return;
    }
    // 获取apollo.bootstrap.namespaces配置的所有namespace
    String namespaces = environment.getProperty(PropertySourcesConstants.APOLLO_BOOTSTRAP_NAMESPACES, ConfigConsts.NAMESPACE_APPLICATION);

    List<String> namespaceList = NAMESPACE_SPLITTER.splitToList(namespaces);
    // 初始化一个PropertySource对象
    CompositePropertySource composite = new CompositePropertySource(PropertySourcesConstants.APOLLO_BOOTSTRAP_PROPERTY_SOURCE_NAME);
    for (String namespace : namespaceList) {
      // 根据namespace获取配置key-value
      Config config = ConfigService.getConfig(namespace);
      // 添加到propertySources属性集合中
      composite.addPropertySource(configPropertySourceFactory.getConfigPropertySource(namespace, config));
    }
    // 添加到环境对象的属性集合中
    environment.getPropertySources().addFirst(composite);
  }

}
关键代码就是根据namespace获取key-value了,Config config = ConfigService.getConfig(namespace)
  public static Config getConfig(String namespace) {
    return s_instance.getManager().getConfig(namespace);
  }

  public Config getConfig(String namespace) {
    Config config = m_configs.get(namespace);

    if (config == null) {
      synchronized (this) {
        config = m_configs.get(namespace);

        if (config == null) {
          // 获取配置工厂对象
          ConfigFactory factory = m_factoryManager.getFactory(namespace);
          // 创建config 放入本地缓存
          config = factory.create(namespace);
          m_configs.put(namespace, config);
        }
      }
    }

    return config;
  }

  public Config create(String namespace) {
    // 获取文件类型,默认properties
    ConfigFileFormat format = determineFileFormat(namespace);
    if (ConfigFileFormat.isPropertiesCompatible(format)) {
      // YAML  YML
      return new DefaultConfig(namespace, createPropertiesCompatibleFileConfigRepository(namespace, format));
    }
    // 创建config 获取key-value  关键代码createLocalConfigRepository
    return new DefaultConfig(namespace, createLocalConfigRepository(namespace));
  }

  LocalFileConfigRepository createLocalConfigRepository(String namespace) {
    if (m_configUtil.isInLocalMode()) {
      // 本地
      return new LocalFileConfigRepository(namespace);
    }
    // 服务端 关键代码createRemoteConfigRepository
    return new LocalFileConfigRepository(namespace, createRemoteConfigRepository(namespace));
  }

  RemoteConfigRepository createRemoteConfigRepository(String namespace) {
    return new RemoteConfigRepository(namespace);
  }

  public RemoteConfigRepository(String namespace) {

    ```

    // 获取key-value配置  实现类RemoteConfigRepository
    this.trySync();
    // 开启定时每5分钟刷新一次
    this.schedulePeriodicRefresh();
    // 长轮询  异步刷新配置
    this.scheduleLongPollingRefresh();
  }
具体的怎么从服务端获取key-value的代码就不放了,逻辑也比较简单。值得关注的是apollo是通过长轮询的机制实现配置动态刷新的,如果服务端有配置刷新,消息表会有相应的记录。客户端通过不断的请求服务端获取是否有配置更新,如果有就会通过线程池的方式从服务端拉取最新配置,然后跟本地原有的配置进行比较,如果有改动,就会提交一个任务到线程池,触发相应的监听器AutoUpdateConfigChangeListener更新bean中的字段值。如果我们使用了@ApolloConfigChangeListener注解,也会执行相应的监听方法。