前言
对于大多数 maven 多模块化工程,可以使用 Jacoco 这款工具,关于 Jacoco 这款工具,ChatGPT 对它的描述是这样的:
JaCoCo(Java Code Coverage)是一个开源的测试覆盖率工具,它可以用于帮助开发人员衡量其软件测试的有效性。它支持多种语言,包括 Java 和 Kotlin 等,并且可以与多个构建工具和集成开发环境(IDE)一起使用。
JaCoCo 可以收集测试覆盖率数据,并生成可视化的测试覆盖率报告,帮助开发人员更好地理解其代码的测试覆盖率情况。它提供了多种测试覆盖率指标,例如行覆盖率、分支覆盖率、方法覆盖率、类覆盖率等,可以帮助开发人员了解其测试覆盖率情况的具体细节。
JaCoCo 还可以与多种构建工具集成,例如 Maven、Gradle 等。它可以通过 Maven 或 Gradle 的插件来收集测试覆盖率数据,并在构建过程中生成测试覆盖率报告
Jacoco 可以很好的支持对 Maven 多模块进行聚合分析测试覆盖率,可以从项目整体输出覆盖率报告非常方便。
下面展示一下具体的使用方法
一:创建根项目
先创建一个多模块的 Maven 项目,大致的结构如下:
├── parent-project
├── pom.xml
├── business-module1
│   ├── pom.xml
│   └── src
│       ├── main
│       └── test
├── business-module2
│   ├── pom.xml
│   └── src
│       ├── main
│       └── test
└── test-module
    ├── pom.xml
    └── src
        ├── main
        └── test
在一个空白的目录,一个的 Maven 的根项目:
mvn archetype:generate \
-DgroupId=org.example \
-DartifactId=jacoco-multi-module-example \
-DarchetypeArtifactId=maven-archetype-quickstart \
-DinteractiveMode=false
然后进入目录:
cd jacoco-multi-module-example
把根目录 pom.xml 的 packaging 属性改为 pom,从而将根目录设置为一个聚合模块,用来管理多个子模块的依赖关系
<packaging>pom</packaging>
二:创建子模块
根据上面的结构,在根目录下,分别创建:
- business-module1
- business-module2
- test-module
在根目录的路径下,输入以下命令,创建 business-module1 模块:
mvn archetype:generate \
-DgroupId=org.example \
-DartifactId=business-module1 \
-DarchetypeArtifactId=maven-archetype-quickstart  \
-DinteractiveMode=false
创建 business-module2 模块:
mvn archetype:generate \
-DgroupId=org.example \
-DartifactId=business-module2 \
-DarchetypeArtifactId=maven-archetype-quickstart \
-DinteractiveMode=false
创建 test-module 单元测试模块:
mvn archetype:generate \
-DgroupId=org.example \
-DartifactId=test-module \
-DarchetypeArtifactId=maven-archetype-quickstart \
-DinteractiveMode=false
然后模拟实际的开发,分别在模块1,模块2中添加一些业务代码,
在 business-module1 中我添加一个简单的数学运算 IntegerSimpleCompute 类:
// business-module1\src\main\java\org\example\IntegerSimpleCompute.java
package org.example;

public class IntegerSimpleCompute {

    public int add(int i, int j) {
        return i + j;
    }

    public int subtract(int i, int j) {
        return i - j;
    }

    public int multiply(int i, int j) {
        return i * j;
    }

    public int divide(int i, int j) {
        return i / j;
    }
}
在 business-module2 中我添加一个简单的逻辑运算 IntegerLogicCompute 类:
// business-module2\src\main\java\org\example\IntegerLogicCompute.java
package org.example;

public class IntegerLogicCompute {

    public int increment(Integer i) {
        return i + 1;
    }

    public int decrement(Integer i) {
        return i- 1;
    }

    // 存在条件分支的语句,需要满足所有条件分支判断才能达到 100% 的覆盖率
    public boolean equals(Integer i, Integer j) {
        if (i < 127 && j < 127) {
            return i == j;
        }
        return i.equals(j);
    }
}
三:创建测试模块
我们将 test-module 作为测试模块,在该模块的 pom.xml 文件中,我们引入上面的测试模块,方便对他们进行集成测试
<dependencies>
    <dependency>
        <groupId>org.example</groupId>
        <artifactId>business-module1</artifactId>
        <version>1.0-SNAPSHOT</version>
    </dependency>

    <dependency>
        <groupId>org.example</groupId>
        <artifactId>business-module2</artifactId>
        <version>1.0-SNAPSHOT</version>
    </dependency>

    <dependency>
        <groupId>junit</groupId>
        <artifactId>junit</artifactId>
        <version>4.12</version>
        <scope>test</scope>
    </dependency>
</dependencies>
然后在 src/test/java 目录下创建测试类:
// test-module\src\test\java\org\example\IntegrationTest.java
package org.example;

import org.junit.Before;
import org.junit.Test;

import static org.junit.Assert.assertEquals;

public class IntegrationTest {

    private IntegerSimpleCompute simpleCompute;
    private IntegerLogicCompute logicCompute;

    @Before
    public void init() {
        simpleCompute = new IntegerSimpleCompute();
        logicCompute = new IntegerLogicCompute();
    }

    @Test
    public void simpleComputeTest() throws Throwable {
        assertEquals(7, simpleCompute.add(3, 4));
        assertEquals(4, simpleCompute.subtract(7, 3));
        assertEquals(12, simpleCompute.multiply(3, 4));
        assertEquals(3, simpleCompute.divide(12, 4));
    }

    @Test
    public void logicComputeTest() throws Throwable {
        assertEquals(8, logicCompute.increment(7));
        assertEquals(6, logicCompute.decrement(7));
        assertEquals(true, logicCompute.equals(125, 125));
        assertEquals(false, logicCompute.equals(123, 125));
        assertEquals(false, logicCompute.equals(123, 130));
        assertEquals(false, logicCompute.equals(133, 125));
        assertEquals(true, logicCompute.equals(140, 140));
        assertEquals(false, logicCompute.equals(140, 141));
    }
}
到可以,你可以通过:
mvn test
执行单元测试,maven 的 maven-surefire-plugin 插件也会简单的输出如下测试报告:
Tests run: 2, Failures: 0, Errors: 0, Skipped: 0
四:生成覆盖率报告
首先在根目录的 pom.xml 引入 jacoco 插件并且启动代理:
<build>
    <plugins>
        <!-- 指定 Java 编译版本 -->
        <plugin>
            <groupId>org.apache.maven.plugins</groupId>
            <artifactId>maven-compiler-plugin</artifactId>
            <version>3.8.1</version>
            <configuration>
                <source>11</source>
                <target>11</target>
            </configuration>
        </plugin>

        <!-- jacoco 插件 -->
        <plugin>
            <groupId>org.jacoco</groupId>
            <artifactId>jacoco-maven-plugin</artifactId>
            <version>0.8.8</version>
            <executions>
                <!--  执行 prepare-agent 目标,它会启动 JaCoCo 代理 -->
                <execution>
                    <id>default-prepare-agent</id>
                    <goals>
                        <goal>prepare-agent</goal>
                    </goals>
                </execution>

                <!-- 执行 mvn verify 时,生成测试覆盖率报告 -->
                <execution>
                    <id>report</id>
                    <phase>verify</phase>
                    <goals>
                        <goal>report</goal>
                    </goals>
                </execution>
            </executions>
        </plugin>
    </plugins>
</build>
然后在 test-module 模块中引入 jacoco 插件,声明一个聚合分析任务:
<build>
    <plugins>
        <plugin>
            <groupId>org.jacoco</groupId>
            <artifactId>jacoco-maven-plugin</artifactId>
            <version>0.8.8</version>
            <executions>
                <!--  在执行 mvn verify 时,生成聚合测试覆盖率报告,所有 Maven 子模块的测试覆盖率数据 -->
                <execution>
                    <id>report-aggregate</id>
                    <phase>verify</phase>
                    <goals>
                        <goal>report-aggregate</goal>
                    </goals>
                </execution>
            </executions>
        </plugin>
    </plugins>
</build>
最后在根目录执行指令,运行所有测试:
$ mvn clean verify
构建成功后可以在 test-module 模块下的 target/site/jacoco-aggregate/index.html 查看覆盖率报告:
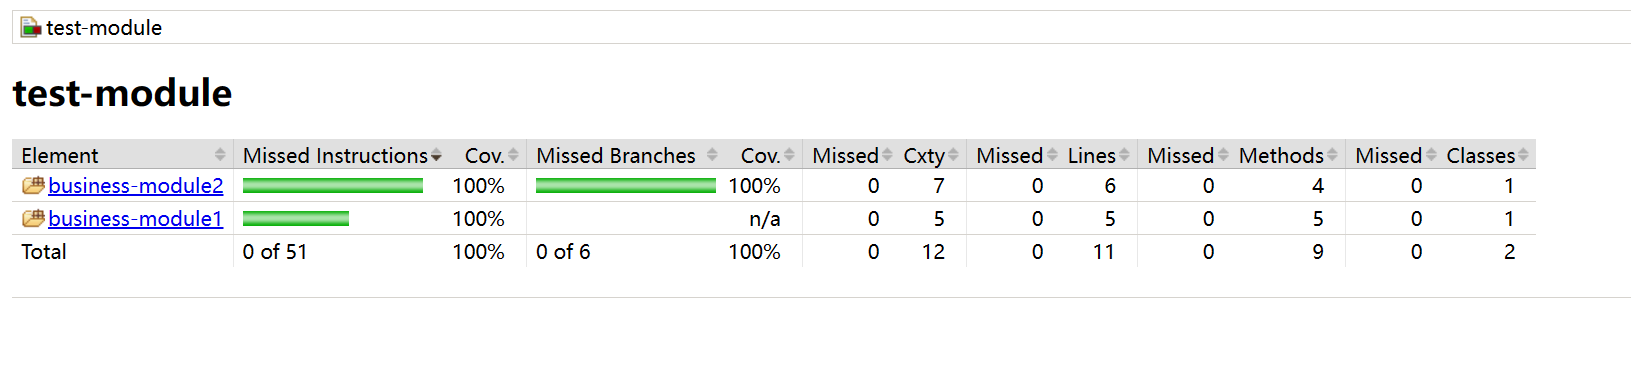
点击对应模块可以看到包内部所有类,方法还有每一行的测试覆盖率情况,这里具体不再展开,自己可以尝试以下
示例代码:jacoco-module-sample
参考资料: