RabbitMQ是一个在AMQP基础上完整的,可复用的企业消息系统。他遵循Mozilla Public License开源协议。
MQ全称为Message Queue, 消息队列(MQ)是一种应用程序对应用程序的通信方法。应用程序通过读写出入队列的消息(针对应用程序的数据)来通信,而无需专用连接来链接它们。消 息传递指的是程序之间通过在消息中发送数据进行通信,而不是通过直接调用彼此来通信,直接调用通常是用于诸如远程过程调用的技术。排队指的是应用程序通过 队列来通信。队列的使用除去了接收和发送应用程序同时执行的要求。
1.RabbitMQ安装
安装配置epel源
   $ rpm -ivh http://dl.fedoraproject.org/pub/epel/6/i386/epel-release-6-8.noarch.rpm

安装erlang
   $ yum -y install erlang

安装RabbitMQ
   $ yum -y install rabbitmq-server
注意:service rabbitmq-server start/stop
安装API
pip install pika
or
easy_install pika
or
源码

https://pypi.python.org/pypi/pika
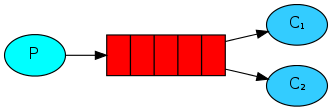
2.简单的接收-发送模型
一个P向queue发送一个message,一个C从该queue接收message并打印。

producer,连接至RabbitMQ Server,声明队列,发送message,关闭连接,退出。
#生产者代码
#!/usr/bin/env python
# -*- coding: utf-8 -*-
# @Time     : 2023/3/21 15:25
# @Author   : 李泽雄
# @BoKeYuan : 小家电维修
# @File     : rabbitMQ_1_send.py
# @Version  : Python 3.10.10
# @Project  : python3
# @Software : PyCharm

import pika


#credentials = pika.PlainCredentials('chuan', '123')  # mq用户名和密码,没有则需要自己创建
# 虚拟队列需要指定参数 virtual_host,如果是默认的可以不填。
connection = pika.BlockingConnection(pika.ConnectionParameters(host='localhost',
                                                               port=5672,
                                                               virtual_host='/',
                                                               ))

# 建立rabbit协议的通道
channel = connection.channel()
# 声明消息队列,消息将在这个队列传递,如不存在,则创建。durable指定队列是否持久化
channel.queue_declare(queue='hello', durable=False)

# message不能直接发送给queue,需经exchange到达queue,此处使用以空字符串标识的默认的exchange
# 向队列插入数值 routing_key是队列名
channel.basic_publish(exchange='',
                      routing_key='hello',
                      body='Hello world!')
# 关闭与rabbitmq server的连接
connection.close()
consumer,连接至RabbitMQ Server,声明队列,接收消息并进行处理这里为打印出消息,退出。
#消费者代码
#!/usr/bin/env python
# -*- coding: utf-8 -*-
# @Time     : 2023/3/21 15:21
# @Author   : 李泽雄
# @BoKeYuan : 小家电维修
# @File     : rabbitMQ_1_recv.py
# @Version  : Python 3.10.10
# @Project  : python3
# @Software : PyCharm
import pika

#credentials = pika.PlainCredentials('chuan', '123')
# BlockingConnection:同步模式
connection = pika.BlockingConnection(pika.ConnectionParameters(host='localhost',
                                                               port=5672,
                                                               #virtual_host='/',
                                                                ))
channel = connection.channel()
# 申明消息队列。当不确定生产者和消费者哪个先启动时,可以两边重复声明消息队列。
channel.queue_declare(queue='hello', durable=False)
# 定义一个回调函数来处理消息队列中的消息,这里是打印出来
def callback(ch, method, properties, body):
    # 手动发送确认消息
    ch.basic_ack(delivery_tag=method.delivery_tag)
    print(body.decode())
    # 告诉生产者,消费者已收到消息

# 告诉rabbitmq,用callback来接收消息
# 默认情况下是要对消息进行确认的,以防止消息丢失。
# 此处将auto_ack明确指明为True,不对消息进行确认。
channel.basic_consume('hello',
                      on_message_callback=callback)
                      # auto_ack=True)  # 自动发送确认消息
# 开始接收信息,并进入阻塞状态,队列里有信息才会调用callback进行处理
channel.start_consuming()
3.Work Queues(消息公平分发)
将耗时的消息处理通过队列分配给多个consumer来处理,我们称此处的consumer为worker,我们将此处的queue称为Task Queue,其目的是为了避免资源密集型的task的同步处理,也即立即处理task并等待完成。相反,调度task使其稍后被处理。也即把task封装进message并发送到task queue,worker进程在后台运行,从task queue取出task并执行job,若运行了多个worker,则task可在多个worker间分配。
消息公平分发:
如果Rabbit只管按顺序把消息发到各个消费者身上,不考虑消费者负载的话,很可能出现,一个机器配置不高的消费者那里堆积了很多消息处理不完,同时配置高的消费者却一直很轻松。为解决此问题,可以在各个消费者端,配置perfetch=1,意思就是告诉RabbitMQ在我这个消费者当前消息还没处理完的时候就不要再给我发新消息了。

所以以上只用一份代码演示,因为就一个perfetch=1的区别。
建立连接,声明队列,发送可以模拟耗时任务的message,断开连接、退出。
#生产者代码
#!/usr/bin/env python
# -*- coding: utf-8 -*-
# @Time     : 2023/3/21 15:25
# @Author   : 李泽雄
# @BoKeYuan : 小家电维修
# @File     : rabbitMQ_2_send.py
# @Version  : Python 3.10.10
# @Project  : python3
# @Software : PyCharm

import pika


#credentials = pika.PlainCredentials('chuan', '123')  # mq用户名和密码
# 虚拟队列需要指定参数 virtual_host,如果是默认的可以不填。
connection = pika.BlockingConnection(pika.ConnectionParameters(host='localhost',
                                                               port=5672,
                                                               virtual_host='/',
                                                               #credentials=credentials
                                                               ))

# 建立rabbit协议的通道
channel = connection.channel()
# 声明消息队列,消息将在这个队列传递,如不存在,则创建。durable指定队列是否持久化。确保没有确认的消息不会丢失
channel.queue_declare(queue='rabbitmqtest', durable=True)

# message不能直接发送给queue,需经exchange到达queue,此处使用以空字符串标识的默认的exchange
# 向队列插入数值 routing_key是队列名
# basic_publish的properties参数指定message的属性。此处delivery_mode=2指明message为持久的
for i in range(10):
    channel.basic_publish(exchange='',
                          routing_key='rabbitmqtest',
                          body='Hello world!%s' % i,
                          properties=pika.BasicProperties(delivery_mode=2))
# 关闭与rabbitmq server的连接
connection.close()
建立连接,声明队列,不断的接收message,处理任务,进行确认。
#消费者代码
#!/usr/bin/env python
# -*- coding: utf-8 -*-
# @Time     : 2023/3/21 15:21
# @Author   : 李泽雄
# @BoKeYuan : 小家电维修
# @File     : rabbitMQ_2_recv.py
# @Version  : Python 3.10.10
# @Project  : python3
# @Software : PyCharm


# 消费者代码,consume1与consume2
import pika
import time

#credentials = pika.PlainCredentials('chuan', '123')
# BlockingConnection:同步模式
connection = pika.BlockingConnection(pika.ConnectionParameters(host='localhost',
                                                               port=5672,
                                                               virtual_host='/',
                                                               #credentials=credentials
                                                               ))
channel = connection.channel()
# 申明消息队列。当不确定生产者和消费者哪个先启动时,可以两边重复声明消息队列。
channel.queue_declare(queue='rabbitmqtest', durable=True)
# 定义一个回调函数来处理消息队列中的消息,这里是打印出来
def callback(ch, method, properties, body):
    # 手动发送确认消息
    #time.sleep(1)
    print(body.decode())
    # 告诉生产者,消费者已收到消息
    ch.basic_ack(delivery_tag=method.delivery_tag)

# 如果该消费者的channel上未确认的消息数达到了prefetch_count数,则不向该消费者发送消息
channel.basic_qos(prefetch_count=1)
# 告诉rabbitmq,用callback来接收消息
# 默认情况下是要对消息进行确认的,以防止消息丢失。
# 此处将no_ack明确指明为True,不对消息进行确认。
channel.basic_consume('rabbitmqtest',
                      on_message_callback=callback)
                      # auto_ack=True)  # 自动发送确认消息
# 开始接收信息,并进入阻塞状态,队列里有信息才会调用callback进行处理
channel.start_consuming()
4.Publish\Subscribe(消息发布\订阅)
之前的例子都基本都是1对1的消息发送和接收,即消息只能发送到指定的queue里,但有些时候你想让你的消息被所有的Queue收到,类似广播的效果,这时候就要用到exchange了,
An exchange is a very simple thing. On one side it receives messages from producers and the other side it pushes them to queues. The exchange must know exactly what to do with a message it receives. Should it be appended to a particular queue? Should it be appended to many queues? Or should it get discarded. The rules for that are defined by the exchange type.
Exchange在定义的时候是有类型的,以决定到底是哪些Queue符合条件,可以接收消息
- fanout: 所有bind到此exchange的queue都可以接收消息
- direct: 通过routingKey和exchange决定的那个唯一的queue可以接收消息
- topic:所有符合routingKey(此时可以是一个表达式)的routingKey所bind的queue可以接收消息
表达式符号说明:#代表一个或多个字符,*代表任何字符
例:#.a会匹配a.a,aa.a,aaa.a等
*.a会匹配a.a,b.a,c.a等
注:使用RoutingKey为#,Exchange Type为topic的时候相当于使用fanout
headers: 通过headers 来决定把消息发给哪些queue
4.1 fanout消息订阅模式
生产者将消息发送到Exchange,Exchange再转发到与之绑定的Queue中,每个消费者再到自己的Queue中取消息。所有bind到此exchange的queue都可以接收消息。
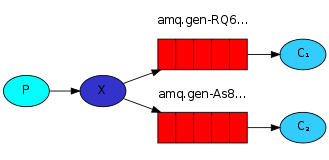
日志消息发送者:建立连接,声明fanout类型的exchange,通过exchage向queue发送日志消息,消息被广播给所有接收者,关闭连接,退出。
#生产者代码
#!/usr/bin/env python
# -*- coding: utf-8 -*-
# @Time     : 2023/3/21 17:07
# @Author   : 李泽雄
# @BoKeYuan : 小家电维修
# @File     : rabbitMQ_fanout_pub.py.py
# @Version  : Python 3.10.10
# @Project  : python3
# @Software : PyCharm


# 生产者代码
import pika


#credentials = pika.PlainCredentials('chuan', '123')  # mq用户名和密码
# 虚拟队列需要指定参数 virtual_host,如果是默认的可以不填。
connection = pika.BlockingConnection(pika.ConnectionParameters(host='localhost',
                                                               port=5672,
                                                               virtual_host='/',
                                                               #credentials=credentials
                                                               ))
# 建立rabbit协议的通道
channel = connection.channel()
# fanout: 所有绑定到此exchange的queue都可以接收消息(实时广播)
# direct: 通过routingKey和exchange决定的那一组的queue可以接收消息(有选择接受)
# topic: 所有符合routingKey(此时可以是一个表达式)的routingKey所bind的queue可以接收消息(更细致的过滤)
channel.exchange_declare('logs', exchange_type='fanout')


#因为是fanout广播类型的exchange,这里无需指定routing_key
for i in range(10):
    channel.basic_publish(exchange='logs',
                          routing_key='',
                          body='Hello world!%s' % i)

# 关闭与rabbitmq server的连接
connection.close()
日志消息接收者:建立连接,声明exchange,将exchange与queue进行绑定,开始不停的接收log并打印。
#消费者代码
#!/usr/bin/env python
# -*- coding: utf-8 -*-
# @Time     : 2023/3/21 17:08
# @Author   : 李泽雄
# @BoKeYuan : 小家电维修
# @File     : rabbitMQ_fanout_sub.py
# @Version  : Python 3.10.10
# @Project  : python3
# @Software : PyCharm

import pika

#credentials = pika.PlainCredentials('chuan', '123')
# BlockingConnection:同步模式
connection = pika.BlockingConnection(pika.ConnectionParameters(host='localhost',
                                                               port=5672,
                                                               virtual_host='/',
                                                               #credentials=credentials
                                                               ))
channel = connection.channel()

#作为好的习惯,在producer和consumer中分别声明一次以保证所要使用的exchange存在
channel.exchange_declare(exchange='logs',
                         exchange_type='fanout')

# 随机生成一个新的空的queue,将exclusive置为True,这样在consumer从RabbitMQ断开后会删除该queue
# 是排他的。
result = channel.queue_declare('', exclusive=True)

# 用于获取临时queue的name
queue_name = result.method.queue

# exchange与queue之间的关系成为binding
# binding告诉exchange将message发送该哪些queue
channel.queue_bind(exchange='logs',
                   queue=queue_name)

# 定义一个回调函数来处理消息队列中的消息,这里是打印出来
def callback(ch, method, properties, body):
    # 手动发送确认消息
    print(body.decode())
    # 告诉生产者,消费者已收到消息
    #ch.basic_ack(delivery_tag=method.delivery_tag)

# 如果该消费者的channel上未确认的消息数达到了prefetch_count数,则不向该消费者发送消息
channel.basic_qos(prefetch_count=1)
# 告诉rabbitmq,用callback来接收消息
# 默认情况下是要对消息进行确认的,以防止消息丢失。
# 此处将no_ack明确指明为True,不对消息进行确认。
channel.basic_consume(queue=queue_name,
                      on_message_callback=callback,
                      auto_ack=True)  # 自动发送确认消息
# 开始接收信息,并进入阻塞状态,队列里有信息才会调用callback进行处理
channel.start_consuming()
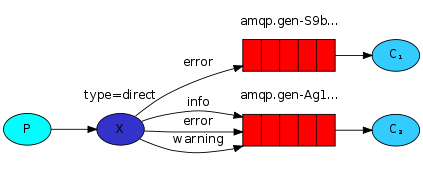
4.2 direct路由模式
此时生产者发送消息时需要指定RoutingKey,即路由Key,Exchange接收到消息时转发到与RoutingKey相匹配的队列中。
log message发送者:建立连接,声明direct类型的exchange,生成并发送log message到exchange,关闭连接,退出。
#生产者代码
#!/usr/bin/env python
# -*- coding: utf-8 -*-
# @Time     : 2023/3/21 17:12
# @Author   : 李泽雄
# @BoKeYuan : 小家电维修
# @File     : rabbitMQ_direct_pub.py
# @Version  : Python 3.10.10
# @Project  : python3
# @Software : PyCharm


# 生产者代码,测试命令可以使用:python rabbitMQ_direct_pub.py error 404error
import pika
import sys

connection = pika.BlockingConnection(pika.ConnectionParameters(host='localhost'))
channel = connection.channel()

# 声明一个名为direct_logs的direct类型的exchange
# direct类型的exchange
channel.exchange_declare(exchange='direct_logs',
                         exchange_type='direct')

# 从命令行获取basic_publish的配置参数
severity = sys.argv[1] if len(sys.argv) > 1 else 'info'
message = ' '.join(sys.argv[2:]) or 'Hello World!'

# 向名为direct_logs的exchage按照设置的routing_key发送message
channel.basic_publish(exchange='direct_logs',
                      routing_key=severity,
                      body=message)

print(" [x] Sent %r:%r" % (severity, message))
connection.close()
log message接收者:建立连接,声明direct类型的exchange,声明queue,使用提供的参数作为routing_key将queue绑定到exchange,开始循环接收log message并打印。
#消费者代码
#!/usr/bin/env python
# -*- coding: utf-8 -*-
# @Time     : 2023/3/21 17:12
# @Author   : 李泽雄
# @BoKeYuan : 小家电维修
# @File     : rabbitMQ_direct_sub.py
# @Version  : Python 3.10.10
# @Project  : python3
# @Software : PyCharm


# 消费者代码,测试可以使用:python rabbitMQ_direct_sub.py error
import pika
import sys

connection = pika.BlockingConnection(pika.ConnectionParameters(host='localhost'))
channel = connection.channel()

# 声明一个名为direct_logs类型为direct的exchange
# 同时在producer和consumer中声明exchage或queue是个好习惯,以保证其存在
channel.exchange_declare(exchange='direct_logs',
                         exchange_type='direct')

result = channel.queue_declare('', exclusive=True)
queue_name = result.method.queue

# 从命令行获取参数:routing_key
severities = sys.argv[1:]
if not severities:
    print(sys.stderr, "Usage: %s [info] [warning] [error]" % (sys.argv[0],))
    sys.exit(1)

for severity in severities:
    # exchange和queue之间的binding可接受routing_key参数
    # fanout类型的exchange直接忽略该参数。direct类型的exchange精确匹配该关键字进行message路由
    # 一个消费者可以绑定多个routing_key
    # Exchange就是根据这个RoutingKey和当前Exchange所有绑定的BindingKey做匹配,
    # 如果满足要求,就往BindingKey所绑定的Queue发送消息
    channel.queue_bind(exchange='direct_logs',
                       queue=queue_name,
                       routing_key=severity)

def callback(ch, method, properties, body):
    print(" [x] %r:%r" % (method.routing_key, body,))


channel.basic_consume(queue=queue_name,
                      on_message_callback=callback,
                      auto_ack=True)

channel.start_consuming()
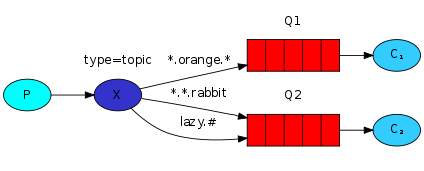
4.3 topic匹配模式
更细致的分组,允许在RoutingKey中使用匹配符。
- *:匹配一个单词
- #:匹配0个或多个单词
log message发送者:建立连接、声明topic类型的exchange、根据程序参数构建routing_key和要发送的message,以构建的routing_key将message发送给topic类型的exchange,关闭连接,退出。
#生产者代码
#!/usr/bin/env python
# -*- coding: utf-8 -*-
# @Time     : 2023/3/21 17:18
# @Author   : 李泽雄
# @BoKeYuan : 小家电维修
# @File     : rabbitMQ_topic_pub.py
# @Version  : Python 3.10.10
# @Project  : python3
# @Software : PyCharm

# 生产者代码,基本不变,只需将exchange_type改为topic(测试:python rabbitMQ_topic_pub.py rabbitmq.red
# red color is my favorite
import pika
import sys

connection = pika.BlockingConnection(pika.ConnectionParameters(host='localhost'))
channel = connection.channel()

# 声明一个名为direct_logs的direct类型的exchange
# direct类型的exchange
channel.exchange_declare(exchange='topic_logs',
                         exchange_type='topic')

# 从命令行获取basic_publish的配置参数
severity = sys.argv[1] if len(sys.argv) > 1 else 'info'
message = ' '.join(sys.argv[2:]) or 'Hello World!'

# 向名为direct_logs的exchange按照设置的routing_key发送message
channel.basic_publish(exchange='topic_logs',
                      routing_key=severity,
                      body=message)

print(" [x] Sent %r:%r" % (severity, message))
connection.close()
log message接收者:建立连接,声明topic类型的exchange,声明queue,根据程序参数构造routing_key,根据routing_key将queue绑定到exchange,循环接收并处理message。
#消费者代码
#!/usr/bin/env python
# -*- coding: utf-8 -*-
# @Time     : 2023/3/21 17:18
# @Author   : 李泽雄
# @BoKeYuan : 小家电维修
# @File     : rabbitMQ_topic_sub.py
# @Version  : Python 3.10.10
# @Project  : python3
# @Software : PyCharm


# 消费者代码,(测试:python rabbitMQ_topic_sub.py *.red)
import pika
import sys

connection = pika.BlockingConnection(pika.ConnectionParameters(host='localhost'))
channel = connection.channel()

# 声明一个名为direct_logs类型为direct的exchange
# 同时在producer和consumer中声明exchage或queue是个好习惯,以保证其存在
channel.exchange_declare(exchange='topic_logs',
                         exchange_type='topic')

result = channel.queue_declare('', exclusive=True)
queue_name = result.method.queue

# 从命令行获取参数:routing_key
severities = sys.argv[1:]
if not severities:
    print(sys.stderr, "Usage: %s [info] [warning] [error]" % (sys.argv[0],))
    sys.exit(1)

for severity in severities:
    # exchange和queue之间的binding可接受routing_key参数
    # fanout类型的exchange直接忽略该参数。direct类型的exchange精确匹配该关键字进行message路由
    # 一个消费者可以绑定多个routing_key
    # Exchange就是根据这个RoutingKey和当前Exchange所有绑定的BindingKey做匹配,
    # 如果满足要求,就往BindingKey所绑定的Queue发送消息
    channel.queue_bind(exchange='topic_logs',
                       queue=queue_name,
                       routing_key=severity)

def callback(ch, method, properties, body):
    print(" [x] %r:%r" % (method.routing_key, body,))


channel.basic_consume(queue=queue_name,
                      on_message_callback=callback,
                      auto_ack=True)

channel.start_consuming()
5.RPC远程过程调用
在应用场景2中描述了如何使用work queue将耗时的task分配到不同的worker中。但是,如果我们task是想在远程的计算机上运行一个函数并等待返回结果呢。这根场景2中的描述是一个完全不同的故事。这一模式被称为远程过程调用。现在,我们将构建一个RPC系统,包含一个client和可扩展的RPC server,通过返回斐波那契数来模拟RPC service。
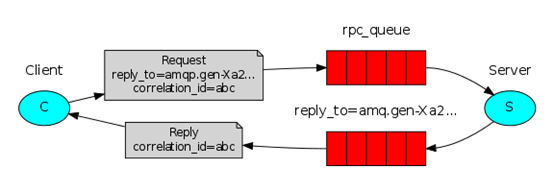
RPC server:建立连接,声明queue,定义了一个返回指定数字的斐波那契数的函数,定义了一个回调函数在接收到包含参数的调用请求后调用自己的返回斐波那契数的函数并将结果发送到与接收到message的queue相关联的queue,并进行确认。开始接收调用请求并用回调函数进行请求处理。
#生产者代码
#!/usr/bin/env python
# -*- coding: utf-8 -*-
# @Time     : 2023/3/21 17:26
# @Author   : 李泽雄
# @BoKeYuan : 小家电维修
# @File     : rabbitMQ_rpc_server.py
# @Version  : Python 3.10.10
# @Project  : python3
# @Software : PyCharm


# 生产者代码
# !/usr/bin/env python
# encoding:utf8
import pika

# 建立到达RabbitMQ Server的connection
connection = pika.BlockingConnection(pika.ConnectionParameters(
    host='localhost'))
channel = connection.channel()

# 声明一个名为rpc_queue的queue
channel.queue_declare(queue='rpc_queue')


# 计算指定数字的斐波那契数
def fib(n):
    if n == 0:
        return 0
    elif n == 1:
        return 1
    else:
        return fib(n - 1) + fib(n - 2)


# 回调函数,从queue接收到message后调用该函数进行处理
def on_request(ch, method, props, body):
    # 由message获取要计算斐波那契数的数字
    n = int(body)

    print (" [.] fib(%s)" % (n,))
    # 调用fib函数获得计算结果
    response = fib(n)

    # exchage为空字符串则将message发送个到routing_key指定的queue
    # 这里queue为回调函数参数props中reply_ro指定的queue
    # 要发送的message为计算所得的斐波那契数
    # properties中correlation_id指定为回调函数参数props中co的rrelation_id
    # 最后对消息进行确认
    ch.basic_publish(exchange='',
                     routing_key=props.reply_to,
                     properties=pika.BasicProperties(correlation_id= \
                                                         props.correlation_id),
                     body=str(response))
    ch.basic_ack(delivery_tag=method.delivery_tag)


# 只有consumer已经处理并确认了上一条message时queue才分派新的message给它
channel.basic_qos(prefetch_count=1)

# 设置consumeer参数,即从哪个queue获取消息使用哪个函数进行处理,是否对消息进行确认
channel.basic_consume( queue='rpc_queue',on_message_callback=on_request,)

print (" [x] Awaiting RPC requests")

# 开始接收并处理消息
channel.start_consuming()
RPC client:远程过程调用发起者:定义了一个类,类中初始化到RabbitMQ Server的连接、声明回调queue、开始在回调queue上等待接收响应、定义了在回调queue上接收到响应后的处理函数on_response根据响应关联的correlation_id属性作出响应、定义了调用函数并在其中向调用queue发送包含correlation_id等属性的调用请求、初始化一个client实例,以30为参数发起远程过程调用。
#消费者代码
#!/usr/bin/env python
# -*- coding: utf-8 -*-
# @Time     : 2023/3/21 17:26
# @Author   : 李泽雄
# @BoKeYuan : 小家电维修
# @File     : rabbitMQ_rpc_client.py
# @Version  : Python 3.10.10
# @Project  : python3
# @Software : PyCharm


# 消费者代码,这里以生成斐波那契数列为例
# !/usr/bin/env python
# encoding:utf8
import pika
import uuid


# 在一个类中封装了connection建立、queue声明、consumer配置、回调函数等
class FibonacciRpcClient(object):
    def __init__(self):
        # 建立到RabbitMQ Server的connection
        self.connection = pika.BlockingConnection(pika.ConnectionParameters(
            host='localhost'))

        self.channel = self.connection.channel()

        # 声明一个临时的回调队列
        result = self.channel.queue_declare('',exclusive=True)
        self.callback_queue = result.method.queue

        # 此处client既是producer又是consumer,因此要配置consume参数
        # 这里的指明从client自己创建的临时队列中接收消息
        # 并使用on_response函数处理消息
        # 不对消息进行确认
        self.channel.basic_consume(queue=self.callback_queue,
                                   on_message_callback=self.on_response,
                                   auto_ack=True,
                                   )

    # 定义回调函数
    # 比较类的corr_id属性与props中corr_id属性的值
    # 若相同则response属性为接收到的message
    def on_response(self, ch, method, props, body):
        if self.corr_id == props.correlation_id:
            self.response = body

    def call(self, n):
        # 初始化response和corr_id属性
        self.response = None
        self.corr_id = str(uuid.uuid4())

        # 使用默认exchange向server中定义的rpc_queue发送消息
        # 在properties中指定replay_to属性和correlation_id属性用于告知远程server
        # correlation_id属性用于匹配request和response
        self.channel.basic_publish(exchange='',
                                   routing_key='rpc_queue',
                                   properties=pika.BasicProperties(
                                       reply_to=self.callback_queue,
                                       correlation_id=self.corr_id,
                                   ),
                                   # message需为字符串
                                   body=str(n))

        while self.response is None:
            self.connection.process_data_events()

        return int(self.response)


# 生成类的实例
fibonacci_rpc = FibonacciRpcClient()

print (" [x] Requesting fib(30)")
# 调用实例的call方法
response = fibonacci_rpc.call(30)
print (" [.] Got %r" % (response,))
参考: https://blog.csdn.net/zyz511919766/article/details/41946521?locationNum=5&fps=1
https://zhuanlan.zhihu.com/p/135384847
https://www.jianshu.com/p/9d6947925809/