1. GPIO
pin脚计算规则:
引脚编号 = 控制引脚的寄存器基数 + 控制引脚寄存器位数
如:GPIO_E2(即PE02) = (‘E’-’A’)*32+2=130
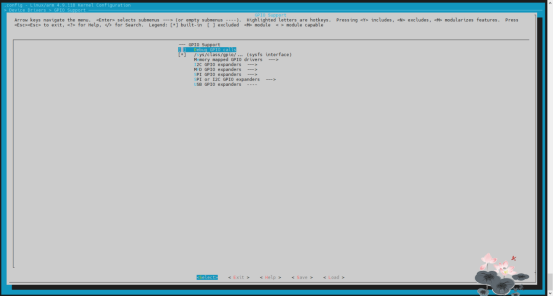
1)系统支持
make kernel_menuconfig
Device Drivers --->
[*] GPIO Support --->
[*] /sys/class/gpio/... (sysfs interface)
2)GPIO控制脚本
##############################################################################
# Data: 2023/02/14
# Author: Jimmy Nie <nieshihua@blackvision.net>
##############################################################################
#!/bin/sh

NUM=0 #eg. PB06:('B'-'A')*32+6=38
DIR=0 #0:out, 1:in
OFF=0
ON=1
SLEEP_SECS=2

#0. GPIO tool helper
helper() {
        echo -e "GPIO tool usage:"
        echo -e "\t$0 init <port num> <directory>"
        echo -e "\t\tInit the GPIO driver! You must do this first"
        echo -e "\t\tport num: the gpio port, such PB06, port_num=('B'-'A')*32+6=38"
        echo -e "\t\tdirectory: 0,out; 1,in \n"

        echo -e "\t$0 turn_on <port num>"
        echo -e "\t$0 turn_off <port_num>"
        echo -e "\t$0 switch <port_num> <seconds>"
        echo -e "\t\tseconds: >0 \n"

        echo -e "\t -h or --help for this information"

        exit
}

#1. Init the GPIO driver
init() {
        #1. set the port number
        if [[ $# -ne 0 ]]; then
                        NUM=$1
                        echo -e "GPIO Port Num: $NUM"

        fi

        #2. set the directory
        if [[ $# -eq 2 ]]; then
                DIR=$2
                echo -e "GPIO$NUM diretory: $DIR (0:out, 1:in)"
        fi

        #3. write the export and directory
        if [[ -f /sys/class/gpio/export ]]; then
                        chmod 754 /sys/class/gpio/export
                        if [[ ! -e "/sys/class/gpio/gpio$NUM" ]]; then
                                echo -n $NUM > /sys/class/gpio/export
                        fi

                        cd /sys/class/gpio/gpio$NUM
                        if [[ $DIR -eq 0 ]]; then
                                echo -n "out" > /sys/class/gpio/gpio$NUM/direction
                        else
                                echo -n "in" > /sys/class/gpio/gpio$NUM/direction
                        fi
        else
                        echo -e "/sys/class/gpio/export was not existed"
                        exit
        fi

        sleep 1s

}

#2. Turn on/off the gpio
turn_on() {
        if [[ ! -e "/sys/class/gpio/gpio$NUM" ]]; then
                echo -e "Please init the GPIO driver first"
                helper
        fi

        kill_switch

        echo -e "Turn On ~~~~~~"
        echo -n $ON > /sys/class/gpio/gpio$NUM/value
}

turn_off() {
        if [[ ! -e "/sys/class/gpio/gpio$NUM" ]]; then
                echo -e "Please init the GPIO driver first"
                helper
        fi

        kill_switch

        echo -e "Turn Off ~~~~~~"
        echo -n $OFF > /sys/class/gpio/gpio$NUM/value
}

switch() {
        if [[ ! -e "/sys/class/gpio/gpio$NUM" ]]; then
                echo -e "Please init the GPIO driver first \n"
                helper
        fi

        if [[ $# -eq 2 ]]; then
                SLEEP_SECS=$2
        fi

        echo -e "Switch seconds: $SLEEP_SECS"

        kill_switch

        while true
        do
                echo -e "ON ~~~~~~"
                echo -n $ON > /sys/class/gpio/gpio$NUM/value
                sleep $SLEEP_SECS
                echo -e "OFF ~~~~~~"
                echo -n $OFF > /sys/class/gpio/gpio$NUM/value
                sleep $SLEEP_SECS
        done
}

kill_switch() {
        SWITCH_PID=`ps|grep "switch $NUM" | grep -v "grep"|awk '{print $1}'|tr -d ' \n'`
        if [[ -n "$SWITCH_PID" ]] && [[ $SWITCH_PID -gt 0 ]]; then
                echo -e "kill gpio$NUM, pid=$SWITCH_PID"
                kill -9 $SWITCH_PID
        else
                echo -e "GPIO$NUM not switch!"
        fi
}


if [[ $# -lt 2 ]]; then
        helper
fi

NUM=$2

case $1 in
        init)
                if [[ $# -ge 3 ]]; then
                        init $2 $3
                else
                        helper
                fi
                ;;
        turn_on)
                turn_on $2
                ;;
        turn_off)
                turn_off $2
                ;;
        switch)
                if [[ $# -eq 3 ]]; then
                        switch $2 $3
                else
                        switch $2
                fi
                ;;
        *)
                helper
                ;;
esac
3)自启动脚本
本文以控制LED灯为例,LED灯的连接引脚PB02,高电平有效。
自启动文本放在/etc/init.d/目录下
#!/bin/sh /etc/rc.common
START=99
PROC_NAME=bvrobot

start(){
        #Init System LED driver PB02
        /sbin/gpio_tool init 34 0
        sleep 1
        /sbin/gpio_tool turn_on 34
}
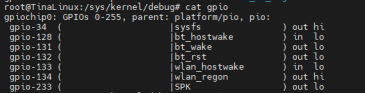
4)问题点
若写入export时候,报“resource busy”,如图:

可以查看一下该引脚是否被占用,查看命令为:
cat /sys/kernel/debug/gpio
2. PWM
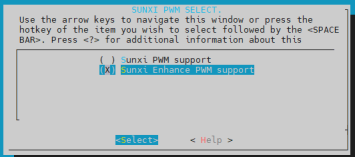
1)PWM支持
make kernel_menuconfig
Device Drivers --->
[*] Pulse-Width Modulation (PWM) Support --->
<*> SUNXI PWM SELECT. (Sunxi Enhance PWM support) --->
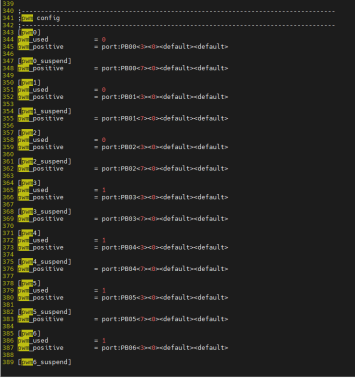
2)系统配置
需要将哪些GPIO引脚复用成PWM?
cdevice 后,找到 sys_config.fex,根据硬件原理图进行配置,我的配置如下:
3)PWM脚本工具
3.1)PWM设备驱动框架
通过PWM框架注册的PWM设备,可通过sysfs 方式进行操控。sysfs文件路径为/sys/class/pwm。
3.2)pwmchipX
/sys/class/pwm/pwmchipX表示PWM控制器
- npwm: PWM 控制器下共有几路 PWM 输出
- export: 在使用 PWM 之前,需要将其导出
- unexport: 将导出的 PWM 删除。
3.3)pwmX
通过 export 导出之后,会生成 pwmX目录。
- enable: 用于使能或禁止PWM输出。
0: 禁止 PWM 输出1: 使能 PWM 输出
- duty_cycle: 用于配置 PWM 的占空比,以 ns(纳秒)为单位
- period: 用于配置 PWM 周期,以 ns(纳秒)为单位
- polarity: 用于配置极性。
normal:普通;inversed:反转;
3.4)通用脚本
##############################################################################
# Data: 2023/02/14
# Author: Jimmy Nie <nieshihua@blackvision.net>
##############################################################################
#!/bin/sh
 NUM=0
PERIOD=100000000      #unit: ns, 100ms
DUTY_CYCLE=50000000  #unit: ns, 50ms
POLARITY='normal'

#0. GPIO tool helper
helper() {
        echo -e "PWM tool usage:"
        echo -e "\t$0 init [port num] <period> <duty_cycle>"
        echo -e "\t\t !!! Init the GPIO driver! You must do this first !!!"
        echo -e "\t\t port num: the pwm port"
        echo -e "\t\t period: unit(ns), default:100ms"
        echo -e "\t\t duty_cycle: unit(ns), default:50ms"
        echo -e "\t\t polarity: [normal] or [inversed], default:nomal"

        echo -e ""
        echo -e "\t$0 deinit [port num]"
        echo -e "\t$0 enable [port num]"
        echo -e "\t$0 disable [port num]"

        echo -e ""
        echo -e "\t -h or --help for this information"

        exit
}

#1. Init the GPIO driver
init() {
        #1. set the port number
        if [[ $# -eq 1 ]]; then
                NUM=$1
                echo -e "PWM$NUM period=$PERIOD (default), duty_cycle=$DUTY_CYCLE (default)"

        fi

        #2. set the directory
        if [[ $# -eq 2 ]]; then
                PERIOD=$2
                echo -e "PWM$NUM period=$PERIOD, duty_cycle=$DUTY_CYCLE (default)"
        else
                if [[ $# -eq 3 ]]; then
                        PERIOD=$2
                        DUTY_CYCLE=$3
                        echo -e "PWM$NUM period=$PERIOD, duty_cycle=$DUTY_CYCLE"
                fi
        fi

        #3. write the export and period
        if [[ -f /sys/class/pwm/pwmchip0/export ]]; then
                chmod 754 /sys/class/pwm/pwmchip0/export
                if [[ ! -e "/sys/class/pwm/pwmchip0/pwm$NUM" ]]; then
                        echo -n $NUM > /sys/class/pwm/pwmchip0/export
                else
                        echo -e "The PWM$NUM already existed!"
                        exit;
                fi

                sleep 1
                cd /sys/class/pwm/pwmchip0/pwm$NUM

                echo $PERIOD > period
                echo $DUTY_CYCLE > duty_cycle
                echo $POLARITY > polarity
        else
                echo -e "/sys/class/pwm/pwmchip0/export was not existed"
                exit
        fi
}

deinit() {
        if [[ -e "/sys/class/pwm/pwmchip0" ]]; then
                echo 1 >  /sys/class/pwm/pwmchip0/unexport
        fi

        echo -e "deinit /sys/class/pwm/pwmchip0/pwm$NUM"
}

#2. Enable/Disable the pwm
enable() {
        if [[ ! -e "/sys/class/pwm/pwmchip0/pwm$NUM" ]]; then
                echo -e "Please init the PWM$NUM first"
                helper
        fi

        echo -e "Enable PWM$NUM ~~~~~~"
        echo -n $ON > /sys/class/pwm/pwmchip0/pwm$NUM/enable
}

disable() {
        if [[ ! -e "/sys/class/pwm/pwmchip0/pwm$NUM" ]]; then
                echo -e "Please init the PWM$NUM first"
                helper
        fi

        echo -e "Disable PWM$NUM ~~~~~~"
        echo -n $OFF > /sys/class/pwm/pwmchip0/pwm$NUM/enable
}


#3. Process
if [[ $# -lt 2 ]]; then
        helper
fi

NUM=$2

case $1 in
        init)
                if [[ $# -eq 2 ]]; then
                        init $2
                elif [[ $# -eq 3 ]]; then
                        init $2 $3
                elif [[ $# -eq 4 ]]; then
                        init $2 $3 $4
                else
                        helper
                fi
                ;;
        deinit)
                deinit $2
                ;;
        enable)
                enable $2
                ;;
        disable)
                disable $2
                ;;
        *)
                helper
                ;;
esac
4)信号检测
使用示波器,测试使能的引脚
3. UART
R328的GPIO需要配置成uart,以便与外部进行交互;目前R328具备5个串口(UART0-4,其中0为debug口),具体可以参见R328的datasheet!
1)配置说明
设置的格式为:
port:<port><mux feature><pullup/down><drive capability><output level>` # Port端口+组内序号<功能分配><内部电阻状态><驱动能力><输出电平状态>
- port: 与GPIO对应,参考硬件原理图
- mux feature:功能配置
input:0; output:1, 其它见对应芯片的datasheet- pullup/down:disabled:0; pullup enabled:1; pulldown enabled:2 (only valid when port is an input)
- drive capability:defines the output drive in mA, values are 0-3 corresponding to 10mA, 20mA, 30mA and 40mA.
- output level:sets the initial output level for the port; 0 = low; 1 = high (only valid for outputs)
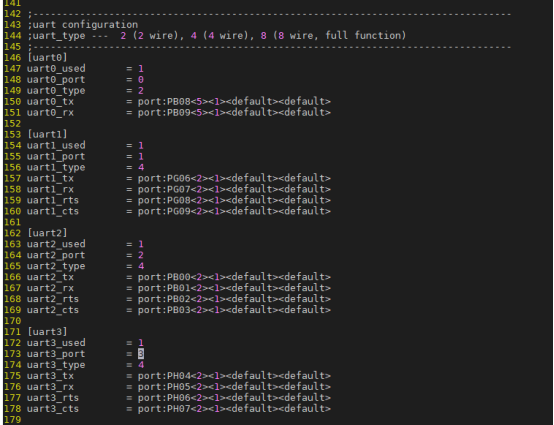
2)系统配置
以下所有的配置,一定根据自己的硬件原理图来,切莫直接抄袭!
- 1-
cconfig后,vim sys_config.fex- 2- 设置debug口为uart0

- 3- 设置其它的串口(和GPIO做对应)
3)串口检测
串口已经配置完成,那如何验证自己配置的串口是否成功了呢?
方法其实很多,可借助PC的串口调试工具等!
但是最简单的方式,其实是将Rx和Tx进行短接,然后用Rx发送数据,看Tx是否能接收的到,具体操作如下(以uart3为例):
注意:进行下列步骤前,务必保证对应串口已经初始化!!!
① 将Rx和Tx进行连接:这真是一个天才的想法,不要崇拜哥
② 实时检测串口的Rx:cat /dev/ttyS3 &
③ 使用Tx发送数据:echo "11223344556677889900" > /dev/ttyS3
查看Rx和Tx收到的数据数量:
cat /proc/tty/driver/ua

4)串口测试C++源码
留言单发
4. LEDC
用于控制LED,使得LED可以常亮、灭、闪烁、呼吸。
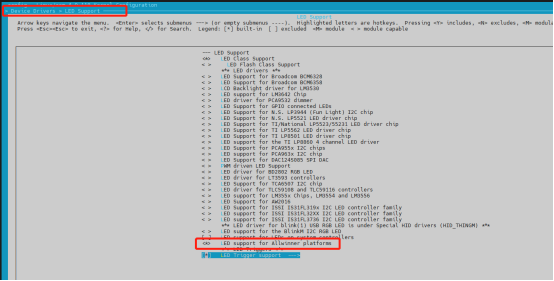
1)系统支持
make kernel_menuconfig
Device Drivers
└─>LED_Support
└─>LED support for Allwinner platforms
2)系统配置
cdevice后,vim sys_config.fex,根据硬件原理图进行配置