1.组件封装
- 父传子 【使用最多的 主要用于封装
展示型的组件】 - 子传父 【主要用于封装 有
交互的组件, 一般是有事件绑定】 - 插槽 【主要是要插入内容】
1)卡片组件封装【展示型组件】
封装
<template>
  <div class="as-panel">
    <div class="icon-wrapper">
      <i class="iconfont" :class="icon" :style="{color: iconColor}"></i>
    </div>
    <div class="content-right">
      <h1 class="title">{{ title }}</h1>
      <span class="count">{{ count }}</span>
    </div>
  </div>
</template>

<script>
export default {
  props: {
    // 参数

    // 图标
    icon: {
      type: String,
    },
    // 标题
    title: {
      type: String,
    },
    // 数字
    count: {
      type: Number,
    },
    // 图标颜色
    iconColor: {
      type: String,
    },
  },
}
</script>

<style lang="less" scoped>
.as-panel {
  background-color: #fff;
  width: 100%;
  height: 120px;
  border-radius: 4px;
  box-shadow: 1px 1px 5px #ccc;
  display: flex;
  margin-bottom: 20px;
  .icon-wrapper {
    flex: 1;
    display: flex;
    justify-content: center;
    align-items: center;
    .iconfont {
      font-size: 40px;
    }
  }

  .content-right {
    flex: 2;
    display: flex;
    flex-direction: column;
    justify-content: center;
    align-items: center;

    .title {
      font-size: 22px;
      font-weight: 700;
      margin-bottom: 10px;
    }
    .count {
      font-size: 24px;
      color: #ccc;
    }
  }
}
</style>
使用:
<as-panel icon="icon-shouye" title="总订单" count="100" iconColor="#ff0000"></as-panel>2) 按钮组件封装
封装
<template>
  <button @click="handleClick" class="as-button" :class="classObj">
    <!-- 预留插槽 将来插入内容 -->
    <slot />
  </button>
</template>

<script>
export default {
  // 接收参数
  props: {
    // 按钮类型
    type: {
      type: String,
    },
  },

  methods: {
    handleClick() {
      this.$emit('click')
    },
  },

  computed: {
    // 计算类名
    classObj() {
      return {
        'as-button-primary': this.type === 'primary',
        'as-button-danger': this.type === 'danger',
        'as-button-success': this.type === 'success',
      }
    },
  },
}
</script>

<style lang="less" scoped>
.as-button {
  min-width: 60px;
  height: 35px;
  background-color: #6495ed;
  color: #fff;
  border-radius: 4px;
  outline: none;
  border: 2px solid #fff;
}

.as-button-primary {
  background-color: #409eff;
}

.as-button-danger {
  background-color: #f56c6c;
}

.as-button-success {
  background-color: #00ff00;
}
</style>
<as-button @click="handleOk" type="primary">确定</as-button>
<as-button @click="handleCancel" type="danger">取消</as-button>3)模态框组件的封装
<template>
<div @click="handleClose" class="as-dialog" v-show="visible">
<div @click.stop class="dialog-wrapper" :style="{ width: width + 'px' }">
<div class="header">
<span class="title">{{ title }}</span>
<span @click="handleClose">X</span>
</div>
<div class="content">
<!-- 这里预留一个匿名插槽 将来插入内容 -->
<slot></slot>
</div>
<div class="footer">
<!-- 预留了一个具名插槽 将来外部的内容可以插入这个位置 -->
<slot name="footer"></slot>
</div>
</div>
</div>
</template>
<script>
export default {
props: {
// 插槽显示或隐藏
visible: {
type: Boolean,
},
// 标题
title: {
type: String,
},
// 宽度
width: {
type: String,
},
},
methods: {
// 关闭
handleClose() {
// 子传父 告诉父亲关闭模态框
this.$emit('close')
},
},
}
</script>
<style lang="less" scoped>
.as-dialog {
display: flex;
justify-content: center;
align-items: center;
position: fixed;
left: 0;
top: 0;
width: 100%;
height: 100%;
z-index: 50;
background-color: rgba(0, 0, 0, 0.5);
.dialog-wrapper {
display: flex;
flex-direction: column;
width: 50%;
min-height: 300px;
background-color: #fff;
border-radius: 4px;
box-shadow: 1px 1px 5px #000;
.header {
display: flex;
justify-content: space-between;
align-items: center;
flex: 0 0 60px;
padding: 0 20px;
box-sizing: border-box;
background-color: #17415b;
color: #fff;
}
.content {
flex: 1;
padding: 20px;
box-sizing: border-box;
}
.footer {
display: flex;
justify-content: flex-end;
align-items: center;
flex: 0 0 60px;
padding: 0 20px;
box-sizing: border-box;
}
}
}
</style>使用:
<!-- 模态框 -->
<as-dialog @close="dialogVisible = false" :visible="dialogVisible" title="订单详情" width="800">
<p>内容内容呢</p>
<!-- 尾部 -->
<template slot="footer">
<as-button @click="handleOk" type="primary">确定</as-button>
<as-button @click="handleCancel" type="danger">取消</as-button>
</template>
</as-dialog>4)echarts组件的封装
准备:
下载安装echarts yarn add echarts --save
挂载到vue原型上 (为了减少体积可使用按需引入)
mian.js中引入echarts --import echarts from "echarts"
然后--Vue.proptotype.$echarts=echarts
父组件中:
1)请求接口,获取数据
2)创建引入注册使用封装的echarts组件
3)向组件传入需要的数据
子组件中:
1)props接收数据
2)封装函数
a)echarts组件内初始化echarts let chart =this.$eharts.init(this.$el)
b)配置 --let option ={}
c)使用配置 --chart setOption(option)
3)mounted和watch监听数据变化调用函数
echarts组件封装:
<template>
  <!-- 容器 -->
  <div id="box" :style="style"></div>
</template>
<script>
//引入echarts
import echarts from 'echarts'
export default {
  //配置对象与样式
  props: {
    style: {
      type: Object,
    },
    options: {
      type: Object,
    },
  },
  methods: {
    drawLine() {
      //初始化
      let myCharts = echarts.init(document.getElementById('box'))
      //配置
      let option = this.options
      //创建图表
      myCharts.setOption(option)
    },
  },
  mounted() {
    this.drawLine()
  },
  watch: {
    options: {
      handler() {
        this.drawLine()
      },
      deep: true,
    },
  },
}
</script>

<style lang="less" scoped></style>
父组件使用:
<template>
  <div class="goods-total">
    <!-- 头部 -->
    <div class="header">
      <span class="title">时间范围</span>
      <el-date-picker
        class="time"
        v-model="date"
        type="daterange"
        align="right"
        unlink-panels
        range-separator="至"
        start-placeholder="开始日期"
        end-placeholder="结束日期"
        :picker-options="pickerOptions2"
      ></el-date-picker>
      <el-button type="primary" @click="search">查询</el-button>
      <el-button type="primary" @click="reset">重置</el-button>
    </div>

    <!-- 使用echarts组件 -->
    <zz-charts :options="options"></zz-charts>
  </div>
</template>

<script>
//引入报表组件
import ZzCharts from "@/components/zz-charts/ZzCharts.vue";
//引入获取数ajax请求api
import { getTotalOrder } from "@/api/order";
//引入时间处理库
import moment from "moment";
export default {
  components: {
    ZzCharts,
  },
  data() {
    return {
      date: [], //查询数据
      options: {},
    };
  },
  methods: {
    //   发送请求获取数据
    async getData() {
      let { data } = await getTotalOrder({
        date:
          this.date === null ? JSON.stringify([]) : JSON.stringify(this.date),
      });
      //处理获取到是数据的时间格式
      data.forEach((item) => {
        item.orderTime = moment(item.orderTime).format("YYYY-MM-DD HH:mm:ss");
      });
      //赋值到data中渲染
      this.options = {
        title: "订单统计",
        legend: "金额",
        xData: data.map((item) => item.orderTime),
        series: [
          {
            name: "金额",
            type: "line",
            data: data.map((item) => item.orderAmount),
          },
        ],
      };
    },
    //点击查询
    search() {
      this.getData();
    },
    //重置
    reset() {
      this.date = [];
      this.getData();
    },
  },
  created() {
    this.getData();
  },
};
</script>

<style lang="less" scoped>
.goods-total {
  .header {
    .time {
      margin: 0 10px;
    }
  }
  .chartOut {
    width: 100%;
    padding: 20px 20px 50px 20px;
    margin-top: 50px;
    background: #fff;
    #myEcharts {
      width: 70%;
      height: 500px;
      background: #fff;
    }
  }
}
</style>4.1)vue 封装的 echarts 组件被同一个页面多次调用,数据被覆盖问题解决办法。
初始化方式改为ref方式 this.charts = this.$echarts.init(this.$refs.bar_dv)
5)百度地图组件封装
2.权限路由+菜单权限
默认路由一直存在,动态路由登录才计算出显示哪些模块。
1.常规配置路由
2.然后进行路由的拆分,静态路由和动态路由(动态路由中配置meta字段设置可以访问的用户)
3.实例化路由,将静态路由配置传入进去
4.进行登录状态的配置,筛选动态路由并使用addRoutes追加路由配置,如果存在子路由的情况可以使用递归配合判断,满足条件结束递归。
5.设置路由守卫进行跳转判定。
实现方式一:
import Vue from "vue"
import VueRouter from "vue-router"
Vue.use(VueRouter)
import Index from "../pages/Index/Index.vue"
/*
    权限路由的实现
    1.路由拆分(静态和动态)
    2.动态路由的配置
    3.实例化路由将静态配置放进去
    4.判断登录状态,计算筛选动态路由,并追加,登录后要刷新进行重新运行代码
    5.设置守卫,判断状态
*/

//静态路由
const routes = [
    {
        path: "/",
        component: Index
    },
    {
        path: "/login",
        component: () => import("../pages/Login/Login.vue")
    }
]
//1.动态路由配置
const dynamicRoutes = [
    {
        path: "/movieEdit",
        meta: { roles: ["user1"] },
        component: () => import("../pages/MovieEdit/MovieEdit.vue")
    },
    {
        path: "/useCharts",
        meta: { roles: ["user2"] },
        component: () => import("../pages/UseCharts/UseCharts.vue")
    },
    {
        path: "/baiduMap",
        meta: { roles: ["user2"] },
        component: () => import("../pages/UseBaiduMap/UseBaiduMap.vue")
    },
]


//3.实例化路由对象   将配置丢进去
const router = new VueRouter({
    routes
})

//4.判断登录状态,筛选并追加路由
if (localStorage.getItem("role")) {
    let role = localStorage.getItem("role")
    const newDynamicRoutes = dynamicRoutes.filter((item) => {
        if (item.meta.roles.includes(role)) {
            return true
        } else {
            return false
        }
    })
    router.addRoutes(newDynamicRoutes)
}

//5.设置路由守卫 判断登录状态
router.beforeEach((to, from, next) => {
    if (localStorage.getItem("t_k")) {
        next()
    } else {
        if (to.path === "/login") {
            next()
        } else {
            next("/login")
        }
    }
})

//暴露出去
export default router
实现方式二:龙sir版
1)登录成功后,将后端返回的role【用户角色】,存入本地。
2)在路由js文件中封装一个创建动态路由的函数,取出当前角色的role
export function createDynimicRoute() {
  let role = local.get('role') || ''
  if (!role) return
  console.log('当前用户角色:', role)
}

createDynimicRoute() // 初始化调用 [刷新的时候 要执行路由代码 就会执行初始化调用 !!!]
3)登录的时候,也会调用一次,才能正确的创建动态路由
// Login.vue
// 引入创建动态路由的函数
import { createDynimicRoute } from '@/router'

if (code === 0) {
    local.set('role', role) // 把当前用户角色存入本地
    createDynimicRoute() // 登录成功 调用1次 创建动态路由
}
4)动态路由拆分
把路由分为两份
默认的:【登录和首页】
// 路由配置【默认的】
const routes = [
  // 登录
  {
    path: '/login',
    component: Login
  },

  // 后台首页
  {
    path: '/',
    component: Layout,
    redirect: '/home',
    meta: { title: '后台首页' },
    children: [
      {
        path: '/home',
        component: () => import("@/views/home/Home.vue")
      }
    ]
  },
]

// 创建路由实例对象
const router = new VueRouter({
  routes // 把路由传入渲染 [默认只是渲染登录 和 后台首页]
})
动态的:【全部】
做一些自定义meta字段的配置--roles是自定义的名字-可以随便取。
如果不配,默认就是不做权限,大家都可以访问
如果配了,就要区分。 roles: ['super', 'normal'] --数组形式,可拓展
// 动态路由【动态的】
const dynimicRoute = [
  // 登录
  {
    path: '/login',
    component: Login
  },

  // 后台首页
  {
    path: '/',
    component: Layout,
    redirect: '/home',
    meta: { title: '后台首页' },
    children: [
      {
        path: '/home',
        component: () => import("@/views/home/Home.vue")
      }
    ]
  },

  // 订单管理
  {
    path: '/order',
    component: Layout,
    redirect: "/order/order-list",
    meta: { title: '订单管理' },
    children: [
      {
        path: '/order/order-list',
        component: () => import("@/views/order/OrderList.vue")
      },
      {
        name: 'orderEdit',
        path: '/order/order-edit',
        component: () => import("@/views/order/OrderEdit.vue")
      },
    ]
  },

  // 商品管理
  {
    path: '/goods',
    component: Layout,
    meta: { title: '商品管理', roles: ['super', 'normal'] },
    redirect: "/goods/goods-list",
    children: [
      {
        path: '/goods/goods-list',
        component: () => import("@/views/goods/GoodsList.vue"),
        meta: { title: '商品列表' },
      },
      {
        path: '/goods/goods-add',
        component: () => import("@/views/goods/GoodsAdd.vue"),
        meta: { title: '商品添加' },

      },
      {
        path: '/goods/goods-cate',
        component: () => import("@/views/goods/GoodsCate.vue"),
        meta: { title: '商品分类', roles: ['super'] },
      }
    ]
  },

  // 店铺管理
  {
    path: '/shop',
    component: Layout,
    meta: { title: '店铺管理', roles: ['super'] },
    children: [
      {
        path: '',
        component: () => import("@/views/shop/Shop.vue")
      }
    ]
  },

  // 账号管理
  {
    path: '/account',
    component: Layout,
    meta: { title: '账号管理', roles: ['super', 'normal'] },
    redirect: '/account/account-list',
    children: [
      {
        path: '/account/account-list',
        component: () => import("@/views/account/AccountList.vue"),
        meta: { title: '账号列表', roles: ['super'] },
      },
      {
        path: '/account/account-add',
        component: () => import("@/views/account/AccountAdd.vue"),
        meta: { title: '账号添加', roles: ['super'] },
      },
      {
        path: '/account/pass-modify',
        component: () => import("@/views/account/PassModify.vue"),
        meta: { title: '修改密码' },
      },
      {
        path: '/account/personal',
        component: () => import("@/views/account/Personal.vue"),
        meta: { title: '个人中心' },
      },
    ]
  },

  // 销售统计
  {
    path: '/total',
    component: Layout,
    meta: { title: '销售统计', roles: ['super'] },
    redirect: '/total/goods-total',
    children: [
      {
        path: '/total/goods-total',
        component: () => import("@/views/total/GoodsTotal.vue"),
        meta: { title: '商品统计' },

      },
      {
        path: '/total/order-total',
        component: () => import("@/views/total/OrderTotal.vue"),
        meta: { title: '订单统计' },

      }
    ]
  },
]
5)计算动态路由
创建动态路由 挂载动态路由
/**
 * 创建动态路由的函数
*/
export function createDynimicRoute() {
  let role = local.get('role') || ''
  if (!role) return
  // 把可以访问的动态路由计算出来--计算函数提取出去
  let accessRoutes = calcRoutes(dynimicRoute, role)
  // 动态添加路由【这些被动态添加进去的路由 就可以被访问了】
  router.addRoutes(accessRoutes)
}
createDynimicRoute() // 初始化调用
5)-1 计算动态路由方法实现(将计算动态路由的函数方法提取出去)
/**
 * 计算动态路由
 * 参数1:完整的动态路由
 * 参数2:当前用户角色
 * 返回值: 算出来的可以有权限访问的路由数组
 */
function calcRoutes(dynimicRoute, role) {
  let accessRoutes = dynimicRoute.filter(route => {
    if (hasPermission(route, role)) { //判断的方法又提取出去
      // 递归过滤
      if (route.children && route.children.length) {
        route.children = calcRoutes(route.children, role)
      }
      return true
    } else {
      return false
    }
  })
  return accessRoutes
}
5)-2 判断是否有权限访问的方法
/**
 * 判断是有当前角色 对 当前单个路由对象 有权限访问
 * @param {当前路由对象} route
 * @param {当前角色}  role
 * @return { true 或 false }  如果有权限访问 就返回true 否则 就返回false
 */
function hasPermission(route, role) {
  if (route.meta && route.meta.roles) { // 如果配置了
    return route.meta.roles.includes(role)
  } else {
    return true   // 如果没有配置meta中的roles 证明这个模块不需要做权限 都可以访问
  }
}
6)权限菜单实现
计算:
在路由中配置meta字段,看那些模块==不需要==再左侧菜单显示
 // 登录
  {
    path: '/login',
    component: Login,
    meta: { isMenu: false }
  },

   // 404
  {
    path: '/404',
    component: () => import('@/views/error404/Error404.vue'),
    meta: { isMenu: false }
  },
  {
    path: '*',
    redirect: '/404',
    meta: { isMenu: false }
  }
在创建动态路由的函数中 调用计算菜单的函数 传入权限路由
export function createDynimicRoute() {
  let role = local.get('role') || ''
  if (!role) return
  // 把可以访问的动态路由计算出来
  let accessRoutes = calcRoutes(dynimicRoute, role)
  // 动态添加路由【这些被动态添加进去的路由 就可以被访问了】
  router.addRoutes(accessRoutes)

  // 计算权限菜单 /***************************/
  let menus = calcMenus(accessRoutes)
  local.set('menus', menus) // 存入本地

}
createDynimicRoute() // 初始化调用
计算菜单
/**
 * 计算权限菜单
 * 参数1:权限路由
 */
function calcMenus(accessRoutes) {
  let menus = accessRoutes.filter(route => {
    if (route.meta && route.meta.hasOwnProperty('isMenu')) {
      return false
    } else {
      return true
    }
  })
  return menus;
}
7)菜单的渲染
<template>
<div class="left-menu">
<!-- logo -->
<div class="login-container">
<img width="42" height="42" src="../../../assets/imgs/logo.png" alt="logo" />
外卖商家后台
</div>
<!-- 左侧导航 -->
<el-menu
:default-active="curActive"
active-text-color="#1890FF"
router
unique-opened
background-color="#001529"
text-color="#fff"
>
<template v-for="menu in menus">
<!-- 没有子 -->
<el-menu-item
v-if="menu.children && menu.children.length === 1 || menu.path === '/order'"
:index="menu.path"
:key="menu.path"
>
<i class="iconfont" :class="menu.meta.icon"></i>
<span slot="title">{{ menu.meta.title }}</span>
</el-menu-item>
<!-- 有子 -->
<el-submenu v-else :index="menu.path" :key="menu.path">
<template slot="title">
<i class="iconfont" :class="menu.meta.icon"></i>
<span>{{ menu.meta.title }}</span>
</template>
<el-menu-item
v-for="subMenu in menu.children"
:key="subMenu.path"
:index="subMenu.path"
>{{ subMenu.meta.title }}</el-menu-item>
</el-submenu>
</template>
</el-menu>
</div>
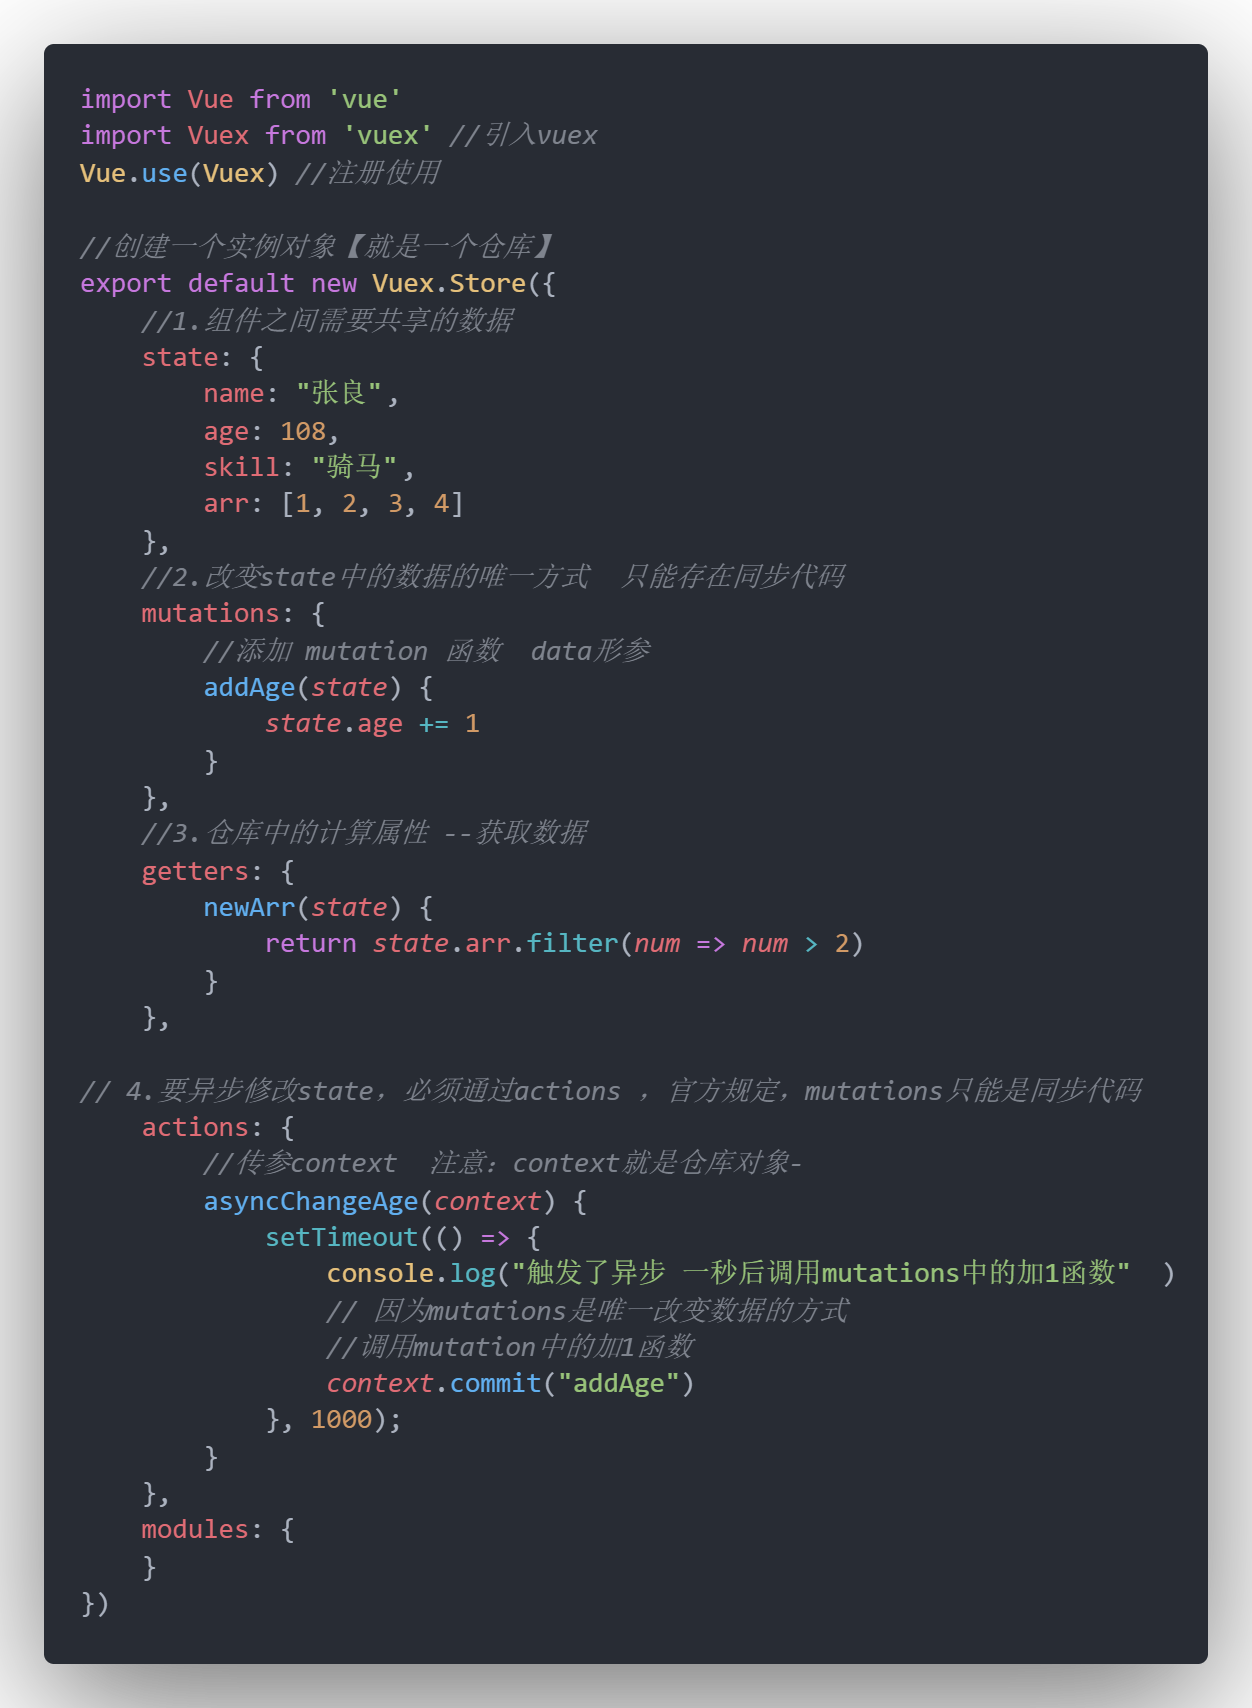
</template>3.vuex
VueX是适用于在Vue项目开发时使用的状态管理工具。--搭建项目时多选一项
vuex帮助我们管理组件之间需要共享的数据。
this.$store--实例的仓库对象
准备工作:
1)安装vuex
2)根目录创建store文件和index.js
3)index.js中引入vue和vuex并使用vuex
4)export default new Vuex.Store ({}) 暴露出去
5)main.js中引入store中的js 并在new Vue中使用(index可以省略)
6)请求到的数据存入仓库 this.$store.commit("方法名", data); //【方法名】仓库中mutations中的函数,data存到仓库的数据
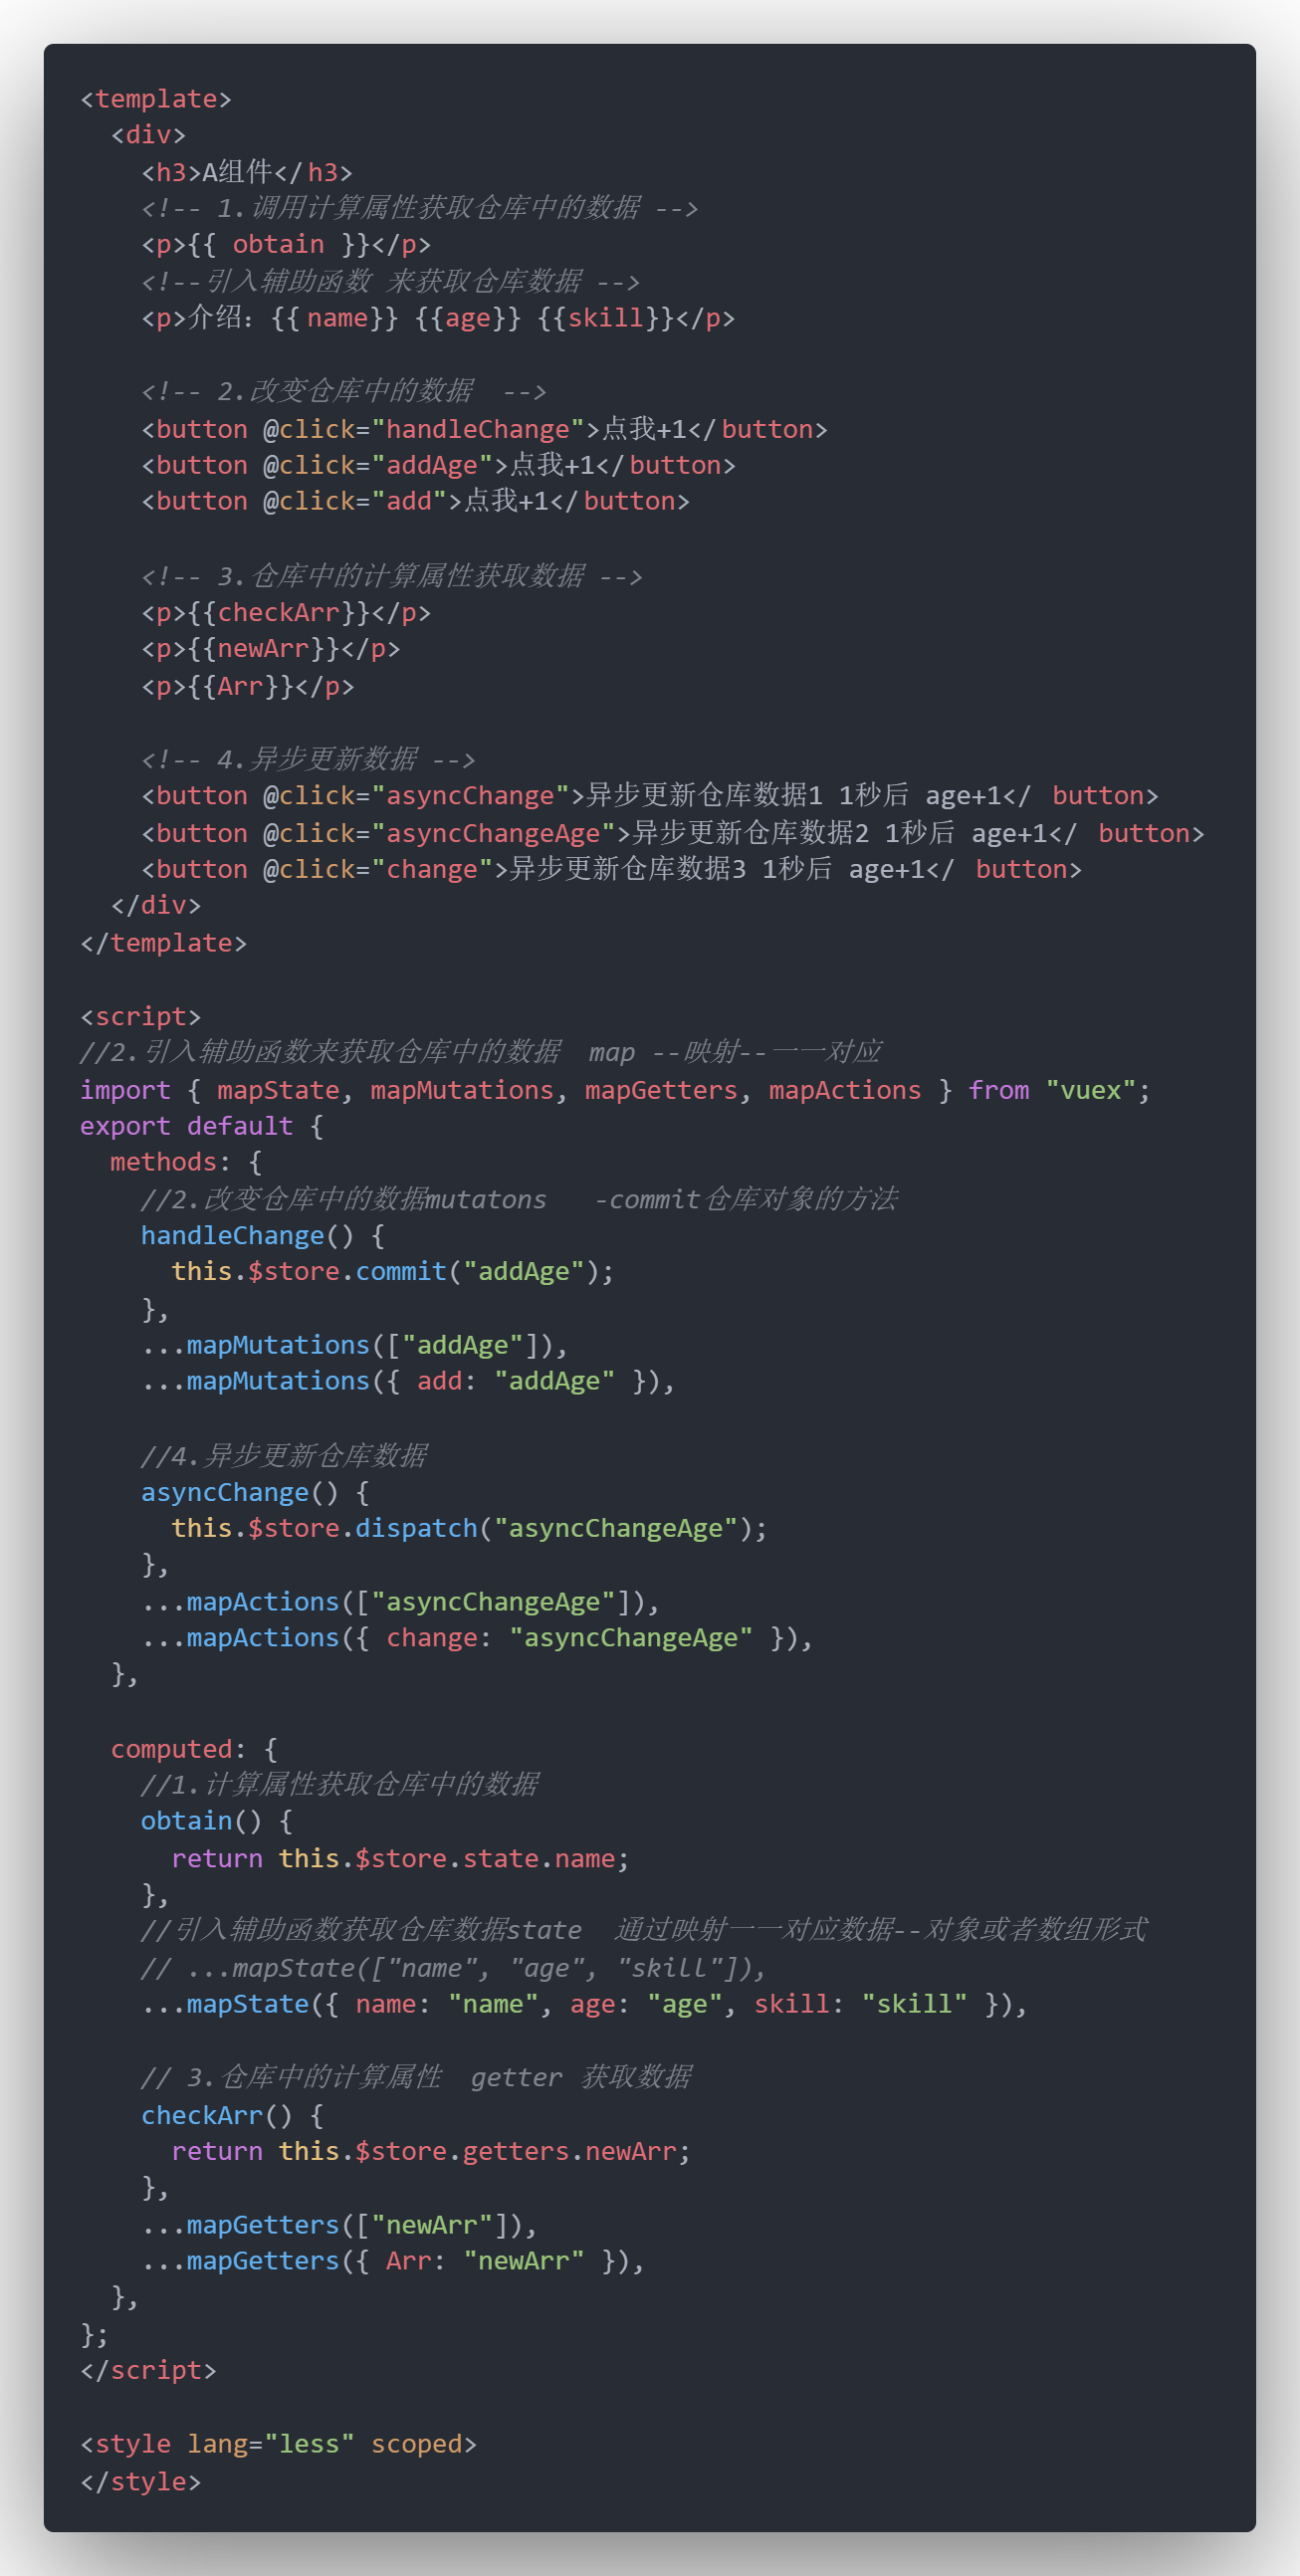
7)组件内获取和改变仓库数据
computed 中获取仓库中的数据
a.引入辅助函数{mapState,mapMutations,mapGetters,mapActions}
methods中改变仓库数据
核心api
- state --存放需要共享的数据
- mutations 改变state的唯一方式【只能放同步代码】
- getters 仓库中的计算属性
- actions 如果要异步修改state,必须通过actions ,官方规定,mutations只能是同步代码
- modules 如果仓库过大,需要拆分模块
modules 如果仓库过大,需要拆分模块
const moduleA = {
  state: () => ({ ... }),
  mutations: { ... },
  actions: { ... },
  getters: { ... }
}

const moduleB = {
  state: () => ({ ... }),
  mutations: { ... },
  actions: { ... }
}

const store = new Vuex.Store({
  modules: {
    a: moduleA,
    b: moduleB
  }
})

store.state.a // -> moduleA 的状态
store.state.b // -> moduleB 的状态
//其他基本使用
*********vuex中***********
import Vue from 'vue'
import Vuex from 'vuex'
Vue.use(Vuex)
import { getListByType } from '@/common/request/index'
const state = {
//药品类型列表
rPType:[],
//使用频率表
frequency:[],
//用药途径表
channel:[]
}
const mutations = {
//存储药品类型、使用频率、用药途径表
setRpTypeList(state,datas){
state.rPType=datas.rPType
state.frequency=datas.frequency
state.channel=datas.channel
console.log(state.rPType,'类型-----------')
console.log(state.frequency,'频率-----------')
console.log(state.channel,'途径-----------')
}
}
const actions = {
//获取类型、用药途径和频率表
async getListByType(context){
let rPType = await getListByType({type:3})
let frequency = await getListByType({type:5})
let channel = await getListByType({type:6})
const datas={
rPType,
frequency,
channel
}
context.commit("setRpTypeList",datas)
}
}
***********触发发送请求存储数据的页面***********
//存储药品类型、使用频率、用药途径枚举表
this.$store.dispatch('getListByType')4.vue 性能优化:
路由懒加载 生命周期销毁后移除事件 所有组件都是按需引入
5.vue-router的从头配置(项目中没有路由时)
在创建项目后(不带路由的项目)使用路由
步骤
**************//1:安装*****
cnpm install --save vue-router

***************//2:新建配置文件*****
在src下创建router文件夹:内创建index.js

***************//3:router/index.js中引入vue和vue-router******
import Vue from "vue";
import VueRouter from "vue-router";

*************//4.使用一下vuerouter******
Vue.use(VueRouter);

************//5.引入组件/这一步可以换成在配置中懒加载*****
import comform from "../components/comform.vue";
import comform2 from "../components/comform2.vue";

//路由懒加载:配置项中-component:()=>import('路径')  ---进入这个页面才会加载路由--性能优化

****************//6.配制路由*****
const routes = [
  {
    path:"/tab1",
    component: comform
  },
  {
    path: "/tab2",
    component: comform2
  }
]

***********//7.实例化路由,将路由配置丢进去*****
var router =  new VueRouter({
  routes
})

*****//8.暴露出去******
export default router;

*****************//9:导入和挂载路由到vue全局对象(都在根入口main.js)********
import router from "./router/index.js"    //import router 的router 一定要小写, 不要写成Router, 否则报 can't match的报错
new Vue({
  router,
  render: h => h(App),
}).$mount('#app')

******//10.设置路由出口*********
  <router-view></router-view>

*****************//11:使用,页面配置跳转路径********
在想要使用展示路由的地方配置展示和配置跳转项:如在app.js 入口处template模板
<template>
  <div id="app">
      <!-- <my-form/> -->
      <router-link to="/tab1">显示1</router-link>
      <router-link to="/tab2">显示2</router-link>
      <router-view></router-view>
  </div>
</template>
6.自动化注册组件
1)src下创建util文件夹和index.js
2)vue官网中找到深入了解组件==>>基础组件的自动化全局注册
2)全复制,然后作下修改
  // 其组件目录的相对路径,复制下来的时候查看自己的目录进行修改
  '../components',
  // 是否查询其子目录,true递归
  true,
  // 匹配基础组件文件名的正则表达式
  /[A-Z]\w+\.(vue|js)$/
7.v-model语法糖,(自定义组件的v-model实现)
原理:
1)子组件定义model对象接收外界数据和设置传递数据到外界的自定义事件
2)props中定义接收的数据。
3)data中保存props接收到的值,供给组件内使用
4)在需要发送到外界数据的地方,将内部数据发送到外界。
1)子组件
<template>
  <div>
    <input type="text" v-model="txt" @input="changeTxt" />
  </div>
</template>

/* 1.外界数据传到组件内展示
  2.数据改变时通过$emit传到外界
 */
<script>
export default {
//model接收外界数据和定义发送数据的事件
  model: {
    prop: "msg",  //接收到的外界数据
    event: "sendTxt", //发送数据的事件
  },
  props: {
    msg: String, //定义接收到的数据的类型
  },
  data() {
    return {
      txt: this.msg, //将
    };
  },
  methods: {
    changeTxt() {
      this.$emit("sendTxt", this.txt);
    },
  },
};
</script>

<style lang="less" scoped>
</style>
2)父组件
<template>
  <div id="app">
    <Input v-model="txt" />
    <p>{{ txt }}</p>
  </div>
</template>

<script>
export default {
  data() {
    return {
      txt: "111",
    };
  },
};
</script>

<style lang="less" scoped>
#app {
  color: orange;
  font-size: 30px;
  text-align: center;
}
</style>
8.vue中开启debugger
packge.json中
"rules": {
"no-debugger":0
}
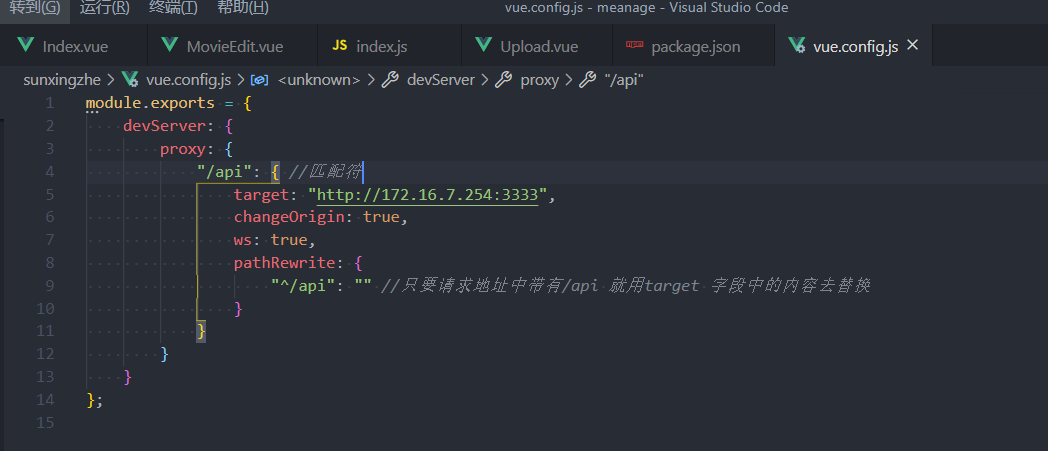
9.启用代理
/
10.富文本编辑器
世界上最好的富文本编辑器(http://www.wangeditor.com/)--官网
1)安装命令:yarn add wangeditor -S
2)创建通用富文本编辑器组件,引入需要使用的地方。
3)富文本组件中配置富文本编辑器。
4)进行v-model数据的双向绑定v-model数据双向绑定看标题7。
//父组件*******************************
<!-- 富文本编辑器展示内容 -->
  <div v-html="content"></div>
<!-- 引入富文本编辑器组件 -->
  <Editor v-model="content" />

//子组件********************************
<template>
  <!-- 富文本编辑器组件 -->
  <div id="div1"></div>
</template>

<script>
import E from "wangeditor";

export default {
  //1.model定义一进一出
  model: {
    prop: "edit_txt", //2.定义要接收的数据
    event: "sendTxt", //3.定义发送数据的自定义事件
  },
  props: {
    edit_txt: String, //4.根据model指定,定义实际数据类型
  },
  data() {
    return {
      editor_content: this.edit_txt, //5.接收到的数据赋值给data,供本组件使用
    };
  },
  mounted() {
    //初始化文本编辑器实例
    const editor = new E("#div1");

    // 配置 onchange 回调函数
    editor.config.onchange = (newHtml) => {
      console.log("change 之后最新的 html", newHtml);
      this.editor_content = newHtml;
      this.$emit("sendTxt", this.editor_content); //6.发送出去
    };
    // 配置触发 onchange 的时间频率,默认为 200ms
    editor.config.onchangeTimeout = 500; // 修改为 500ms
    editor.create();

    editor.txt.html(this.editor_content); // 重新设置编辑器内容
  },
};
</script>

<style lang="sass" scoped>

</style>
11.环境变量配置
概念:根据不同运行模式,切换不同数据结果的的变量定义
常用模式 dev test product
环境变量的创建
建以下格式的文件
.env.dev .env.aaa
在package.json中启动命令后 添加--mode = dev
环境变量的使用
在vue.config.js中使用 process.env.环境变量名 --全大写
在非vue.config.js中使用 process.env.VUE_APP_变量名
12.$set设置动态属性
?调用方法:this.$set( target, key, value )
? target:要更改的数据源(可以是对象或者数组)
? key:要更改的具体数据
? value :重新赋的值
@click="openRpList(item)"
//传入当前行对象 每次触发函数都设置isOpenRpList属性,并且以上一次取反
openRpList(item) {
  this.$set(item, 'isOpenRpList', !item.isOpenRpList);
},
13.vue设置请求超时和中断请求
超时状态
 axios.get('http://xxx.com/index/index', {
  		timeout: 300000  //这里来设置请求超时的时间
    })
  }).then(res => {})
  .catch(err => {
	console.log('数据请求超时')
  })
当前端请求发送并且响应未完成时,终止请求,不再返回数据
1、Axios 提供了一个 CancelToken的函数,这是一个构造函数,该函数的作用就是用来取消接口请求的。利用axios请求的config参数,向axios添加一个包含cancelToken的config配置对象。示例:
<body>
  <div id="app">
    <button @click="getMsg" class="get-msg">获取数据</button>
    <button @click="cancelGetMsg" class="cancel">取消获取</button>
  </div>
  <script>
  var app = new Vue({
    el: '#app',
    data: {
      cancel: null // 这里要先初始化
    },
    methods: {
      getMsg () {
        let CancelToken = axios.CancelToken
        let self = this
        axios.get('http://xxx.com/index/index', {
          cancelToken: new CancelToken(c => {
            this.cancel = c
            console.log(c)
            // 这个参数 c 就是CancelToken构造函数里面自带的取消请求的函数,这里把该函数当参数用
          })
        }).then(res => {})
        .catch(err => {})
      },
      cancelGetMsg () {
        this.cancel() // 终止请求
      }
    }
  })
  </script>
</body>
14.this.$el和this.$refs
ref 有三种用法:
1、ref 加在普通的元素上,用this.$refs.(ref值) 获取到的是dom元素
2、ref 加在子组件上,用this.$refs.(ref值) 获取到的是组件实例,可以使用组件的所有方法。在使用方法的时候直接this.$refs.(ref值).方法() 就可以使用了。
3、利用 v-for 和 ref 获取一组数组或者dom 节点
应注意的坑有:
1、ref 需要在dom渲染完成后才会有,在使用的时候确保dom已经渲染完成。比如在生命周期 mounted(){} 钩子中调用,或者在 this.$nextTick(()=>{}) 中调用。
2、如果ref 是循环出来的,有多个重名,那么ref的值会是一个数组 ,此时要拿到单个的ref 只需要循环就可以了。
$el:
获取 OffsetTop,组件不是DOM元素,是没有OffsetTop的,无法通过 点 .OffsetTop来获取的。就需要通过$el来获取组件中的DOM元素
15.解决刷新页面丢失store数据的问题
state: {
    teamA: JSON.parse(sessionStorage.getItem("teamA")) || '主队'
},
mutations: {
    data_teamA(state, x) {
        sessionStorage.setItem('teamA', JSON.stringify(x))
        state.teamA = x
    }
},
16.input添加回车事件
@keyup.enter.native="keyupClick";