目录
介绍
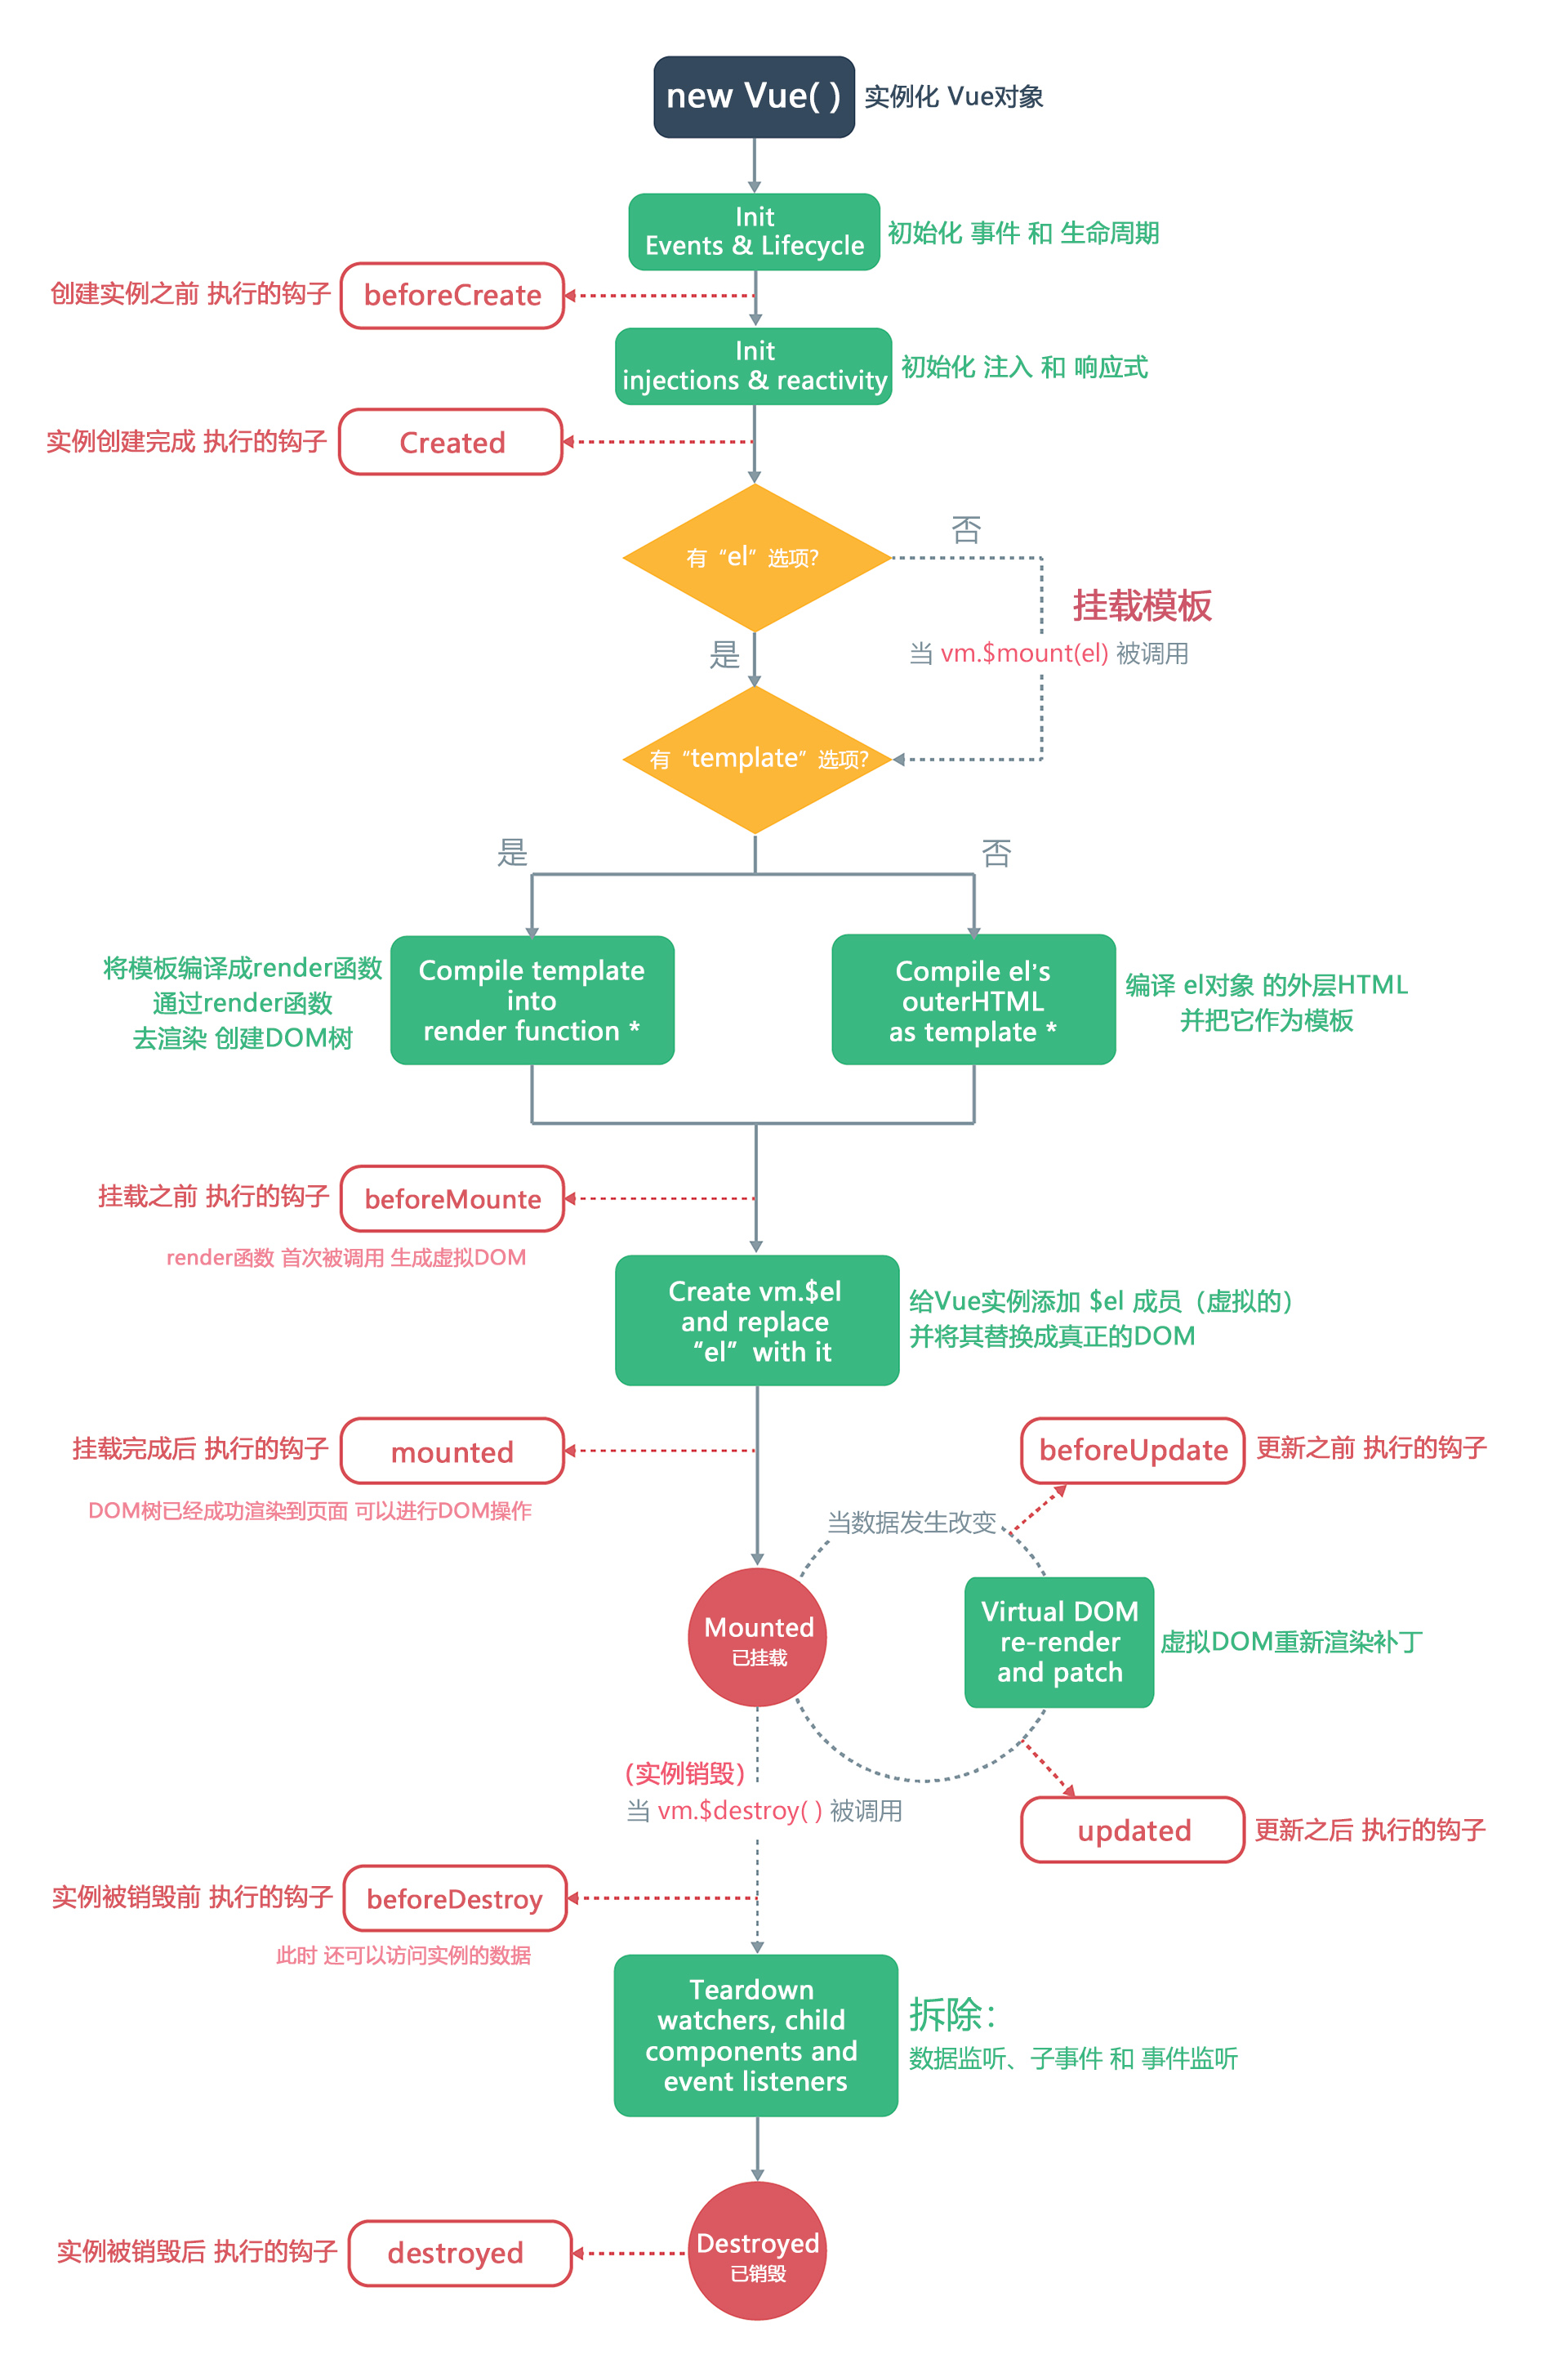
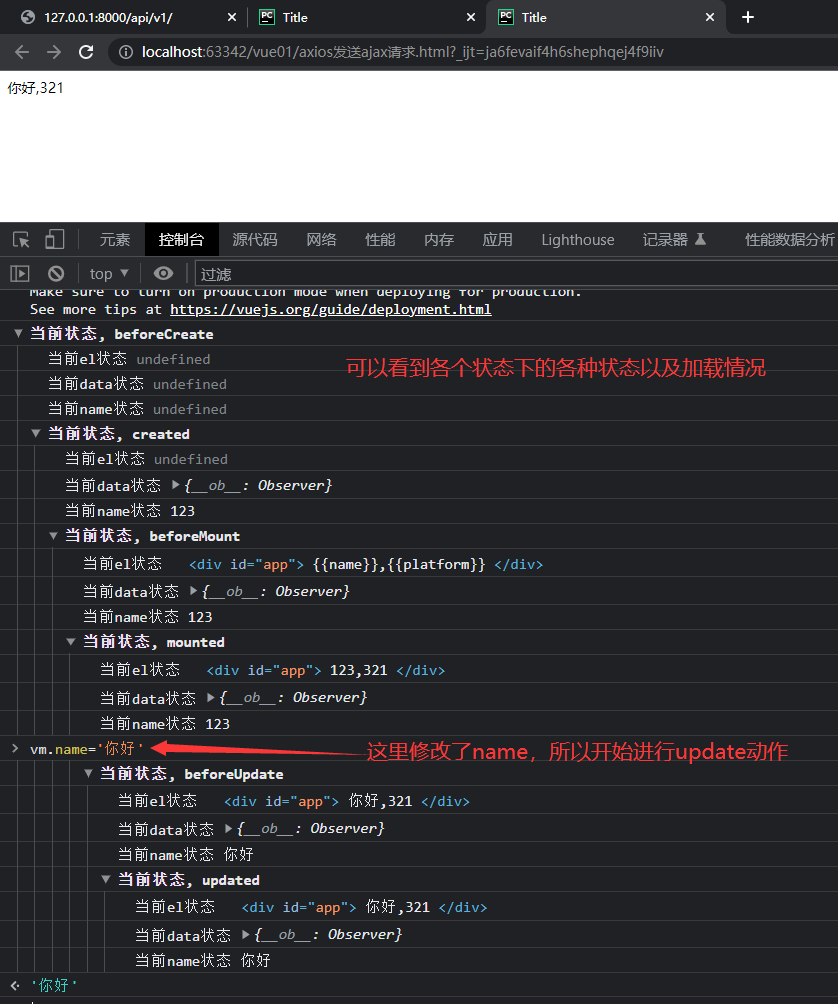
Vue实例有一个完整的生命周期,也就是从开始创建初女台化数据、编译模板、挂载DOM、渲染一更新一渲染、卸载等一系列过程,我们称这是Vue的生命周期。
生命周期: vue实例从创建到销毁的过程。
生命周期钩子: 就是生命周期事件的别名而已
| 钩子函数 | 描述 |
|---|---|
| 创建期间的生命周期函数 | |
| beforeCreate | 创建Vue实例之前调用,实例刚在内存中被创建出来,此时,还没有初始化好data 和 methods 属性 |
| created | 创建Vue实例成功后调用(可以在此处发送异步请求后端数据),也就是实例已经完成了模板的编译,但是还没有挂载到页面中 |
| beforeMount | 渲染DOM之前调用,此时已经完成了模板的翻译,但是还有完全挂载到页面中 |
| mounted | 创建Vue实例之前调用,实例刚在内存中被创建出来,此时,还没有初始化好data 和 methods 属性 |
| 运行期间的生命周期函数 | |
| beforeUpdate | 重新渲染之前调用(数据更新等操作时,控制DOM重新渲染),也就是状态更新之前执行此函数,此时 data 中的状态值是最新的,但是界面上显示的数据还是旧的,因为此时还没有开始重新渲染DOM节点 |
| updated | 重新渲染完成之后调用,也就是实例更新完毕之后调用次函数,此时 data 中的状态值 和 界面上显示的数据,都已经完成了更新,界面已经被重新渲染好了 |
| 销毁期间的生命周期函数 | |
| beforeDestroy | 实例销毁之前调用,在这一步,实例仍然完全可用 |
| 当执行 beforeDestroy 钩子函数的时候,Vue实例就已经从运行阶段进入到了销毁阶段;当执行 beforeDestroy 的时候,实例身上所有的 data 和所有的 methods, 以及 过滤器、指令、、 都处于可用状态,此时,还没有真正执行销毁的过程 | |
| destroyed | Vue 实例销毁后调用。调用后,vue 实例 指示的所有东西都会解绑,所有的事件监听器会被移除,所有的子实例也会被销毁 |
<!DOCTYPE html>
<html lang="en">
<head>
    <meta charset="UTF-8">
    <title>Title</title>
    <script src="./js/vue.js"></script>
    <script src="https://unpkg.com/axios/dist/axios.min.js"></script>

</head>
<body>
<div id="app">
    {{name}},{{platform}}
</div>
</div>

<script>
    var vm = new Vue({
        el: '#app',
        data: {
            name: '123',
            platform: '321',
        },
        methods: {},
        beforeCreate() {
            console.group('当前状态, beforeCreate')
            console.log('当前el状态', this.$el)
            console.log('当前data状态', this.$data)
            console.log('当前name状态', this.name)
        }
        ,
        created() {
            console.group('当前状态, created')
            console.log('当前el状态', this.$el)
            console.log('当前data状态', this.$data)
            console.log('当前name状态', this.name)
        },
        beforeMount() {
            console.group('当前状态, beforeMount')
            console.log('当前el状态', this.$el)
            console.log('当前data状态', this.$data)
            console.log('当前name状态', this.name)
        },
        mounted() {
            console.group('当前状态, mounted')
            console.log('当前el状态', this.$el)
            console.log('当前data状态', this.$data)
            console.log('当前name状态', this.name)
        },
        beforeUpdate() {
            console.group('当前状态, beforeUpdate')
            console.log('当前el状态', this.$el)
            console.log('当前data状态', this.$data)
            console.log('当前name状态', this.name)
        },
        updated() {
            console.group('当前状态, updated')
            console.log('当前el状态', this.$el)
            console.log('当前data状态', this.$data)
            console.log('当前name状态', this.name)
        },
        beforeDestroy() {
            console.group('当前状态, beforeDestroy')
            console.log('当前el状态', this.$el)
            console.log('当前data状态', this.$data)
            console.log('当前name状态', this.name)
        },
        destroyed() {
            console.group('当前状态, destroyed')
            console.log('当前el状态', this.$el)
            console.log('当前data状态', this.$data)
            console.log('当前name状态', this.name)
        }
    })
</script>
</body>
</html>
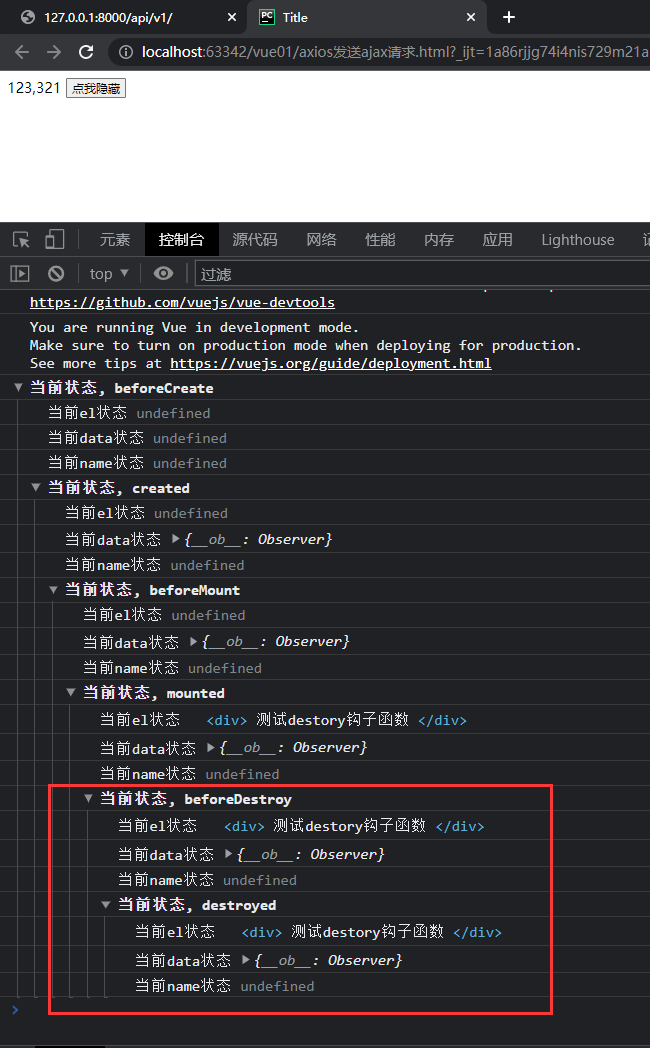
因为beforeDestroy与destoryed状态是关闭后才出现的,所以在这里看不到,可以使用组件的形式进行展示,比如使用了v-if的标签,在定义为false后,组件会被销毁掉,这时就会触发destroy类型的函数。
代码如下:
<!DOCTYPE html>
<html lang="en">
<head>
    <meta charset="UTF-8">
    <title>Title</title>
    <script src="./js/vue.js"></script>
</head>
<body>
<div id="app">
    <button @click="btnFunc">点我隐藏</button>
    <mycomp v-if="show"></mycomp>
</div>
<script>
    Vue.component(
        'mycomp',
        {
            template: `
              <div>
              {{test}}
              </div>
            `,
            data() {
                return {
                    test: '测试destory钩子函数',
                }
            },
            methods: {},
            beforeCreate() {
                console.group('当前状态, beforeCreate')
                console.log('当前el状态', this.$el)
                console.log('当前data状态', this.$data)
                console.log('当前name状态', this.name)
            },
            created() {
                console.group('当前状态, created')
                console.log('当前el状态', this.$el)
                console.log('当前data状态', this.$data)
                console.log('当前name状态', this.name)
            },
            beforeMount() {
                console.group('当前状态, beforeMount')
                console.log('当前el状态', this.$el)
                console.log('当前data状态', this.$data)
                console.log('当前name状态', this.name)
            },
            mounted() {
                console.group('当前状态, mounted')
                console.log('当前el状态', this.$el)
                console.log('当前data状态', this.$data)
                console.log('当前name状态', this.name)
            },
            beforeUpdate() {
                console.group('当前状态, beforeUpdate')
                console.log('当前el状态', this.$el)
                console.log('当前data状态', this.$data)
                console.log('当前name状态', this.name)
            },
            updated() {
                console.group('当前状态, updated')
                console.log('当前el状态', this.$el)
                console.log('当前data状态', this.$data)
                console.log('当前name状态', this.name)
            },
            beforeDestroy() {
                console.group('当前状态, beforeDestroy')
                console.log('当前el状态', this.$el)
                console.log('当前data状态', this.$data)
                console.log('当前name状态', this.name)
            },
            destroyed() {
                console.group('当前状态, destroyed')
                console.log('当前el状态', this.$el)
                console.log('当前data状态', this.$data)
                console.log('当前name状态', this.name)
            }
        })
    var vm = new Vue({
        el: '#app',
        data: {
            name: '123',
            platform: '321',
            show: false
        },
        methods: {
            btnFunc() {
                this.show =! this.show
            }
        },
    })
</script>
</body>
</html>