一、Helm工具介绍
1.1 了解Helm
Helm是Kubernetes中查找、分享、构建应用的最佳方式。
Helms 是一个Kubernetes应用的包管理工具,用来管理chart(一种预先配置的安装包资源)。
官网地址:
官网地址: https://helm.sh/
github地址:https://github.com/helm/helm/releases
1.2 Helm核心概念
- Chart:Chart是helm package,包含了一个k8s应用运行起来的所有要素。比如service、deployment、configmap、serviceaccount、rbac等,这些要素以template文件的形式存在,结合values文件,最终渲染出能被k8ss执行的yaml文件。
- Respository:仓库是charts集合,方便进行分享和分发。
- Hub:不同个人和组织提供的公共仓库(Respository)形成分散和分布的Helm仓库,不利于查找,私有官方提供Helm Hub,各公共仓库可以注册到Helm Hub,Helm只是分布式的仓库的几种展示中心。仓库注册到Helm Hub时,会将Chart清单文件向Helm Hub同步一份,这样可以在Helm Hub集中展示仓库列表和各仓库中的Chart列表。
Chart包也就是tgz文件实际上存储在各仓库中。Helm Hub并不实际存储Chart包。Helm只是在查询Chart时和Helm Hub有交互,其它操作都是和仓库直接交互的。 - Realase:Release是Helm Chart在Kubernetes的一个运行实例,这个release 名字会出现在k8s,其中service 和deploy的名字跟这个release 名字一致。
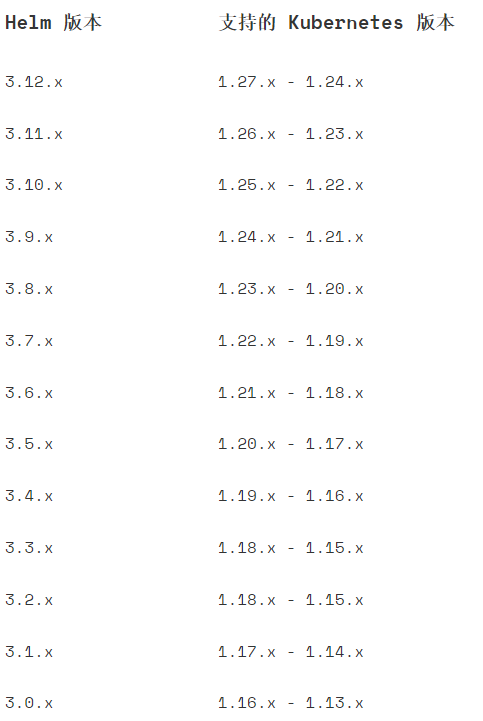
1.3 Helm版本和Kubernetes 版本要求
二、Helm工具用法
2.1 安装Helm
官网下载地址:https://github.com/helm/helm/releases
wget https://get.helm.sh/helm-v3.12.3-linux-amd64.tar.gz解压并做软链接
tar zxf helm-v3.12.3-linux-amd64.tar.gz  -C /opt/
mv /opt/linux-amd64/  /opt/helm
ln -s /opt/helm/helm  /bin/
2.2 Helm常用命令
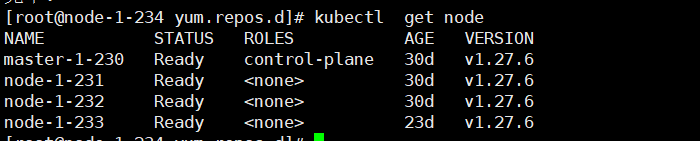
node-1-134 配置kubectl
添加仓库
#helm repo add bitnami https://charts.bitnami.com/bitnami
"bitnami" has been added to your repositories
#helm repo add helm_sh https://charts.helm.sh/stable

#helm repo add aliyun https://kubernetes.oss-cn-hangzhou.aliyuncs.com/charts
"aliyun" has been added to your repositories
更新仓库列表到本地
# helm repo update
Hang tight while we grab the latest from your chart repositories...
...Successfully got an update from the "aliyun" chart repository
...Successfully got an update from the "bitnami" chart repository
Update Complete. ⎈Happy Helming!⎈
查看仓库列表
# helm repo list
NAME   	URL
bitnami	https://charts.bitnami.com/bitnami
aliyun 	https://kubernetes.oss-cn-hangzhou.aliyuncs.com/charts
在本地仓库搜索所有chart
helm search repo 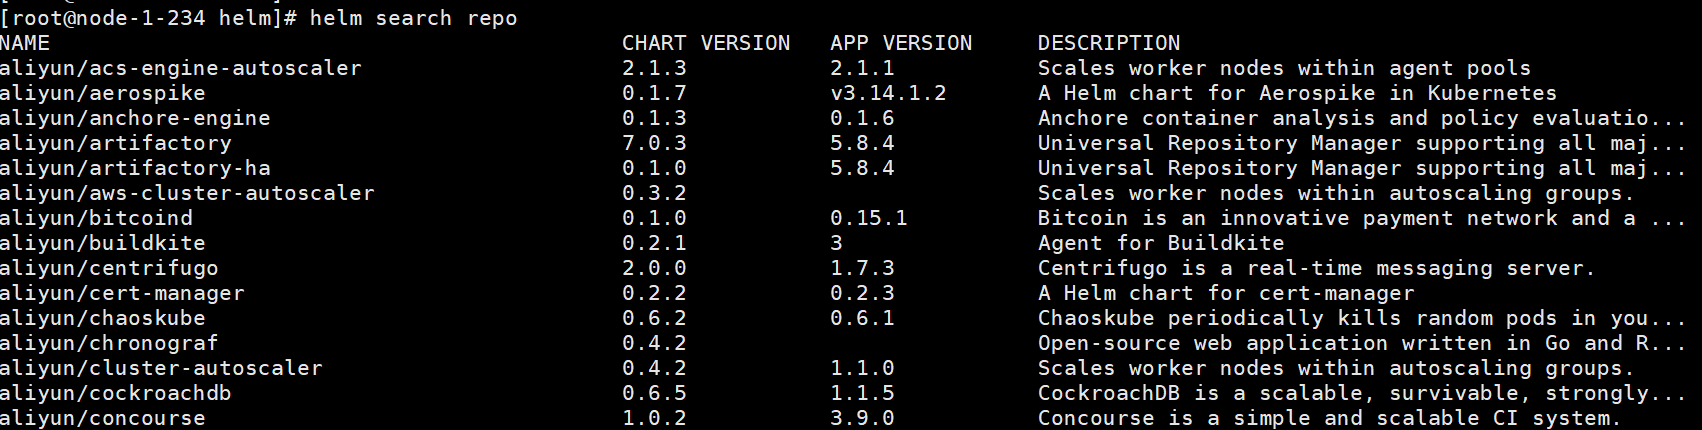
在本地仓库搜索mysql
# helm search repo mysql
NAME                         	CHART VERSION	APP VERSION	DESCRIPTION
aliyun/mysql                 	0.3.5        	           	Fast, reliable, scalable, and easy to use open-...
bitnami/mysql                	9.14.1       	8.0.35     	MySQL is a fast, reliable, scalable, and easy t...
aliyun/percona               	0.3.0        	           	free, fully compatible, enhanced, open source d...
aliyun/percona-xtradb-cluster	0.0.2        	5.7.19     	free, fully compatible, enhanced, open source d...
bitnami/phpmyadmin           	13.0.0       	5.2.1      	phpMyAdmin is a free software tool written in P...
aliyun/gcloud-sqlproxy       	0.2.3        	           	Google Cloud SQL Proxy
aliyun/mariadb               	2.1.6        	10.1.31    	Fast, reliable, scalable, and easy to use open-...
bitnami/mariadb              	14.1.0       	11.1.2     	MariaDB is an open source, community-developed ...
bitnami/mariadb-galera       	10.0.3       	11.1.2     	MariaDB Galera is a multi-primary database clus...
在公共的hub搜索chart
helm search hub mysql
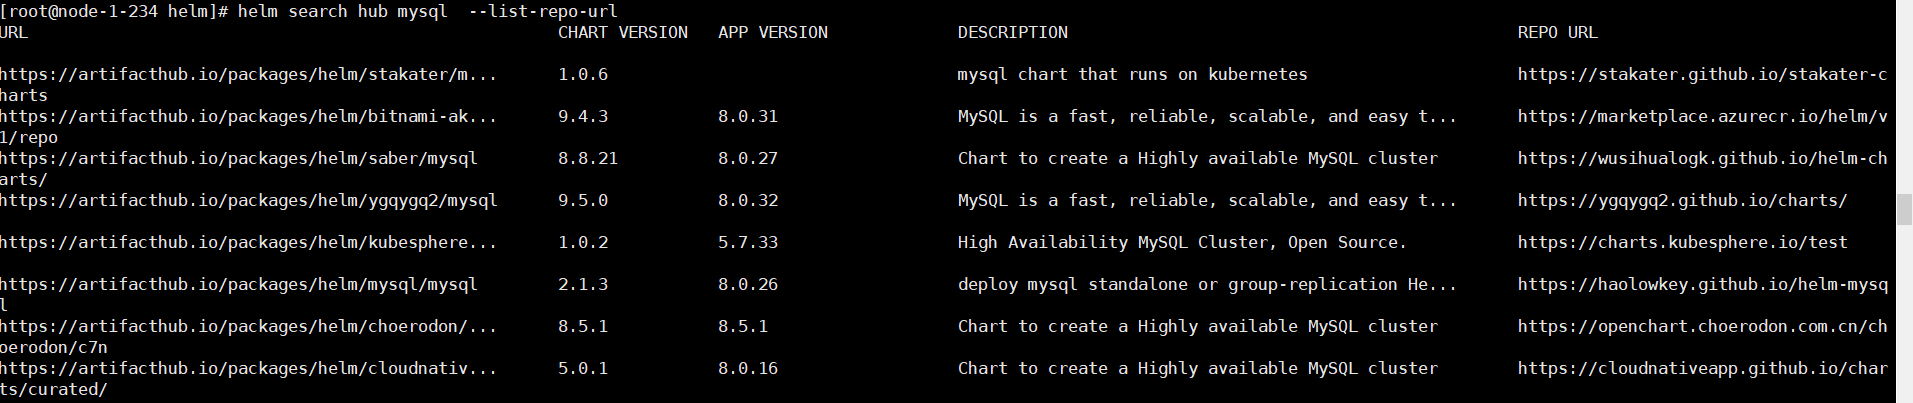
helm search hub mysql --list-repo-url ##查看对应repo的url
helm search hub mysql --max-col-width 100 #可以设置每一列的宽度,这样可以显示所有的描述信息
查看某个chat 详细信息
# helm show chart bitnami/mysql
 # helm show chart bitnami/mysql
annotations:
  category: Database
  images: |
    - name: mysql
      image: docker.io/bitnami/mysql:8.0.35-debian-11-r0
    - name: mysqld-exporter
      image: docker.io/bitnami/mysqld-exporter:0.15.0-debian-11-r70
    - name: os-shell
      image: docker.io/bitnami/os-shell:11-debian-11-r90
  licenses: Apache-2.0
apiVersion: v2
appVersion: 8.0.35
dependencies:
- name: common
  repository: oci://registry-1.docker.io/bitnamicharts
  tags:
  - bitnami-common
  version: 2.x.x
description: MySQL is a fast, reliable, scalable, and easy to use open source relational
  database system. Designed to handle mission-critical, heavy-load production applications.
home: https://bitnami.com
icon: https://bitnami.com/assets/stacks/mysql/img/mysql-stack-220x234.png
keywords:
- mysql
- database
- sql
- cluster
- high availability
maintainers:
- name: VMware, Inc.
  url: https://github.com/bitnami/charts
name: mysql
sources:
- https://github.com/bitnami/charts/tree/main/bitnami/mysql
version: 9.14.1
查看某个chart values
helm show values bitnami/mysql安装chart (示例:安装nginx)
helm search repo nginx ##先搜一下

helm install nginx-test  bitnami/nginx   #这个nginx-test就是release名字,同时也是service和deployment/statefulset以及pod前缀,当然你也可以不去定义release name,让Helm帮忙定义,那么命令就要改为
# helm install nginx-test  bitnami/nginx
NAME: nginx-test
LAST DEPLOYED: Fri Oct 27 22:09:29 2023
NAMESPACE: default
STATUS: deployed
REVISION: 1
TEST SUITE: None
NOTES:
CHART NAME: nginx
CHART VERSION: 15.3.5
APP VERSION: 1.25.3

** Please be patient while the chart is being deployed **
NGINX can be accessed through the following DNS name from within your cluster:

    nginx-test.default.svc.cluster.local (port 80)

To access NGINX from outside the cluster, follow the steps below:

1. Get the NGINX URL by running these commands:

  NOTE: It may take a few minutes for the LoadBalancer IP to be available.
        Watch the status with: 'kubectl get svc --namespace default -w nginx-test'

    export SERVICE_PORT=$(kubectl get --namespace default -o jsonpath="{.spec.ports[0].port}" services nginx-test)
    export SERVICE_IP=$(kubectl get svc --namespace default nginx-test -o jsonpath='{.status.loadBalancer.ingress[0].ip}')
    echo "http://${SERVICE_IP}:${SERVICE_PORT}"


# helm install   bitnami/nginx --generate-name
NAME: nginx-1698415932
LAST DEPLOYED: Fri Oct 27 22:12:14 2023
NAMESPACE: default
STATUS: deployed
REVISION: 1
TEST SUITE: None
NOTES:
CHART NAME: nginx
CHART VERSION: 15.3.5
APP VERSION: 1.25.3

** Please be patient while the chart is being deployed **
NGINX can be accessed through the following DNS name from within your cluster:

    nginx-1698415932.default.svc.cluster.local (port 80)

To access NGINX from outside the cluster, follow the steps below:

1. Get the NGINX URL by running these commands:

  NOTE: It may take a few minutes for the LoadBalancer IP to be available.
        Watch the status with: 'kubectl get svc --namespace default -w nginx-1698415932'

    export SERVICE_PORT=$(kubectl get --namespace default -o jsonpath="{.spec.ports[0].port}" services nginx-1698415932)
    export SERVICE_IP=$(kubectl get svc --namespace default nginx-1698415932 -o jsonpath='{.status.loadBalancer.ingress[0].ip}')
    echo "http://${SERVICE_IP}:${SERVICE_PORT}"
# helm list -A
NAME            	NAMESPACE	REVISION	UPDATED                                	STATUS  	CHART       	APP VERSION
nginx-1698415932	default  	1       	2023-10-27 22:12:14.460723372 +0800 CST	deployed	nginx-15.3.5	1.25.3


install过程中会自动生成缓存目录: ~/.cache/helm/repository/
安装完成后 查看helm安装过的chart
# helm list -A
NAME      	NAMESPACE	REVISION	UPDATED                                	STATUS  	CHART       	APP VERSION
nginx-test	default  	1       	2023-10-27 22:09:29.007263045 +0800 CST	deployed	nginx-15.3.5	1.25.3
卸载
# helm uninstall nginx-test
release "nginx-test" uninstalled
下载chart 包
helm pull bitnami/mysql使用本地chart包安装
# helm pull bitnami/mysql
[root@node-1-234 helm]# ll
总用量 48
-rw-r--r-- 1 root root 46714 10月 27 22:13 mysql-9.14.1.tgz
[root@node-1-234 helm]# tar zxf mysql-9.14.1.tgz
[root@node-1-234 helm]# cd  mysql
[root@node-1-234 mysql]# helm install test-mysql .
NAME: test-mysql
LAST DEPLOYED: Fri Oct 27 22:13:49 2023
NAMESPACE: default
STATUS: deployed
REVISION: 1
TEST SUITE: None
NOTES:
CHART NAME: mysql
CHART VERSION: 9.14.1
APP VERSION: 8.0.35

** Please be patient while the chart is being deployed **

Tip:

  Watch the deployment status using the command: kubectl get pods -w --namespace default

Services:

  echo Primary: test-mysql.default.svc.cluster.local:3306

Execute the following to get the administrator credentials:

  echo Username: root
  MYSQL_ROOT_PASSWORD=$(kubectl get secret --namespace default test-mysql -o jsonpath="{.data.mysql-root-password}" | base64 -d)

To connect to your database:

  1. Run a pod that you can use as a client:

      kubectl run test-mysql-client --rm --tty -i --restart='Never' --image  docker.io/bitnami/mysql:8.0.35-debian-11-r0 --namespace default --env MYSQL_ROOT_PASSWORD=$MYSQL_ROOT_PASSWORD --command -- bash

  2. To connect to primary service (read/write):

      mysql -h test-mysql.default.svc.cluster.local -uroot -p"$MYSQL_ROOT_PASSWORD"
三、Helm工具实践
3.1 安装redis-cluster
先搭建一个NFS的SC
下载redis-cluster的chart包
helm pull bitnami/redis-cluster --untar修改values.yaml
cd redis-cluster
vi values.yaml # 定义sc和密码
  storageClass: "nfs-client"
  redis:
    password: "helm123"
安装
# helm install redis-cluster .
NAME: redis-cluster
LAST DEPLOYED: Fri Oct 27 22:15:37 2023
NAMESPACE: default
STATUS: deployed
REVISION: 1
TEST SUITE: None
NOTES:
CHART NAME: redis-cluster
CHART VERSION: 9.0.13
APP VERSION: 7.2.2** Please be patient while the chart is being deployed **


To get your password run:
    export REDIS_PASSWORD=$(kubectl get secret --namespace "default" redis-cluster -o jsonpath="{.data.redis-password}" | base64 -d)

You have deployed a Redis® Cluster accessible only from within you Kubernetes Cluster.INFO: The Job to create the cluster will be created.To connect to your Redis® cluster:

1. Run a Redis® pod that you can use as a client:
kubectl run --namespace default redis-cluster-client --rm --tty -i --restart='Never' \
 --env REDIS_PASSWORD=$REDIS_PASSWORD \
--image docker.io/bitnami/redis-cluster:7.2.2-debian-11-r0 -- bash

2. Connect using the Redis® CLI:

redis-cli -c -h redis-cluster -a $REDIS_PASSWORD
查看redis状态
# helm status  redis-cluster
NAME: redis-cluster
LAST DEPLOYED: Fri Oct 27 22:15:37 2023
NAMESPACE: default
STATUS: deployed
REVISION: 1
TEST SUITE: None
NOTES:
CHART NAME: redis-cluster
CHART VERSION: 9.0.13
APP VERSION: 7.2.2** Please be patient while the chart is being deployed **


To get your password run:
    export REDIS_PASSWORD=$(kubectl get secret --namespace "default" redis-cluster -o jsonpath="{.data.redis-password}" | base64 -d)

You have deployed a Redis® Cluster accessible only from within you Kubernetes Cluster.INFO: The Job to create the cluster will be created.To connect to your Redis® cluster:

1. Run a Redis® pod that you can use as a client:
kubectl run --namespace default redis-cluster-client --rm --tty -i --restart='Never' \
 --env REDIS_PASSWORD=$REDIS_PASSWORD \
--image docker.io/bitnami/redis-cluster:7.2.2-debian-11-r0 -- bash

2. Connect using the Redis® CLI:

redis-cli -c -h redis-cluster -a $REDIS_PASSWORD
测试
3.2 应用的升级和回滚
安装好的应用,如果再次修改values.yaml(比如修改密码为:helm456,则需要做升级处理
helm upgrade redis-cluster .查看升级历史
helm history redis-cluster回滚
helm rollback redis-cluster 1
四、自定义Chart-内置对象
五、Chart的values
六、Chart模板里的函数