Nginx版本:Nginx 1.8
MySQL版本:MySQL 5.7
PHP版本:PHP 7.3
nginx
- 安装依赖
sudo yum install -y gcc-c++
sudo yum install -y pcre pcre-devel
sudo yum install -y zlib zlib-devel
sudo yum install -y openssl openssl-devel
- 安装包下载:您可以通过Nginx开源社区直接获取对应版本的安装包URL,然后通过 wget URL的方式将Nginx安装包下载至ECS实例。例如,Nginx 1.8.1的下载命令如下:
sudo wget http://nginx.org/download/nginx-1.8.1.tar.gz
- 运行以下命令,解压Nginx 1.8.1安装包,然后进入Nginx所在的文件夹。
sudo tar zxvf nginx-1.8.1.tar.gz
cd nginx-1.8.1
- 依次运行以下命令,编译源码。
sudo ./configure \
 --user=nginx \
 --group=nginx \
 --prefix=/usr/local/nginx \
 --with-http_stub_status_module \
 --with-http_gzip_static_module \
 --with-http_realip_module \
 --with-http_sub_module \
 --with-http_ssl_module
执行后会提示配置安装目录
nginx path prefix: "/usr/local/nginx"
nginx binary file: "/usr/local/nginx/sbin/nginx"
nginx configuration prefix: "/usr/local/nginx/conf"
nginx configuration file: "/usr/local/nginx/conf/nginx.conf"
nginx pid file: "/usr/local/nginx/logs/nginx.pid"
nginx error log file: "/usr/local/nginx/logs/error.log"
nginx http access log file: "/usr/local/nginx/logs/access.log"
nginx http client request body temporary files: "client_body_temp"
nginx http proxy temporary files: "proxy_temp"
nginx http fastcgi temporary files: "fastcgi_temp"
nginx http uwsgi temporary files: "uwsgi_temp"
nginx http scgi temporary files: "scgi_temp"
- 编译安装
sudo make && make install
安装报错,如果你是非root用户安装会提示错误
mkdir: cannot create directory ‘/usr/local/nginx’: Permission denied
命令换成 sudo make && sudo make install
- 创建nginx用户组
$ groupadd nginx
$ useradd -M -g nginx -s /sbin/nologin nginx  # 定用户的登录 shell 为 /sbin/nologin,即不允许该用户登录系统
$ vim /usr/local/nginx/conf/nginx.conf  # 修改配置文件,第一行如存在"user nobody;"将其替换成"user nginx nginx;"并解除注释,不存在直接加上
$ /usr/local/nginx/sbin/nginx -t #测试是否配置成功,输出结果"syntax is ok"说明没问题
nginx: the configuration file /usr/local/nginx/conf/nginx.conf syntax is ok
nginx: configuration file /usr/local/nginx/conf/nginx.conf test is successful
- 运行以下命令,进入Nginx的sbin目录,然后启动Nginx。
cd /usr/local/nginx/sbin/
sudo ./nginx
在本地主机中,使用浏览器访问IP。
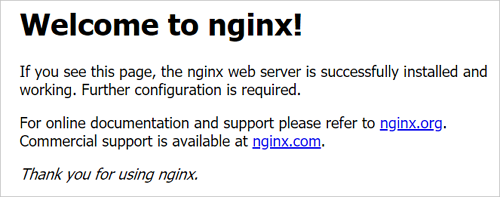
出现如下图所示的页面,表示Nginx已成功安装并启动。

这里开始切换成root用户,因为一直sudo很烦
MYSQL安装查看“mysql安装”
PHP
- 安装依赖
yum install libxml2 libxml2-devel openssl openssl-devel bzip2 bzip2-devel libcurl libcurl-devel libjpeg libjpeg-devel libpng libpng-devel freetype freetype-devel gmp gmp-devel libmcrypt libmcrypt-devel readline readline-devel libxslt libxslt-devel zlib zlib-devel glibc glibc-devel glib2 glib2-devel ncurses curl gdbm-devel db4-devel libXpm-devel libX11-devel gd-devel gmp-devel expat-devel xmlrpc-c xmlrpc-c-devel libicu-devel libmcrypt-devel libmemcached-devel libsqlite3x-devel oniguruma-devel
- 安装编译工具
yum groupinstall 'Development Tools'
- 下载php7.3源文件,可以加上超时时间防止下载中断(--timeout=7200)
wget https://www.php.net/distributions/php-7.3.33.tar.gz
- 解压
tar -zxvf php-7.3.33.tar.gz
- 生成编译文件
./configure --prefix=/usr/local/php73 --with-config-file-path=/usr/local/php73/etc --with-curl --with-freetype-dir --with-gd --with-gettext --with-iconv-dir --with-kerberos --with-libdir=lib64 --with-libxml-dir --with-mysqli --with-openssl --with-pcre-regex --with-pdo-mysql --with-pear --with-png-dir --with-jpeg-dir --with-xmlrpc --with-xsl --with-zlib --with-bz2 --with-mhash --enable-fpm --enable-bcmath --enable-libxml --enable-inline-optimization --enable-mbregex --enable-mbstring --enable-opcache --enable-pcntl --enable-shmop --enable-soap --enable-sockets --enable-sysvsem --enable-sysvshm --enable-xml --enable-zip --enable-fpm
这边出了一个错误提示缺少libzip库:configure: error: Please reinstall the libzip distribution,这里面选包的时候要确保version >= 0.11,然后执行
wget https://libzip.org/download/libzip-1.3.2.tar.gz
tar xf libzip-1.3.2.tar.gz
cd libzip-1.3.2/
./configure && make && make install
export PKG_CONFIG_PATH="/usr/local/lib/pkgconfig/"
安装完成后重新生成编译文件
- 编译安装
make && make install
安装完成,提示
Build complete.
  Don't forget to run 'make test'.

  Installing shared extensions:     /usr/local/php73/lib/php/extensions/no-debug-non-zts-20180731/
  Installing PHP CLI binary:        /usr/local/php73/bin/
  Installing PHP CLI man page:      /usr/local/php73/php/man/man1/
  Installing PHP FPM binary:        /usr/local/php73/sbin/
  Installing PHP FPM defconfig:     /usr/local/php73/etc/
  Installing PHP FPM man page:      /usr/local/php73/php/man/man8/
  Installing PHP FPM status page:   /usr/local/php73/php/php/fpm/
  Installing phpdbg binary:         /usr/local/php73/bin/
  Installing phpdbg man page:       /usr/local/php73/php/man/man1/
  Installing PHP CGI binary:        /usr/local/php73/bin/
  Installing PHP CGI man page:      /usr/local/php73/php/man/man1/
  Installing build environment:     /usr/local/php73/lib/php/build/
  Installing header files:          /usr/local/php73/include/php/
  Installing helper programs:       /usr/local/php73/bin/
    program: phpize
    program: php-config
  Installing man pages:             /usr/local/php73/php/man/man1/
    page: phpize.1
    page: php-config.1
  Installing PEAR environment:      /usr/local/php73/lib/php/
  [PEAR] Archive_Tar    - installed: 1.4.14
  [PEAR] Console_Getopt - installed: 1.4.3
  [PEAR] Structures_Graph- installed: 1.1.1
  [PEAR] XML_Util       - installed: 1.4.5
  warning: pear/PEAR dependency package "pear/Archive_Tar" installed version 1.4.14 is not the recommended version 1.4.4
  [PEAR] PEAR           - installed: 1.10.13
  Wrote PEAR system config file at: /usr/local/php73/etc/pear.conf
  You may want to add: /usr/local/php73/lib/php to your php.ini include_path
  /root/package/php-7.3.33/build/shtool install -c ext/phar/phar.phar /usr/local/php73/bin
  ln -s -f phar.phar /usr/local/php73/bin/phar
  Installing PDO headers:           /usr/local/php73/include/php/ext/pdo/
- php加入环境变量
vim /etc/profile

添加
PATH=$PATH:/usr/local/php73/bin
export PATH

立即生效
source  /etc/profile
也可以自己写个脚本
  $ cd /usr/local/bin
  $ vim php #复制下面内容,保存退出
      #!/bin/bash
      BAD_ARGS=65
      if [[ $# -ne 1 ]]; then
              echo "`basename $0` need one arg."
              exit $BAD_ARGS
      fi
      /usr/local/php73/bin/php $1
  $ chmod +x php
查看版本
php -v
- 复制下载解压后源码中的配置文件到安装目录,当然也可以自己创建
cp php-7.3.33/php.ini-production /usr/local/php73/etc/php.ini
启动php-fpm并与nginx关联
- 添加php-fpm.conf配置,安装后会生成默认配置只需要去掉.default后缀或者重新复制一份出来
$ cd /usr/local/php73/etc
$ cat php-fpm.conf.default | egrep -v '((^$)|^;)' > php-fpm.conf
$ cat /usr/local/php73/etc/php-fpm.conf
    [global]
    include=/usr/local/php73/etc/php-fpm.d/*.conf
$ cd php-fpm.d/
$ cat www.conf.default | egrep -v '((^$)|^;)' > www.conf
$ cat www.conf
    [www]
    user = nginx
    group = nginx
    listen = 127.0.0.1:9000
    pm = dynamic
    pm.max_children = 100
    pm.start_servers = 10
    pm.min_spare_servers = 5
    pm.max_spare_servers = 50
user和group用于设置运行php-fpm进程的用户和用户组。
listen是配置php-fpm进程监听的IP地址以及端口,默认是127.0.0.1:9000
pm.max_children用于设置php-fpm的进程数。
pm:pm用来指定php-fpm进程池开启进程的方式,有两个值可以选择,分别是static(静态)和dynamic(动态)。
pm.max_children:在static方式下表示固定开启的php-fpm进程数量,在dynamic方式下表示开启php-fpm的最大进程数。
pm.start_servers:表示在dynamic方式下初始开启php-fpm进程数量。
pm.min_spare_servers:表示在dynamic方式空闲状态下开启的最小php-fpm进程数量。
pm.max_spare_servers:表示在dynamic方式空闲状态下开启的最大php-fpm进程数量,这里要注意pm.max_spare_servers的值只能小于等于pm.max_children的值。
- 启动php-fpm,启动成功没有提示,可以ps检查是否启动成功
/usr/local/php73/sbin/php-fpm
$ ps -ef | grep php
    root      2314     1  0 14:17 ?        00:00:00 php-fpm: master process (/usr/local/php73/etc/php-fpm.conf)
    nginx     2315  2314  0 14:17 ?        00:00:00 php-fpm: pool www
    nginx     2316  2314  0 14:17 ?        00:00:00 php-fpm: pool www
    nginx     2317  2314  0 14:17 ?        00:00:00 php-fpm: pool www
    nginx     2318  2314  0 14:17 ?        00:00:00 php-fpm: pool www
    nginx     2319  2314  0 14:17 ?        00:00:00 php-fpm: pool www
    nginx     2320  2314  0 14:17 ?        00:00:00 php-fpm: pool www
    nginx     2321  2314  0 14:17 ?        00:00:00 php-fpm: pool www
    nginx     2322  2314  0 14:17 ?        00:00:00 php-fpm: pool www
    nginx     2323  2314  0 14:17 ?        00:00:00 php-fpm: pool www
    nginx     2324  2314  0 14:17 ?        00:00:00 php-fpm: pool www
    root      2356 27996  0 14:40 pts/0    00:00:00 grep --color=auto php
- nginx配置修改,支持php
上面成功安装后有提示ngxin配置文件地址:/usr/local/nginx/conf/nginx.conf
打开文件,并在server里面加入下面配置
location ~ \.php$ {
    try_files $uri =404;        # 尝试请求的 PHP 文件,如果不存在则返回 404 错误
    fastcgi_pass   127.0.0.1:9000;    # 将请求转发给本地监听的 PHP-FPM 进程,端口为 9000
    fastcgi_index  index.php;    # 指定索引文件为 index.php
    fastcgi_param  SCRIPT_FILENAME  $document_root$fastcgi_script_name;    # 设置 PHP 脚本文件的绝对路径
    include        fastcgi_params;    # 包含 fastcgi_params 文件中的其他参数
}
- 重启nginx
/usr/local/nginx/sbin/ -s reload
- 测试
服务根目录下创建php文件并写入
<?php
phpinfo();
浏览器访问:http://ip或者域名/测试文件名.php
