1、技术原理
Mosaic是YOLOV4中提出的新方法,适用于目标检测,主要思想是将四张图片进行拼接到一张图上作为训练样本。由于Mosaic用于目标检测,进行拼接时目标框的坐标也要做相应的变化。Mosaic的主要操作如下:
- 对每一张图进行随机裁剪得到A;crop的目标是选择原图的某一块区域,而不是全图进行后续的拼接;
- 将A进行resize到输出图大小得到B;目标是统一坐标系尺寸,方便后续拼接;坐标框会进行相应的缩放
- 将B随机裁剪一块指定大小的区域C;
- 将C粘贴到输出图相应的位置;此时只需要坐标平移就可以调整坐标框
2、增强图片展示

从图中可以看出,Mosaic合并后的坐标并不是很理想,比如正负样本分配时,往往会将预测框与groundTruth之间的IOU小于一定阈值的视为负样本。而经过Mosaic拼接的训练样本,groundTruth box的大小已经被裁剪,那么原图上为负样本的预测框与裁剪后的groundTruth box之间的IOU可能就满足了IOU阈值条件而被视为正样本。因此,可能存在这么一种情况,同样大小的框,经Mosaic操作被视为正样本,没经Mosaic操作的视为负样本;当然,Mosaic操作的图片都经过了resize,大小在一定程度上都发生了改变,groundTruth box也发生了变化,但这只是相当于将一个原本被视为负样本的box经过resize后就变成了正样本的box。
3、Mosaic算法
Mosaic的源代码已在GitHub上开源,详情可以点击下方卡片查看。
在这里仅展示核心代码。
3.1、主程序


class Yolo_dataset(Dataset):
    def __init__(self, label_path, cfg, train=True):
        pass#此处忽略
    def __len__(self):
        return len(self.truth.keys())
    def __getitem__(self, index):
        if not self.train:
            return self._get_val_item(index)
        img_path = self.imgs[index]
        bboxes = np.array(self.truth.get(img_path), dtype=np.float)
        img_path = os.path.join(self.cfg.dataset_dir, img_path)
        use_mixup = self.cfg.mixup
        if random.randint(0, 1):
            use_mixup = 0

        if use_mixup == 3:
            min_offset = 0.2
            # cut_x与cut_y相当于在输出图片上定义一点,然后沿着这点画十字,就将图片分成四个区域了
            cut_x = random.randint(int(self.cfg.w * min_offset), int(self.cfg.w * (1 - min_offset)))
            cut_y = random.randint(int(self.cfg.h * min_offset), int(self.cfg.h * (1 - min_offset)))

        r1, r2, r3, r4, r_scale = 0, 0, 0, 0, 0
        dhue, dsat, dexp, flip, blur = 0, 0, 0, 0, 0
        gaussian_noise = 0

        out_img = np.zeros([self.cfg.h, self.cfg.w, 3])#定义最后输出的图片(就是上面定义中心点的图片),大小都在配置文件中。
        out_bboxes = []#输出的标注框

        for i in range(use_mixup + 1):
            if i != 0:
                img_path = random.choice(list(self.truth.keys()))#随机抽取一张图片
                bboxes = np.array(self.truth.get(img_path), dtype=np.float)#得到改张图片的bboxes
                img_path = os.path.join(self.cfg.dataset_dir, img_path)
            img = cv2.imread(img_path)
            img = cv2.cvtColor(img, cv2.COLOR_BGR2RGB)
            if img is None:
                continue
            oh, ow, oc = img.shape#当前图片的shape
            dh, dw, dc = np.array(np.array([oh, ow, oc]) * self.cfg.jitter, dtype=np.int)#cfg.jitter就是一个缩放因子,限制crop的尺度

           #图片增强
            dhue = rand_uniform_strong(-self.cfg.hue, self.cfg.hue)#随机色调
            dsat = rand_scale(self.cfg.saturation)#随机饱和度
            dexp = rand_scale(self.cfg.exposure)#随机曝光

            #原图第一次crop的坐标偏移
            pleft = random.randint(-dw, dw)
            pright = random.randint(-dw, dw)
            ptop = random.randint(-dh, dh)
            pbot = random.randint(-dh, dh)

            flip = random.randint(0, 1) if self.cfg.flip else 0#随机翻转

            swidth = ow - pleft - pright#当前图片裁剪后的宽,尚未发生裁剪
            sheight = oh - ptop - pbot#当前图片裁剪后的高,尚未发生裁剪
            #truth就是box的坐标,box坐标经历了两次调整:[1]原图crop后坐标调整;[2]crop后图片放大到(self.cfg.w, self.cfg.h),坐标做相应的调整。
            truth, min_w_h = fill_truth_detection(bboxes, self.cfg.boxes, self.cfg.classes, flip, pleft, ptop, swidth,
                                                  sheight, self.cfg.w, self.cfg.h)
            #图片增强,原图先crop后resize到(self.cfg.w, self.cfg.h),此时图片才实施裁剪
            ai = image_data_augmentation(img, self.cfg.w, self.cfg.h, pleft, ptop, swidth, sheight, flip,
                                         dhue, dsat, dexp, gaussian_noise, blur, truth)

            if use_mixup == 0:
                out_img = ai
                out_bboxes = truth
            if use_mixup == 1:
                if i == 0:
                    old_img = ai.copy()
                    old_truth = truth.copy()
                elif i == 1:
                    out_img = cv2.addWeighted(ai, 0.5, old_img, 0.5)
                    out_bboxes = np.concatenate([old_truth, truth], axis=0)
            elif use_mixup == 3:
                if flip:
                    pleft,pright = pright,pleft
                #第二次crop的偏移量,crop的对象是ai
                left_shift = int(min(cut_x, max(0, (-int(pleft) * self.cfg.w / swidth))))
                top_shift = int(min(cut_y, max(0, (-int(ptop) * self.cfg.h / sheight))))
                right_shift = int(min((self.cfg.w - cut_x), max(0, (-int(pright) * self.cfg.w / swidth))))
                bot_shift = int(min(self.cfg.h - cut_y, max(0, (-int(pbot) * self.cfg.h / sheight))))
                #实施随机裁剪并粘贴到预定义的位置
                out_img, out_bbox = blend_truth_mosaic(out_img, ai, truth.copy(), self.cfg.w, self.cfg.h, cut_x,
                                                       cut_y, i, left_shift, right_shift, top_shift, bot_shift)
                out_bboxes.append(out_bbox)

        if use_mixup == 3:
            out_bboxes = np.concatenate(out_bboxes, axis=0)#合并四张图留存下来的坐标
        out_bboxes1 = np.zeros([self.cfg.boxes, 5])
        out_bboxes1[:min(out_bboxes.shape[0], self.cfg.boxes)] = out_bboxes[:min(out_bboxes.shape[0], self.cfg.boxes)]#只保留一定数量的框
        return out_img, out_bboxes1
3.2、裁剪及resize后坐标的调整
def fill_truth_detection(bboxes, num_boxes, classes, flip, dx, dy, sx, sy, net_w, net_h):
    if bboxes.shape[0] == 0:
        return bboxes, 10000
    np.random.shuffle(bboxes)
    bboxes[:, 0] -= dx#由于原图被裁剪了,框的坐标当然也要做相应的变化
    bboxes[:, 2] -= dx
    bboxes[:, 1] -= dy
    bboxes[:, 3] -= dy
    #被剪后的图片,框的坐标在图片外的进行截断
    bboxes[:, 0] = np.clip(bboxes[:, 0], 0, sx)#横坐标不小于0,不大于裁剪后图片的宽
    bboxes[:, 2] = np.clip(bboxes[:, 2], 0, sx)

    bboxes[:, 1] = np.clip(bboxes[:, 1], 0, sy)
    bboxes[:, 3] = np.clip(bboxes[:, 3], 0, sy)
    #既然图片被裁剪,那么那些落在被裁剪图片之外的框就应该删除,注意这里使用的是and
    #对于半边被裁剪的还是留在裁剪后的图片中
    out_box = list(np.where(((bboxes[:, 1] == sy) & (bboxes[:, 3] == sy)) |
                            ((bboxes[:, 0] == sx) & (bboxes[:, 2] == sx)) |
                            ((bboxes[:, 1] == 0) & (bboxes[:, 3] == 0)) |
                            ((bboxes[:, 0] == 0) & (bboxes[:, 2] == 0)))[0])
    list_box = list(range(bboxes.shape[0]))
    for i in out_box:
        list_box.remove(i)
    # 保留没裁剪图之内的框
    bboxes = bboxes[list_box]

    if bboxes.shape[0] == 0:
        return bboxes, 10000
    #类别肯定是[0,classes]
    bboxes = bboxes[np.where((bboxes[:, 4] < classes) & (bboxes[:, 4] >= 0))[0]]
    #限制框的数量,这个在cfg中有配置
    if bboxes.shape[0] > num_boxes:
        bboxes = bboxes[:num_boxes]
    #对于长宽,取最小的那个
    min_w_h = np.array([bboxes[:, 2] - bboxes[:, 0], bboxes[:, 3] - bboxes[:, 1]]).min()
    #裁剪后的图片变换成输出图片尺寸大小时,各个框的坐标
    bboxes[:, 0] *= (net_w / sx)
    bboxes[:, 2] *= (net_w / sx)
    bboxes[:, 1] *= (net_h / sy)
    bboxes[:, 3] *= (net_h / sy)
    # 翻转就将左右坐标也进行翻转
    if flip:
        temp = net_w - bboxes[:, 0]
        bboxes[:, 0] = net_w - bboxes[:, 2]
        bboxes[:, 2] = temp

    return bboxes, min_w_h
3.3、图片增强
def image_data_augmentation(mat, w, h, pleft, ptop, swidth, sheight, flip, dhue, dsat, dexp, gaussian_noise, blur,
                            truth):
    try:
        img = mat
        oh, ow, _ = img.shape
        pleft, ptop, swidth, sheight = int(pleft), int(ptop), int(swidth), int(sheight)
        # crop
        src_rect = [pleft, ptop, swidth + pleft, sheight + ptop]  # x1,y1,x2,y2
        img_rect = [0, 0, ow, oh]
        new_src_rect = rect_intersection(src_rect, img_rect)  # 交集

        dst_rect = [max(0, -pleft), max(0, -ptop), max(0, -pleft) + new_src_rect[2] - new_src_rect[0],
                    max(0, -ptop) + new_src_rect[3] - new_src_rect[1]]
        # cv2.Mat sized

        if (src_rect[0] == 0 and src_rect[1] == 0 and src_rect[2] == img.shape[0] and src_rect[3] == img.shape[1]):
            sized = cv2.resize(img, (w, h), cv2.INTER_LINEAR)
        else:
            #裁剪及resize
            cropped = np.zeros([sheight, swidth, 3])
            cropped[:, :, ] = np.mean(img, axis=(0, 1))

            cropped[dst_rect[1]:dst_rect[3], dst_rect[0]:dst_rect[2]] = \
                img[new_src_rect[1]:new_src_rect[3], new_src_rect[0]:new_src_rect[2]]

            # resize
            sized = cv2.resize(cropped, (w, h), cv2.INTER_LINEAR)

        # flip
        if flip:
            # cv2.Mat cropped
            sized = cv2.flip(sized, 1)  # 0 - x-axis, 1 - y-axis, -1 - both axes (x & y)

        # HSV augmentation
        # cv2.COLOR_BGR2HSV, cv2.COLOR_RGB2HSV, cv2.COLOR_HSV2BGR, cv2.COLOR_HSV2RGB
        if dsat != 1 or dexp != 1 or dhue != 0:
            if img.shape[2] >= 3:
                hsv_src = cv2.cvtColor(sized.astype(np.float32), cv2.COLOR_RGB2HSV)  # RGB to HSV
                hsv = cv2.split(hsv_src)
                hsv[1] *= dsat
                hsv[2] *= dexp
                hsv[0] += 179 * dhue
                hsv_src = cv2.merge(hsv)
                sized = np.clip(cv2.cvtColor(hsv_src, cv2.COLOR_HSV2RGB), 0, 255)  # HSV to RGB (the same as previous)
            else:
                sized *= dexp

        if blur:
            if blur == 1:
                dst = cv2.GaussianBlur(sized, (17, 17), 0)
                # cv2.bilateralFilter(sized, dst, 17, 75, 75)
            else:
                ksize = (blur / 2) * 2 + 1
                dst = cv2.GaussianBlur(sized, (ksize, ksize), 0)

            if blur == 1:
                img_rect = [0, 0, sized.cols, sized.rows]
                for b in truth:
                    left = (b.x - b.w / 2.) * sized.shape[1]
                    width = b.w * sized.shape[1]
                    top = (b.y - b.h / 2.) * sized.shape[0]
                    height = b.h * sized.shape[0]
                    roi(left, top, width, height)
                    roi = roi & img_rect
                    dst[roi[0]:roi[0] + roi[2], roi[1]:roi[1] + roi[3]] = sized[roi[0]:roi[0] + roi[2],
                                                                          roi[1]:roi[1] + roi[3]]

            sized = dst

        if gaussian_noise:
            noise = np.array(sized.shape)
            gaussian_noise = min(gaussian_noise, 127)
            gaussian_noise = max(gaussian_noise, 0)
            cv2.randn(noise, 0, gaussian_noise)  # mean and variance
            sized = sized + noise
    except:
        print("OpenCV can't augment image: " + str(w) + " x " + str(h))
        sized = mat

    return sized
3.4、第二次crop并粘贴到指定区域
def blend_truth_mosaic(out_img, img, bboxes, w, h, cut_x, cut_y, i_mixup,
                       left_shift, right_shift, top_shift, bot_shift):
    #第二次crop的偏移坐标
    left_shift = min(left_shift, w - cut_x)
    top_shift = min(top_shift, h - cut_y)
    right_shift = min(right_shift, cut_x)
    bot_shift = min(bot_shift, cut_y)
    # 随机选取一块指定大小的块,然后粘贴到相应的区域
    #img的图片格式是[h,w]
    if i_mixup == 0:#左上角
        bboxes = filter_truth(bboxes, left_shift, top_shift, cut_x, cut_y, 0, 0)
        out_img[:cut_y, :cut_x] = img[top_shift:top_shift + cut_y, left_shift:left_shift + cut_x]
    if i_mixup == 1:#右上角
        bboxes = filter_truth(bboxes, cut_x - right_shift, top_shift, w - cut_x, cut_y, cut_x, 0)
        out_img[:cut_y, cut_x:] = img[top_shift:top_shift + cut_y, cut_x - right_shift:w - right_shift]
    if i_mixup == 2:#左下角
        bboxes = filter_truth(bboxes, left_shift, cut_y - bot_shift, cut_x, h - cut_y, 0, cut_y)
        out_img[cut_y:, :cut_x] = img[cut_y - bot_shift:h - bot_shift, left_shift:left_shift + cut_x]
    if i_mixup == 3:#右下角
        bboxes = filter_truth(bboxes, cut_x - right_shift, cut_y - bot_shift, w - cut_x, h - cut_y, cut_x, cut_y)
        out_img[cut_y:, cut_x:] = img[cut_y - bot_shift:h - bot_shift, cut_x - right_shift:w - right_shift]
    return out_img, bboxes
4、实验效果


从Table2中可以看出,Mosaic数据增强比其他数据增强方式效果更好。不过也可以看出,Mish激活函数效果更加明显,由Swish转换成Mish就增加了15个百分点。
前言
在Yolo-V4、Yolo-V5中,都有一个很重要的技巧,就是Mosaic数据增强,这种数据增强方式简单来说就是把4张图片,通过随机缩放、随机裁减、随机排布的方式进行拼接。Mosaic有如下优点:
(1)丰富数据集:随机使用4张图片,随机缩放,再随机分布进行拼接,大大丰富了检测数据集,特别是随机缩放增加了很多小目标,让网络的鲁棒性更好;
(2)减少GPU显存:直接计算4张图片的数据,使得Mini-batch大小并不需要很大就可以达到比较好的效果。
mosaic python实现
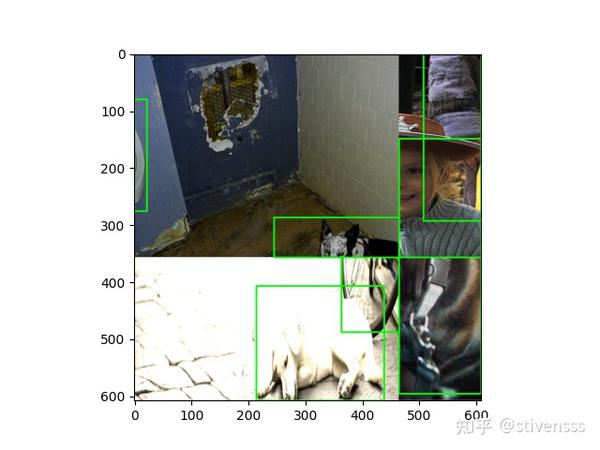
思路:随机选择四张图,取其部分拼入该图,如下图所示,四种颜色代表四张样本图,超出的部分将被舍弃。
具体做法如下:
step1:新建mosaic画布,并在mosaic画布上随机生成一个点
im_size = 640
mosaic_border = [-im_size // 2, -im_size // 2]
s_mosaic = im_size * 2

mosaic = np.full((s_mosaic, s_mosaic, 3), 114, dtype=np.uint8)
yc, xc = (int(random.uniform(-x, s_mosaic + x)) for x in mosaic_border)

step2:围绕随机点 (x_c, y_c) 放置4块拼图
(1)左上位置
画布放置区域: (x1a, y1a, x2a, y2a)
case1:图片不超出画布,画布放置区域为 (x_c - w , y_c - h , x_c, y_c)
case2:图片超出画布,画布放置区域为 (0 , 0 , x_c, y_c)
综合case1和case2,画布区域为:
x1a, y1a, x2a, y2a = max(x_c - w, 0), max(y_c - h, 0), x_c, y_c

图片区域 : (x1b, y1b, x2b, y2b)
case1:图片不超出画布,图片不用裁剪,图片区域为 (0 , 0 , w , h)
case2:图片超出画布,超出部分的图片需要裁剪,区域为 (w - x_c , h - y_c , w , h)
综合case1和case2,图片区域为:
x1b, y1b, x2b, y2b = w - (x2a - x1a), h - (y2a - y1a), w, h
(2)右上位置
画布放置区域: (x1a, y1a, x2a, y2a)
case1:图片不超出画布,画布区域为 (x_c , y_c - h , x_c + w , y_c)
case2:图片超出画布,画布区域为 (x_c , 0 , s_mosaic , y_c)
综合case1和case2,画布区域为:
x1a, y1a, x2a, y2a = x_c, max(y_c - h, 0), min(x_c + w, s_mosaic), y_c

图片区域 : (x1b, y1b, x2b, y2b)
case1:图片不超出画布,图片不用裁剪,图片区域为 (0 , 0 , w , h)
case2:图片超出画布,图片需要裁剪,图片区域为 (0 , h - (y2a - y1a) , x2a - x1a , h)
综合case1和case2,图片区域为:
x1b, y1b, x2b, y2b = 0, h - (y2a - y1a), min(w, x2a - x1a), h
同理可实现左下和右下的拼图。
step3:更新bbox坐标
4张图片的bbox (n,4),其中n为4张图片中bbox数量,4代表四个坐标值(xmin,ymin,xmax,ymax) ,加上偏移量得到mosaic bbox坐标:
def xywhn2xyxy(x, padw=0, padh=0):
    # x: bbox坐标 (xmin,ymin,xmax,ymax)
    x = np.stack(x)
    y = x.clone() if isinstance(x, torch.Tensor) else np.copy(x)
    y[:, 0] = x[:, 0] + padw  # top left x
    y[:, 1] = x[:, 1] + padh  # top left y
    y[:, 2] = x[:, 2] + padw  # bottom right x
    y[:, 3] = x[:, 3] + padh  # bottom right y
    return y
mosaic python 完整实现代码如下:
import cv2
import torch
import random
import os.path
import numpy as np
import matplotlib.pyplot as plt
from camvid import get_bbox, draw_box

def load_mosaic(im_files, name_color_dict):
    im_size = 640
    s_mosaic = im_size * 2
    mosaic_border = [-im_size // 2, -im_size // 2]
    labels4, segments4, colors = [], [], []
    # mosaic center x, y
    y_c, x_c = (int(random.uniform(-x, s_mosaic + x)) for x in mosaic_border)

    img4 = np.full((s_mosaic, s_mosaic, 3), 114, dtype=np.uint8)
    seg4 = np.full((s_mosaic, s_mosaic), 0, dtype=np.uint8)

    for i, im_file in enumerate(im_files):
        # Load image
        img = cv2.imread(im_file)
        seg_file = im_file.replace('images', 'labels')
        name = os.path.basename(seg_file).split('.')[0]
        seg_file = os.path.join(os.path.dirname(seg_file), name + '_L.png')
        seg, boxes, color = get_bbox(seg_file, names, name_color_dict)
        colors += color
        h, w, _ = np.shape(img)

        # place img in img4
        if i == 0:  # top left
            x1a, y1a, x2a, y2a = max(x_c - w, 0), max(y_c - h, 0), x_c, y_c
            x1b, y1b, x2b, y2b = w - (x2a - x1a), h - (y2a - y1a), w, h
        elif i == 1:  # top right
            x1a, y1a, x2a, y2a = x_c, max(y_c - h, 0), min(x_c + w, s_mosaic), y_c
            x1b, y1b, x2b, y2b = 0, h - (y2a - y1a), min(w, x2a - x1a), h
        elif i == 2:  # bottom left
            x1a, y1a, x2a, y2a = max(x_c - w, 0), y_c, x_c, min(s_mosaic, y_c + h)
            x1b, y1b, x2b, y2b = w - (x2a - x1a), 0, w, min(y2a - y1a, h)
        elif i == 3:  # bottom right
            x1a, y1a, x2a, y2a = x_c, y_c, min(x_c + w, s_mosaic), min(s_mosaic, y_c + h)
            x1b, y1b, x2b, y2b = 0, 0, min(w, x2a - x1a), min(y2a - y1a, h)
        img4[y1a:y2a, x1a:x2a] = img[y1b:y2b, x1b:x2b]

        # place seg in seg4
        seg4[y1a:y2a, x1a:x2a] = seg[y1b:y2b, x1b:x2b]

        # update bbox
        padw = x1a - x1b
        padh = y1a - y1b
        boxes = xywhn2xyxy(boxes, padw=padw, padh=padh)
        labels4.append(boxes)
    labels4 = np.concatenate(labels4, 0)
    for x in labels4[:, 1:]:
        np.clip(x, 0, s_mosaic, out=x)  # clip coord

    # draw result
    draw_box(seg4, labels4, colors)

    return img4, labels4,seg4

if __name__ == '__main__':
    names = ['Pedestrian', 'Car', 'Truck_Bus']

    im_files = ['camvid/images/0016E5_01440.png',
                'camvid/images/0016E5_06600.png',
                'camvid/images/0006R0_f00930.png',
                'camvid/images/0006R0_f03390.png']

    load_mosaic(im_files, name_color_dict)


参考
YOLOV5: https://github.com/ultralytics/yolov5