how convolutions work
让我们在二维灰度图像上创建一个基本卷积,探索卷积是如何工作的。首先,我们可以从 scipy 中获取 "asccent "图像来加载图像。这是一张漂亮的内置图片,有很多角度和线条。
import cv2
import numpy as np
from scipy import misc
i = misc.ascent()
接下来,我们可以使用 pyplot 库绘制图像,这样就能知道图像的样子了。
import matplotlib.pyplot as plt
plt.grid(False)
plt.gray()
plt.axis('off')
plt.imshow(i)
plt.show()
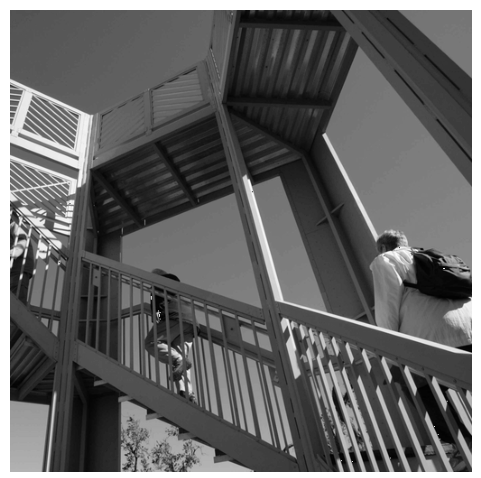
<图像大小为 640x480,1 个轴>。
图像存储为一个 numpy 数组,因此我们只需复制该数组即可创建转换后的图像。我们还可以获取图像的尺寸,以便稍后对其进行循环。
i_transformed = np.copy(i)
size_x = i_transformed.shape[0]
size_y = i_transformed.shape[1]
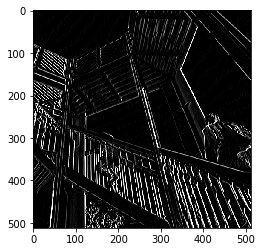
现在我们可以创建一个 3x3 数组的过滤器。
# This filter detects edges nicely
# It creates a convolution that only passes through sharp edges and straight
# lines.

#Experiment with different values for fun effects.
#filter = [ [0, 1, 0], [1, -4, 1], [0, 1, 0]]

# A couple more filters to try for fun!
filter = [ [-1, -2, -1], [0, 0, 0], [1, 2, 1]]
#filter = [ [-1, 0, 1], [-2, 0, 2], [-1, 0, 1]]

# If all the digits in the filter don't add up to 0 or 1, you
# should probably do a weight to get it to do so
# so, for example, if your weights are 1,1,1 1,2,1 1,1,1
# They add up to 10, so you would set a weight of .1 if you want to normalize them
weight  = 1
现在让我们创建一个卷积。我们将遍历图像,留出 1 像素的余量,然后将当前像素的每个相邻像素乘以过滤器中定义的值。
也就是说,当前像素上方和左侧的相邻像素将乘以滤镜中的左上角值,等等。然后我们将结果乘以权重,并确保结果在 0-255 的范围内。
最后,我们将把新值加载到转换后的图像中。
for x in range(1,size_x-1):
  for y in range(1,size_y-1):
      convolution = 0.0
      convolution = convolution + (i[x - 1, y-1] * filter[0][0])
      convolution = convolution + (i[x, y-1] * filter[0][1])
      convolution = convolution + (i[x + 1, y-1] * filter[0][2])
      convolution = convolution + (i[x-1, y] * filter[1][0])
      convolution = convolution + (i[x, y] * filter[1][1])
      convolution = convolution + (i[x+1, y] * filter[1][2])
      convolution = convolution + (i[x-1, y+1] * filter[2][0])
      convolution = convolution + (i[x, y+1] * filter[2][1])
      convolution = convolution + (i[x+1, y+1] * filter[2][2])
      convolution = convolution * weight
      if(convolution<0):
        convolution=0
      if(convolution>255):
        convolution=255
      i_transformed[x, y] = convolution
现在我们可以绘制图像,看看卷积的效果!
# Plot the image. Note the size of the axes -- they are 512 by 512
plt.gray()
plt.grid(False)
plt.imshow(i_transformed)
#plt.axis('off')
plt.show()

电脑cpu干烧了,随便学学吧|||
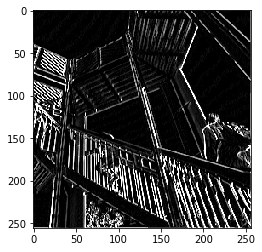
这段代码将显示一个 (2, 2) 池。这里的想法是遍历图像,查看像素及其右侧、下方和右下方的紧邻像素。取其中最大的一个并将其加载到新图像中。这样,新图像的大小将是旧图像的 1/4,X 和 Y 轴的尺寸也会因此减半。你会发现,尽管进行了压缩,图像的特征仍然得以保留!
new_x = int(size_x/2)
new_y = int(size_y/2)
newImage = np.zeros((new_x, new_y))
for x in range(0, size_x, 2):
  for y in range(0, size_y, 2):
    pixels = []
    pixels.append(i_transformed[x, y])
    pixels.append(i_transformed[x+1, y])
    pixels.append(i_transformed[x, y+1])
    pixels.append(i_transformed[x+1, y+1])
    newImage[int(x/2),int(y/2)] = max(pixels)

# Plot the image. Note the size of the axes -- now 256 pixels instead of 512
plt.gray()
plt.grid(False)
plt.imshow(newImage)
#plt.axis('off')
plt.show()