nginx虚拟主机实战
基于nginx部署网站
虚拟主机指的就是一个独立的站点,具有独立的域名,有完整的www服务,例如网站、FTP、邮件等。
Nginx支持多虚拟主机,在一台机器上可以运行完全独立的多个站点。
一、为什么配置虚拟主机
一些草根流量站长,常会搭建个人站点进行资源分享交流,并且可能有多个不同业务的站点,如果每台服务器只运行一个网站,那么将造成资源浪费,成本浪费。
利用虚拟主机的功能,就不用为了运行一个网站而单独配置一个Nginx服务器,或是单独再运行一组Nginx进程。
虚拟主机可以在一台服务器,同一个Nginx进程上运行多个网站。
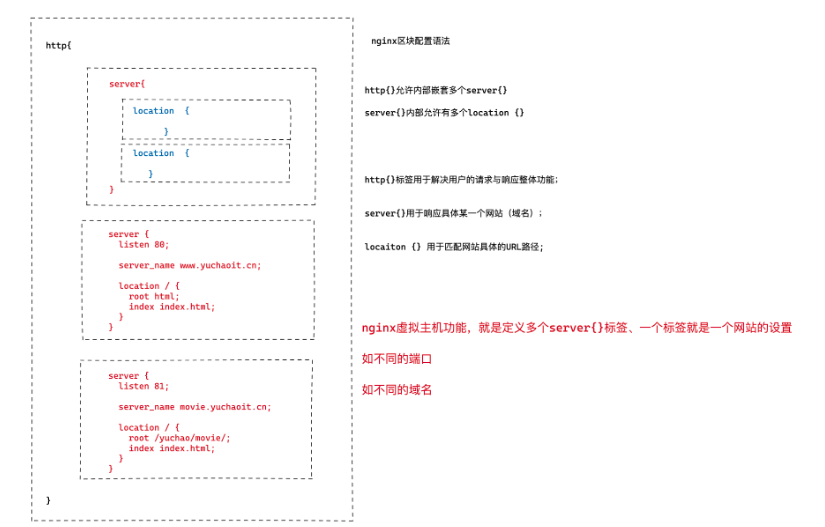
nginx.conf主配置文件中,最简单的一段虚拟主机配置如下
1.单虚拟主机(静态资源网站)
nginx.conf
user  www;
worker_processes  auto;

error_log  /var/log/nginx/error.log notice;
pid        /var/run/nginx.pid;


events {
    worker_connections  1024;
}


http {
    include       /etc/nginx/mime.types;
    default_type  application/octet-stream;

    log_format  main  '$remote_addr - $remote_user [$time_local] "$request" '
                      '$status $body_bytes_sent "$http_referer" '
                      '"$http_user_agent" "$http_x_forwarded_for"';

    access_log  /var/log/nginx/access.log  main;

    sendfile        on;
    #tcp_nopush     on;

    keepalive_timeout  65;

    #gzip  on;

    include /etc/nginx/conf.d/*.conf;
}
yuchaoit.conf
利用include功能导入其他目录下的配置文件,便于管理多个网站配置,防止全部塞进一个配置文件,难以维护。
[root@web-9 /etc/nginx/conf.d]#grep -Ev '^$|#' /etc/nginx/conf.d/yuchaoit.conf
server {
    listen       80;
    server_name  localhost;
    charset utf-8;
    location / {
        root   /usr/share/nginx/html;
        index  index.html index.htm;
    }
    error_page   500 502 503 504  /50x.html;
    location = /50x.html {
        root   /usr/share/nginx/html;
    }
}
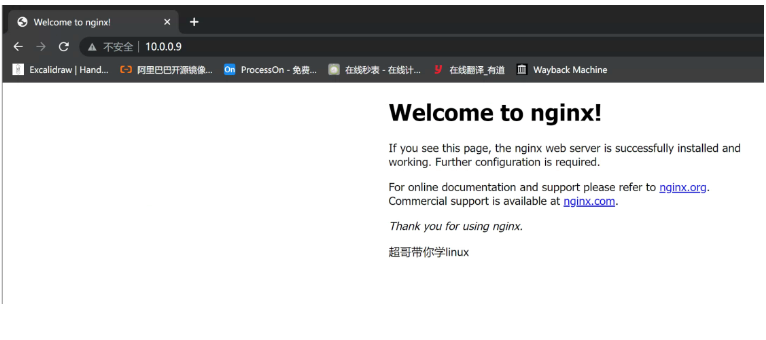
查看主页
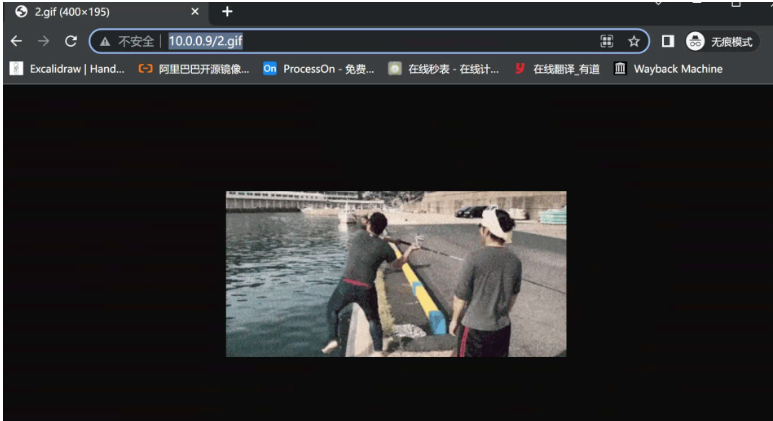
静态资源如图片等
wget -O 1.gif https://p5.itc.cn/images01/20210329/1ddda8eb9945487f9bdfe951e75a1737.gif

wget -O 2.gif https://p1.itc.cn/images01/20210329/f9a37ab55ba04ff692bccc61bc1cd829.gif
静态文本数据
若是text类型,nginx能够提供读取;
若是其他类型,nginx提供下载功能;

2.基于IP多虚拟主机
Linux操作系统都能够支持给网卡绑定多个IP地址,可以使得一块网卡上运行多个基于IP的虚拟主机。
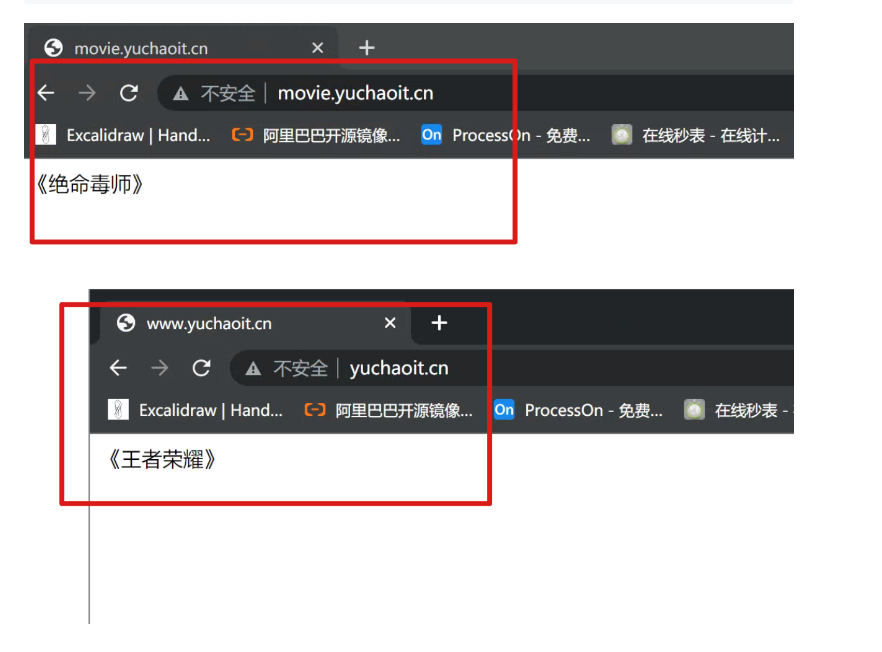
[root@web-9 /usr/share/nginx/html]#ifconfig eth0
eth0: flags=4163<UP,BROADCAST,RUNNING,MULTICAST>  mtu 1500
        inet 10.0.0.9  netmask 255.255.255.0  broadcast 10.0.0.255
        ether 00:0c:29:ca:e3:88  txqueuelen 1000  (Ethernet)
        RX packets 180107  bytes 156489622 (149.2 MiB)
        RX errors 0  dropped 0  overruns 0  frame 0
        TX packets 109642  bytes 14407514 (13.7 MiB)
        TX errors 0  dropped 0 overruns 0  carrier 0  collisions 0


添加ip
ip addr add 10.0.0.77/24 dev eth0

[root@web-9 /usr/share/nginx/html]#ip addr add 10.0.0.77/24 dev eth0
[root@web-9 /usr/share/nginx/html]#ping 10.0.0.77
PING 10.0.0.77 (10.0.0.77) 56(84) bytes of data.
64 bytes from 10.0.0.77: icmp_seq=1 ttl=64 time=0.019 ms
64 bytes from 10.0.0.77: icmp_seq=2 ttl=64 time=0.021 ms
修改yuchaoit.conf支持多虚拟主机,编写多个server{}标签即可。

[root@web-9 /usr/share/nginx/html]#grep -Ev '^$|#' /etc/nginx/conf.d/yuchaoit.conf
server {
    listen       10.0.0.9:80;
    server_name  localhost;
    charset utf-8;
    location / {
        root   /usr/share/nginx/html/movie;
        index  index.html index.htm;
    }
    error_page   500 502 503 504  /50x.html;
    location = /50x.html {
        root   /usr/share/nginx/html;
    }
}
server {
    listen       10.0.0.77:80;
    server_name  localhost;
    charset utf-8;
    location / {
        root   /usr/share/nginx/html/game;
        index  index.html index.htm;
    }
    error_page   500 502 503 504  /50x.html;
    location = /50x.html {
        root   /usr/share/nginx/html;
    }
}
创建测试数据

[root@web-9 /usr/share/nginx/html]#mkdir -p /usr/share/nginx/html/{movie,game}
[root@web-9 /usr/share/nginx/html]#echo '《绝命毒师》' > /usr/share/nginx/html/movie/index.html
[root@web-9 /usr/share/nginx/html]#echo '《王者荣耀》' > /usr/share/nginx/html/game/index.html
重启nginx,访问测试

[root@web-9 /usr/share/nginx/html]#systemctl reload nginx

[root@web-9 /usr/share/nginx/html]#curl 10.0.0.9
《绝命毒师》
[root@web-9 /usr/share/nginx/html]#
[root@web-9 /usr/share/nginx/html]#curl 10.0.0.77
《王者荣耀》
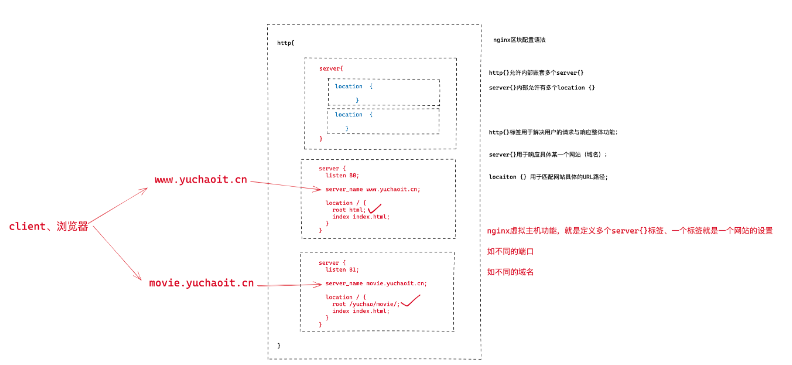
3.基于域名的多虚拟主机
基于多IP的虚拟主机可能会造成IP地址不足的问题,如果没有特殊需求,更常用的是基于多域名的形式。
只需要你单独配置DNS服务器,将主机名对应到正确的IP地址,修改Nginx配置,可以识别到不同的主机即可,这样就可以使得多个虚拟主机用同一个IP,解决了IP不足的隐患。
需要先做好域名解析
未配置dns服务器的话,修改hosts即可
C:\Windows\System32\drivers\etc

写入解析
C:\Windows\System32\drivers\etc

10.0.0.9 movie.yuchaoit.cn
10.0.0.9 www.yuchaoit.cn
yuchaoit.conf
[root@web-9 /usr/share/nginx/html]#grep -Ev '^$|#' /etc/nginx/conf.d/yuchaoit.conf

server {
    listen       80;
    server_name  www.yuchaoit.cn;
    charset utf-8;
    location / {
        root   /usr/share/nginx/html/game;
        index  index.html index.htm;
    }
    error_page   500 502 503 504  /50x.html;
    location = /50x.html {
        root   /usr/share/nginx/html;
    }
}
server {
    listen       80;
    server_name  movie.yuchaoit.cn;
    charset utf-8;
    location / {
        root   /usr/share/nginx/html/movie;
        index  index.html index.htm;
    }
    error_page   500 502 503 504  /50x.html;
    location = /50x.html {
        root   /usr/share/nginx/html;
    }
}
重启查看多域名解析的情况
[root@web-9 /usr/share/nginx/html]#systemctl restart nginx
4.基于多端口的虚拟主机
基于端口的配置在生产环境比较少见,用于特殊场景,例如公司内部测试平台网站,使用特殊端口的后台,OA系统、网站后台,CRM后台等。
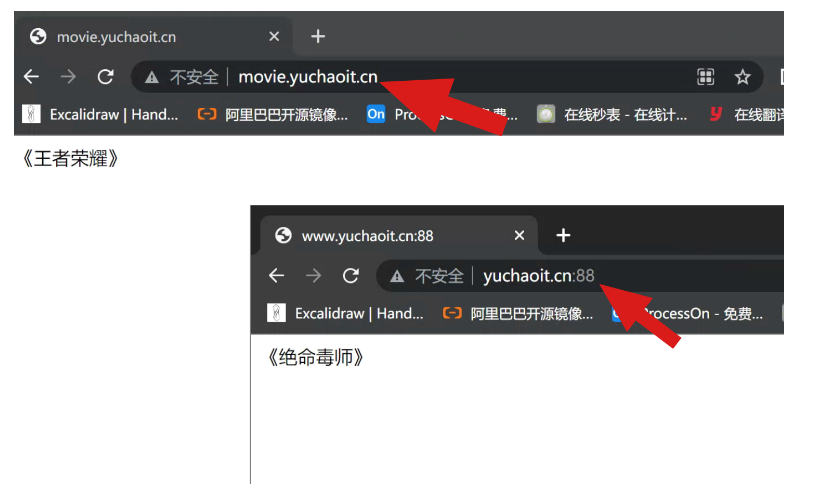
案例:运行基于80、81端口的虚拟主机运行
yuchaoit.conf
[root@web-9 /usr/share/nginx/html]#grep -Ev '^$|#' /etc/nginx/conf.d/yuchaoit.conf
server {
    listen       80;
    server_name  www.yuchaoit.cn;
    charset utf-8;
    location / {
        root   /usr/share/nginx/html/game;
        index  index.html index.htm;
    }
    error_page   500 502 503 504  /50x.html;
    location = /50x.html {
        root   /usr/share/nginx/html;
    }
}
server {
    listen       88;
    server_name  movie.yuchaoit.cn;
    charset utf-8;
    location / {
        root   /usr/share/nginx/html/movie;
        index  index.html index.htm;
    }
    error_page   500 502 503 504  /50x.html;
    location = /50x.html {
        root   /usr/share/nginx/html;
    }
}
重启查看多端口虚拟主机
5.虚拟主机配置文件优化(include)
如果所有配置都写入一个文件,维护起来很麻烦,修改错了某一个conf文件,导致所有页面都报错,因此拆分为单个的文件更为合适。
/etc/nginx/nginx.conf主文件
[root@web-9 /usr/share/nginx/html]#grep -Ev '^$|#' /etc/nginx/nginx.conf
user  www;
worker_processes  auto;
error_log  /var/log/nginx/error.log notice;
pid        /var/run/nginx.pid;
events {
    worker_connections  1024;
}
http {
    include       /etc/nginx/mime.types;
    default_type  application/octet-stream;
    log_format  main  '$remote_addr - $remote_user [$time_local] "$request" '
                      '$status $body_bytes_sent "$http_referer" '
                      '"$http_user_agent" "$http_x_forwarded_for"';
    access_log  /var/log/nginx/access.log  main;
    sendfile        on;
    keepalive_timeout  65;
    include /etc/nginx/conf.d/*.conf;  # 这里指定了导入的conf路径
}
www页面配置文件
[root@web-9 /etc/nginx/conf.d]#cat www.yuchaoit.conf
server {
    listen       80;
    server_name  www.yuchaoit.cn;
    charset utf-8;
    location / {
        root   /usr/share/nginx/html/game;
        index  index.html index.htm;
    }
    error_page   500 502 503 504  /50x.html;
    location = /50x.html {
        root   /usr/share/nginx/html;
    }
}
movie页面配置文件
[root@web-9 /etc/nginx/conf.d]#cat movie.yuchaoit.conf
server {
    listen       80;
    server_name  movie.yuchaoit.cn;
    charset utf-8;
    location / {
        root   /usr/share/nginx/html/movie;
        index  index.html index.htm;
    }
    error_page   500 502 503 504  /50x.html;
    location = /50x.html {
        root   /usr/share/nginx/html;
    }
}
创建对应的网页数据
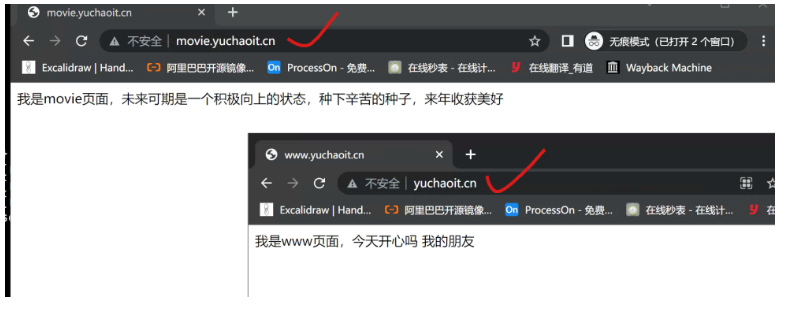
[root@web-9 /etc/nginx/conf.d]#echo '我是www页面,今天开心吗 我的朋友' > /usr/share/nginx/html/game/index.html
[root@web-9 /etc/nginx/conf.d]#
[root@web-9 /etc/nginx/conf.d]#echo "我是movie页面,未来可期是一个积极向上的状态,种下辛苦的种子,来年收获美好" > /usr/share/nginx/html/movie/index.html
查看页面
二、创建nginx访问日志
日志对于程序员很重要,可用于问题排错,记录程序运行状态,一个好的日志能够给与精确的问题定位。
Nginx日志功能需要在nginx.conf中打开相关指令log_format,设置日志格式,以及设置日志的存储位置access_log,指定日志的格式,路径,缓存大小。
1.日志格式字段解释
nginx.conf中有关访客日志定义如下
 #a
log_format  main  '$remote_addr - $remote_user [$time_local] "$request" '
                      '$status $body_bytes_sent "$http_referer" '
                    '"$http_user_agent" "$http_x_forwarded_for"';

 access_log  logs/access.log  main;

参数解释
$remote_addr :记录访问网站的客户端IP地址
$remote_user :记录远程客户端用户名称
$time_local :记录访问时间与时区
$request :记录用户的 http 请求起始行信息(请求方法,http协议)
$status :记录 http 状态码,即请求返回的状态,例如 200 、404 、502 等
$body_bytes_sent :记录服务器发送给客户端的响应 body 字节数
$http_referer :记录此次请求是从哪个链接访问过来的,可以根据 referer 进行防盗链设置
$http_user_agent :记录客户端访问信息,如浏览器、手机客户端等
$http_x_forwarded_for :当前端有代理服务器时,设置 Web 节点记录客户端地址的配置,此参数生效的前提是代理服务器上也进行了相关的 x_forwarded_for 设置

备注
$remote_addr 可能拿到的是反向代理IP地址
$http_x_forwarded_for 可以获取客户端真实IP地址
2.日志格式参考

3.生成日志

1.检测日志
[root@web-9 ~]#tail -f /var/log/nginx/access.log


2.循环访问10次
[root@web-9 ~]#for i in {1..10};do curl 10.0.0.9/yuchao.png;done

3.查看日志
4.关闭日志
若是有大量日志写入是比较占用磁盘IO,特殊情况下,可以关闭日志功能;
关于日志的2个参数
log_format  main  '$remote_addr - $remote_user [$time_local] "$request" '
'$status $body_bytes_sent "$http_referer" '
'"$http_user_agent" "$http_x_forwarded_for"';

access_log  /var/log/nginx/access.log  main;
日志指令语法
access_log  path  [format  buffer=size  | off]

path代表日志存放路径
off是关闭日志
关闭日志记录
#access_log  /var/log/nginx/access.log  main;
access_log off;
此时就不会记录访客日志了5.多虚拟主机的日志
由于企业会有多个网站业务,日志也必然需要分开记录。
单独写入到各自的server{}标签内即可。
1.全局配置
全局定义好日志格式,子页面配置中定义日志路径即可。
[root@web-9 /etc/nginx/conf.d]#cat /etc/nginx/nginx.conf

user  www;
worker_processes  auto;

error_log  /var/log/nginx/error.log notice;
pid        /var/run/nginx.pid;


events {
    worker_connections  1024;
}


http {
    include       /etc/nginx/mime.types;
    default_type  application/octet-stream;

    log_format  main  '$remote_addr - $remote_user [$time_local] "$request" '
                      '$status $body_bytes_sent "$http_referer" '
                      '"$http_user_agent" "$http_x_forwarded_for"';


    sendfile        on;
    #tcp_nopush     on;

    keepalive_timeout  65;

    #gzip  on;

    include /etc/nginx/conf.d/*.conf;
}
2.www页面的日志
定义日志路径
[root@web-9 /etc/nginx/conf.d]#cat www.yuchaoit.conf
server {
    listen       80;
    server_name  www.yuchaoit.cn;
    charset utf-8;
    access_log /var/log/nginx/www.yuchaoit.log;
    location / {
        root   /usr/share/nginx/html/game;
        index  index.html index.htm;
    }
    error_page   500 502 503 504  /50x.html;
    location = /50x.html {
        root   /usr/share/nginx/html;
    }
}
3.movie页面日志
[root@web-9 /etc/nginx/conf.d]#cat movie.yuchaoit.conf
server {
    listen       80;
    server_name  movie.yuchaoit.cn;
    charset utf-8;
    access_log /var/log/nginx/movie.yuchaoit.log;
    location / {
        root   /usr/share/nginx/html/movie;
        index  index.html index.htm;
    }
    error_page   500 502 503 504  /50x.html;
    location = /50x.html {
        root   /usr/share/nginx/html;
    }
}
4.日志记录结果

三、错误日志
Nginx能够将自身运行故障的信息也写入到指定的日志文件中。对于错误信息的调试,是维护Nginx的重要手段,指令是error_log,可以放在http{}全局中,也可以单独为虚拟主机记录。
语法:
error_log file  level;

日志级别在乎debug|info|notice|warn|error|crit|alert|emerg
级别越高,日志记录越少,生产常用模式是warn|error|crit级别
日志的记录,会给服务器增加额外大量的IO消耗,按需修改
0.自动生成配置文件模板
https://www.digitalocean.com/community/tools/nginx?domains.0.php.wordPressRules=true&domains.0.logging.accessLog=true&domains.0.logging.errorLog=true&global.app.lang=zhCN
0.去掉主配置的error_log
[root@web-9 /etc/nginx/conf.d]#cat  /etc/nginx/nginx.conf

user  www;
worker_processes  auto;

pid        /var/run/nginx.pid;


events {
    worker_connections  1024;
}


http {
    include       /etc/nginx/mime.types;
    default_type  application/octet-stream;

    log_format  main  '$remote_addr - $remote_user [$time_local] "$request" '
                      '$status $body_bytes_sent "$http_referer" '
                      '"$http_user_agent" "$http_x_forwarded_for"';


    sendfile        on;
    #tcp_nopush     on;

    keepalive_timeout  65;

    #gzip  on;

    include /etc/nginx/conf.d/*.conf;
}
1.记录movie页面的错误日志
[root@web-9 /etc/nginx/conf.d]#cat movie.yuchaoit.conf
server {
    listen       80;
    server_name  movie.yuchaoit.cn;
    charset utf-8;
    access_log /var/log/nginx/movie.yuchaoit.log;
    error_log /var/log/nginx/error.movie.yuchaoit.log;
    location / {
        root   /usr/share/nginx/html/movie;
        index  index.html index.htm;
    }
    error_page   500 502 503 504  /50x.html;
    location = /50x.html {
        root   /usr/share/nginx/html;
    }
}
2.记录www页面的错误日志
[root@web-9 /etc/nginx/conf.d]#cat www.yuchaoit.conf
server {
    listen       80;
    server_name  www.yuchaoit.cn;
    charset utf-8;
    access_log /var/log/nginx/www.yuchaoit.log;
    error_log  /var/log/nginx/error.www.yuchaoit.log;
    location / {
        root   /usr/share/nginx/html/game;
        index  index.html index.htm;
    }
    error_page   500 502 503 504  /50x.html;
    location = /50x.html {
        root   /usr/share/nginx/html;
    }
}
3.重启服务,检查日志
[root@web-9 /etc/nginx/conf.d]#systemctl restart nginx

[root@web-9 ~]#ls /var/log/nginx/
access.log  error.movie.yuchaoit.log  movie.yuchaoit.log
error.log   error.www.yuchaoit.log    www.yuchaoit.log
4.记录错误日志
当访问该网站出现各种错误时,将被记录日志;
运维可以根据该日志找出当前服务器存在的错误问题,进行修复;

四、404页面优化
nginx指令error_page的作用是当发生错误的时候能够显示一个预定义的uri;

语法1
error_page 404 /404.html;

语法2
error_page 404 https://error.taobao.com/app/tbhome/common/error.html;
1.修改www页面的404优化
默认404页面很丑

优化之后
1.修改配置文件
[root@web-9 /usr/share/nginx/html]#cat  /etc/nginx/conf.d/www.yuchaoit.conf
server {
    listen       80;
    server_name  www.yuchaoit.cn;
    charset utf-8;
    access_log /var/log/nginx/www.yuchaoit.log;
    error_log  /var/log/nginx/error.www.yuchaoit.log;
    error_page 404 /404.html;
    location / {
        root   /usr/share/nginx/html/game;
        index  index.html index.htm;
    }
    error_page   500 502 503 504  /50x.html;
    location = /50x.html {
        root   /usr/share/nginx/html;
    }
}


2.创建404.html,注意这里是表示去访问www.yuchaoit.cn/404.html
因此该文件要放入 root参数指定的网页根目录下
[root@web-9 /usr/share/nginx/html]#cat game/404.html

<h1 style='red'>您访问的地址有误,请正确查找 </h1>

2.指定另一个url
server {
    listen       80;
    server_name  movie.yuchaoit.cn;
    charset utf-8;
    access_log /var/log/nginx/movie.yuchaoit.log;
    error_log /var/log/nginx/error.movie.yuchaoit.log;
    error_page 404 https://error.taobao.com/app/tbhome/common/error.html;
    location / {
        root   /usr/share/nginx/html/movie;
        index  index.html index.htm;
    }
    error_page   500 502 503 504  /50x.html;
    location = /50x.html {
        root   /usr/share/nginx/html;
    }
}
~
~
