1.inotify简介
inotify 是一个从 2.6.13 内核开始,对 Linux 文件系统进行高效率、细粒度、异步地监控机制, 用于通知用户空间程序的文件系统变化。可利用它对用户空间进行安全、性能、以及其他方面的监控。Inotify 反应灵敏,用法非常简单,并且比 cron 任务的繁忙轮询高效得多。如果内核版本不低于 2.6.13,系统就支持 inotify。 如果存在/usr/include/sys/inotify.h 文件, 表明内核支持 inotify。
1[root@localhost ~]#  ls -l /proc/sys/fs/inotify/     #列出文件目录,出现下面的内容,说明服务器内核支持inotify
2total 0
3-rw-r--r-- 1 root root 0 Oct 13 05:39 max_queued_events
4-rw-r--r-- 1 root root 0 Oct 13 05:39 max_user_instances
5-rw-r--r-- 1 root root 0 Oct 13 05:39 max_user_watches
2.inotify的作用
inotify 可以监控文件,也可以监控目录。当监控目录时,它可以同时监控目录及目录中的各子目录及文件的。此外, inotify 使用文件描述符作为接口,因而可以使用通常的文件 I/O 操作 select、 poll 和 epoll 来监视文件系统的变化。
3.inotify实现数据实时同步原理
无论是手动执行 rsync 还是把 rsync 客户端发出的数据同步请求命令做成周期性任务计划, 每隔一段时间不管有没有数据变化都发出一次数据同步请求命令, 同步一次数据。 服务端和客户端都有时间差。所以, 使用内核提供的 inotify 机制,当数据发生改变时(删除、修改等)就触发 rsync 客户端发出数据 同步请求。 从而实现数据的实时传输。
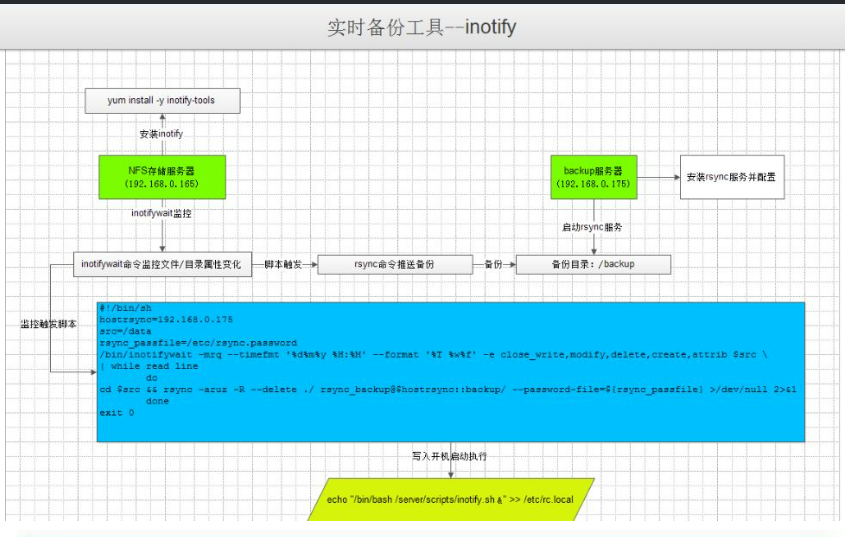
rsync + inotify 机制实现的两台服务器数据同步如下图如示:

4.inotify的安装与使用
1[root@localhost ~]# yum install -y inotify-tools
2[root@localhost ~]# inotifywait -mrq --timefmt '%d%m%Y %H:%M' --format '%T %w%f' -e create /backup  #创建对目录/backup的监控
317102017 00:02 /backup/1.txt
417102017 00:02 /backup/2.txt
517102017 00:02 /backup/3.txt
617102017 00:02 /backup/4.txt
717102017 00:02 /backup/5.txt
5.inotify之inotifywait命令详解
 1参数详解:
 2-r:递归查询目录
 3-q:打印监控时间信息
 4-m:始终保持时间监听状态
 5--excludei: 排除文件或目录时,不区分大小写。
 6--timefmt: 指定时间输出的格式
 7--format: 打印使用指定的输出类似格式字符串
 8a、 %w:显示被监控文件的文件名;
 9b、 %f:如果发生某事件的对象是目录,则显示被监控目录的名字;默认显示为空串;
10c、 %T:使用--timefmt 选项中自定义的时间格式;
11d、 %e 表示发生的事件
12e、 %Xe 事件以“X”分隔
13-e:指定需要监控的事件
14access: 文件或目录被读取
15modify: 文件或目录内容被修改
16attrib: 文件或目录属性被改变
17close: 文件或目录封闭,无论读/写模式
18open:文件或目录被打开
19move_to:文件或目录被移动到另外一个目录
20move:文件或目录被移动另一个目录或从另一个目录移动到当前目录
21create:文件或目录被创建在当前目录
22delete:文件或目录被删除
23unmount:文件系统被卸载
24常用组合:close_write,modify,delete,create,attrib
6.编写监控脚本
 1[root@nfs scripts]# vim inotify.sh
 2#!/bin/bash
 3/usr/bin/inotifywait -mrq '%w%f' -e close_write,modify,delete,create /backup \
 4| while read line
 5do
 6cd /backup && rsync -azP ./ rsync_bakup@192.168.0.175::backup/ --password-file=/etc/rsync.password >/dev/null 2>&1
 7done
 8exit 0
 9[root@nfs scripts]# sh inotify.sh &             #<==运行脚本监控/backup
10[root@nfs scripts]# touch /backup/{1..10}.log           #<==NFS上创建文件进行测试
11[root@backup backup]# ll                    #<==备份服务上查看是否备份成功
12total 4
13-rw-r--r-- 1 rsync rsync    0 Oct 17 00:28 10.log
14drwxr-xr-x 2 rsync rsync 4096 Oct 12 21:43 192.168.0.165
15-rw-r--r-- 1 rsync rsync    0 Oct 17 00:28 1.log
16-rw-r--r-- 1 rsync rsync    0 Oct 17 00:28 2.log
17-rw-r--r-- 1 rsync rsync    0 Oct 17 00:28 3.log
18-rw-r--r-- 1 rsync rsync    0 Oct 17 00:28 4.log
19-rw-r--r-- 1 rsync rsync    0 Oct 17 00:28 5.log
20-rw-r--r-- 1 rsync rsync    0 Oct 17 00:28 6.log
21-rw-r--r-- 1 rsync rsync    0 Oct 17 00:28 7.log
22-rw-r--r-- 1 rsync rsync    0 Oct 17 00:28 8.log
23-rw-r--r-- 1 rsync rsync    0 Oct 17 00:28 9.log
24[root@nfs scripts]# echo "/bin/bash /server/scripts/inotify.sh &" >> /etc/rc.local  #<==设置开机启动
7.修改inotify默认参数(inotify默认内核参数值太小)
 1查看系统默认参数值
 2sysctl -a | grep max_queued_events
 3结果是:fs.inotify.max_queued_events = 16384
 4sysctl -a | grep max_user_watches
 5结果是:fs.inotify.max_user_watches = 8192
 6sysctl -a | grep max_user_instances
 7结果是:fs.inotify.max_user_instances = 128
 8修改参数:
 9sysctl -w fs.inotify.max_queued_events="99999999"
10sysctl -w fs.inotify.max_user_watches="99999999"
11sysctl -w fs.inotify.max_user_instances="65535"
12vim /etc/sysctl.conf #添加以下代码
13fs.inotify.max_queued_events=99999999
14fs.inotify.max_user_watches=99999999
15fs.inotify.max_user_instances=65535
16:wq! #保存退出
17
18参数说明:
19max_queued_events:
20inotify队列最大长度,如果值太小,会出现"** Event Queue Overflow **"错误,导致监控文件不准确
21max_user_watches:
22设置inotifywait或inotifywatch命令可以监视的文件数量(单进程)
23max_user_instances:
24每个用户创建inotify实例最大值
25【inotify在实际生产环境中,对于50-200KB的文件,inotify的最发并发量为200-300,如果客户端写入速度大于这个量,将会造成短暂的延迟】
8.总结
11 rysnc+inotify实时备份流程:
22 a.实现从NFS客户端到rsync服务端的rsync的部署
33 b.实现从NFS客户端对NFS目录文件系统时间的实时监控
44 c.当监控到NFS目录文件系统事件变化后,触发rsync推送变化的文件
最后来一张总结图: