一. vue中的jsx
用接近模板的语法代替render函数
不仅能自由地渲染dom,同时语法上也和template相似
例如:
- "标签 h+ 变量"可以生成不同类型的级别的标题
- 使用html字符串渲染
Message.alert({
messge:确定要删除xxx的笔记?,
type: 'warning'
}) - 使用函数组件,它只是一个接受一些 prop 的函数
应用: 程序化地在多个组件中选择一个来代为渲染
// 一个文件写多个组件
const Input = (props) => <input {...props} />
export const Textarea = (props) => <input {...props} />
export const Password = (props) => <input type="password" {...props} />

export default Input
总结: 根据使用场景去用jsx。
二. jsx语法
1. 文本插值
模板内双大括号
<h1>{{ msg }}</h1>
jsx单大括号
const name = 'Vue'
const element = <h1>Hello, { name }</h1>
2. 条件和循环
模板: v-for,v-if
jsx: v-for使用for循环或者array.map代替, v-if使用if-else语句,三元表达式
const element = (name) => { // if要放在函数里面
  if (name) {
    return <h1>Hello, { name }</h1>
  } else {
    return <h1>Hello, Stranger</h1>
  }
}

const element = icon ? <span class="icon"></span> : null

const list = ['java', 'c++', 'javascript', 'c#', 'php']
return (
  <ul>
  {list.map(item => {
   return <li>{item}</li>
  })}
  </ul>
)
3.属性绑定 单括号
在模板代码中,一般通过 v-bind:prop="value"或:prop="value"来给组件绑定属性,在JSX里面就不能继续使用v-bind指令了,而是通过单大括号的形式进行绑定
const href = 'https://xxx.com'
const element = <a href={href}>xxx</a>
此外,模板代码中能通过
批量绑定标签属性。在JSX中也有相应的替换方案:<div {...properties}>。
class绑定同样也是使用单大括号的形式
const element = <div className={`accordion-item-title ${ disabled ? 'disabled' : '' }`}></div>
const element = <div class={
    [ 'accordion-item-title', disabled && 'disabled' ]
  }
>Item</div>
style绑定需要使用双大括号
const width = '100px'
const element = <button style={{ width, fontSize: '16px' }}></button>
4. 事件绑定
(1)在模板代码中通过v-on指令监听事件,在JSX中通过on + 事件名称的大驼峰写法来监听,且绑定事件也是用大括号,比如click事件要写成onClick/ vOn:click,mouseenter事件要写成onMouseenter
const confirm = () => {
  // 确认提交
}
<button onClick={confirm}>确定</button>
(2).native修饰符: 将前面的on替换为nativeOn, 即onClick变成nativeOnClick。
 render() {
    // 监听下拉框根元素的click事件
    return <CustomSelect nativeOnClick={this.handleClick}></CustomSelect>
  }
(3) 除了上面的监听事件的方式之外,我们还可以使用对象的方式去监听事件
  render() {
    return (
      <ElInput
        value={this.content}
        on={{
          focus: this.handleFocus,
          input: this.handleInput
        }}
        nativeOn={{
          click: this.handleClick
        }}
      ></ElInput>
    )
  }
(4)对于 .passive、.capture 和 .once 这些事件修饰符,Vue 提供了相应的前缀可以用于 on
on: {
    '!click': this.doThisInCapturingMode,  // capture
    '~keyup': this.doThisOnce,  // .once
    '~!mouseover': this.doThisOnceInCapturingMode  // .capture.oncee 或.once.capture
}
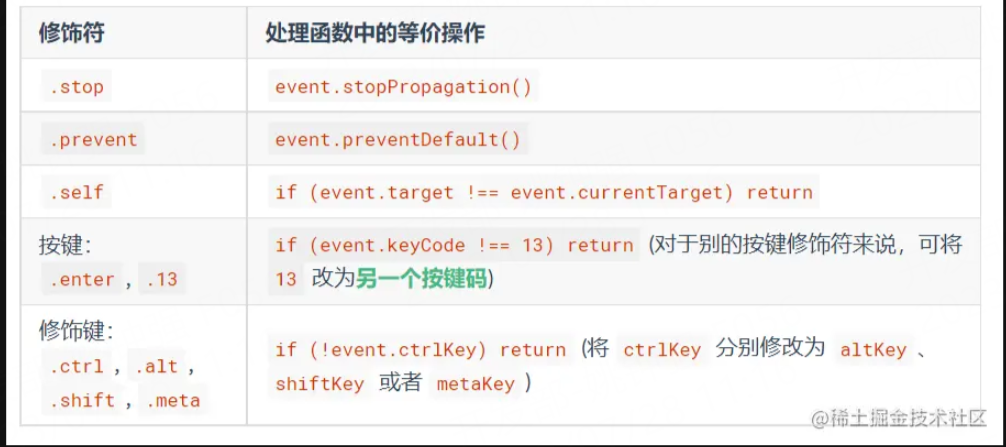
其他修饰符可以使用事件方法
5. v-show与v-model
大多数指令并不能在JSX中使用,对于原生指令,只有v-show是支持的。
而v-model是Vue提供的一个语法糖,它本质上是由 value属性(默认) + input事件(默认)组成的,所以,在JSX中,我们便可以回归本质,通过传递value属性并监听input事件来手动实现数据的双向绑定(现在用vModel也可以实现)
export default {
  data() {
    return {
      name: ''
    }
  },
  methods: {
    // 监听 onInput 事件进行赋值操作
    handleInput(e) {
      this.name = e.target.value
    }
  },
  render() {
    // 传递 value 属性 并监听 onInput事件
    return <input value={this.name} onInput={this.handleInput}></input>
  }
}
此外,在脚手架vue-cli4中,已经默认集成了对v-model的支持,可以直接使用
<input v-model={this.value}>
同样的,在JSX中,对于.sync也需要用属性+事件来实现,如下代码所示:
export default {
  methods: {
    handleChangeVisible(value) {
      this.visible = value
    }
  },
  render() {
    return (
      <ElDialog
        title="测试.sync"
        visible={this.visible}
        on={{ 'update:visible': this.handleChangeVisible }}
      ></ElDialog>
    )
  }
}
6.插槽
(1) 默认插槽
在模板template中
// 自定义组件 myComponent
<div class="my-component">
 <slot></slot>
</div>
在Vue的实例this上面有一个属性$slots,这个上面就挂载了一个这个组件内部的所有插槽,使用this.$slots.default就可以将默认插槽加入到组件内部
<div class="my-component">
 { this.$slots.default }
</div>
(2) 具名插槽
有时我们需要多个插槽, 就需要为插槽命名
模板template自定义具名插槽:
// 自定义组件 myComponent
<div class="container">
  <header>
    <slot name="header"></slot>
  </header>
</div>
// 使用
<myComponent>
  <h1 slot="header">标题</h1>
</myComponent>
jsx自定义具名插槽:这里定义一个叫footer的具名插槽
// 自定义组件 myComponent
render() {
  return (
    <div class="container">
    <header>
        { this.$slots.footer }
    </header>
    </div>
  )
}
// jsx使用方式
render () {
  return (
    <myComponent>
      <h1 slot="footer">底部</h1>
    </myComponent>
  )
}
(3) 作用域插槽
让插槽内容能够访问子组件中才有的数据
模板template中的使用
// 自定义组件 myComponent
<div class="container">
    <header>
        <slot name="default" :data="data" >
    </header>
</div>

// 使用
<myComponent>
  <template  #default="slotProps">
    <div>{{ slotProps.data }} </div>
  </template>
</myComponent>
jsx的作用域插槽写法,
// 自定义组件 myComponent
props: ['data'],
render () {
  return (
    <div class="container">
      <header>
          {
            this.$scopedSlots.default({
              text: this.data
            })
          }
      </header>
    </div>
  )
}
// 使用
render () {
  const scopedSlots = {
      default: ({ text }) => {
        return <div style="color:red;">{text + '333333'}</div>
      }
  }
  return (
    <myComponent scopedSlots={scopedSlots}></myComponent>
  )
}
7. 使用自定义组件
import MyComponent from './my-component'

export default {
  render() {
    return <MyComponent>hello</MyComponent>
  },
}
8.在method里返回JSX
 methods: {
    renderFooter() {
      return (
        <div>
          <ElButton>确定</ElButton>
          <ElButton>取消</ElButton>
        </div>
      )
    }
  },
  render() {
    const buttons = this.renderFooter()
    return (
      <ElDialog visible={this.visible}>
        <div>内容</div>
        <template slot="footer">{buttons}</template>
      </ElDialog>
    )
  }
参考:https://blog.csdn.net/qq_41581588/article/details/129183261