springboot配置Swagger3.0
1、pom加入依赖
我们创建一个SpringBoot项目,引入 swagger3 依赖
<dependency>
    <groupId>io.springfox</groupId>
    <artifactId>springfox-boot-starter</artifactId>
    <version>3.0.0</version>
</dependency>
2、启动类上加入注解
在启动类上加入两个注解,即可开启 swagger3
@SpringBootApplication
@EnableSwagger2
@EnableOpenApi
public class NacosApplication {

    public static void main(String[] args) {
        SpringApplication.run(NacosApplication.class, args);
        System.out.println("我是 nacos 微服务");
    }
}
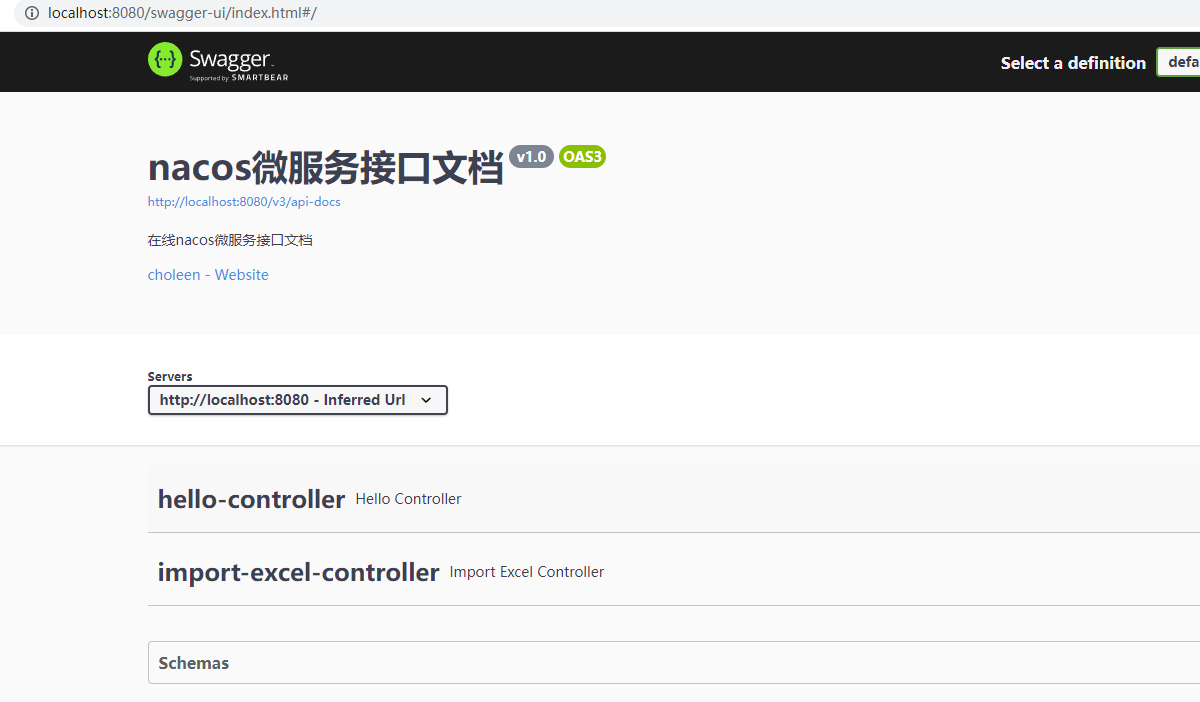
对于swagger,简单的配置就可以看到页面了,我们我输入 localhost:8080/swagger-ui/index.html
3、创建Swagger配置类
对于swagger,我们可以对 index.html 页面做一些配置,比如邮箱、姓名、git地址等。
@Configuration
public class SwaggerConfiguration {

    @Bean
    Docket docket() {
        return new Docket(DocumentationType.OAS_30)
                // 配置网站基本信息
                .apiInfo(new ApiInfoBuilder()
                        .title("nacos微服务接口文档")
                        .version("v1.0")
                        .description("在线nacos微服务接口文档")
                        .contact(new Contact("choleen", "https://choleen95.github.io/",
                                ""))
                        .build())
                .select()
                .apis(RequestHandlerSelectors.basePackage("com.example.nacos.controller"))
                .build();

    }

}
目前,对于请求,我们配置了对于controller包下的所有类的接口,都展示在上面。
4、创建接口-三种
目前创建三种接口,一种是form表单传值,一种是路径传参,一种是实体传参
@Api("查询演出接口")
@RequestMapping("/hello/")
@RestController
public class HelloController {

    private static final Logger logger = LoggerFactory.getLogger(HelloController.class);
    @Resource(name = "activityMapper")
    ActivityMapper activityMapper;

    @ApiOperation("根据场地城市及Id查询演出表")
    @ApiImplicitParams({
            @ApiImplicitParam(name = "venueCity", value = "场地城市"),
            @ApiImplicitParam(name = "id", value = "id")
    })
    @GetMapping("activity")
    public ResponseHelper sayHello(String venueCity, @RequestParam(required = true) String id) {
        List<Activity> list = activityMapper.queryEntityList(venueCity, id);
        return ResponseHelper.build(200, list);
    }

    @ApiOperation("根据id查询演出")
    @ApiImplicitParam(name = "id", value = "id")
    @GetMapping("{id}")
    public ResponseHelper queryInfo(@PathVariable(value = "id")Long id) {
        Activity activity = activityMapper.selectById(id);
        return ResponseHelper.build(200, activity);
    }

    @ApiOperation("分页查询演出")
    @ApiImplicitParam(name = "activity", value = "演出实体")
    @GetMapping("queryByPage")
    public ResponseHelper queryByActivity(@RequestBody Activity activity) {
        QueryWrapper<Activity> wrapper = new QueryWrapper<>();
        wrapper.eq("venue_city",activity.getVenueCity()).eq("id",activity.getId());
        PageDTO<Activity> page = new PageDTO<>(1,10);
        PageDTO<Activity> page1 = activityMapper.selectPage(page, wrapper);
        return ResponseHelper.build(200, page1);
    }

}
这里有几个参数需要介绍一下。
- @Api 在类上,标明此Controller的用处、
- @ApiOperation 表明此接口的用处
- @ApiImplicitParam 请求一个入参的说明,有name、value、defaultValue等属性
- @ApiImplicitParams 若有多个入参,此是一个数组,把多个ApiImplicitParam放进去即可
- @RequestParam(required=true) 和 @ApiImplicitParam中的必填不同,一个是开发者指定参数必传,一个是swagger调用时必填,但对后台无影响。
- 若入参是一个实体,比如第三个分页查询 ,可以在实体中也注入 swagger 注解,在前端页面也可让开发者了解参数结构
@Data
@EqualsAndHashCode(callSuper = false)
@ApiModel(value = "activity", description = "演出表")
@TableName("activity")
public class Activity implements Serializable {

    private static final long serialVersionUID = -3563130625676560116L;
    @ApiModelProperty(value = "主键ID")
    private Long id;
    @ApiModelProperty(value = "演出名称")
    private String name;
    @ApiModelProperty(value = "演出起始时间")
    @JSONField(format = "yyyy-MM-dd HH:mm:ss")
    private Date showStartTime;
    @ApiModelProperty(value = "演出结束时间")
    @JSONField(format = "yyyy-MM-dd HH:mm:ss")
    private Date showEndTime;
    @ApiModelProperty(value = "场地城市")
    private String venueCity;
    @ApiModelProperty(value = "场地名称")
    private String venueName;
    @ApiModelProperty(value = "场地地址")
- @ApiModel 是描述此类的信息
- @ApiModelProperty 是描述字段的信息
5、swagger调试
接口编写好了,我们可以去 localhost:8080/swagger-ui/index.html 页面上去调试。
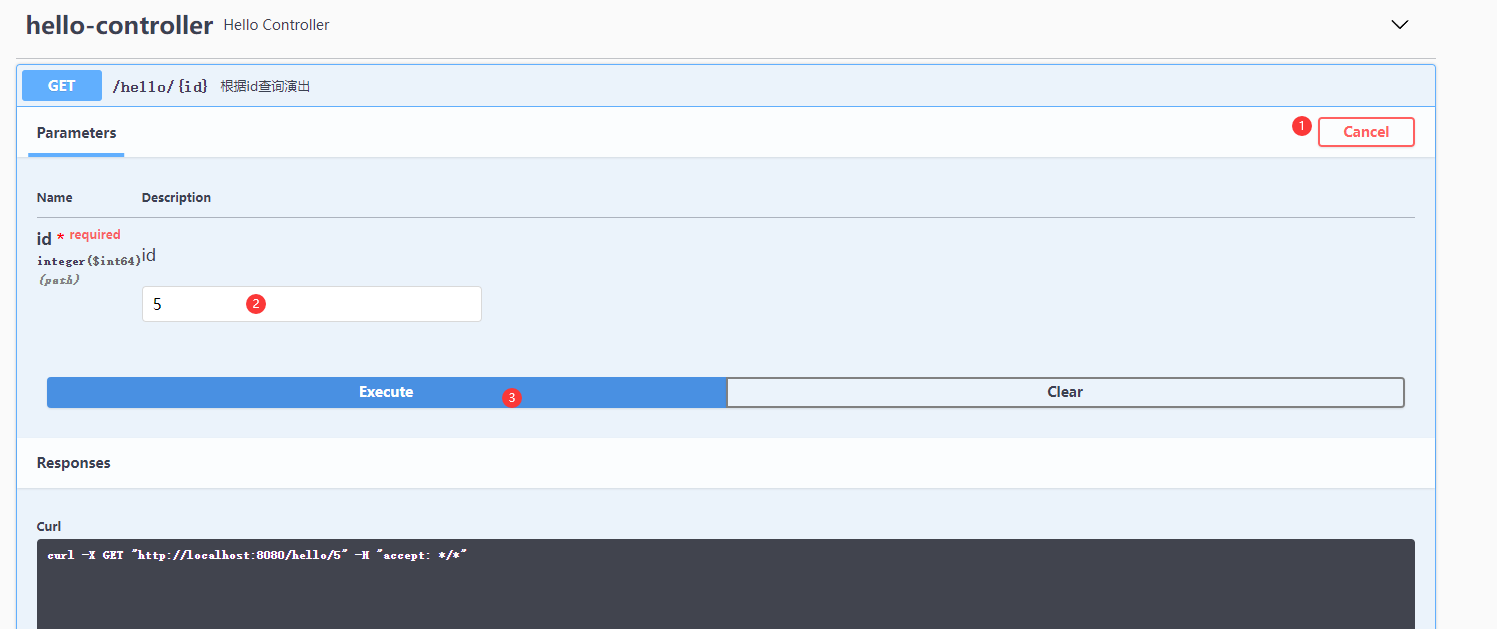
点击 try it 然后再填入参数,点击 Excute ,即可再返回中看到结果。
- springboot Swagger3 Swaggerspringboot2 springboot swagger3 swagger springboot swagger3 swagger springboot swagger3权限swagger springboot swagger3 knife4j swagger swagger3 注解swagger3常用swagger swagger swagger2 swagger3 amp modelconverter swagger3 openapi3对象 springboot swagger springboot swagger2 swagger