兄弟组件通信、Publish/Subscribe模式
【实现方案】
这里介绍利用框架本身提供的事件绑定接口来模拟Publish/Subscribe模式实现兄弟组件通信的方法。
一、实现步骤及代码
1、一个、customEventInVm2(当然也可以定义Pub端如sendMsg)
<template>
<div class="tutorial-page" style="flex-direction: column;">
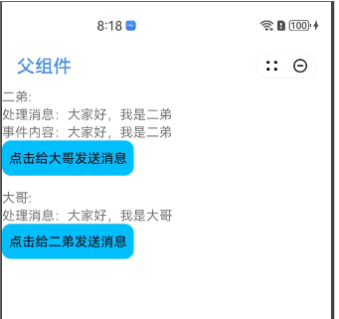
<text class="tutorial-title">二弟:</text>
<text>处理消息:{{msg}}</text>
<text>事件内容:{{eventDetail}}</text>
<input type="button" value="点击给大哥发送消息" onclick="sendMsg" class="input-ed"/>
</div>
</template>
<style lang="less">
.input-ed {
width: 300px;
height: 80px;
font-size: 30px;
background-color: #00bfff;
border-radius: 20px;
}
</style>
<script>
import moment from 'moment'
export default {
props: [],
data() {
return {
msg: '大家好,我是二弟',
eventDetail: '大家好,我是二弟',
}
},
sendMsg() {
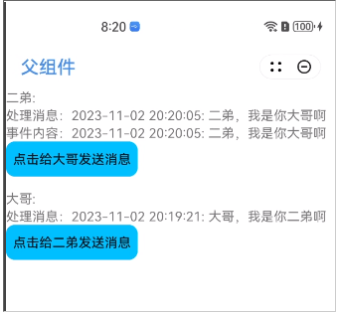
if (this.previousVm) {
this.previousVm.receiveMsg('大哥,我是你二弟啊')
}
},
processMessage(msg) {
const now = moment(new Date()).format('YYYY-MM-DD HH:mm:ss')
this.msg = `${now}: ${msg}`
},
/**
* 通过events对象:绑定事件
*/
events: {
customEventInVm2(evt) {
const now = moment(new Date()).format('YYYY-MM-DD HH:mm:ss')
this.eventDetail = `${now}: ${evt.detail}`
}
}
}
</script>
2、 达到相互持有实现
<!-- 父组件 -->
<import name="comp-part2" src="./part2"></import>
<import name="comp-part3" src="./part3"></import>

<template>
  <div class="tutorial-page" style="flex-direction: column;">
    <!-- 兄弟VM通信 -->
    <div>
      <comp-part2 id="sibling1"></comp-part2>
    </div>
    <div style="margin-top: 30px">
      <comp-part3 id="sibling2"></comp-part3>
    </div>
  </div>
</template>

<style lang="less">
</style>

<script>
  export default {
    onInit: function () {
        this.$page.setTitleBar({text: '父组件', textColor: '#4a90e2', backgroundColor: '#FFFFFF', backgroundOpacity: 0.5, menu: false})
    },
    onReady() {
      this.establishRef()
    },
    /**
     * 建立相互VM的引用
     */
    establishRef(evt) {
      const siblingVm1 = this.$vm('sibling1')
      const siblingVm2 = this.$vm('sibling2')
      siblingVm1.parentVm = this
      siblingVm1.nextVm = siblingVm2
      siblingVm2.parentVm = this
      siblingVm2.previousVm = siblingVm1

      siblingVm1.previousVm = siblingVm2
    }
  }
</script>
3、 即可完成触发(当然也可以定义Sub端,如receiveMsg)
<template>
  <div class="tutorial-page" style="flex-direction: column;">
    <text class="tutorial-title">大哥:</text>
    <text>处理消息:{{msg1}}</text>
    <input type="button" value="点击给二弟发送消息" onclick="sendMesssage" class="input-dg"/>
  </div>
</template>

<style lang="less">
  .input-dg {
    width: 300px;
    height: 80px;
    font-size: 30px;
    background-color: #00bfff;
    border-radius: 20px;
  }
</style>

<script>
  import moment from 'moment'
  export default {
    props: [],
    data() {
      return {
        msg1: '大家好,我是大哥',
      }
    },

    receiveMsg(msg) {
      const now = moment(new Date()).format('YYYY-MM-DD HH:mm:ss')
      this.msg1 = `${now}: ${msg}`
    },
    sendMesssage() {
      if (this.previousVm) {
        // Way1. 调用方法
        this.previousVm.processMessage('二弟,我是你大哥啊')
        // Way2. 触发事件
        this.previousVm.$emit('customEventInVm2', '二弟,我是你大哥啊')
      }
    }
  }
</script>
二、效果图展示
【参考文档】
https://doc.quickapp.cn/tutorial/framework/parent-child-component-communication.html